
CW-C4000e - Label printer EPSON - Free user manual and instructions
Find the device manual for free CW-C4000e EPSON in PDF.


| Product Type | Color Label Printer |
| Model | CW-C4000e |
| Brand | Epson |
| Print Technology | Epson PrecisionCore Inkjet |
| Max Print Resolution | Up to 1200 x 1200 dpi |
| Max Print Width | 4.1 inches (104 mm) |
| Max Print Speed | Up to 300 mm/s (draft mode) |
| Supported Media Types | Roll-fed labels, continuous paper, tags |
| Ink Type | Epson Genuine Pigment Ink (CMYK) |
| Connectivity | USB 2.0, Ethernet 10/100 Base-T, Wi-Fi |
| Dimensions (W x D x H) | 366 x 366 x 235 mm |
| Weight (without ink/media) | Approx. 14 kg |
| Power Supply | AC 100-240 V, 50/60 Hz |
| Power Consumption | Approx. 60 W (printing), 1.5 W (standby) |
| Operating Temperature | 15 to 35 °C |
| Humidity Range | 20 to 80% RH (non-condensing) |
| Maintenance | Clean periodically with soft cloth; use genuine ink for best results |
| Safety Features | Automatic cutter, media end sensor, overheat protection |
| Spare Parts Available | Printhead, maintenance box, cutter blade, rollers |
| Reparability Index | High – modular design with user-replaceable parts |
| General Information | Industrial label printer for on-demand color labels; supports label design software |
Frequently Asked Questions - CW-C4000e EPSON
User questions about CW-C4000e EPSON
0 question about this device. Answer the ones you know or ask your own.
Ask a new question about this device
Download the instructions for your Label printer in PDF format for free! Find your manual CW-C4000e - EPSON and take your electronic device back in hand. On this page are published all the documents necessary for the use of your device. CW-C4000e by EPSON.
USER MANUAL CW-C4000e EPSON
Manuals for This Product..... Downloading the Latest Version. Symbols Used in This Guide.....
About Models of this Product..... Gloss Black Ink/Matte Black Ink.
Software Introduction..... Product and Driver Versions..... How to Check the Product Version How to Check the Printer Driver
Screens in This Manual..... Safety Precautions..... Cautions on Installation..... Cautions on Handling..... Cautions on Power Supply..... Cautions on Ink Cartridges..... Cautions on the Maintenance Box Caution Label....
Supported Paper..... Paper Shape/Form/Size..... Paper Types..... Paper That Cannot Be Used....
Part Names and Functions..... Front..... Inside..... Rear..... Connectors..... Operation Panel....
Basic Operation
Turning On or Off..... Turning the Power On..... Turning the Power Off.... 25
Checking the Printer Status..... Checking the Paper Information. Checking the Status of Consumables Printing Nozzle Check Patterns. Printing Status Sheet..... Checking Network Connection and Settings....28
Replacing the Ink Cartridges..... Checking Amount of Ink Remaining How to Replace the Ink Cartridge
Replacing the Maintenance Box....
Checking the Amount of Empty Space in the Maintenance Box.... 32 How to Replace the Maintenance Box.... Printer Driver Settings.... Media Definition.... 35 Media Name.... 35 Width.... 36 Length.... 36 Gap Between Labels.... 36 Media Form.... 36 Media Saying.... 37 Media Coating Type.... 37 Print Quality.... 37 Color Correction.... 38 Spot Color Setting.... 38 Settings For Paper Handling After Print Notification.... 39 Pause1.... 39 Media Detection.... 39 Loading and Replacing Paper.... Loading Roll Paper.... 41 Loading Fanfold Paper.... 4 Adjusting the Shutters.... How to Remove Paper.... 53 19
Maintenance
Cleaning the Exterior....5 Cleaning the Platen....56 Cleaning the Auto Cutter..... Cleaning the Print Head..... Printing Nozzle Check Patterns..... Head Cleaning....60
Troubleshooting
A Message is Displayed on the Operation Panel... 62 Problem with Print Quality... Horizontal White Banding... White or Black Banding... White or Black Banding near the Edges... Printed Colors Are Wrong... Printed Characters Look Blurred... Print Position Shifts... Paper is Smeared or Smudged with Ink... Paper is Fed and Ejected, and an Error Occurs... 67 Margins are Generated on Printed Labels... 68 Margins of Label Are Large...
Contents
Printing from a computer is impossible or becomes suddenly impossible...69
Checking Whether the Printer Driver Is Installed...69
The printer does not turn on...69
Print Job is Canceled on PC but "Printing"
Message on Printer Does Not Disappear...69
Roll Paper is Jammed...70
Fanfold Paper is Jammed...72
Specifications
Product Specifications...74
Electrical Specifications...76
Overall Dimensions...77
Environmental Specifications...78
Paper Specifications...79
Ink Cartridge....80
Maintenance Box....81
Appendix
Consumables and Options....82
Ink Cartridge....82
Maintenance Box....83
OT - PT 40....84
OT-WA34....86
Restriction of Use....89
Notes....90
Trademarks....90
Before use
This chapter describes information you should know before using the product.
Manuals for This Product
Paper manual | Start HereGuides you through basic setup steps from unpacking to loading paper. |
Manual viewable with PC | User's Guide (This Manual)Describes details about the functions and operating procedures of the product, maintenance information, and troubleshooting. It can be viewed from the supplied CD. |
Manual viewable with PC | CW-C4000 Series Technical Reference GuideProvides information necessary for installing the product, performing daily tasks, and developing a system using the product.Download this document from the following URL. |
Manual viewable with PC | Online Video ManualThe videos provides a clear description of the setup procedure. Download this document from the following URL.The contents of videos are subject to change without notice. |
Downloading the Latest Version
The latest versions of the printer driver, utilities, and manuals can be downloaded from the following URL.
https://www.epson-biz.com/
Symbols Used in This Guide
The following symbols are used in this guide to indicate important information.
Symbols for Safety
The symbols shown below are used in this manual in order to ensure safety and proper use of this product and to prevent danger to you and other persons, and property damage. Be sure that you completely understand their meanings before reading this manual.
| Warning | Handling the product improperly by ignoring this symbol can lead to death or serious injury. |
| Caution | Handling the product improperly by ignoring this symbol can lead to injury and property damage. |
Symbols for General Information
| Important | Indicates information with which you must comply when using the product. Mishandling due to ignoring this information may cause the product to fail or malfunction. |
| Note | Indicates supplementary explanations and information you should know. |
| Indicates a reference page containing related information. |
About Models of this Product
Gloss Black Ink/Matte Black Ink
You can select which type of black ink to use from gloss black (BK) and matte black (MK). The printer prompts you to select it when you turn on the printer for the first time.
Supported paper types vary by the black ink type. See “Paper Specifications” on page 79.

Important
You cannot change the black ink type once you select the black ink type and let the printer charge the ink.
Software Introduction
The following introduces the software that can be installed from the CD-ROM included with the product.
| Name Overview | |
| Install Navi Allows you to install the printer | driver and other software, and also connect the product with the computer. |
| Printer driver | Driver to print from Windows applications. The utility (CW-C4000 Series PrinterSetting) for configuring the printer settings can be started from the driver. For details on how to use the driver, refer to Help or the video. |
| EpsonNet Config Tool to acquire or set network settings, such as TCP/IP of the product. | |
| Color Tone Matching Assistant Assists you to adjust colors of illustrations or letters.You can check how aspecific color used in illustrations or letters will look on printouts. | |
Product and Driver Versions
How to Check the Product Version
You can check the version of your product firmware by printing the status sheet. Check the results of status sheet printing. “Printing Status Sheet” on page 28
You can also check the version on the operation panel.
[Menu] - [Printer Status/Print] - [Firmware Version]
How to Check the Printer Driver Version
You can check the version in the printer driver screen.
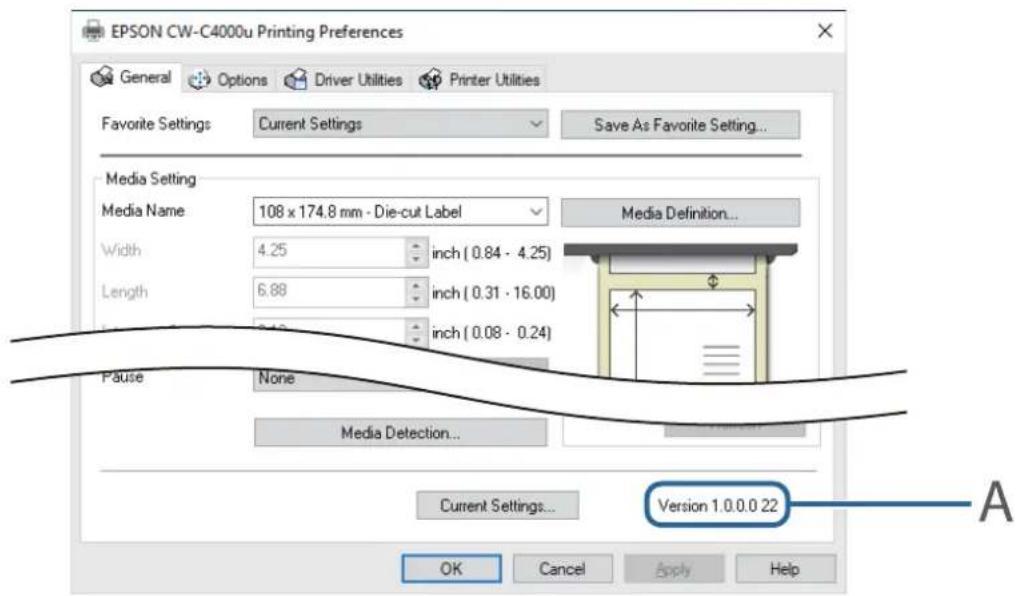
A: Printer driver version
Screens in This Manual
The screens in this manual and the screens actually displayed in Windows may differ depending on the product used and operating system. Unless otherwise specified, the screens in this manual are those when using Windows 10.
Before use
Safety Precautions
To ensure safe use of the product, be sure to read this manual and the other instruction manuals supplied with the product before use. Store this manual in a safe place so that you can resolve any unclear points regarding the product at any time.
Cautions on Installation

Warning
Do not cover the product with a cloth or install it in a poorly-ventilated location. Doing so can result in heat accumulated in the product causing a fire.

Caution
☐ Do not install/store the product in an unstable location or in a location subject to vibration from other devices. Equipment may fall or collapse, causing breakage and possible injury. ☐ Do not install the product in a location exposed to oily smoke or dust, or in a humid location. Otherwise electric shock or fire may occur. ☐ When lifting the product, perform the work with the correct posture. Lifting the product with an inappropriate posture may cause injury.
Cautions on Handling

Warning
☐ Do not use the product in a location with volatile substances such as alcohol or paint thinner present, or near fire. Otherwise electric shock or fire may occur. ☐ Shut down the product immediately if it produces smoke, a strange odor, or unusual noise. Otherwise electric shock or fire may occur. If an abnormality occurs, immediately turn off the power and remove the plug from the outlet, and then contact qualified service personnel for advice. ☐ Shut down the product immediately if a foreign object or water or other liquid gets inside the product. Otherwise electric shock or fire may occur. Immediately turn off the power and remove the plug from the outlet, and then contact qualified service personnel for advice.
☐ Do not disassemble the areas other than those mentioned in this manual.
☐ Never repair the product yourself as doing so is dangerous.
☐ Do not use the product in a location where inflammable gas, explosive gas, etc. is present in the atmosphere. Furthermore, do not use aerosol sprayers containing flammable gas inside or around the product. Doing so may cause fire.
☐ Do not connect cables in ways other than those mentioned in this manual. Doing so may cause fire. It may also damage the other connected devices.
Before use
☐ Do not touch the areas inside the product other than those mentioned in this manual. Doing so may cause electric shock or burns. ☐ Do not insert metal or flammable materials, or allow them to fall into the product. Otherwise electric shock or fire may occur. ☐ If the screen of the printer is damaged, handle the liquid crystal inside it very carefully. Should any of the following situations arise, take emergency measures. ☐ When any part gets onto your skin, wipe off the deposit, and wash the area properly with soap and water. ☐ When any part gets into your eyes, flush them with clean water for at least 15 minutes, and thereafter, consult with a doctor. ☐ When a part gets into your mouth, immediately consult with a doctor.

Caution
Do not allow anyone to stand or place heavy objects on top of the product. In particular, be careful in the case of a household with children. Equipment may fall or collapse, causing breakage and possible injury. Install the cables and optional products in the proper direction according to the proper procedures. Doing so may cause fire or injury. Follow the instructions in this manual to install them properly. Before moving the product, shut down and unplug the product, and make sure that all the cables are disconnected. Failure to do so may damage a cable, causing electric shock or fire. Do not subject the product to vibration or shock while the power is on. Doing so may cause printing malfunction. Do not store or transport the product while it is tilted, standing, or upside down. Doing so may cause the ink to leak. Store the cutter in a place out of reach of children. There is a risk of injury from the cutter blade. When replacing the cutter, handle it with care.
Cautions on Power Supply

Warning
Be sure to use the specified AC adapter (AC ADAPTER, K1 (Model: M248B)) only. In addition, do not use the specified adapter with another device. Otherwise electric shock or fire may occur. Observe the following points when handling the AC adapter. Otherwise electric shock or fire may occur.
Do not use in a location where rain or water will get on the AC adapter.
Do not suspend the product by the power cord.
Do not allow a clip or other metal object to touch the connectors.
Before use
Do not cover with bedding.
Do not allow dust or other foreign material to adhere to the power plug. Otherwise electric shock or fire may occur. Insert the power plug securely all the way into the outlet. Otherwise electric shock or fire may occur. Do not use a power cord other than that supplied with the product. In addition, do not use the supplied power cord with another device. Otherwise electric shock or fire may occur. Do not use a damaged power cord. Otherwise electric shock or fire may occur. Contact qualified service personnel for advice if the power cord is damaged. Furthermore, observe the following points so as not to damage the power cord.
Do not modify the power cord.
Do not place heavy objects on the power cord.
Do not forcibly bend, twist, or pull the power cord.
Do not lay the power cord near a heating appliance.
Do not insert or remove the power plug with wet hands. Doing so may cause electric shock. Do not connect many power cords to one outlet. Doing so may cause fire. Supply power directly from a power outlet. Regularly disconnect the power plug from the outlet and clean the base of the prongs and between the prongs. Leaving the power plug connected to the outlet for a long period of time may cause dust to accumulate on the base of the power plug prongs, resulting in a short and fire. Hold the plug and do not pull the cord when disconnecting the power plug from the outlet. Pulling the cord may damage the cord or deform the plug, causing electric shock or fire. Do not remove and insert the power plug from/to the outlet while the printer is powered on. Doing so may cause electric shock.

Caution
To ensure safety, unplug the product before leaving it unused for an extended period.
Cautions on Ink Cartridges

Caution
The ink cartridges that can be used differ depending on the model number of the product. Use ink cartridges suitable for the model number of your printer.

"Ink Cartridge" on page 80
Shake new ink cartridges well before installing them.
Do not touch the IC chip on an ink cartridge. Doing so may result in normal operation and printing becoming no longer possible. The product uses ink cartridges equipped with IC chips to manage the amount of ink used and other information, so ink cartridges are usable even if they are removed and reinstalled. However, if an ink cartridge with not much ink remaining is removed and reinstalled, it may not be usable. Some ink is consumed each time cartridges are installed because the product automatically checks their reliability. When replacing the black ink cartridge, make sure to replace it with a cartridge of the same type of black ink. The printer does not work if you install a cartridge of a different type of black ink. Install ink cartridges of all colors. Printing is not possible if even only one ink cartridge is missing. Since ink cartridges are designed to stop the operation before ink runs out completely to maintain the quality of the print head, some ink remains in the used ink cartridges. All the ink colors are also consumed for maintenance operations when an ink cartridge is replaced and for print head cleaning. Do not turn off the power or open the ink cartridge cover during ink charging (while the ① (power) LED lamp is flashing). Opening the cover may cause the ink to be recharged, resulting in more ink being consumed. Also, it may result in normal printing becoming no longer possible. Even for monochrome printing, all the ink colors are used in an operation designed to maintain the printing and print head quality. Do not disassemble an ink cartridge. Doing so may cause ink to get into eyes or onto skin. Do not disassemble or modify an ink cartridge. Doing so may cause printing malfunction. Use of old ink cartridges may result in reduced print quality. Use ink cartridges within six months after opening the packages. The usage period for ink cartridges is printed on the packaging of the individual ink cartridges. If ink contacts your skin, eyes, or mouth, take the following actions.
When ink gets onto your skin, immediately wash the area with soap and water.
When ink gets into your eyes, immediately flush them with water. Leaving the ink as is may result in bloodshot eyes or mild inflammation. If something is wrong, immediately consult with a doctor.
When ink gets into your mouth, immediately spit it out and consult with a doctor.
Before use
There may be some ink around the ink supply port on a removed ink cartridge. Take care so that it does not stain the desk or other surface. Do not open an ink cartridge package until you are ready to install the ink cartridge in the product. Do not shake an ink cartridge too hard. The ink cartridge may leak if you shake it around too much or push the sides strongly. Do not allow foreign objects to fall into the cartridge installation section. Doing so may result in normal printing becoming no longer possible. Remove any object that falls into the installation section, taking care not to damage the section. When ink is charged the first time (right after purchase), ink is consumed for filling the print head nozzles (ink discharge holes) to get ready for printing. Therefore, the number of the sheets that can be printed may be fewer than for cartridges installed later. When the printer is powered off with the power button, the print head is automatically capped to prevent the ink from drying. When you will not use the printer after installing the ink cartridges, be sure to turn the power off with the power button. Do not pull out the power plug or turn off the breaker while the power is on. Printing on water-repellent paper such as art paper, which is slow-drying, may cause print stains. Also, if you print on glossy paper, fingerprints may get on the paper or ink may adhere to your fingers when you touch the print surface. Select and use paper that will not cause print stains. Store the ink cartridges in a place out of reach of children. Epson recommends storing ink cartridges in a cool and dark place. If you wish to use ink cartridges that have been stored in a cold place for a long period of time, leave them for at least 3 hours in a place that is at room temperature before use. Do not remove the ink cartridges from the product when storing or transporting the product.
Cautions on the Maintenance Box

Caution
Store in a place out of reach of children. Do not drink any adhered ink. Do not disassemble or modify the maintenance box. Doing so may cause ink to get into eyes or onto skin. Do not touch the IC chip on the maintenance box. If a maintenance box that can still be used has been removed and left detached for a long period of time, do not reuse it. Do not peel off the film from the top surface of the maintenance box. If ink contacts your skin, eyes, or mouth, take the following actions.
When ink gets onto your skin, immediately wash the area with soap and water. When ink gets into your eyes, immediately flush them with water. Leaving the ink as is may result in bloodshot eyes or mild inflammation. If something is wrong, immediately consult with a doctor. When ink gets into your mouth, immediately spit it out and consult with a doctor.
Do not shake a used maintenance box too hard. The ink may leak from the maintenance box if you swing or shake it too hard. Avoid storing the maintenance box under high temperatures or in a frozen state. Keep it away from direct sunlight.
Before use
Caution Label
The labels affixed to the product indicate the following cautions.
 Caution Caution | Do not touch the blade of the auto cutter with a hand. Doing so may cause injury.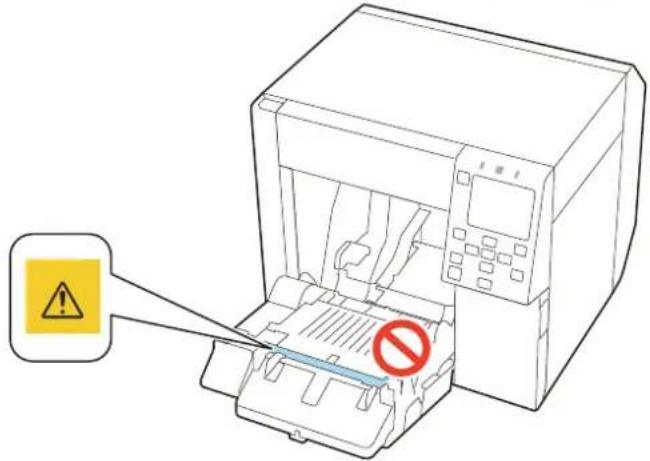 |
 Caution Caution | Do not touch the movable blade of the auto cutter with a hand. Doing so may cause injury.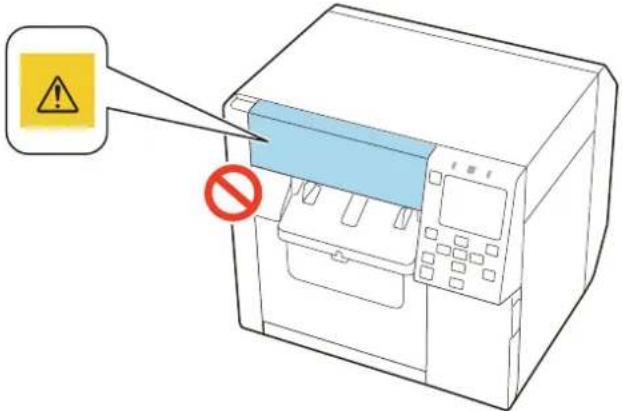 |
 Caution Caution | To prevent fingers from being trapped, the lock mechanism is activated to stop the cover closing if the unit is raised up from the installation surface. When using the product, install it on a level surface.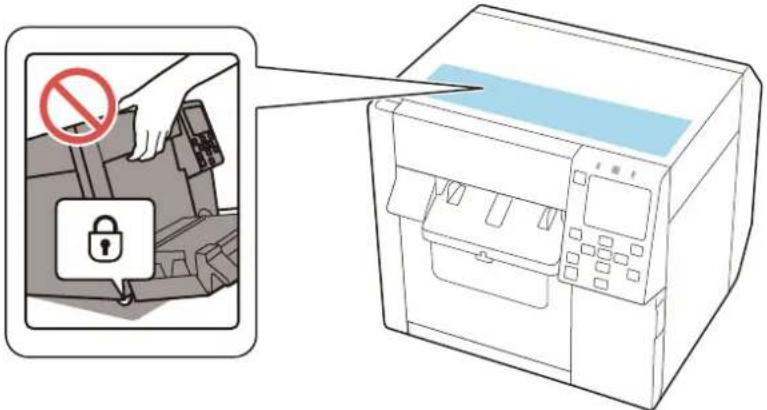 |
Before use
Supported Paper
This section describes the shape, form, size, and type of paper that can be used by this printer, and paper that cannot be used.
For more details, see the CW-C4000 Series Technical Reference Guide.
Paper Shape/Form/Size
| Forms of paper Paper shapes | Paper | width(mm) | Backingpaperwidth(mm) | Labelwidth(mm) | Gapbetweenlabels(mm) |
Continuous plain paperwithout black marks*1 | Roll paper | 25.4 to 108 --- --- | |||
Continuous plain paperwithout black marks*1 | Fanfold paper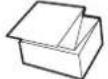 | 50 to 108 --- --- | |||
Continuous plain paper(without black marks)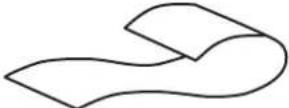 | Roll paper | 25.4 to 108 --- --- | |||
Full-page labelwith or without black marks | Roll paper | --- 25.4 to 112 21.4 to 108 --- | |||
Die-cut label(Gap *2) | Roll paper | --- 25.4 to 112 21.4 to 108 2.0 to 6.0 | |||
Die-cut labelwithout black marks*1 | Roll paper | --- 25.4 to 112 21.4 to 108 2.0 to 6.0 |
Before use
| Forms of paper Paper shapes | Paper | width(mm) | Backing paper width(mm) | Label width(mm) | Gap between labels(mm) |
Die-cut label without black marks*1 | Fanfold paper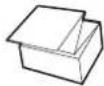 | --- 50 to 1 | 12 46 to 108 2.0 to 6.0 | ||
Wristband paper without black marks*1 | Roll paper | Contact qualified service personnel for advice. | --- --- --- |
*1: The print position is detected based on the black marks printed on the back of the paper. *2: The print position is detected based on the gaps between labels.
| Note | When labels less than 10 mm in length are cut automatically, the printed label may adhere to the cutter blade and become difficult to remove.Depending on shape, thickness, and stiffness of die-cut labels, the labels may peel off their backing paper inside the printer. When you want to use die-cut labels that do not meet the paper specifications, contact qualified service personnel for advice. |
Paper Types
Supported paper types vary depending on the type of black ink as shown below.
| Paper Type When using Matte Ink When using Gloss Ink | ||
| Plain paper | √ | - |
| Matte paper | √ | √ |
| Texture Paper | √ | - |
| Synthetic | √ | √ |
| Wristband paper | √ | - |
| Glossy paper - | √ | |
| Glossy Film | - | √ |
| High Glossy Paper | - | √ |
Before use
Paper That Cannot Be Used
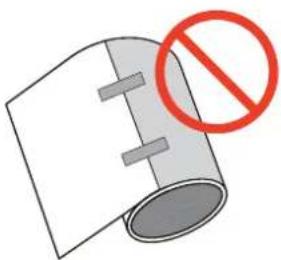
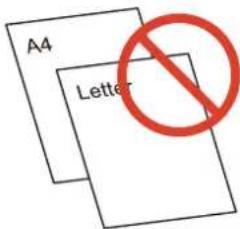
Do not load paper like the following. Such paper will cause paper jams and print stains.
□Thermal paper
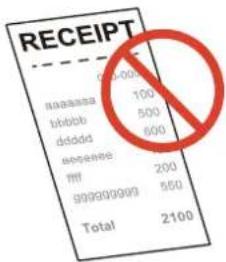
□Paper joined together by tape, etc.

□Paper joined to the core by tape, etc.
□Paper of A size, B size, etc.
Before use
□Paper with transparent backing paper

Before use
Part Names and Functions
This section describes the main operation parts.
Front
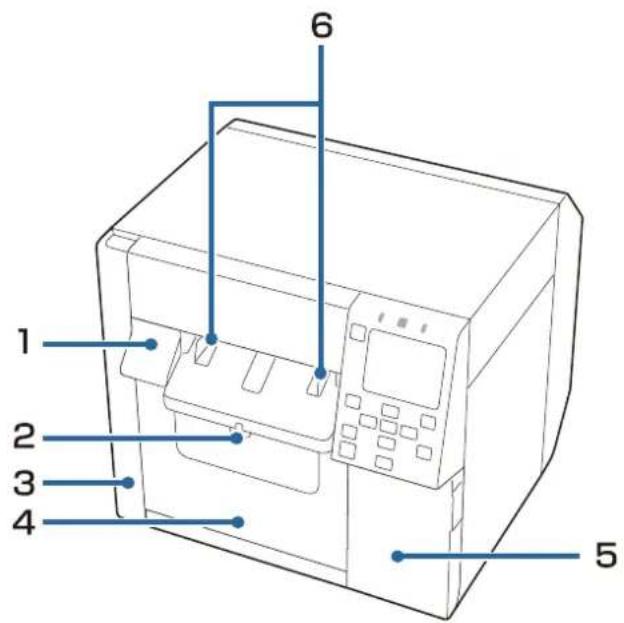
| No. | Name Description | |
| 1 | Release lever Pull this lever towards you to open the front cover. | |
| 2 | Lock lever (paper ejection guides) | Press down this level to enable adjustment of the paper ejection guides.Pull up this lever until it clicks into place to lock the paper ejection guides. |
| 3 | Maintenance box cover Open this cover to install or replace the maintenance box."Replacing the Maintenance Box" on page 32 | |
| 4 | Front cover Open this cover to load or replace paper. | |
| 5 | Ink cartridge cover Open this cover to install or replace the ink cartridge."Replacing the Ink Cartridges" on page 29 | |
| 6 | Paper ejection guides These guides are for preventing the paper from getting out of position when ejected. Adjust them to match the paper width. | |
Before use
Inside
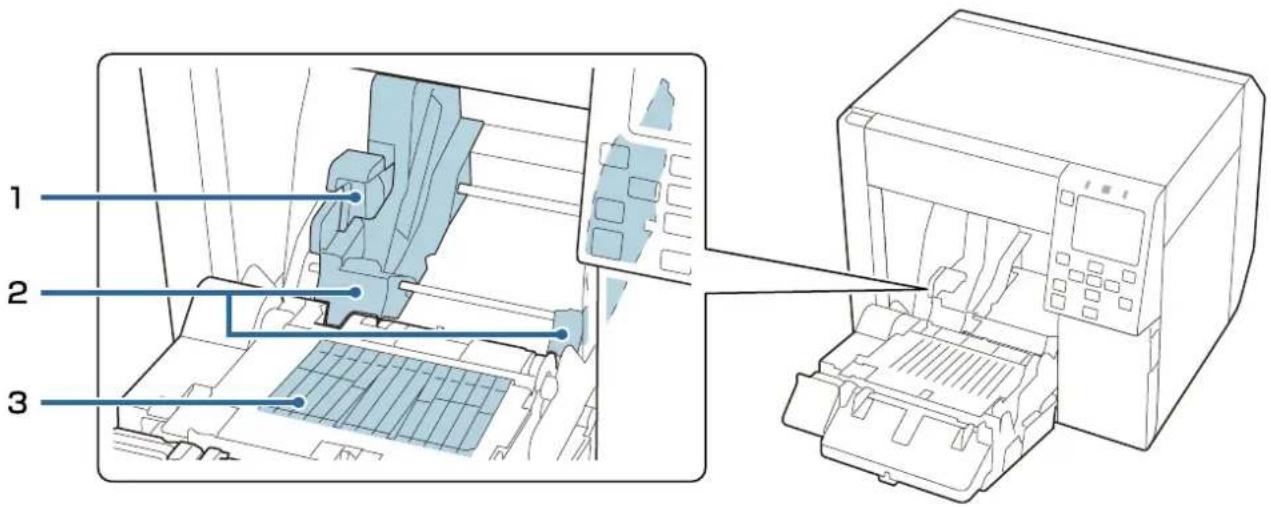
| No. Name Description | ||
| 1 | Lock lever (roll paper guides) Pull up this level to enable adjustment of the roll paper guides.Push down this lever to lock the roll paper guides. | |
| 2 | Roll paper guides These guides are for fixing the roll paper in place. Adjust them to match the paper width. | |
| 3 | Shutter Adjust this to match the paper width."Adjusting the Shutters" on page 51 | |
Before use
Rear
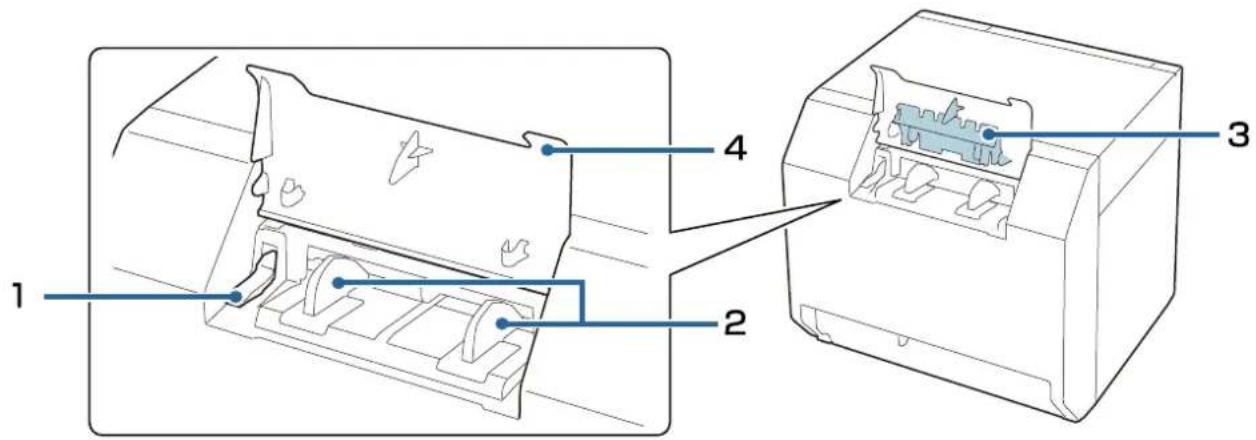
| No. | Name Description | |
| 1 | Lock lever (fanfold paper guides) | Pull up this lever to enable adjustment of the fanfold paper guides.Pull down this lever to lock the fanfold paper guides. |
| 2 | Fanfold paper guides These guides are for preventing the paper from getting out of positionwhen fed into the printer. Adjust them to match the paper width. | |
| 3 | Paper feed guide Attach this cover inside the front cover when using fanfold paper. | |
| 4 | Rear cover Open this cover to load or replace the fanfold paper."Loading Fanfold Paper" on page 46 | |
Connectors

| No. | Name Description | |
| 1 | Wire saddle Pass the USB cable through this saddle to prevent disconnection of the cable. | |
| 2 AC | inlet Connect the power cable. | |
| 3 LAN | port Connect a LAN cable. | |
| 4 USB | B port Connect a USB Type B cable. | |
| 5 | USB A port (for connecting an optional device) | Connect the optional Wireless LAN Unit. |
Operation Panel
![graph TD 1["Power"] --> 2["Power Symbol"] 2 --> 3["Control Unit"] 3 --> 4["Home Icon"] 3 --> 5["Arrow to Left"] 3 --> 6["Switch Icon"] 3 --> 7["Down Arrow"] 7 --> 8["Delete Button"] 7 --> 9["Down Arrow"] 7 --> 10["Next Button"] 10 --> 1 style 1 fill:#f9f,stroke:#333 style 2 fill:#ccf,stroke:#333 sty…](/content/2026/06/1388322/images/daecb7c3dbd3d9797b6737dc4747c058928fbdebfeb0a9248d884e6210e56a83.jpg)
| No. | Name Description | |
| 1 | LED The status of the printer can be checked from the flashing of the LEDs.For more details, see the CW-C4000 Series Technical Reference Guide.(power) LEDStays on while the printer is on. Flashes during printing or charging ink.Status LEDStays on or flashes while an error or problem is occurring.(pause) LEDStays on or flashes while the printer is paused. | |
| 2 | (CDWX)(power) button Turns on or off the printer. | |
| 3 | (384Z)(home) button Displays the Home screen. | |
| 4 | (HC52)(back) button Use to return to the previous screen. | |
| 5 | (Z8K4)(cut) button Use to cut paper. | |
| 6 | (BOD2)(arrows) buttons and OK button | Use the button to select a menu item, and then press the OK button to activate the selected menu or setting. |
| 7 | (HYTA)(feed) button Press this briefly to feed paper by one page.[BHGA] | Hold down to feed paper continuously. |
| 8 | (BKY)(cancel) button Cancels current print job. | |
Before use
| No. Name Description | ||
| 9 | || (pause) button | If this button is pressed during printing, printing is stopped after printing of the current page is finished. Press this button again to resume printing.If this button is pressed while the printer is idling, the printer is paused.Press this button again to return the printer to its idling state. |
| 10 Screen Status of the printer, menus, and error messages are displayed. | ||
Basic Operation
This chapter describes the basic operating procedures of the printer.
Turning On or Off
Turning the Power On
Hold down the ⏻ (power) button until the ⏱ (power) LED lights up.
Turning the Power Off
Hold down the ⏻ (power) button until a power-off confirmation message is displayed. Then select [Yes] on the confirmation screen. The ⏱ (power) LED goes out and the printer is turned off.
Basic Operation
Checking the Printer Status
The status of the printer can be checked from the lighting and flashing of the LEDs, and from the printer screen.
Also, by printing the status sheet, you can check the printer settings and condition of the nozzles.
"Printing Status Sheet" on page 28
Checking the Paper Information
Information of currently loaded paper; paper type and paper source setting is displayed on the home screen.
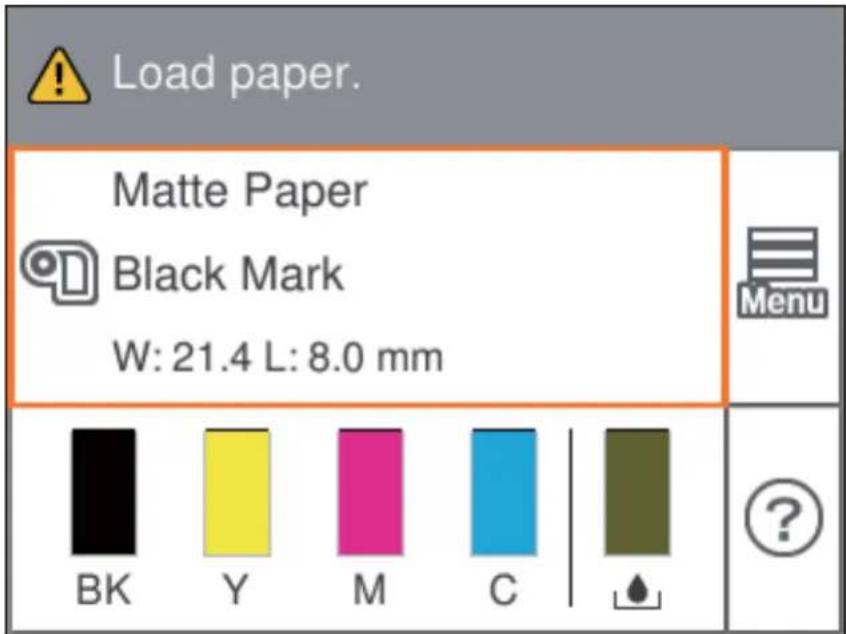
| Note | Touch this area to directly access the Paper Settings menus.You can also make the paper settings using the printer driver."Printer Driver Settings" on page 35If the settings differ between the operation panel and the printer driver, the settings of the printer driver are applied. |
Checking the Status of Consumables
The status of the ink cartridges and the maintenance box can be checked on the screen.
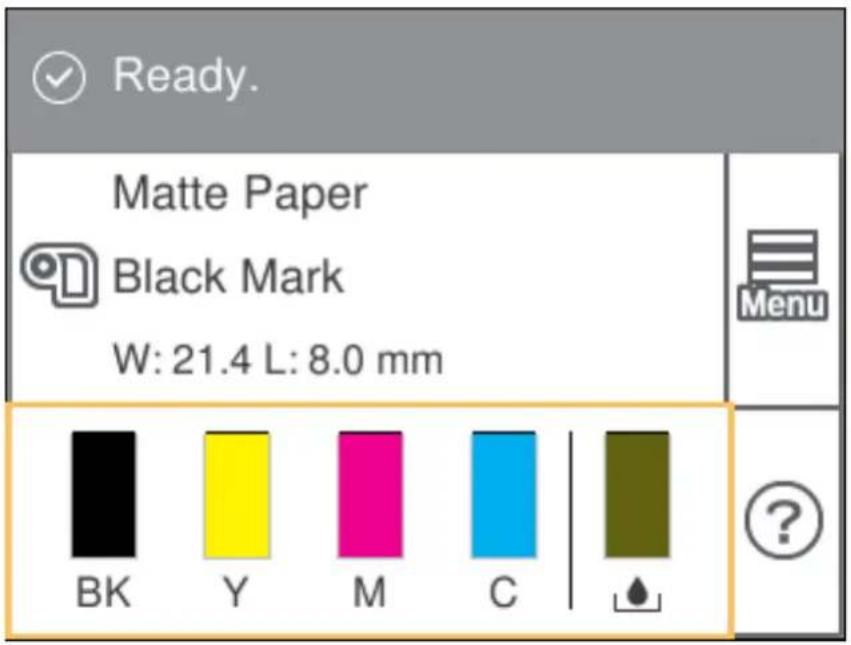
Printing Nozzle Check Patterns
By printing the nozzle check patterns, you can check the print head nozzles for clogging.
To print the check patterns, select the menu as described below.
Using the Operation Panel
[Menu] - [Maintenance] - [Print Head Nozzle Check]
Using the Printer Driver
Click [Nozzle Check] on the [Printer Utilities] tab.
Using the WebConfig
Select [Print Nozzle Check Pattern] on the [Maintenance] window, and then click [Start].
Basic Operation
Printing Status Sheet
By printing the status sheet, you can check the firmware version and printer settings such as the print mode and media detection settings. The following types of status sheets can be printed from the operation panel.
[Menu] - [Printer Status/Print] - [Print Status Sheet]
| <Printer Status Sheet>Sheet Output TimeYYYY.MM.DD hh:mm<Basic Information>ModelXX-XXXXX BKSerial NumberXXXXXXXXXXMain Firmware VersionXXXXXXXXXMAC AddressXX:XX:XX:XX:XX:XXIP Address SettingAuto/ManualIP AddressXXX.XXX.XXX.XXXSubnet MaskXXX.XXX.XXX.XXXGateway AddressXXX.XXX.XXX.XXXHead IDXXXXXXXXXXXXXXXXXXXXXXXXXXXXXXXXXXXXXX1- | HHH NetWork Status Sheet HHH<General Info>MAC Address XX:XX:XX:XX:XX:XXFirmware xxxxxxxxxxxx<Ethernet>Network Status Auto(Disconnected)<TCP/IP IPv4>Obtain IP Address ManualIP Address xxx.xxx.xxx.xxxSubnet Mask xxx.xxx.xxx.xxxDefault Gateway xxx.xxx.xxx.xxxHHHHHHHHHHHH 1/1 HHHHHHHHHHH | |
| - | AAAA 311103 xxxx yyyy/mm/dd hh:mm04 xxxx yyyy/mm/dd hh:mm05 xxxx yyyy/mm/dd hh:mm06 xxxx yyyy/mm/dd hh:mm07 xxxx yyyy/mm/dd hh:mm08 xxxx yyyy/mm/dd hh:mm09 xxxx yyyy/mm/dd hh:mm10 xxxx yyyy/mm/dd hh:mm | |
| Note | You can also print a list of the fonts and bar codes that are already registered in the printer, or the newly registered images and templates.If the Wireless LAN Unit has been connected to the printer, wireless network status and settings are printed on the Network Settings section of the status sheet. | |
Checking Network Connection and Settings
You can check the network connection status and settings by printing a network connection check report.
For more details, see the CW-C4000 Series Technical Reference Guide.
Basic Operation
Replacing the Ink Cartridges
This section describes how to replace the ink cartridges.
 Caution Caution | Carefully read the cautions on handling before installing the ink cartridges."Cautions on Ink Cartridges" on page 11 |
Checking Amount of Ink Remaining
You can check approximate remaining amount of ink on the operation panel or a computer.
| Note | Even when the printer is low on ink, you can print until you are prompted to replace the ink cartridge. Replace the ink cartridge as necessary. |
How to Replace the Ink Cartridges
The procedure below is for replacing the BK cartridge. Follow the same procedure for replacing the other color cartridges.
| Important | When replacing the black ink cartridge, make sure to replace with a cartridge of the same type of black ink. The printer does not work if you install a cartridge of different type of black ink.Shake new ink cartridges well before installing them. |
1 Open the ink cartridge cover.
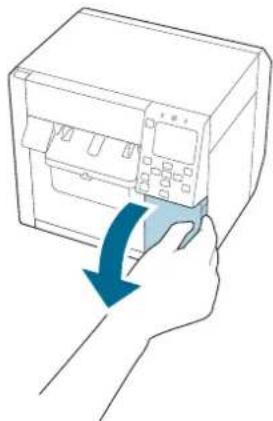
Basic Operation
2
Press the lever down to remove the used ink cartridge.
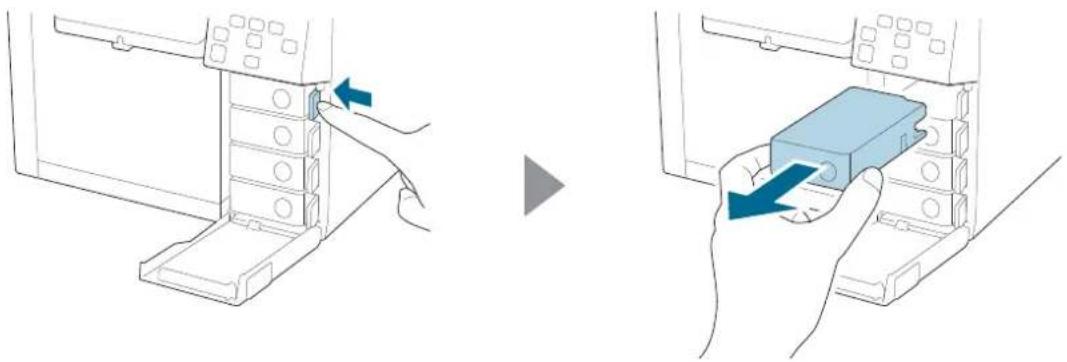
3
Shake the ink cartridge.
As shown in the figure below, shake the cartridge horizontally. Move the cartridge by about 5 cm to both directions, and repeat it about 15 times for about 5 seconds.
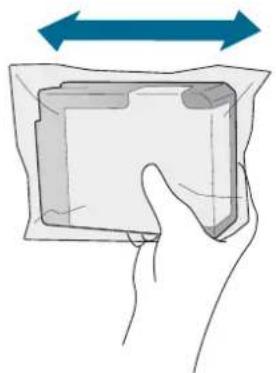
4
Take out the new ink cartridge from the bag.
“Cautions on Ink Cartridges” on page 11
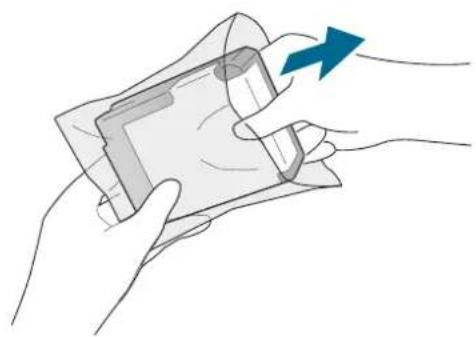
Basic Operation
 Caution Caution | Do not touch the areas shown in the figure. |
 |
5
Install the ink cartridge.
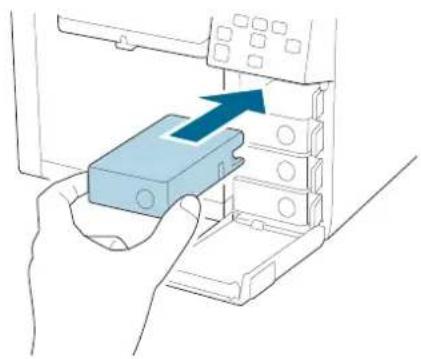

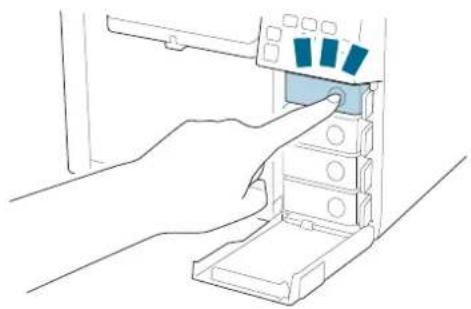
6
Close the ink cartridge cover.
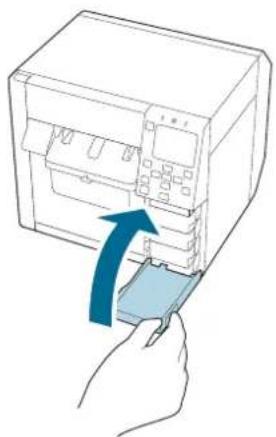
Basic Operation
Replacing the Maintenance Box
This section describes how to replace the maintenance box.
| Caution | Carefully read the cautions on handling before setting the maintenance box. "Cautions on the Maintenance Box" on page 13 |
Checking the Amount of Empty Space in the Maintenance Box
You can check the approximate amount of empty space in the maintenance box on the operation panel or a computer.
| Note | Even if the maintenance box is running low on space, you can still print until you are prompted to replace it. Replace the maintenance box with a new one as necessary. |
How to Replace the Maintenance Box
1
Open the maintenance box cover.
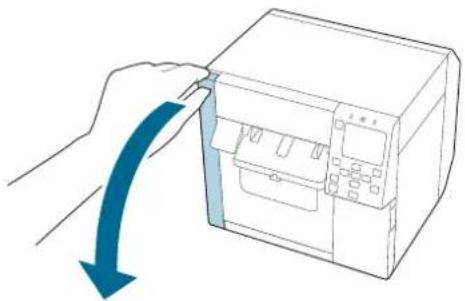
2
Take out the maintenance box.
When disposing of the used maintenance box, put it in a plastic bag that came with the new maintenance box.

"Disposal of Maintenance Box" on page 83
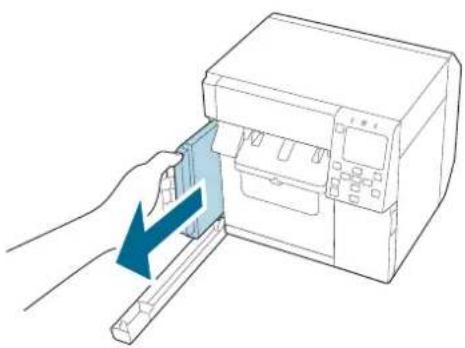
3
Take out a new maintenance box from the bag.

"Cautions on the Maintenance Box" on page 13
Basic Operation
 Caution Caution | Do not touch the areas shown in the figure. |
 |
4 Insert the new maintenance box all the way in.
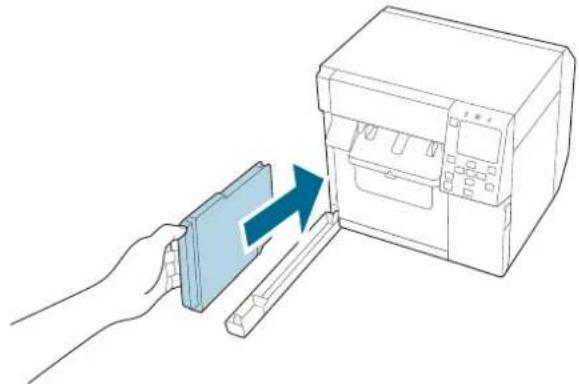
5 Close the maintenance box cover.
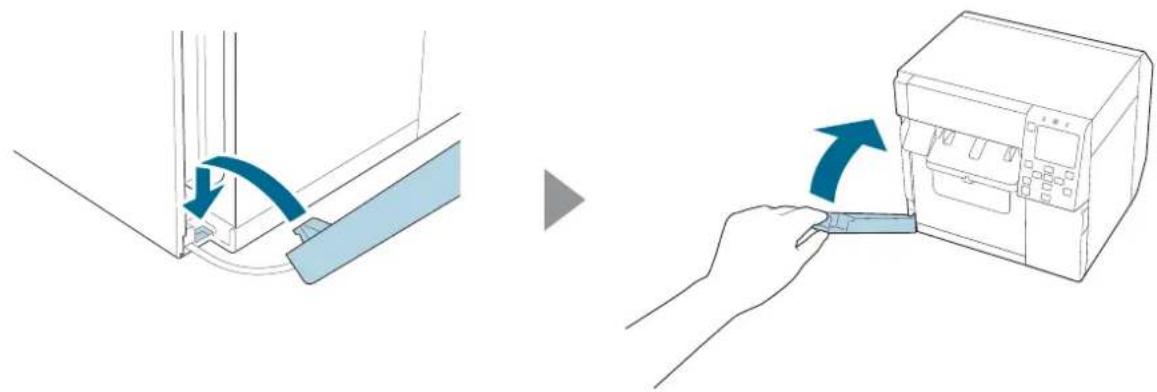
Basic Operation

Press the (Pause) button.
Check that the printer is ready for printing by checking the home screen.

| Note | It is recommended to clean the platen at the same time you replace the maintenance box. “Cleaning the Platen” on page 56The non-woven cloth and cotton swabs used for cleaning are included in the replacement maintenance box.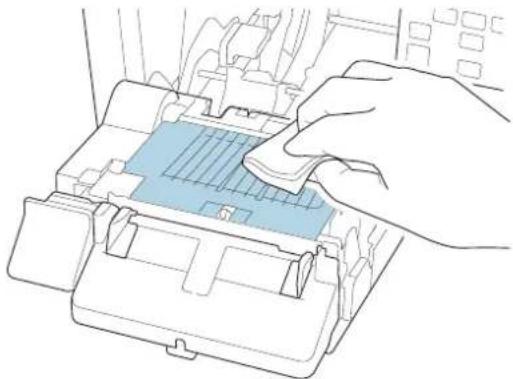 |
Basic Operation
Printer Driver Settings
Set the basic items required for printing such as the size and form of media.
The printer driver is equipped with a help function. Right-click an item and then click Help to display an explanation on the item.
You can also learn how to configure the printer driver with videos. Access the videos from the following URL.
https://www.epson-biz.com/?prd=cw-c4k&inf=video

| Note | If the settings on the printer (settable using the operation panel, CW-C4000 Series PrinterSettings, or WebConfig) differ from the printer driver settings, printing is performed by applying the printer driver settings. |
Media Definition
The size, form, type, and other settings of frequently used paper can be registered as a media definition. The set media definition can be selected from the Media Name pull-down menu. This is convenient because you will not need to set the paper settings of the driver when printing from an application if you register a media definition in advance.
If you wish to set the paper size and other settings every time without registering a media definition, select [Custom] from the [Media Name] pull-down menu on the [General] tab. The various settings on the [General] tab will become available so that you can set the paper size and other settings.
Media Name
□Media Size Reduction
☐108 x 174.8 mm - Die-cut Label* (Initial setting)
Basic Operation
Custom
*: This setting is suitable for printing the roll paper included with the product.
Width
When Media Form is other than Continuous paper or Wristband Paper
21.4 to 108.0 mm
Initial setting: 108.0 mm
When Media Form is Continuous paper or Wristband Paper
25.4 to 108.0 mm
Initial setting: 108.0 mm
Length
Can be specified from 8 to 406.4 mm
Initial setting: 174.8 mm
Gap Between Labels
When Media Form is Die-cut Label
2 to 6 mm
Initial setting: 3 mm
When Media Form is other than Die-cut Label
0 to 6 mm
Initial setting: 3 mm
Media Form
☐ Die-cut label (gap detection) (Initial setting)
☐ Die-cut label (black mark detection)
Full-page Label (black mark detection)
Full-page Label (no detection)
□ Continuous paper (black mark detection)
Basic Operation
☐ Continuous paper (no detection) □ Wristband (black mark detection)
Media Saving
Enabled only when [Full-page Label (no detection)] or [Continuous paper (no detection)] is selected as the [Media Form].
Eliminate Lower Margin ☐ Eliminate Lower And Upper Margin ☐ No Saving (Initial setting)
Media Coating Type
Plain Paper ☐ Matte Paper (Initial setting) Synthetic Texture Paper ☐ Wristband Paper ☐ Glossy Paper ☐ Glossy Film ☐ High Glossy Paper
Print Quality
When Media Coating Type is Plain Paper
Max Speed ☐ Speed (Initial setting) Normal Quality
When Media Coating Type is Matte Paper, Synthetic, or Texture Paper
Max Speed ☐ Speed
Basic Operation
Normal (Initial setting)
Quality
When Media Coating Type is Wristband Paper
Max Speed
☐ Speed (Initial setting)
Normal
When Media Coating Type is Glossy Paper, Glossy Film, or High Glossy Paper
Normal
Quality (Initial setting)
□Max Quality
| Note | When [Epson Preferred Color] is selected as [Color Correction], available print quality settings are different from above description.If you change the [Media Coating Type], the [Print Quality] will be automatically set to the initial setting suitable for the selected paper type. |
Color Correction
□Epson Vivid Color (Initial setting)
□Epson Preferred Color
ICM
□None
Spot Color Setting
No Spot Color (Initial setting)
Settings For Paper Handling After Print
☐Cut (after printing last label)
☐Cut (at specified label)
☐Cut (after last page of collate page)
Do not cut (stop at peel position)
Do not cut (stop at cut position) (Initial setting)
Basic Operation
Do not cut (stop at the print end position)
Notification
None (Initial setting) Beep at Cut Beep at Job End Beep at Collate End
| Note | Regardless of the printer driver setting described above, the buzzer will not sound if the buzzer setting of the printer is disabled. |
Pause
None (Initial setting) Pause at Cut Pause at Job End Pause at Collate End
Media Detection...
The initial setting of [Media Source] and [Media Detection] will change depending on the settings of the printer.
Media Source
Supply from Inside (Roll Paper) Supply from Outside (Fanfold Paper) Supply from Outside (Roll Paper)
Media Detection
Gap detection Black mark detection No detection
Basic Operation
Loading and Replacing Paper
This section describes how to load and replace paper. The procedure differs depending on whether to supply paper from inside or outside the printer. Videos that show the procedure are also available.
Click the URL below to view the videos.
https://www.epson-biz.com/?prd=cw-c4k&inf=video
| Supply from Inside (Internal) Supply from Outside (Rear Feed) | |
Paper is supplied from inside the printer. Set roll paper into the printer.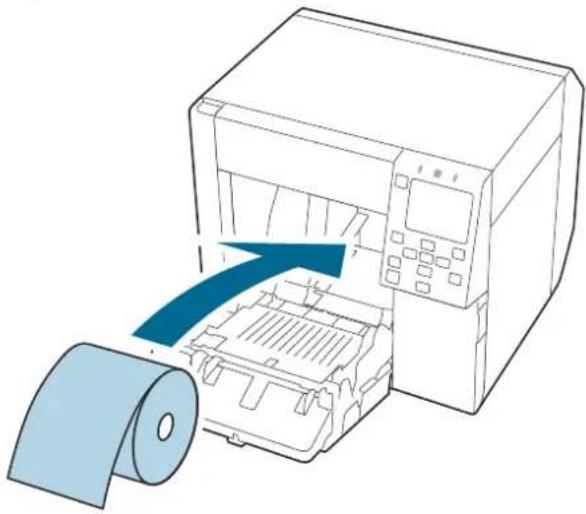 | Paper is supplied from outside the printer. Place fanfold paper behind the printer.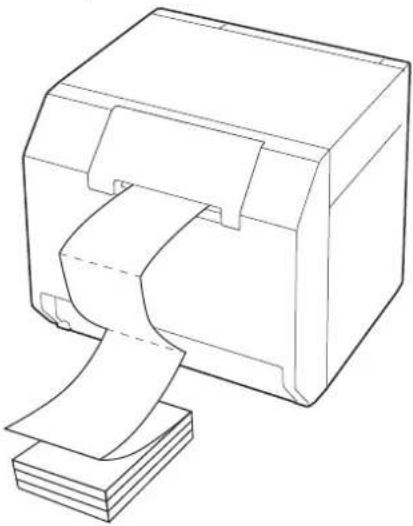 |

Important
☐ To supply roll paper from outside the printer, prepare an external paper feeder and paper rewinder by yourself. For more details, contact qualified service personnel for advice. ☐ When replacing paper with a different shape, form, or type of paper, change the paper settings either from the operation panel or on the printer driver before loading the paper. "Checking the Paper Information" on page 26 "Printer Driver Settings" on page 35
Basic Operation
Loading Roll Paper
 Caution Caution | After turning on the printer, wait until the home screen is displayed, and then open the front cover. If you open the cover before the home screen is displayed, the printer may fail to load the paper correctly. |
1 Turn the printer on. 2 Open the front cover.
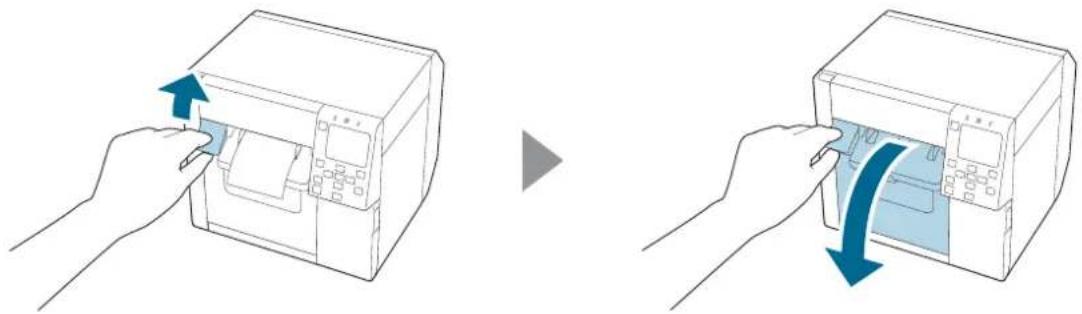
3 If the paper feed guide has been attached, remove it.
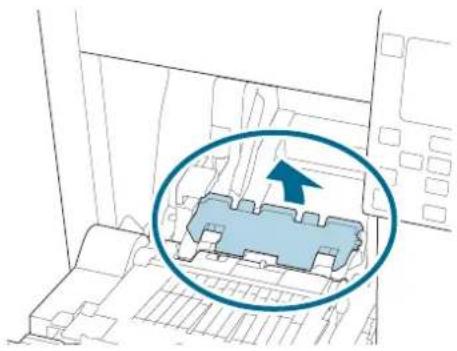
4 Raise the lock lever of the roll paper guides.
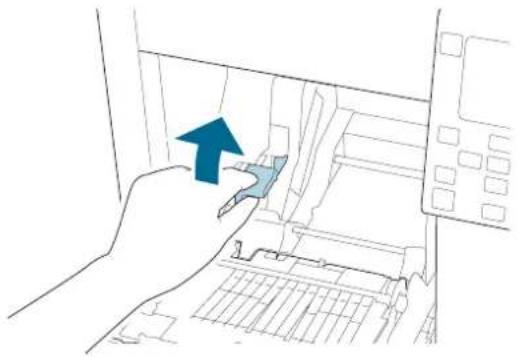
Basic Operation
5
Slide the roll paper guides outward as far as they go.

6
Lower the lock lever of the roll paper guides.

7
Insert paper with the printable side face up.

Basic Operation
8
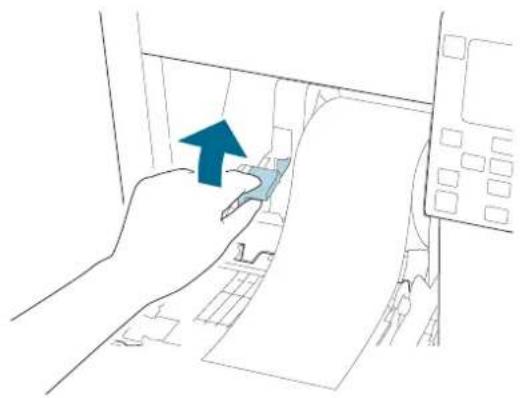
Raise the lock lever of the roll paper guides.
9
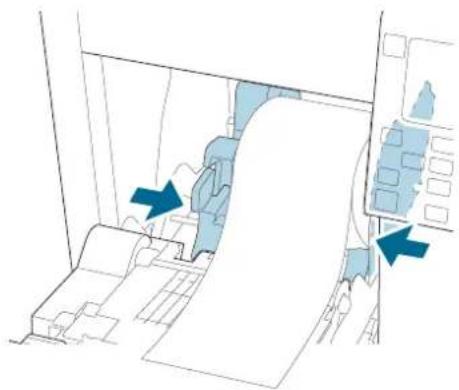
Slide the roll paper guides against the paper.
10
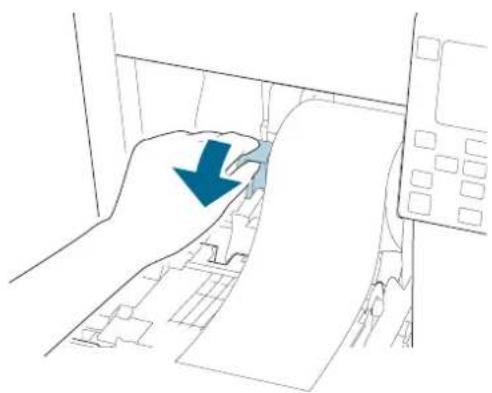
Lower the lock lever of the roll paper guides.
11
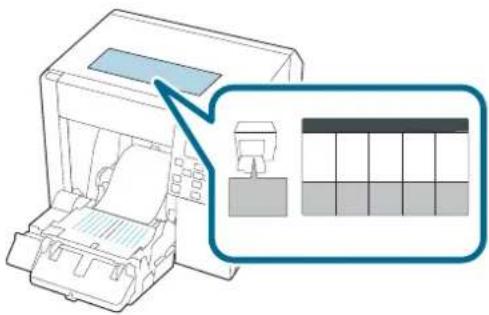
According to the paper width, open and/or close the platen shutters.
“Adjusting the Shutters” on page 51
Basic Operation
12
Lower the lock lever of the paper ejection guides.
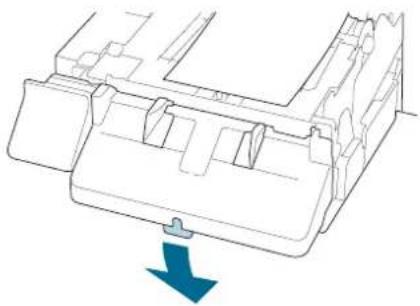
13
Slide the paper ejection guides outward.
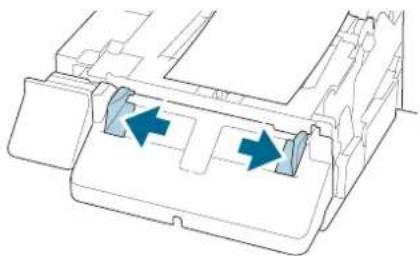
14
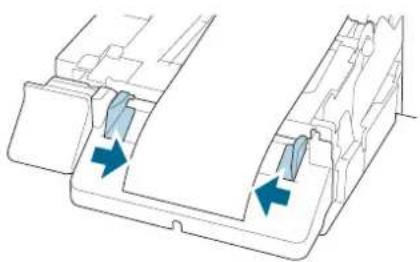
Pull out the paper as shown.

15
Hold down the paper by hand, and slide the roll paper guides against the paper.
Basic Operation
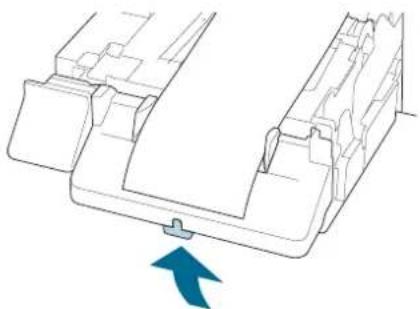
16
Raise the lock lever of the paper ejection guides until it clicks into place.
17
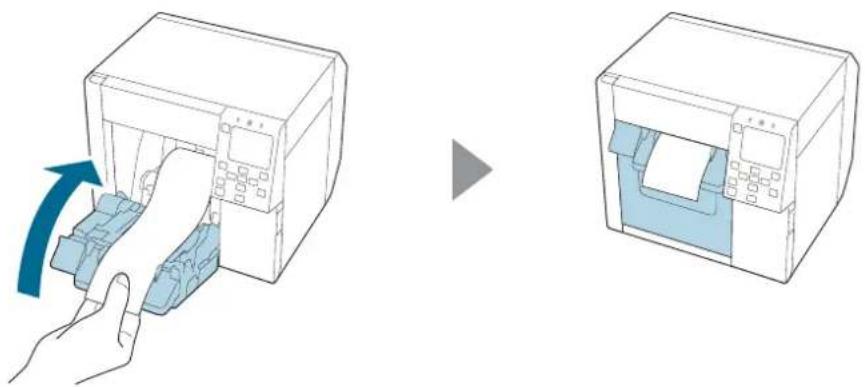
Pull out the leading edge of the roll paper, and then close the front cover.
18
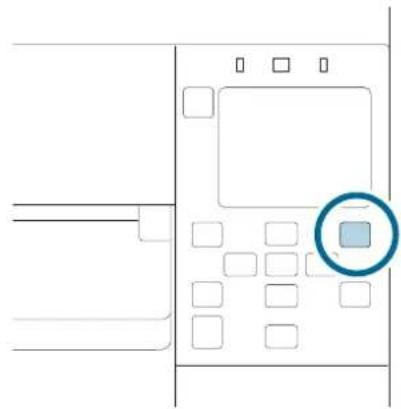
Press the (Pause) button.
Check that the printer is ready for printing by checking the home screen.
Basic Operation
Loading Fanfold Paper
 Caution Caution | After turning on the printer, wait until the home screen is displayed, and then open the front cover. If you open the cover before the home screen is displayed, the printer may fail to load the paper correctly. |
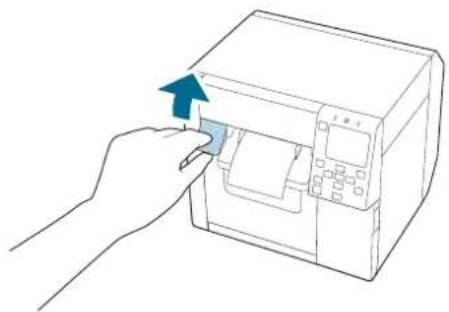
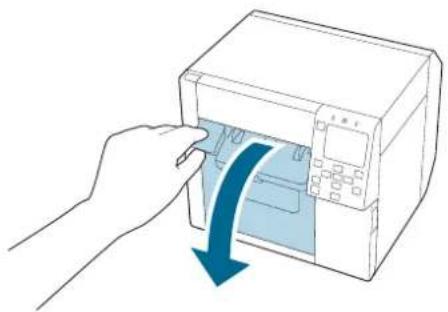
1 Turn the printer on. 2 Open the front cover.

3 Open the rear cover.
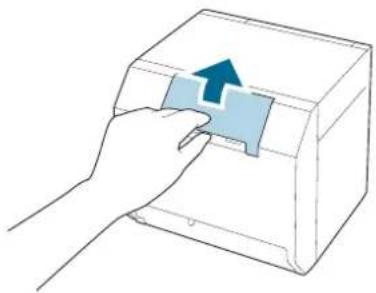
4 Remove the paper feed guide, and then close the rear cover.

Basic Operation
5
Attach the paper feed guide.

6
According to the paper width, open and/or close the platen shutters.
“Adjusting the Shutters” on page 51
7
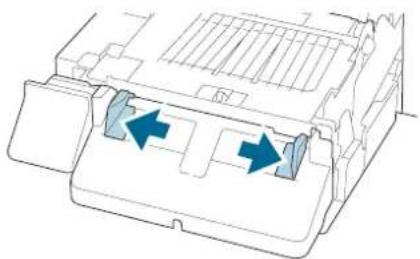
Lower the lock lever of the paper ejection guides.

8
Slide the paper ejection guides outward as far as they go.
Basic Operation

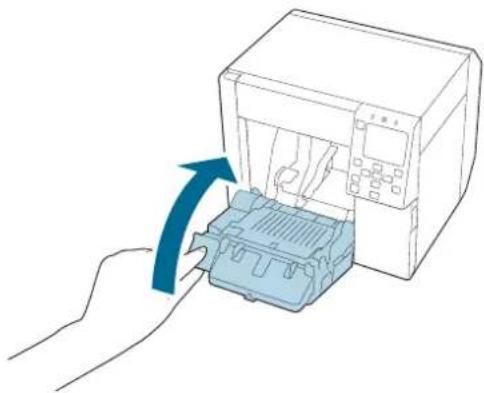
Raise the lock lever of the paper ejection guides until it clicks into place.


Close the front cover.

Open the rear cover.
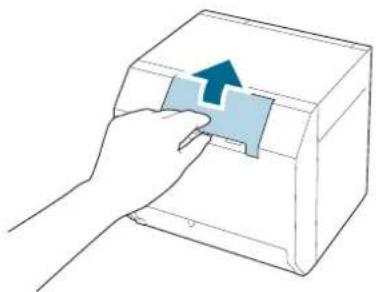

Raise the lock lever of the fanfold paper guides.
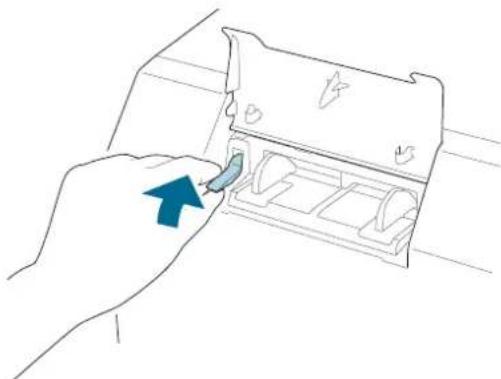
Basic Operation
13
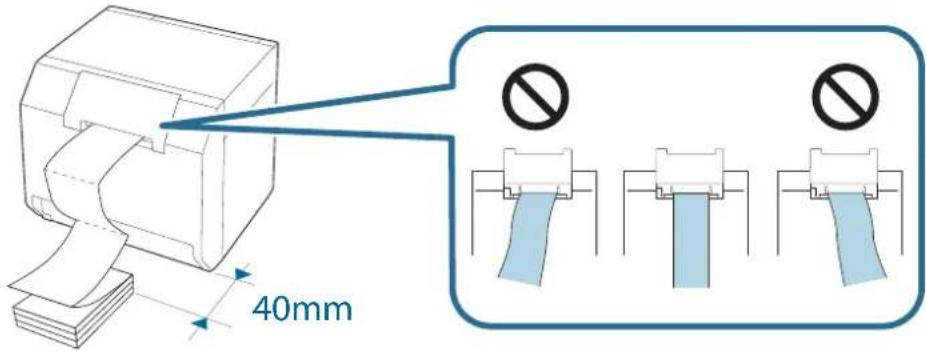
Place the fanfold paper behind the printer.
Place the fanfold paper at least 40 mm away from the printer.
Make sure the paper is vertical in relation to the paper feed slot.
14
Slide the fanfold paper guides against the paper.

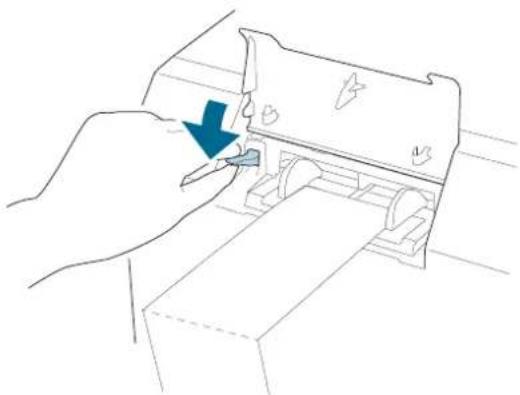
15
Lower the lock lever of the fanfold paper guides.
16
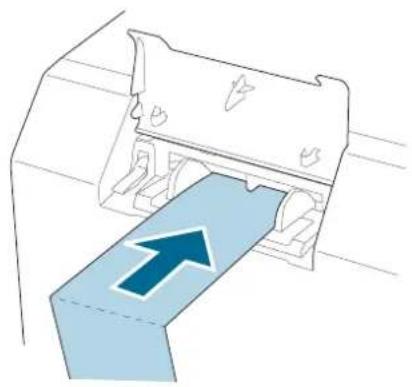
Insert the leading edge of the paper with the printable side face up.
When you insert about 100 mm of the paper, the paper is automatically fed further into the printer.
Basic Operation
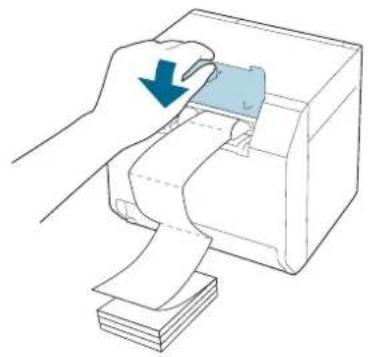
17
Close the rear cover.
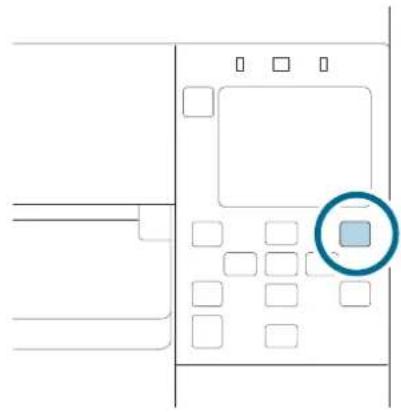
18
Press the (Pause) button.
Check that the printer is ready for printing by checking the home screen.
Basic Operation
Adjusting the Shutters
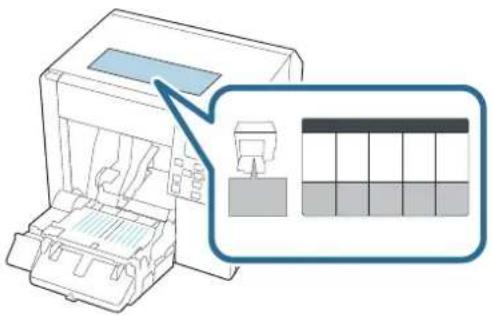
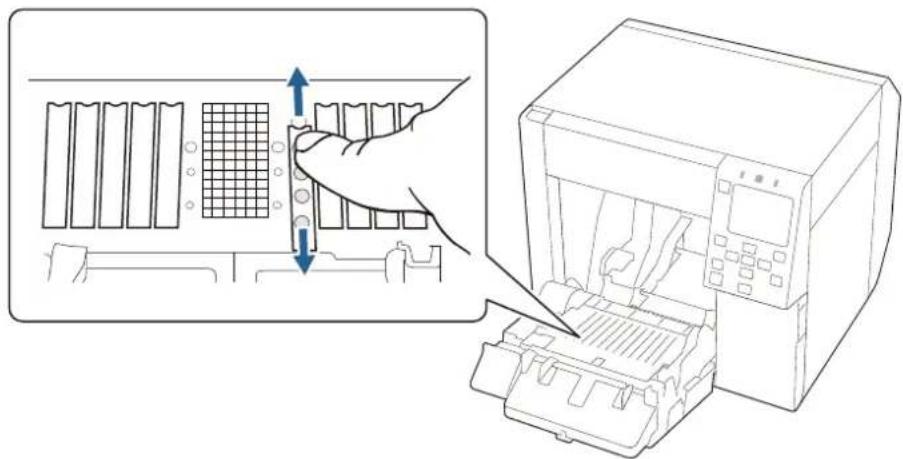
Inside the front cover, there are shutters for adjusting paper suction for during printing.
The shutters need to be correctly opened/closed to match the paper width used. To open/close them, move them with a finger. Furthermore, the paper width can be checked on the label at the top of the main unit.

Caution
If the shutters are not correctly opened/closed, paper may be jammed or smudged with ink.
| Paper width / Backing paper width Shutter state | |
25.4 to 43.8 mm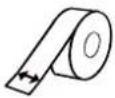 | Close all the shutters.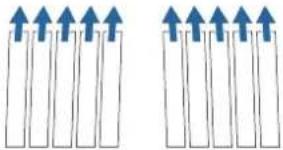 |
43.9 to 58.4 mm Open the innermost shutters. | 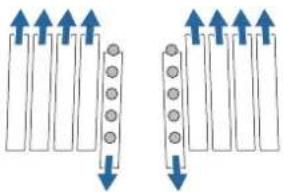 |
58.5 to 73.0 mm Open the inner four shutters. | 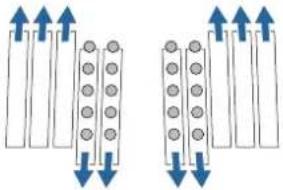 |
Basic Operation
| Paper width / Backing paper width Shutter state | |
73.1 to 87.6 mm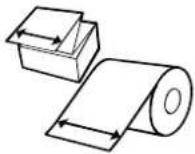 | Open the inner six shutters.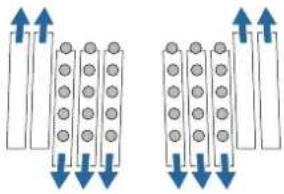 |
87.7 to 102.2 mm Open the inner eight shutters.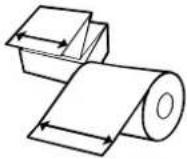 | 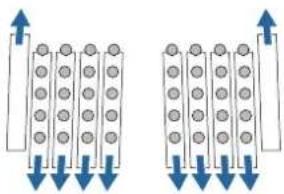 |
102.3 mm or longer Open all the shutters.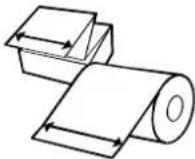 | 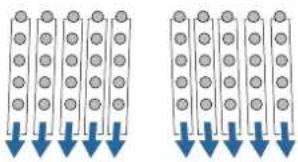 |
Basic Operation
How to Remove Paper
1 Check that the printer has been turned on. 2 Open the front cover.
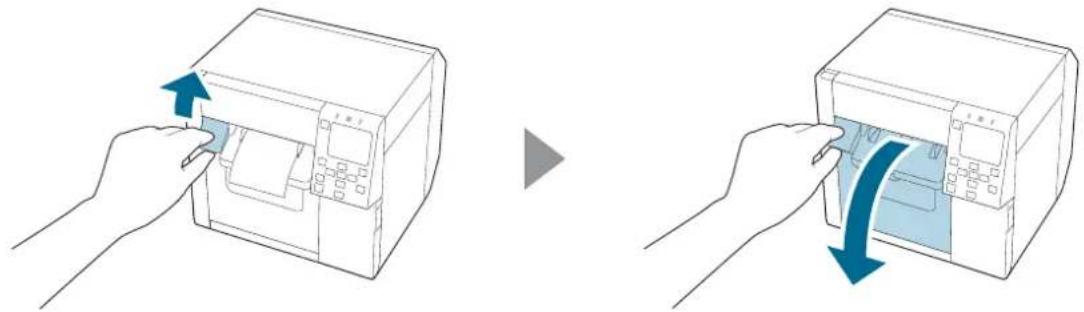
3 Remove roll paper or paper core from the printer.
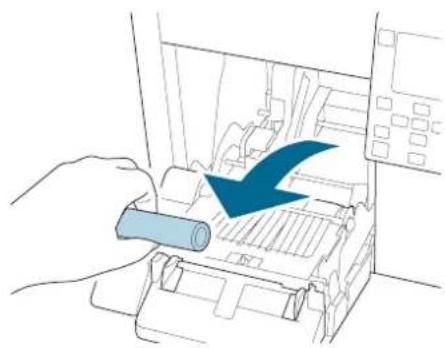
4 Close the front cover.
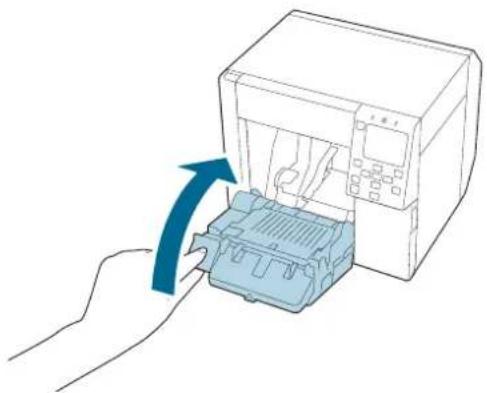
Basic Operation

Press the (Pause) button.
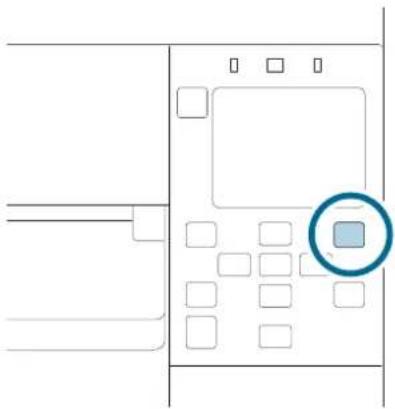
Removing the paper is now completed.
To load paper, see "Loading Roll Paper" on page 41 or "Loading Fanfold Paper" on page 46.
Maintenance
This chapter describes how to carry out maintenance of the printer.
Cleaning the Exterior
1 Turn the printer off and then disconnect the power cable from the outlet. 2 Wipe off any dirt with a dry cloth or cloth that has been slightly dampened. See the Technical Reference Guide for cleaning precautions.
Maintenance
Cleaning the Platen
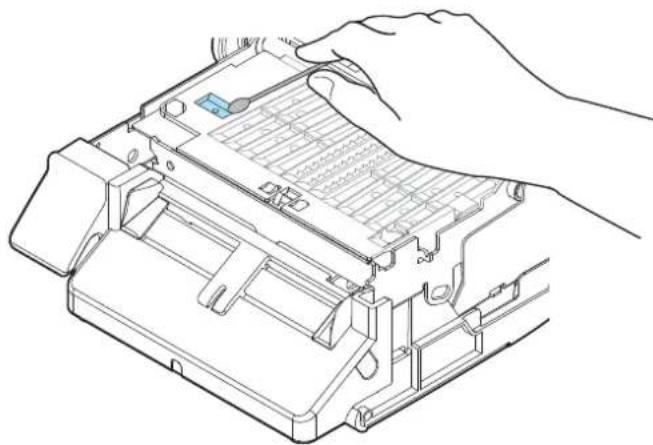
If there is ink adhered to the platen, hands or paper may become dirty. Furthermore, if the holes in the platen become blocked by dirt, ink soiling inside the platen may occur.
Use the non-woven fabric or cotton swabs to clean the platen by following the steps below.
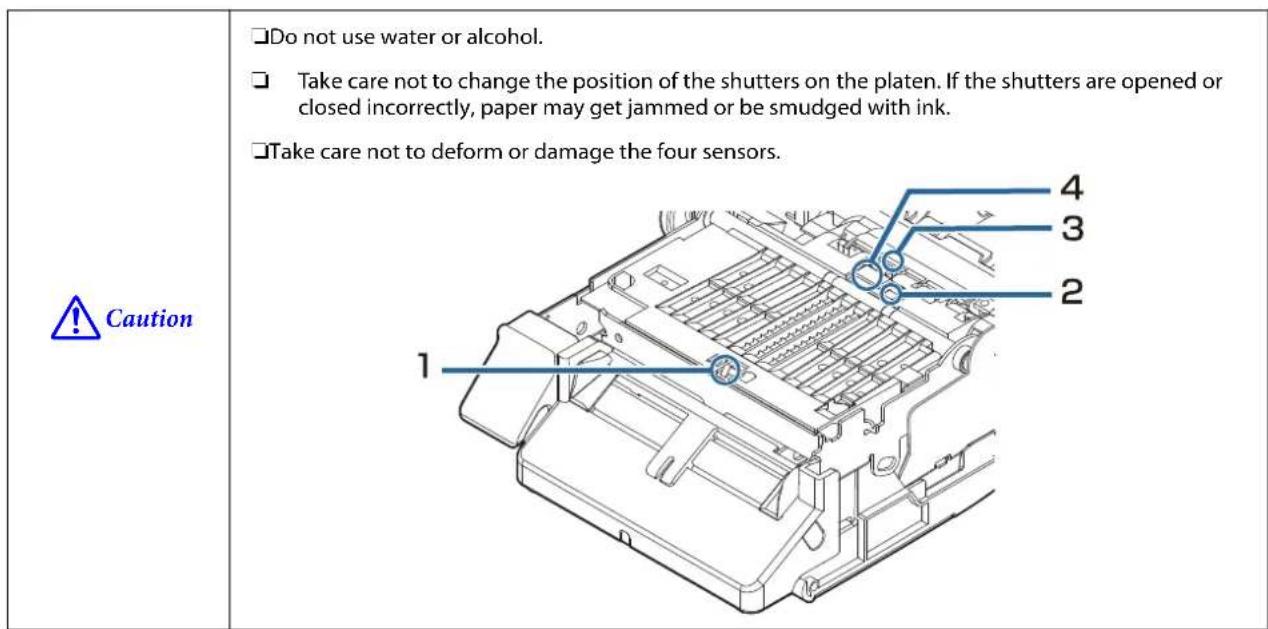
1 Turn the printer off and then disconnect the power cable from the outlet. 2 Open the front cover.
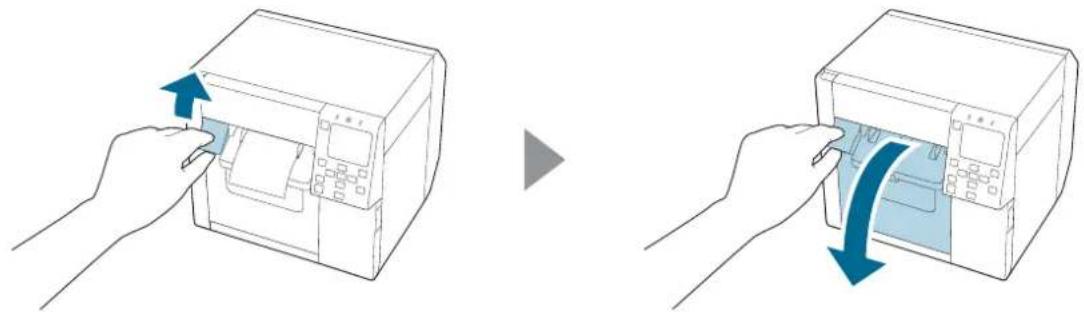
3 Remove the roll paper or fanfold paper.
Maintenance
4
Use the non-woven fabric for platen cleaning to clean the platen.
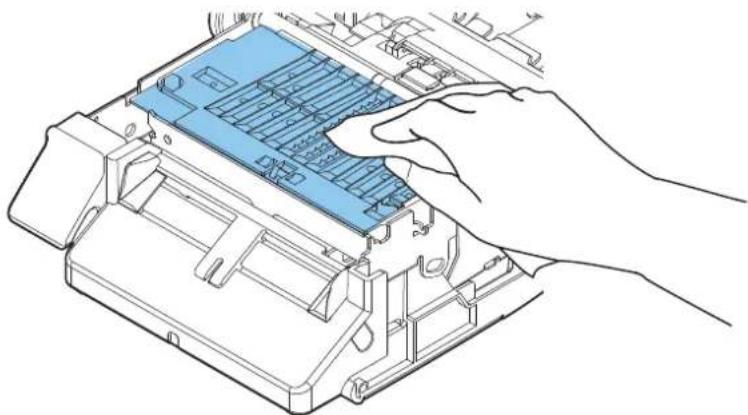
5
Use cotton swabs to clean the holes and around the holes. If the holes are blocked, be sure remove the dirt to unblock the holes.
6
Close the front cover.
Maintenance
Cleaning the Auto Cutter
The fixed blade of the auto cutter may become unable to cut cleanly due to the adhesive of label paper adhering to it.
Perform cleaning by following the steps below.
1 Turn the printer off and then disconnect the power cable from the outlet. 2 Open the front cover and remove the paper. 3 Remove the adhesive adhered to the fixed blade of the auto cutter on the front cover side.
Remove it with a cotton swab or the like dampened with alcohol.


Caution
Do not directly touch the fixed blade of the auto cutter.
Doing so may cause injury to a finger.
Maintenance
Cleaning the Print Head
If the nozzles are clogged, faint colors, banding, or unintended colors appear on printouts.
When such print quality problems occur, print nozzle check patterns and check for nozzle clogging.
Example of the nozzle check patterns with gloss black ink
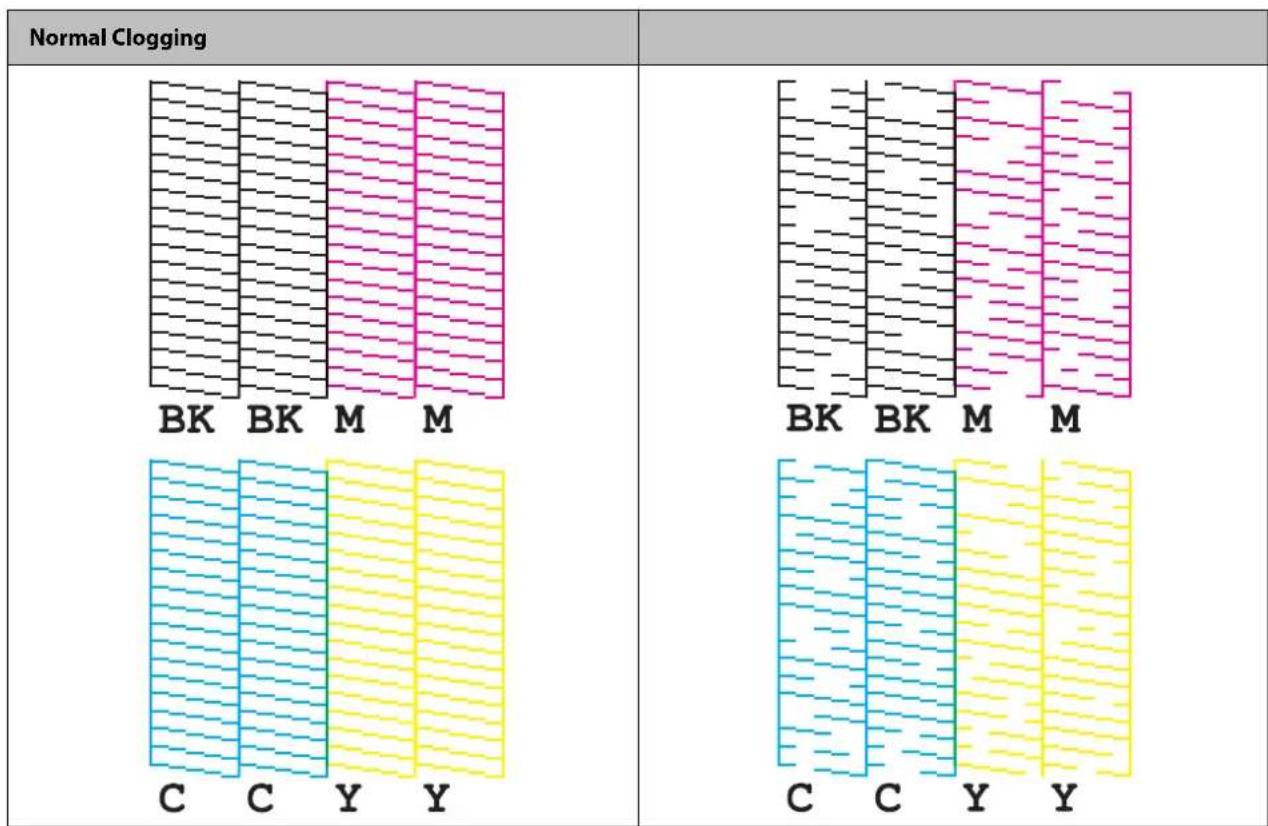
When the printed patterns show the nozzle clogging state, run a head cleaning.
Printing Nozzle Check Patterns
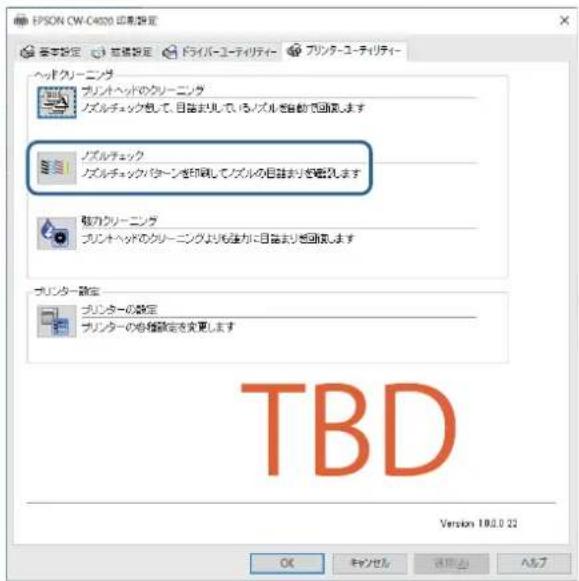
You can print the nozzle check patterns using the nozzle check function available from the operation panel or the printer driver.
Using the Operation Panel
[Menu] - [Maintenance] - [Print Head Nozzle Check]
Using the Printer Driver
Click [Nozzle Check] on the [Printer Utilities] tab.
Maintenance
| Important | Do not turn off the power or open the covers during head cleaning. Doing so may cause printing malfunction.Do not run the head cleaning more than necessary. Ink is consumed because ink is discharged from the head to clean it.If there is not much ink remaining, head cleaning may not be possible. Replace the ink cartridges and then try again."Replacing the Ink Cartridges" on page 29 |
Using the Operation Panel
[Menu] - [Maintenance] - [Print Head Cleaning]
[Menu] - [Maintenance] - [Power Cleaning]
Using the Printer Driver
Click [Print Head Cleaning] or [Power Cleaning] on the [Printer Utilities] window.
Maintenance

This chapter describes how to resolve problems. For troubleshooting information that is not described here, see the CW-C4000 Series Technical Reference Guide.
A Message is Displayed on the Operation Panel
| Message Solution and Reference | |
| InformationPaper feed error.Load the paper or change the media source setting. | Use paper that matches the [Media Source] and [Media Form] settings. Or change the [Media Source] and [Media Form] settings to match them with the loaded paper."Printer Driver Settings" on page 35 |
| InformationCannot detect the paper specified by the Media Detect setting.Load paper that matches the setting or change the setting. | Use paper that matches the [Media Detect] settings. Or change the [Media Detect] settings to match them with the loaded paper."Printer Driver Settings" on page 35 |
| (On the home screen)Load paper. | Load paper."Loading and Replacing Paper" on page 40 |
| InformationThe size of the loaded paper is incorrect.Replace the paper. | Load media that matches the print area size. Or change the print area to match it with the media size."Loading and Replacing Paper" on page 40 |
| InformationThe roll paper is not loaded. | Load roll paper."Loading and Replacing Paper" on page 40 |
| InformationThe fanfold paper is not loaded. | Load fanfold paper."Loading and Replacing Paper" on page 40 |
| InformationPaper jam. | Remove the jammed paper and then load paper."Roll Paper is Jammed" on page 70"Fanfold Paper is Jammed" on page 72 |
| InformationThe paper is not loaded correctly. Reload the paper. | Remove the paper, and then load the paper again."How to Remove Paper" on page 53"Loading and Replacing Paper" on page 40 |
| InformationCalibration failed.Press the OK button. Then reload or replace the paper. | Make sure that the paper loaded in the printer matches the paper detection method (gap or black mark), and reset the paper."Loading and Replacing Paper" on page 40Calibration is impossible if Gap Between Labels exceeds 6 mm."Supported Paper" on page 15If the error still occurs, the detector cannot handle the paper. Replace the paper. |
Troubleshooting
| Message Solution and Reference | |
| InformationThe paper has already been cut and cannot be cut. | This error occurs when you press the Cut button at the position where the paper is already cut.Feed the paper by printing or pressing the Feed button to enable the Cut button. |
| Maintenance ErrorThe ink cartridge is not installed correctly. | Install an ink cartridge with a sufficient amount of ink remaining."How to Replace the Ink Cartridges" on page 29 |
| (On the home screen, an exclamation mark on the ink levels) | Prepare a new ink cartridge to be replaced with the low-ink-level cartridge.If you continue to use the low-ink-level cartridge, you may be required to replace it during printing.If you replace the cartridge during printing, you may see a difference in color between colors printed by the old cartridge and colors printed by the new one due to a difference in ink drying status.If it is not acceptable for you, replace the ink cartridge with a new one before starting printing."How to Replace the Ink Cartridges" on page 29The removed ink cartridge can be installed again and used until you are prompted to replace it. |
| InformationYou need to replace the following ink cartridge(s). | Install an ink cartridge with a sufficient amount of ink remaining."How to Replace the Ink Cartridges" on page 29 |
| Maintenance ErrorCannot recognize the ink cartridge.Select "Next" to clear the error. | Reinstall the ink cartridge.If the error reoccurs, replace the ink cartridge with a new one."How to Replace the Ink Cartridges" on page 29 |
| InformationYou have not installed genuine Epson ink cartridges. | For the best performance of the printer, it is recommended to use genuine Epson ink cartridges.Use of non-genuine Epson ink cartridges can adversely affect the printer and print quality and prevent the printer from realizing its maximum performance.Epson cannot guarantee the quality and reliability of non-genuine Epson products.Repairs for any damage or breakdown of this product due to the use of non-genuine Epson products will not be free of charge even if the warranty period is still valid. |
| InformationThese ink cartridges are not compatible. | Because the installed ink cartridges are not the ones for this printer, an error such as a cartridge detection error may occur. |
| Maintenance ErrorMaintenance Box not installed.Product Number: SJMB4000 | Install a new maintenance box."How to Replace the Maintenance Box" on page 32 |
| Maintenance ErrorCannot recognize the Maintenance Box.Product Number: SJMB4000 | Reinstall the maintenance box.If the error reoccurs, replace the maintenance box with a new one."How to Replace the Maintenance Box" on page 32 |
Troubleshooting
| Message Solution and Reference | |
| (On the home screen)The Maintenance Box is nearing end of its service life. | Prepare a new maintenance box to be replaced with the near-full maintenance box.When a message saying “The Maintenance Box is at the end of its service life. You need to replace it.” is displayed, replace the maintenance box."How to Replace the Maintenance Box" on page 32 |
| Maintenance ErrorThe Maintenance Box is at the end of its service life.You need to replace it.Product Number: SJMB4000 | Replace the maintenance box with a new one."How to Replace the Maintenance Box" on page 32 |
| InformationMemory Full. Document was not printed. | Contact your system administrator and delete unnecessary files. |
| Printer ErrorTurn on the printer again.See your documentation for more details.XXXXXX | 1. Turn off the printer.2. Check that there is no paper jam or foreign materials near the ejection slot.3. Turn the printer on.If the printer error still occurs, contact qualified service personnel for advice.When contacting, tell the person the "XXXXXXXXX" (a 6- or 8-digit alphanumeric code). |
| InformationCannot start cleaning because ink is low.Printer features except cleaning are available. | When running the cleaning, install ink cartridges with a sufficient amount of ink remaining."How to Replace the Ink Cartridges" on page 29 |
| InformationPausedThe print quality may decrease because the nozzles are clogged. | The print quality may decrease because the nozzles are clogged. If it is not acceptable, run a print head cleaning."Cleaning the Print Head" on page 59 |
Troubleshooting
| Message Solution and Reference | |
| ErrorThe connection between your network and the printer is unstable.You may be able to solve this problem by disabling the IEEE802.3az (Energy Efficient Ethernet) function.See your documentation for more details. | When connecting to a wired LAN using a device that supports IEEE802.3az (Energy Efficient Ethernet), the connection may become unstable, the connection may not be possible, or the communication speed may slow down.Follow the steps below to disable the IEEE802.3az function on your computer and printer.1. Disconnect the LAN cables from the computer and printer respectively.2. If the IEEE802.3az function has been enabled on your computer, disable it.3. Connect the computer and printer directly with a LAN cable.4. On the printer, select [Menu] - [General Settings] - [Network Settings] - [Connection Check] to check the IP address of the printer.5. Start WebConfig on the computer.Start your web browser and enter the IP address of the printer.6. Select the [Network Settings] tab, then [Ethernet].7. Set [IEEE 802.3az] to [Off].8. Click [Next].9. Click [Apply].10. Disconnect the LAN cable from the computer and printer.11. If you disabled IEEE802.3az on your computer in step 2, enable it.12. Connect the LAN cables you disconnected in step 1 to the computer and printer.If the problem still occurs, a device other than the printer may be causing the problem. |
Troubleshooting
Problems with Print Quality
Horizontal White Banding
| Cause Solution and Reference |
| The nozzles are clogging. Print the nozzle check patterns to check the nozzles for clogging."Printing Nozzle Check Patterns" on page 59If the nozzles are clogging, run a print head cleaning."Cleaning the Print Head" on page 59 |
White or Black Banding
| Cause Solution and Reference | |
| The paper is not loaded correctly. Reload the paper. | “Loading and Replacing Paper” on page 40 |
| The paper being used and the Media Coating Type setting differ. | Check the paper being used and the Media Coating Type setting of the printer driver.“Printer Driver Settings” on page 35 |
White or Black Banding near the Edges
| Cause Solution and Reference | |
| The outside shutters on the platen, which are not needed to be opened for the paper, are open. | Air flow from the outside shutters adversely affect the printing operation and may cause white banding on printouts.Set the shutters on the platen according to the instructions on the label attached to the printer."Adjusting the Shutters" on page 51 |
Printed Colors Are Wrong
| Cause Solution and Reference | |
| If the printer is moved after initial charging, the specified colors may not be output (colors may be mixed) due to vibrations and impacts. | Run a head cleaning and check that colors are no longer mixed. “Cleaning the Print Head” on page 59 |
Troubleshooting
Printed Characters Look Blurred
| Cause Solution and Reference | |
| The outside shutters on the platen, which are not needed to be opened for the paper, are open. | Air flow from the outside shutters adversely affect the printing operation and may cause blurred print.Set the shutters on the platen according to the instructions on the label attached to the printer."Adjusting the Shutters" on page 51 |
Print Position Shifts
| Cause Solution and Reference | |
| The edge guide is not set along the paper edge. | Check that the edge guide is properly set at the paper width position."Loading and Replacing Paper" on page 40 |
| The paper is not loaded centrally. If the paper is offset from the center when loaded, print position may be laterally shifted at the beginning of printing.Use the paper guides to load the paper centrally or feed the paper before starting printing. | |
| The trailing edge of the paper is approaching. | When the trailing edge of the paper approaches, print position may be laterally shifted, or blurred print may occur.Replace the paper with a new one. |
Paper is Smeared or Smudged with Ink
| Cause Solution and Reference | |
| The paper being used and the Media Coating Type setting differ. | Check the paper being used and the Media Coating Type setting of the printer driver."Printer Driver Settings" on page 35 |
| If foreign matter is adhered to the head, the paper may be smeared with ink. | Run a print head cleaning."Cleaning the Print Head" on page 59 |
| The paper width and the shutters on the platen do not match. | If the paper width and shutters on the platen do not match, rising up of the paper may cause the paper and print head to rub against each other, leading to the paper becoming dirty. Set the shutters on the platen according to the instructions on the label attached to the printer."Adjusting the Shutters" on page 51 |
Paper is Fed and Ejected, and an Error Occurs
| Cause Solution and Reference | |
| The paper being used differs from that of Media detection settings. | Check the paper being used and Media detection settings of the printer. “Printer Driver Settings” on page 35 |
Troubleshooting
Margins are Generated on Printed Labels
| Cause Solution and Reference | |
| This is normal, and not a failure of the printer. | If you do not enable [Borderless Printing] on the [Options] tab of the printer driver, 1.5 mm margin at the top, bottom, left, and right will be created narrowing the printable area on the label. If you wish to set the entire area of the label size as the printable area, enable [Borderless Printing].When [Borderless Printing] is enabled, edges of label image may be printed on the backing paper, so create margins of 1.5 mm at the top, bottom, left, and right in the label image data. |
Margins of Label Are Large
| Cause Solution and Reference | |
| The margin setting is too large. | Check the margin settings in the application and then set the top, bottom, left, and right margins to 1.5 mm. |
Troubleshooting
Printing from a computer is impossible or becomes suddenly impossible
Checking Whether the Printer Driver Is Installed
Check whether or not the required software and applications are installed on the computer.
To print with this printer, a printer driver is required. Check whether or not the printer driver is installed by following the steps below.
1 Display Devices and Printers on the computer.
2 Check that the printer name is displayed.
If not, the printer driver is not installed.
3 Install the printer driver.
“Downloading the Latest Version” on page 4
The printer does not turn on
Check that the power cable is connected to the printer and outlet properly.
“Connectors” on page 22
Print Job is Canceled on PC but "Printing" Message on Printer Does Not Disappear
If you cancel printing in printer queue on the computer, it may cause the print data to break up and “Printing” may be kept displayed on the operation panel of the printer.
To cancel the status, press the (cancel) button on the operation panel, and then select [All label formats].
Troubleshooting
Roll Paper is Jammed
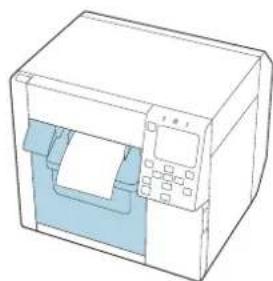
1 Open the front cover.
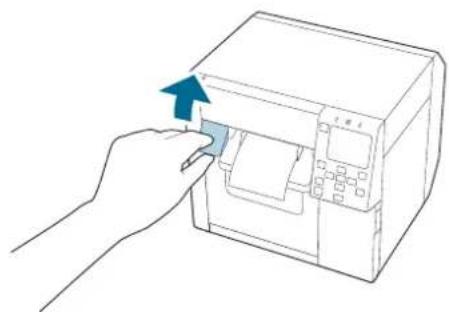
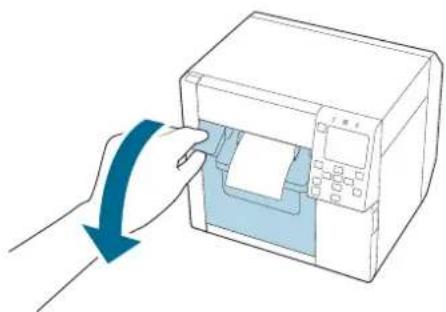
2 Remove the jammed paper.
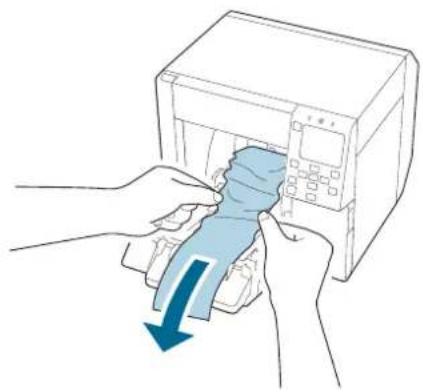

3 Pull out the leading edge of the roll paper, and then close the front cover.
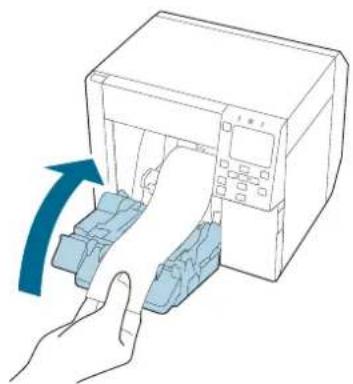
Troubleshooting

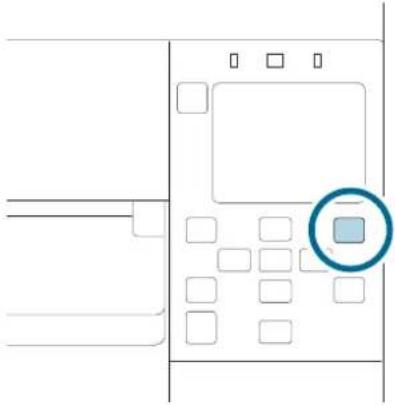
Press the (Pause) button.
Check that the printer is ready for printing by checking the home screen.
If the problem of paper jam cannot be resolved even after following the steps above, refer to the CW-C4000 Series Technical Reference Guide.
| Note | After removing jammed paper, make sure that there is no labels or adhesive left inside the printer. If you use the printer without removing them, it leads to frequent paper jams, or may cause poor print quality.If paper jam occurs frequently, clean the inside of the printer."Maintenance" on page 55 |
Troubleshooting
Fanfold Paper is Jammed
1 Open the front cover.
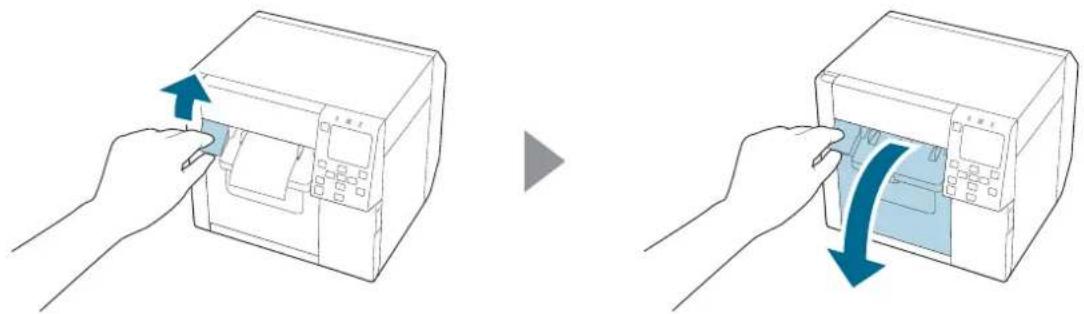
2 Cut out the jammed paper.

3 Open the rear cover and then remove the jammed paper.
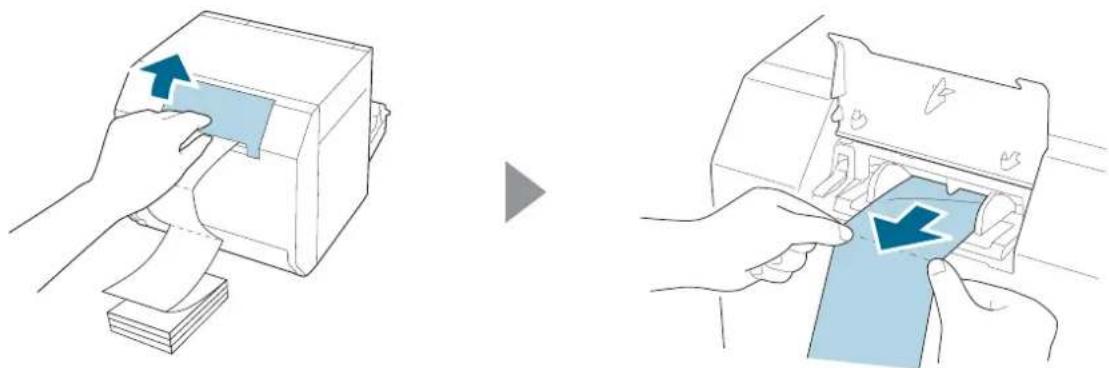
4 Close the rear cover.
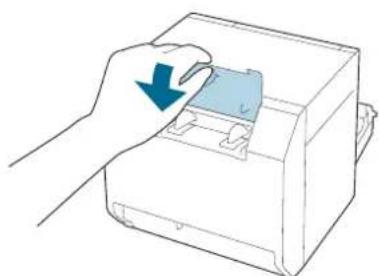
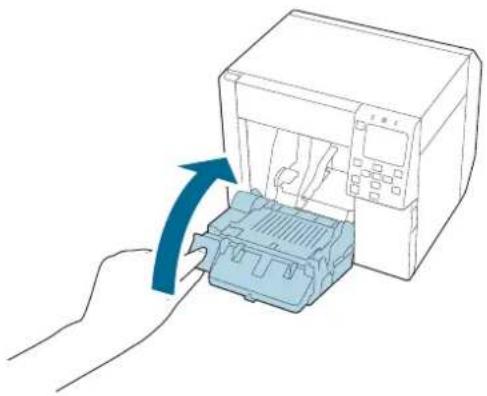
Troubleshooting

Close the front cover.

Press the (Pause) button.
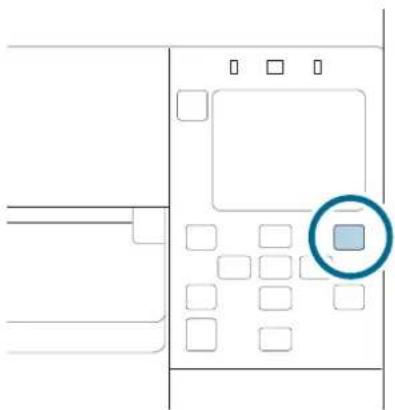
If the problem of paper jam cannot be resolved even after following the steps above, refer to the CW-C4000 Series Technical Reference Guide.
| Note | After removing jammed paper, make sure that there is no labels or adhesive left inside the printer. If you use the printer without removing them, it leads to frequent paper jams, or may cause poor print quality.If paper jam occurs frequently, clean the inside of the printer."Maintenance" on page 55 |
Specifications
This chapter describes the specifications of the printer.
Product Specifications
| Item Specifications | |||
| Printing method Serial inkjet, dot matrix method | Four-color printing | ||
| Paper feed method Forward and reverse friction feed | |||
| Cutting type of the auto cutter Full cut (cuts paper completely) | |||
| Print resolution 300 × 600 dpi | 600 × 600 dpi600 × 1200 dpi1200 × 1200 dpi | ||
| Print speed Print quality setting:Max Speed300 × 600 dpi(width × height) | Printing width:25.4 mm | 124 mm/s | |
| Printing width:101.6 mm | 100 mm/s | ||
| Printing width:25.4 mm | 111 mm/s | ||
| Printing width:101.6 mm | 70 mm/s | ||
| Printing width:25.4 mm | 63 mm/s | ||
| Printing width:101.6 mm | 48 mm/s | ||
| Printing width:25.4 mm | 27 mm/s | ||
| Printing width:101.6 mm | 18 mm/s | ||
| Printing width:25.4 mm | 11 mm/s | ||
| Printing width:101.6 mm | 8 mm/s | ||
| Interface Wired LAN 1000BASE-T/100BASE-TX/10BASE-T | |||
| Wireless LAN Available by connecting the optional Wireless LAN Unit. | |||
| USB USB2.0 High-Speed | |||
Specifications
| Item Specifications | |
| Weight Approx. 13 kg |
Specifications
Electrical Specifications
| Item Specifications | ||
| Power supply Dedicated AC adapter (AC ADAPTER, K1, Model number: M248B) | ||
| Rated voltage 42 V DC | ||
| Rated current 1.38 A | ||
| Power consumption | Operating* | Approx. 28.2 W on average |
| Standby Approx. 2.6 W on average | ||
| Power off Approx. 0.13 W on average | ||
*Based on Epson evaluation conditions
Specifications
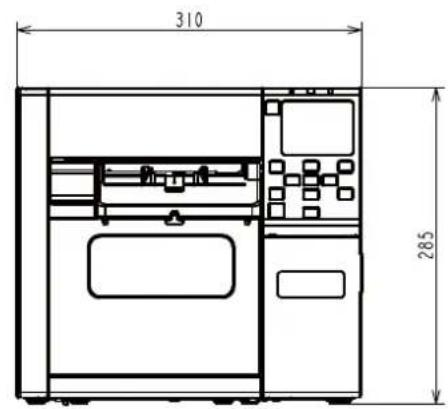
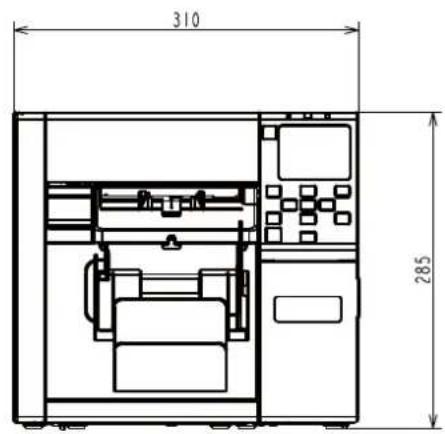
Overall Dimensions
| Item Specifications | |
| Height 285 mm | |
| Width 310 mm | |
| Depth 283 mm |
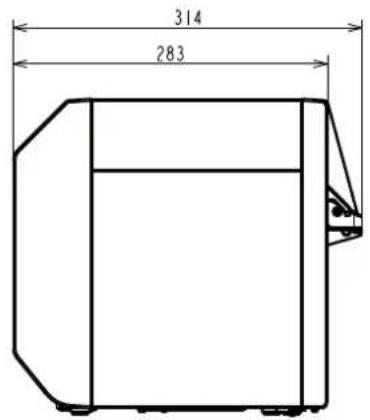
Unit: mm
With OT-PT40 Installed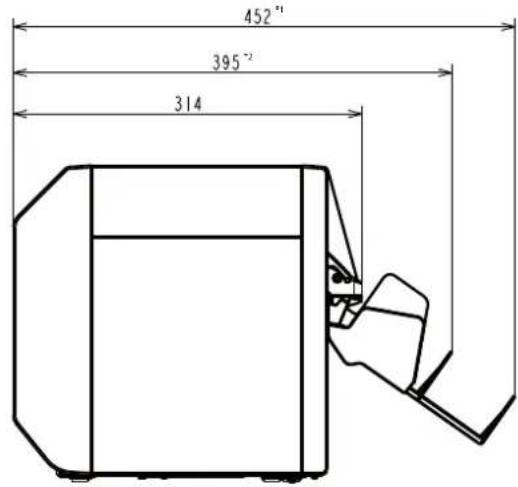
Unit: mm
*1: When paper ejection tray is extended *2: When paper ejection tray is retracted
Specifications
Environmental Specifications
| Temperature /humidity | Printing 5 to 35°C, 20 to 80%RH without condensation (the blue-colored range in the graph) 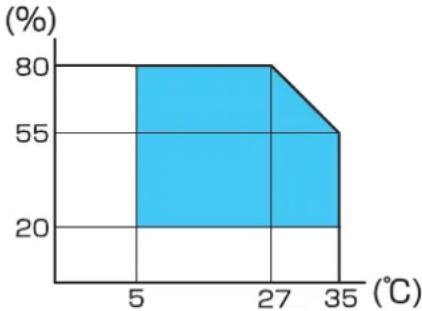 | ||
| Barcode printing 15 to 35°C, 20 to 85% RH without condensation | |||
| Storage When packed (Ink not charged) | -20 to 60°C, 5 to 85% RH without condensation (When -20°C or 60°C, within 120 hours) | ||
| With ink charged | Gloss black ink | -15 to 40°C (Within 6 months at 0 to 25°C) (Within 1 month at 40°C) | |
| Matte black ink | -10 to 40°C (Within 6 months at 0 to 25°C) (Within 1 month at 40°C) | ||
| Elevation 0 to 3000 m | |||
| Noise Approx. 58 dB | Based on Epson evaluation conditions. | ||
Specifications
Paper Specifications
The following types of paper can be used with the printer.
| Paper Type When using Matte Ink When using Gloss Ink | ||
| Plain paper | √ | - |
| Matte paper | √ | √ |
| Texture Paper | √ | - |
| Synthetic | √ | √ |
| Wristband paper | √ | - |
| Glossy paper - | √ | |
| Glossy Film - | √ | |
| High Glossy Paper - | √ |
Specifications
Ink Cartridge
| Model number | CW-C4000u SJIC41P-BK, SJIC41P-MK, SJIC41P-C, SJIC41P-M, SJIC41P-Y |
| CW-C4000e SJIC42P-BK, SJIC42P-MK, SJIC42P-C, SJIC42P-M, SJIC42P-Y | |
| CW-C4010 SJIC42P-BK, SJIC42P-MK, SJIC42P-C, SJIC42P-M, SJIC42P-Y | |
| CW-C4020 SJIC43P-BK, SJIC43P-MK, SJIC43P-C, SJIC43P-M, SJIC43P-Y | |
| CW-C4030 SJIC44P-BK, SJIC44P-MK, SJIC44P-C, SJIC44P-M, SJIC44P-Y | |
| CW-C4040 SJIC45P-BK, SJIC45P-MK, SJIC45P-C, SJIC45P-M, SJIC45P-Y | |
| CW-C4050 SJIC46P-BK, SJIC46P-MK, SJIC46P-C, SJIC46P-M, SJIC46P-Y | |
| Type 4 individual color cartridges | |
| Ink colors Black (gloss black, matte black), cyan, magenta, yellow | |
| Ink type Pigmented ink | |
| Expiration date | |
| Storage temperature | Transporting (without unpacking) |
| Storage (without unpacking) | |
| Installed -20 to 40°C (within 1 month when 40°C) | |
Specifications
Maintenance Box
| Model number SJMB4000 | ||
| Type Maintenance box with integrated waste ink absorbing material | ||
| Storage temperature | Transporting (without unpacking) | -20 to 60°C (within 5 days when 60°C) |
| Storage (without unpacking) | -20 to 40°C (within 1 month when 40°C) | |
| Installed -20 to 40°C (within 1 month when 40°C) | ||
Appendix
Consumables and Options
Consumables and options for this product are available. They can be purchased from sales representatives.
Visit the URL below for more details.
https://www.epson-biz.com/
Ink Cartridge
Four ink cartridge colors are used. Black ink can be selected from gloss black and matte black.*
For the ink cartridges that can be used with this product, refer to “Ink Cartridge” on page 80.
* Some models of the printer cannot use matte black ink.
Genuine Ink Cartridges Recommended
For the best performance of the printer, it is recommended to use genuine Epson ink cartridges. Use of non-genuine Epson ink cartridges can adversely affect the printer and print quality and prevent the printer from realizing its maximum performance. Epson cannot guarantee the quality and reliability of non-genuine Epson products. Repairs for any damage or breakdown of this product due to the use of non-genuine Epson products will not be free of charge even if the warranty period is still valid. Color adjustment of the product is based on the use of genuine Epson ink cartridges. Use of non-genuine ink cartridges may result in reduced print quality. Epson recommends the use of genuine Epson ink cartridges.
Disposal of Ink Cartridges
Dispose the ink cartridges properly following the law or regulations of your country and area.
Maintenance Box
The maintenance box is a box used to collect waste ink. The maintenance box available for this product is:
Model number: SJMB4000
Genuine Maintenance Box Recommended
For the best performance of the printer, it is recommended to use a genuine Epson maintenance box. Use of a non-genuine Epson maintenance box can adversely affect the printer and prevent the printer from realizing its maximum performance. Repairs for any damage or breakdown of this product due to the use of non-genuine Epson products will not be free of charge even if the warranty period is still valid. Epson cannot guarantee the quality and reliability of non-genuine Epson products.
Disposal of Maintenance Box
Dispose the ink cartridges properly following the law or regulations of your country and area.
Appendix
OT-PT40
OT-PT40 is a paper ejection tray that allows you to temporarily collect printed labels.
OT-PT40 can hold paper of the following sizes.
Maximum paper size: 105 x 148 mm (width x length)
Minimum paper size: 76 x 54 mm (width x length)
| Note | In the case of roll paper, the paper is curled so if multiple labels or sheets are printed and ejected, they may overflow the tray.Depending on the printer model, OT-PT40 comes with the printer. |
Attach the tray by following the steps below.
1. Attach the tray by hooking it onto the hooks on the underside of the paper ejection guides.

2. Pull the lever at the bottom right of the OT-PT40 to release the lock.

Appendix
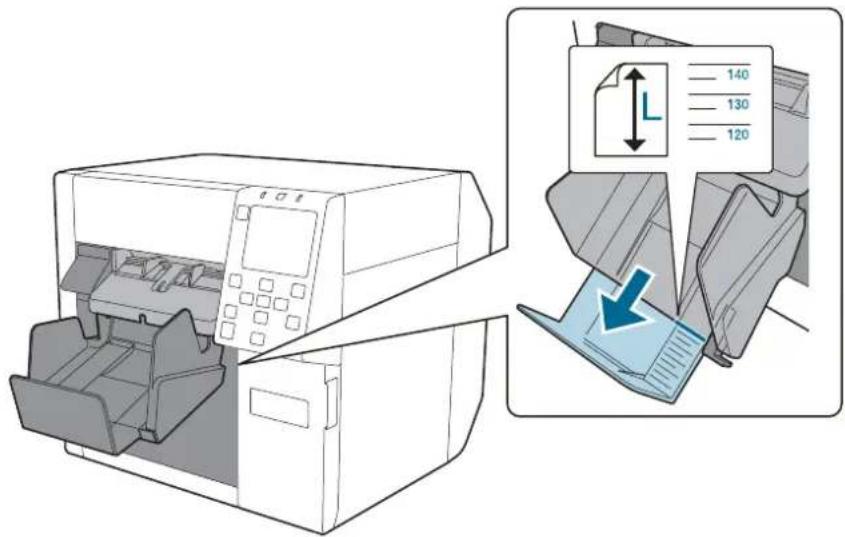
3. Extend the tray until the paper length indication matches the length of your paper.
Extend the tray until the paper length indication matches the length of your paper.
Appendix
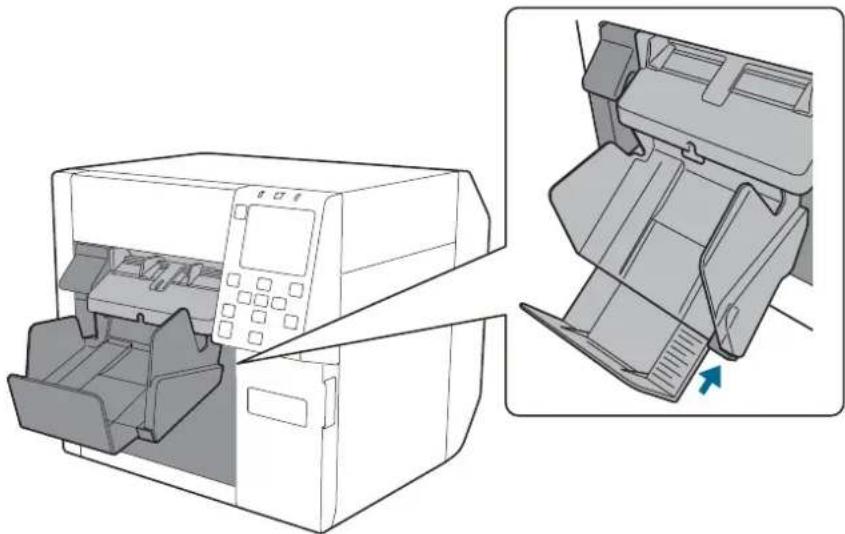
Push in lever at the bottom right of the OT-PT40 to lock it in place.
Appendix
OT-WA34
OT-WA34 is an attachment that enables the printer to print on wristbands. Attach this to the printer for printing on wristbands.
| Caution | Attach OT-WA34 only for printing on wristband (WB-L1/M1/S1). It is not necessary for printing on any other type of paper or label.Be careful not to hurt yourself when attaching or removing OT-WA34 to/from the printer.Read the instruction manual included with the wristband to use it safely and correctly. |
Attaching OT-WA34
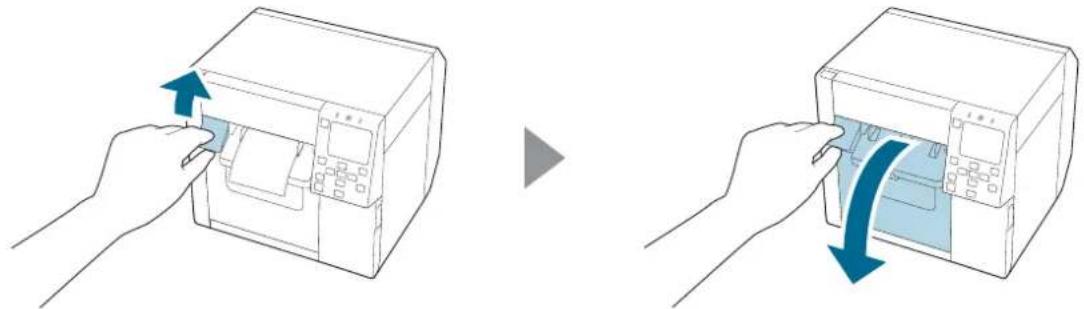
1. Open the front cover.
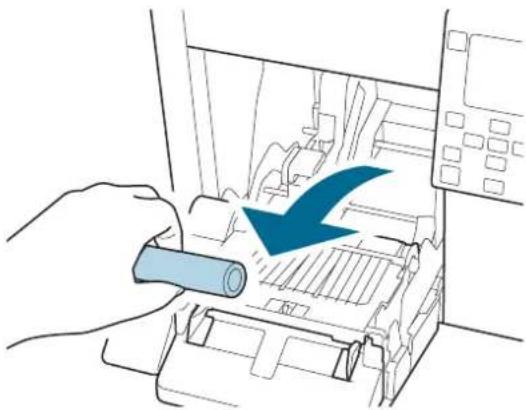
2. Remove roll paper or paper core from the printer.
3. Attach the OT-WA34 by inserting it into the grooves inside the front cover.
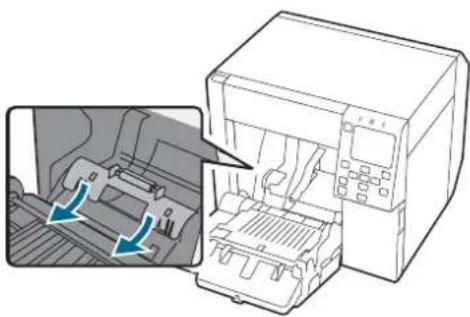
Appendix
4.
Close the front cover.
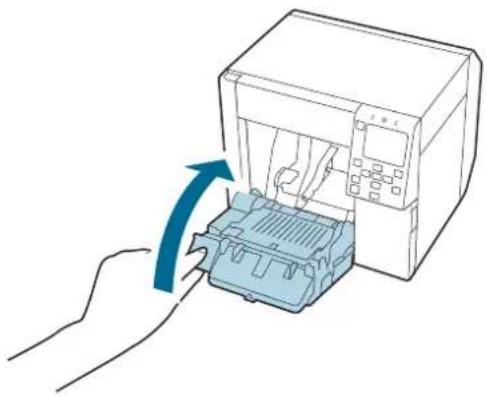
Removing OT-WA34
1.
Open the front cover.
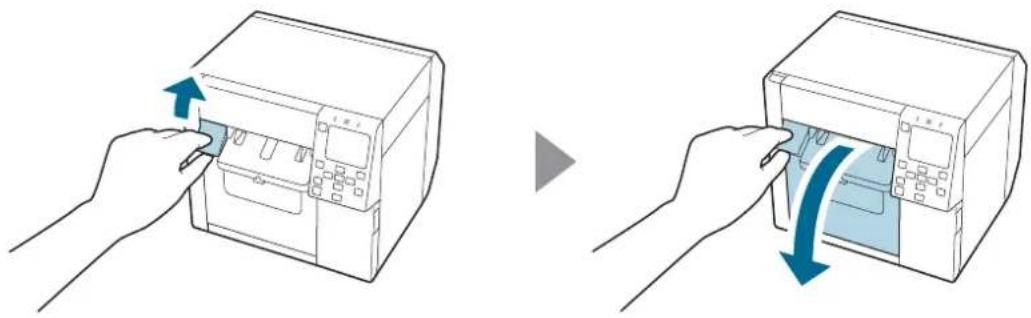
2.
Remove the OT-WA34.
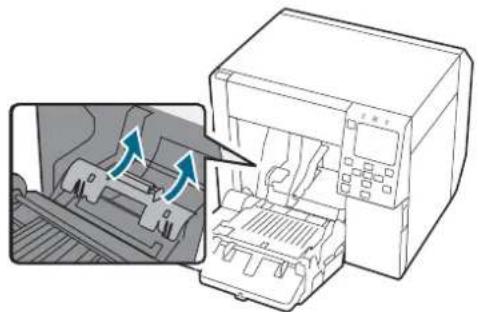
Appendix

Close the front cover.
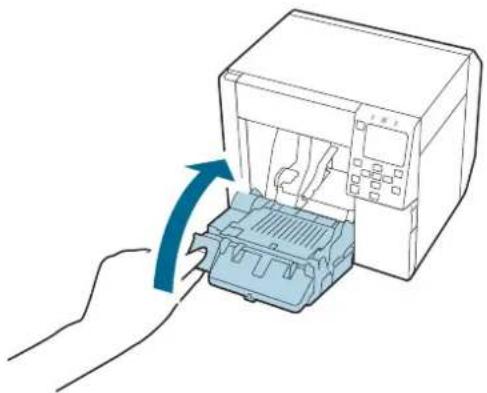
Appendix
Restriction of Use
When this product is used for applications requiring high reliability/safety such as transportation devices related to aviation, rail, marine, automotive etc.; disaster prevention devices; various safety devices etc.; or functional/precision devices etc., you should use this product only after giving consideration to including fail-safes and redundancies into your design to maintain safety and total system reliability.
Appendix
Notes
(1) All rights reserved. No part of this publication may be reproduced, stored in a retrieval system, or transmitted in any form or by any means, electronic, mechanical, photocopying, recording, or otherwise, without the prior written permission of Seiko Epson Corporation. (2) The content of this manual is subject to change without notice. (3) While every precaution has been taken in the preparation of this manual, Seiko Epson Corporation assumes no responsibility for errors or omissions. (4) Neither is any liability assumed for damages resulting from the use of the information contained herein. (5) Neither Seiko Epson Corporation nor its affiliates shall be liable to the purchaser of this product or third parties for damages, losses, costs, or expenses incurred by purchaser or third parties as a result of: accident, misuse, or abuse of this product or unauthorized modifications, repairs, or alterations to this product, or (excluding the U.S.) failure to strictly comply with Seiko Epson Corporation's operating and maintenance instructions. (6) Seiko Epson Corporation shall not be liable for any damages or problems arising from the use of any options or any consumable products other than those designated as Genuine Epson Products or Epson Approved Products by Seiko Epson Corporation.
Trademarks
Microsoft®, Windows®, Windows Vista®, and Windows Server® are registered trademarks of Microsoft Corporation in the United States and/or other countries.

- BASIC OPERATION
- MAINTENANCE
- TROUBLESHOOTING
- CONTENTS
- SPECIFICATIONS
- APPENDIX
- BEFORE USE
- MANUALS FOR THIS PRODUCT
- DOWNLOADING THE LATEST VERSION
- SYMBOLS USED IN THIS GUIDE
- SYMBOLS FOR SAFETY
- ABOUT MODELS OF THIS PRODUCT
- GLOSS BLACK INK/MATTE BLACK INK
- SOFTWARE INTRODUCTION
- PRODUCT AND DRIVER VERSIONS
- HOW TO CHECK THE PRODUCT VERSION
- HOW TO CHECK THE PRINTER DRIVER VERSION
- SCREENS IN THIS MANUAL
- SAFETY PRECAUTIONS
- CAUTIONS ON INSTALLATION
- WARNING
- CAUTION
- CAUTIONS ON HANDLING
- CAUTIONS ON POWER SUPPLY
- CAUTIONS ON INK CARTRIDGES
- CAUTIONS ON THE MAINTENANCE BOX
- CAUTION LABEL
- SUPPORTED PAPER
- PAPER TYPES
- PAPER THAT CANNOT BE USED
- PART NAMES AND FUNCTIONS
- FRONT
- INSIDE
- REAR
- CONNECTORS
- OPERATION PANEL
- TURNING ON OR OFF
- TURNING THE POWER ON
- TURNING THE POWER OFF
- CHECKING THE PRINTER STATUS
- CHECKING THE PAPER INFORMATION
- CHECKING THE STATUS OF CONSUMABLES
- PRINTING NOZZLE CHECK PATTERNS
- USING THE OPERATION PANEL
- USING THE PRINTER DRIVER
- USING THE WEBCONFIG
- PRINTING STATUS SHEET
- CHECKING NETWORK CONNECTION AND SETTINGS
- REPLACING THE INK CARTRIDGES
- CHECKING AMOUNT OF INK REMAINING
- HOW TO REPLACE THE INK CARTRIDGES
- OPEN THE INK CARTRIDGE COVER
- REPLACING THE MAINTENANCE BOX
- CHECKING THE AMOUNT OF EMPTY SPACE IN THE MAINTENANCE BOX
- HOW TO REPLACE THE MAINTENANCE BOX
- INSERT THE NEW MAINTENANCE BOX ALL THE WAY IN
- CLOSE THE MAINTENANCE BOX COVER
- PRINTER DRIVER SETTINGS
- MEDIA DEFINITION
- MEDIA NAME
- WIDTH
- WHEN MEDIA FORM IS OTHER THAN CONTINUOUS PAPER OR WRISTBAND PAPER
- WHEN MEDIA FORM IS CONTINUOUS PAPER OR WRISTBAND PAPER
- LENGTH
- GAP BETWEEN LABELS
- WHEN MEDIA FORM IS DIE-CUT LABEL
- WHEN MEDIA FORM IS OTHER THAN DIE-CUT LABEL
- MEDIA FORM
- MEDIA SAVING
- MEDIA COATING TYPE
- PRINT QUALITY
- WHEN MEDIA COATING TYPE IS PLAIN PAPER
- WHEN MEDIA COATING TYPE IS MATTE PAPER, SYNTHETIC, OR TEXTURE PAPER
- WHEN MEDIA COATING TYPE IS WRISTBAND PAPER
- WHEN MEDIA COATING TYPE IS GLOSSY PAPER, GLOSSY FILM, OR HIGH GLOSSY PAPER
- COLOR CORRECTION
- SPOT COLOR SETTING
- SETTINGS FOR PAPER HANDLING AFTER PRINT
- NOTIFICATION
- PAUSE
- MEDIA DETECTION
- MEDIA SOURCE
- LOADING AND REPLACING PAPER
- IMPORTANT
- LOADING ROLL PAPER
- LOADING FANFOLD PAPER
- ADJUSTING THE SHUTTERS
- HOW TO REMOVE PAPER
- CLEANING THE EXTERIOR
- CLEANING THE PLATEN
- CLEANING THE AUTO CUTTER
- CLEANING THE PRINT HEAD
- PROBLEMS WITH PRINT QUALITY
- PRINTING FROM A COMPUTER IS IMPOSSIBLE OR BECOMES SUDDENLY IMPOSSIBLE
- CHECKING WHETHER THE PRINTER DRIVER IS INSTALLED
- THE PRINTER DOES NOT TURN ON
- PRINT JOB IS CANCELED ON PC BUT "PRINTING" MESSAGE ON PRINTER DOES NOT DISAPPEAR
- ROLL PAPER IS JAMMED
- OPEN THE FRONT COVER
- REMOVE THE JAMMED PAPER
- PULL OUT THE LEADING EDGE OF THE ROLL PAPER, AND THEN CLOSE THE FRONT COVER
- FANFOLD PAPER IS JAMMED
- CUT OUT THE JAMMED PAPER
- OPEN THE REAR COVER AND THEN REMOVE THE JAMMED PAPER
- CLOSE THE REAR COVER
- OVERALL DIMENSIONS
- ENVIRONMENTAL SPECIFICATIONS
- PAPER SPECIFICATIONS
- CONSUMABLES AND OPTIONS
- INK CARTRIDGE
- GENUINE INK CARTRIDGES RECOMMENDED
- DISPOSAL OF INK CARTRIDGES
- MAINTENANCE BOX
- GENUINE MAINTENANCE BOX RECOMMENDED
- DISPOSAL OF MAINTENANCE BOX
- OT-PT
- EXTEND THE TRAY UNTIL THE PAPER LENGTH INDICATION MATCHES THE LENGTH OF YOUR PAPER
- OT-WA
- ATTACHING OT-WA
- REMOVE ROLL PAPER OR PAPER CORE FROM THE PRINTER
- ATTACH THE OT-WA34 BY INSERTING IT INTO THE GROOVES INSIDE THE FRONT COVER
- REMOVING OT-WA
- RESTRICTION OF USE
- NOTES
- TRADEMARKS
Brand : EPSON
Model : CW-C4000e
Category : Label printer