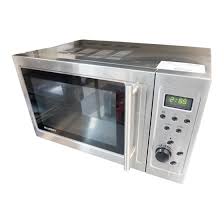
BMG900ESL23 - Microwaves BLUESKY - Free user manual and instructions
Find the device manual for free BMG900ESL23 BLUESKY in PDF.
User questions about BMG900ESL23 BLUESKY
0 question about this device. Answer the ones you know or ask your own.
Ask a new question about this device
Download the instructions for your Microwaves in PDF format for free! Find your manual BMG900ESL23 - BLUESKY and take your electronic device back in hand. On this page are published all the documents necessary for the use of your device. BMG900ESL23 by BLUESKY.
USER MANUAL BMG900ESL23 BLUESKY
COMMENT CHOISIR LE RECIPIENT ADEQUAT?
DESCRIPTION- 5
PANNEAU DE COMMANDE 6
AFFICHEUR DIGITAL 7
COMMENT CHOISIR LE RECIPIENT ADEQUAT?
COMMENT CHOISIR LE RECIPIENT ADEQUAT?
28
DESCRIPTION
28
PANNEAU DE COMMANDE
29
AFFICHEUR DIGITAL 30
Never try to use the device with the door open. You would risk exposing yourselves to microwave energy. Never disregard the safety instructions.
Never place an object between the front panel and the door and never allow fat or cleaning products to accumulate on the sealing joints.
Never use the oven if it is damaged. Be particularly careful that the door closes correctly and that the following elements are not damaged
z. Door (distorted),
aa. Hinges and handles (broken or loose),
bb. Door joints and sealing joints.
Only qualified personnel are authorised to make adjustments or carry out maintenance on this device.
TABLE OF CONTENTS
MEASURES INTENDED TO AVOID SERIOUS EXPOSURE TO MICROWAVE ENERGY -57
TECHNICAL SPECIFICATIONS 58
BEFORE CONTACTING THE AFTER-SALES SERVICE 58
INSTALLATION 58
INSTRUCTIONS FOR CONNECTING TO EARTH 59
IMPORTANT SECURITY INSTRUCTIONS 59
PRINCIPLES OF MICROWAVE COOKING 60
HOW TO CHOOSE THE ADEQUATE RECIPIENT? 61
DESCRIPTION 61
CONTROL PANEL 62
DIGITAL DISPLAY 63
ADJUSTMENT AND PROGRAMMING OF THE OVEN 63
CLEANING AND MAINTENANCE 67
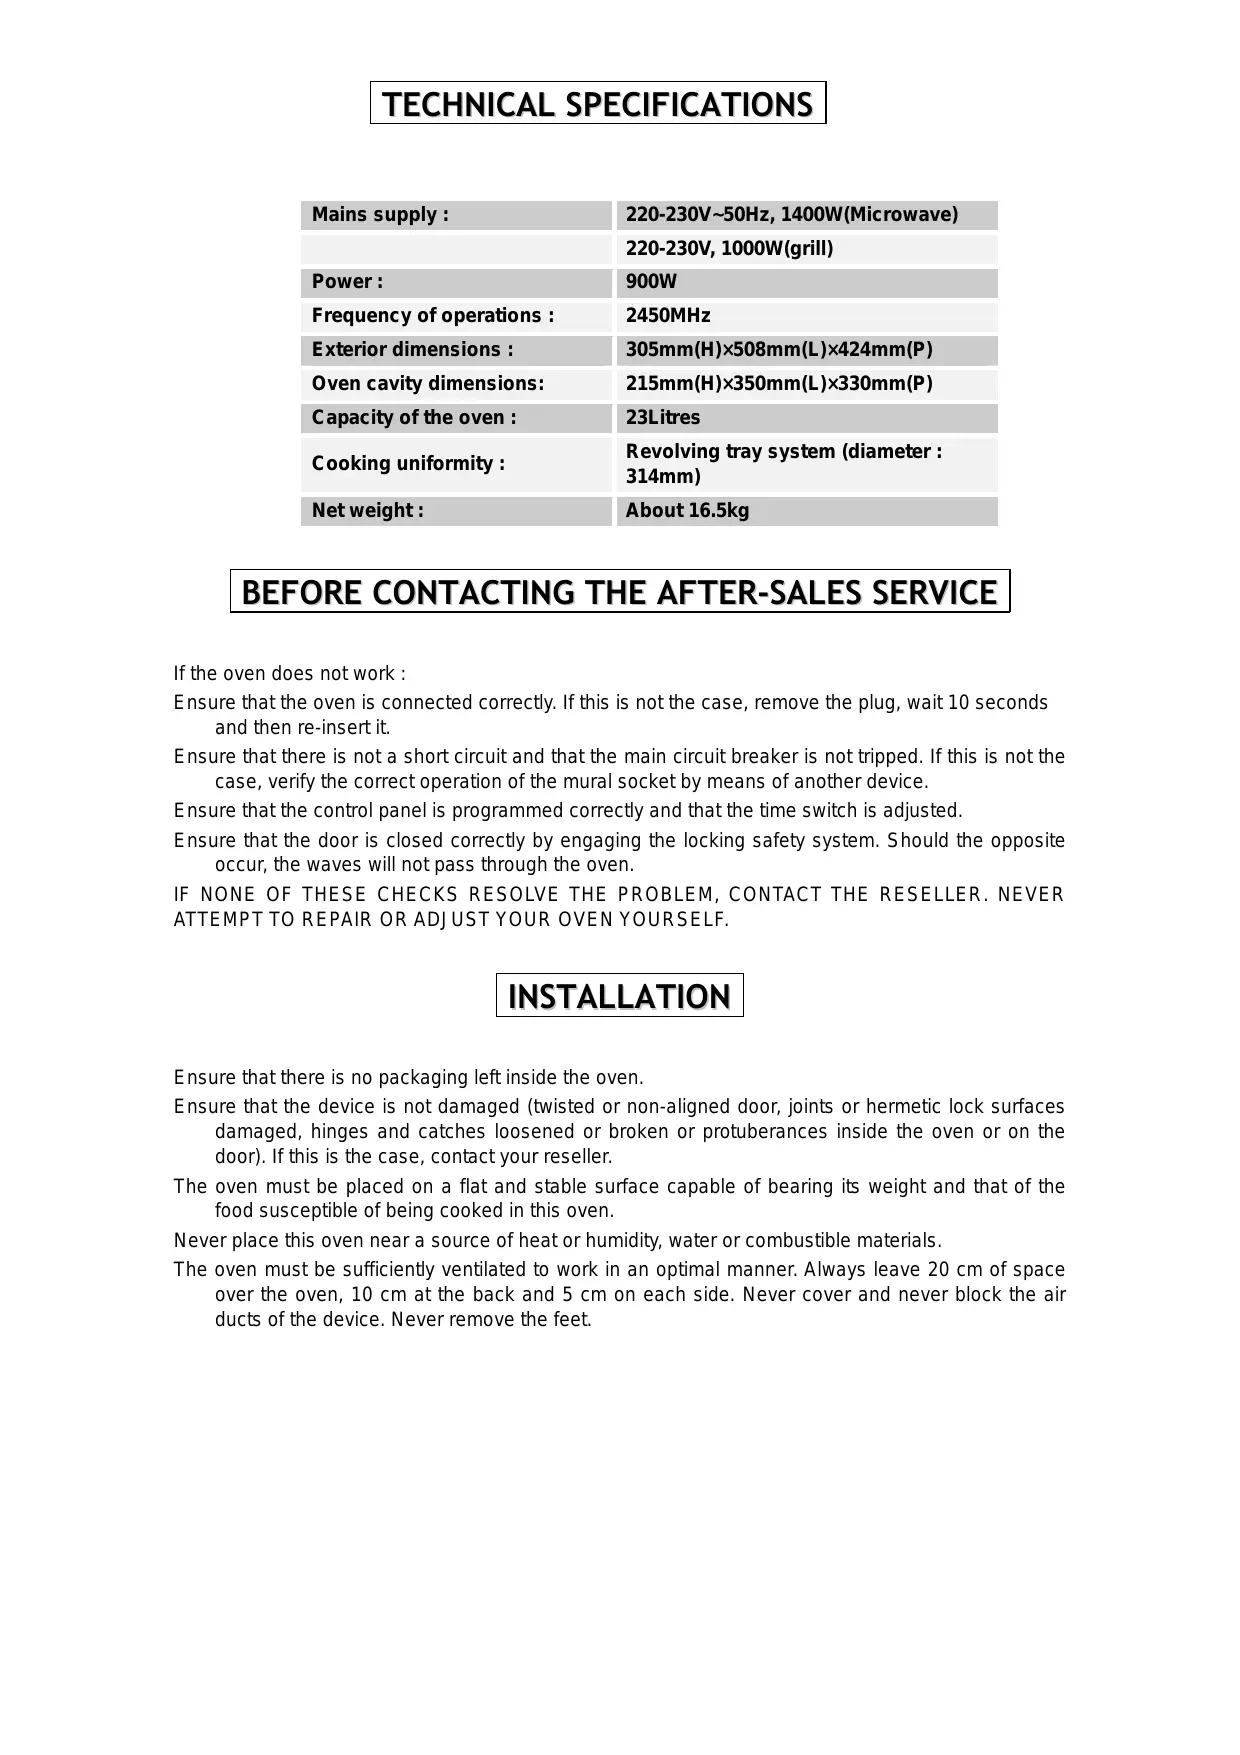
TECHNICAL SPECIFICATIONS
| Mains supply : | 220-230V~50Hz, 1400W(Microwave) |
| 220-230V, 1000W(grill) | |
| Power : | 900W |
| Frequency of operations : | 2450MHz |
| Exterior dimensions : | 305mm(H)×508mm(L)×424mm(P) |
| Oven cavity dimensions: | 215mm(H)×350mm(L)×330mm(P) |
| Capacity of the oven : | 23Litres |
| Cooking uniformity : | Revolving tray system (diameter : 314mm) |
| Net weight : | About 16.5kg |
BEFORE CONTACTING THE AFTER-SALES SERVICE
If the oven does not work :
Ensure that the oven is connected correctly. If this is not the case, remove the plug, wait 10 seconds and then re-insert it.
Ensure that there is not a short circuit and that the main circuit breaker is not tripped. If this is not the case, verify the correct operation of the mural socket by means of another device.
Ensure that the control panel is programmed correctly and that the time switch is adjusted.
Ensure that the door is closed correctly by engaging the locking safety system. Should the opposite occur, the waves will not pass through the oven.
IF NONE OF THESE CHECKS RESOLVE THE PROBLEM, CONTACT THE RESELLER. NEVER ATTEMPT TO REPAIR OR ADJUST YOUR OVEN YOURSELF.
INSTALLATION
Ensure that there is no packaging left inside the oven.
Ensure that the device is not damaged (twisted or non-aligned door, joints or hermetic lock surfaces damaged, hinges and catches loosened or broken or protuberances inside the oven or on the door). If this is the case, contact your reseller.
The oven must be placed on a flat and stable surface capable of bearing its weight and that of the food susceptible of being cooked in this oven.
Never place this oven near a source of heat or humidity, water or combustible materials.
The oven must be sufficiently ventilated to work in an optimal manner. Always leave 20~cm of space over the oven, 10~cm at the back and 5~cm on each side. Never cover and never block the air ducts of the device. Never remove the feet.
Never use the oven without the tray, its support and the drive axle being correctly installed.
Ensure that the supply lead is not damaged and that it does not wander below the oven or onto any other hot or sharp surface.
The plug must always remain accessible to be able to be disconnected easily in the case of an emergency.
Never use this oven outside.
INSTRUCTIONS FOR CONNECTING TO EARTH
This device must absolutely be connected to the earth. It is equipped with a lead having an earth wire as well as an earth pin. This pin must absolutely be connected to a correctly installed plug and linked with the earth. In case of a short circuit, connection to earth reduces the risks of electric shock by providing an exit line for the electric current.
ATTENTION : An inadequate usage of the earth can present an important risk of electric shock.
Remark
If you have questions with regard to the connection to earth or the electric instructions, consult a qualified electrician or a person from the technical service.
The manufacturer and the reseller decline any responsibility in the case of damage caused to the device or injury to persons due to non-compliance with the procedures of electric installation of the device.
IMPORTANT SECURITY INSTRUCTIONS
Certain basic safety measures have necessarily to be followed during the use of an electric device :
ATTENTION in order to avoid any risk of burns, electric shock, fire, injury to persons or from excessive exposure to microwave energy :
Read these instructions attentively before the first usage of your device.
Only use this device for the utilisation described in these directions for use. Never use chemicals or corrosive sprays in this device. This oven is specifically intended for the re-heating and for the cooking of food. It is not intended for industrial or experimental usage.
Never use this device when empty.
Never use the device when the plug or the supply lead is damaged, when it does not work normally or when it underwent damage or that it has fallen. In every case, bring it back to your after-sales service.
As for all devices, it requires more consequential surveillance when children use it.
To reduce the risk of fire within the cavity of the oven :
cc. When you warm food contained in plastic or paper, control regularly to limit the risk of fire.
dd. Remove the metal ties from the paper or plastic bags before placing them in the oven.
ee. If you observe smoke, switch off and disconnect the device at once and leave the door of the oven closed to suffocate the flames.
ff. Never use the device for storage purposes. Never leave paper, kitchen utensils or food inside the oven when it is not in use.
Never use hermetic recipients to warm liquids or others food, they risk exploding at any time.
Warming liquids by microwave can provoke delayed eruptive boiling. Therefore, be particularly attentive during the manipulation of the recipients.
Never deep-fry food in the oven. The oil can damage your device or your utensils and even cause burns.
Never warm complete eggs in the oven, they risk exploding.
Prick food having a thick skin such as potatoes, marrows, apples or sweet chestnuts before putting them in the oven.
After re-heating small jars or feeding bottles for babies, shake to distribute the heat and check the temperature to avoid any burns.
The cooking bowls can become very warm by the transfer of heat. Use insulated gloves to handle them.
Ensure that the bowls being used are suitable for the microwave oven.
ATTENTION : never change the power supply lead, carry out maintenance, repairs or operations involving the dismantling of a cover constituting protection against microwave energy. These manipulations can turn out to be very hazardous and must absolutely be carried out by a qualified person to avoid any danger.
PRINCIPLES OF MICROWAVE COOKING
The arrangement of food is very important. Always place the thickest pieces on the outside of the tray.
Check the cooking time. Adjust the recommended minimum time and prolong the cooking if need be. Food that is too cooked can smoke and burst into flames.
Cover food during cooking to avoid spatters and to obtain uniform cooking.
Turn the food over once during cooking to accelerate the cooking of food such as chicken and hamburgers. Thicker food such as roast beef must be turned more often.
Food, such as meatballs, must be turned and moved from the centre towards the outside of the tray half way through cooking.
HOW TO CHOOSE THE ADEQUATE RECIPIENT?
The ideal recipient is composed of a material that is permeable to microwaves. It therefore allows waves to pass through it and warm the food.
Microwaves can not pass through metal. Metal bowls or dishes having metallic finishes must, therefore, not be used.
Never use products composed of recycled paper. They can effectively contain small metal fragments susceptible of causing sparks and/or a fire.
Use, preferably, round or oval dishes to oblong or square dishes. The food placed in the corners is more exposed to over cooking.
The table below constitutes a general guide intended to help you choose the ideal recipient.
| RECIPIENT | MICROWAVE | GRILL | MIXED COOKING |
| Heatproof glass | Yes | Yes | Yes |
| Non heatproof glass | No | No | No |
| Heatproof ceramic | Yes | Yes | Yes |
| Plastic dish resistant to microwaves | Yes | No | No |
| Foodstuff paper | Yes | No | No |
| Metal container | No | Yes | No |
| Metal griddle of the grill | No | Yes | Yes |
| Aluminium foil and aluminium pastry boats | Yes | Yes | Yes |
DESCRIPTION
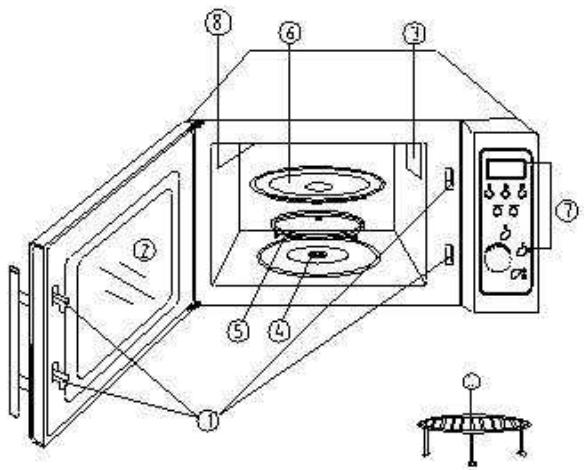
- The door locking system
- Door of the oven
- Ventilation opening
- Drive axle
- Revolving tray support
- Revolving tray
- Command panel
- Grill
- Grill support
Stop/cancel
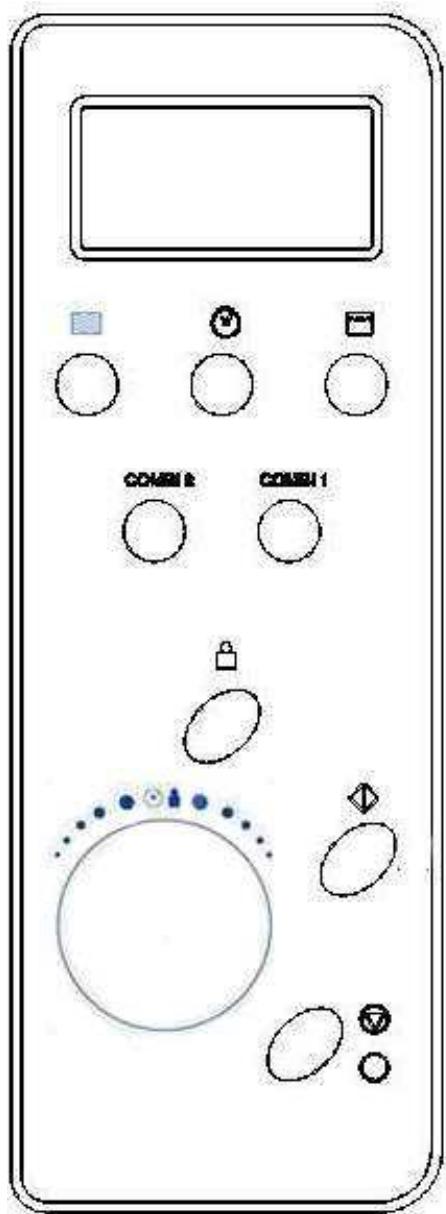
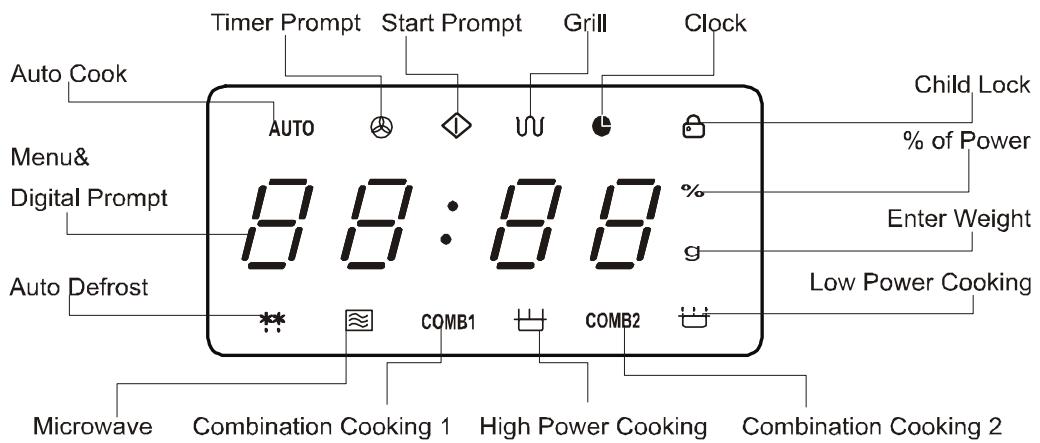
digital DISPLAY
Cooking time, power, programming indicator and time are displayed.

Power
Push this button to select the desired cooking power.

Grill
Press this button to program a grill cooking time of up to 60 minutes.
COMB1/COMB2
Cooking combining the microwave and the grill.

time/menu
Turn this control button to enter the time as well as to determine the duration of cooking.
Turn this button to select a menu of automatic cooking such as defrosting.

weight adj.
Having selected a menu of automatic cooking, use this button to specify the weight of food as well as the number of portions.

clock
Use this button to enter into the time adjustment mode. Confirm by pushing once more on this button.

Start
Press this button to start a cooking program.
Each pressure on this button increases the cooking time and starts the program at full power at once.


This button allows the cancelling of a program before adjusting the cooking.
One push allows the temporary cancellation of the cooking. Two pushes and you cancel it definitively.
This button also allows to activate the child lock.
DIGITAL DISPLAY
ADJUSTMENT AND PROGRAMMING OF THE OVEN
A sound signal will warn you of each pressure on the key.
ADJUSTMENT OF THE CLOCK
During the first start up of the oven, the screen will display "1:01". This clock operates in 2 times 12 hours. If you wish to verify the time during the operation of the oven, push the
... button. It will remain displayed during 5 seconds.
FOR EXAMPLE: If you wish to adjust the time of the oven to 8:30
Push the button
- Push the button
- Turn the button to adjust to 8 hours.
- Press once more on the button
- Turn the button to adjust to 30 min.
- Push the button a last time to confirm your adjustment.
COOKING WITH THE GRILL
It is not possible for you to program a cooking time longer than 60 minutes. Cooking with the grill is particularly effective for thin slices of meat, steaks, chops, and kebabs. This cooking is also perfectly suited for hot sandwiches or grilled dishes.
For example, if you wish to cook food under the grill during 12 minutes.
- Push the button
2.Push the button. - Turn the button until 12:00.
- Push the button to start cooking
MICROWAVE COOKING
To begin cooking in the microwave, just press the button a certain number of times to select the desired power. Then use the .n to adjust the desired cooking
time. It is not possible for you to program a cooking time longer than 60 minutes.
| POWER button | DISPLAY | COOKING POWER |
| Once | 100 | 100% |
| Twice | 80 | 80% |
| 3 times | 60 | 60% |
| 4 times | 40 | 40% |
| 5 times | 20 | 20% |
| 6 times - (adjustment of the timer) | 0 | 0 |
For example, if you wish to cook food during one minute at 60% of the microwave power.
Push the 0 Cton to stop the oven.
Push the tton on 3 occasions.
Turn the
Push the k on to start the cooking.
Cooking.
COMBINED COOKING 1 (COMB 1)
It is not possible for you to program a cooking time longer than 60 minutes.
This combined cooking mode corresponds to 30% of the cooking time in microwave mode,
70% of the cooking time in grill mode. This combination is perfectly suitable for fish, potatoes or grilled dishes.
FOR EXAMPLE : If you wish to cook food in combination 1 during 25 minutes.
Push the 0tton.
Push the COM1 button.
Turn the Aton to 25:00.
Push the on to start the cooking.
COMBINED COOKING 2 (COMB 2)
It is not possible for you to program a cooking time longer than 60 minutes.
This mode of combined cooking corresponds to 55% of the cooking time in microwave mode, 45% of the cooking time in grill mode. This combination is perfectly suitable for puddings, omelettes, baked potatoes and poultry.
FOR EXAMPLE : If you wish to cook food in combination 2 during 12 minutes.
Push the on.
Push the COM 2 button.
Turn the 12:00.
Push the on.
AUTOMATIC COOKING MENU
For food or the following cooking modes, it is not necessary to program the duration and the cooking power. It is sufficient to enter into the oven the type of food that you wish to cook as well as the weight of this food. In order to do this, turn the button to select a category of food / cooking mode. Then push the button to indicate the number of portions or the approximate weight of food that you wish to cook. The oven begins cooking once the button is engaged.

For example, to cook 400gr of fish :
Push the

O tton.
Turn the
menu.

on to select fish cooking, resumed under element 6 in the automatic cooking

ton to indicate a weight of 400g
Press 8 times on the
Push the

button to begin cooking.
| AUTOMATIC MENU | Push the ☐. Button, to indicate the weight or the number of portions. | |||||||||
| 1 | 2 | 3 | 4 | 5 | 6 | 7 | 8 | 9 | ||
| 1 | Coffee / soup | 1 cup | 1 soup | 2 soups | ||||||
| 2 | Rice | 80g | 100g | 120g | ||||||
| 3 | Spaghetti | 100g | 200g | 300g | ||||||
| 4 | Potato | 150g | 300g | 450g | 600g | |||||
| 5 | Re-heating | 70g | 140g | 210g | 280g | 320g | 350g | 380g | 420g | 450g |
| 6 | Fish | 50g | 100g | 150g | 200g | 250g | 300g | 350g | 400g | 450g |
| 7 | Chicken | 800g | 1000g | 1200g | 1300g | 1400g | 1500g | 1700g | 1800g | 2000g |
| 8 | Beef / Sheep | 300g | 500g | 800g | 1000g | 1200g | 1300g | 1800g | ||
| 9 | Kebab | 80g | 100g | 150g | 200g | 300g | 400g | 500g | 600g | 700g |
| 10 | Automatic defrosting | |||||||||
Do not, however, lose sight of the fact that the result of automatic cooking depends on factors such as the form and the size of the food, your personal preferences with regard to the cooking mode of some food or even the placing of the food inside the oven. If you are not satisfied with the result, adjust the cooking time according to your liking.
AUTOMATIC DEFROSTING
This oven allows the defrosting of meat, poultry, and seafood. The time and the defrosting power are adjusted automatically once the type of food and the weight is programmed. The range weight of frozen foods varies between 100gr and 4000gr.
FOR EXAMPLE: If you wish to defrost 600gr of shrimps.
Push the
Oitton.
Turn the
Button to select the mode (10th element, after the modes of automatic cooking) button again to determine the 500a.
Push the
tton to start defrosting.
FAST COOKING
The oven will work at full power (100%) for EXPRESS cooking.
For each pressure on the button, you obtain the following programming adjustments:
| DURATION | PUSHES ON THE START BUTTON |
| 0:30 | Once |
| 1:00 | Twice |
| 1:30 | Three times |
| … | … |
| 12:00 | 15 times |
For example, to program 2 minutes of cooking in this mode:
Push the
O button.
Push the
ton 4 times, the oven eely begin cooking at full
ADJUSTMENT OF THE TIME SWITCH
The time switch offers you a remit of time. The oven light, the revolving tray and the ventilation function but the microwaves are not present. This function allows you to precise the cooking.
For example; if you wish to adjust the time switch to 3 minutes.
Push the

button.
Push the

ton 6 times.
Turn the

button to 3:00.
Push the

utton.
CHILD SECURITY
This function allows the avoidance of the accidental operation of the oven by a child. The CHILD LOCK indicator will appear on the screen. The oven can not be operated when this function is activated.
To activate the safety, push and maintain
the button during 3 seconds. A sound signal indicates to you that the function is indeed activated and the indicator lights up.
To deactivate the safety, push and maintain
the button during 3 seconds until the indicator disappears.
SPECIAL FUNCTION
AUTOMATIC REMINDER
When the cooking or defrosting of food is finished, the oven will emit a triple sound signal every 2 minutes until the door of the oven is opened or that the button is pressed.
CLEANING AND MAINTENANCE
Switch off the oven and disconnect the supply lead before cleaning.
Ensure that the inside of the oven remains clean. When spatters adhere to the wall, wipe with a wet rag. If the oven is very dirty, you can use a non-corrosive detergent. Avoid using sprays or corrosive cleaners, they would risk staining, scratching or tarnishing the inside of your oven.
Use a wet rag to clean the outside of the oven. To avoid any damage to the functioning elements placed inside the oven, be particularly attentive not to allow any infiltrations of water through the aeration openings.
Clean the spatters inside and outside the oven pane by means of a wet rag.
Avoid the control panel getting wet. Clean with a soft and damp rag. During the cleaning of this control panel, leave the door of the oven open to avoid any accidental operation.
If vapour forms inside or outside the oven, clean by means of a soft rag. This can occur when the oven works in a very humid environment. This reaction is completely normal.
Remove occasionally the revolving tray to clean it. Use warm soapy water or put it in the dishwasher.
The tray support and the bottom of the oven must be cleaned regularly to avoid a troublesome noise. Only use a non-corrosive cleaner. The support can be cleaned with warm soapy water or in the dishwasher. Then ensure that it is replaced correctly.
To eliminate smells from your oven, mix a cup of water with the juice and skin of a lemon in a large bowl and heat it all up during 5 minutes in the microwave. Clean carefully and wipe with a soft rag.
If the oven lamp has to be replaced, please contact the reseller.