
AK-T70R32 - Air conditioner AKAI - Free user manual and instructions
Find the device manual for free AK-T70R32 AKAI in PDF.


| Product Type | Split Air Conditioner |
| Brand | AKAI |
| Model | AK-T70R32 |
| Cooling Capacity (BTU/h) | 7000 |
| Energy Efficiency Ratio (EER) | 2.8 |
| Power Supply (V/Hz) | 220-240 V / 50 Hz |
| Power Input (W) | 750 |
| Indoor Unit Dimensions (W x H x D) | 800 x 290 x 200 mm |
| Outdoor Unit Dimensions (W x H x D) | 700 x 550 x 250 mm |
| Indoor Unit Weight | 8.5 kg |
| Outdoor Unit Weight | 25 kg |
| Refrigerant Type | R32 |
| Operating Modes | Cool, Heat, Fan, Dry, Auto |
| Fan Speeds | 3 (Low, Medium, High) + Auto |
| Remote Control | Included |
| Timer | On/Off Timer (24 hours) |
| Air Filter | Washable mesh filter |
| Noise Level Indoor (dB/A) | 35-45 |
| Noise Level Outdoor (dB/A) | 50-56 |
| Pipe Connection Size (Liquid/Gas) | 1/4 inch / 3/8 inch |
| Maximum Pipe Length (m) | 15 |
| Installation Type | Wall-mounted split system |
| Self-Cleaning Function | Yes |
| Sleep Mode | Yes |
| CE Certification | Yes |
Frequently Asked Questions - AK-T70R32 AKAI
User questions about AK-T70R32 AKAI
0 question about this device. Answer the ones you know or ask your own.
Ask a new question about this device
Download the instructions for your Air conditioner in PDF format for free! Find your manual AK-T70R32 - AKAI and take your electronic device back in hand. On this page are published all the documents necessary for the use of your device. AK-T70R32 by AKAI.
USER MANUAL AK-T70R32 AKAI
This unit must be installed by a registered, licensed installer as required by Government regulations.

natural_image
Front view of a white air conditioner unit with 'AKAI' branding and digital display (no text beyond brand name)
natural_image
Exterior view of a white AKAI air conditioning unit with a circular fan grille (no text or symbols visible)
7.3kW Reverse Cycle Inverter Split System Air Conditioner
USER MANUAL
Model Number AK-T70R32
Contents
03 General Safety Instructions
08 Product Overview
11 Getting Started
14 Instructions
27 FAQs and Troubleshooting Guide
29 Other Useful Information
General Safety Instructions
IMPORTANT SAFETY INSTRUCTIONS
READ CAREFULLY AND KEEP FOR FUTURE REFERENCE
Read this manual thoroughly before getting the appliance installed, maintained or using it. The manual contains many important safety statements concerning use of this appliance. Always read and observe all safety statements. They reduce the risk of fire, electric shock and injury when correctly adhered to.
Keep the manual in a safe place for future reference, along with the completed warranty card and purchase receipt. If you sell or transfer ownership of this product, please pass these instructions on to the next owner.
Always follow basic safety precautions and accident prevention measures when using an electrical appliance, including the following:
Installation
- IMPORTANT! This unit comes with separate installation instructions for use by an appropriately qualified installer.
Do not try to install the air conditioner on your own; doing so will expose you to danger and void the warranty. - It is your responsibility to ensure the unit is installed by a qualified technician, who should check that it is earthed in accordance with national wiring regulations and install a thermomagnetic circuit breaker.
- Note the installer's details on page 33 of this manual for future reference.
- Please refer to the Installation Manual supplied with this appliance for safety instructions specific to the installation, service and maintenance of the indoor and outdoor units. These installation safety instructions include information about the refrigerant gas used in the appliance (R32) and important safety advice relating to the refrigerant.
Electrical safety
- Voltage: Make sure your electrical voltage and circuit frequency correspond to those indicated on the appliance rating plate.
- Power plug: Keep the power plug clean. To avoid the risk of electric shock or fire, insert the plug correctly and firmly into the socket. Check and ensure that the socket is suitable for the plug, otherwise have the socket changed. Do not alter the plug.
- No extension cord: Do not use the unit with an extension cord or adaptor.
- Power cord: Do not bend, tug or compress the power cord as this could damage it. A damaged power cord can cause electric shock or fire.
General Safety Instructions (Cont.)
- Damaged cord: If the supply cord is damaged, it must be replaced by the manufacturer, its service agent or similarly qualified persons in order to avoid a hazard. Contact our after sales support centre for advice.
- Protect from water: Do not expose the air conditioner to water. The electrical insulation could be damaged and cause electrocution. Do not touch the unit when barefoot or when parts of your body are wet or damp.
- Do not disconnect during use: Pulling out the plug to switch off the appliance when it is in operation could create a spark and cause a fire.
- Disconnect when not in use: Ensure that the indoor unit is switched off and disconnected from the power supply when it will remain inoperative for a long period and before cleaning or maintenance.
Grip the plug when disconnecting, do not pull the cord.
Usage conditions and restrictions
- Intended purpose: This appliance has been made for air conditioning domestic environments and must not be used for any other purpose, such as for drying clothes, cooling food etc. It is not intended for commercial, trade or industrial use. Only use the air conditioner as instructed in this manual.
- Alterations: Do not alter the characteristics of the appliance in any way.
- Common sense: These instructions are not intended to cover every possible condition and situation. As with any electrical household appliance, common sense and caution are therefore always recommended when installing, operating and maintaining the unit.
- Usage restriction: This appliance is not intended for use by persons (including children) with reduced physical, sensory or mental capabilities, or lack of experience and knowledge, unless they have been given supervision or instruction concerning use of the appliance by a person responsible for their safety.
- Children: Supervise children to ensure they do not play with the appliance. Cleaning and user maintenance shall not be made by children without supervision.
- Air filter: Always use the air conditioner with the air filter mounted. Using it without air filter could cause an excessive accumulation of dust or waste on the inner parts of the device with possible subsequent failures.
- Temperature selection: Selecting the most suitable temperature can prevent damage to the unit.
- Exposure to cold air flow: Never remain directly exposed to the flow of cold air for a long time, as direct and prolonged exposure to cold air from the air conditioner could be dangerous for your health. Take particular care in rooms where there are children, or old or sick people.
General Safety Instructions (Cont.)
- Air flow direction: The airflow direction should be properly adjusted. The flaps should be directed downwards in heating and upwards in cooling mode.
- Plants and animals: Do not direct the airflow onto plants or animals, as long and direct exposure to cold air from an air conditioner could adversely affect them.
- Do not block openings: Do not obstruct the air inlet or outlet of the indoor or outdoor unit. Obstructing openings reduces the operating efficiency of the air conditioner with possible consequent failures or damages.
- Keep clear: Do not climb onto or place any objects on top of the unit.
- Do not insert objects: Never insert a stick or similar object into the appliance. It could cause injury.
- Maximise efficiency: Do not leave windows or doors open for long when the air conditioner is operating.
- Smoke or burning smell: If the appliance gives off smoke or there is a burning smell, immediately disconnect the unit from the power supply and contact our after sales support centre. Prolonged use of the appliance in such conditions could cause fire or electrocution.
Cleaning, servicing and repair
- Disconnect before cleaning: Before carrying out any cleaning or maintenance, make sure the unit is disconnected from the mains electricity supply. Do not use any other means to clean the appliance than those referred to in this manual (see pages 29 to 30 for comprehensive instructions).
- Professional care: Cleaning and maintenance must be carried out by specialised technical personnel.
- Repair: Only have the unit repaired by an authorised service centre. Incorrect repair could expose you to the risk of electric shock, fire or injury. Prolonged use of the unit in such conditions could cause fire or electrocution.
- Do not use when faulty: Do not use the appliance in the event of a technical fault. Any faults must be fixed by an appropriately qualified and authorised person. Contact our after sales support line for advice.
- Batteries: Make sure the batteries in the remote control are disposed of appropriately for recycling.
- Misuse: We assume no liability for any eventual damages to property or injury to persons caused by misuse of the product or noncompliance with these instructions.
General Safety Instructions (Cont.)
Important safety precautions concerning refrigerant R32
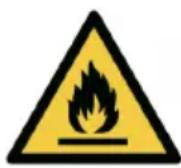
WARNING: Combustible & Dangerous
This symbol alerts you to take care as the appliance contains a flammable refrigerant: R32 (difluoromethane). Take extra care when installing the unit and when carrying out maintenance.
The refrigerant used in this air conditioner, R32, is an odourless hydrocarbon gas with a high level of environmental compatibility, with just one third of the global warming potential (GWP) and a zero ozone depleting potential (ODP).
While R32 is flammable and can explode under certain conditions, there will be no risk of burning and explosion if the air conditioner is installed correctly by a professional installer following all instructions and safety advice below and in the separate installation manual.

natural_image
Simple line icon of an open book with a lowercase 'i' in the center, no text or symbols present.
Read the user manual Read the installation manual
- The room in which this air conditioner is installed must have a minimum area of more than 25m^2 . (This air conditioner is suitable for cooling/heating a room of 35–50m^2 .)
- Do not expose the appliance to high heat, sparks and open flames.
- The appliance shall be stored in a room without continuously operating sources, such as open flames, an operating ignition gas appliance or an operating electric heater.
- Do not pierce or burn the appliance.
- This air conditioner has been fully charged with refrigerant at the factory. Should a recharge of refrigerant become necessary, it may only be recharged by a professional installer.
- Maintenance must only be carried out by properly qualified, authorised personnel. If the appliance requires maintenance or service, please contact our after sales support centre.
- The service technician must strictly comply with:
- All instructions in the installation manual provided with the appliance
– All relevant provisions of gas-related local laws and regulations.
General Safety Instructions (Cont.)
• After installation, the service technician must:
- Check that air cannot enter the refrigerant system
- Check for refrigerant leaks when moving the air conditioner
- Carry out a test cycle under controlled conditions after installing the unit and record the operating data.
Disposal
- This air conditioner contains a flammable refrigerant, which must be removed before disposal. Contact your municipal authorities for any codes or regulations concerning the disposal of such materials.
- At the end of its working life, do not throw this appliance out with your household rubbish. Electrical and electronic products contain substances that can have a detrimental effect on the environment and human health if disposed of inappropriately. Observe any local regulations regarding the disposal of electrical consumer goods and dispose of it appropriately for recycling and recovery of the refrigerant.
Product Overview
- This Reverse Cycle Inverter Air Conditioner is made up of an indoor and outdoor unit (Fig. 1 & 2), which are connected through properly insulated copper pipes (not supplied) and an electrical connecting cable.
- The indoor unit is installed on a wall of the room to be air conditioned (it must not be installed in a laundry or similar room with high humidity levels).
- The outdoor unit is installed outdoors on the ground, or on a wall on suitable brackets.
Fig. 1: Indoor unit
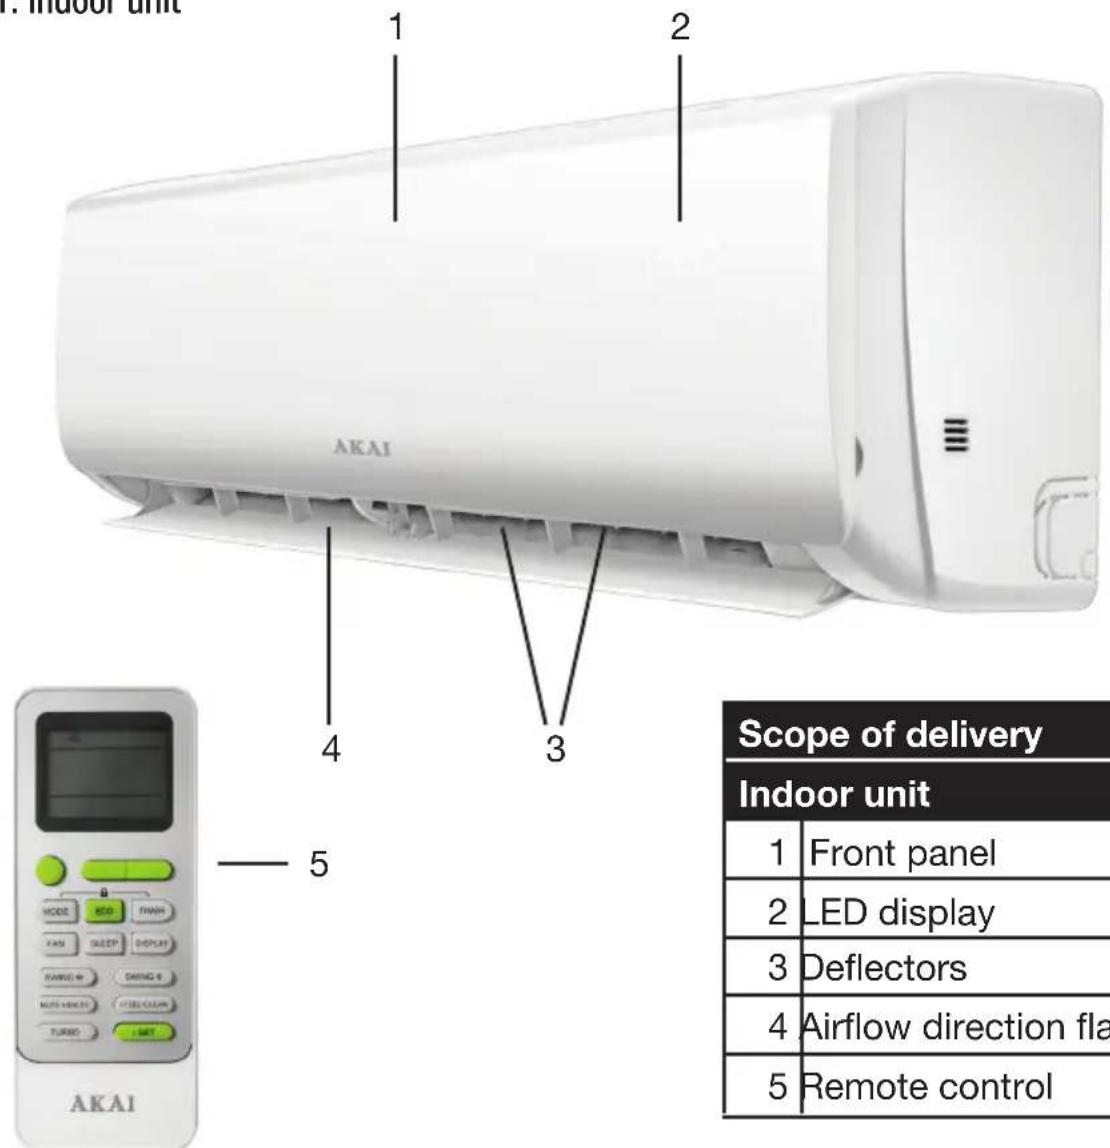
| Scope of delivery | |
| Indoor unit | |
| 1 | Front panel |
| 2 | LED display |
| 3 | Deflectors |
| 4 | Airflow direction flaps |
| 5 | Remote control |
Product Overview (Cont.)
Fig. 2: Outdoor unit
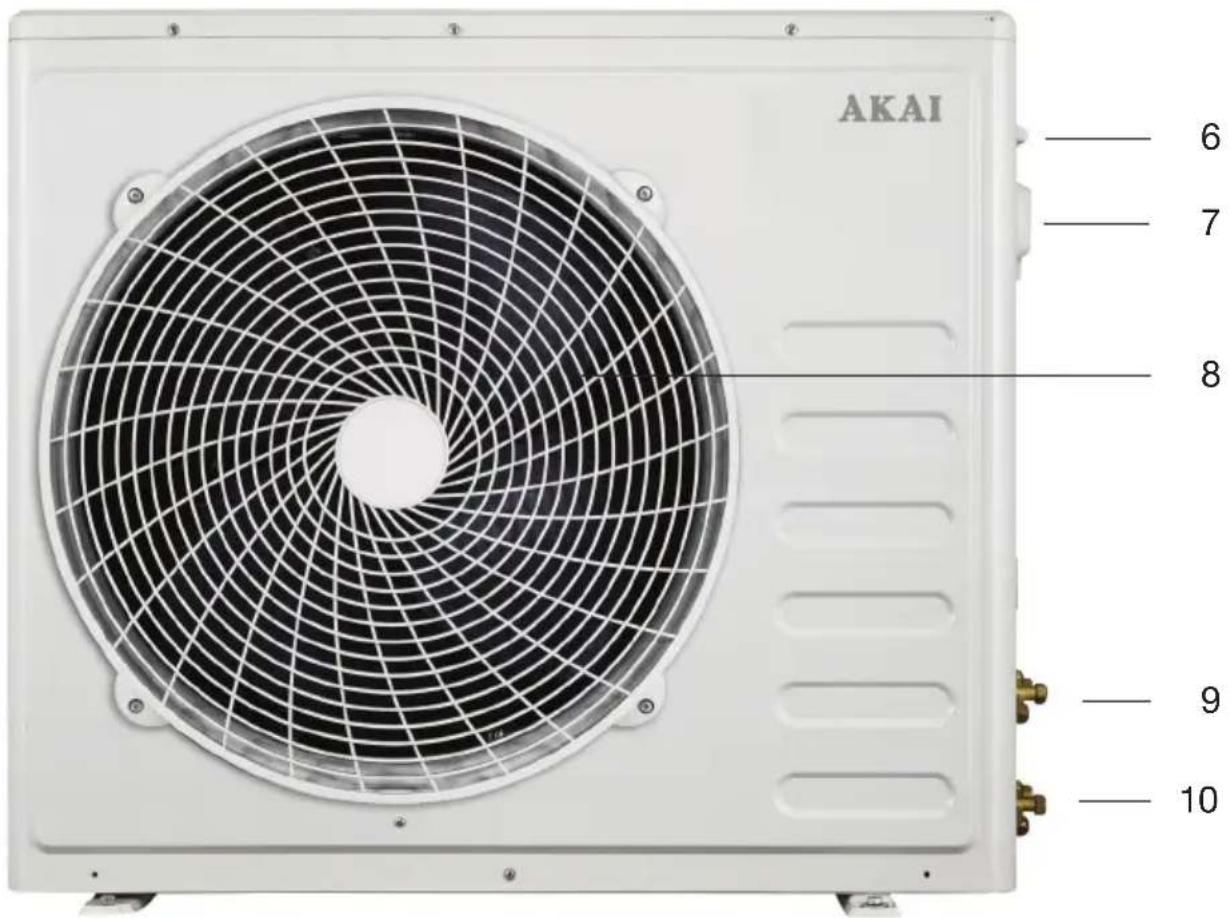
| Outdoor unit | |
| 6 | Outdoor unit rating label |
| 7 | Terminal block cover |
| 8 | Air outlet grille |
| 9 | Gas valve |
| 10 | Liquid valve |
NOTE:
Due to continued product improvement, images and illustrations in this manual may vary slightly from the product purchased. All images in this manual are for reference purposes only. Parts are not necessarily pictured to scale.
Product Overview (Cont.)
Fig. 3: Installation hardware (not to scale)
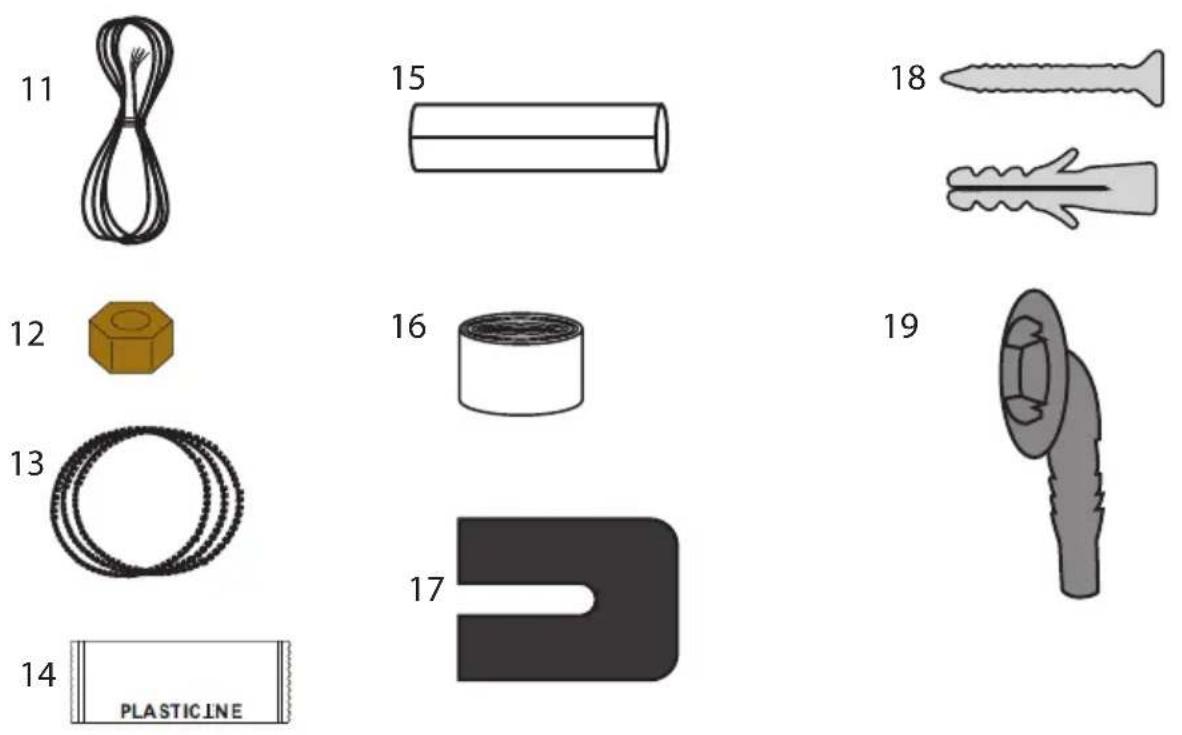
Installation hardware
| 11 | Power cable |
| 12 | Copper nuts (x4) |
| 13 | Drainage pipe |
| 14 | Sealing colloid |
| 15 | Pipe insulation (open tube) |
| 16 | Binding tape |
| 17 | Rubber mats for outdoor unit (x4) |
| 18 | Screws & plugs (x8) |
| 19 | Drainage mouth |
Other inclusions (not pictured)
| Remote control holder (for wall-mounting) |
| AAA Batteries (x2) |
| Instruction manual |
| Installation manual |
| Warranty certificate |
Getting Started
Unpacking
- When unpacking the appliance, keep the original packaging carton and materials in a safe place. It will help prevent any damage if the product needs to be transported in the future.
- In the event it is to be disposed of, please recycle all packaging materials where possible.
- Plastic wrapping can be a suffocation hazard for babies and young children, so ensure all packaging materials are out of their reach and disposed of safely.
- Read the manual to familiarise yourself with all parts and operating principles of the air conditioner. Pay particular attention to the safety instructions on the previous pages.
Installation
WARNING!
- This air conditioner must be correctly installed by an authorised, licensed installer in accordance with all applicable rules and national wiring regulations and all instructions in the separate INSTALLATION MANUAL. It is in your interest and that of your safety to ensure compliance.
- Do not try to install the air conditioner yourself! Doing so will expose you to danger and void the warranty. Improper installation, adjustment, alteration or service can cause injury or damage. We decline any responsibility for injury or damage, to persons or property, as a result of improper use or installation.
Introduction
This Reverse Cycle Inverter Split System Air Conditioner is designed to create comfortable climatic conditions in any room of your home. It consists of an indoor unit that must be wall-mounted in the room you want to heat or cool, and an outdoor unit that can be installed on the ground or on an outside wall on suitable brackets.
Modes of operation
You can set the air conditioner to cool, heat or dehumidify the air, or let the unit adjust the room temperature automatically to ensure comfortable conditions all year round. These modes are described in detail in the “Instructions” section of this manual.
Getting Started (Cont.)
How it works
- The indoor air, sucked in by the fan, enters the unit through the grille at the front panel and passes through a filter, which collects any dust (Fig. 4).
- The air is then conveyed to the heat exchanger, where it is cooled and dehumidified or heated, depending on your setting. The heat removed from the room is released to the outside.
- At the end of the cycle, the fan releases the conditioned air back into the room.
- The direction of the air outlet is regulated by flaps on the indoor unit, which are motorised up and down. The vertical deflectors, also motorised, direct the airflow right and left.

Getting the most out of your air conditioner
- Keep windows and doors shut. Rooms in which the air conditioner is being used should be closed off so the room air is recirculated.
- Locate window/wall units on the south side of the house, if possible. Shade the unit if it is exposed to full sun, but don't restrict airflow over it.
- Set thermostats at 23-26°C for summer cooling. Each degree you lower the thermostat may increase running costs by up to 10%.
- Homes that are insulated require air conditioners with lower heating/ cooling outputs because they can trap the cool/warm air. A fully insulated home will require less power usage from the air conditioner to reach a comfortable room temperature. However, ceiling sweep fans will help move warm/cool air back down to floor level in rooms with very high ceilings.
Getting Started (Cont.)
Preparing the remote control
Inserting/replacing batteries
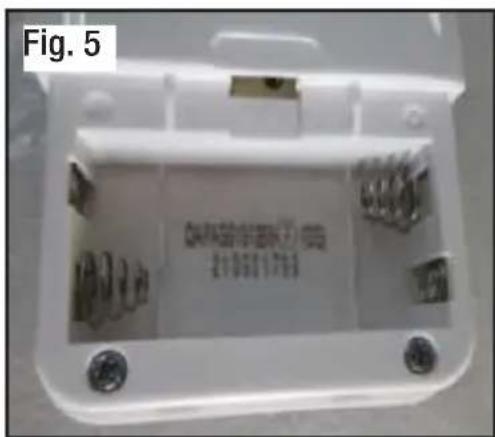
Remove the cover from the battery compartment by sliding it off the housing (Fig. 5). Insert two new AAA (1.5V) batteries, ensuring the polarities (+/-) match the markings. Refit the cover by sliding it back into place.
NOTE:
- Do not use rechargeable batteries.
- Replace old batteries with new ones of the same type when the display is no longer legible.
- Dispose of your remote control batteries in accordance with your local laws and regulations concerning battery disposal.
Remote control
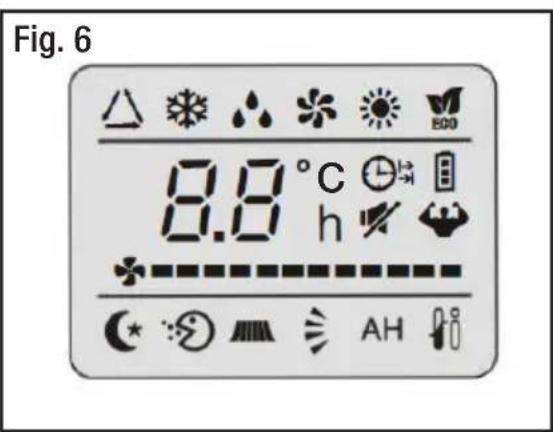
For this type of air conditioner (reverse cycle) the remote control has been programmed to function in all available modes. The temperature will be displayed in degrees Celsius (°C) for your convenience.
Instructions
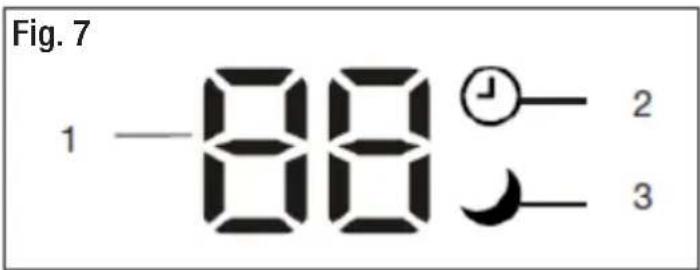
Indoor unit LED display
| No | LED | Function | |
| 1 | Temperature display Indicates the set temperature (in °C) | ||
| 2 | Timer | ⊕ | Illuminates when the Timer function is activated |
| 3 | Sleep | ↘ | Illuminates when the Sleep function is activated |
NOTE: The shape and position of switches and indicators may vary slightly according to the model, but their function is the same.
Instructions (Cont.)
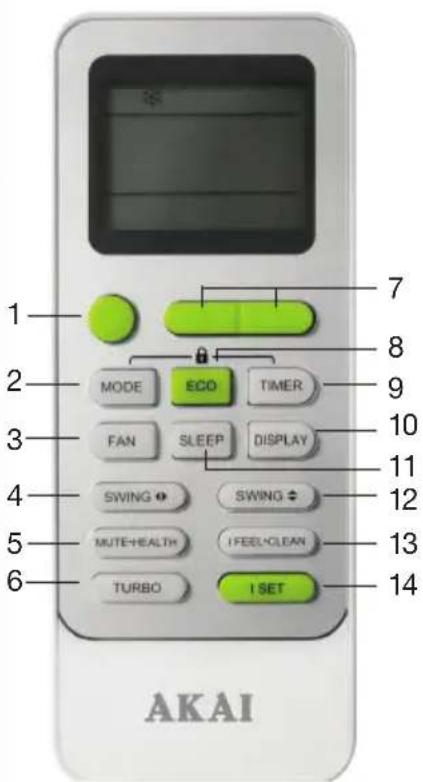
Remote control buttons
| Button Function | ||
| 1 POWER | Start or stop operation. | |
| 2 MODE Select the mode of operation. | ||
| 3 FAN Select the fan speed. | ||
| 4 SWING [R/L] | Activate or deactivate the deflectors for ◀ right/left air movement. | |
| 5 | MUTE Activate the mute function. | |
| HEALTH Not available on this model. | ||
| 6 TURBO | Enable the unit to reach the preset temperature in the shortest time. | |
| 7 | ▼ [DOWN] Decrease temperature or time setting. | |
| ▲ [UP] | Increase temperature or time setting. | |
| 8 | ECO | In cooling mode, the room temperature will be allowed to rise 2°C above the set temperature before cooling restarts; in heating mode, it will be allowed to fall 2°C below the set temperature before heating restarts. |
| 9 TIMER Set to switch on and off automatically. | ||
| 10 DISPLAY | Switch on/off the LED display. | |
| 11 SLEEP Activate the sleep function. | ||
| 12 SWING [UP/DOWN] | Activate or deactivate the flaps for ▲▼ up/down air movement. | |
| 13 | I FEEL | Activate/deactivate the I FEEL function for automatic regulation of the room temperature based on the temperature around the remote controller. |
| CLEAN | Switch on/off the 30-minute self-clean function (recommended every three months). | |
| 14 I SET Switch on/off the I SET function. | ||
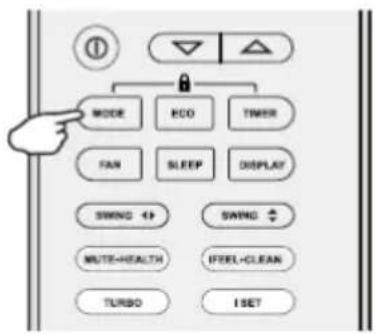
| LOCK | Press the MODE and TIMER buttons at the same time to activate the child lock and lock the remote control buttons. | |
Fig. 8
NOTE:
Every time you press a button, the unit confirms with a beep the correct reception of each action.
Instructions (Cont.)
Remote control display
| Symbol | Indicator |
| AUTO mode indicator | |
| COOLING mode indicator | |
| DEHUMIDIFYING / DRY mode indicator | |
| FAN ONLY mode indicator | |
| HEATING mode indicator | |
| TIMER ON indicator | |
| TIMER OFF indicator | |
| I FEEL indicator | |
| DEFLECTOR or FLAP SWING indicator | |
| AUTO FAN indicator | |
| LOW FAN SPEED indicator | |
| MEDIUM FAN SPEED indicator | |
| HIGH FAN SPEED indicator | |
| MUTE indicator | |
| SLEEP indicator | |
| ECO indicator | |
| SUPER/TURBO indicator | |
| Not applicable for this model |
Fig. 9

Instructions (Cont.)
Using the remote control
- Direct the remote control towards the signal receptor at the front panel of the indoor unit, as illustrated (Fig. 10).
- Ensure that there are no objects between the remote control and the signal receptor at the front of the air conditioner's indoor unit.
- Operate the remote control from a maximum distance of 3m.
- Never leave the remote control exposed to direct sunlight.
- Keep the remote control at a distance of at least 1m from any television or other electrical appliances.
The remote control may be kept in a wall-mounted holder (supplied). Just attach it to a suitable wall, as illustrated (Fig. 11), and store the remote in easy reach.

Fig. 11 Remote control holder

natural_image
Hand holding a screwdriver to lift a rectangular box (no text or symbols visible)
natural_image
Illustration of a mobile phone mounted on a stand with a downward arrow indicating compression (no text or symbols)
natural_image
Illustration of a mobile phone inside a container with an arrow indicating direction (no text or symbols)Replacing the batteries
When there is no beep confirmation from the indoor unit, or when the LCD does not activate, it is time to replace the batteries. Take off the cover at back and replace the old batteries with fresh ones of the same size and type. See "Inserting/replacing batteries", page 13, for detailed instructions.
NOTE: Only remove the batteries from the remote control when the air conditioner is not in operation.
InstructionsInstructions (Cont.)
Airflow swing control
The airflow direction (Fig. 12) ensures even distribution of cool air in the room (or warm air, in heating mode).
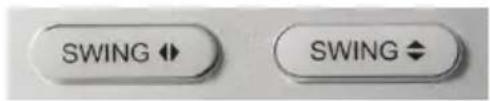
- Press the SWING ◀ button to activate the deflectors for right/left air movement.
- Press the SWING ▲▼ button to activate the flaps for up/down air movement.
- Press both SWING buttons to activate both airflow directions for 3D air circulation.
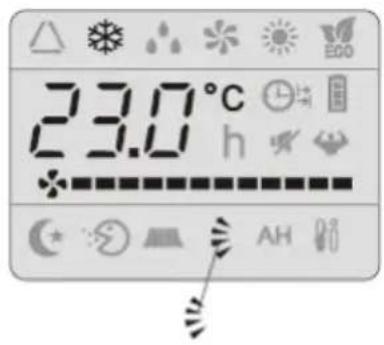
- In COOLING mode, make sure the flaps (Fig. 13) are oriented upwards so the cooled air is directed upwards – it will automatically sink down.
- In HEATING mode, the flaps (Fig. 13) should be oriented downward, as warm air tends to rise upwards.

Fig. 12

CAUTION!
• Always adjust the airflow while the unit is switched off.
- Never attempt to change the flap position manually, as this could seriously damage the delicate flap activating mechanism.
- DANGER! Never insert your hand or objects in the unit's air outlet. It contains a fan that turns at high speed.
Instructions (Cont.)
COOLING mode

In COOLING mode (Fig. 14) the air conditioner will cool down the room to your set temperature and reduce the humidity in the air at the same time.
- To activate the cooling function, press the MODE button on the remote control until the cooling symbol (✿) appears on the display.
- To activate the cooling cycle, use the ▲or ▼ button to set the temperature lower than the current ambient room temperature.
- To optimise the air conditioner's cooling function, set the temperature as described above, then also adjust the speed (by pressing the FAN button) and the airflow direction (see page 18).

HEATING mode

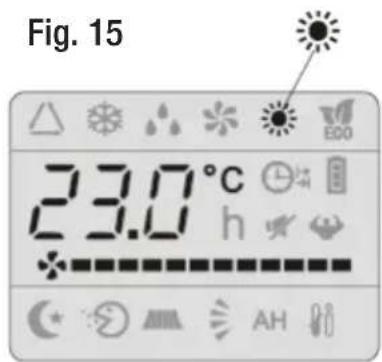
In HEATING mode (Fig. 15) the air conditioner will heat up the room to your set temperature.
- To activate the heating function, press the MODE button on the remote control until the heating symbol (💡 appears on the display.
- To activate the heating cycle, use the ▲or ▼ button to set the temperature higher than the current ambient room temperature.
- To optimise the air conditioner's heating function, set the temperature as described, then also adjust the speed (by pressing the FAN button) and the airflow direction (see page 18).

Instructions (Cont.)
IMPORTANT!
- If the unit is fitted with a 'Hot Start' function, startup will be delayed for a few seconds to ensure an immediate output of hot air.
- In HEATING mode the unit will automatically activate a defrost cycle if there is an excessive amount of frost on the condenser. This procedure usually lasts for 2–10 minutes during which time the fans stop operation. After defrosting, the unit will automatically return to HEATING mode.
FAN mode
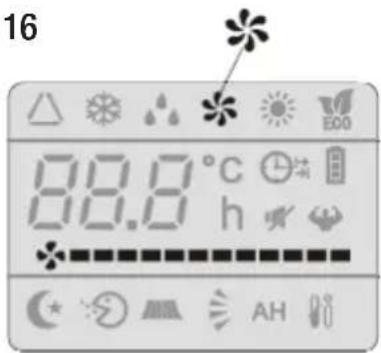
In FAN mode (Fig. 16) only the air conditioner's ventilation will be working.
- To activate FAN mode, press the MODE button until the fan symbol (✿) appears in the display.
- Press the FAN button to change the fan speed: LOW - MEDIUM - HIGH - AUTO.
NOTE:
- The remote control stores the speed that was set in the previous mode of operation.
- In FEEL mode (automatic) the air conditioner automatically chooses the fan speed and the mode of operation (COOLING or HEATING).
Fig. 16

Instructions (Cont.)
DRY (DEHUMIDIFYING) mode
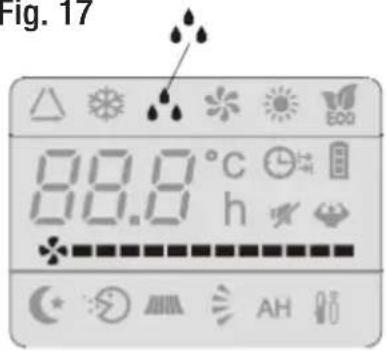
In DRY mode (Fig. 17), the unit will alternate cooling and fan only cycles to reduce the humidity in the air, making the room more comfortable.
- To activate DRY mode, press the MODE button until the dry symbol (.) appears in the display.
Fig. 17
SLEEP function
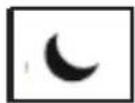
When the SLEEP function (Fig. 18) is selected, the unit will automatically switch to quiet operation and maintain
the temperature at a comfortable level during the night.
- To activate the SLEEP function, press the SLEEP button on the remote control until the sleep symbol ( ) appears in the display. The SLEEP icon will be illuminated on the indoor unit display (Fig. 19).
NOTE: When the SLEEP function is selected:
- In COOLING or DRY mode the set temperature will automatically rise by 1°C every hour to achieve a total 2°C increase during the first 2 hours.
- In HEATING mode the set temperature is gradually decreased by 2°C during the first 2 hours.
• After running in SLEEP mode for 10 hours, the unit will automatically switch off.
Fig. 18
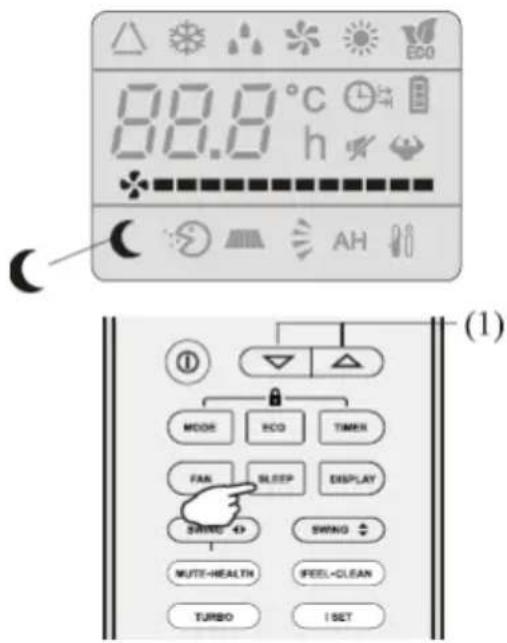
Fig. 19

Instructions (Cont.)
TIMER ON function

Program the timer to switch the unit on automatically (Fig. 20).
- To program the start time, make sure the unit is switched off.
- Press the TIMER button on the remote control for the first time to activate the timer, then use the ▲ or ▼ button to set the desired temperature.
- Press the TIMER button a second time, then use the ▲ or ▼ button to set the time period after which the unit will switch on. With every press of the ▲ or ▼ button, the time will adjust by half an hour. Keep pressing until the display shows the time that passes between programming and the start time.
- Press the TIMER button a third time to confirm the setting. The TIMER icon will be illuminated on the indoor unit display (Fig. 21).
Example:
If it is 11am now and you want the unit to come on at 1pm, you must press the button four times for the two-hour period.
- To cancel the set function, press the TIMER button again.
Fig. 20


Fig. 21

IMPORTANT!
- Before proceeding with the timed start, program the working mode (with the MODE button) and the fan speed (with the FAN button). Then switch the air conditioner off (with the POWER button).
- In case of a power failure or other disconnections from the power supply, you will have to reset your timer settings.
- Before proceeding with the timed start, program the working mode (with the MODE button) and the fan speed (with the FAN button). Then switch the air conditioner off (with the POWER button). - In case of a power failure or other disconnections from the power supply, you will have to reset your timer settings.
Instructions (Cont.)
TIMER OFF function

Program the timer to switch the unit off automatically (Fig. 22).
- To program the switch-off time, the air conditioner must be switched on.
- Press the TIMER button on the remote control for the first time to activate the timer, then use the ▲ or ▼ button to set the time period after which the unit will switch off. With every press of the ▲ or ▼ button, the time will adjust by half an hour.
- Press the TIMER button a second time to confirm the setting. The TIMER icon will be illuminated on the indoor unit display (Fig. 21).
- To cancel the set function, press the TIMER button again.
Fig. 22

NOTE: The timer can be set, in half-hourly intervals, up to a maximum of 24 hours (Fig. 23).
Fig. 23

flowchart
graph LR
    A["0.5 °C @"] --> B["1.0 °C @"]
    B --> C["..."]
    C --> D["10 °C @"]
    D --> E["24 °C @"]
Instructions (Cont.)
AUTO mode

In AUTO mode (Fig. 24) the fan speed and temperature are set automatically according to the room temperature (tested by the temperature sensor incorporated in the indoor unit) to ensure and maintain comfortable conditions.
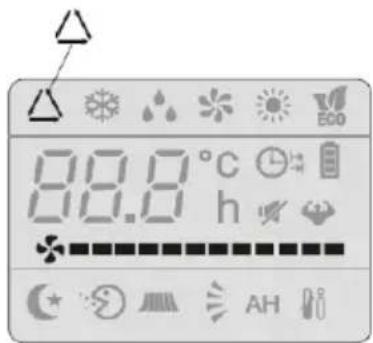
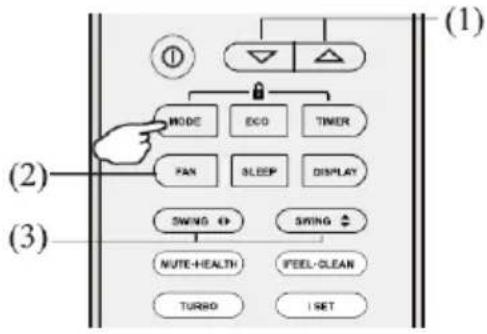
- To activate AUTO mode, press the MODE button on the remote control until the auto symbol (△) appears in the display.
- The unit will cool, heat or dry the room automatically, depending on the current room temperature, as listed in the table below.
| Ambient temp. | Operation mode Auto temp. |
| < 20°C Heating 23°C | |
| 20°C – 26°C Drying 18°C | |
| >26°C Cooling 23°C |
Fig. 24
flowchart
graph TD
    A["①"] --> B["MODE"]
    A --> C["ECO"]
    A --> D["TIMER"]
    A --> E["FAN"]
    A --> F["SLEEP"]
    A --> G["DISPLAY"]
    H["SWING ◆"] --> I["NUTE-HEALTH"]
    H --> J["FEEL-CLEAN"]
    H --> K["TURBO"]
    H --> L["1 SET"]
    M["(2)"] --> N["②"]
    O["(3)"] --> P["(1)"]
- To optimise the efficient working of the air conditioner, adjust the temperature (only ± 2^ ), the speed and the airflow direction by pressing the relevant buttons.
I FEEL function
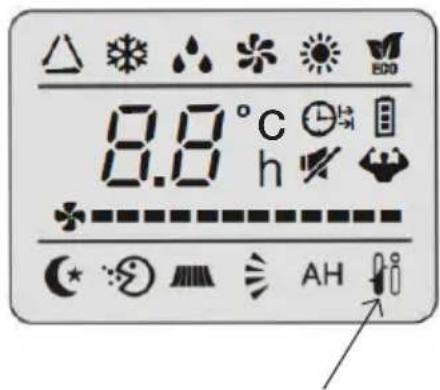
When the I FEEL function (Fig. 25) is selected, the appliance will automatically regulate the room temperature based on the temperature (0–50°C) around the remote control.
- To activate the I FEEL function, press the I FEEL part (left side) of the button on the remote control until the I FEEL symbol ( 🔍 appears in the display.
- This function will terminate two hours after activation.
Fig. 25
Instructions (Cont.)
I SET function
In COOLING, HEATING, FAN and DRY mode you can save certain settings as your favourites so you do not have to select them again the next time you want to run the air conditioner on these settings.
You can adjust the temperature (in COOLING and HEATING mode), the fan speed (in COOLING, HEATING and FAN mode) and the swing settings (in COOLING, HEATING, FAN and DRY mode).
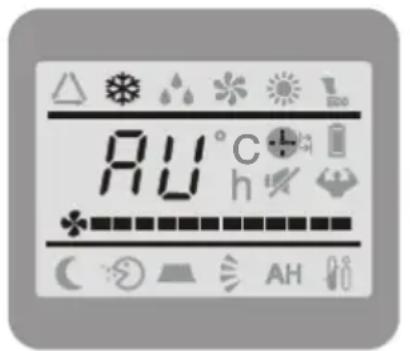
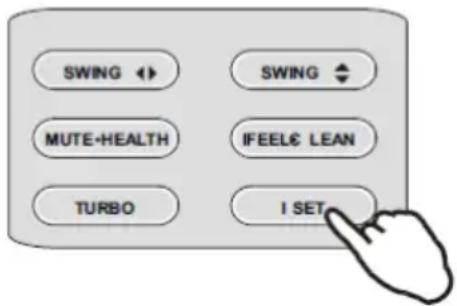
- When you have selected your favourite settings, press and hold the I SET button for more than 3 seconds until “AU” appears on the display and the background of the display lights up. The remote controller will now run and remember these settings.
Fig. 26
- You can reset the settings by repeating the above operation.
- To activate this function, press the I SET button. The air conditioner will run according to the previously selected settings and on the remote control display, "AU" will be flashing (Fig. 26).
- Press the button again to cancel this function.
Turbo function
Press the TURBO button to produce maximum cooling or heating performance in the shortest time.
Eco function
Press the ECO button to achieve energy savings while running the unit. Depending on the mode selected, the room temperature will be allowed to rise 2^ C above (or fall 2^ C below) the set temperature before cooling/heating restarts.
Child lock function
Press the MODE and TIMER buttons at the same time to activate the child lock. All buttons on the remote control are now locked. To unlock the child lock, press both buttons again.
Instructions (Cont.)
Self-clean function
An automatic self-clean function helps clean away dirt and bacteria that has accumulated on the evaporator.
- Press the CLEAN part (right side) of the button to enter this function in any mode (Fig. 27).
- The self-clean cycle will run for about 30 minutes and then it will revert to the previously set mode. Any noises you may hear during this cycle are from the plastic parts expanding and contracting, which is normal.
- To cancel the self-clean cycle, press the POWER or MODE button. The appliance will emit two beep sounds when the cleaning cycle is finished or has been cancelled.
- We recommend you run the self-clean function every three months, at a time when the ambient temperature does not exceed 30^ C around the indoor unit and 5–30^ C around the outdoor unit.
Auto-restart function
The appliance is preset to restart automatically and keep the selected settings after a power blackout or a voltage drop.
Emergency function
If the remote control is lost, lift the front panel of the unit to access the emergency button (Fig. 28), then proceed as follows:
- Press the button once (one beep) if you want the air conditioner to work in FORCED COOLING mode.
- Press the button twice (two beeps) if you want the air conditioner to work in FORCED HEATING mode.
- Press the button again (a single long beep) to switch off the air conditioner. After 30 minutes in forced mode, the unit will automatically start working in AUTO mode (see page 22 for details).
NOTE: The shape and position of the emergency button may vary according to the model, but its function is the same.
Fig. 27


FAQs and Troubleshooting Guide
If you experience problems with your air conditioner, check for solutions in the table below. If the problem cannot be solved by simple adjustments, contact our after sales support centre, or contact a licensed air conditioner technician.
| Problem Possible cause and solution | |
| The appliance does not work. | Power failure/disconnected — check the power supply and ensure the unit is properly connected.The Timer On function is activated — see page 22.Damaged indoor/outdoor unit fan motor — call the after sales support line to arrange a service.Faulty compressor/thermomagnetic circuit breaker — call for service.Faulty protective device or fuse — call for service.Loose connections or disconnected — check the power supply and ensure proper connection.A protection mechanism has activated to protect the appliance — see page 29.The voltage is higher or lower than the required voltage range — call for service.The electronic control board is damaged — call for service. |
| Strange odour. The | air filter is dirty — see ‘Air filters’, page 30. |
| Noise like running water. | This is the backflow of liquid in the refrigerant circulation — call for service. |
| Strange crackling noise. | With varying temperatures, the front panel expands and contracts, which can make a noise — this is not a problem and no cause for concern. |
| There is a fine mist coming from the air outlet. | This occurs when the air in the room becomes very cold, for example in COOLING or DRY mode — this is not a problem and no cause for concern. |
| The appliance does not respond to commands. | The remote control is too far from the indoor unit — operate the remote control from a 3m maximum distance, see page 17.The remote control batteries are flat — insert new ones.There are obstacles between the remote control and the signal receiver on the indoor unit — move the obstacles, see page 17. |
FAQs and Troubleshooting Guide (Cont.)
| Problem Possible cause and solution | |
| Insufficient airflow, either hot or cold. | Unsuitable temperature setting — adjust the fan by pressing the FAN button.Obstructed air intakes and outlets — clear any obstructions.Dirty air filter — clean the filter, see ‘Air filters’, p. 30.Fan speed is set to minimum — adjust by pressing the FAN button.Other sources of heat in the room — check for other heat sources.No refrigerant — call for service. |
| The display is off. T | There has been a power failure — check if other appliances are working. |
Error and other signals on the display
In case of certain malfunctions, the indoor unit will display the error codes below. Note the code and contact our after sales support centre for advice.
| Code Error | |
| E1 | Fault of the indoor temperature sensor — set the temperature manually and call for service. |
| E2 | Fault of the indoor pipe temperature sensor — set the temperature manually and call for service. |
| E6 | Malfunction of the indoor fan motor — call for service. |
| CL | Filter cleaning reminder — cut off power and clean the filter before reuse. |
Other Useful Information
Service required!
Switch off the appliance immediately, cut off the power supply and call our after sales support line for service in the event of:
- Loud and unusual noises during operation.
- Faulty electronic control board.
- Faulty fuses or switches.
- Spraying water or objects inside the appliance.
• Overheated cables or plugs. - Very strong smell or smoke coming from the appliance.
Protection
The protective device may trip and stop the appliance in the following situations.
| Heating mode | Outdoor air temperature is above 24°C. |
| Outdoor air temperature is below -15°C. | |
| Room temperature is above 27°C. | |
| Cooling mode | Outdoor air temperature is above 43°C. |
| Room temperature is below 21°C. | |
| Dry mode Room temperature is below 18°C. | |
NOTE: After stopping and restarting the air conditioner, or after changing the mode during operation, the system does not restart immediately. This is a protection function for the compressor. In such a case, wait for three minutes for the system to restart.
Maintenance
Periodic maintenance is essential for keeping your air conditioner efficient.
CAUTION!
Before carrying out any maintenance, disconnect the power supply by setting the installation on/off switch to OFF.
End of season maintenance
- Disconnect the automatic switch or the plug.
- Clean and replace the filters.
- On a sunny day let the appliance work in ventilation for some hours, so that the inside of the unit can dry completely.
Other Useful Information (Cont.)
Air filters
After running for a particular period, the air conditioner will display "CL" and remind you to clean the filter (Fig. 29).
- Open the front panel following the direction of the arrow (Fig. 30).
- Keeping the front panel raised with one hand (Fig. 31), take out the air filter with the other hand (Fig. 32).
- Clean the filter with a damp cloth or, if necessary, wash it in warm water (not exceeding 45°C). Leave to dry in a cool and dry place.
- Once the filter is completely dry, insert it back into the unit with one hand while keeping the front panel raised with the one hand.
- Close the front panel.
NOTE: Any electrostatic and deodorant filters (if installed) cannot be washed and must be replaced every six months.
Cleaning the heat exchanger
- Open the front panel of the unit, lift it up as far as possible and then unhook it from the hinges to make cleaning easier.
- Clean the indoor unit using a cloth with warm water (not exceeding 40°C) and a mild detergent. Never use harsh solvents or detergents.
- If the battery of the outdoor unit is clogged by dust, leaves or other environmental debris, remove it with an air jet or a bit of water.
Fig. 29


natural_image
Technical line drawing of a 3D mechanical part with labeled dimension (Fig. 30), showing internal structure without any text or symbols beyond label.

natural_image
Cutaway diagram of an air conditioner unit showing internal structure and airflow direction (no text or symbols)Other Useful Information (Cont.)
Replacing the batteries
The batteries in the remote control will need replacing when the indoor unit no longer emits a confirmation beep when you press a button. Insert two new AAA (1.5V) batteries, ensuring the polarities (+/-) match the markings. For more details and an illustration, please refer to page 13.
Service, repair and spare parts
If you look after your air conditioner it should give you years of good service. Should you experience problems with the appliance that you cannot solve yourself – or to purchase a spare part – please phone our after sales support centre on 1300 886 649 or email us at info@tempo.org.
Do not attempt to repair the unit yourself!
Compliance
This product has been fully tested and meets all requirements as set out by standards AS/NZS 60335.1 and AS/NZS 60335.2.40 and also AS/NZS 3823.1.1 and AS/NZS 3823.2.

The RCM Mark (Regulatory Compliance Mark) indicates that the product complies with the relevant guidelines of the ACMA as well as corresponding government requirements for the safety of electrical devices.
Responsible disposal
At the end of its working life, do not throw this appliance out with your household rubbish. Electrical and electronic products contain substances that can have a detrimental effect on the environment and human health if disposed of inappropriately. Observe any local regulations regarding the disposal of electrical consumer goods and dispose of it appropriately for recycling and recovery of the refrigerant.
This air conditioner contains a flammable refrigerant, which must be removed before disposal. Contact your municipal authorities for any codes or regulations concerning the disposal of such materials.
Other Useful Information (Cont.)
Technical specifications
| Model Number | AK-T70R32 | |
| Capacity | Cooling 7300W | |
| Heating 8000W | ||
| Current | Cooling 8.2A | |
| Heating 9.4A | ||
| Rated Current (AS/NZS 60335) | Cooling 13.5A | |
| Heating 14.5A | ||
| Power Input | Cooling 1800W | |
| Heating 2100W | ||
| Rated Power Input (AS/NZS 60335) | Cooling 2800W | |
| Heating 2900W | ||
| Room size suitability 35–50m | ^2 | |
| Rated Voltage and Frequency 220–240V ~, 50Hz | ||
| Ingress Protection Outdoor Unit IPX4 | ||
| Max. Pressure | Discharge 3.7MPa | |
| Suction 1.2MPa | ||
| Noise (SPL) | Indoor Unit 51dB(A) | |
| Outdoor Unit 62dB(A) | ||
| Refrigerant Type | Type R32 | |
| Quantity 1420g | ||
| Indoor Airflow Volume | Cooling 1330m | ^3/h |
| Heating 1430m | ^3/h | |
| Net Weight | Indoor Unit 17kg | |
| Outdoor Unit 59kg | ||
| Dimensions (mm) | Indoor Unit 1186 x | 340 x 258 |
| Outdoor Unit 975 x | 433 x 808 | |
The external static pressure of the air conditioner is 0Pa for all models.
Other Useful Information (Cont.)
Licensed installer details
Please ask your licensed installer/electrician to fill in the details below (or in the INSTALLATION manual) so you have them on record should you need to contact the installer in the future.
Proof of professional installation is also required for warranty claims.
Please fill in the details below:
Name of licensed installer: ....
Licence number: ....
Date of installation: ....
Signature / Date: ....
This page has been left blank intentionally.
This page has been left blank intentionally.

natural_image
Icon showing a person reading a document with an exclamation mark symbol (no text or numbers present)Please read the manual
It will help you get the best out of your product.
Still have questions?
Call After Sales Support
1300 886 649
Or visit www.tempo.org
Warranty returns
Should you for any reason need to return this product for a warranty claim, make sure to include all accessories with the product.
Product does not work?
If you encounter problems with this product, or if it fails to perform to your expectations, make sure to contact our After Sales Support Centre on 1300 886 649.
For an electronic copy of this manual, please contact our after sales support centre.
Instruction Manual Revision Index
Version No Issue Date Description
V1.0 02 September 2019 Original release
V1.1 02 January 2020 Updates: pages 13, 20
- USER MANUAL
- Contents
- General Safety Instructions
- IMPORTANT SAFETY INSTRUCTIONS
- READ CAREFULLY AND KEEP FOR FUTURE REFERENCE
- Installation
- Electrical safety
- General Safety Instructions (Cont.)
- Usage conditions and restrictions
- Cleaning, servicing and repair
- WARNING: Combustible & Dangerous
- Read the user manual Read the installation manual
- Disposal
- Product Overview
- Product Overview (Cont.)
- NOTE:
- Getting Started
- Unpacking
- WARNING!
- Introduction
- Modes of operation
- Getting Started (Cont.)
- How it works
- Getting the most out of your air conditioner
- Preparing the remote control
- Inserting/replacing batteries
- Remote control
- Instructions
- Indoor unit LED display
- Instructions (Cont.)
- Using the remote control
- Replacing the batteries
- InstructionsInstructions (Cont.)
- Airflow swing control
- CAUTION!
- COOLING mode
- HEATING mode
- IMPORTANT!
- FAN mode
- DRY (DEHUMIDIFYING) mode
- SLEEP function
- TIMER ON function
- Example:
- TIMER OFF function
- AUTO mode
- I FEEL function
- I SET function
- Turbo function
- Eco function
- Child lock function
- Self-clean function
- Auto-restart function
- Emergency function
- FAQs and Troubleshooting Guide
- FAQs and Troubleshooting Guide (Cont.)
- Error and other signals on the display
- Other Useful Information
- Service required!
- Switch off the appliance immediately, cut off the power supply and call our after sales support line for service in the event of:
- Protection
- Maintenance
- End of season maintenance
- Other Useful Information (Cont.)
- Air filters
- Cleaning the heat exchanger
- Service, repair and spare parts
- Compliance
- Responsible disposal
- Licensed installer details
- Please read the manual
- Warranty returns
- Product does not work?
- Instruction Manual Revision Index
Brand : AKAI
Model : AK-T70R32
Category : Air conditioner