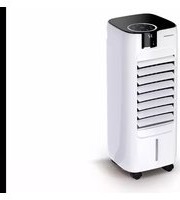
THRAF575E - Air Conditioning THOMSON - Free user manual and instructions
Find the device manual for free THRAF575E THOMSON in PDF.


| Product Type | Portable Air Conditioner |
| Brand | Thomson |
| Model | THRAF575E |
| Cooling Capacity | 2.5 kW (8500 BTU/h) |
| Power Supply | 220-240 V, 50 Hz |
| Power Consumption (Cooling) | 900 W |
| Dimensions (W x D x H) | 70 x 45 x 35 cm |
| Weight | 25 kg |
| Noise Level | 55 dB(A) |
| Airflow Volume | 350 m³/h |
| Refrigerant | R290 |
| Functions | Cooling, Dehumidifying, Fan only, Sleep mode, Timer |
| Control | Remote control and touch panel |
| Filter Type | Washable mesh filter |
| Filter Cleaning Interval | Every 2 weeks |
| Self-evaporation | Yes (partial) |
| Exhaust Hose Length | 1.5 m |
| Window Kit Included | Yes |
| Safety Features | Overload protection, auto shut-off, tip-over switch |
| Spare Parts | Filter, remote control, exhaust hose |
| Reparability Index | 7.5 / 10 |
| Energy Efficiency Class (Cooling) | A |
| Warranty | 2 years |
Frequently Asked Questions - THRAF575E THOMSON
User questions about THRAF575E THOMSON
0 question about this device. Answer the ones you know or ask your own.
Ask a new question about this device
Download the instructions for your Air Conditioning in PDF format for free! Find your manual THRAF575E - THOMSON and take your electronic device back in hand. On this page are published all the documents necessary for the use of your device. THRAF575E by THOMSON.
USER MANUAL THRAF575E THOMSON
natural_image
White portable air purifier with black ventilation slots and digital display (no visible text or symbols)Please read these instructions carefully before using this appliance. Please keep these instructions for future reference.
This product conforms to the requirements of directives 2014/35/UE (repealing directive 73/23/CEE amended by directive 93/68/CEE) and 2014/30/UE (repealing directive 89/336/CEE).
1. WARNINGS
The product must be installed in accordance with the national wiring rules.
This unit is intended for household and domestic indoor use only.
- Use the appliance in a room size corresponding to its cooling capacity.
- Do not use the appliance near gas appliances, fireplaces or flammable liquids.
- Handle the appliance with care
- Keep your appliance about 1 meter away from any other electrical device to avoid the risk of electromagnetic interference.
- To avoid overheating, please put the appliance about 50 cm away from a wall and do not cover it.
- Do not expose to direct or indirect heat sources.
- Do not use this appliance in wet area, and not to have contact with water.
- Do not submit the unit to strong shocks or vibrations.
- The plug must be easily accessible when the device is connected.
-
Before connecting the appliance, check that:
-
The supply voltage is the same as the nameplate,
- The power supply socket is suitable to the device,
-
The cable plug is adapted to the socket. The product is intended only for a socket with a main voltage of 230 volts (50 Hz).
-
Always remove the plug from the socket when not in use.
- Do not use the unit with a damaged cord or plug
- The appliance should be unplugged when filling and cleaning
- This appliance can be used by children aged from 8 years and above and persons with reduced physical, sensory or mental capabilities or lack of experience and knowledge if they have been given supervision or instruction concerning use of the appliance in a safe way and understand the hazards involved. Children shall not play with the appliance. Cleaning and user maintenance shall not be made by children without supervision.
-
Never insert fingers, pencils or other objects through the grid when the appliance is running.
-
This product complies with the requirements of directives 2014/35/EU (repealing Directive 73/23/EEC amended by Directive 93/68/EEC) and 2014/30/EU(repealing Directive 89/336/EEC)
- Never run the product in the presence or within reach of unsupervised children.
- If the power cord is damaged, it must be replaced by the manufacturer, its service or similarly qualified persons in order to avoid a hazard.
- User instructions should be provided with the device so that it can be used safely.
- Regarding the correct assembly of the device, please refer to the corresponding instructions.
- For cleaning and maintenance instruction, refer to the corresponding section.
2. OPERATING CHARACTERISTICS
IMPORTANT
- Fix the wheels on the product before usage.
- Always make sure there is water in the tank when your air cooler is running in COOL mode.
- Do not move the appliance when it is filled with water. Empty before moving.
- Use the air cooler on a stable, flat and level surface.
- Never use the air cooler without the filters
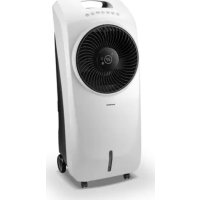
2.1 DESCRIPTION
Control panel
Display panel
Filter
Air Outlet
Water Level
Indicator
Water Tank Cover
Water Tank
Castors
2.2 INSTALLATION
- Pull the unit outwards from the carton and place it on a solid hot-proof horizontal surface.
- Check if the accessories are complete, same as the accessories list.
- Place the unit on a solid hot-proof horizontal surface. Take out the casters and caster wrench to assemble.
Note: Casters with locks are for the two front holes and casters without locks are for the two back holes at the bottom of the unit.

4. Add water:
The appliance must be switched off before water filling
-Remove the water tank.
-If required, place the frozen ice boxes or ice cubes in the left side of the water tank to increase cooling effect.
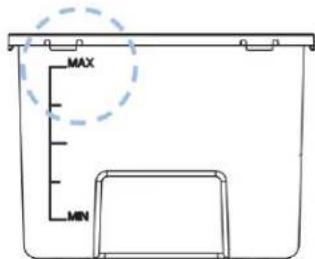
-Fill water tank with cold tap water, taking care to not exceed the maximum line marked on the water tank, and not below the minimum level.

Using Ice Packs
Put the ice pack in the freezer until the liquid inside becomes the ice, then put the ice pack in the water of the tank. During the cooling function, the air will be cooler.
Note:
-ONLY PUT THE ICE PACKS and ICE CUBES on the left side compartment of the tank as the right side is the pump compartment and must not block the pump moving structure.
-Water level must be between the MIN and MAX line.
-After some time operation, dust and dirt may occur in water tank. It is recommended to change water and clean water tank frequently.
-
Only use the unit with correct AC outlet.
-
Insert the plug pin into a wall socket, a small beep sound can be heard and the unit is on standy mode.
Note:
- To protect against electric shock, do not remove plug from wall outlet with wet hand.
- Unplug from outlet before moving the unit.
2.3 OPERATION
Control panel

Remote Control
Remote control panel has the same functions as the unit control panel Insert the plug pin into a wall socket and turn on the power switch which is at the side of the unit. A small beep sound can be heard and the power indicator will be on.
POWER : Press once this button to make the unit ready for working. It will start up with MID in 3 seconds and then revert to work under the memorized status. If first time use, it will start up with MID in 3 seconds and then work with LOW. Press again this button to turn OFF.
SPEED Less this button to select desired fan speed,
LOW MID ≈ HIGH ≈ LOW in turn. At the same time, display panel shows , or, or. ≈
SLEEP MODE 📋: Press this button to select desired wind mode, it works as per the presetted computer program, alternating between different fan speeds.
UP/DOWN : Press once this button to make vertical swing of louvers, the indicator will be displayed. Press again for fixed air direction.
LEFT/RIGHT ◇: Press once this button to make horizontal swing of louvers, the ◇ indicator will be displayed. Press again for fixed air direction.
COOL Press once this button to start the evaporative cooling function. Press again this button to cancel.
TIMER: It can be set between 0.5 to 8 hours, increased by 0.5 hour intervals. When the digital display shows 8 hours, press again this button to cancel.
DISPLAY LIGHT ON/OFF: Press once this button to light-off the display, press one more time to light-up again.
CHILD LOCK : Press this button 3 seconds to lock the control panel in case children mis-control. Press 3 seconds again to cancel this function.
3. CLEANING AND MAINTENANCE
Always disconnect the appliance from the mains by switching it off and removing the plug from the power outlet before cleaning.
- Unplug from outlet.
- No water on the control panel.
Cleaning the filtration mesh
- Remove plug from wall outlet.
- Catch the filtration mesh handle and pull upwards.
- Clean filtration mesh with mild detergent and soft brush.
- Make sure filtration mesh is completely dry before installing.
Note: After long time operation, the filtration mesh becomes clogged with dust and dirt, which will greatly affect the unit's performance. It is recommended to clean the filtration mesh frequently.

natural_image
Technical illustration of a device with internal structure and top view showing airflow direction (no text or symbols)Cleaning the water tank
- Remove plug from wall outlet.
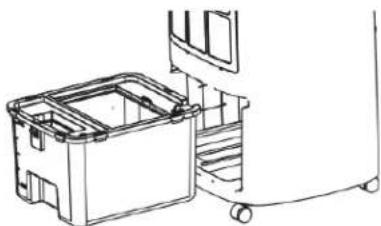
- Pull out the water tank.
- Clean the water tank with a little mild detergent on a towel and then rinse in water.
- Put the water tank in place after cleaning.
Note: After some time operation, dust and dirt may occur in water tank. It is recommended to change water and clean water tank frequently.
natural_image
Line drawing of a mechanical device with a rectangular housing and wheels (no text or symbols)Cleaning the body
- Remove plug from wall outlet.
- It is advisable to use a neutral detergent and a soft cloth and to rub dry. Do not use solvents, acidic detergents, petrol or alcohol etc. to clean the plastic components, as these could be deformed or damaged.
- Cleaned with a damp cloth and allow to dry.
If you do not use the product for a long period, please empty the water tank.
4. TROUBLE SHOOTING
If there is something wrong during operation, it may not be the unit's problem. You may check against the following list before send for repair
| Problems | Possible reasons | Solutions |
| Not working | 1. The plug is not securely inserted into the socket or not connected well.2. The “POWER” button is not pressed. | 1. Insert the plug pin into the wall socket and make sure it is connected well.2. Press “POWER” button after plugged. |
| Air refreshing effect not good | 1. The filtration mesh is clogged with dust and dirt, which affects the unit’s performance.2. The air vent is obstructed. | 1. Clean the filtration mesh.2. Remove the foreign objects from the air vent. |
Note:
- If the problem can not be found in the list or it persists, please contact service center or a qualified technician for further inspection.
- Do NOT open and repair the unit by yourself.
Never attempt to disassemble or repair the unit yourself. In the case of not competent repair, the guarantee is void.
5. TECHNICAL SPECIFICATIONS
| Model | THRAF575E |
| Tension | 220-240V~ |
| Frequency | 50Hz |
| Power | 65W |
| Timer | 8h |
| Water tank capacity | 6L |
| Class II | |
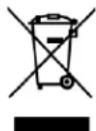
The European directive 2012/19/CE on Waste Electrical and Electronic Equipment (WEEE), requires that old household electrical appliances must not be disposed in the normal unsorted municipal waste stream. Old appliances must be collected separately in order to optimize the recovery and recycling of the materials
they contain and reduce the impact on human health and the environment.
The crossed out "wheeled bin" symbol on the product reminds you of your obligation, that when you dispose of the appliance it must be separately collected.
Consumers should contact their local authority or retailer for information concerning the correct disposal of their old appliance
The warranty does not cover the wear parts of the product, nor the problems or damage resulting from:
(1) surface deterioration due to normal wear and tear of the product;
(2) defects or deterioration due to contact with liquids and corrosion caused by rust;
(3) any incident, abuse, misuse, alteration, disassembly or Unauthorized repair;
(4) improper maintenance, improper use concerning the product or connection to an incorrect voltage;
(5) any use of accessories not supplied or not approved by the manufacturer.
The guarantee will be cancelled if the nameplate and / or serial number of the product are removed.
THOMSON is a trademark of TECHNICOLOR S.A used under license by ADMEA
- WARNINGS
- OPERATING CHARACTERISTICS
- IMPORTANT
- DESCRIPTION
- INSTALLATION
- Add water:
- The appliance must be switched off before water filling
- Note:
- OPERATION
- Control panel
- CLEANING AND MAINTENANCE
- Cleaning the filtration mesh
- Cleaning the water tank
- Cleaning the body
- TROUBLE SHOOTING
- TECHNICAL SPECIFICATIONS
Brand : THOMSON
Model : THRAF575E
Category : Air Conditioning