
MC-50 - Hi-Fi System BLAUPUNKT - Free user manual and instructions
Find the device manual for free MC-50 BLAUPUNKT in PDF.
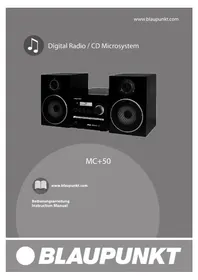


| Product Type | Hi-Fi System |
| Brand | Blaupunkt |
| Model | MC-50 |
| Dimensions (W x H x D) | Approx. 250 x 120 x 280 mm (main unit) |
| Weight | Approx. 3.5 kg (main unit) |
| Power Supply | AC 230V ~ 50Hz |
| Power Consumption | 30 W (typical) |
| Frequency Range (Radio) | FM 87.5 - 108 MHz |
| Supported Media | CD, CD-R, CD-RW, USB flash drive |
| Audio Formats | MP3, WMA |
| Output Power | 2 x 10 W RMS |
| Connectivity | USB, AUX input, headphone jack |
| Radio Presets | 20 FM presets |
| Display | LCD screen |
| Remote Control | Included (battery type: CR2025) |
| Speaker Specifications | Passive speakers, 3-way |
| Maintenance | Clean with soft dry cloth; avoid liquids |
| Safety Features | Auto power off, overheating protection |
| Spare Parts Availability | Contact Blaupunkt service centers |
| Repairability | Modular design; user-replaceable fuses |
| Warranty | 2 years (limited) |
| Package Contents | Main unit, 2 speakers, remote control, manual |
Frequently Asked Questions - MC-50 BLAUPUNKT
User questions about MC-50 BLAUPUNKT
0 question about this device. Answer the ones you know or ask your own.
Ask a new question about this device
Download the instructions for your Hi-Fi System in PDF format for free! Find your manual MC-50 - BLAUPUNKT and take your electronic device back in hand. On this page are published all the documents necessary for the use of your device. MC-50 by BLAUPUNKT.
USER MANUAL MC-50 BLAUPUNKT
Digital Radio / CD Microsystem

MC+50

www.blaupunkt.com


FM (UKW): 87.5 - 108 MHz
Weight: 3.0 kg
TO PREVENT FIRE OR SHOCK HAZARD DO NOT EXPOSE THIS APPLIANCE TO RAIN OR MOISTURE

LIGHTNING FLASH WITH ARROWHEAD SYMBOL
within an equilateral triangle, is intended to alert the user to the presence of uninsulated dangerous voltage within the product's enclosure that may be of sufficient magnitude to constitute a risk of electric shock to persons.
EXCLAMATION POINT
POINT within an equilateral triangle, is used to indicate that a specific component shall be replaced only by the component specified in that documentation for safety reasons.
To achieve the utmost in enjoyment and performance, and in order to become familiar with its features, please read this manual carefully before attempting to operate this product. This will assure you years of trouble-free performance and listening pleasure.
Important Notes
· This safety and operating instruction should be retained for future reference. - The apparatus should not be exposed to dripping or splashing or placed in a humid atmosphere such as a bathroom. - Do not install the product in the following areas:
o Places exposed to direct sunlight or close to radiators o On top of other stereo equipment that radiate too much heat o Blocking ventilation or in a dusty area o Areas where there is constant vibration o Humid or moist places.
- Do not place near candles or other naked flames
- Operate the product only as instructed in this manual.
- Before turning on the power for the first time, make sure the power adaptor is properly connected.
For safety reasons, do not remove any covers or attempt to gain access to the inside of the product. Refer any servicing to qualified personnel.
Do not attempt to remove any screws, or open the casing of the unit; there are no user serviceable parts inside. Refer all servicing to qualified service personnel.
CE Conformity
Model number: MC+50
Description: Digital Radio / CD Microsystem
Brand name: Blaupunkt
Responsible party: M3 Electronic GmbH
Gutenbergstrasse 5, D-65830 Kriftel, Germany
Hereby, Blaupunkt Competence Center Audio M3 Electronic GmbH, declares that this Class 1 equipment is in compliance with the essential requirements and other relevant provisions of Directive 1999/5/EC.
A letter of conformity can be obtained from info@m3-electronic.de.
Safety Instructions
- READ INSTRUCTIONS – All the safety and operating instructions should be read before the appliance is operated.
- RETAIN INSTRUCTIONS - The safety and operating instructions should be retained for future reference.
- HEED WARNINGS – All warnings on the appliance and in the operating instructions should be adhered to.
- FOLLOW INSTRUCTIONS – All operating instructions should be followed.
- WATER AND MOISTURE – The appliance should not be used near water, for example, near a bathtub, washbowl, kitchen sink, laundry tub, swimming pool or in a wet basement.
- VENTILATION – The appliance should be situated so that its location or position does not interfere with its proper ventilation. Do not place on bed, sofa, rug or similar surface that may block the ventilation openings, in a built-in installation, such as a bookcase or cabinet that may impede the flow of air through the ventilation openings.
- HEAT – The appliance should be situated away from heat sources such as radiators, stoves, or other appliances (including amplifiers) that produce heat.
- POWER SOURCE – The appliance should be connected to a power supply only of the type described in the operating instructions or as marked on the appliance.
- POWER CORD PROTECTION – Power supply cords should be routed so that they are not likely to be walked on or pinched by items placed upon or against them.
- POWER LINES – an outdoor antenna should be located away from power lines.
- OBJECT AND LIQUID ENTRY – care should be taken so that objects do not fall and liquids are not spilled into the enclosure through openings.
- ESD WARNING – the display does not function properly or not reaction to operation of any the control may due to the electrostatic discharge. Switch off and unplug the set. Reconnect after a few seconds.
- DAMAGE REQUIRING SERVICE – the appliance should be serviced by qualified service personal when: a. the power-supply cord or plug has been damaged. b. Objects have fallen into, or liquid has been spilled into the appliance enclosure. c. The appliance has been exposed to rain. d. The appliance has been dropped, or the enclosure damaged. e. The appliance does not appear to operate normally.
- SERVICING – the user should not attempt to service the appliance beyond that described in the user operation instructions. All other servicing should be referred to qualified service personnel.
- DO ensure that all electrical connections (including the mains plug, extension leads and inter-connections between the pieces of equipment) are properly made and in accordance with the manufacturer's instructions. Switch off and unplug the power before making or changing connections.
- Unplug this apparatus during lightning storms or when unused for long periods of time.
- Never unplug your radio by pulling on the power cord. Always grasp the plug firmly and pull straight out from the outlet.
- DON'T remove any fixed cover as this may expose dangerous voltages.
- DON'T place hot objects or naked flame sources such as lighted candles or nightlight on, or close to equipment. High temperatures can melt plastic and lead to fires.
- DON'T leave equipment switched on when it is unattended unless it is specifically stated that it is designed for unattended operation. Switch off using the switch on the equipment and make sure that your family knows how to do this. Special arrangements may need to be made for infirm or handicapped people.
- DON'T continue to operate the equipment if you are in any doubt about if it's working normally or if it's damaged in any way. Switch it off, unplug the mains power and consult your dealer.
- REPAIR OR REPLACE all electric service cords that have become frayed or otherwise damaged immediately. Do not use a cord that shows cracks or abrasion damage along its length, the plug, or the connector end.
- DON'T place objects filled with liquids, such as vases on the apparatus.
- Batteries shall not be exposed to excessive heat such as sunshine, fire or the like.
- The mains plug shall remain readily operable.
- Ensure a minimum distance of 5cm around the apparatus for sufficient ventilation.
- The ventilation should not be impeded by covering the ventilation opening with items such as newspapers, table-cloths, curtains, etc.
- The batteries should be drawn to the environmental aspects of battery disposal.
Warning: Danger of radiation


These labels tell you that the unit contains a laser component. Opening the CD compartment lid and defeating the safety interlocks will expose the user to radiation from the laser beam. Do not stare into the laser while it is operating.
Electrical information
Mains Supply: The mains operating voltage of this unit is marked on a rating plate on the back of the unit.
The means of disconnecting this appliance from the mains supply is the mains plug. This should be unobstructed and readily operable at all times.
Introduction
Introduction DAB (Digital Audio Broadcasting) technology allows many more radio stations compared to FM. DAB transmissions do away with problems of hiss and fade that plague AM and FM broadcasts and are less likely to be affected by adverse weather conditions or other sources of interference. In addition to speech and music DAB transmissions carry high levels of data - far greater than the limited RDS information available on FM stations. Unlike FM, DAB is broadcast on many frequencies. Many countries in Europe, including the UK use Band III (174-240 MHz); others, France for example, use the L-Band (1452-1492 MHz). Germany uses both bands. Your radio can tune Band III. Countries in Europe that use Band III include: Belgium, Denmark, Holland, Italy, Norway, Portugal, Spain, Sweden, Switzerland. Your radio will tune stations in all these countries.
Your radio cannot receive French or German stations broadcasting in the L-Band though FM services are available all over Europe. Being digital, DAB transmissions can have a wider frequency range and greater dynamics than that available with FM technology. FM reception is available on the MC+ 50 for use in those locations where there is no usable DAB service. Check how many stations you can get in your area by texting DAB and your postcode to 88600# or find out which stations on the website at: getdigitalradio.com
Controls and connectors


- IR receiver
- LCD display
- STANDBY/PLAY/PAUSE button
- SKIP PREV button
- CD loading drawer
- POWER button
- SKIP NEXT button
- EJECT ▲/FUNCTION button
- VOLUME control
- AUDIO input
- SPEAKER outputs
- PIGTAIL antenna
- POWER cable
Controls and connectors

- STANDBY button
- CD button
- DAB/FM button
- PLAY/PAUSE ▶ button
- MENU/STOP ■ button
- ◀◀/TUNER- button
- ◀◀/PREV button
- NUMERIC buttons
- TONE button
23.EJECT ▲button
- AUXIN button
- REPEAT button
- INFO button
- ▶▶/NEXT button
- ▶▶/TUNER+ button
- ENTER button
- PROGRAM button
- SHUFFLE button
- LOUD button
- DSP button
- MUTE button
- VOLUME-/+ buttons
Preparation for use
Loudspeakers
Placing & connecting the speakers
• Unwrap the speaker wires. - Place a speaker on either side of the main unit, preferably at the same height, and with at least 150 mm between each speaker and the main unit. - Connect the speaker plugs to the rear of the unit (11). Take care to match the speaker placed to the LEFT to the LEFT output on the rear of the unit. Repeat for the RIGHT speaker.

Connecting the power
Connecting mains power
- Check the voltage marked on the rear rating plate is the same as the voltage in your area.
- Connect the mains plug to the wall socket and switch the mains power ON.
- Press the POWER button (6) on the main unit to power ON the unit.
Remote control batteries
Fitting or replacing the remote control batteries


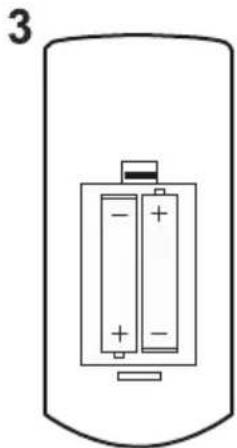
When replacing the batteries in the remote control, refer to the diagram above.
- Push the catch on the battery door in the direction of the embossed arrow on the rear of the remote.
- While pushing the catch, open the battery door.
- Fit two AAA batteries observing polarity as shown. When replacing the batteries, use only the same AAA type supplied.
- Re-fit the battery door and clip it in place.
Disposal of batteries
Dispose of used batteries with regard to the recycling regulations in your area. Do NOT short circuit batteries or throw them into water, the general rubbish or in a fire. Weak batteries can leak and damage the remote control. Replace them in good time!
Getting started
Switching on the MC+ 50 for the first time
- Connect the mains plug to a wall outlet.
- Extend the pig tail antenna as far as it can go.
NOTE: The quality of the DAB reception will be influenced by the positioning of the pigtail aerial.
- Press the POWER button (6) to power on the unit.
- The radio will automatically auto tune and operate the quick scan.
POWER ON
WELCOME
Scanning... 12

During scan mode, the LCD will display a slide bar that indicates the progress of the scan, and the amount of radio stations that have been found so far. Once the scan has finished, the radio will select the first alphanumeric station.
Station selection
To listen to the stations that have been found, use the ◀◀ / ▶▶ buttons (19, 28) on the remote or PREV / NEXT (4, 7 on the main unit) to cycle through. Each time you press a button, the unit will skip to the next or previous stored station. Press the ENTER button (29 on the remote) or PLAY/PAUSE button (3 on the unit) to activate the station.
Standby mode
Press and hold the STANDBY/PLAY/PAUSE button (3) on the unit or press the STANDBY button (14) on the remote to put the system into standby mode. To resume normal operation, press either button again.
NOTE: When you power on the unit from standby, the last used mode will resume.
Positioning the antenna
- Positioning of the aerial will influence the DAB signal quality. To find the optimum position, select the display signal strength indicator by cycling through the display modes using the INFO button (26).
BBC R1

- Once the indicator is displayed, move the aerial and observe the signal level as shown by the bar graph. When you are happy with the positioning, perform an auto tune to capture all of the available stations.
General operation
DSP effects
Pressing the DSP button (33) repeatedly cycles through a set of EQ presets to alter the sound field. Choose from Jazz, Rock, Classic, Pop, Live, Dance & Off.
Loudness function
This function will add a rounder bass sound at low levels. Press the LOUD button (32) on the remote to enable. Press again to disable the effect.
Mute function
Press the MUTE button (34) at any time to silence the output. Press again to resume. NOTE: The mute indicator screen will time out after 10 seconds.
Tone controls
Adjust the Bass & Treble tone controls if required.
- Press the TONE button (22) on the remote control.
- The first adjustment is Volume. Use the VOL+/- buttons (35) to adjust.
- Press the TONE button again to edit the Bass. Use the VOL+/- buttons to adjust.
- Press the TONE button (22) once more to edit Treble. Use the VOL+/- buttons to adjust.
Switching modes
To switch between the available modes: CD, FM, DAB & AUX IN.
Press and hold the EJECT/FUNCTION button (unit) (8) to cycle through the options or press the relevant button on the remote control from CD, DAB/FM & AUX IN. To switch between DAB & FM press the button again.
DAB operation
Select DAB using either method described above.
Auto scan mode
- To activate the full scan press the MENU button (18).
- When you see the option press the ENTER button. The unit will search for all available DAB stations that can be tuned.
Manual tuning
As well as an auto tune function, you can manually tune the receiver.
- Press the MENU button in DAB mode, and use the ◀◀ /▶▶ buttons (19,28) on the remote or PREV / NEXT (4,7 main unit) to find . Press the ENTER button (29) to activate the manual tune options.
- Now use the ◀◀/▶▶ buttons on the remote or PREV / NEXT (main unit) to cycle through the DAB ensembles/multiplexes, which are numbered from 5A to 13F.
- Press the ENTER button to view the ensemble/multiplex details. Press the ENTER button again to enter the multiplex.
- To see what stations are present in the found ensemble/multiplex, just press the / ◀◀ ▶▶ buttons on the remote or PREV / NEXT (main unit). When you've located a station that you would like to listen to, press the ENTER button. 5.Any stations found during the manual tune operation will be added to your station list.
Storing station presets
It is possible to store up to 10 of your favourite stations. This will enable you to access your favourite stations quickly & easily.
To store a preset, you must first be listening to the station that you would like to save. Then press & hold one of the numeric buttons from 1 - 0 to store the station under that number. You will see Preset x Stored appear on the display with x being the number you stored the station under.
Recalling a station preset
To select a preset, just press the required numeric button while in DAB mode to activate the station you stored.
Display modes
Every time you press the INFO button on the remote control, the display will cycle through the following display modes: The information is displayed on the lower segment of the LCD display.
![graph TD A["DLS (scrolling text)"] --> B["Signal Strength"] B --> C["Programme Type"] C --> D["Ensemble Name"] E["Channel Frequency"] --> F["Signal Error"] F --> G["Bitrate"] G --> D](/content/2026/06/1365382/images/e670b6a3109ed98d8a95996a8c58b3cae4feef6ced42c8be0c41aee054008859.jpg)
Ensemble/Multiplex (Group name)
A multiplex/ensemble is a collection of radio stations that are bundled and transmitted on one frequency. There are national and local multiplexes. Local ones contain stations that are specific to that area, e.g., MXR West.
NOTE: DAB – unlike normal radio – groups together several radio stations and transmits them on one frequency.
Bit rate
This displays the type of broadcast you are receiving, e.g., mono or stereo, and what bit rate is being used.
DLS (Dynamic Label Segment)
Dynamic label segment is a scrolling message that the broadcaster may include with their transmissions. This message usually includes information like program details.
Program type
This describes the "style" or "genre" of music that is being broadcast, e.g., "Rock" or "Classical".
Secondary services
On some occasions you will see a ">" symbol directly after the name of the station. This indicates that there are secondary services available to that station.
These secondary services contain extra services that relate to the primary station, e.g., a sports station may want to add extra commentaries. The secondary services are inserted directly after the primary station.
To activate a secondary service, press the button.
You will see that the ">" has changed to a "<" to indicate you are listening to the secondary service. To return to the original service, press the button.
Pruning
When the radio has performed a scan in several locations, you may find there are stored stations that you can no longer receive. This function automatically removes them from the stored station list.
- Press the MENU button (18).
- When the option appears, use the ◀◀ / ▶▶ buttons on the remote or PREV / NEXT (main unit) to find it, then press the ENTER button to select.
- Use the ◀◀ / ▶▶ buttons on the remote or PREV / NEXT (main unit) to select YES and press ENTER to confirm.
DRC (Dynamic Range Control)
This causes the radio to reduce the dynamic range of the audio signal. The purpose is to adapt the dynamic range of the audio signal to listening in a noisy environment.
NOTE: This is not available on some DAB stations.
- Press the MENU button.
- When the option appears, use the ◀◀ / ▶▶ buttons on the remote or PREV / NEXT (main unit) to find it, then press the ENTER button to select.
- Choose between DRC off, DRC Low, and DRC High using the ◀◀ / ▶▶ buttons on the remote or PREV / NEXT (main unit).
- Press the ENTER button to save the setting.
FM operation
See Switching modes to switch to FM.
Scanning for stations
You can scan up or down the frequency range manually by pressing the TUNER- / TUNER+ (main unit) or press ◀◀ / ▶▶ (remote) buttons to increase or decrease the frequency in 0.05 MHz increments.
To scan the previous or next stations, press and hold (remote) or press and hold TUNER- / TUNER+ (main unit).

Scan Modes
When performing an auto scan you can set the sensitivity level of the stations to be found. EG: strong signals only or all stations.
- In FM mode, press the MENU button, when appears on the display press the ENTER button to view the submenu.
- Use the ◀◀ /▶▶ buttons on the remote or PREV / NEXT(main unit) to select either ALL STATIONS (which will detect any station, even with a weak signal) or STRONG STATION (which will only detect stations with a good signal strength). Press the ENTER button to select the required option.
- When you perform a scan as described in SCANNING FOR STATIONS, only stations fitting the applied setting will be detected.
Storing station presets
It is possible to store up to 10 of your favourite stations. This will enable you to access your favourite stations quickly& easily.
To store a preset, you must first be listening to the station that you would like to save. Then press & hold one of the numeric buttons from 1 - 0 to store the station under that number. You will see Preset x Stored appear on the display with x being the number you stored the station under.
Recalling a station preset
To select a preset, just press the required numeric button while in FM mode to activate the station you stored.
Display modes
Every time you press the "INFO" button, the display will cycle through the following display Modes:
![graph TD A["Radio Text"] --> B["Program Type"] C["Program Name"] --> D["Audio Mode (Stereo/Mono)"] B <--> D](/content/2026/06/1365382/images/23f276ccbde5ab4f637262c47668ea6e8ff884f1273feb30bca77c0a9222080a.jpg)
Radio text
As with DAB, the broadcaster can include a scrolling text that displays information about the current program. If Radio text information is not available, then the display will show .
Program type
This describes the "Style" or "genre" of music that is being broadcast e.g. "Rock" or "Classical". If no programme type has been set then will be displayed.
Program name
This will display the frequency of the current station.
Audio mode
This denotes whether the station is in Stereo or Mono mode.
CD operation
- Make sure you are in CD mode, if not press the CD button on the remote or press & hold the FUNCTION button until you reach CD.
- Press the EJECT button (8,23), when the disc drawer pops out insert a disc (label side facing upwards), press the EJECT button again to close.
- When the door is closed "Loading disc" will appear on the display and the unit detects how many tracks are found on the current disc, this will be displayed on screen.
- Playback will begin automatically from Track 01.
- To stop playback press the STOP ■button (18).
- To pause playback press the PLAY/PAUSE ▶ button (3,17) during playback. To resume playback press once more.
Skipping Tracks
To skip to the next track on a disc, press ▶▶ (remote) or NEXT (unit). To skip to the previous track, press ◀◀ (remote) or PREV (unit).
Fast Searching Tracks
To fast forward a track during playback, press the (remote) button or press and hold the NEXT button (unit). Each press of the button increases the search speed, e.g., 2x and 4x; the next press will resume normal playback. To fast rewind a track during playback, press the (remote) button or press and hold the PREV button (unit).
Repeat Operation
- During playback, pressing the REPEAT button will flag the current track to repeat indefinitely.
- Pressing the REPEAT button again will repeat all tracks on the disc.
- To cancel the repeat function, press the REPEAT button a third time.
Programme Playback
You may wish to play back tracks of a CD in a different order than the original disc was recorded in.
- Press the PROGRAM button (30) to enter the programme setup function.
- Use the ◀◀ / ▶▶ buttons to skip between the play order numbers.
- Set the play order track numbers using the numeric keys.
![graph TD A["PROGRAM INPUT\n01[00"] 02["00"]] --> B["Play Order Track Number"] B --> C["PROGRAM INPUT\n01[02"] 02["14"]→]](/content/2026/06/1365382/images/0a23733f7a240624faeb4c7bde7825c39eb28a297fb4693c95a810a51157016c.jpg)
For example: the diagram on the right would play track 02 as the first track and track 14 as the second track.
- When tracks 1-2 are set, use the 🔊 buttons to access further play order screens. Repeat steps 2-3 for the remainder of the program playlist.
- When complete, use the ◀◀ buttons to scroll across to the arrow on the right of the display and press the ENTER button to begin playback.
- To cancel the program sequence, press the STOP button twice.
Random Operation
Press the SHUFFLE button (31) on the remote control. The CD contents will be played once in a random order.
Pressing the SHUFFLE button again activates the RANDOM option. This will play the CD content in a random fashion with some tracks being played a number of times.
To cancel the random operation, press the SHUFFLE button again.
Numeric buttons
While listening to a CD, a specific track number can be played by pressing the relative digit on the number buttons.
E.g., track 6 would be 06. To play track 12, you would press the 1 button then 2.
Random Operation
Press the SHUFFLE button (31) on the remote control. The CD contents will be played once in a random order.
Pressing the SHUFFLE button again activates the RANDOM option. This will play the CD content in a random fashion with some tracks being played a number of times. To cancel the random operation, press the SHUFFLE button again.
Numeric buttons
While listening to a CD, a specific track number can be played by pressing the corresponding digit on the number buttons. For example, track 6 would be 06. To play track 12, press the 1 button then the 2 button.
External input
Connecting external audio sources
External audio sources such as iPods and MP3 players can be connected using a 3.5mm to RCA audio cable (not supplied).

- Connect one end of the cable to the MP3 player's headphone/line output and the other end to the AUX IN input (10) on the back of the unit.
- Press and hold the FUNCTION button until you reach the AUX-IN option, or press the AUX-IN button on the remote control.
- Adjust the volume to your desired level.
NOTE: When connecting via the headphone output, the volume of the micro system is affected by the volume control on the player. Ensure that the player is set to about 70-80% to avoid distortion.
Advanced operation
Factory reset
Follow the steps below to restore to factory settings.
- Press the MENU button (Note: This does not work in CD or AUX mode; enter another mode before pressing the MENU button). Use the ◀◀ / ▶▶ buttons on the remote or PREV / NEXT (main unit) to find , then press the ENTER button to select.
- When you see , press the ENTER button.
- Select using the ◀◀ / ▶▶ buttons, then press ENTER to start the reset process.
NOTE: Once the reset has taken place, you will lose all your stored presets both DAB and FM, and the internal DAB registry.
Care and maintenance
After using your radio
- Set to Standby.
- Switch the unit off at the mains and unplug it if you are leaving it unattended for a long period (holidays etc).
- Avoid leaving batteries fitted if you leave the radio unattended for long periods. They may leak and damage the radio.
CARE AND CLEANING
All care and cleaning operations should be carried out with the unit unplugged from the mains power.
Occasionally wipe the cabinet with a lint free duster. Never clean the unit with liquids or solvents.
Trouble shooting
| PROBLEM | CAUSE SOLUTION | |
| No soundStatic SoundSound is distorted | Volume not turned upSignal reception too lowVolume is too high | Adjust the main volume knobAdjust the antenna or move the unit to a stronger signal location |
| Desired station not found | Weak signal | Use the Manual Tune function |
| The display is blank | This may occur if the broadcaster changes the lable of a service or removes a lable while tuned. | The radio will try to retune per formance a scan. |
| I can hear a burbling noise on some stations | weak signal Try re-positioning the aerial |
Specifications
Supply Voltage, Mains: AC 220-240V~50Hz
Max. Power Consumption....40W
Speaker Power: 2 x 5W
DAB: 174-240 MHz
FM: 87.5-108 MHz
Net Weight: 3.0 kg
Contents
The carton should contain:
• The MC+ 50 Microsystem - 2 x Speakers - Remote control (with batteries) - Operating Manual
LOCATION
Place the unit on a dry stable surface away from heat and damp and where it is unlikely to fall or be knocked over.

This symbol on the product or in the instructions means that your electrical and electronic equipment should be disposed at the end of its life separately from your household waste. There are separate collection systems for recycling in the EU.
For more information, please contact the local authority or your retailer where you purchased the product.
© All rights reserved by Blaupunkt Competence Center Audio M3 Electronic GmbH. This material may be reproduced, copied or distributed for personal use only.

BLAUPUNKT
Competence Center Audio
M3 Electronic GmbH
Gutenbergstrasse 5
D-65830 Kriftel - Germany
www.blaupunkt.com
Service Hotline Germany: 0180 55 88 66 4
All rights reserved. All brand names are registered
trademarks of their respective owners. Specifications are
subject to change without prior notice.

- LIGHTNING FLASH WITH ARROWHEAD SYMBOL
- EXCLAMATION POINT
- IMPORTANT NOTES
- CE CONFORMITY
- SAFETY INSTRUCTIONS
- WARNING: DANGER OF RADIATION
- ELECTRICAL INFORMATION
- INTRODUCTION
- CONTROLS AND CONNECTORS
- PREPARATION FOR USE
- LOUDSPEAKERS
- PLACING & CONNECTING THE SPEAKERS
- CONNECTING THE POWER
- CONNECTING MAINS POWER
- REMOTE CONTROL BATTERIES
- DISPOSAL OF BATTERIES
- GETTING STARTED
- SWITCHING ON THE MC+ 50 FOR THE FIRST TIME
- STATION SELECTION
- STANDBY MODE
- POSITIONING THE ANTENNA
- GENERAL OPERATION
- DSP EFFECTS
- LOUDNESS FUNCTION
- MUTE FUNCTION
- TONE CONTROLS
- SWITCHING MODES
- DAB OPERATION
- AUTO SCAN MODE
- MANUAL TUNING
- STORING STATION PRESETS
- RECALLING A STATION PRESET
- DISPLAY MODES
- ENSEMBLE/MULTIPLEX (GROUP NAME)
- BIT RATE
- DLS (DYNAMIC LABEL SEGMENT)
- PROGRAM TYPE
- SECONDARY SERVICES
- PRUNING
- DRC (DYNAMIC RANGE CONTROL)
- FM OPERATION
- SCANNING FOR STATIONS
- SCAN MODES
- RADIO TEXT
- PROGRAM NAME
- AUDIO MODE
- CD OPERATION
- SKIPPING TRACKS
- FAST SEARCHING TRACKS
- REPEAT OPERATION
- PROGRAMME PLAYBACK
- RANDOM OPERATION
- NUMERIC BUTTONS
- EXTERNAL INPUT
- CONNECTING EXTERNAL AUDIO SOURCES
- ADVANCED OPERATION
- FACTORY RESET
- CARE AND MAINTENANCE
- AFTER USING YOUR RADIO
- CARE AND CLEANING
- SPECIFICATIONS
- CONTENTS
- BLAUPUNKT
Brand : BLAUPUNKT
Model : MC-50
Category : Hi-Fi System