
AFICIO SP W2470 - Multifunction Printer RICOH - Free user manual and instructions
Find the device manual for free AFICIO SP W2470 RICOH in PDF.
| Product type | Large format multifunction printer |
| Maximum format | A0 (841 mm) roll, A1 bypass |
| Print speed | Up to 4 pages A1/min (roll tray) |
| Resolution | 600 × 600 dpi |
| Print languages | RPCS, PostScript 3, PDF Direct, GL/2 & TIFF |
| Memory | 512 MB |
| Hard disk | 80 GB |
| Power supply | 220-240 V, 50/60 Hz, 8 A |
| Power consumption (printing) | 1.00 kW |
| Dimensions (L × D × H) | 1080 × 720 × 1160 mm |
| Weight | Approx. 172 kg |
| Paper capacity – roll | 2 trays, max length 15 m each |
| Paper capacity – sheets | Sheet tray 250 sheets, bypass tray 1 sheet |
| Media types | Plain paper, translucent, recycled film |
| Standard interfaces | Ethernet 10/100Base-TX, USB 2.0 |
| Optional interfaces | WLAN IEEE 802.11b, Gigabit Ethernet |
| First print (A1, roll tray) | 20 seconds |
| Warm-up time | Less than 120 seconds |
| Noise level – printing | < 68 dB(A) |
| Noise level – standby | < 43 dB(A) |
| Control panel | LCD screen with selection keys |
| Main consumable | Black toner cartridge (approx. 2188 pages A1) |
Frequently Asked Questions - AFICIO SP W2470 RICOH
User questions about AFICIO SP W2470 RICOH
0 question about this device. Answer the ones you know or ask your own.
Ask a new question about this device
Download the instructions for your Multifunction Printer in PDF format for free! Find your manual AFICIO SP W2470 - RICOH and take your electronic device back in hand. On this page are published all the documents necessary for the use of your device. AFICIO SP W2470 by RICOH.
USER MANUAL AFICIO SP W2470 RICOH
Operating Instructions Hardware Guide
1 Guide to the Printer
2 Setting Up
3 Connecting the Printer Cables
4 Configuration
5 Paper and Other Media
6 Replacing Consumables
7 Cleaning and Adjusting the Printer
8 Troubleshooting
9 Removing Misfed Paper
10 Appendix
Introduction
This manual contains detailed instructions and notes on the operation and use of this machine. For your safety and benefit, read this manual carefully before using the machine. Keep this manual in a handy place for quick reference.
Do not copy or print any item for which reproduction is prohibited by law.
Copying or printing the following items is generally prohibited by local law:
bank notes, revenue stamps, bonds, stock certificates, bank drafts, checks, passports, driver's licenses.
The preceding list is meant as a guide only and is not inclusive. We assume no responsibility for its completeness or accuracy. If you have any questions concerning the legality of copying or printing certain items, consult with your legal advisor.
Important
Contents of this manual are subject to change without prior notice. In no event will the company be liable for direct, indirect, special, incidental, or consequential damages as a result of handling or operating the machine.
Trademarks
Microsoft®, Windows®, Windows NT® and Windows Server® are either registered trademarks or trademarks of Microsoft Corporation in the United States and/or other countries.
Adobe®, PostScript® and Acrobat® are registered trademarks of Adobe Systems Incorporated.
AppleTalk and Mac OS are trademarks of Apple Computer Inc., registered in the U.S. and other countries.
Bonjour™ is a trademark of Apple Computer, Inc.
Netscape and Netscape Navigator are registered trademarks of Netscape Communications Corporation.
Ethernet is a registered trademark of Xerox Corporation.
Other product names used herein are for identification purposes only and might be trademarks of their respective companies. We disclaim any and all rights to those marks.
The proper names of the Windows operating systems are as follows:
The product name of Windows 98 is Microsoft® Windows® 98.
The product name of Windows Me is Microsoft® Windows® Millennium Edition (Windows Me).
- The product names of Windows 2000 are as follows: Microsoft® Windows® 2000 Professional Microsoft® Windows® 2000 Server Microsoft® Windows® 2000 Advanced Server
- The product names of Windows XP are as follows: Microsoft® Windows® XP Professional Microsoft® Windows® XP Home Edition Microsoft® Windows® Media Center Edition Microsoft® Windows® Tablet PC Edition
- The product names of Windows Server 2003 are as follows: Microsoft® Windows Server® 2003 Standard Edition Microsoft® Windows Server® 2003 Enterprise Edition Microsoft® Windows Server® 2003 Web Edition Microsoft® Windows Server® 2003 Datacenter Edition
- The product names of Windows Server 2003 R2 are as follows: Microsoft® Windows Server® 2003 R2 Standard Edition Microsoft® Windows Server® 2003 R2 Enterprise Edition Microsoft® Windows Server® 2003 R2 Datacenter Edition
- The product names of Windows NT 4.0 are as follows: Microsoft® Windows NT® Workstation 4.0 Microsoft® Windows NT® Server 4.0
Notes
Some illustrations in this manual might be slightly different from the machine.
Certain options might not be available in some countries. For details, please contact your local dealer.
Manuals for This Printer
Refer to each manual as required.
Important
Media differ according to manual.
To view the PDF versions of these manuals, Adobe Acrobat Reader/Adobe Reader must be installed on your computer.
Depending on which country you are in, HTML versions of these manuals might also be provided. To view these, a Web browser must be installed on your computer.
Safety Information
Provides information on safe usage of this machine.
To prevent damage to the machine and avoid injury, be sure to read this.
Hardware Guide (This manual)
Contains information about paper and explains procedures such as installing options, replacing consumables, responding to error messages, and resolving jams.
Software Guide
Contains procedures for using this machine in a network environment, utilizing the software, and using security functions.
Security Reference
This manual is for machine administrators.
The machine's security functions prevent unauthorized use of the machine, data tampering, and information leakage.
For increased security, configure the following settings.
Using Server Certificates
Using SSL
- Changing Administrator User Names and Passwords For details, see "Setting Up the Printer", Security Guide.
Be sure to refer to this manual when configuring the machine's security and authentication settings.
Symbols
The following set of symbols is used in this manual.
WARNING:
Indicates important safety notes.
Ignoring these notes could result in serious injury or death. Be sure to read these notes. They can be found in the "Safety Information".
CAUTION:
Indicates important safety notes.
Ignoring these notes could result in moderate or minor injury, or damage to the machine or to property. Be sure to read these notes. They can be found in the "Safety Information".
Important
Indicates points to pay attention to when using the machine, and explanations of likely causes of paper misfeeds, damage to originals, or loss of data. Be sure to read these explanations.
Note
Indicates supplementary explanations of the machine's functions, and instructions on resolving user errors.
Reference
This symbol is located at the end of sections. It indicates where you can find further relevant information.
[]
Indicates the names of keys that appear on the machine's display panel.
【】
Indicates the names of keys on the machine's control panel.
Keys on the computer's keyboard.
Names of Major Options
This section explains the names of the major options described in this manual.
Major options for this machine are referred to as follows:
- Paper Cassette Type 240 Cut paper tray
- Folder FD6500A Folding finisher
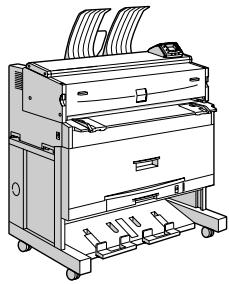
Model-Specific Information
In this manual, model-specific information is indicated by the following marks:
220-240V
Indicates information that is specific to the 220 to 240V model.
120V
Indicates information that is specific to the 120V model.

Note
Check the label on the rear of the printer to identify the model.
BAL006S
Dimensions in this manual are given in two units of measure: metric and inch. If your printer is the 220 to 240V model, refer to the metric units. If your printer is the 120V model, refer to the inch units.
Installing the Operating Instructions
The CD-ROM "Manuals" provided with this printer contains HTML version Operating Instructions. Follow the instructions below to install it.
Important
System Requirements :
- Windows 95/98/Me, Windows 2000/XP, Windows Server 2003 or Windows NT4.0.
- 800 × 600 or higher monitor resolution.
Web Browser Requirements :
- Microsoft Internet Explorer 5.5 SP2 or higher
- Firefox 1.0 or higher
Quit all applications currently running.
2 Insert the CD-ROM "Manuals" into the CD-ROM drive.
The installer starts.
3 Select an interface language and the model type want to use, and then click [OK].
4 Click [Install manuals] or [Install HTML Manuals].
220-240V
If you want to read manuals from CD-ROM, click [Read manuals].
120V
If you want to read manuals from CD-ROM, click [Read HTML Manuals] or [Read PDF Manuals].
5 Follow the instructions on the screen to complete the installation.
Click [Finish] when the installation is completed.
7 Click [Exit].
Note
The CD-ROM "Manuals" contains two versions of the manuals: a standard version and a simpler version. Select the appropriate version for your operating environment.
To uninstall the Operating Instructions, select [Programs] in the [Start] menu, select this printer driver, and then click [Uninstall]. You can uninstall each Manual separately.
If you are using an unsupported Web browser and the simpler version of the Operating Instructions Manual does not display correctly, open the folder "MANUAL.HTMLLANG (language) \ (manual name) unv" on the CD-ROM "Manuals", and then double-click on "index.htm".
TABLE OF CONTENTS
Manuals for This Printer
How to Read This Manual .ii
Symbols
Names of Major Options
Model-Specific Information.. 3
Installing the Operating Instructions .iv
1. Guide to the Printer
Exterior: Front View. 1
Exterior: Rear View 3
Interior 5
Control Panel. 6
Display Panel 7
Displays and Key Operations 8
Options 10
External Options 10
Internal Options 11
2. Setting Up
Printer Setup Procedures 13
Where to Put Your Printer 14
Optimum Environmental Conditions. 14
14
Access to the Printer 15
Installing the Toner Cartridge 16
Loading Paper 20
Loading the Paper Roll into Tray 1 and 2. 21
Loading Cut Paper into the Tray 3 24
Turning On the Power 26
Anti-humidity Heater Switch 28
Selecting the Display Language 29
Test Printing 31
3. Connecting the Printer Cables
Ethernet Cable Connection 33
Reading the LED Lamps 35
USB Cable Connection 36
4. Configuration
Ethernet Configuration 39
40
Receiving an IP Address Automatically (DHCP) 43
Configuring Network Settings When Using NetWare 45
Setting the Ethernet Speed 47
IEEE 802.11b (Wireless LAN) Configuration 49
Setting the SSID. 52
Setting Security Method of Wireless LAN 54
Setting a WEP key 54
Setting WPA 57
Configuring WPA/WPA2 60
Installing a Site Certificate 61
62
Setting Items of WPA/WPA2 63
5. Paper and Other Media
Supported Paper for Each Tray 65
Paper Recommendations 67
Loading Paper 67
Storing Paper 67
Types of Paper and Other Media 68
Paper Not Supported by This Printer 70
Handling Paper 71
Print Area 72
Loading Paper 73
Loading the Paper Roll into Tray 1 and 2. 74
Loading Cut Paper into Tray 3 81
Loading Paper in the Bypass Tray 88
6. Replacing Consumables
Replacing the Toner Cartridge 95
7. Cleaning and Adjusting the Printer
Maintaining Your Printer 101
Cleaning the Main Unit 102
Adjusting Paper Thickness 103
Adjusting the Fine Ratio 105
Adjusting the Folding Width 107
Adjusting the Margin Fold 109
8. Troubleshooting
Error and Status Messages Appears on the Control Panel 111
Panel Tones 113
Printer Does Not Print 114
Checking the Port Connection 116
Other Printing Problems 117
Additional Troubleshooting 122
9. Removing Misfed Paper
Removing Misfed Paper 125
Paper Misfeed Message 127
Paper Misfeed Message (A1) 127
Paper Misfeed Message (A2) 128
Paper Misfeed Message (B) 129
Paper Misfeed Message (C) 129
Paper Misfeed Message (N) 130
Paper Misfeed Message (V) 131
10.Appendix
Moving and Transporting the Printer 133
Disposal 134
Consumables 135
Toner Cartridge 135
Specifications for the Main Unit 136
Specifications for Options 139
Paper Cassette Type 240 139
IEEE 802.11b Interface Unit Type H 139
Gigabit Ethernet Board Type A 140
INDEX. 141
1. Guide to the Printer
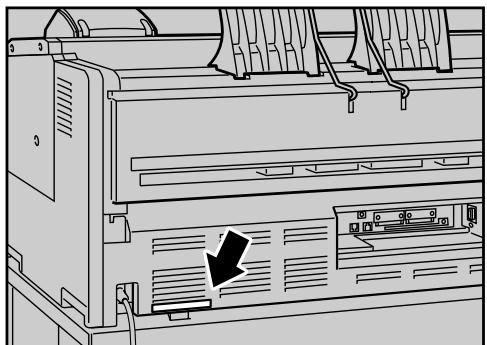
Exterior: Front View
This section explains names and functions of the parts on the front and left side of the printer.
BAL007S
1. Upper output stacker
When the upper output is selected, output paper is stacked here.
2. Ventilation holes
Prevent overheating.
3. Main unit
Open when paper jam or toner runs out.
4. Main unit opening lever
Use to open the main unit.
5. Power switch
Switches the power of the printer to On or Stand by mode.
6. Paper roll tray (Tray 1 and 2)
Load a paper roll here.
7. Control panel
See p.6 "Control Panel".
8. Main unit front cover
Open when toner runs out.
9. Bypass tray
Use to feed paper in manually. Load paper print side up.
10. Bypass tray's paper guide
Set to the width of the paper for bypass printing.
11. Cut paper tray (Tray 3, optional)
Load cut paper here.
13. Lower output auxiliary guide
Pull this out to insert rolled paper.
12. Lower output stacker
When the lower output is selected, output paper is stacked here.

Note
- Do not pull out the lower output auxiliary guide when lower output is selected. Otherwise, output paper may not be stacked properly.
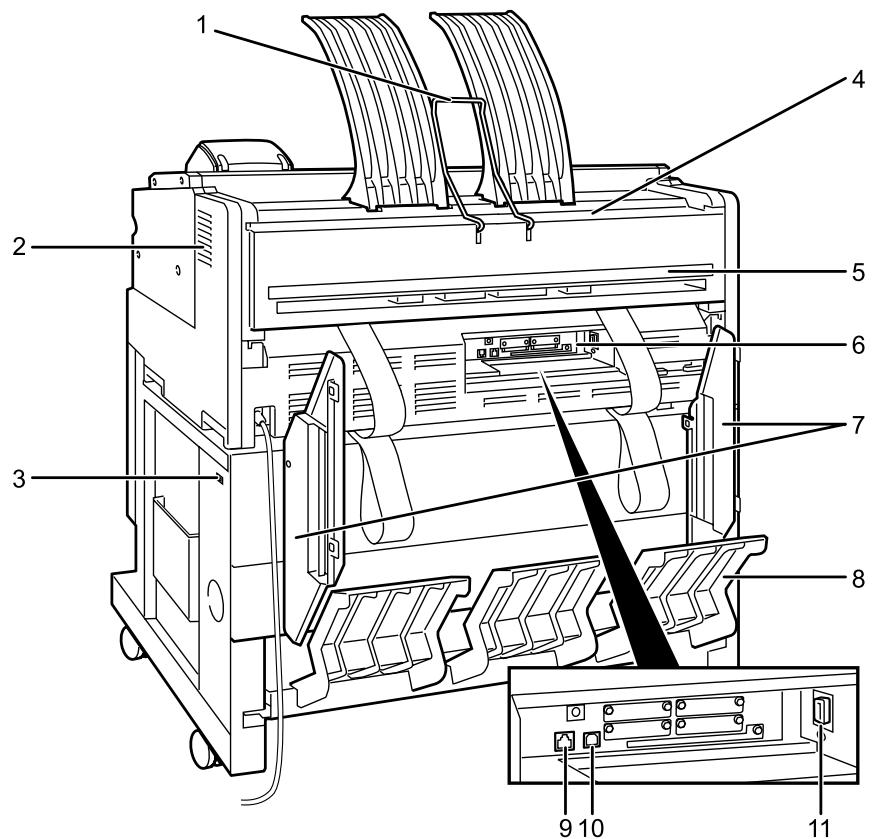
Exterior: Rear View
This section explains names and functions of the parts on the rear side of the printer.
BAL008S
1. Upper output guide
Takes prints to the upper output stacker.
2. Vents
Prevent overheating.
3. Anti-humidity heater switch
Turn this switch to On when operating this machine in humid conditions. The anti-humidity heater prevents roll and tray paper absorbing moisture.
4. Upper output exit
When the upper output is selected, output paper is delivered here with the print side facing the user.
5. Lower output exit
When the lower output is selected, output prints are delivered here with the print side up.
6. Controller board
Attach the interface cable, network cable, or USB cable here.
7. Lower output guides
Prevent delivered paper being stacked at an angle when the lower output is selected.
8. Lower output tray
Delivers prints from the lower output exit, and then sends them to the lower output stacker.
9. Ethernet port
Plug a network (Ethernet) cable into this port to connect the printer to a computer network.
10. USB port
Plug a USB cable into this port to connect the printer directly to a host computer.
11. Folding finisher port (optional)
Plug the folding finisher cable into this port.

Note
- Use the lower output guides if A0 or A1 sheets are being delivered to the lower output exit.

Reference
p.10 "Options"
p.28 "Anti-humidity Heater Switch"
Interior
This section explains names and functions of the parts inside of the printer.

1. Toner cartridge
Replace the relevant toner when the following messages appear:

Add Toner"
2. Paper roll 1 (Tray 1)
3. Paper roll 2 (Tray 2)
4. Cutter knob
Use to manually cut paper if there are paper jams in the cutter area of the machine. Always return the cutter knob to the left or right end.
5. Paper holder
The two paper holders grip the paper roll and are mounted on the paper roll tray's roll holder.
6. Paper feed knob
Use when loading paper rolls or clearing paper jams.
7. Roll holder
Adjust this to the size of the paper roll you are using.
Control Panel
This section explains names and usage of the parts of the control panel.
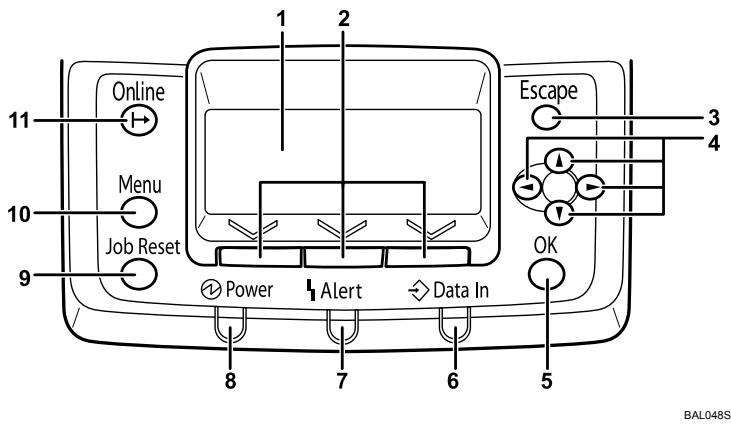
1. Display
Displays current printer status and error messages.
Entering energy saver mode turns off the back light. For details about energy saver mode, see Software Guide.
2. Selection keys
Correspond to the function items shown on the bottom line of the display.
3.【Escape】key
Press this key to return to the previous display.
4.Scroll keys
Press to move the cursor in each direction.
When the [][][][] keys appear in this manual, press the scroll key of the same direction.
5.【OK】key
Use this key to confirm settings, or setting values, or move to the next menu level.
6. Data In indicator
Blinks when the printer is receiving data from a computer. The Data In indicator lights up if there is data to be printed.
7. Alert indicator
Lights up when a printer error occurs. Follow the instructions that appear on the display.
8. Power indicator
Remains lit while the power is on. It is unlit when the power is off or while the printer is in energy saver mode.
9.【Job Reset】key
When the printer is online, press this key to cancel an ongoing print job.
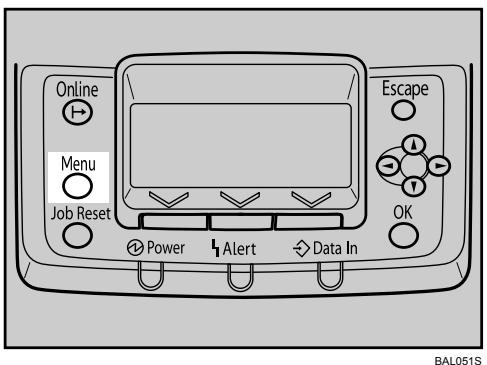
10.【Menu】key
Press this key to configure and check the current printer settings.
11. 【Online】key
Indicates whether the printer is online or offline. Press this to switch between online and offline status.
When the lamp is lit, the printer is online, enabling data reception from connected computers.
When the lamp is unlit, the printer is offline, disabling data reception from the connected computers.
While configuring settings, press the 【Online】key to return to the initial screen.
Display Panel
This section explains configuring the printer using the initial screen of the display panel.

Important
Do not touch the display panel.
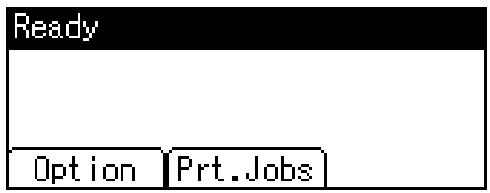
The following screen appears when you turn on the printer.
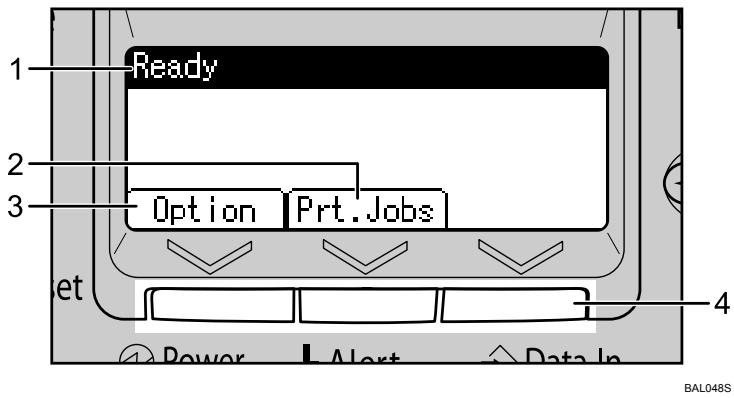
1. Operational status or messages
Displays printer status and messages.
2. [Prt.Jobs]
Press to display print jobs sent from a computer.
![RICOH AFICIO SP W2470 - [Prt.Jobs] - 1](/content/2025/01/136417/images/0a8ca10c78a8e0423e58a7c280e7b06de694419635504deca90938daccc652a3.jpg)
3. [Option]
Press to display the status of the options installed on the printer.
![RICOH AFICIO SP W2470 - [Option] - 1](/content/2025/01/136417/images/648bba03f591b43f0bf156d087e61bf986d8cb3de062444ab56d9aadb567f277.jpg)
4. Selection keys
Correspond to the function items at the bottom of the display.
Example: On the initial screen, when "press [Option]" appears in this manual, press the left selection key.

Note
- Adjust the brightness if the screen is dark. Change the setting for [Maintenance], [General Settings], [Display Contrast].
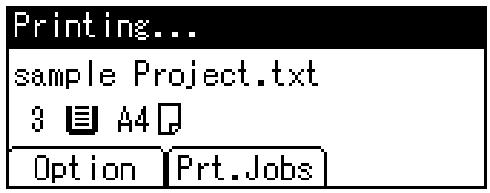
Displays and Key Operations
When the messages and menus described below appear, follow the procedures explained here.
Printing
Displays the name of the file being printed, selected paper tray, and paper size during a print job. To cancel the print job, press the [Job Reset] key.
Menu screen
Press the [Menu] key to display the Menu screen. Use the scroll key displayed on the upper left corner of the display to highlight a required function. To select a highlighted function or move to a selected directory, press the [OK] key.

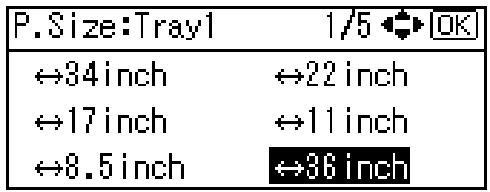
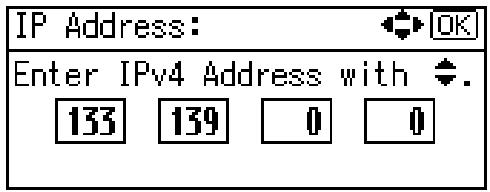
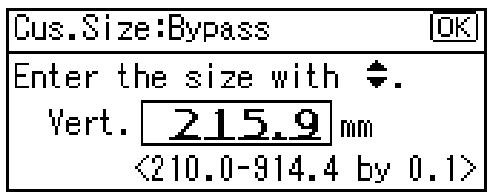
Entering the custom paper size, IPv4 Address, etc.
To enter the IPv4 address or specify a custom paper size, use the scroll keys to change the values, and then press the [OK] key.
When an error message appears
If the settings made for the job conflict with the printer's settings, a data mismatch error occurs. To resolve this error, press [JobReset] to pause printing, then press [Change], and then select the tray to resume printing from. Press the [OK] key to begin printing from the selected tray.

Options
This section introduces the names and functions of main optional parts.
External Options
This section provides explanations about external options.
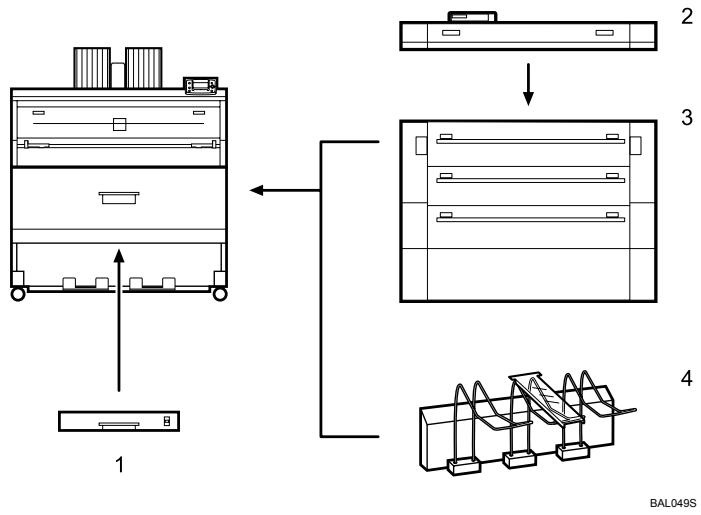
1. Cut paper tray
Load cut paper here. You can load up to 250 sheets (A3, 12'' × 18'' ).
2. Manual feeder
The paper feed table combined with the control panel allows you to operate the folding finisher independently.
3. Folding finisher
Automatically folds paper like fans or accordion.
4. Rear stacker
Allows you to stack paper delivered to the lower output exit.
Note
If the rear stacker is installed, the lower output stacker, lower output tray, lower output guides, and folding finisher cannot be used.
If you want to install the external option, contact your sales or service representative.
Internal Options
This section provides explanations about internal options.
- IEEE 802.11b interface unit
- Allows you to install the wireless LAN interface.
- Gigabit ethernet board
- Allows you to communicate with 1000BASE-T.
Note
- Remove the machine's Ethernet and USB ports before connecting the Gigabit ethernet board.
If you want to install the optional interface unit, contact your sales or service representative.
Reference
p.33 "Connecting the Printer Cables"
p.39 "Configuration"
1
Printer Setup Procedures
Follow the steps explained below to set up the printer.
| 1 | Where to Put the Printer | Choose your machine's location carefully, be-cause environmental conditions greatly affect its performance.See p.14 “Where to Put Your Printer”. |
| 2 | Installing the toner cartridge | Insert the toner cartridge included with the printer.See p.16 “Installing the Toner Cartridge”. |
| 3 | Loading Paper | Set paper in the paper roll tray or the cut paper tray (optional).See p.20 “Loading Paper”. |
| 4 | Turning the Power On | Turn on the printer. The precautions on the power unit and the anti-humidity heater are also explained. See p.26 “Turning On the Power”. |
| 5 | Selecting the Display Language | Select the language used on the display. English is set as the default language.See p.29 “Selecting the Display Language”. |
| 6 | Connecting the Printer Cables | Connect the printer to a computer. Procedures for connection via both Ethernet and USB are provided.See p.33 “Ethernet Cable Connection”. See p.36 “USB Cable Connection”. |
| 7 | Configuration | Configure the interface. Procedures for config-uring both Ethernet and Wireless interfaces are provided.See p.39 “Ethernet Configuration”. See p.49 “IEEE 802.11b (Wireless LAN) Configu-ration”. |
| 8 | Test Printing | Print a test page to confirm the printer is work-ing properly. The test print shows only if the printer is functioning correctly. A successful test print does not indicate that the connection be-tween the printer and the computer or network is properly established.See p.31 “Test Printing”. |
| 9 | Installing the Printer Driver | Install the printer driver on your computer.See “Installing the Printer Driver”, Software Guide. |
Where to Put Your Printer
This section provides precautions for installation.
Choose your machine's location carefully. Environmental conditions greatly affect its performance.
Optimum Environmental Conditions
The following describes precautions when locating the machine.
CAUTION:
- Keep the machine away from humidity and dust. Otherwise a fire or an electric shock might occur.
- Do not place the machine on an unstable or tilted surface. If it topples over, an injury might occur.
CAUTION:
- After you move the machine, use the caster fixture to fix it in place. Otherwise the machine might move or come down to cause an injury.
CAUTION:
-
Make sure the room where you are using the machine is well ventilated and spacious. Good ventilation is especially important when the machine is used heavily.
-
Temperature: 10 - 30^ C( 50 - 86^ F)
- Humidity: 15 - 90%
- A strong and level base.
- The machine must be level within 5mm , 0.2 inches: both front to rear and left to right.
- To avoid possible buildup of ozone, make sure to locate this machine in a large well ventilated room that has an air turnover of more than 30m^3/hr/ person.
Environments to Avoid
- Locations exposed to direct sunlight or other sources of strong light (more than 1,500 lux).
- Locations directly exposed to cool air from an air conditioner or heated air from a heater. (Sudden temperature changes can cause condensation to form inside the machine.)
- Locations close to machines generating ammonia, such as a diazo copy machine.
- Places where the machine will be subject to frequent strong vibration.
- Dusty areas.
- Areas with corrosive gases.
Access to the Printer
Place the machine near the power source, providing the clearance areas shown.
Clearance required for the machine only
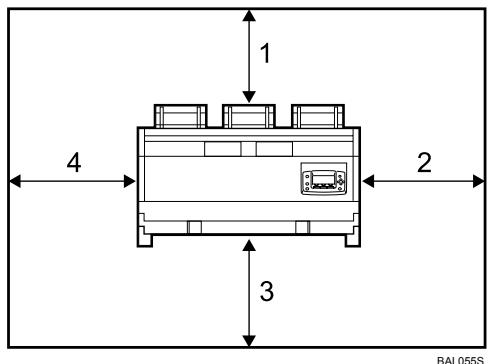
- Rear: 60 cm (23.6") or more
- Right: 60 cm (23.6") or more
- Front: 100 cm (39.4") or more
- Left: 60 cm (23.6") or more
Clearance required for the machine and the optional folding finisher
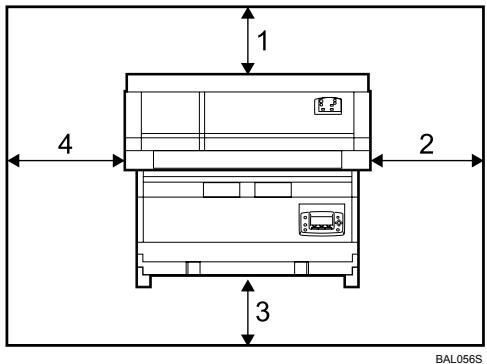
- Rear: 100 cm (39.4") or more
- Right: 80 cm (31.5") or more
- Front: 100 cm (39.4") or more
- Left: 80 cm (31.5") or more
Installing the Toner Cartridge
This section explains adding and storing toner.
WARNING:
- Do not incinerate used toner or toner containers. Toner dust might ignite when exposed to an open flame. Dispose of used toner containers in accordance with local regulations.
CAUTION:
- Keep toner (used or unused) and toner containers out of reach of children.
CAUTION:
- If toner or used toner is inhaled, gargle with plenty of water and move into a fresh air environment. Consult a doctor if necessary.
CAUTION:
- If toner or used toner gets into your eyes, flush immediately with large amounts of water. Consult a doctor if necessary.
CAUTION:
- If toner or used toner is swallowed, dilute by drinking a large amount of water. Consult a doctor if necessary.
CAUTION:
- Avoid getting toner on your clothes or skin when removing a paper jam or replacing toner. If your skin comes into contact with toner, wash the affected area thoroughly with soap and water.
- If toner gets on your clothing, wash with cold water. Hot water will set the toner into the fabric and may make removing the stain impossible.
CAUTION:
- Do not open toner containers forcefully. Toner can spill, dirtying your clothes or hands, and possibly resulting in accidental ingestion.
Important
□ When you first use this printer, use the toner packaged with the printer.
- Fault may occur if you use toner other than the recommended type.
Store toner containers in a cool, dry place free from direct sunlight.
Store on a flat surface.
Do not remove the tape of the toner cartridge.
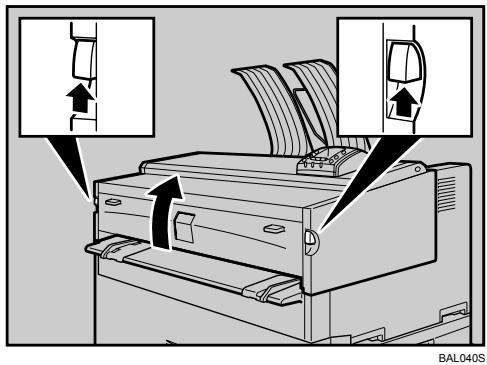
Lift both main unit opening levers, and then open the main unit upward.
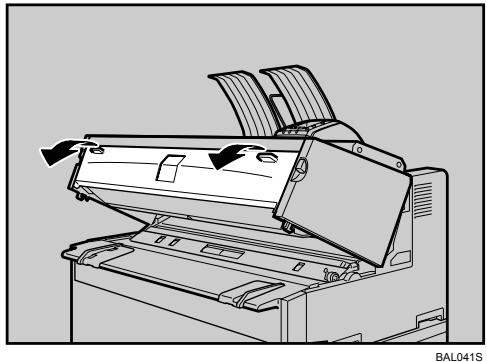
2 Open the main unit front cover.
3 Remove the toner cartridge from its package. Gently tap the capped and end of the cartridge (①) four or five times. Tap the other end of the cartridge (②) four or five times.
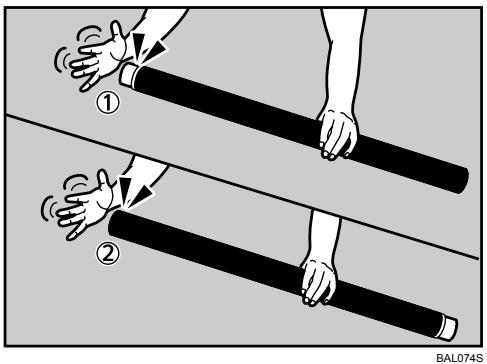
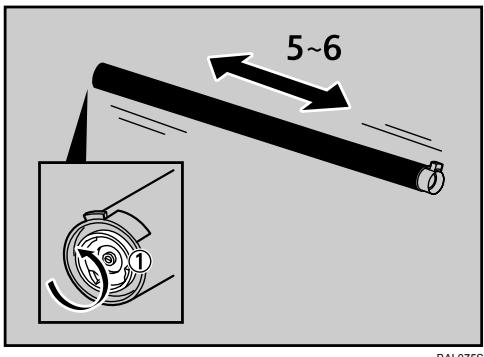
4 Shake the toner cartridge from side to side four or five times so that the toner moves freely inside of the cartridge.
Rotate the joint (①) to confirm that it rotates easily. If the joint does not turn easily, tap the end of the cartridge and shake it again.
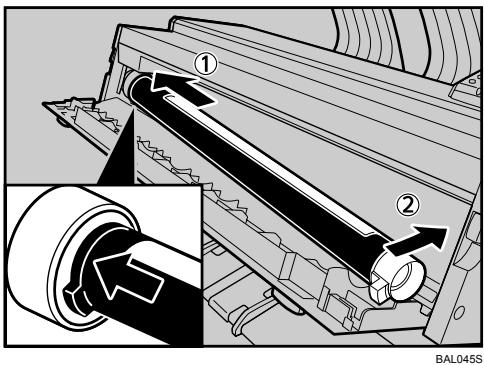
5 Insert the end of the toner cartridge into the toner holder on the left (①). Insert the toner cartridge into the right in the direction of the arrow (②).
Do not rotate the cartridge until you remove the tape (next step).
Slowly remove the tape from the toner cartridge.
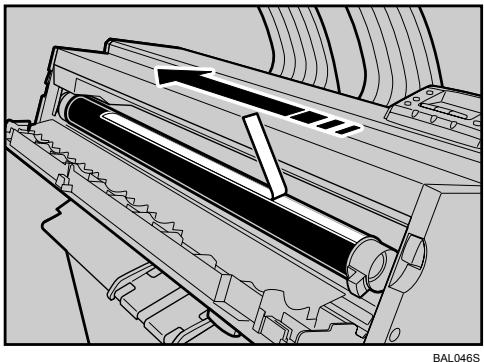
7 Rotate the toner cartridge in the direction of the arrow unit it stops.
BAL047S
8 Close the main unit front cover and the main unit.
Note
The waste toner bottle makes a noise when toner is added. This noise does not indicate a malfunction.
The toner cartridge supplied with the printer allow you to print about 2,188 pages (1,300 m). These numbers were obtained from printing A1 6 % charts, but the actual number of pages will vary depending on paper type, size, contents, and print settings.
- Toner is not covered by warranty. However, if there is a problem, contact the store where it was purchased.
Loading Paper
This section explains what to do when paper runs out and needs reloading.
CAUTION:
- Be careful when replacing the roll paper or removing misfed paper by following the operating instructions properly. Otherwise, an injury may result from the paper cutter inside.
CAUTION:
- The fusing section of this machine might be very hot. Caution should be taken when removing misfed paper.
CAUTION:
- When replacing or loading the paper roll, do not put the paper roll on the upper of the paper roll tray. Otherwise the tray may fall and an injury may result.
- Hold the paper rolls horizontally with both hands. When you grab the paper holder and hold the paper roll vertically, the paper roll may fall off and an injury may result.
CAUTION:
- When replacing or loading the paper, or clearing paper jams, pull out the cut paper tray slowly with both hands. Do not pull out the cut paper tray with a single hand. Otherwise the rear of the cut paper tray may fall and an injury may result.
Default settings
220-240V
Tray 1 (Paper roll 1): A0 (841 mm)
Tray 2 (Paper roll 2): A2 (420 mm)
Tray 3 (Cut paper): A4
Bypass tray: A4
120V
Tray 1 (Paper roll 1): 36 inch
Tray 2 (Paper roll 2): 18 inch
Tray 3 (Cut paper): 12^ × 18^
Bypass tray: 8^1 / 2^ × 11^

Note
For paper types and sizes that can be loaded in the paper roll tray and cut paper tray, see "Supported Paper for Each Tray".
For details about changing the paper size in the paper roll tray or cut paper tray, see "Changing the paper size in Tray 1 and 2^ or "Changing the paper size in Tray 3^ .
To load paper in the bypass tray, see "Loading Paper in the Bypass Tray".
Do not print on both sides of the paper.

Reference
p.65 "Supported Paper for Each Tray"
p.77 "Changing the size of the paper in Tray 1 and 2"
p.83 "Changing the size of the paper in Tray 3"
p.88 "Loading Paper in the Bypass Tray"
Loading the Paper Roll into Tray 1 and 2
The following procedure explains loading the paper roll.

Open the paper roll tray.
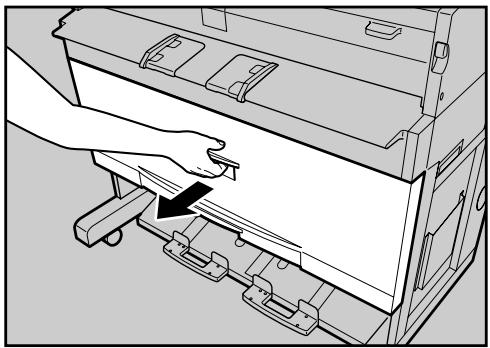
BAL014S

Hold both sides of the empty paper roll and remove it from the unit.
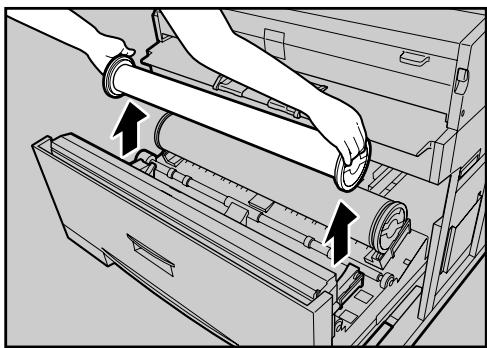
BAL015S
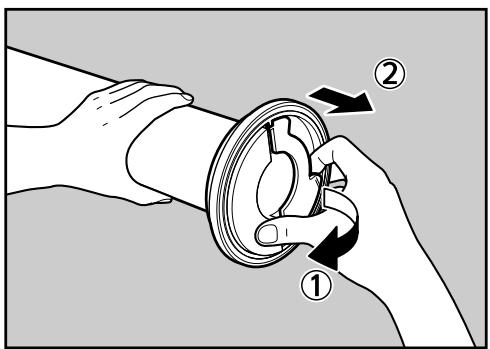
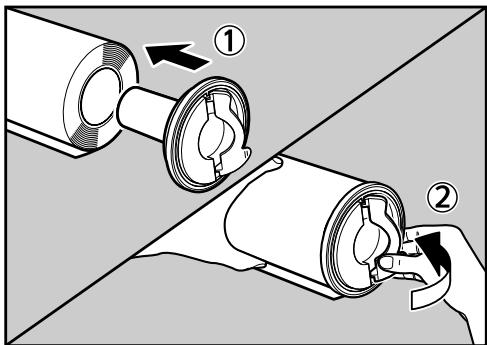
3 Raise the green lever on the paper holder (①). Remove the paper holder from the empty paper roll core (②).
Remove both sides of the paper holder.
BAL016S
4 Set the paper holder in the new paper roll (①). Lower the lever (②).
Insert the paper holder firmly until it stops.
Set both sides of the paper holder.
BAL017S
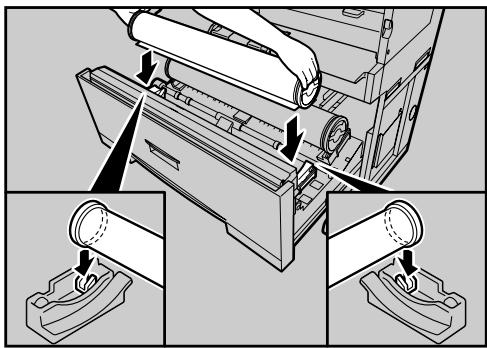
Set the paper roll. The edge of the paper roll should be on the bottom.
Hold both sides of the paper holder. Set it in the roll holder.
BAL018S
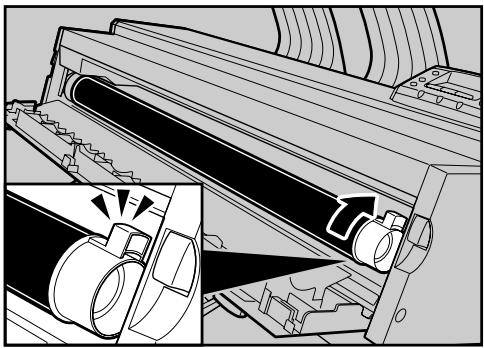
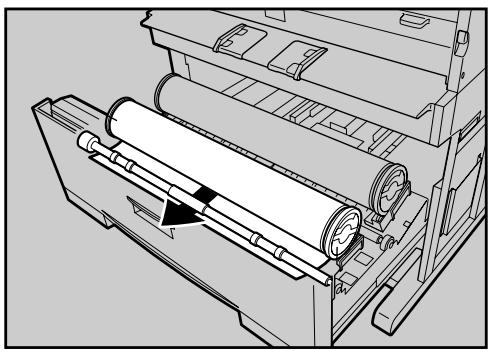
Pass the paper edge under the rubber part of the roller.
BAL019S
7 Turn the paper feed knob in the direction of the arrows until the edge of the paper emerges.
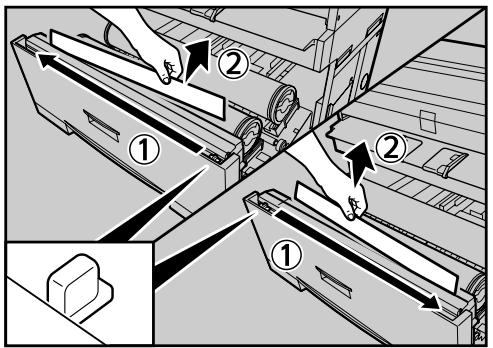
Cut the edge of the paper by sliding the cutter knob from left to right, or from right to left (①). Remove the offcut (②).
BAL021S
9 Tune the paper feed knob 90 degrees forward.
In order to eject any cut-off that might have remained, be sure to turn the paper feed knob 90 degrees forward.
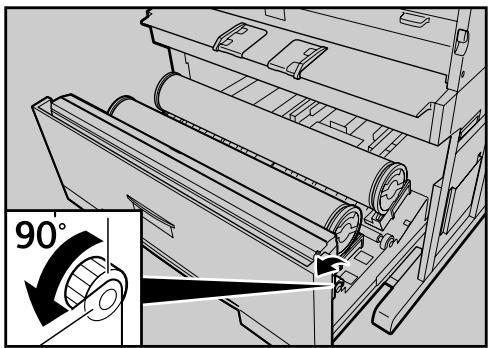
BAL022S
Close the paper roll tray.
Loading Cut Paper into the Tray 3
The following procedure explains loading cut paper.
Pull out the cut paper tray while lifting upward and out.
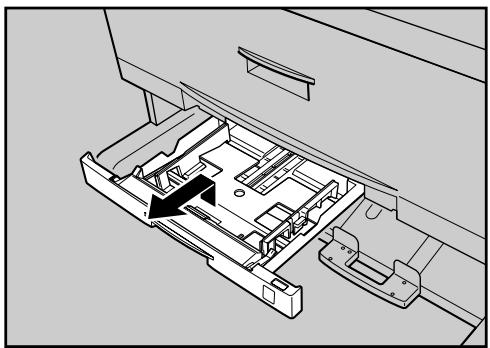
BAL027S
Hold both sides and lift the front of the tray, and then remove it from of the printer.
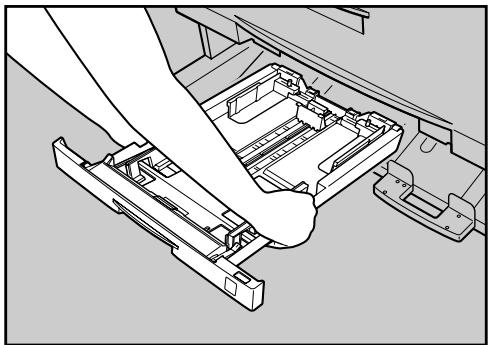
BAL028S
3 While pressing the release lever, open the side fence (①).
When changing the paper size, adjust the end fence to the paper size while pressing the release lever (②).
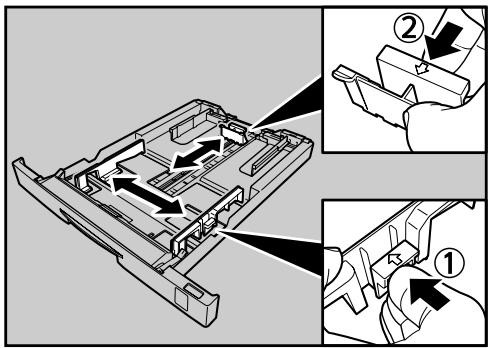
BAL029S
Fan the paper before loading paper in the cut paper tray.
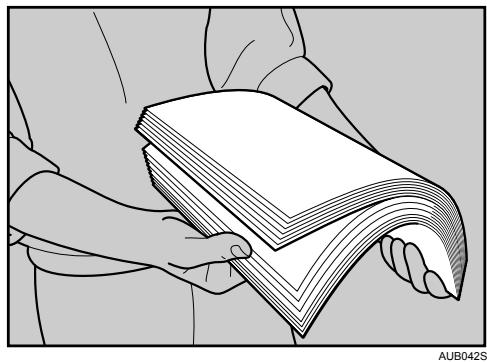
Load paper print face down.
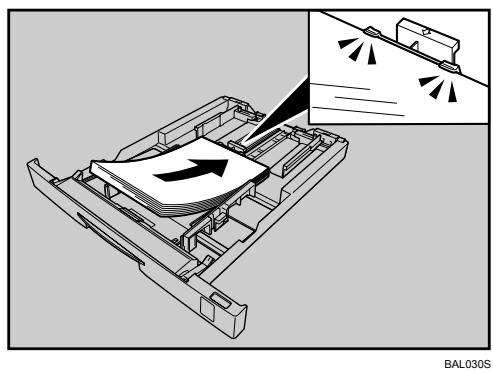
Load paper below the limit mark on the paper guide.
While pressing the release lever, adjust the side fence to the paper size.
6 Insert the cut paper tray while lifting upward into the machine, push slowly until it stops.
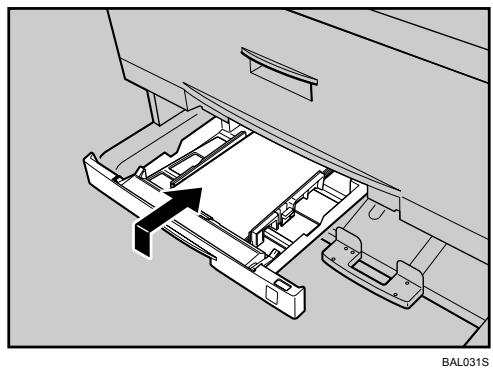
If you push the cut paper tray forcefully, the tray's paper guide may become out of position.
Note
Straighten curled or warped paper before loading.
- Extend the side-end fences when changing to a larger paper size such as A3. See "Changing the paper size in Tray 3".
Reference
p.83 "Changing the size of the paper in Tray 3"
Turning On the Power
This section discusses how to turn on/off the power.
WARNING:
- Connect the machine only to the power source described on the inside front cover of this manual. Connect the power cord directly into a wall outlet and do not use an extension cord.
- Do not damage, break or make any modifications to the power cord. Do not place heavy objects on it. Do not pull it hard nor bend it more than necessary. These actions could cause an electric shock or fire.
WARNING:
- If the power cord is damaged (exposure of the core, disconnection, etc.), contact your service representative to change a new one. Operating the machine with a damaged power cord may cause an electric shock or fire.
CAUTION:
- When you disconnect the power plug from the wall outlet, always pull the plug (not the cable).
CAUTION:
- To disconnect the power code, pull it out by plug. Do not drag the code itself. Doing so may result in damage to the code, leading to fire or electric shock.
Important
Make sure the plug is inserted firmly in the wall outlet.
The outlet voltage must not fluctuate by more than 10% .
The wall outlet must be installed near the machine and easily accessible.
Turn the power to Standby when plugging and unplugging the power cord.
- Do not turn the power switch to Standby when the power indicator is lit or flashing. Doing so may result in damage to the hard disk or memory.
□ When you unplug the power cord, the anti-condensation heaters go off.
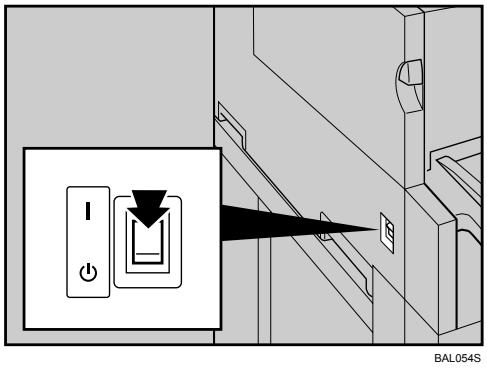
Power Switch (left side of the machine)
Setting this switch to "O Stand by" makes the power indicator on the control panel go out. The machine is then in standby mode.
Make sure the power cord is firmly plugged into the wall outlet.
2 Make sure the power is set to " Stand by".
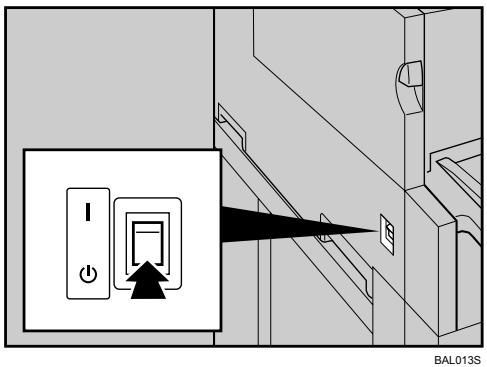
3 Turn on the power switch.
The power indicator on the control panel lights up.
Note
□ After you switch the power on, a message informing you that the machine is initializing might appear on the control panel display. Do not switch the power to Standby during this process. Initialization takes about three minutes.
This machine automatically enters Energy Saver mode if you do not use it for a certain period.
To use the folding finisher, turn its power switch on before turning on the main unit's power switch.
To power down the folding finisher, first turn the power switch of the main unit to Stand by, and then turn off the folding finisher's power switch.
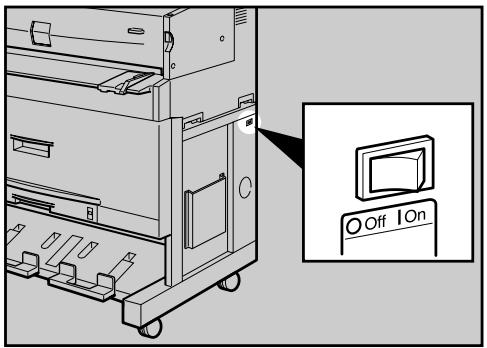
Anti-humidity Heater Switch
This section explains the anti-humidity heater switch.
During winter or humid periods when there can be sudden changes in temperature and humidity, the paper in the paper roll tray, or the cut paper tray can absorb moisture. This may cause image quality to deteriorate.
To prevent this, the machine has a built-in anti-humidity heater.
There is a switch for the anti-humidity heater on the right side of the paper roll tray. Turn this switch on if the humidity level becomes high and image quality is affected. Turn the switch off at other times.
ATZ019S

Reference
p.71 "Handling Paper"
Selecting the Display Language
The following explains the procedure for selecting a language on the display. A message about selecting the language will appear on the display. If you want to use the display in English, the following procedures are unnecessary.
Press the [Menu] key.
![RICOH AFICIO SP W2470 - Press the [Menu] key. - 1](/content/2025/01/136417/images/b4c091e0764a0e5d7af87a392ef28d03bd8535205b41a23db77a2615479eec08.jpg)
The [Menu] screen appears.
Press the [] or [] key to select [Language].
![RICOH AFICIO SP W2470 - Press the [] or [] key to select [Language]. - 1](/content/2025/01/136417/images/8c6a458aeb20218b33b3fbd980e6178805ffe791d88b27a21d1e5dcfa1c1e331.jpg)
Press the [OK] key.
![RICOH AFICIO SP W2470 - Press the [OK] key. - 1](/content/2025/01/136417/images/4c4c7248634a0276d05aaa20f3f05a230fad1c08dff433b4a2225c5e0f577c65.jpg)
Press the [] or [] key to select the language, and then press the [OK] key.
![RICOH AFICIO SP W2470 - Press the [] or [] key to select the language, and then press the [OK] key. - 1](/content/2025/01/136417/images/7609b4bf7b27ab8c8766e96bfe07f04a8ec10619f30f06bc3df0821c2d9bcd4c.jpg)
Press the【Menu】key.
The initial screen appears.
Note
The default setting is English.
Test Printing
The following explains the procedure for test printing of the configuration page. Test printing in order to verify that the printer is working normally. Test printing checks printer performance only, it does not test the connection to the computer.
Press the [Menu] key.
![RICOH AFICIO SP W2470 - Press the [Menu] key. - 1](/content/2025/01/136417/images/cf751c204664b1bab18e4280b67bc6a6076b75fab02f174df5fe0c1d7e08561a.jpg)
The [Menu] screen appears.
Press the [] or [] key to select [List/Test Print], and then press the [OK] key.
![RICOH AFICIO SP W2470 - Press the [] or [] key to select [List/Test Print], and then press the [OK] key. - 1](/content/2025/01/136417/images/6cd7c7472d9803d2b87b27e2becd1ef7326a3ab853272ead8a6e6f45fa2e323f.jpg)
Press the [ ] or [ ] key to select [Config. Page], and then press the [OK] key.
![RICOH AFICIO SP W2470 - Press the [ ] or [ ] key to select [Config. Page], and then press the [OK] key. - 1](/content/2025/01/136417/images/7d3e9bac00dabadd4e4a19c784fb3f2a41a238648b2583cf0e8eeecbfbce1319.jpg)
The following message appears and the configuration page is printed.
![RICOH AFICIO SP W2470 - Press the [ ] or [ ] key to select [Config. Page], and then press the [OK] key. - 2](/content/2025/01/136417/images/2a471fe82cacb84f12bd6e35971594a0a52db5824469eb144887e8af0db01069.jpg)
Press the [Menu] key.
The initial screen appears.
![RICOH AFICIO SP W2470 - Press the [Menu] key. - 1](/content/2025/01/136417/images/90e7f428a05fcff68193f8a4a079ea6034b5b36aafc7d476e178014e0b4df105.jpg)
Note
□ If printing is not normal, check and follow contents of an error message on the display, and retry a test print.
For details about the configuration page, see "Interpreting the Configuration Page", Software Guide.
3. Connecting the Printer Cables
Ethernet Cable Connection
Prepare a hub and other network devices, and connect the Ethernet cable to the printer.
Connect 10BASE-T or 100BASE-TX cable to the printer's Ethernet port. For 1000BASE-T, the optional Gigabit Ethernet board is available.

Important
An Ethernet cable is not supplied with this printer. Select your cable according to the network environment.
The printer's Ethernet and USB ports are not available when the Gigabit Ethernet board is attached to the printer.
Connecting to the standard Ethernet port

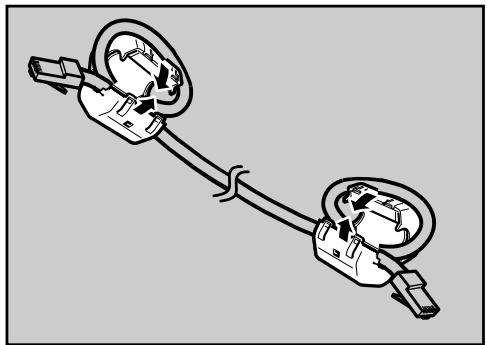
Attach the ferrite core to the Ethernet cable.
Attach the core supplied with the printer to the connector end, making a loop as shown.
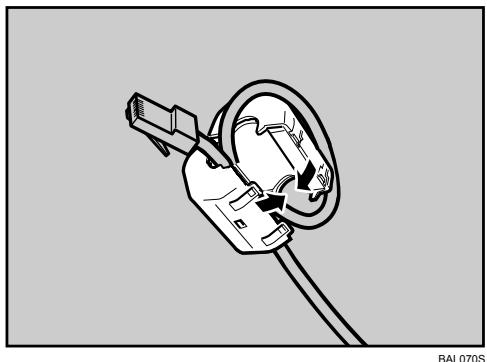

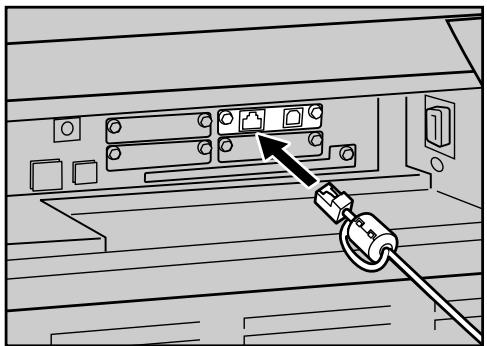
Connect the Ethernet cable to the Ethernet port that is located on the rear side of the printer.


Connect the other end of the cable to the network, for example using a hub.
Connecting to the Ethernet port of the Gigabit Ethernet board
1 Attach two ferrite cores to the Ethernet cable.
Attach the core supplied with the printer to the connector end, making a loop as shown.
BAL071S
Connect the Ethernet cable to the Ethernet port that is located on the rear side of the printer.
BAL058S
3 Connect the other end of the cable to the network, for example using a hub.
Note
For details about attaching the gigabit ethernet board, contact your sales or service representative.
For details about configuring the network environment, see "Ethernet Configuration".
Reference
p.39 "Ethernet Configuration"
Reading the LED Lamps
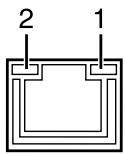
Standard Ethernet port
BAL076S
- Green: turns on when the printer is properly connected to the network.
- Yellow: turns on when 100BASE-TX is in use. It turns off when 10BASE-T is in use.
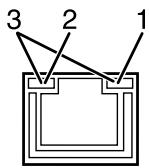
Optional Gigabit Ethernet board
BAL077S
- Yellow: turns on 100BASE-TX is in use.
- Green: turns on when 10BASE-T is in use.
- Both the green and yellow lamps are lit when 1000BASE-T is in use.
USB Cable Connection
Important
- USB connection is possible under Windows Me/2000/XP, Windows Server 2003, Mac OS 9.x, and Mac OS X.
Windows Me supports USB1.1 speeds. - USB connection with Mac OS is only possible via the printer's USB port, not the Gigabit Ethernet board's USB port.
A USB cable is not supplied with this printer. Select your cable according to the computer.
1 Connect the USB cable to the printer.
- Connecting the USB cable to the standard USB port
Connect the smaller connector of the USB cable to the USB port on the left side of the printer.
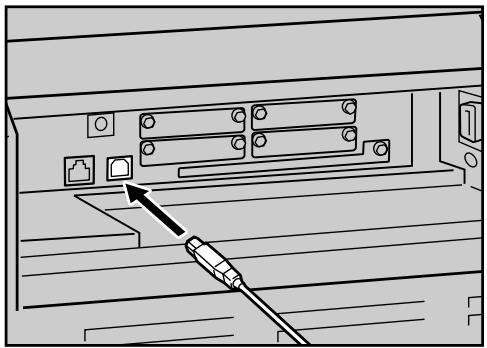
BAL059S
- Connecting the USB cable to the Gigabit Ethernet board USB port Connect the smaller connector of the USB cable to the USB port of the Gigabit Ethernet board.
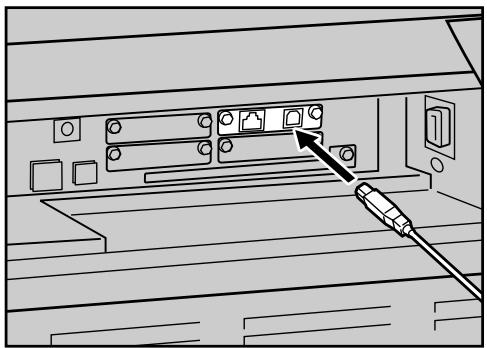
BAL060S
2 Connect the opposite end's flat connector to the desired device such as your computer's USB interface, or a USB hub.
The printer is now connected to the computer. The Plug and Play screen appears on the computer display. See "Installing the Printer Driver Using USB", Software Guide for details.
Note
For details about attaching the gigabit ethernet board, contact your sales or service representative.
Reference
"Installing the Printer Driver Using USB", Software Guide
3
Ethernet Configuration
Configure the following network settings according to the network interface you are using.
You can use SmartDeviceMonitor for Admin or a Web browser to configure IP address-related settings in a TCP/IP-capable environment.
Important
- Configure the printer for the network using the control panel.
The following table shows the control panel settings and their default values. These items appear in the [Host Interface] menu.
| Setting name | Default |
| Machine IPv4 Address | DHCP: On IPv4 Address: 011.022.033.044 Subnet Mask: 0.0.0.0 Gateway Address: 0.0.0.0 |
| IPv6 Stateless Setting | Active |
| NW Frame Type | Auto Select |
| Effective Protocol | IPv4: Active IPv6: Inactive NetWare: Active SMB: Active AppleTalk: Active |
| Ethernet Speed | Auto Select |
| LAN Type | Ethernet |

Note
□ If DHCP is in use, the IP address, subnet mask, and gateway address are all set automatically.
- Configure these setting as necessary. See Software Guide for details.
Specifying an IP Address (No DHCP)
Follow this procedure to assign a specific IP address to the printer. This is only necessary when you will use the printer on a network without DHCP, or want to prevent the printer's IP address from changing.
Before beginning, make sure that you know the IP address, subnet mask and gateway address that the printer will use.
Press the [Menu] key.
![RICOH AFICIO SP W2470 - Press the [Menu] key. - 1](/content/2025/01/136417/images/dc5548418e6fb9670768693e6d5bfe4944866be974497222de5e60bd84b9a2f3.jpg)
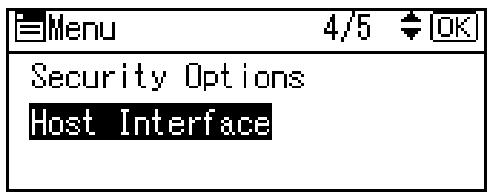
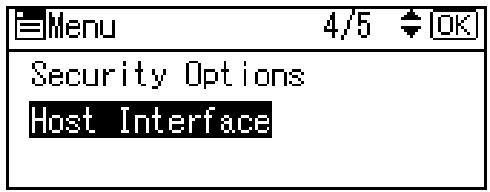
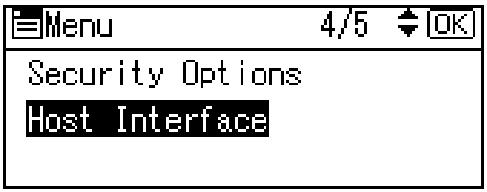
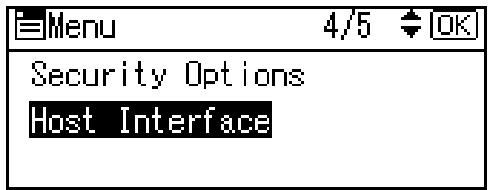
Press the [ ] or [ ] key to select [Host Interface], and then press the [OK] key.
![RICOH AFICIO SP W2470 - Press the [ ] or [ ] key to select [Host Interface], and then press the [OK] key. - 1](/content/2025/01/136417/images/819f3e847c80c503f0fc5113c8947975c2f97f1870980de207259e42b2b3d3a3.jpg)
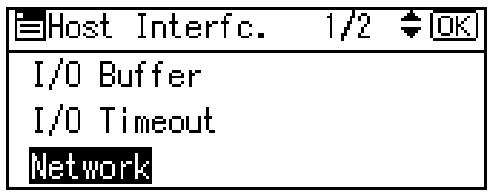
Press the [ ] or [ ] key to select [Network], and then press the [OK] key.
![RICOH AFICIO SP W2470 - Press the [ ] or [ ] key to select [Network], and then press the [OK] key. - 1](/content/2025/01/136417/images/3c955a6755c96e2a74f5f894845b50452a82986c8cb1d9ab00bc7546deea728c.jpg)
Press the [] or [] key to select [Effective Protocol], and then press the [OK] key.
![RICOH AFICIO SP W2470 - Press the [] or [] key to select [Effective Protocol], and then press the [OK] key. - 1](/content/2025/01/136417/images/4651f54aed43b3d85a4c9160b01c2fbf61ff1c88e8dc947a3a398285afc7599e.jpg)
Press the [] or [] key to select the appropriate network protocol, and then press the [OK] key.
![RICOH AFICIO SP W2470 - Press the [] or [] key to select [Effective Protocol], and then press the [OK] key. - 2](/content/2025/01/136417/images/fa8c2b0e8ba04bc57e979d400926eb0a8beda39baf2cf21c2df9749636e4aba9.jpg)
6 Press the [] or [] key to select [Active] or [Inactive], and then press the [OK] key.
![RICOH AFICIO SP W2470 - Press the [] or [] key to select [Effective Protocol], and then press the [OK] key. - 3](/content/2025/01/136417/images/95517be0b23aa563c98d336be23530071c9e7701570d16b9c4ea864761020efe.jpg)
Set other protocols you need to set in the same way.
- Select [Inactive] for unused protocols.
- Enable IPv4 to use the pure IPv4 environment of NetWare 5/5.1, NetWare 6/6.5.
Press the [Escape] key until the screen returns to the [Network] menu.
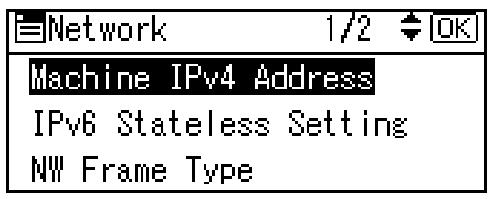
If you use IPv4, assign the IPv4 address to the printer. Press the [] or [] key to select [Machine IPv4 Address], and then press the [OK] key.
![RICOH AFICIO SP W2470 - Press the [] or [] key to select [Effective Protocol], and then press the [OK] key. - 4](/content/2025/01/136417/images/1d6c2e72a5ba2f0cdb168e327e6c53a27a095971f639767d60c3f62f6263a3ae.jpg)
To get the IP address for the printer, contact your network administrator.
To specify the IP Address, press [IP Add.].
![RICOH AFICIO SP W2470 - Press the [] or [] key to select [Effective Protocol], and then press the [OK] key. - 5](/content/2025/01/136417/images/ae3b12f75abff2be90064f326d3d9e89679198ef428ad8079881dfd76ce16693.jpg)
If you use IPv4, also assign subnet mask and gateway address. To assign these, press [Subnet M] or [Gateway].
Press the [ ] or [ ] key to enter the address, and then press the [OK] key.
![RICOH AFICIO SP W2470 - Press the [ ] or [ ] key to enter the address, and then press the [OK] key. - 1](/content/2025/01/136417/images/eab0c7991cc7de848fd531f96c5c98038fe6dc96ccf3821f24f1dfeff581412a.jpg)
- Press the [] or [] key to enter the left-most entry field of the address. After entering the left field, press the [] key, and then you can enter the next field.
After completing entry of the all fields, press the [OK] key. - Use the same method to assign the subnet mask and gateway address.
- Change the IP address from "011.022.033.044" to an IP address supported by your network.
Press the [] or [] key to select [Specify], and then press the [OK] key.
![RICOH AFICIO SP W2470 - Press the [] or [] key to select [Specify], and then press the [OK] key. - 1](/content/2025/01/136417/images/e67d553b4e0917044ef435b6ef673b516c2d8bd5ed08d058d85bfc6bfb9abc3e.jpg)
If you do not select [Specify] in this step, the address you set will not be saved.
Press the【Menu】key.
The initial screen appears.
E Print a configuration page to confirm the settings.
Note
For details about printing the configuration page, see p.31 "Test Printing".
Receiving an IP Address Automatically (DHCP)
Follow this procedure to set the printer to receive an "IP address" automatically using "DHCP". The "DHCP" feature is active by default, so this procedure is only required if you have changed the default settings.
Important
□ When [DHCP] is selected, you cannot configure settings for the following items:
IPv4 Address
- Subnet Mask
- Gateway Address
- Consult your network administrator for information about configuring network settings.
Press the [Menu] key.

Press the [ ] or [ ] key to select [Host Interface], and then press the [OK] key.
Press the [ ] or [ ] key to select [Network], and then press the [OK] key.
Press the [] or [] key to select [Machine IPv4 Address], and then press the OK] key.
Press the [] or [] key to select [Auto-Obtain (DHCP)], and then press the OK] key.
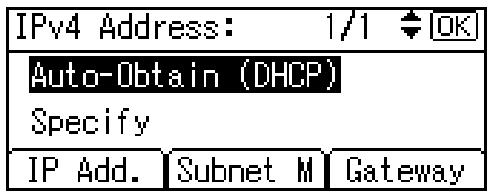
The printer will automatically receive an IP address.
To check the detected addresses, press the followings:
- [IP Add.]: IPv4 Address
- [Subnet M]: Subnet Mask
- [Gateway]: Gateway Address
6 Press the [Menu] key.
The initial screen appears.
7 Print a configuration page to confirm the settings.
Note
For details about printing the configuration page, see p.31 "Test Printing".
Configuring Network Settings When Using NetWare
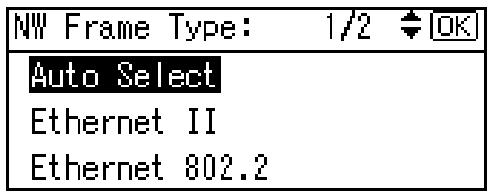
If you use NetWare, select the appropriate NetWare frame type.
Select one of the items below as necessary.
- Auto Select
- Ethernet II
- Ethernet 802.2
- Ethernet 802.3
- Ethernet SNAP
Important
Usually, you can use the default (Auto Select). When you first select [Auto Select], the frame type detected by the printer is adopted. However, if your network can use more than two frame types, the printer may fail to select the correct frame type with [Auto Select] selected. In this case, select the preferred frame type.
Press the [Menu] key.

BAL051S
Press the [ ] or [ ] key to select [Host Interface], and then press the [OK] key.
Press the [] or [] key to select [Network], and then press the [OK] key.

Press the [ ] or [ ] key to select [NW Frame Type], and then press the [OK] key.
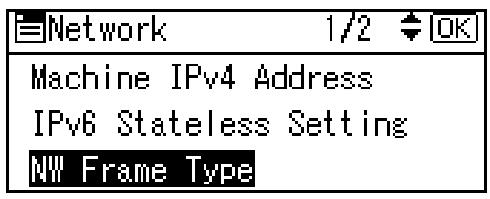
Press the [] or [] key to select the frame type to use, and then press the OK key.
6 Press the [Menu] key.
The initial screen appears.
7 Print a configuration page to confirm the settings.
Note
For details about printing the configuration page, see p.31 "Test Printing".
Setting the Ethernet Speed
You can set the speed that the printer will use for Ethernet communications. In most cases, this should be left on the default setting [Auto Select]. This setting allows two interfaces to automatically determine the optimum speed when they are connected.
| Router/HUB | Printer | ||||
| 10Mbps Half Duplex | 10Mbps Full Duplex | 100Mbps Half Duplex | 100Mbps Full Duplex | Auto Select | |
| 10 Mbps half duplex | ○ | - | - | - | ○ |
| 10 Mbps full duplex | - | ○ | - | - | - |
| 100 Mbps half duplex | - | - | ○ | - | ○ |
| 100 Mbps full duplex | - | - | - | ○ | - |
| auto-negotiation (auto selection) | ○ | - | ○ | - | ○ |
Important
- Connection cannot be established if the selected Ethernet speed does not match your network's transmission speed.
The use of this feature is recommended. To use it, select [Auto Select].
Press the [Menu] key.
![RICOH AFICIO SP W2470 - Press the [Menu] key. - 1](/content/2025/01/136417/images/b4c087af6e639031ffe7838e1ac682def2bb0a5e156e1e2722936aefac4e7263.jpg)
Press the [ ] or [ ] key to select [Host Interface], and then press the [OK] key.
![RICOH AFICIO SP W2470 - Press the [ ] or [ ] key to select [Host Interface], and then press the [OK] key. - 1](/content/2025/01/136417/images/7983969ed23449b126fdb9ef5109f1352c3cf5661baaeab564a4448269c25f81.jpg)
Press the [ ] or [ ] key to select [Network], and then press the [OK] key.
![RICOH AFICIO SP W2470 - Press the [ ] or [ ] key to select [Host Interface], and then press the [OK] key. - 2](/content/2025/01/136417/images/8e4db3d96e2eac9e73bea68b725f5b9f6c7f8bb325ba736fb3a3c4b1688aad54.jpg)
Press the [] or [] key to select [Ethernet Speed], and then press the [OK] key.
![RICOH AFICIO SP W2470 - Press the [ ] or [ ] key to select [Host Interface], and then press the [OK] key. - 3](/content/2025/01/136417/images/a092a7519c0fe3428827761d6ac4c3f7bf0aa033c239e80a1dd5919d96469a6e.jpg)
Press the [] or [] key to select the ethernet speed, and then press the OK key.
![RICOH AFICIO SP W2470 - Press the [ ] or [ ] key to select [Host Interface], and then press the [OK] key. - 4](/content/2025/01/136417/images/49fd45c91296beab2f89187e11c9d07fb759b8fa5a4bc955e69b9455549fe142.jpg)
6 Press the [Menu] key.
The initial screen appears.
7 Print a configuration page to confirm the settings.
Note
For details about printing the configuration page, see p.31 "Test Printing".
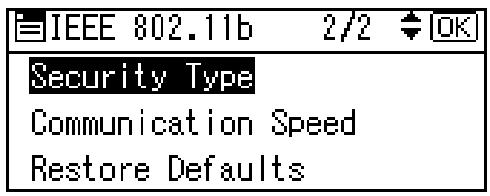
IEEE 802.11b (Wireless LAN) Configuration
Configure the printer to use IEEE 802.11b (Wireless LAN). The following table shows the control panel settings and their default values. These items appear in the [Host Interface] menu.
| Setting name | Default |
| Communication Mode | 802.11 Ad hoc |
| SSID Setting | blank |
| Channel | 220-240V 11 120V 11 |
| Security Type | None |
| Communication Speed | Auto |
Note
□ Ethernet and wireless LAN (IEEE 802.11b) cannot be used at the same time.
To use IEEE 802.11b (Wireless LAN), set as the followings using the control panel: press the [Menu] key, and then select [Host Interface], [Network], [LAN Type], and then [IEEE 802.11b]. In addition, set the IP address, subnet mask, gateway address, DHCP, Frame Type (NW), and active protocol as explained in p.39 "Ethernet Configuration".
Press the [Menu] key.

BAL051S
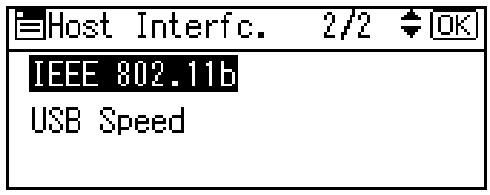
Press the [ ] or [ ] key to select [Host Interface], and then press the [OK] key.
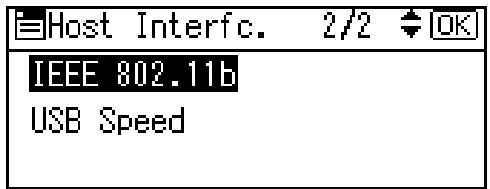
Press the [ ] or [ ] key to select [IEEE 802.11b], and then press the [OK] key.
Press the [] or [] key to select [Communication Mode], and then press the OK] key.
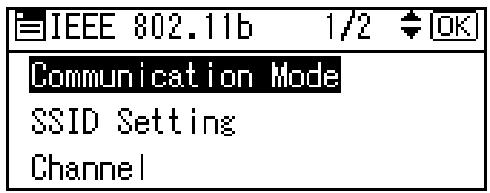
Press the [] or [] key to select the transmission mode of IEEE 802.11b, and then press the OK key.
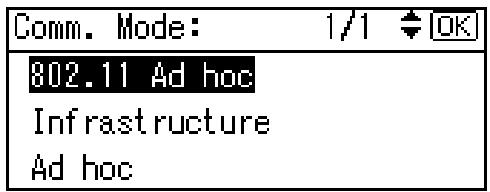
- To communicate wirelessly with a device that does not require an SSID to be set, select [Ad hoc].
- The transmission mode of IEEE 802.11b can also be set using the Web Image Monitor. For details, see Web Image Monitor Help, and "Configuring the Network Interface Board Using Web Browser", Software Guide.
6 If [802.11 Ad hoc] or [Ad hoc] is selected for [Communication Mode], confirm the channel to use for transmission.
Press the [] or [] key to select [Channel], and then press the [OK] key.
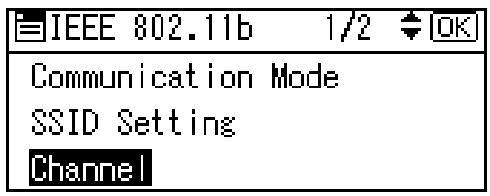
Press the [] or [] key to select the appropriate channel, and then press the OK key.

9 Set [Communication Speed] in the same way.
The default is [Auto]. If you need to change the transmission speed depending on the environment you are using, select the appropriate transmission speed.
Press the【Menu】key.
The initial screen appears.
Print a configuration page to confirm the settings.
Note
For details about printing the configuration page, see p.31 "Test Printing".
Setting the SSD
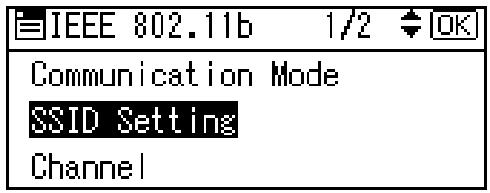
When "Communication Mode" is set to "Infrastructure" or "802.11 Ad hoc", you must specify the Service Set Identifier (SSID) of the wireless access point that the printer will connect to for network access. Ask the network administrator for the SSID to use.
In the [IEEE 802.11b] menu, press the [] or [] key to select [SSID Setting], and then press the [OK] key.
If an SSID has been set, you can check the SSID setting.
To specify the SSID, press [SSID].
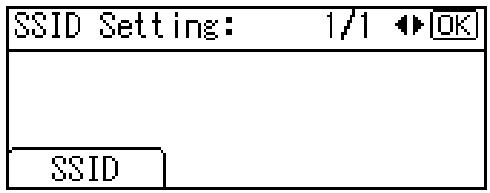
3 The message "Enter SSID." appears. Press [Text].

Press scroll keys to enter characters, and then press the [OK] key.
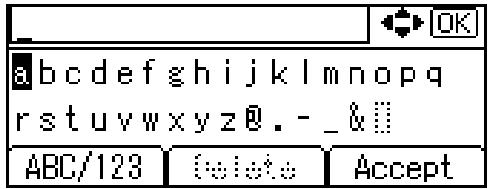
- You can switch among upper/ lower cases, numeric codes, and symbols by pressing [ABC/123].
- The characters that can be used are ASCII 0 × 20 - 0 × 7 e (32 bytes).
5 When all characters have been entered, press [Accept].
![RICOH AFICIO SP W2470 - When all characters have been entered, press [Accept]. - 1](/content/2025/01/136417/images/71cca5212b54b05eaa42c53f856da134b84a86a18c3bf041349565a25cdcf180.jpg)
6 Press the [Menu] key.
The initial screen appears.
7 Print a configuration page to confirm the settings.
Note
The SSID can also be set using a Web browser. For details, see the Web Image Monitor Help, and "Configuring the Network Interface Board Using Web Browser", Software Guide.
For details about printing the configuration page, see p.31 "Test Printing".
Setting Security Method of Wireless LAN
Setting a WEP key
If the wireless network uses WEP to encrypt transmitted data, the corresponding WEP key must be set to the printer to allow communications with other network devices.
Ask the network administrator for the WEP key to use.
Press the [Menu] key.
Press the [ ] or [ ] key to select [Host Interface], and then press the [OK] key.
Press the [ ] or [ ] key to select [IEEE 802.11b], and then press the [OK] key.
Press the [ ] or [ ] key to select [Security Type], and then press the [OK] key.
Press the [] or [] key to select [WEP], and then press [Details].
![RICOH AFICIO SP W2470 - Press the [] or [] key to select [WEP], and then press [Details]. - 1](/content/2025/01/136417/images/2cb2774c5711b408937e8ee26afa877cb3092e945c5d207a1e2a828ce4682755.jpg)
When activating the WEP setting, you will need to enter the WEP key. If you have not entered the key, be sure to enter it.
6 The confirmation message appears. Press [Text].
![RICOH AFICIO SP W2470 - The confirmation message appears. Press [Text]. - 1](/content/2025/01/136417/images/5b7d9ea1cc684b9e32d5290f4f78f866a381882db1c83283ea4e6c72c45ae93d.jpg)
Press scroll keys to enter characters, and then press the [OK] key.
![RICOH AFICIO SP W2470 - Press scroll keys to enter characters, and then press the [OK] key. - 1](/content/2025/01/136417/images/eea3a05fc58c5930c07b6e27e76785209464d28c1fbb6cae1d07226baefcada9.jpg)
- When entering a character, pressing the [OK] key will mask it with an asterisk for security reasons.
• You can switch among upper/lower cases, numeric codes, and symbols by pressing [ABC/123]. - When using 64-bit WEP, up to 10 hexadecimal characters or five ASCII characters can be entered. When using 128-bit WEP, up to 26 hexadecimal characters or 13 ASCII characters can be used.
- Up to 10 or 26 hexadecimal characters and 5 or 13 ASCII characters can be entered.
- For ASCII character strings, uppercase and lowercase letters are differentiated, so be sure to enter characters in the required case.
8 When all characters have been entered, press [Accept].
![RICOH AFICIO SP W2470 - When all characters have been entered, press [Accept]. - 1](/content/2025/01/136417/images/1ea6781ef835d6a593c268a9f7f2ef2e2dca51239875ce27c5d1276eb352102a.jpg)
The display returns to the [Security Type] menu.
9 Check [WEP] is selected, and then press the [OK] key.
![RICOH AFICIO SP W2470 - When all characters have been entered, press [Accept]. - 2](/content/2025/01/136417/images/3fdae900b6165b2cb126237275e776e412dc690a50b3372b1b7f39abe088da8b.jpg)
Press the【Menu】key.
The initial screen appears.
Print a configuration page to confirm the settings.
Note
In the case of using a WEP key on a network, activate the WEP setting to be used for communication along with WEP.
- Confirm the network administrator for the WEP Key to use.
- The WEP key can also be set using a Web browser. For details, see the Web Image Monitor Help.
For details about printing the configuration page, see p.31 "Test Printing".
Setting WPA
In the case of using WPA on a network, activate the WPA setting to be used for communication along with WPA. Consult your network administrator for information about making authentication settings.
Press the [Menu] key.
![RICOH AFICIO SP W2470 - Press the [Menu] key. - 1](/content/2025/01/136417/images/2502b039b7883af38ceae5865504282dfc44d020baa99a6ac4fdb28a4da4c14a.jpg)
Press the [ ] or [ ] key to select [Host Interface], and then press the [OK] key.
![RICOH AFICIO SP W2470 - Press the [ ] or [ ] key to select [Host Interface], and then press the [OK] key. - 1](/content/2025/01/136417/images/8b94cf0a5ee022261ea324080db4c3f64aeb56e94ae58afb80e44b0565ce4c22.jpg)
Press the [ ] or [ ] key to select [IEEE 802.11b], and then press the [OK] key.
![RICOH AFICIO SP W2470 - Press the [ ] or [ ] key to select [IEEE 802.11b], and then press the [OK] key. - 1](/content/2025/01/136417/images/2ac2b4448617ba0f861b2cc8abc637ac7ea4fa6a35ccc32978021629a996b667.jpg)
Press the [ ] or [ ] key to select [Security Type], and then press the [OK] key.
![RICOH AFICIO SP W2470 - Press the [ ] or [ ] key to select [Security Type], and then press the [OK] key. - 1](/content/2025/01/136417/images/84dc7cc0be468fd44eb3e472d005939707cbd97a1cc16b2d73af74e18f3efded.jpg)
Press the [] or [] key to select [WPA], and then press [Details].
![RICOH AFICIO SP W2470 - Press the [ ] or [ ] key to select [Security Type], and then press the [OK] key. - 2](/content/2025/01/136417/images/c712468134e14b36704517f0b7f432952e5bc2c662494aaa3fe833b79f99eb1b.jpg)
Press the [] or [] key to select [Encryption Method], and then press the OK] key.
![RICOH AFICIO SP W2470 - Press the [ ] or [ ] key to select [Security Type], and then press the [OK] key. - 3](/content/2025/01/136417/images/2225cc59f58b6a497c9305f837c8419a250655c80d566da4492cad6e920bdc39.jpg)
Press the [] or [] key to select encryption method, and then press the OK key.
![RICOH AFICIO SP W2470 - Press the [ ] or [ ] key to select [Security Type], and then press the [OK] key. - 4](/content/2025/01/136417/images/5fbca402a17913f525895db99b9fab5c7ed4c03789e2e098f003b310d3cc9948.jpg)
Consult your network administrator for information about making encryption settings.
Encryption settings are as follows:
- TKIP
Uses the same algorithm as RC4, but further reduces vulnerability using methods such as key mixing.
- CCMP(AES)
Increases security using AES (Advanced Encryption Standard).
The display returns to the [WPA] menu.
Press the [] or [] key to select [Authentication Method], and then press the OK] key.
![RICOH AFICIO SP W2470 - Press the [ ] or [ ] key to select [Security Type], and then press the [OK] key. - 5](/content/2025/01/136417/images/481fd48a34fd7ccbae9b4c48911400bb4ea49eff16e99a9941d396669fbf1486.jpg)
Press the [] or [] key to select authentication method, and then press the [OK] key.
![RICOH AFICIO SP W2470 - Press the [ ] or [ ] key to select [Security Type], and then press the [OK] key. - 6](/content/2025/01/136417/images/8c590ffbb55e9adc249ac01ef138d22087b124c4da33d1b6d9ca4412010e9e24.jpg)
Authentication settings are as follows:
WPA-PSK
Performs authentication using an encryption key (a Pre-Shared Key) that is shared by the access point and client. Enter the Pre-Shared Key using between 8 and 63 ASCII characters.
WPA
WPA uses CA certificates and a RADIUS server to provide secure wireless communication.
WPA2-PSK
As with WPA-PSK, authenticate using the encryption key (a Pre-Shared Key) shared by the access point and client. Enter Pre-Shared Key using between 8 and 63 ASCII characters.
WPA2
WPA2 is an expanded version of WPA that fully supports IEEE 802.11i.
Wait for two seconds, the display returns to the [WPA] menu.
Press [Exit].
![RICOH AFICIO SP W2470 - Press the [ ] or [ ] key to select [Security Type], and then press the [OK] key. - 7](/content/2025/01/136417/images/318abf0c2bbbbb29510ac4ccc7ab1239071b066f4c35052f87387d725ea5ed1f.jpg)
Check [WPA] is selected, and then press the [OK] key.
![RICOH AFICIO SP W2470 - Press the [ ] or [ ] key to select [Security Type], and then press the [OK] key. - 8](/content/2025/01/136417/images/32e0ec816f9520cf52452435e80c815911f725a434ec6ce15e0b1d50e80a5120.jpg)
Press the【Menu】key.
The initial screen appears.
E Print a configuration page to confirm the settings.
Note
For details about printing the configuration page, see p.31 "Test Printing".
Configuring WPA/WPA2
WPA/WPA2 uses an authentication server to provide greatly enhanced security compared to WPA-PSK/WPA2-PSK.
WPA/WPA2 can be configured using Web Image Monitor's administrator mode.
You can select four types of EAP authentication method: EAP-TLS, LEAP, EAP-TTLS, and PEAP. Note that each EAP authentication method has different configuration settings and authentication procedures.
Types and requirements of certificates are as follows:
If a certificate is required, configure all settings after installing the certificate.
EAP Types Requiring a "Site Certificate"
EAP-TLS, EAP-TTLS, PEAP (Necessary except LEAP)
EAP Types Requiring a "Site Certificate" and/or a "Device Certificate"
EAP-TLS, PEAP (Phase 2 is for TLS only)
Important
To set WPA/WPA2, you must enable SSL. For details about setting SSL configuration.
To set WPA/WPA2, you must use Web Image Monitor.
Note
For details, see "Protection Using Encryption" and "Using Web Image Monitor", Software Guide.
Installing a Site Certificate
Access the authentication server and obtain the CA Certificate.
Methods of obtaining certificates differ according to the operating system you are using.
2 Start your Web browser.
For details about the login user name and password, consult your administrator.
3 Log on to Web Image Monitor in the administrator mode.
Click [Configuration].
5 Click [Site Certificate] in "Security".
Click [Browse] on [Site Certificate to Import], and then select the CA Certificate you obtained.
7 Click [Import].
3 Check that the imported certificate's [Status] shows "Trustworthy".
If [Site Certificate Check] shows "Active", and the [Status] of the certificate shows "Untrustworthy", communication might not be possible.
Click [OK].
10 Click [Logout].
Quit Web Image Monitor.
Installing Device Certificate
1 Start your Web browser.
2 Log on to Web Image Monitor in the administrator mode.
Click [Configuration].
4 Click [Device Certificate] in "Security".
Click [Certificate 2] on "Device Certificate" window, and then click [Request].
6 Enter appropriate "Common Name" and "Country Code" on "Certificate Information" page, and then click [OK].
"Updating..." appears. Wait for about two minutes, and then click [OK].
Click [Details], shown in the "Device Certificate" window as the memo pad icon for "Requesting".
9 Select all, and then copy the entire "Text for Requested Certificate" text that is displayed in the "Certificate Status" window.
Access the certificate authority server, and then obtain the CA signified certificate using the text copied into "Text for Requested Certificate" windows. Obtaining the certificate differs depending on the environment you want to use.
Click [Certificate 2] on "Device Certificate" window, and then click [Install].
Using a text editor, open the CA signified certificate downloaded in step 10, and then copy over all the text.
In the [Install Certificate] window, paste all the text copied into CA signified certificate.
Click [OK].
"Updating..." appears. Wait for about one or two minutes, and then click [OK].
Check that the "Device Certificate" shows "Installed".
17 Click [Certificate 2] on "Certification", and then click [OK].
18 Click [Logout].
9 Quit Web Image Monitor.

Note
If you request two certificates simultaneously, the certificate authority might not display either certificate. Click [Cancel Request] to cancel the request.
- You can select [Certificate 1] and [Certificate 2] in the "Device Certificate" window. Note that if you select [Certificate 1] in the "Device Certificate" window, you must select "Certificate 1" in the "IEEE802.11b" drop down menu in the "Certification" window.
- Click [Cancel Request] to cancel the request for the server certificate.
□ If "Not found" appears after clicking [OK] in steps 9 and 17, wait one or two minutes, and then click [Refresh].
Setting Items of WPA/WPA2
Start your Web browser.
2 Log on to Web Image Monitor in the administrator mode.
3 Click [Configuration], and then click [Wireless LAN Settings] in "Interface".
4 Select [Infrastructure Mode] in "Communication Mode".
5 Enter the alphanumeric characters (a-z, A-Z, or 0-9) in "SSID" according to the access point you want to use.
Select [WPA] in "Security Type".
7 Select [TKIP] or [CCMP(AES)] in "WPA Encryption Method" according to the access point you want to use.
Select [WPA] or [WPA2] in "WPA Authentication Method".
In "UserID", enter the user name set in the RADIUS server.
Enter the domain name in "Domain Name".
Select "EAP Type". Configurations differ according to the EAP Type.
EAP-TLS:
- Select the certificate you want to use in "WPA Client Certificate". Make the following settings according to the operating system you are using:
- Select [On] or [Off] in "Authentication Server Certificate".
- Select [On] or [Off] in "Trust Intermediate Certificate Authority".
- Enter the host name of the RADIUS server on "Server ID".
LEAP:
- Click [Change] in "Password", and then enter the password set in the RA-DIUS server.
EAP-TTLS:
- Click [Change] in "Password", and then enter the password set in the RA-DIUS server.
- Click [Change] in "Phase 2 User Name", and then enter the user name set in the RADIUS server.
- Select [CHAP], [MSCHAP], [MSCHAPv2], [PAP], or [MD5] in "Phase 2 User Name".
- Certain methods might not be available, depending on the RADIUS server you want to use.
Make the following settings according to the operating system you are using:
- Select [On] or [Off] in "Authentication Server Certificate".
- Select [On] or [Off] in "Trust Intermediate Certificate Authority".
- Enter the host name of the RADIUS server in "Server ID".
PEAP:
- Click [Change] in "Password", and then enter the password set in the RA-DIUS server.
- Click [Change] on "Phase 2 User Name", and then enter the user name set in the RADIUS server.
- Select [MSCHAPv2] or [TLS] in "Phase 2 Method".
- When you select [TLS], Select the client certificate you want to use in "WPA Client Certificate".
Make the following settings according to the operating system you are using:
- Select [On] or [Off] in "Authentication Server Certificate".
- Select [On] or [Off] in "Trust Intermediate Certificate Authority".
- Enter the host name of the RADIUS server on "Server ID".
Click [OK].
Click [Logout].
Quit Web Image Monitor.
Note
If there is a problem with settings, you might not be able to communicate with the printer. To identify the problem, open the Web Image Monitor system log or print a network summary.
If you cannot identify the problem, reset the printer interface to normal, and then repeat the procedure from the beginning.
5. Paper and Other Media
Supported Paper for Each Tray
This section describes the paper size, feed direction, and the maximum amount of paper that can be loaded into each paper tray in this printer.
Symbols
| In this manual | On the display | Paper feed direction |
| ☐↑(Feed direction) | A1☐ 22 × 34☐ | Long-edge feed direction |
| ☐↑(Feed direction) | A3☐ 9 × 12☐ | Short-edge feed direction |
Note
The symbols and terminology are used to represent the feed direction.
- Be careful of the paper feed direction. The direction is determined for each paper size.
Metric version
| Where paper is placed | Paper type | Paper size | Number of sheets that can be placed |
| Tray 1(Paper Roll 1)Tray 2(Paper Roll 2) | Plain paperTranslucent paperRecycle paperFilm | Paper rollDiameter: less than 175 mmCore: 75.7 mm - 77 mmWidth: 210, 257, 297, 364, 420, 440, 490, 515, 594, 620, 625, 660, 680, 707, 728, 800, 841, 880 mmRoll length: less than 15 m | - |
| Tray 3(Cut Paper) | Plain paperRecycle paper | A3☐, A4☐, B4 JIS☐ | 250 sheets |
| Bypass tray | Plain paperTranslucent paperRecycle paperFilm | A0☐, A1☐☐, A2☐☐, A3☐☐, A4☐, B1 JIS☐, B2 JIS☐, B3 JIS☐, B4 JIS☐Custom size: 210 - 914.4 mm in width, 257 - 2000 mm in length | 1 sheet |
Inch version
| Where paper is placed | Paper type | Paper size | Number of sheets that can be placed |
| Tray 1(Paper Roll 1)Tray 2(Paper Roll 2) | Plain paperTranslucent paperRecycle paperFilm | Paper rollDiameter: 6.7"or lessCore: 2.98"- 3.03"Width: 81/2", 9", 11", 12", 17", 18", 22", 24", 30", 34", 36"Roll length: 590" (49.2 ft.) or less | - |
| Tray 3(Cut Paper) | Plain paperRecycle paper | 12" × 18", 11" × 17", 81/2" × 14", 81/2" × 13", 81/2" × 11" | 250 sheets |
| Bypass tray | Plain paperTranslucent paperRecycle paperFilm | 36" × 48", 34" × 44", 30" × 42", 24" × 36", 22" × 34", 18" × 24", 17" × 22", 12" × 18", 11" × 17", 9" × 12", 81/2" × 14", 81/2" × 11"Custom size: 8.27 - 36.00 inch in width, 10.12 - 78.74 inch in length | 1 sheet |
Note
Do not print on both sides of paper.
The paper sizes are supported, but they must be selected using the control panel. See "Loading the Paper Roll into Tray 1 and 2^ , "Loading Cut Paper into Tray 3 ^ , and "Loading Paper in the Bypass Tray".
- Custom sizes must be selected using the control panel or the printer driver. See "Loading custom size paper".
If multiple-sheet jams occur, load paper sheet by sheet.
If you load paper of the same size in the same orientation in two or more trays, the machine automatically shifts to another tray - except the bypass tray - when the first tray in use runs out of paper. This function is called "Tray Switching". (However, if one tray contains recycled or special paper, the settings of the other trays must be the same for Tray Switching to work.) This saves interrupting a print run to replenish paper when making a large number of prints.
Paper weight and capacity
| Tray | Supported paper weight | Supported capacity (Plain paper) |
| Tray 1 (Paper Roll 1) Tray 2 (Paper Roll 2) | 52.3 - 110 g/m2(13.9 - 29.3 lb.) | Roll length less than 15 m |
| Tray 3 (Cut Paper) | 52.3 - 110 g/m2(13.9 - 29.3 lb.) | 250 sheets (80 g/m2) |
| Bypass tray | 52.3 - 110 g/m2(13.9 - 29.3 lb.) | 1 sheet (80 g/m2) |
Paper Recommendations
This section describes loading and storing paper, details of each type of paper, and the printable area.
Configure the settings depending on the type of paper you are using.
Important
- Print quality cannot always be guaranteed for all types of paper that are sold at stores.
Loading Paper
Important
- Do not use ink-jet printer paper because it may stick to the fusing unit and cause a paper misfed.
□ Do not reuse paper that has already been printed onto by other printers.
Set paper roll
- Use a paper roll that has a black core.
- If humidity is high, and the paper roll has expanded due to moisture, be sure to cut off approximately 1000 ~mm ( 40'' ), before making printing.
- When a paper roll of 90 g/m^2 (24 lb.) or 110 g/m^2 (29.3 lb.) paper is used and there is little paper left on the roll, image may be faint near the leading and / or trailing edge, or an image may be doubled. To prevent this, set 3 - 5 mm ( 0.11'' - 0.19'' ) margins from the leading and trailing edges.
Set paper as follows:
- Tray 3: print side facing down
- Bypass Tray: print side facing up
Storing Paper
Take care when storing paper. Improperly stored paper might result in poor print quality, paper misfeeds, or printer damage. Recommendations are as follows:
- Avoid storing paper in humid areas.
- Avoid exposing paper to direct sunlight.
- Store on a flat surface.
- Keep paper in the package in which the paper came.
Types of Paper and Other Media
This section describes the types of paper and required settings.
Plain paper
| Paper thickness | 51 - 134 g/m2(13.6 - 35.6 lb.) |
| Printer setup | Select [Paper Input], [Paper Type: XXX](XXX: Tray 1 to 3, Bypass Tray), [No Display (Plain Paper)]. |
| Printer driver setup | Select [Plain] or [Plain/Recycled] in the [Paper type:] list. |
| Supported paper feeding tray | Any input tray can be used. |
| Paper capacity | · Tray 1 and 2: Roll length, less than 15 m · Tray 3: 250 sheets · Bypass tray: 1 sheet Note □ Make sure paper is not stacked higher than the upper limit mark (▼) inside the tray 3. |
| Plain paper thickness | Default: level 3 (medium) If you require higher print quality, change the paper thickness value according to the thickness of your paper. You can select one of five thicknesses. Thicker settings allow thicker paper to be used, but printing is slower. For details, see p.103 “Adjusting Paper Thickness”. |
Translucent paper
| Printer setup | Select [Paper Input], [Paper Type: XXX](XXX: Tray 1, Tray 2, By-pass Tray), [Translucent Paper]. |
| Printer driver setup | Select [Translucent] in the [Paper type:] list. |
| Supported paper feeding tray | Tray 1, Tray 2, Bypass tray |
| Paper capacity | • Tray 1 and 2: Roll length, less than 15 m • Bypass tray: 1 sheet |
| Translucent paper thickness | Default: level 3 (medium) If the print quality needs to be improved, change the paper thickness value depending on the paper thickness that you are using. Paper thickness value can be changed in 5 levels. Thicker settings allow thicker paper to be used, but are printed more slowly. For details, see p.103 “Adjusting Paper Thickness”. |
| Additional cautions | Do not use with the folding finisher. |
Film
| Printer setup | Select [Paper Input], [Paper Type: XXX](XXX: Tray 1, Tray 2, By-pass Tray), [Film]. |
| Printer driver setup | Select [Film] in the [Paper type:] list. |
| Supported paper feeding tray | Tray 1, Tray 2, Bypass tray |
| Paper capacity | • Tray 1 and 2: Roll length, less than 15 m • Bypass tray: 1 sheet |
| Film thickness | Default: level 3 (medium) If the print quality needs to be improved, change the paper thickness value depending on the paper thickness that you are using. Paper thickness value can be changed in 5 levels. Thicker settings allow thicker paper to be used, but are printed more slowly. For details, see p.103 “Adjusting Paper Thickness”. |
| Additional cautions | Do not use with the folding finisher. |
Paper Not Supported by This Printer
This section describes paper unusable on this printer.
CAUTION:
- Do not use aluminum foil, carbon paper, or similar conductive paper to avoid a fire or machine failure.
Important
To prevent faults, do not use any of the following kinds of treated paper.
- Paper for inkjet printers
Thermal fax paper
Art paper - Aluminum foil
- Carbon paper
Conductive paper - OHP transparencies
- Paper with perforated lines
- Tab stock
- Envelopes
□ Faults can occur if you print onto sides that are already printed. Take care to print onto unprinted sides only.
Note
To prevent misfeeds, do not use the following kinds of paper:
- Bent, folded, or creased paper
- Torn paper
- Slippery paper
Perforated paper - Rough paper
- Thin paper with little stiffness
- Paper with a dusty surface
- Adhesive labels
- OHP transparencies
If you print on to rough grain paper, the output image might be blurred.
- When using non-recommended paper (especially chemically treated paper, hemmed paper, film), paper jams may occur, paper wrinkle, or output image deteriorate.
Do not use paper that has already been printed on.
Do not print on both sides of paper.
If you use paper roll that is not marked with a black core, paper jams might occur when the paper ends.
- Do not use paper printed onto with an inkjet printer, as it may become entangled or jammed, which may damage the machine. In the worst event, this may cause fire, depending on paper and ink type combination.
Handling Paper
This section describes handling paper.
Depending on the humidity of the storage environment, handle paper as follows:
| % | State of paper | Try this ... |
| High humidity 70 (Normal conditions) 40 Low humidity | Part of the image is lost, or a multi-sheet feed or wrinkling occurs on both translucent (vellum) and normal paper. | ·Improve the environment where the machine is placed (e.g., install an air conditioner or dehumidifier). ·Remove paper from the machine immediately after copying or printing, and store it in a plastic bag. |
| Part of the image is lost on both translucent (vellum) and normal paper. | ·If you are not using the machine for a long time, remove paper from the machine and store it in a plastic bag. | |
| ·Store paper in a plastic bag each day after the last copy or print job is completed. | ||
| Part of the image is lost on translucent paper (vellum). | ·If you are not using the machine for a long time, remove translucent paper (vellum) from the machine and store it in a plastic bag. | |
| Part of the image is lost, or a multi-sheet feed or wrinkling occurs on both translucent (vellum) and normal paper. | ·Improve the environment where the machine is placed (e.g., install an air conditioner or humidifier). ·Remove paper from the machine immediately after copying or printing, and store it in a plastic bag. |
ATY039S
Note
If humidity is above 70% , turn on the anti-humidity heater.
Print Area
This section describes the area of a page that is available for printing. The following diagram shows the print area for this printer.
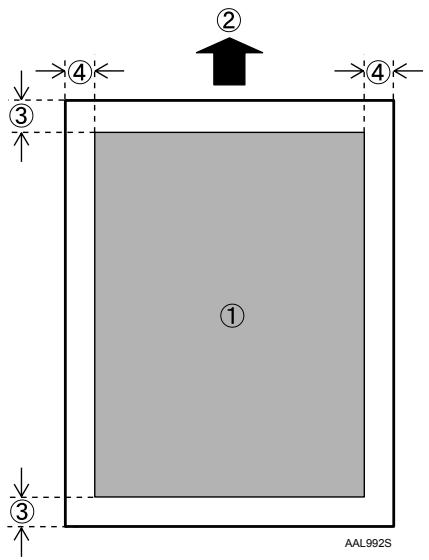
- Print area
- Feed direction
- Non-reproduction area:
Top: less than 5mm (0.32")
Bottom: less than 5mm (0.32^ )
- Non-reproduction area:
Left and Right 2 ± 2 ~mm ( 0.08'' ± 0.08'' ), less than 5 ~mm ( 0.2'' ) on either side

Note
The print area may vary depending on the paper size, printer language and printer driver settings.
Loading Paper
This section explains what to do when paper runs out and needs reloading.
CAUTION:
- Be careful when replacing the roll paper or removing misfed paper by following the operating instructions properly. Otherwise, an injury may result from the paper cutter inside.
CAUTION:
- The fusing section of this machine might be very hot. Caution should be taken when removing misfed paper.
CAUTION:
- When replacing or loading the paper roll, do not put the paper roll on the upper of the paper roll tray. Otherwise the tray may fall and an injury may result.
- Hold the paper rolls horizontally with both hands. When you grab the paper holder and hold the paper roll vertically, the paper roll may fall off and an injury may result.
CAUTION:
- When replacing or loading the paper, or clearing paper jams, pull out the cut paper tray slowly with both hands. Do not pull out the cut paper tray with a single hand. Otherwise the rear of the cut paper tray may fall and an injury may result.
Important
□ When removing paper rolls, lift the paper holders on either side of the paper roll before removing. Do not lift one side only. This could damage the machine.
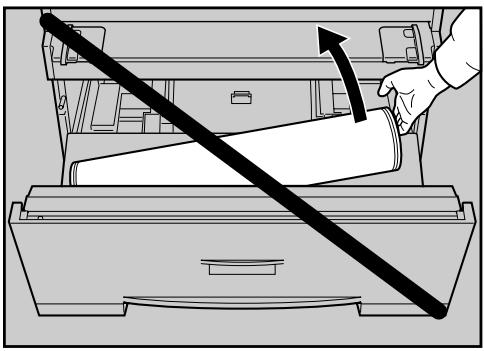
ATJ012S

Note
Do not print on both sides of the paper.
For paper types and sizes that can be loaded in the paper roll tray and cut paper tray, see p.65 "Supported Paper for Each Tray".
Loading the Paper Roll into Tray 1 and 2
The following procedure explains loading the paper roll.
Open the paper roll tray.

BAL014S
2 Holding both ends of the paper roll, carefully lift it out of the tray.
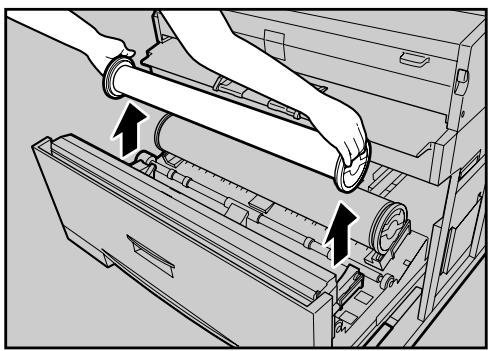
BAL015S
3 Remove the paper holders from both ends of the paper roll.
To remove the paper holder: raise the green lever on the paper holder (①), and then pull the paper holder out of the paper roll tube (②).

BAL016S
4 Insert the paper holders into both ends of the new paper roll.
To insert the paper holder: push the paper holder as far as it will go into the paper roll (①), then push down the green lever (②).
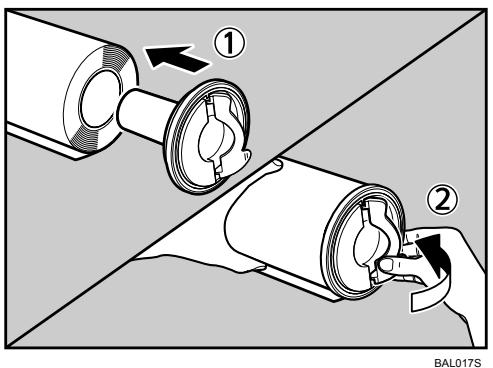
5 Holding both ends of the paper holder, carefully place it (paper edge down) on the roll holders inside the tray.
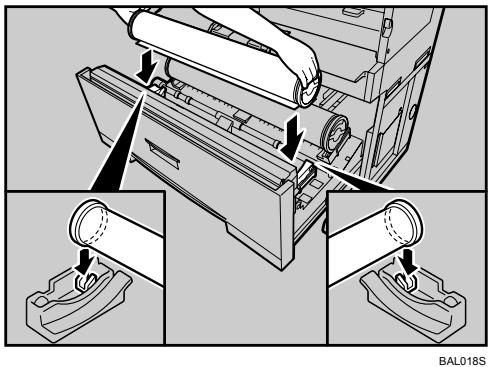
Push the paper edge under the rubber part of the roller.
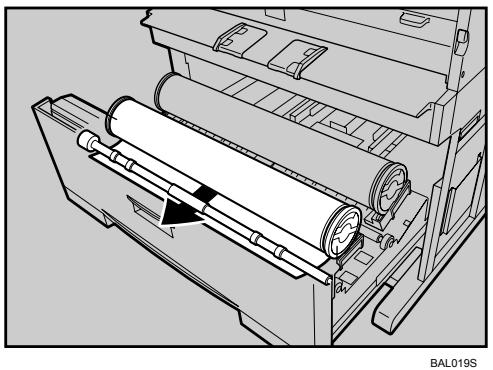
7 Turn the paper feed knob in the direction of the arrows until the edge of the paper emerges.
Cut the edge of the paper by sliding the cutter knob from left to right, or from right to left (①). Then remove the offcut (②).
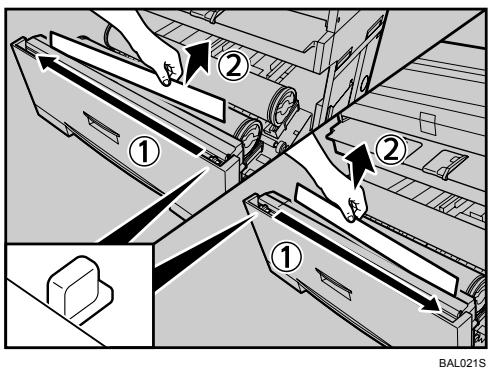
9 Turn the paper feed knob 90 degrees forward.
To be sure that there is no offcut remaining, turn the paper feed knob 90 degrees forward.
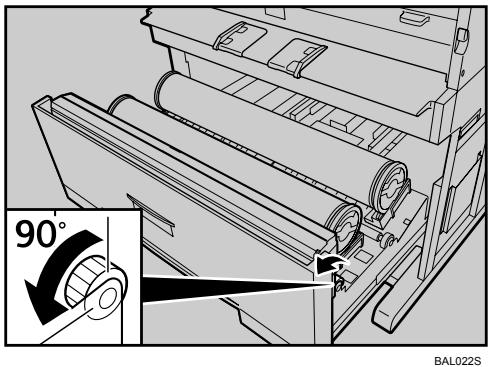
10 Close the paper roll tray.
Changing the size of the paper in Tray 1 and 2
Important
□ Always follow the instructions below when adjusting the roll holder. Do not force the roll holder by pulling or sliding it forcefully. Doing so will damage it.
Open the paper roll tray.

2 Holding both ends of the empty paper roll, lift it out of the unit.
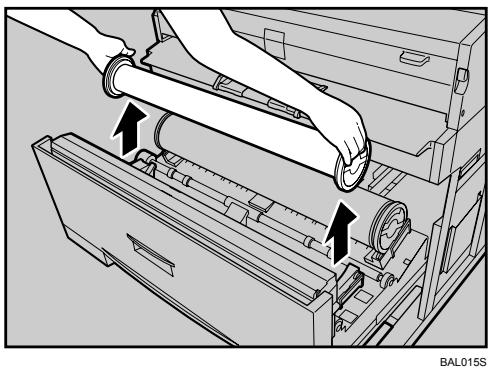
Push the roll holders slightly inward (as if sliding them toward the center of the tray), and then lift them up and out.
Each roll holder has an underside hook and magnet to secure it to the tray floor.
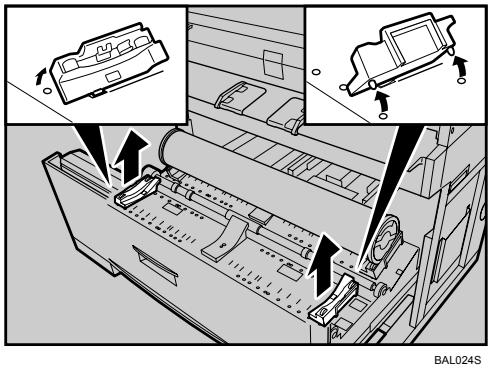
Position the roll holder by inserting its hook in the appropriate slot in the tray floor. (The roll holder's orientation is correct if the underside magnet is outward of the hook.)
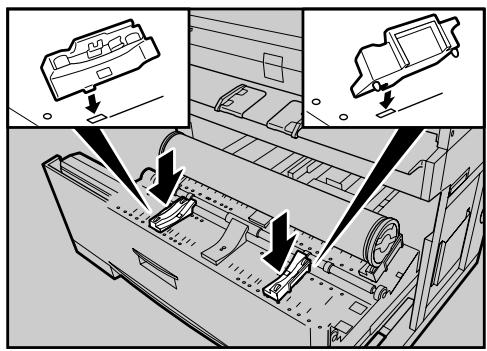
BAL025S
Make sure the hooks are fully inserted in the slots.
Check the paper size in the windows on the inside of the roll holder.
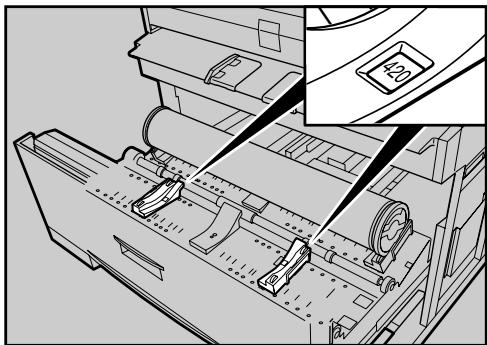
BAL026S
Be sure the positions of the roll holders correspond, so that the roll is centrally placed.
6 Load the paper roll.
For details, see p.74 "Loading the Paper Roll into Tray 1 and 2".
Press the [Menu] key.
![RICOH AFICIO SP W2470 - Press the [Menu] key. - 1](/content/2025/01/136417/images/7af0546a9401879b09467b49bf99732eae80ff06d9fd6352449f1ed98d0c67a1.jpg)
Press the [] or [] key to select [Paper Input], and then press the [OK] key.
![RICOH AFICIO SP W2470 - Press the [] or [] key to select [Paper Input], and then press the [OK] key. - 1](/content/2025/01/136417/images/f5c013d7b9e9b6a3a9d91d6ac2b79dac97ac395860c60116ce5f61a6dbc2d5ba.jpg)
Press the [ ] or [ ] key to select [Paper Size:Tray 1] or [Paper Size:Tray 2], and then press the [OK] key.
![RICOH AFICIO SP W2470 - Press the [ ] or [ ] key to select [Paper Size:Tray 1] or [Paper Size:Tray 2], and then press the [OK] key. - 1](/content/2025/01/136417/images/aae92d51d8db8a54c2496ddd78f33e0d889217ab1416ef4e689364280f367ff7.jpg)
Select the paper size you want to set using the scroll keys, and then press the [OK] key.
![RICOH AFICIO SP W2470 - Select the paper size you want to set using the scroll keys, and then press the [OK] key. - 1](/content/2025/01/136417/images/d0597323221d8c534213875fcb349f2d3b1051e585432a65270533eae9a8fa9e.jpg)
About two seconds later, the display returns to the [Paper Input] screen.
Press the【Menu】key.
The initial screen appears.
Specifying the paper type
Press the【Menu】key.

BAL051S
Press the [ ] or [ ] key to select [Paper Input], and then press the [OK] key.
![RICOH AFICIO SP W2470 - Press the [ ] or [ ] key to select [Paper Input], and then press the [OK] key. - 1](/content/2025/01/136417/images/fa4a73f3ec2e5d59b5baef1848a0d3d13708daae1cbb42fa186f50deb41b22fc.jpg)
Press the [ ] or [ ] key to select [Paper Type:Tray 1] or [Paper Type:Tray 2], and then press the [OK] key.
![RICOH AFICIO SP W2470 - Press the [ ] or [ ] key to select [Paper Type:Tray 1] or [Paper Type:Tray 2], and then press the [OK] key. - 1](/content/2025/01/136417/images/51cd13a8b7f29c26eb8899a782a91cd546096f76bb7b7408479d1607a4d3e940.jpg)
Press the [] or [] key to select the target paper type, and then press the OK key.
![RICOH AFICIO SP W2470 - Press the [] or [] key to select the target paper type, and then press the OK key. - 1](/content/2025/01/136417/images/8dbbd99db4b91a680d002afbdb44a6029b0bfcfa723b7be894912386c02ce907.jpg)
About two seconds later, the display returns to the [Paper Input] screen.
Press the [Menu] key.
The initial screen appears.
Loading Cut Paper into Tray 3
The following procedure explains loading cut paper.
Pull the cut paper tray partially out while lifting it upward.
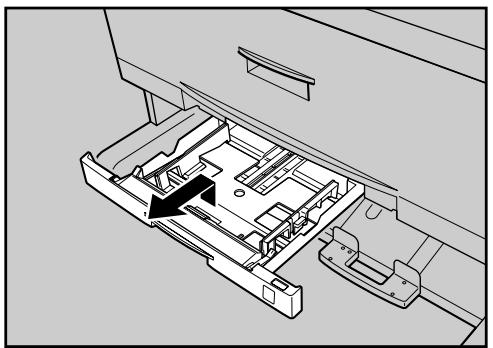
BAL027S
Holding both sides, lift the front end of the tray, and then pull the tray completely out.
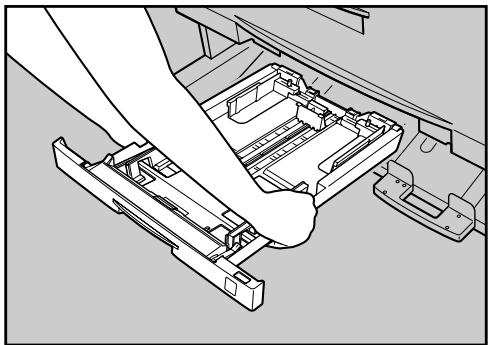
BAL028S
3 While pressing the release lever, open the side fence (①).
To change the paper size, adjust the end fence to the paper size while pressing the release lever (②).
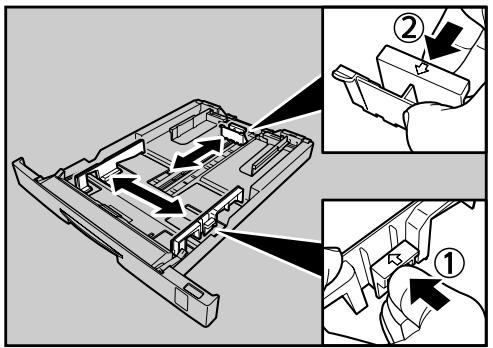
BAL029S
Fan the paper before loading it in the cut paper tray.

Load paper print face down.

Do not load paper over the limit mark on the paper guide.
While pressing the release lever, adjust the side fence to the paper size.
6 Holding the cut paper tray so that the front is higher than the rear, push it carefully all the way into the machine.
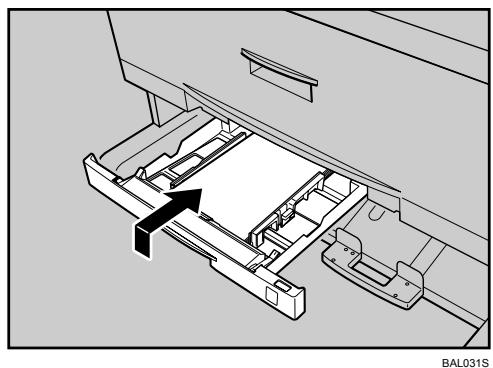
Do not push the cut paper tray forcefully. Doing so will knock the tray's paper guide out of alignment.
Note
Load new paper only when the tray is completely empty.
Straighten curled or warped paper before loading.
- Extend the side-end fences when changing to a larger paper size such as A3. See "Changing the size of the paper in Tray 3".
Changing the size of the paper in Tray 3
The following procedure explains how to change the paper size in the cut paper tray.

Note
This procedure is required for loading A3, B4JIS, 11'' × 17'' , or 12'' × 18'' size paper.
□ If you want to load A4 , 8^1/2^ × 11^ , 8^1/2^ × 13^ , 8^1/_2^ × 14^ paper sizes, see p.81 "Loading Cut Paper into Tray 3'' .
Straighten curled or warped paper before loading.

Pull the cut paper tray partially out while lifting it upward.

BAL032S

Holding both sides, lift the front end of the tray, and then pull the tray completely out.
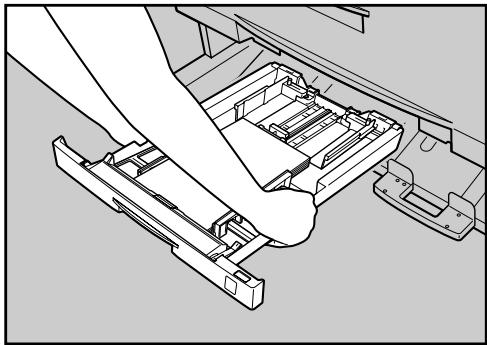
BAL033S
3 Loosen the screws on the right and left side-end fences by turning them counterclockwise.
Remove any remaining paper.
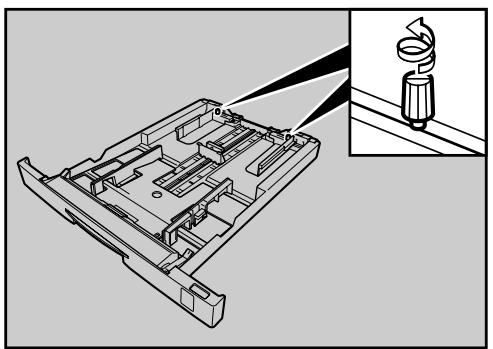
BAL034S
4 While pressing the release lever, open the side fences, end fence, and side-end fences.
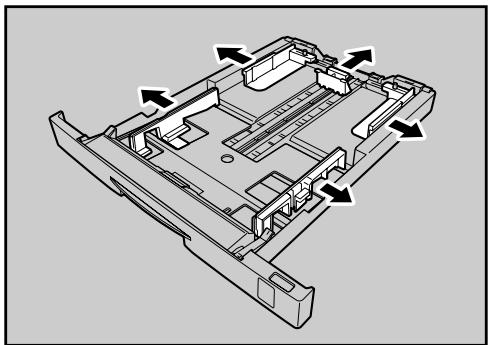
BAL035S
Fan the paper before loading it in the cut paper tray.
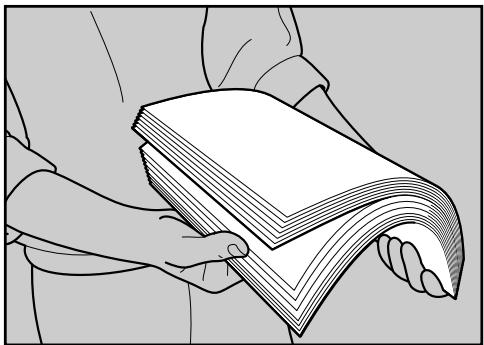
AUB042S
6 Load paper print side down (①).
While pressing the release lever, adjust the side fences, end fence, and side-end fences to the paper size (②).
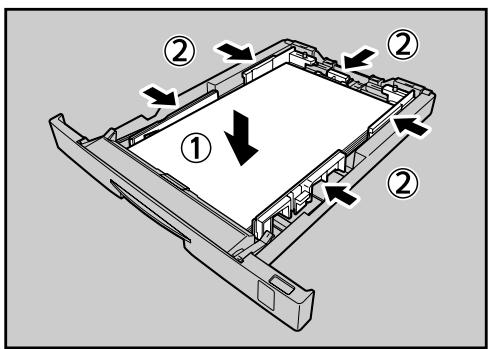
BAL036S
Do not load paper over the limit mark on the paper guide.
7 Fasten the screws on the right and left side-end fences by turning them clockwise.
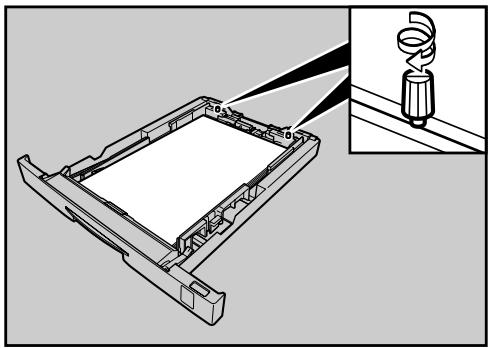
BAL037S
Holding the cut paper tray so that the front is higher than the rear, push it carefully all the way into the machine.
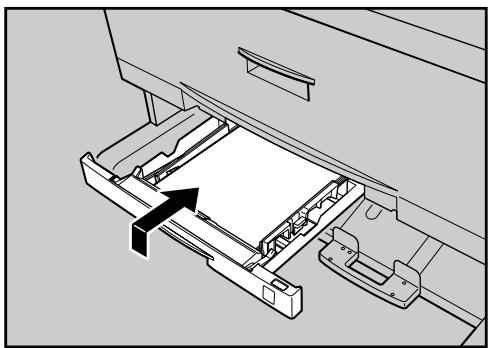
BAL038S
Press the [Menu] key.
![RICOH AFICIO SP W2470 - Press the [Menu] key. - 1](/content/2025/01/136417/images/8544be62b25187d8bdf4039495d6462a971d8d23112ef02bbd28ec746b4c122f.jpg)
Press the [] or [] key to select [Paper Input], and then press the [OK] key.
![RICOH AFICIO SP W2470 - Press the [] or [] key to select [Paper Input], and then press the [OK] key. - 1](/content/2025/01/136417/images/f156e1b4549029863d4d77b1e47bf7df2ab24a90a1f56d79dfa79f1fee8aa3b7.jpg)
Press the [] or [] key to select [Paper Size:Tray 3], and then press the [OK] key.
![RICOH AFICIO SP W2470 - Press the [] or [] key to select [Paper Size:Tray 3], and then press the [OK] key. - 1](/content/2025/01/136417/images/bcd1758d281e2587142185d7fe0c3cbb6d42e4737f0af687c44cf9e65dea591e.jpg)
Select the paper size you want to set using the scroll keys, and then press the [OK] key.
![RICOH AFICIO SP W2470 - Select the paper size you want to set using the scroll keys, and then press the [OK] key. - 1](/content/2025/01/136417/images/53ffc56744832f31c13b234caf5d46645b5d07935d5875c88bac73b841b6c5c8.jpg)
About two seconds later, the display returns to the [Paper Input] screen.
Press the【Menu】key.
The initial screen appears.
Specifying the paper type
Press the [Menu] key.
![RICOH AFICIO SP W2470 - Press the [Menu] key. - 1](/content/2025/01/136417/images/b58ad38bcefcba839c9429c6f01118c10b49893576800ebe8cd5d7a5c1402a2d.jpg)
Press the [ ] or [ ] key to select [Paper Input], and then press the [OK] key.
![RICOH AFICIO SP W2470 - Press the [ ] or [ ] key to select [Paper Input], and then press the [OK] key. - 1](/content/2025/01/136417/images/bc58893fa97b3332f4eebd59d17e3e69a04bbf6881ac615f2cae1c5c451a1402.jpg)
Press the [] or [] key to select [Paper Type:Tray 3], and then press the [OK] key.
![RICOH AFICIO SP W2470 - Press the [] or [] key to select [Paper Type:Tray 3], and then press the [OK] key. - 1](/content/2025/01/136417/images/3f9cb5da03df600e64fd61ee367f4151c6d70441e2b891db89de2dc2ee5ad055.jpg)
Press the [] or [] key to select the target paper type, and then press the OK key.
![RICOH AFICIO SP W2470 - Press the [] or [] key to select the target paper type, and then press the OK key. - 1](/content/2025/01/136417/images/e0ebd074c10a479530aef35d8b9f041d94623d81b205eb69b5d9061aabd4ef42.jpg)
About two seconds later, the display returns to the [Paper Input] screen.
Press the [Menu] key.
The initial screen appears.
Loading Paper in the Bypass Tray
Important
- Paper that has a vertical length of 257 - 2000 ~mm (10.12 - 78.74 inches) and a horizontal length of 210 - 914.4 ~mm (8.27 - 36 inches) can be printed from the bypass tray.
-
Insert paper in the bypass tray lengthwise or widthwise relative the feeding orientation.
A0 size paper must always be inserted lengthwise from the bypass tray.
The following functions are not available when printing from the bypass tray: -
Auto Tray Select
- Auto Tray Switching
- Folding (with the optional folding finisher)
□ You cannot print or insert paper into the bypass tray during printing.
1 Set the paper size using the printer driver or control panel.
Adjust the bypass tray's paper guides to the size of the paper.

If the paper size of the paper guide and the paper do not match, skewing and misfeeds might occur.
3 Send the print job to the printer.
Gently push the paper face up into the bypass tray until the beeper sounds.
Place the paper centrally, so that the space on either side of its edges is even. Then push it carefully in, so that it makes light contact with the feed rollers. Support the paper with your hands until it feeds in.
The paper feeds into the machine automatically and printing starts.
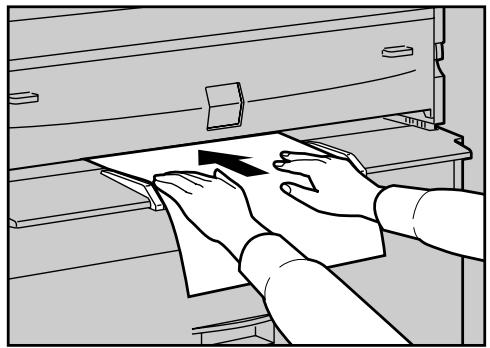
BAL073S
Check that the paper feeds in properly.
Note
Insert the paper until you hear the beep.
□ When loading translucent paper or film, specify the paper size and type.
If you are printing multiple pages, you must manually feed in the subsequent sheets.
Do not print on both sides of the paper.
□ Do not use paper that has already been copied onto or printed on.
For details about printer driver settings, see the printer driver Help.
Specifying the standard size paper
Press the【Menu】key.
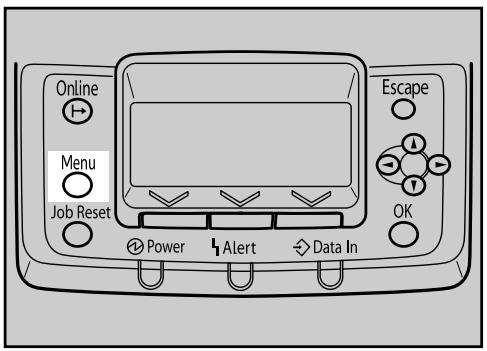
BAL051S
Press the [ ] or [ ] key to select [Paper Input], and then press the [OK] key.
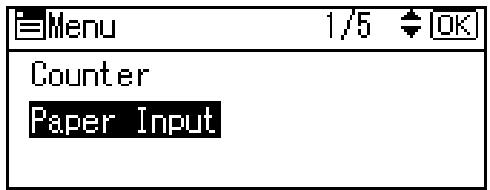
Press the [] or [] key to select [Paper Size:Bypass], and then press the OK] key.
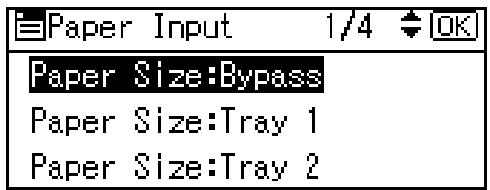
4 Select the paper size you want to set using the scroll keys, and then press the [OK] key.
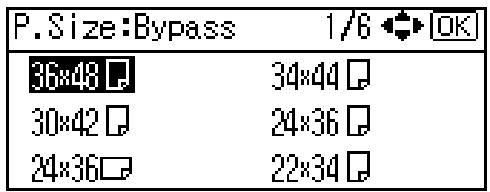
About two seconds later, the display returns to the [Paper Input] screen.
Press the [Menu] key.
The initial screen appears.
Specifying custom size paper
Press the [Menu] key.
![RICOH AFICIO SP W2470 - Press the [Menu] key. - 1](/content/2025/01/136417/images/5609c5021d138ca621b6d323703a74de4554970337ef9b124395586520344115.jpg)
BAL051S
Press the [ ] or [ ] key to select [Paper Input], and then press the [OK] key.
![RICOH AFICIO SP W2470 - Press the [Menu] key. - 2](/content/2025/01/136417/images/e07272d785ffe2d749cf934419114a64e2d8ed1911abbdeea9145dec8c53b9a2.jpg)
Press the [] or [] key to select [Paper Size:Bypass], and then press the OK] key.
![RICOH AFICIO SP W2470 - Press the [Menu] key. - 3](/content/2025/01/136417/images/d66e8bcb557838fa43edd151a891a02b86c8058b6fd6fa6e766f783e74aaeabd.jpg)
Press the Scroll keys to select [Custom Size], and then press the [OK] key.
![RICOH AFICIO SP W2470 - Press the [Menu] key. - 4](/content/2025/01/136417/images/7c6bfa26e04c64aef89848c85cca0d55ecdcba287b85fdbe7e1c10b0104d9d6a.jpg)
Press the [] or [] key to enter the horizontal value, and then press the OK key.
220-240V
![RICOH AFICIO SP W2470 - Press the [Menu] key. - 5](/content/2025/01/136417/images/929567b4162af553b085be93e69608694a7dd8283a1bdd79f6e65a1fdd77effd.jpg)
120V
![RICOH AFICIO SP W2470 - Press the [Menu] key. - 6](/content/2025/01/136417/images/4a36e68b29e59d2d743fddbc2ee448cfe78953e853e99474d82428466f91a766.jpg)
If you press and hold the key, the value increases/decreases by 1 or 10mm (0.1 or 1 inch).
6 Press the [] or [] key to enter the vertical value, and then press the [OK] key.
220-240V
![RICOH AFICIO SP W2470 - Press the [Menu] key. - 7](/content/2025/01/136417/images/6e8bee183a14004e37d0ca6b026cd7e548460108f061f4e700fca35fa124dbcb.jpg)
120V
![RICOH AFICIO SP W2470 - Press the [Menu] key. - 8](/content/2025/01/136417/images/a2a5845050b4b68b688fa8814ff77befda426ae457b64fd7318e0b3eddf3b5c3.jpg)
If you press and hold the key, the value increases/decreases by 1 or 10mm (0.1 or 1 inch).
The settings appear and about two seconds later, the display returns to the [Paper Input] screen.
Press the [Menu] key.
The initial screen appears.
Specifying the paper type
Press the [Menu] key.
![RICOH AFICIO SP W2470 - Press the [Menu] key. - 1](/content/2025/01/136417/images/cbc88dbe8397abc0995e909ad29e6f5b14d08e18c35c378a6f35d26a2be56b4f.jpg)
Press the [ ] or [ ] key to select [Paper Input], and then press the [OK] key.
![RICOH AFICIO SP W2470 - Press the [ ] or [ ] key to select [Paper Input], and then press the [OK] key. - 1](/content/2025/01/136417/images/8fae7ae52c23975e75ddc9767e0abd68d3e133014c249c21627b7973ec12e33c.jpg)
Press the [] or [] key to select [Paper Type:Bypass Tray], and then press the OK] key.
![RICOH AFICIO SP W2470 - Press the [] or [] key to select [Paper Type:Bypass Tray], and then press the OK] key. - 1](/content/2025/01/136417/images/610bbefb75c19e6273e90c1c2dc2e6abc99767de0e353b43e18d6e3f3e56d2d9.jpg)
Press the [] or [] key to select the target paper type, and then press the OK key.
![RICOH AFICIO SP W2470 - Press the [] or [] key to select the target paper type, and then press the OK key. - 1](/content/2025/01/136417/images/c71c92c48c2abfbc5186bae0b0267282598fc502df3774a6c8fc81d25e52f9ac.jpg)
About two seconds later, the display returns to the [Paper Input] screen.
Press the [Menu] key.
The initial screen appears.
6. Replacing Consumables
Replacing the Toner Cartridge
This section explains adding and storing toner.
WARNING:
- Do not incinerate used toner or toner containers. Toner dust might ignite when exposed to an open flame. Dispose of used toner containers in accordance with local regulations.
CAUTION:
- Keep toner (used or unused) and toner containers out of reach of children.
CAUTION:
- If toner or used toner is inhaled, gargle with plenty of water and move into a fresh air environment. Consult a doctor if necessary.
CAUTION:
- If toner or used toner gets into your eyes, flush immediately with large amounts of water. Consult a doctor if necessary.
CAUTION:
- If toner or used toner is swallowed, dilute by drinking a large amount of water. Consult a doctor if necessary.
CAUTION:
- Avoid getting toner on your clothes or skin when removing a paper jam or replacing toner. If your skin comes into contact with toner, wash the affected area thoroughly with soap and water.
- If toner gets on your clothing, wash with cold water. Hot water will set the toner into the fabric and may make removing the stain impossible.
CAUTION:
- Do not open toner containers forcefully. Toner can spill, dirtying your clothes or hands, and possibly resulting in accidental ingestion.
Replace the toner if any of the following messages appear on the display:

Add Toner
Raise Mainframe then open Front Cover to replace.
When the following message appears on the display, the toner should be replaced soon. Prepare new toner.
Toner is almost empty.
Option
Prt.Jobs

Important
Use of non-recommended toner can result in malfunction.
□ When adding toner, do not the power switch to Stand by. If you do, settings will be lost.
□ Always add toner when the machine requests you to do so.
Do not shake the removed toner cartridge, remaining toner might scatter.
Store toner containers in a cool, dry place away from direct sunlight.
Store toner on a flat surface.

Lift both main unit opening levers, and then lift open the main unit.
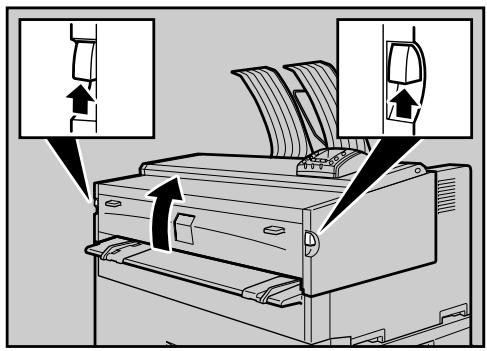
BAL040S
2 Open the main unit front cover.
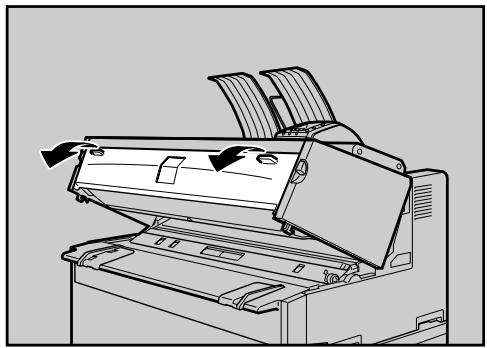
BAL041S
Hold the toner cartridge at the edge of the right end, and then roll it in the direction of the arrow.
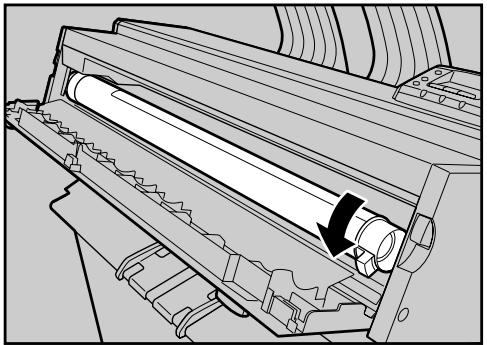
BAL042S
4 Hold the toner cartridge at the edge of the left end, and then remove it from the printer.
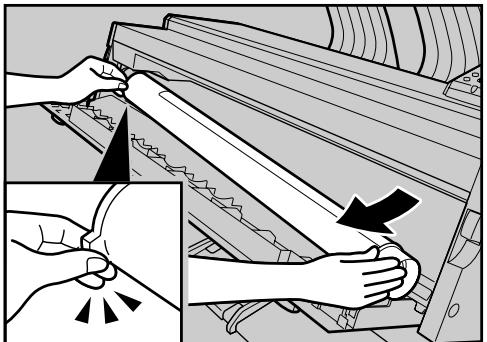
BAL043S
5 Remove the toner cartridge from its package. Gently tap the capped and end of the cartridge (①) four or five times. Tap the other end of the cartridge (②) four or five times.
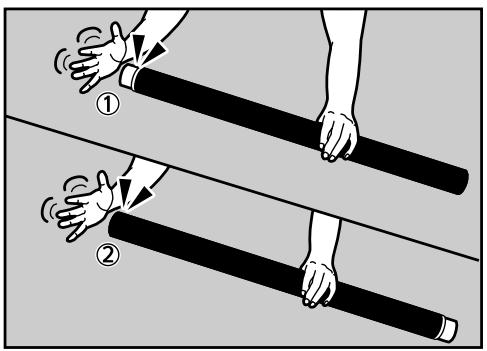
BAL074S
6 Shake the toner cartridge from side to side four or five times so that the toner moves freely inside of the cartridge.
Rotate the joint (①) to confirm that it rotates easily. If the joint does not turn easily, tap the end of the cartridge and shake it again.
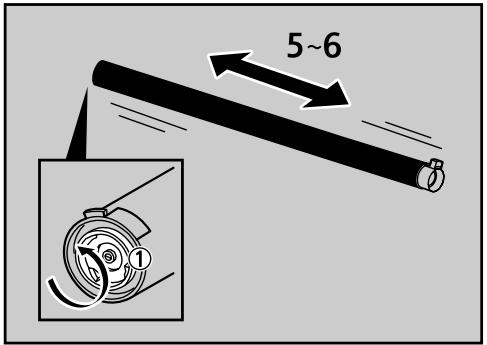
BAL075S
7 Insert the end of the toner cartridge into the toner holder on the left (1). Then insert the toner cartridge into the right in the direction of the arrow (2).
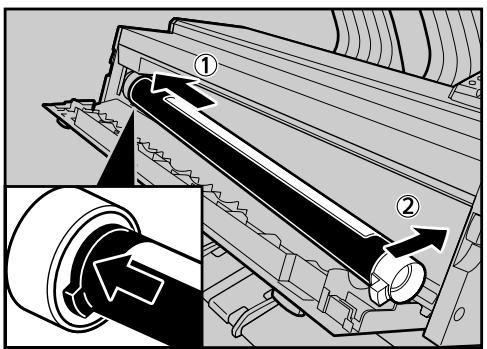
BAL045S
Do not rotate the cartridge until you remove the tape.
3 Carefully remove the tape from the toner cartridge.

9 Rotate the toner cartridge in the direction of the arrow until it stops.
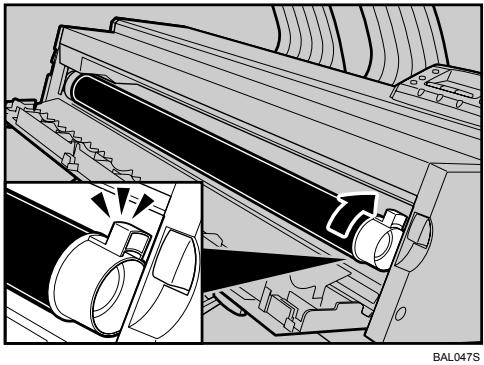
Close the main unit front cover and the main unit.
Note
The waste toner bottle makes a noise when toner is added. This noise does not indicate a malfunction.
The toner cartridge supplied with the printer allows you to print about 3,625 pages (2,175 m). These numbers were obtained from printing A1 6 % charts, but the actual number of pages you can print will vary depending on paper type, size, contents, and print settings.
Our products are engineered to meet the highest standards of quality and functionality. When purchasing expendable supplies, we recommend using only those provided by an authorized dealer.
Toner is not covered by warranty. However, if there is a problem, contact the store where it was purchased.
7. Cleaning and Adjusting the Printer
Maintaining Your Printer
Clean the printer periodically to maintain fine printing.
Important
- Do not use chemical cleaners or organic solvents, such as thinner or benzene. If such substances get inside the machine or melt plastic parts, a failure might occur.
- Do not clean parts other than those explicitly specified in this manual. Other parts should only be cleaned by your service representative.
- You must disconnect the plug from the wall outlet at least once a year. Clean away any dust and grime from and around the plug and outlet before reconnecting. Accumulated dust and grime pose a fire hazard.
How to maintain
Cleaning the machine: Wipe the machine with a soft, dry cloth. If this does not remove the dirt, wipe the machine with a damp and tightly wrung cloth. If a damp cloth still does not remove the dirt, try using a mild detergent. Wipe the machine with a dry cloth to remove the moisture, after using a damp cloth.
Cleaning the Main Unit
Clean off toner that may have collected on the imaging area.
Important
- Do not leave the main unit more than 10 minutes, otherwise print quality may deteriorate.
Lift the main unit opening levers on either side and open the main unit.

BAL010S
Wipe it with a soft, dry cloth.
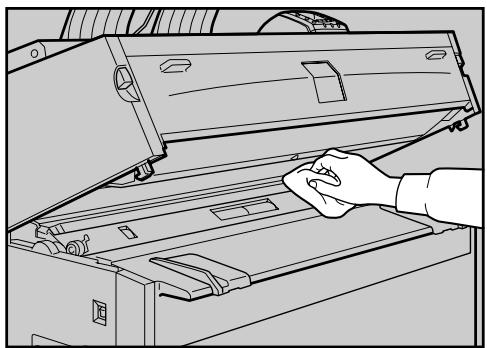
BAL011S
3 Close the main unit cover gently.
Adjusting Paper Thickness
The following procedure explains how to change the paper thickness value. You can select one of five paper thickness values for plain paper, translucent paper, and film.
Important
The default thickness value for each paper type is level 3 (medium).
Press the [Menu] key.
![RICOH AFICIO SP W2470 - Press the [Menu] key. - 1](/content/2025/01/136417/images/78441a91a3b64eb920b6fc90d9eebacdf6a6ec6f953158ca6868a6534d62ee13.jpg)
BAL051S
Press the [ ] or [ ] key to select [Maintenance], and then press the [OK] key.
![RICOH AFICIO SP W2470 - Press the [ ] or [ ] key to select [Maintenance], and then press the [OK] key. - 1](/content/2025/01/136417/images/7d6501beca45d7be0172697e5a900f9a0f6832c116b99fa6d6b43bf1b17b5c3f.jpg)
Press the [ ] or [ ] key to select [General Settings], and then press the [OK] key.
![RICOH AFICIO SP W2470 - Press the [ ] or [ ] key to select [General Settings], and then press the [OK] key. - 1](/content/2025/01/136417/images/b1009c755975568f95ecc455451f8e200907fe01ea459597cce7e76fa9aee361.jpg)
Press the [] or [] key to select [Paper Thickness:Paper Tray] or [Paper Thickness:Bypass], and then press the [OK] key.
![RICOH AFICIO SP W2470 - Press the [] or [] key to select [Paper Thickness:Paper Tray] or [Paper Thickness:Bypass], and then press the [OK] key. - 1](/content/2025/01/136417/images/f1d3e761db8942974707c8def316b45988bbcec03074ae7bf4512734cb59b657.jpg)
Press the [] or [] key to select the paper type you want to use, and then press the [OK] key.
![RICOH AFICIO SP W2470 - Press the [] or [] key to select [Paper Thickness:Paper Tray] or [Paper Thickness:Bypass], and then press the [OK] key. - 2](/content/2025/01/136417/images/e45b5e0ea6d7fb523d4625be2d6692ffb679a3b49a98eded34929812c2a353ca.jpg)
Press the [<] or [>] key to specify the paper thickness you require, and then press the [OK] key.
To increase paper thickness, press the [ ] key. To decrease, press the [ ] key.
![RICOH AFICIO SP W2470 - Press the [] or [] key to select [Paper Thickness:Paper Tray] or [Paper Thickness:Bypass], and then press the [OK] key. - 3](/content/2025/01/136417/images/531b0a7a139f37b849b41dd0a226942ef6cb1ed9f94547a6cd33dd969fe765fd.jpg)
Press the [Menu] key.
The initial screen appears.
Adjusting the Fine Ratio
The following procedure explains how to adjust the fine ratio when using the folding finisher
Press the [Menu] key.

Press the [ ] or [ ] key to select [Maintenance], and then press the [OK] key.
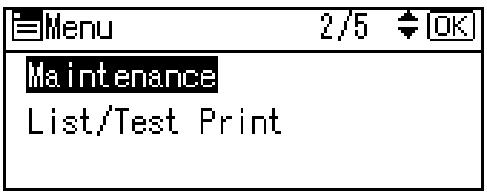
Press the [] or [] key to select [General Settings], and then press the [OK] key.
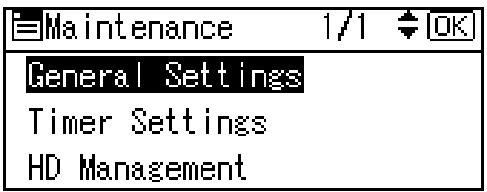
Press the [] or [] key to select [Fine Ratio Adjustment], and then press the OK] key.
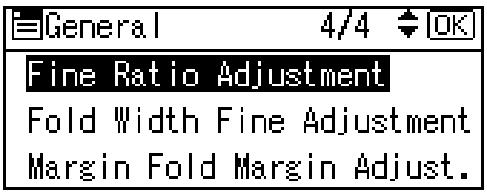
Press the [ ] or [ ] key to select the paper type you want to use, and then press the [OK] key.
Press the [] or [] key to specify the fine ratio you require, and then press the [OK] key.
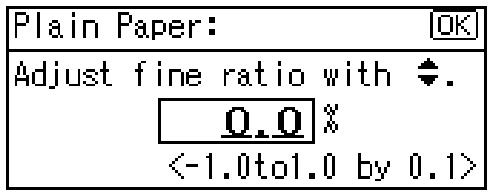
Press the [Menu] key.
The initial screen appears.
Adjusting the Folding Width
The following procedure explains how to adjust the folding width when using the folding finisher.
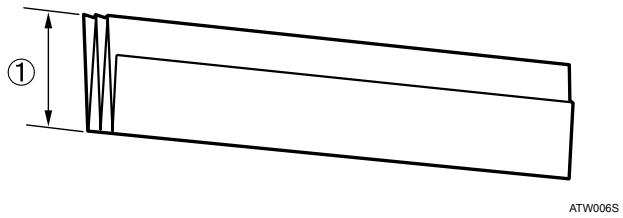
① Available folding width: -6.0 to +6.0mm (-0.24 to +0.24 inch)
Important
This menu is available only if the optional folding finisher is installed.
Press the [Menu] key.
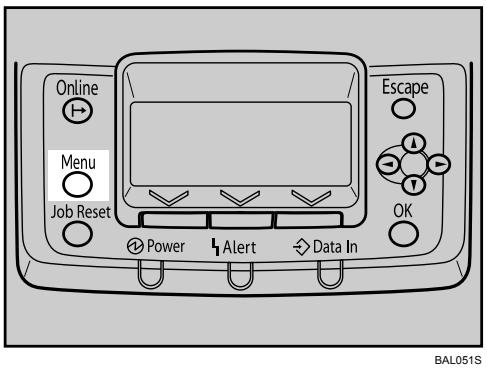
Press the [ ] or [ ] key to select [Maintenance], and then press the [OK] key.
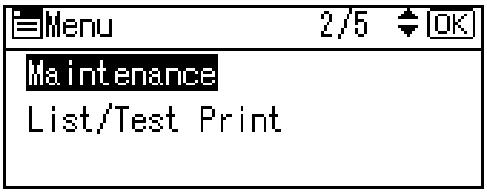
Press the [ ] or [ ] key to select [General Settings], and then press the [OK] key.
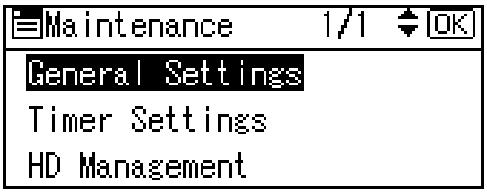
Press the [] or [] key to select [Fold Width Fine Adjustment], and then press the [OK] key.
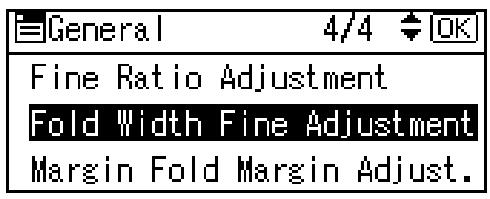
Press the [] or [] key to specify the fold width value you require, and then press the [OK] key.
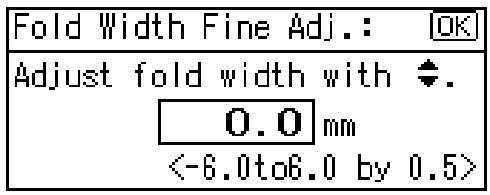
6 Press the [Menu] key.
The initial screen appears.
Adjusting the Margin Fold
The following procedure explains how to adjust the margin fold when using the folding finisher.
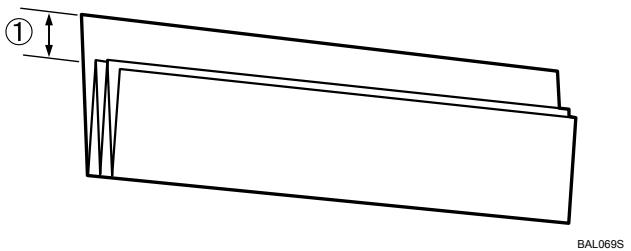
① Available margin fold width: 35 to 40~mm (1.38 to 1.58 inch)
Important
This menu is available only if the optional folding finisher is installed.
Press the [Menu] key.

Press the [ ] or [ ] key to select [Maintenance], and then press the [OK] key.
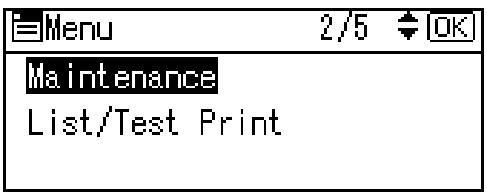
Press the [] or [] key to select [General Settings], and then press the [OK] key.
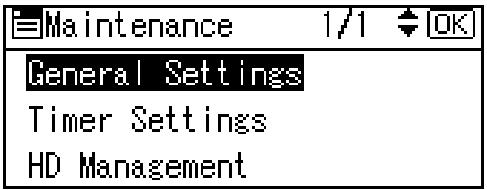
Press the [] or [] key to select [Margin Fold Margin Adjust.], and then press the [OK] key.
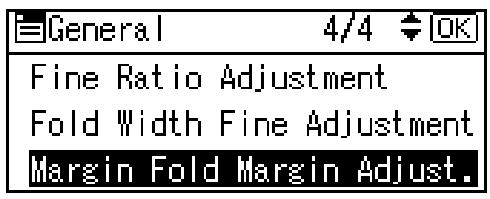
Press the [] or [] key to specify the fold margin value you require, and then press the [OK] key.
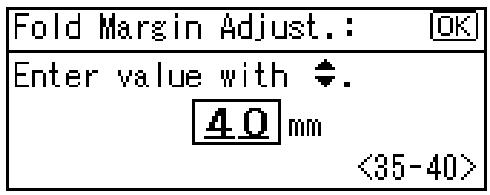
6 Press the [Menu] key.
The initial screen appears.
Error and Status Messages Appears on the Control Panel
This section explains what the messages that appear on the control panel mean and what to do when a particular message appears.
Note that not all the messages that might appear on the control panel are explained in these tables, only the more frequent or problematic messages. Read each message carefully, and then take the actions described below.
Status Messages
| Message | Status |
| Ready | This is the default ready message. The machine is ready for use. No action is required. |
| Waiting... | The machine is waiting for the next data to print. Wait a while. |
| Offline | The machine is offline. To start printing, switch the machine to online by pressing the [Online] key. |
| Please wait... | This message might appear for a second or two while the machine is preparing, performing initial adjustments, or adding toner. Wait a while. |
| Job Suspended... | All jobs in the machine are suspended. Wait a while. |
| Hex Dump Mode | In the hex dump mode, the machine receives data in hexadecimal format. Turn off the machine after printing, and then turn back on. |
| Resetting Job... | The machine is resetting the print job. Wait until “Ready” appears on the display panel. |
| Setting change... | The machine is changing settings. Wait a while. |
| Energy Saver Mode | The printer is in Energy Saver mode. Press any keys to recover to the normal mode. |
Message (in alphabetical order)
| Messages | Cause | Solution |
| Add Toner | The printer is out of toner. | Replace the toner cartridge. See p.95 “Replacing the Toner Cartridge”. |
| Cannot connect with DHCP server | An attempt to change the IP address, subnet mask or gateway address was made while [DHCP] was set to [On]. | Make the change after setting [DHCP] to [Off]. See p.39 “Ethernet Configuration”. |
| Connect failed: Wireless-Card Turn power off, check card. | Check there is an IEEE 802.11b interface unit installed. Check that it is a supported unit. If it is, check it is installed correctly. Install the correct board properly. | Turn the power switch to Standby, and then turn the printer on. If the message appears again, contact your sales or service representative. |
| Ethernet Board Error | An error on the Ethernet board is detected. | Pull out and then re-install the controller board. If the problem persists, contact your sales or service representative. |
| Printer Font Error. | There are problems with the printer's font file. | Turn the power switch to Standby, and then turn the printer on. If the message appears again, contact your sales or service representative. |
| Problem: Wireless board | A wireless card that the machine cannot use has been installed. | Turn the power switch to Standby, and check the interface unit is inserted correctly. Then, turn the printer on again. If the message appears again, contact your sales or service representative. |
| Problem: Wireless card | Access to the wireless board in which the IEEE 802.11b interface unit is inserted is possible, but an error was detected. | Turn the power switch to Standby, and check the interface unit is inserted correctly. Then, turn the printer on again. If the message appears again, contact your sales or service representative. |
| Problem with Hard Disk | An error has occurred in the hard disk drive. | Turn the power switch to Standby, and then turn the printer on. If the message appears again, contact your sales or service representative. |
| SD Card authentic-failed | Authentication from the SD card has failed. | Turn the power switch to Standby, and then turn the printer on. If the message appears again, contact your sales or service representative. |
| Toner is almost empty. | The printer is almost out of toner. | Prepare a new toner cartridge. |
| Waste Toner al-most full | Waste toner bottle is al-most full. | Contact your sales or service representative. |
| Waste Toner Bottle full | Waste toner bottle is full. | Contact your sales or service representative. |

Note
- Confirm error details by printing the Error Log. For details, see "List/Test Print Menu", Software Guide.
Panel Tones
The following table explains the meaning of the various tone patterns that the printer used to alerts to users about its condition.
| Tone pattern | Meaning | Cause |
| Two long beeps. | Printer ready. | After cooling or being switched on, the printer has fully warmed up and is ready for use. |
| Single short beep. | Panel/screen input accepted. | A valid control panel or screen key was pressed. Single short beeps are produced only when valid keys are pressed. |
| Single long beep. | Job completed. | A Printer/Document Server Features job has finished. |
| Four long beeps. | Printer initialized. | The screen is changing back to the initial screen after the printer came out of the energy-saving mode or was reset. |
| Five short beeps repeated five times. | Printer alert. | Printer requires user attention. Paper may have jammed or toner may need replenishing. |
Important
□ Users cannot mute the printer's tone alerts. When the printer beeps to alert users of a paper jam or toner request, if the printer's covers are opened and closed repeatedly within a short space of time, the tone alert might continue, even after normal status has resumed.
Printer Does Not Print
Use the following procedures if printing does not start when printing from a computer.
| Problem | Cause | Solution |
| Printing does not start. | The power is off. | Check the cable is securely plugged into the power outlet and the machine. Turn on the power switch. |
| Printing does not start. | The printer is set to “Of-fline”. | Press the [Online] key. |
| Printing does not start. | The cause is displayed on the display of the control panel. | Check the error message or warning status on the display panel and take the required action. See p.111 “Error and Status Messages Appears on the Control Panel”. |
| Printing does not start. | The interface cable is not connected correctly. | Connect the interface cable securely. See p.33 “Ethernet Cable Connection”, p.36 “USB Cable Connection”. |
| Printing does not start. | The correct interface cable is not being used. | The type of interface cable you should use depends on the computer. Be sure to use the correct one. If the cable is damaged or worn, replace it. |
| Printing does not start. | The interface cable was connected after the printer was switched on. | Connect the interface cable before turning on the printer. |
| Printing does not start. | If the printer is operating in an extended wireless LAN, failure to print might result from a weak wireless signal. | To check signal status for [Host Interface], [[IEEE 802.11b], and [Wireless LAN Signal]. If signal quality is poor, move the machine to a location where radio waves can pass or remove objects that might cause interference. (You can check signal status only when using wireless LAN in the infrastructure mode.) |
| Printing does not start. | If the machine is operat-ing in an extended wireless LAN, SSID settings are incorrect. | Check using the machine's display panel that the SSID is correctly set. See p.52 “Setting the SSID”. |
| Printing does not start. | If the machine is operat-ing in an extended wireless LAN, the receiver's MAC address may be preventing communication with the access point. | Check access point settings when in the infrastructure mode. Depending on the access point, client access may be limited by MAC address. Also, check there are no problems in transmission between access point and wired clients, and between access point and wireless clients. |
| Printing does not start. | The extended wireless LAN has not started. | Confirm the orange LED is lit, and the green LED is lit or blinks during transmission. |
| Printing does not start. | The login user name, log-in password, or driver encryption key is invalid. | Check the login user name, login password, or driver encryption key. |
| Printing does not start. | Advanced encryption has been set using the Extended Security function. | Check the settings of the Extended Secu- rity function with the administrator. |
| Data In indicator does not blink or light up. | If the Data In indicator is unlit or not flashing, the printer has not received the data. | ·When the machine is connected to a computer via a cable, check the com- puter print port settings are correct. See “When the machine is connected to the computer using the interface cable”. ·When it is networked with a com- puter, contact the administrator. |
| Alert indicator is lit. | The cause is displayed on the display of the con- trol panel. | Check the error message on the display panel and take required action. See p.111 “Error and Status Messages Ap- pears on the Control Panel”. |
| [List/Test Print] is disabled. | A mechanical error might have occurred. | Contact your service representative. See p.31 “Test Printing”. |
| Printing does not start when using the extended wireless LAN in Ad-hoc mode. | The correct Communica- tion mode is not set. | Turn the power switch to Standby, and then turn the printer on. Or, change the settings, see p.49 “IEEE 802.11b (Wireless LAN) Configuration”. |
If printing still does not start, contact your sales or service representative.
Checking the Port Connection
When the Data In indicator does not flash or light up, check the port connection as shown below to confirm the setting.
- For a parallel port connection, the port must be set to LPT 1 or LPT 2.
- For a USB port connection, the port must be set to USB00(n). () varies depending on the number of printers connected.
For Windows 95/98/Me
① Click the [Start] button, point to [Settings], and then click [Printers].
(2) Click the icon of the machine. On the [File] menu, click [Properties].
③ Click the [Details] tab.
(4) In the [Print to the following port:] list, confirm the correct port is selected.
For Windows 2000 or Windows NT 4.0
① Click the [Start] button, point to [Settings], and then click [Printers].
② Click the icon of the machine. On the [File] menu, click [Properties].
③ Click the [Ports] tab.
(4) In the [Print to the following port(s)] list, confirm the correct port is selected.
For Windows XP Professional or Windows Server 2003
① Click the [Start] button, and then click [Printers and Faxes].
(2) Click the icon of the machine. On the [File] menu, click [Properties].
③ Click the [Ports] tab.
(4) In the [Print to the following port(s)] list, confirm the correct port is selected.
For Windows XP Home Edition
① Click the [Start] button, and then click [Control Panel].
② Click [Printers and Other Hardware].
③ Click [Printers and Faxes].
④ Click the icon of the machine. On the [File] menu, click [Properties].
⑤ Click the [Ports] tab.
⑥ In the [Print to the following port(s)] list, confirm the correct port is selected.
Other Printing Problems
This section explains likely causes of and possible solutions for problems that can occur when printing from a computer.
If prints are not clear
| Problem | Cause | Solution |
| The print on the entire page is faded. | Toner is beginning to run out. | Add toner. See p.95 “Replacing the Toner Cartridge”. |
| The print on the entire page is faded. | The paper is damp. | Use paper that has been stored in the recommended temperature and humidity condition. See p.67 “Paper Recommendations”. |
| The print on the entire page is faded. | The paper is unsuitable. | Use the recommended paper. (Printing on coarse or treated paper might result in faint print image.) See p.67 “Paper Recommendations”. |
| Parts of images are not printed. | The paper is damp. | Use paper that has been stored in the recommended temperature and humidity condition. See p.67 “Paper Recommendations”. |
| White lines appear. | Toner is beginning to run out. | Add toner. See p.95 “Replacing the Toner Cartridge”. |
When printer driver settings are required
| Problem | Cause | Solution |
| The printed image is different from the image on the computer's display. | With certain functions, such as enlargement and reduction, image layout might be different to that on the computer display. | In the application, change the layout, character size, and character settings. |
| The printed image is different from the image on the computer's display. | You might have selected to replace True Type fonts with machine fonts in the printing process. | To print an image similar to that of the computer display, make settings to print True Type fonts as an image. See the printer driver Help. |
| When printing graphics, the output and the screen are different. | If the printer driver is configured to use the graphics command, the graphics command from the machine is used to print. | If you want to print accurately, set the printer driver to print without using the graphics command. See the printer driver Help. |
| Garbled characters are printed. | The correct printer language might have not been selected. | Set the correct printer language. |
| Images are printed in the wrong orientation. | The feed orientation you selected and the feed orientation selected in the printer driver's option setup might not be the same. | Set the machine's feed orientation and the printer driver's feed orientation accordingly. See the printer driver Help. |
| Images are cut off, or excess is printed. | You may be using paper smaller than the size selected in the application. | Use the same size paper as that selected in the application. If you cannot load paper of the correct size, use the reduction function to reduce the image, and then print. See the printer driver Help. |
| Page layout is not as expected. | Print areas differ depending on machine used. Information that fits on a single page on one machine may not fit on a single page of another machine. | Adjust the [Printable area:] setting in the [Printer Configuration...] dialog box on the [Print Settings] tab in the RPCS printer driver. See the printer driver Help. |
| Photo images are coarse. | Some applications print at lower resolution. | Use the application's settings to specify a higher resolution. |
| Solid lines are printed as broken lines. | Dither patterns do not match. | Make the following settings with the printer driver: Change the [Dithering:] setting on the [Image Adjustments] tab in the [Change User Settings...] dialog box, on the [Print Quality] tab in the RPCS printer driver. See the printer driver Help. |
| Optional components connected to the machine are not recognized when using Windows 95 / 98 / Me, Windows 2000 / XP, Windows Server 2003, and Windows NT 4.0. | Bidirectional communication is not working. | Set up optional devices on the Properties of the printer. See the printer driver Help. |
| Print results using combined printing or auto reduce/enlarge are not as expected under Windows 95 / 98 / Me / 2000 / XP, WindowsServer 2003, or Windows NT 4.0. | The correct application or printer driver settings are not made. | Make sure the application's paper size and orientation settings match those of the printer driver. If a different paper size and orientation are set, select the same size and orientation. |
| When printing on custom size paper under Windows, the image appears in the wrong position. | The correct custom paper size is not specified in the printer driver's settings. | To print on custom size paper from the paper tray, specify the paper size in the printer driver's settings. See the printer driver Help. |
When paper does not feed in properly
| Problem | Cause | Solution |
| Paper is not fed from the selected tray. | When you are using a Windows operating system, printer driver settings override those set using the display panel. | Set the desired input tray using the printer driver. See the printer driver Help. |
| Print is slanted. | The cut paper tray's side fences might not be locked. | Check the side fences are locked. See p.81 “Loading Cut Paper into Tray 3”. |
| Print is slanted. | The paper is feeding in at a slant. | Load the paper correctly. See p.73 “Loading Pa-per”. |
| Misfeeds occur frequently. | The number of sheets loaded in the cut paper tray exceeds the capacity of the machine. | Load paper only as high as the upper limit markings on the side fences of the cut paper tray. See p.81 “Loading Cut Paper into Tray 3”. |
| Misfeeds occur frequently. | The paper is damp. | Use paper that has been stored in the recommended temperature and humidity condition. See p.67 “Paper Recommendations”. |
| Misfeeds occur frequently. | The paper is too thick or too thin. | Use recommended paper. See p.67 “Paper Rec-ommendations”. |
| Misfeeds occur frequently. | The copy paper is wrinkled or has been folded/creased. | Use recommended paper. Use paper that has been stored in the recommended temperature and humidity condition. See p.67 “Paper Rec-ommendations”. |
| Misfeeds occur frequently. | Printed paper is be-ing used. | Use recommended paper. See p.67 “Paper Rec-ommendations”. |
| Copy paper becomes creased. | The paper is damp. | Use paper that has been stored in the recommended temperature and humidity condition. See p.67 “Paper Recommendations”. |
| Copy paper becomes creased. | The paper is too thin. | Use recommended paper. See p.67 “Paper Rec-ommendations”. |
| There is considerable delay between the print start instruction and actual printing. | Processing time depends on data volume. High volume data, such as graphics-heavy documents, take longer to process. | If the Data In indicator is blinking, data has been received by the printer. Wait for a mo-ment. |
| There is considerable delay between the print start instruction and actual printing. | The paper type setting was changed. | If the paper type setting has been changed, there might be a delay before printing begins. Wait for a moment. |
| It takes a long time to complete a print job. | Processing time depends on data volume. High volume data, such as graphics-heavy documents, take longer to process. | Wait for a moment. Making the following setting on the printer driver may reduce the computer's workload. • Select [Speed] in the [Print priority] on the [Print Quality] tab in the printing preferences dialog box. • Also, select the [User settings] check box, and then click [Change User Settings...]. Select the lower value for the [Resolution:] list on the [Image Adjustments] tab in the [Change User Settings] dialog box. See the printer driver Help. |
| Print jobs take a long time to complete. | If a print job is data heavy, it will take longer to complete. | If the Data In indicator is blinking, data has been received by the printer. Wait for a moment. |
Folding finisher
| Problem | Cause | Solution |
| Cannot specify folding. | The folding finisher is offline. | When the folding finisher is offline, folding cannot be specified. Turn off the power switches of both the printer and folding finisher, and then turn them back on again in the following order: folding finisher, and then the printer. Then check the folding finisher is online. |
| Cannot specify folding. | The optional device is not configured correctly on the printer driver. | Configure the optional device correctly using [Change Accessories...] on the printer driver. See the printer driver Help. |
| Cannot specify folding. | Translucent paper or film was specified. | Translucent paper and film are not available for folding. They are delivered to the upper output stacker, but not folded. Select another paper type, and then specify folding. |
| "Please wait..." appears on the display panel and printing cannot be done. | The folding finisher is offline. | Turn off the power switch of both the printer and folding finisher, and then turn them back on again in the following order: folding finisher, and then the printer. Then check the folding finisher is online. |
Other printing problems
| Problem | Cause | Solution |
| A print instruction was issued from the computer, but printing did not start. | User Authentication may have been set. | Ask the administrator for the user code. Specify the user code you confirmed when printing from the printer driver. On the printer driver's [Printer Configuration] tab, click [UserID...] and then enter the user code. |
| PDF files do not print out/cannot perform PDF direct print. | PDF files are password-protected. | To print password-protected PDF files, enter the password in the [PDF Menu] or on SmartDeviceMonitor. For details about [PDF Menu], see “PDF Menu”, Software Guide. For details about SmartDeviceMonitor, see the SmartDeviceMonitor Help. |
| PDF files do not print out/cannot perform PDF direct print. | PDF files cannot be printed if they are print-disabled in PDF file security setting. | Change the PDF file security setting. |
| PDF files do not print out/cannot perform PDF direct print. | High compression PDF files created using the machine's scanner function cannot print directly. | Open the application used to create the PDF, and then print the file using the application's driver. Re-save the file in normal (non-compressed) PDF format. Some types of High Compression PDF files are not supported. Consult your sales representative about the supported file types. |
| PDF direct print produces strange or mal-formed characters. | Fonts were not embedded. | Embed fonts in the PDF file you want to print and then print. |
| Printing by wireless LAN is slow. | The number of jobs exceeds the capacity of the machine. | Reduce the number of jobs. |
| Printing by wireless LAN is slow. | A communication error might have occurred. Interference from other wireless LAN devices can reduce communication speed. | Check if there are any other active wireless devices near the machine. Remove the machine from close proximity with IEEE 802.11b wireless LAN devices. |
If the problem cannot be solved, contact your service representative.
Additional Troubleshooting
Troubles related to the printer functions.
| Problems | Solutions |
| Strange noise. | If the strange noise is heard from the place where a supply has been replaced or an option has been installed recently, check the supply or option is properly installed. If the strange noise persists, contact your sales or service representative. |
| No e-mail received when an alert occurs, and after resolving an alert. | Confirm [Auto Email Notify] is active in the [System] menu on the control panel. See “System Menu”, Software Guide. Access the printer through the Web browser, log on as an Administrator on the Web Image Monitor, and then confirm the following settings in [Auto E-mail Notification]: • Device E-mail Address • Groups to Notify • Select Groups/Items to Notify For details about the settings, see Web Image Monitor Help. • Access the printer through the Web browser, log on as an Administrator on the Web Image Monitor, and then confirm the settings of the SMTP server in [E-mail]. • If the power is switched to standby before the e-mail is transmitted, the e-mail will not be received. • Check if the e-mail address is set for the correct destination. • Check the printer's operation history using the Web Image Monitor's System Log menu in [Network]. If the e-mail was sent but not received, the destination may be incorrect. • Also check the information concerning error mail from the e-mail server. |
| Error notification e-mail was received, but no error-solved e-mail is received. | Check e-mail is set for sending using the Web Image Monitor's [Auto Email Notify] at the time the error was fixed. Click the [Edit] button of [Detailed Settings of Each Item] in [Auto Email Notify], and set [Notify when error:] to [Occurs & Fixed] on the displayed screen. |
| Alert Resolving is set for sending e-mail, but no Alert-resolved e-mail is sent. | If the power of the main unit is turned Stand by after an Alert occurs, the Alert is resolved during the time the power is off: no Alert-resolved e-mail is sent. |
| Alert Occurrence and Alert Resolving are set for sending e-mail, but while no Alert Occurrence mail is received, Alert-resolved e-mail is received. | Alert-notification e-mail is not sent if the problem is resolved before sending. However, an Alert-resolved e-mail is sent. |
| Alert-notification level was changed, and e-mail stopped arriving. | If an Alert-notification e-mail, set with the earlier notification level, arrives, later e-mail will not be sent, even if the notification level is changed after. |
| When no date information is included in sent e-mail, the mail server has a malfunction. | Set to obtain time information from the SNMP server. Refer to the Web Image Monitor’s Help for the appropriate settings. |
If the problem cannot be resolved, contact your sales or service representative.
9. Removing Misfed Paper
Removing Misfed Paper
This section explains what to do when paper misfeed (become jammed inside the printer).
CAUTION:
- The fusing section of this machine might be very hot. Caution should be taken when removing misfed paper.
CAUTION:
- Be careful when replacing the roll paper or removing misfed paper by following the operating instructions properly. Otherwise, an injury may result from the paper cutter inside.
CAUTION:
- When replacing or loading the paper, or clearing paper jams, pull out the cut paper tray slowly with both hands. Do not pull out the cut paper tray with a single hand. Otherwise the rear of the cut paper tray may fall and an injury may result.
CAUTION:
- Keep your hands clear of the paper exit area and the inside of the folding finisher. You can trap your fingers if you do not.
Important
- When clearing misfeeds, do not turn the power switch to Stand by. If you do, settings will be lost.
To prevent misfeeds, do not leave any scraps of paper inside the printer. - Contact your service representative if misfeeds occur frequently.
When a misfeed occurs, letters indicating its location are displayed on the control panel screen.
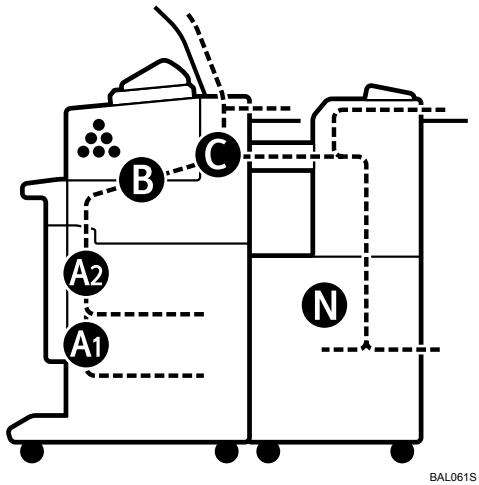
Note
- On the top of main unit, paper output exit cover, and paper roll tray there are diagrams explaining how to resolve misfeeds that have occurred in those places.
Paper Misfeed Message
The following procedure explains how to remove jammed paper.
Important
This machine's internal components get very hot. Wait for the fusing unit to cool down before clearing a paper jam in the unit.
□ When removing jammed paper from the fusing section, touch only the areas explicitly specified in this manual.
Do not remove the fusing unit. Doing so can result in reduced print quality.
Paper Misfeed Message (A1)
The A1, "Open the part as shown and remove paper." error message appears if a paper misfeed occurs in the paper feed section.
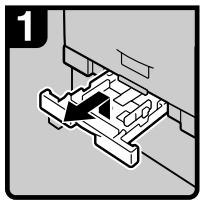
Pull out the cut paper tray while lifting upward and out.
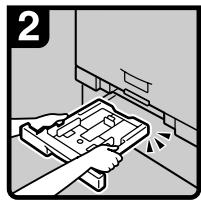
- Hold both sides and lift the front of the tray, and then remove it from the machine.
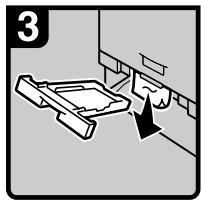

- Remove the jammed paper.
- If the jammed paper is forcefully pulled out, it may tear and scraps may leave in the machine.
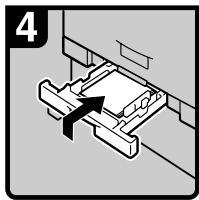

- Insert the cut paper tray while lifting upward into the machine, push slowly until it stops.
If you push the cut paper tray forcefully, the tray's paper guide may become out of position.
ATK010S
Paper Misfeed Message (A2)
The A2, "Open the part as shown and remove paper." error message appears if a paper misfeed occurs in the paper feed section.
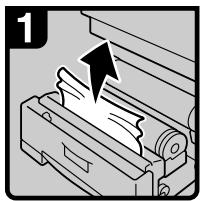
- Open the paper roll tray, and then slowly pull up the edge of the jammed paper.
Note
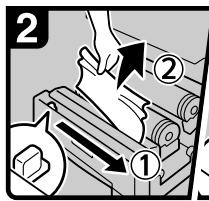
- Cut the edge of the paper roll by sliding the cutter knob right to left, or left to right (①), and then remove the offcut (②).
- Be sure to return the cutter knob to the right or left end of the cutter area.
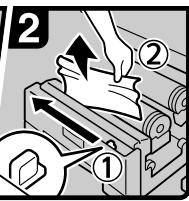
Note
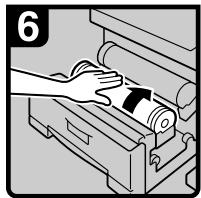
- Rotate the paper roll until the edge of the paper is fed into the rubber part of the roller.
- Make sure the paper is not loose, and insert it straight into the roller.
Note
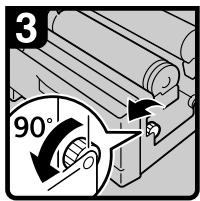
- Turn the paper feed knob 90 degrees forward.
- As a cutoff from the paper roll might have remained, the knob must be turned 90 degrees forward.
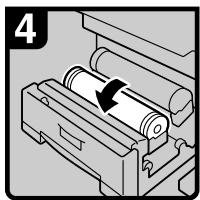
- If you cannot remove the jammed paper, rotate the paper in the direction of the arrow until the edge emerges.
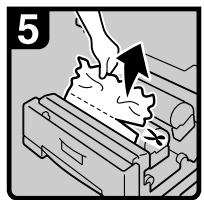
- Cut the edge of the paper using the cutter or scissors.
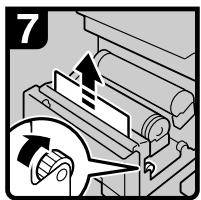
- Rotate the paper feed knob in the direction of the arrow until the edge of the paper roll emerges.
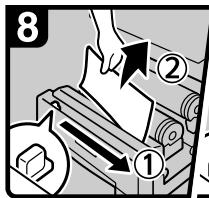
Note
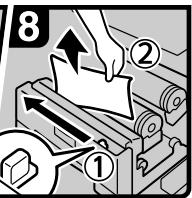
- Cut the edge of the paper roll by sliding the cutter knob right to left, or left to right to (①), and then remove the offcut (②).
- Be sure to return the cutter knob to the right or left end of the cutter area.
Note
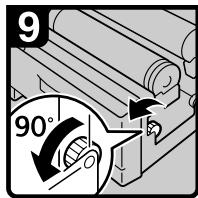
- Turn the paper feed knob 90 degrees forward.
-
As a cutoff from the paper roll might have remained, the knob must be turned 90 degrees forward.
-
Close the paper roll tray.
Paper Misfeed Message (B)
The B, "See instructions on Mainframe to remove." error message appears if a paper misfeed occurs in the mainframe.

- Lift both main unit opening levers, and then open the main unit upward.
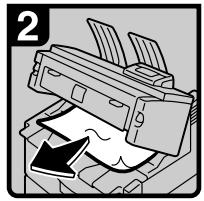
- Remove the jammed original.
- Close the main unit.
BAL062S
Paper Misfeed Message (C)
The 3C, "See instructions on Mainframe to remove." error message appears if a paper misfeed occurs in the mainframe.
Important
The internal parts of the machine may be hot. Wait for the fusing unit to cool down before clearing a paper jam in the unit.
- When removing jammed paper from the fusing section, touch only the areas explicitly specified in this manual.
- Do not remove the fusing unit. Doing so can result in reduced print quality.
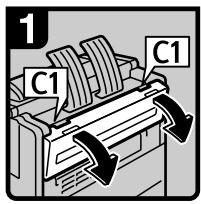
- Open the rear cover holding C1 at the rear with both hands.
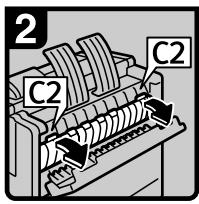
- Hold the C2 knob, and then tilt the top of the fusing unit forward.
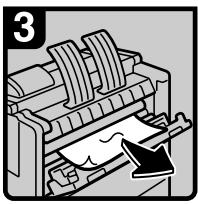
- Remove the jammed paper.
- Close the fusing unit and rear cover.
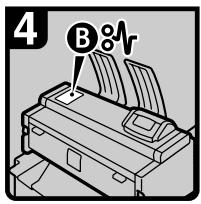
If you cannot remove the jammed paper or the paper misfeed display does not disappear, proceed to "Paper Misfeed Message (B)".
BAL063S
Paper Misfeed Message (N)
The , "See instructions on Finisher to remove." error message appears if a paper misfeed occurs inside the folding finisher.
The messages listed below (J01 to J07) appear on the control panel of the folding finisher. If a paper jam occurs, locate the jam by referring to the display on the folding finisher.
For details, see the manuals for your folding finisher.
When J01 is displayed
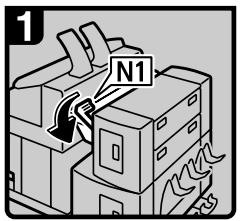
- Lower lever N1.
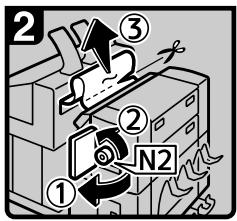
- Open the upper side cover (①), turn knob N2 counterclockwise, and then remove the misfed paper (②).
- If you cannot remove the misfed paper, cut it with scissors or a cutter (③), and then remove the pieces from both the main unit and the finisher side. For details about removing misfed paper from the main unit side, see "When C is lit".
- Close the upper side cover, and then return lever N1 to its original position.
ATK015S
When J03 is displayed
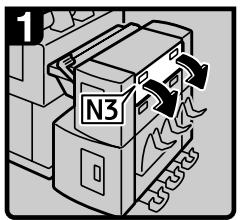
- Open cover N3.
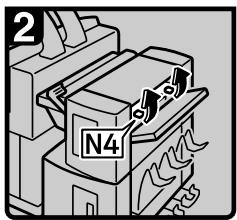
- Open cover N4.
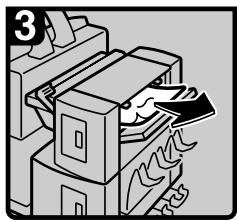
- Remove the jammed paper.
- Close covers N4 and N3.
ATK016S
When J05 is displayed
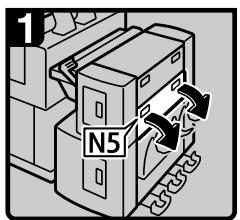
- Open cover N5.
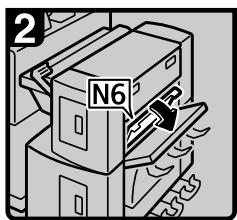
- Open cover N6.
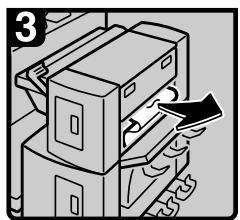
- Remove the jammed paper.
- Close covers N6 and N5.
ATK017S
When J07 is displayed
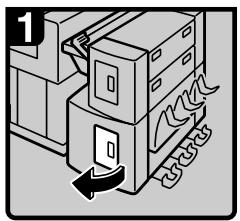
- Open the lower side cover.
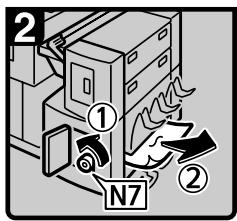
- Turn knob N7 counterclockwise (①), and then remove misfed paper (②).
- Close the lower side cover.
ATK018S
Paper Misfeed Message (V)
The SV, "See instructions on Finisher to remove." error message appears if a paper misfeed occurs inside the folding finisher.
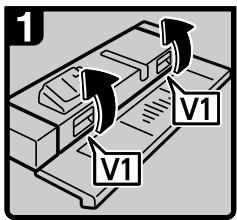
- Open cover V1.
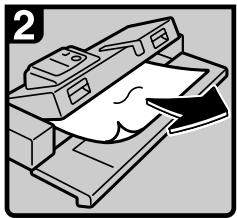
- Remove the jammed paper.
- Close cover V1.
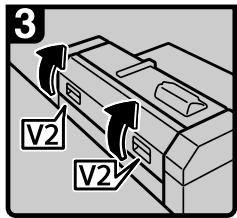
- If you cannot remove the misfed paper, open cover V2.
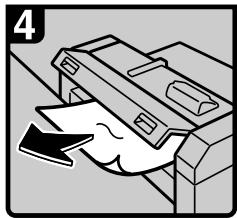
- Remove the jammed paper.
- Close cover V2.
ATS001S
Moving and Transporting the Printer
The following describes precautions when moving the printer.
When you move and transport your machine, contact the store where it was purchased or where service is provided.
CAUTION:
- Contact your service representative if you need to lift the machine (such as when relocating it to another floor). Do not attempt to lift the machine without the assistance of your service representative. The machine will be damaged if it topples or is dropped, resulting in malfunction and risk of injury to users. The machine's various handling areas are for service engineer use only. Do not touch these areas.
CAUTION:
- Before moving the machine, be sure to disconnect all external connections, especially the power cord from the wall outlet. Damaged power cords are a fire and electric shock hazard.
CAUTION:
- Unplug the power cord from the wall outlet before you move the machine. While moving the machine, you should take care that the power cord will not be damaged under the machine.
Important
□ Be careful when moving the machine. Take the following precautions:
- Turn off the power.
- Unplug the power cord from the wall outlet. When you pull out the plug from the socket, grip the plug to avoid damaging the cord, thereby reducing the risk of fire or electric shock.
-
Close all covers and trays, including the front cover and bypass tray.
-
Keep the machine level and carry it carefully, taking care not to jolt or tip it. Rough handling may cause a malfunction or damage the hard disk or memory, resulting in loss of stored files.
Do not take off the holding stand. - Protect the machine from strong shocks. Impact can damage the hard disk and cause stored files to be lost. As a precautionary measure, files should be copied to another computer.
Note
For details about how to turn the power off, see "Turning On the Power".
Reference
p.26 "Turning On the Power"
Disposal
To dispose of the machine, contact the store where it was purchased or where service is provided.
Consumables
To purchase the following consumables, contact your sales or service representative.
CAUTION:
- Our products are engineered to meet the highest standards of quality and functionality. When purchasing expendable supplies, we recommend using only those specified by an authorized dealer.
Toner Cartridge
| Toner | Number of pages per cartridge *1 |
| Black | 2,188 pages (1,300 m) |
^*1 A1 76 % test chart, 99 pages/job
Note
□ If toner containers are not changed when necessary, printing will become impossible. We recommend keeping a stock of containers.
The actual number of printable pages varies depending on the image volume and density, number of pages to be printed at a time, paper type and paper size used, contents of print images, and environmental conditions such as temperature and humidity.
- Toner (consumable) is not covered by warranty. However, if there is a problem, contact the store where it was purchased.
□ When you first use this printer, use the toner packaged with the printer.
- Toner may need to be changed sooner than indicated above due to deterioration over the period of use.
Specifications for the Main Unit
Configuration:
Desktop
Photosensitivity type:
OPCdrum
Development:
Dry two-component magnetic brush development system
Fusing:
Heating roll pressure system
First print speed:
20 sec. or less (A1, paper roll tray)
26 sec. or less (A1□, bypass tray)
Printing speed:
Maximum 4 pages per minute (A1□, paper roll tray)
Interface:
Standard:
- Ethernet (10Base-T/100Base-TX)
USB2.0
It requires a USB computer port and cable that support USB 2.0.
Optional:
- IEEE 802.11b (Wireless LAN)
- Gigabit Ethernet (1000Base-T)
Resolution:
600× 600 dpi (RPCS, PostScript 3, PDF)
300 × 300 dpi (PDF)
Printer language:
RPCS, PostScript 3, PDF Direct, GL/2 & TIFF *1
*1 This machine can print HP-GL, HP-GL/2, TIFF, and CALS files.
Fonts:
PostScript 3: 136 fonts (Type 2:24, Type 14:112)
Paper size
See p.65 "Supported Paper for Each Tray".
Paper weight:
52.3 - 110 g/m² (13.9 - 29.3 lb.)
Media type:
See p.65 "Supported Paper for Each Tray".
Power source:
220-240V
220 - 240 V, 50 / 60 Hz, 8 A
120V
120 V, 60 Hz, 15 A
Power consumption:
220-240V
| Warm-up | 1.39 kw |
| Stand-by (Anti-humidity heater = OFF) | 0.05 kw |
| Stand-by (Anti-humidity heater = ON) | 0.15 kw |
| Printing | 1.00 kw |
| Maximum | 1.5 kw |
120V
| Warm-up | 1.32 kw |
| Stand-by (Anti-humidity heater = OFF) | 0.05 kw |
| Stand-by (Anti-humidity heater = ON) | 0.14 kw |
| Printing | 1.03 kw |
| Maximum | 1.5 kw |
Dimensions (W× D× H)
1080 × 720 × 1160 ~mm (42.6 × 28.4 × 45.7 inches)
Noise emission:
Sound power level:
| Stand-by | Less than 43 dB(A) |
| During Printing | Less than 68 dB(A) |
Sound pressure level:
| Stand-by | Less than 37 dB(A) |
| During Printing | Less than 62 dB(A) |
- Sound power level and sound pressure level are actual values measured in accordance with ISO 7779.
- Sound power level and sound pressure level are measured from the position of the bystander.
10
Weight:
Approx. 172kg (372.9 lb.)
Warm-up time:
Less than 120 seconds (23^,73F)
Paper input capacity:
| Paper roll tray | 150 m (500 ft) × 2 (80 g/m2, 20 lb.) |
| Cut paper tray | 250 sheets (80 g/m2, 20 lb.) |
Paper output capacity:
| Upper output exit | 50 sheets (A1☐, 80 g/m2, 20 lb.) |
| Lower output exit | 40 sheets (A0☐, 80 g/m2, 20 lb.) |
Memory:
512 MB
Hard disk drive :
80 GB
Network:
Topology: Ethernet (10Base-T/100Base-TX)
Protocol: TCP/IP, SMB, IPX/SPX, AppleTalk
Specifications for Options
Paper Cassette Type 240
Paper weight: 64 - 105 g/m²
Paper sizes: A3□, B4JIS□, A4□, 12^ × 18^ □, 11^ × 17^ □, 8^1/2^ × 14^ □, 8^1/2^ × 13^ □, 8^1/_2^ × 11^ □
Power consumption (Max): Approx. 20 W (supplied by main unit)
Paper capacity: 250 sheets
Dimensions (W × D × H) : 620 × 570 × 130 ~mm ( 24.5 × 22.5 × 5.2 inches)
Weight: Approx. 6kg (13.3 lb.)
IEEE 802.11b Interface Unit Type H
Transmission Spec.: Based on IEEE 802.11b (Wireless LAN)
Protocol: IPv4, IPv6, IPX/SPX, AppleTalk

Note
- SmartDeviceMonitor and Web Image Monitor are supported.
Data Transfer Speed: Auto select from below speed 1 Mbps, 2 Mbps, 5.5 Mbps, 11 Mbps
Auto select from below speed 1 Mbps, 2 Mbps, 5.5 Mbps, 11 Mbps
Frequency Range: Metric version: 2412 - 2472 MHz (1 - 13 channels) Inch version: 2412 - 2462 MHz (1 - 11 channels)
10
Transmittable Distance:
1 Mbps 400 m
2 Mbps 270 m
5.5 Mbps 200 m
11 Mbps 140 m
These figures are a guideline for outdoor use. In general, the transmittable distance indoors is 10 - 100m , depending on the environment.
Transmission Mode:
ad hoc mode and infrastructure mode
Gigabit Ethernet Board Type A
Interface Connector:
- Ethernet (10Base-T, 100Base-TX, 1000Base-T)
USB 2.0
It requires a USB computer port and cable that support USB 2.0.
Data Transmission Speed:
- Ethernet: 1000 Mbps, 100 Mbps, 10 Mbps
- USB: 480 Mbps (High speed: USB 2.0), 12 Mbps (Full speed)
Protocol:
TCP/IP, IPX/SPX, AppleTalk
Distance Between Devices:
- Ethernet: 100 m
USB: 5m
INDEX
A
Access to the Printer, 15
Adding Paper, 73
Adding Toner, 95
Additional Troubleshooting, 122
Adjusting Paper Thickness, 103
Adjusting the Fine Ratio, 105
Adjusting the Folding Width, 107
Adjusting the Margin Fold, 109
Anti-HumidityheaterSwitch,3,28
B
Bypass Tray, 1, 88
C
Changing the Paper Size, 77, 83
Cleaning the Main Unit, 102
Connection, 33, 36
Consumables, 135
Control Panel, 6
Custom Size Paper, 91
Cut Paper Tray, 1, 10, 81, 139
D
DHCP, 43
Display Language, 29
Display Panel, 7
Displays and Key Operations, 8
Disposal, 134
E
Environments to Avoid, 14
Ethernet Cable Connection, 33
Ethernet Configuration, 39
Ethernet Speed, 47
External Options, 10
F
Film, 69
Folding Finisher, 10
G
Gigabit Ethernet Board, 11, 140
Guide to the Printer, Front View, 1
Guide to the Printer, Interior, 5
Guide to the Printer, Rear View, 3
H
Handling Paper, 71
How to Read This Manual, ii
HTML Manual, iv
1
IEEE 802.11b Interface Unit, 11, 139
IEEE 802.11b (Wireless LAN)
Configuration, 49
Install the Operating Instructions, iv
Internal Options, 11
IP Address, 40
L
Loading Cut Paper, 24, 81
Loading Paper, 20, 73
Loading Paper, Bypass Tray, 88
Loading Paper, Tray 1 and 2, 21, 74
Loading Paper, Tray 3, 24, 81
Loading the Paper Roll, 21, 74
M
Maintaining Your Printer, 101
Manual Feeder, 10
Manuals for This Printer, i
Messages, 111
Model-Specific Information, iii
Moving, 133
N
Names of Major Options, ii
NetWare, 45
Not Supported Paper, 70
0
Optimum Environmental Conditions, 14
Options, 10, 139
Other Printing Problems, 117
P
Panel Tones, 113
Paper Misfeed Message, 127
Paper Misfeed Message (A1), 127
Paper Misfeed Message (A2), 128
Paper Misfeed Message (B), 129
Paper Misfeed Message (C), 129
Paper Misfeed Message (N), 130
Paper Misfeed Message (V), 131
Paper Recommendations, 67
Paper Roll Tray, 1, 74
Plain Paper, 68
Power Switch, 1, 26
Print Area, 72
Printer Does Not Print, 114
Printer Setup Procedures, 13
Protocol, 40
Put Your Printer, 14
R
Rear Stacker, 10
Removing Misfed Paper, 125
Replacing the Toner Cartridge, 95
S
Setting Security Method of Wireless LAN, 54
Specifications, 136, 139
Specifying the Paper Type, 80, 87, 93
SSID, 52
Storing Paper, 67
Supported Paper, 65
Symbols, ii
T
Test Printing, 31
Toner Cartridge, 5, 16, 95, 135
Translucent Paper, 68
Transporting, 133
Troubleshooting, 111
Turning On the Power, 26
U
USB Cable Connection, 36
Using NetWare, 45
W
WEP, 54
WPA, 57, 60
WPA2, 57, 60

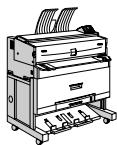
- Operating Instructions Hardware Guide
- Introduction
- Important
- Trademarks
- Notes
- Manuals for This Printer
- Safety Information
- Hardware Guide (This manual)
- Software Guide
- Security Reference
- Symbols
- WARNING:
- CAUTION:
- Note
- Reference
- []
- 【】
- Names of Major Options
- Model-Specific Information
- Installing the Operating Instructions
- TABLE OF CONTENTS
- Guide to the Printer
- Setting Up
- Connecting the Printer Cables
- Configuration
- Ethernet Configuration 39
- IEEE 802.11b (Wireless LAN) Configuration 49
- Setting Security Method of Wireless LAN 54
- Configuring WPA/WPA2 60
- Paper and Other Media
- Supported Paper for Each Tray 65
- Paper Recommendations 67
- Loading Paper 73
- Replacing Consumables
- Cleaning and Adjusting the Printer
- Troubleshooting
- Removing Misfed Paper
- 10.Appendix
- Exterior: Front View
- Upper output stacker
- Ventilation holes
- Main unit
- Main unit opening lever
- Power switch
- Paper roll tray (Tray 1 and 2)
- Control panel
- Main unit front cover
- Bypass tray
- Bypass tray's paper guide
- Cut paper tray (Tray 3, optional)
- Lower output auxiliary guide
- Lower output stacker
- Exterior: Rear View
- Upper output guide
- Vents
- Anti-humidity heater switch
- Upper output exit
- Lower output exit
- Controller board
- Lower output guides
- Lower output tray
- Ethernet port
- USB port
- Folding finisher port (optional)
- Interior
- Toner cartridge
- Paper roll 1 (Tray 1)
- Paper roll 2 (Tray 2)
- Cutter knob
- Paper holder
- Paper feed knob
- Roll holder
- Control Panel
- Display
- Selection keys
- 3.【Escape】key
- 4.Scroll keys
- 5.【OK】key
- Data In indicator
- Alert indicator
- Power indicator
- 9.【Job Reset】key
- 10.【Menu】key
- 【Online】key
- Display Panel
- Operational status or messages
- [Prt.Jobs]
- [Option]
- Selection keys
- Displays and Key Operations
- Printing
- Menu screen
- Entering the custom paper size, IPv4 Address, etc.
- When an error message appears
- Options
- External Options
- Cut paper tray
- Manual feeder
- Folding finisher
- Rear stacker
- Internal Options
- Printer Setup Procedures
- Where to Put Your Printer
- Optimum Environmental Conditions
- Environments to Avoid
- Access to the Printer
- Installing the Toner Cartridge
- Shake the toner cartridge from side to side four or five times so that the toner moves freely inside of the cartridge.
- Insert the end of the toner cartridge into the toner holder on the left (①). Insert the toner cartridge into the right in the direction of the arrow (②).
- Slowly remove the tape from the toner cartridge.
- Rotate the toner cartridge in the direction of the arrow unit it stops.
- Close the main unit front cover and the main unit.
- Loading Paper
- Default settings
- 220-240V
- 120V
- Loading the Paper Roll into Tray 1 and 2
- Loading Cut Paper into the Tray 3
- Turning On the Power
- Power Switch (left side of the machine)
- Turn on the power switch.
- Anti-humidity Heater Switch
- Selecting the Display Language
- Press the [Menu] key.
- Press the [] or [] key to select [Language].
- Press the [OK] key.
- Press the [] or [] key to select the language, and then press the [OK] key.
- Press the【Menu】key.
- Test Printing
- Press the [] or [] key to select [List/Test Print], and then press the [OK] key.
- Press the [ ] or [ ] key to select [Config. Page], and then press the [OK] key.
- Ethernet Cable Connection
- Connecting to the Ethernet port of the Gigabit Ethernet board
- Attach two ferrite cores to the Ethernet cable.
- Connect the Ethernet cable to the Ethernet port that is located on the rear side of the printer.
- Connect the other end of the cable to the network, for example using a hub.
- Reading the LED Lamps
- USB Cable Connection
- Connect the USB cable to the printer.
- Connect the opposite end's flat connector to the desired device such as your computer's USB interface, or a USB hub.
- Ethernet Configuration
- Specifying an IP Address (No DHCP)
- Press the [ ] or [ ] key to select [Host Interface], and then press the [OK] key.
- Press the [ ] or [ ] key to select [Network], and then press the [OK] key.
- Press the [] or [] key to select [Effective Protocol], and then press the [OK] key.
- Press the [ ] or [ ] key to enter the address, and then press the [OK] key.
- Press the [] or [] key to select [Specify], and then press the [OK] key.
- E Print a configuration page to confirm the settings.
- Receiving an IP Address Automatically (DHCP)
- Configuring Network Settings When Using NetWare
- Setting the Ethernet Speed
- IEEE 802.11b (Wireless LAN) Configuration
- Setting the SSD
- When all characters have been entered, press [Accept].
- Press the [Menu] key.
- Print a configuration page to confirm the settings.
- Setting Security Method of Wireless LAN
- Setting a WEP key
- Press the [] or [] key to select [WEP], and then press [Details].
- The confirmation message appears. Press [Text].
- Press scroll keys to enter characters, and then press the [OK] key.
- When all characters have been entered, press [Accept].
- Setting WPA
- Press the [ ] or [ ] key to select [IEEE 802.11b], and then press the [OK] key.
- Press the [ ] or [ ] key to select [Security Type], and then press the [OK] key.
- Configuring WPA/WPA2
- Installing a Site Certificate
- Installing Device Certificate
- Setting Items of WPA/WPA2
- EAP-TLS:
- LEAP:
- EAP-TTLS:
- PEAP:
- Supported Paper for Each Tray
- Metric version
- Paper Recommendations
- Set paper roll
- Set paper as follows:
- Storing Paper
- Types of Paper and Other Media
- Plain paper
- Translucent paper
- Paper Not Supported by This Printer
- Handling Paper
- Print Area
- Insert the paper holders into both ends of the new paper roll.
- Holding both ends of the paper holder, carefully place it (paper edge down) on the roll holders inside the tray.
- Push the paper edge under the rubber part of the roller.
- Turn the paper feed knob in the direction of the arrows until the edge of the paper emerges.
- Changing the size of the paper in Tray 1 and 2
- Press the [] or [] key to select [Paper Input], and then press the [OK] key.
- Press the [ ] or [ ] key to select [Paper Size:Tray 1] or [Paper Size:Tray 2], and then press the [OK] key.
- Select the paper size you want to set using the scroll keys, and then press the [OK] key.
- Specifying the paper type
- Press the [ ] or [ ] key to select [Paper Input], and then press the [OK] key.
- Press the [ ] or [ ] key to select [Paper Type:Tray 1] or [Paper Type:Tray 2], and then press the [OK] key.
- Press the [] or [] key to select the target paper type, and then press the OK key.
- Loading Cut Paper into Tray 3
- Fan the paper before loading it in the cut paper tray.
- Load paper print face down.
- Holding the cut paper tray so that the front is higher than the rear, push it carefully all the way into the machine.
- Changing the size of the paper in Tray 3
- Load paper print side down (①).
- Fasten the screws on the right and left side-end fences by turning them clockwise.
- Holding the cut paper tray so that the front is higher than the rear, push it carefully all the way into the machine.
- Press the [] or [] key to select [Paper Size:Tray 3], and then press the [OK] key.
- Press the [] or [] key to select [Paper Type:Tray 3], and then press the [OK] key.
- Loading Paper in the Bypass Tray
- Gently push the paper face up into the bypass tray until the beeper sounds.
- Check that the paper feeds in properly.
- Specifying the standard size paper
- Specifying custom size paper
- Press the [] or [] key to select [Paper Type:Bypass Tray], and then press the OK] key.
- Replacing the Toner Cartridge
- Add Toner
- Toner is almost empty.
- Open the main unit front cover.
- Hold the toner cartridge at the edge of the right end, and then roll it in the direction of the arrow.
- Hold the toner cartridge at the edge of the left end, and then remove it from the printer.
- Carefully remove the tape from the toner cartridge.
- Rotate the toner cartridge in the direction of the arrow until it stops.
- Close the main unit front cover and the main unit.
- Maintaining Your Printer
- How to maintain
- Cleaning the Main Unit
- Adjusting Paper Thickness
- Press the [ ] or [ ] key to select [Maintenance], and then press the [OK] key.
- Press the [ ] or [ ] key to select [General Settings], and then press the [OK] key.
- Press the [] or [] key to select [Paper Thickness:Paper Tray] or [Paper Thickness:Bypass], and then press the [OK] key.
- Adjusting the Fine Ratio
- Adjusting the Folding Width
- Adjusting the Margin Fold
- Error and Status Messages Appears on the Control Panel
- Status Messages
- Message (in alphabetical order)
- Panel Tones
- Printer Does Not Print
- Checking the Port Connection
- Other Printing Problems
- If prints are not clear
- When printer driver settings are required
- Folding finisher
- Additional Troubleshooting
- Removing Misfed Paper
- Paper Misfeed Message
- Paper Misfeed Message (A1)
- Paper Misfeed Message (A2)
- Paper Misfeed Message (B)
- Paper Misfeed Message (C)
- Paper Misfeed Message (N)
- When J01 is displayed
- When J03 is displayed
- When J05 is displayed
- When J07 is displayed
- Paper Misfeed Message (V)
- Moving and Transporting the Printer
- Disposal
- Consumables
- Toner Cartridge
- Specifications for the Main Unit
- Media type:
- Power source:
- Power consumption:
- Dimensions (W× D× H)
- Noise emission:
- Weight:
- Warm-up time:
- Paper input capacity:
- Paper output capacity:
- Memory:
- Hard disk drive :
- Network:
- Specifications for Options
- Paper Cassette Type 240
- IEEE 802.11b Interface Unit Type H
- Transmittable Distance:
- Transmission Mode:
- Gigabit Ethernet Board Type A
- Interface Connector:
- Data Transmission Speed:
- Protocol:
- Distance Between Devices:
- INDEX
- A
- B
- C
- D
- E
- F
- G
- H
- 1
- L
- M
- N
- 0
- P
- R
- S
- T
- U
- W
Brand : RICOH
Model : AFICIO SP W2470
Category : Multifunction Printer