
AFICIO MP W2400 - Multifunction Printer RICOH - Free user manual and instructions
Find the device manual for free AFICIO MP W2400 RICOH in PDF.

| Product type | Large format multifunction printer |
| Brand | RICOH |
| Model | AFICIO MP W2400 |
| Main functions | Print, copy, scan, fold (with optional finisher) |
| Maximum print size | A0 (width up to 914 mm, length up to 6000 mm) |
| Print speed (A0) | Up to 2 pages per minute |
| Print resolution | 600 dpi |
| Supported paper weight | 64.0 to 81.4 g/m² |
| Supported paper types | Plain paper, recycled paper |
| Fold types | Accordion fold (4 widths: 140, 170, 210, 297 mm); fold with margin (210 mm) |
| Folding capacity | Up to 30 panels (29 folds) |
| Dimensions (finisher) | 1260 × 545 × 995 mm (W × D × H) |
| Weight (finisher) | 145 kg |
| Power supply | 220-240 V, 50/60 Hz, 1.2 A |
| Maximum power consumption | 150 W |
| Safety | Do not remove covers, unplug if damaged, avoid flammable liquids |
| Maintenance and cleaning | Clean with a soft dry cloth; for stains, use a mild detergent and a wrung-out damp cloth |
| Spare parts and repairability | Contact authorized service center for any repair or replacement of parts |
| General information | Use in a well-ventilated environment, away from moisture and dust |
Frequently Asked Questions - AFICIO MP W2400 RICOH
User questions about AFICIO MP W2400 RICOH
0 question about this device. Answer the ones you know or ask your own.
Ask a new question about this device
Download the instructions for your Multifunction Printer in PDF format for free! Find your manual AFICIO MP W2400 - RICOH and take your electronic device back in hand. On this page are published all the documents necessary for the use of your device. AFICIO MP W2400 by RICOH.
USER MANUAL AFICIO MP W2400 RICOH
Operating Instructions
1 Preparation Before Using the Folding Finisher
2 Functions of the Folding Finisher
3 Troubleshooting
4 Remarks
5 Appendix
Introduction
This manual contains detailed instructions and notes on the operation and use of this machine. For your safety and benefit, read this manual carefully before using the machine. Keep this manual in a handy place for quick reference.
Important
Contents of this manual are subject to change without prior notice. In no event will the company be liable for direct, indirect, special, incidental, or consequential damages as a result of handling or operating the machine.
Notes:
Some illustrations in this manual might be slightly different from the machine.
Certain options might not be available in some countries. Depending on which country you are in, certain units may be optional. For details, please contact your local dealer.
Operator Safety
Two kinds of size notation are employed in this manual. With this machine refer to the metric version.
Power Source
220-240 V, 50/60 Hz, 1.2 A. Please be sure to connect the power cord to a power source that matches this specification. For details about the power source, see p.33 "Power Connection"
Safety Information
When using this machine, the following safety precautions should always be followed.
Safety During Operation
In this manual, the following important symbols are used:
WARNING:
Indicates a potentially hazardous situation which, if instructions are not followed, could result in death or serious injury.
CAUTION:
Indicates a potentially hazardous situation which, if instructions are not followed, may result in minor or moderate injury or damage to property.
WARNING:
- Disconnect the power plug (by pulling the plug, not the cable) if the power cable or plug becomes frayed or otherwise damaged.
- To avoid hazardous electric shock, do not remove any covers or screws other than those specified in this manual.
-
Turn off the power and disconnect the power plug (by pulling the plug, not the cable) if any of the following occurs:
-
You spill something into the machine.
- You suspect that your machine needs service or repair.
-
The external housing of your machine has been damaged.
-
Disposal can take place at our authorized dealer.
- Keep the machine away from flammable liquids, gases, and aerosols. A fire or an electric shock might occur.
- Connect the machine only to the power source described on the inside front cover of this manual. Connect the power cord directly into a wall outlet and do not use an extension cord.
- Do not damage, break or make any modifications to the power cord. Do not place heavy objects on it. Do not pull it hard nor bend it more than necessary. These actions could cause an electric shock or fire.
- If the power cord is damaged (exposure of the core, disconnection, etc.), contact your service representative to change a new one. Operating the machine with a damaged power cord may cause an electric shock or fire.

CAUTION:
- Protect the machine from dampness or wet weather, such as rain and snow.
- Contact your service representative if you need to lift the machine (such as when relocating it to another floor). Do not attempt to lift the machine without the assistance of your service representative. The machine will be damaged if it topples or is dropped, resulting in malfunction and risk of injury to users. The machine's various handling areas are for service engineer use only. Do not touch these areas.
- Unplug the power cord from the wall outlet before you move the machine.
- While moving the machine, you should take care that the power cord will not be damaged under the machine.
- When you disconnect the power plug from the wall outlet, always pull the plug (not the cable).
- Do not allow paper clips, staples, or other small metallic objects to fall inside the machine.
- For environmental reasons, do not dispose of the machine or expended supply waste at household waste collection points. Disposal can take place at an authorized dealer.
- Keep the machine away from humidity and dust. Otherwise a fire or an electric shock might occur.
- Do not place the machine on an unstable or tilted surface. If it topples over, an injury might occur.
- Do not use reuse stapled paper. Do not use aluminum foil, carbon-containing paper or other conductive paper. Otherwise, a fire might occur.
- Make sure the room where you are using the machine is well ventilated and spacious. Good ventilation is especially important when the machine is used heavily.
- When loading paper, take care not to trap or injure your fingers.
- Fire and breakdown can result from heavy accumulation of dust inside this machine. Consult your service representative for details about and charges for cleaning the machine's interior.
- Keep your hands clear of the Folding Finisher and Paper Exit. You can trap your fingers if you do not.
Position of WARNING and CAUTION label
This machine has a label for WARNING and CAUTION at the position shown below. For safety, please follow the instructions and handle the machine as indicated.
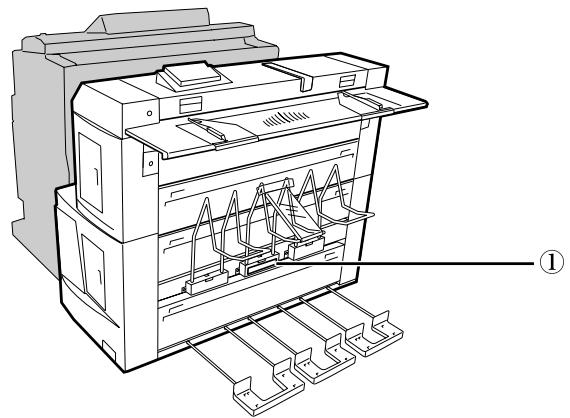

①
Be careful not to trap your hands or clothes in the roller to prevent injury.
ATS016S
User Information on Electrical & Electronic Equipment
Users in the EU, Switzerland and Norway
Our Products contain high quality components and are designed to facilitate recycling.
Our products or product packaging are marked with the symbol below.
The symbol indicates that the product must not be treated as municipal waste. It must be disposed of separately via the appropriate return and collection systems available. By following these instructions you ensure that this product is treated correctly and help to reduce potential impacts on the environment and human health, which could otherwise result from inappropriate handling. Recycling of products helps to conserve natural resources and protect the environment.
For more detailed information on collection and recycling systems for this product, please contact the shop where you purchased it, your local dealer or sales/service representatives.
All Other Users
If you wish to discard this product, please contact your local authorities, the shop where you bought this product, your local dealer or sales/service representatives.
TABLE OF CONTENTS
Safety Information
Safety During Operation..
Position of WARNING and CAUTION label
User Information on Electrical & Electronic Equipment .iv
Users in the EU, Switzerland and Norway iv
All Other Users. iv
How to Read This Manual 1
Symbols 1
Guide to the Folding Finisher 2
Control Panel. 4
1. Preparation Before Using the Folding Finisher
Turning the Folding Finisher On and Off. 7
Turning the Folding Finisher On. 7
Turning the Folding Finisher Off. 8
Operating the Drying Heater Switch 8
Offline Mode 9
Entering System Offline Mode 9
Entering Independent Offline Mode 10
Online Mode 11
Entering Online Mode 11
Paper 12
Supported Paper Types and Sizes 12
Fan fold. 12
Non-fold 12
Unsupported Paper Types 13
Placing Paper on the Paper Feed Table. 14
2. Functions of the Folding Finisher
Basic Operation of the Folding Finisher 15
Cancelling a Folding Operation 16
Fan Fold 17
Fan Fold Type List 17
Fan Fold in Offline Mode 18
Fan Fold in Online Mode 19
Adjusting the Folding Position 19
Adjusting folding width 20
Adjusting margins 21
3. Troubleshooting
When a Status Display Indicator Lights Up 23
When a Paper Jam Occurs 24
When Covers Are Open 25
When Other Errors Occur 25
Removing Jammed Paper 26
When J01 Is Displayed 26
When J03 Is Displayed 27
When J05 Is Displayed 27
When J07 Is Displayed 27
When J31 or J32 Is Displayed 28
Alert Tones 29
4. Remarks
Where to Put the Machine 31
Moving 31
Optimum Environmental Conditions 31
Environments to Avoid 32
Access to the Machine 32
Power Connection 33
Maintaining the Machine 33
5. Appendix
When Folding Paper by Hand 35
Changing the Folding Finisher Settings 37
Available Settings 37
Changing the Settings 38
Specifications 41
INDEX 42
How to Read This Manual
Symbols
This manual uses the following symbols:
WARNING:
Indicates important safety notes.
Ignoring these notes could result in serious injury or death. Be sure to read these notes. They can be found in the "Safety Information" section of this manual.
CAUTION:
Indicates important safety notes.
Ignoring these notes could result in moderate or minor injury, or damage to the machine or to property. Be sure to read these notes. They can be found in the "Safety Information" section of this manual.
Important
Indicates points to pay attention to when using the machine, and explanations of likely causes of paper misfeeds, damage to originals, or loss of data. Be sure to read these explanations.
Note
Indicates supplementary explanations of the machine's functions, and instructions on resolving user errors.
Reference
This symbol is located at the end of sections. It indicates where you can find further relevant information.
【】
Indicates the names of keys on the machine's control panel.
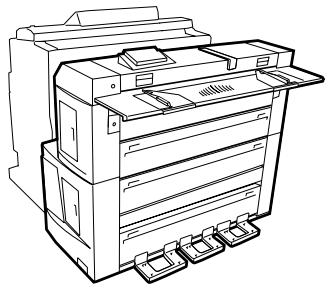
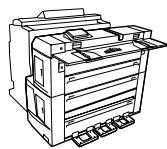
Guide to the Folding Finisher
This section lists the names and functions of the parts of the Folding Finisher.
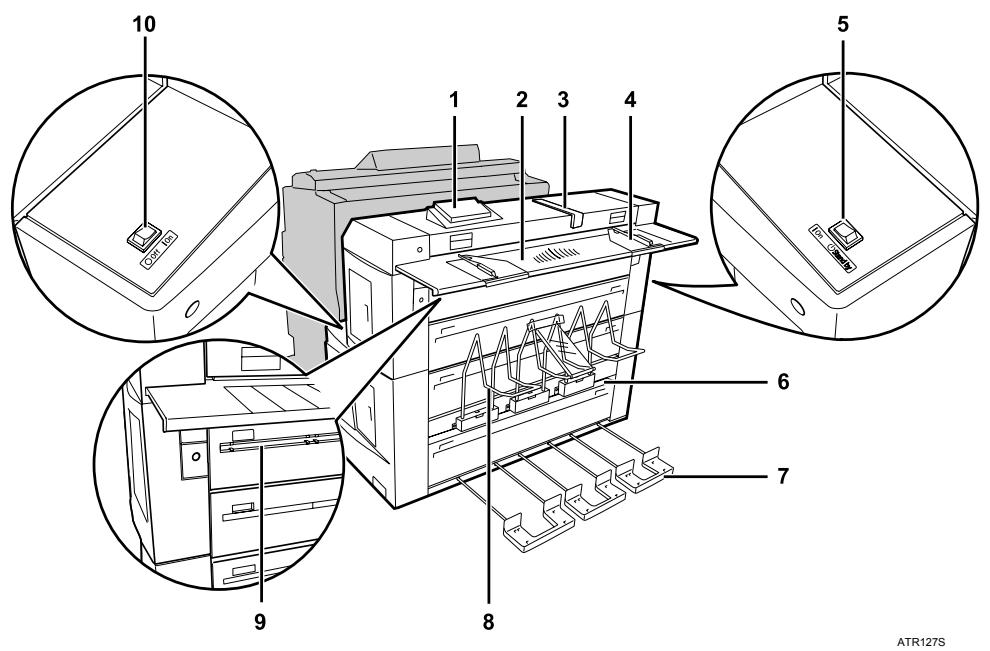
1. Control panel (Option)
The folding type and other settings can be configured using the keys here, and the condition of the Folding Finisher is shown on the display.
2. Paper Feed Table (Option)
Place the paper on this table when using the Folding Finisher independently from the printer. For details, see "Placing Paper on the Paper Feed Table".
3. Folding Guide (Option)
Use this guide when folding paper by hand, see "When Folding Paper by Hand".
4. Paper Guide (Option)
Adjust this guide when placing paper on the Paper Feed Table.
5. Power switch
Use this switch to turn the Folding Finisher on and off. When operating the Folding Finisher and printer together, you must turn on the Folding Finisher first. For details, see "Turning the Folding Finisher On and Off".
6. Paper Exit
Fan-folded paper is output here.
7. Paper Exit Tray
Paper output from the Paper Exit is stacked here. This tray can hold only one sheet of paper at a time. Extend this tray before use.
8. Non-folded Paper Exit Tray
Paper output from the Non-folded Paper Exit is stacked here. Up to 10 sheets can be stacked when using A1 paper.
9. Non-folded Paper Exit
Non-folded paper is output here.
10. Drying Heater switch
When humidity is high, turn this switch to "ON" to dry paper. For details, see "Operating the Drying Heater Switch".
Reference
p.7 "Turning the Folding Finisher On and Off"
p.8 "Operating the Drying Heater Switch"
p.14 "Placing Paper on the Paper Feed Table"
p.35 "When Folding Paper by Hand"
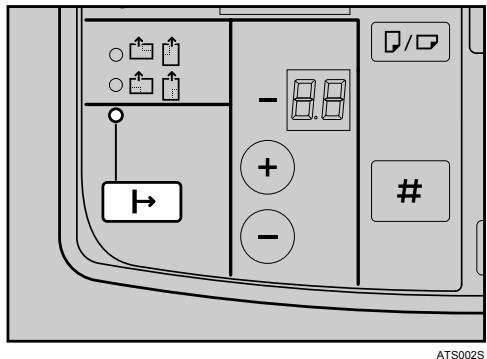
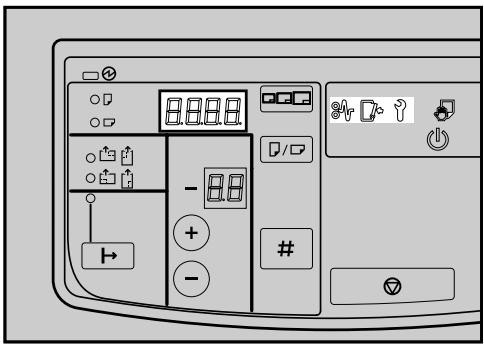
Control Panel
This section explains the names and usage of the parts of the control panel.
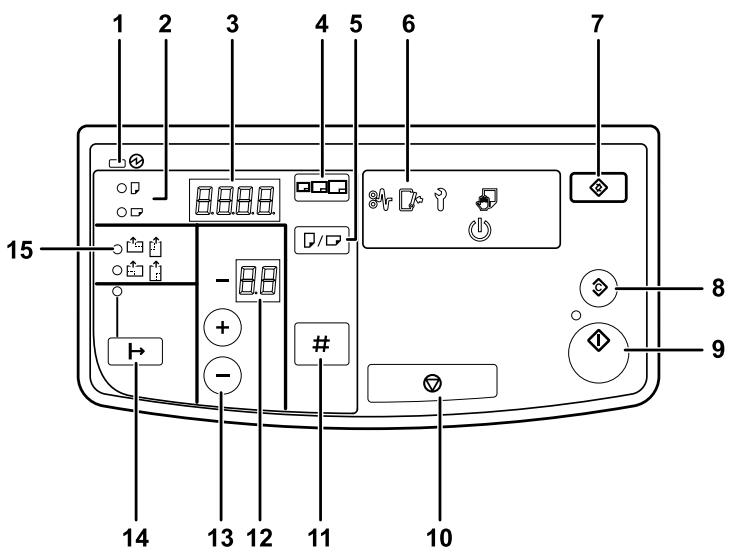
ATS013S
1. Main Power indicator
Remains lit while the power is on.
2. Paper orientation indicator
Indicates the selected orientation of the paper.
3. Display
Shows the size of the paper. Also shows a code number when an error occurs, such as a paper jam.
4. [Paper size] key
Use this key to select the size of the paper on the Paper Feed Table.
5.【Length/Width】key
Use this key to select the orientation of the paper on the Paper Feed Table.
6. Status Display
Indicates the current status of the Folding Finisher.
- Lights up when a paper jam occurs. To remove a jammed paper, see "Removing Jammed Paper".
-
Lights up when a cover is open. See "Troubleshooting", and close the open cover.
-
Lights up when an error occurs in the Folding Finisher. For details, see "Troubleshooting".
- Lights up when paper can be placed on the Paper Feed Table.
- : Lights up when the Folding Finisher is busy. It is not possible to use the Folding Finisher while this light is lit.
7. 【User Tools】key
Use this key to change the settings of the Folding Finisher. For details, see "Changing the Folding Finisher Settings".
8.【Clear Modes】key
Press this key to clear the fold settings.
9.【Start】key
Press this key to start folding. Folding may start automatically without this key being pressed, depending on the settings of the Folding Finisher. For details, see "Changing the Folding Finisher Settings".
10. 【Stop】key
Press this key to cancel folding. For details, see "Cancelling a Folding Operation".
11. 【Enter】key
Press this key to change the Folding Finisher's settings after selecting a setting value.
12. Fold Type No.
Indicates the number of the selected fold type.
13. [+ ][-] keys (Fold Type selection)
Use these keys to select the fold type number.
Switches between using the Folding Finisher and printer together, or using the Folding Finisher independently. The online indicator is lit when the Folding Finisher is in online mode. For details, see "Offline Mode" or "Online Mode".
15. Position of title block
Indicates the title block position on the paper placed on the Paper Feed Table.
Reference
p.9 "Offline Mode"
p.11 "Online Mode"
p.16 "Cancelling a Folding Operation"
p.23 "Troubleshooting"
p.26 "Removing Jammed Paper"
p.37 "Changing the Folding Finisher Settings"
1. Preparation Before Using the Folding Finisher
Turning the Folding Finisher On and Off
This section explains how to turn the Folding Finisher on and off.
Turning the Folding Finisher On
This section explains how to turn on the Folding Finisher.
Turn the power switch of the Folding Finisher to " | On".
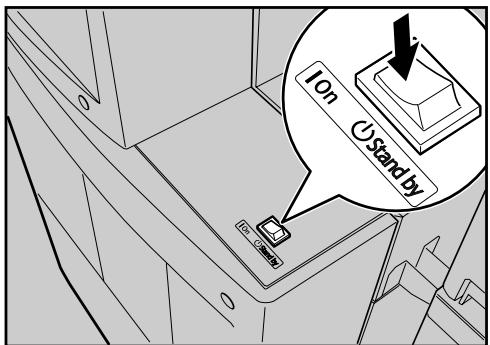
ATR002S
2 Turn on the power switch of the printer.
Note
Turn on the Folding Finisher before turning on the printer. Otherwise, the printer will not recognize the Folding Finisher.
If the printer does not recognize the Folding Finisher when they were turned on in the correct order, check that the cable connecting them is firmly attached at each end.

ATR005S
Turning the Folding Finisher Off
This section explains how to turn off the Folding Finisher.
1 Turn off the power switch of the printer.
2 Turn the power switch of the Folding Finisher to "U Stand by".
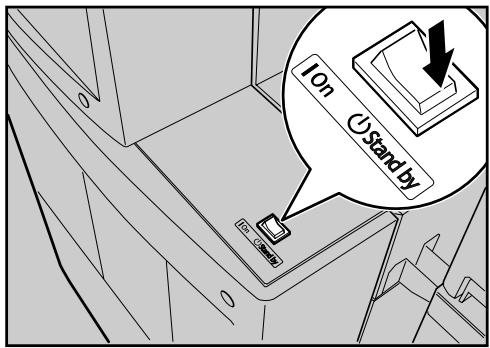
ATR003S
Note
- Turning the Folding Finisher off before turning off the printer causes an alarm. If the alarm sounds, turn the Folding Finisher back on, and then turn off the printer and Folding Finisher in the correct order.
Operating the Drying Heater Switch
When there is rapid temperature change, such as in winter, or high temperature and humidity, such as in the rainy season, paper absorbs moisture and wrinkles. A Drying Heater is included in the Folding Finisher to prevent such conditions from occurring. When humidity is high and paper is wrinkled, turn this switch to "On". Turn this switch to "Off" when not required. If the Drying Heater switch is turned to "On", the Drying Heater operates, even after the power switch is turned off.
ATR207S
Reference
p.12 "Paper"
Offline Mode
Offline mode is the mode in which the Folding Finisher operates independently from the printer. In this mode, paper placed on the Paper Feed Table is folded. There are two types of offline modes:
System offline mode
The Folding Finisher is used independently from the printer, while the printer is on.
Independent offline mode
The Folding Finisher is used independently from the printer, while the printer is off.
Entering System Offline Mode
This section explains how to use the Folding Finisher independently from the printer, while the printer is on.
1 Confirm that both the printer and Folding Finisher are turned on.
2 Confirm that the online indicator is unlit.
If the online indicator is still lit, press and hold the [Online/Offline] key until it turns off.
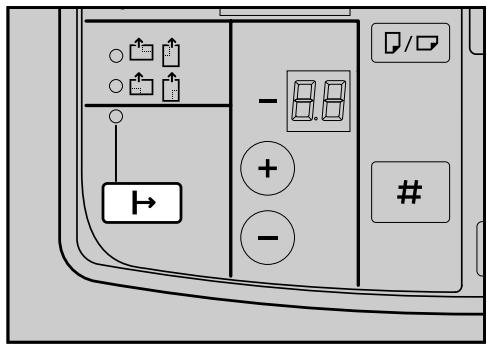
ATS011S
After a few seconds, in the Status Display lights up. You can now place paper on the Paper Feed Table.
Reference
p.7 "Turning the Folding Finisher On and Off"
p.14 "Placing Paper on the Paper Feed Table"
Entering Independent Offline Mode
This section explains how to use the Folding Finisher independently from the printer, while the printer is off.
1 Confirm that both the printer and Folding Finisher are turned off.
2 Turn on the Folding Finisher.
Reference
p.7 "Turning the Folding Finisher On and Off"
p.14 "Placing Paper on the Paper Feed Table"
Online Mode
Online mode is the mode in which the Folding Finisher and printer operate together. In this mode, paper sent from the printer is folded.

Note
- When using the Folding Finisher in online mode, operate it using the printer display or printer driver.
For details about operation using the printer display, see the Copy/Document Server Reference manual of the printer's operating instructions.
For details about operation using the printer driver, see the Printer Reference manual of the printer's operating instructions.
Entering Online Mode
Confirm that both the printer and Folding Finisher are turned on.
2 Confirm that the online indicator is lit.
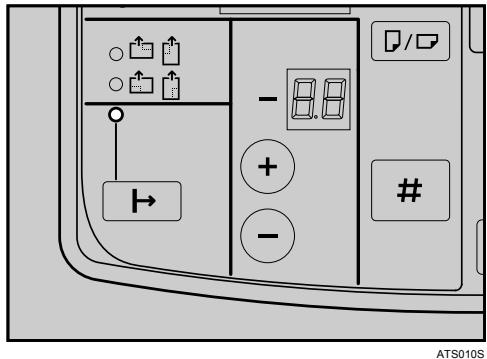
3 If the online indicator is unlit, press and hold the [Online/Offline] key until it lights up.

Note
If the printer and Folding Finisher are not turned on in the correct order, the Folding Finisher cannot enter online mode. For details, see "Turning the Folding Finisher On and Off".

Reference
p.7 "Turning the Folding Finisher On and Off"
Paper
This section lists the paper types and sizes that are supported by the Folding Finisher, and paper types that are not supported.
Supported Paper Types and Sizes
The following tables show supported types and sizes of paper for each fold type.
Fan fold
| Paper type | Paper size | Paper weight |
| Plain Paper, Recycled Paper | ·Width All paper sizes supported by the printer. ·Length Online mode: 320 to 6000 mm (12.6 to 236.3 inches) Offline mode: 297 to 6000 mm (11.7 to 236.3 inches) Regardless of the length of the paper, the number of folded surfaces cannot exceed 30 (i.e., 29 folds). | 64.0 to 81.4 g/m2(17.1 to 21.7 lb) |
Note
- Do not fold Translucent Paper or OHP transparencies. Doing so may cause malfunctions.
- Paper is output from the Paper Exit. The exit tray can hold only one sheet of paper at a time. When paper is output, retrieve the paper immediately. Operating the machine without retrieving the paper results in paper jam.
□ When paper is wrinkled, turn the Drying Heater switch to "ON".
Non-fold
| Paper type | Paper size | Paper weight |
| All paper types supported by the printer. | All paper sizes supported by the printer. | 64.0 to 81.4 g/m2(17.1 to 21.7 lb) |
Note
- Paper is usually output from the Non-folded Paper Exit. However, paper that is 200 to 320mm (7.9 to 12.6 inches) in length is output from the Paper Exit. Up to 10 sheets of paper can be stacked in the Non-Folded Paper Exit Tray (when using A1 paper).
Unsupported Paper Types
This section lists the paper types that are not supported by the Folding Finisher.

Important
- Do not use the following types of paper. Doing so may cause malfunctions.
Heavily curled paper
Thick paper
- Paper with staples
- Torn paper
- Paper with holes
- Very rough paper
- Very smooth paper
- Thin and soft paper
- Release paper
- Paper with penciled characters or images
- Folded paper

Note
- Even supported types of paper may cause paper jams or malfunctions if the paper is not in good condition.
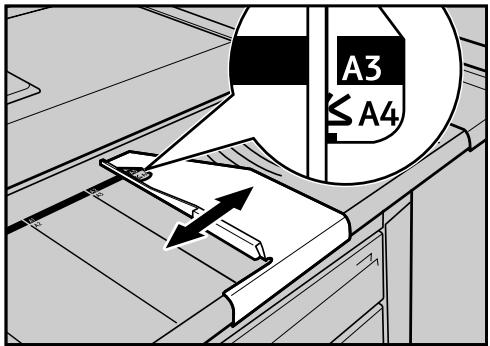
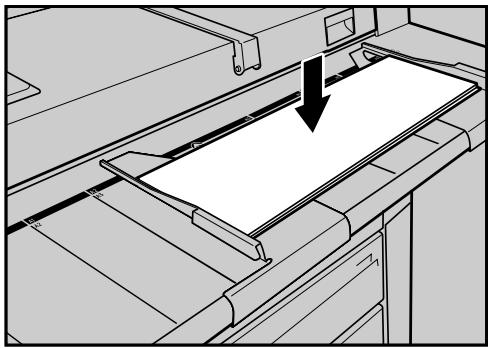
Placing Paper on the Paper Feed Table
When using the Folding Finisher in offline mode, place the paper you want to fold on the Paper Feed Table. This section explains how to place paper on the Paper Feed Table.
Adjust the right and left paper guides to the paper size.
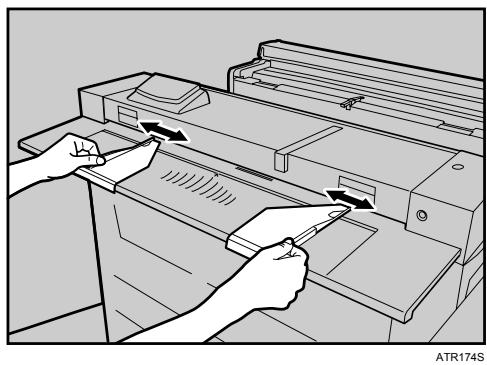
Place paper with the rear side facing up.
Note
Place only one sheet of paper at a time.
□ When placing a long sheet of paper, support it with your hands.
Once you place a sheet of paper, do not push or pull it forcefully. Doing so may damage the paper.
If the front or rear edge of the paper is strongly curled, flatten the paper completely before re-placing it. Curled paper may be damaged during folding.
2. Functions of the Folding Finisher
Basic Operation of the Folding Finisher
This section explains Basic Operation of the Folding Finisher.
1 Confirm that the Folding Finisher is in offline mode.
2 Select the paper size using the [Paper size] key, and then select the paper orientation using the [Length/Width] key.
3 Configure settings for the fold type as required.
Place the paper on the Paper Feed Table with the rear side facing up.
If the Folding Finisher does not start folding automatically, press the [Start] key.
Note
- You can set the Folding Finisher to start folding paper placed on the Paper Feed Table automatically or after pressing the [Start] key. For details, see "Changing the Folding Finisher Settings".
Reference
p.9 "Offline Mode"
p.14 "Placing Paper on the Paper Feed Table"
p.37 "Changing the Folding Finisher Settings"
Cancelling a Folding Operation
You can cancel a folding operation, if you want to change the fold settings after an operation has started.
Important
□ You cannot cancel the folding operation if actual folding has started.
Press the [Stop] key.
![RICOH AFICIO MP W2400 - Press the [Stop] key. - 1](/content/2025/01/136379/images/e34666e2635d63c9c219cf220c4637d3aef42ce16c6df855cdf58a30a1a62893.jpg)
ATS005S
Note
If you cancel an operation, paper will stop while still inside the Folding Finisher. When removing the stopped paper, pull it out slowly so that it does not tear.
Fan Fold
The Folding Finisher folds paper, repeating folding operations in the order of mountain fold, valley fold, mountain fold.
Two types of fan fold are available:
Fan fold
Fan-folds paper into a fan shape with all surfaces the same width. You can select the folding width from 140 mm (5.6 inches), 170 mm (6.7 inches), 210 mm (8.3 inches), or 297 mm (11.7 inches).
Fan fold (Margin Fold)
Creates a margin by changing the folding widths of the first surface and the surfaces that follow. The first surface is folded with a width of 210mm (8.3 inches) and the following surfaces with 170mm (6.7 inches).
Note
For paper that can be folded with Fan fold, see "Supported Paper Types and Sizes".
Reference
p.12 "Supported Paper Types and Sizes"
Fan Fold Type List
When folding paper with Fan fold, select the type using Fold Type No. This section explains the different types of Fan fold.
| Fold type no. | Fold type | Title block position |
| 1 | Fan Fold 140 mm (5.6 inches) | Rear edge |
| 2 | Fan Fold 170 mm (6.7 inches) | Rear edge |
| 3 | Fan Fold 210 mm (8.3 inches) | Rear edge |
| 4 | Fan Fold 297 mm (11.7 inches) | Rear edge |
| 5 | Fan Fold 210 mm (8.3 inches)/Margin Fold | Rear edge |
Fan Fold in Offline Mode
This section explains how to fold paper using Fan fold in offline mode.
1 Confirm that the Folding Finisher is in offline mode.
2 Select the paper size using the [Paper size] key, and then select the paper orientation using the [Length/Width] key.

Use the [+][-] keys to select the Fold Type No.
The [Position of title block] indicator lights up.
4 Confirm the title block position, and then place the paper on the Paper Feed Table with the rear side facing up.
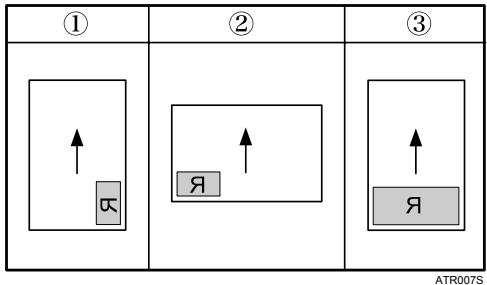
The title block position is determined by the paper size and orientation.
① : When using A3 or larger paper in vertical orientation
(2) : When using A3 or larger paper in horizontal orientation
③ : A4 paper
If the Folding Finisher does not start folding automatically, press the [Start] key.
Note
□ You can set whether the Folding Finisher starts folding paper placed on the Paper Feed Table automatically, or after the [Start] key is pressed. For details, see "Changing the Folding Finisher Settings".
- Use paper measuring 6000 ~mm (236.3 inches) or less, and set it to be folded no more than 29 times (i.e., 30 surfaces). Using paper longer than the above may cause a paper jam.
Reference
p.9 "Offline Mode"
p.14 "Placing Paper on the Paper Feed Table"
p.37 "Changing the Folding Finisher Settings"
Fan Fold in Online Mode
This section explains how to fold paper with Fan fold in online mode.
1 Confirm that the Folding Finisher is in online mode.
Use the printer display or printer driver to set Fan fold.
Note
- Use paper measuring 6000 ~mm (236.3 inches) or less, and set it to be folded no more than 29 times (i.e., 30 surfaces). Using paper longer than the above may cause a paper jam.
For details about operation using the printer display, see the Copy/Document Server Reference manual of the printer's operating instructions.
For details about operation using the printer driver, see the Printer Reference manual of the printer's operating instructions.
Reference
p.11 "Online Mode"
Adjusting the Folding Position
You can adjust folding widths for Fan fold, and margins for Fan fold (Margin Fold).
Note
- The folding position can be adjusted using either the Folding Finisher or the printer. Settings configured with the Folding Finisher are applied when folding paper in offline mode. Settings configured with the printer are applied when folding paper in online mode.
Adjusting folding width
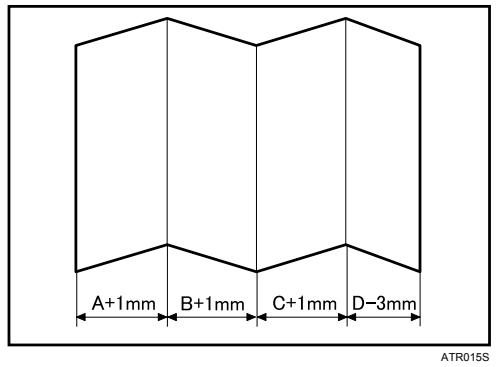
This section explains how to adjust folding widths, using the example of fan-folding paper three times to make four surfaces.
If you adjust the folding width +1 ~mm , the size of each surface is adjusted as follows:
| Before adjustment | After adjustment | |
| 1st surface | A mm | A + 1 mm |
| 2nd surface | B mm | B + 1 mm |
| 3rd surface | C mm | C + 1 mm |
| 4th surface | D mm | D - 3 mm |
The last surface will be shorter than the other surfaces, since the length of the other surfaces has increased.

Note
- Folding position adjustment is applied to all fold types and surfaces. However, a folding width cannot be set to less than 140mm (5.6 inches), since the minimum folding width for Fan fold is 140mm (5.6 inches).
For the procedure to configure settings using the Folding Finisher, see "Changing the Folding Finisher Settings".
□ When configuring settings using the printer, use the system setting "Fold Width Fine Adjustment". For the procedure to configure settings using the printer, see General Settings Guide manual of the printer's operating instructions.

Reference
p.37 "Changing the Folding Finisher Settings"
Adjusting margins
You can adjust the margins that are created using folding paper with Fan fold (Margin Fold).

Note
For the procedure to configure settings using the Folding Finisher, see "Changing the Folding Finisher Settings".
□ When configuring settings using the printer, use the system setting "Fold Width Fine Adjustment". For the procedure to configure settings using the printer, see General Settings Guide manual of the printer's operating instructions.

Reference
p.37 "Changing the Folding Finisher Settings"
2
3. Troubleshooting
If any changes or errors occur in the Folding Finisher, indicators on the display of the control panel light up, or an alarm sounds.
When a Status Display Indicator Lights Up
When an error occurs in the Folding Finisher, the relevant Status Display indicator lights up and the code number appears on the display. This section explains how to resolve the various errors that can occur.
ATS009S
When a Paper Jam Occurs
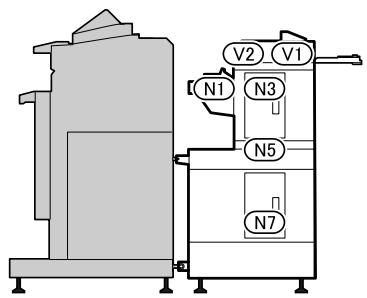
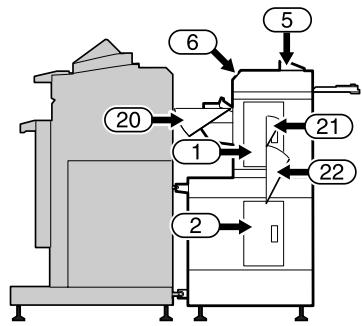
on the Status Display lights up. Locate the jammed paper by referring to the following illustration and table, and then remove it. For details, see "Removing Jammed Paper".
Left Side
ATS015S
| Code numberJ | Location of paper jam |
| J01 | N1 |
| J03 | N3 |
| J05 | N5 |
| J07 | N7 |
| J31 | V1 |
| J32 | V2 |
Reference
p.26 "Removing Jammed Paper"
When Covers Are Open
^* on the Status Display lights up. Locate the open cover by referring to the following illustrations and table, and then close it.
Left Side
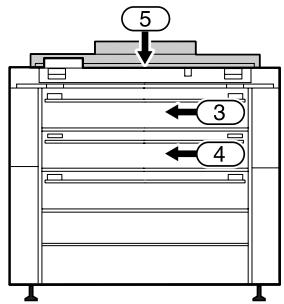
Front
ATS014S
| Code number | Open cover |
| do01 | Cover 1 |
| do02 | Cover 2 |
| do03 | Cover 3 |
| do04 | Cover 4 |
| do05 | Cover 5 |
| do06 | Cover 6 |
| do20 | Cover 20 |
| do21 | Cover 21 |
| do22 | Cover 22 |
When Other Errors Occur
If on the Status Display lights up, the Folding Finisher may be malfunctioning. Turn off the Folding Finisher once, and then turn it back on. If is still lit, contact your sales or service representative and report the code numbers indicated on the display.
Reference
p.7 "Turning the Folding Finisher On and Off"
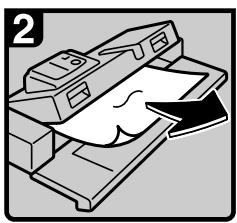
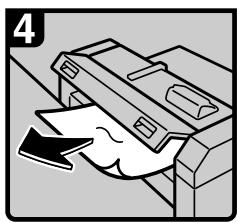
Removing Jammed Paper
If on the Status Display lights up, a paper jam has occurred. This section explains how to resolve for paper jams.
CAUTION:
- Keep your hands clear of the Folding Finisher and Paper Exit. You can trap your fingers if you do not.
Important
- Do not turn off the power when removing the paper. If the power is turned off, functions and values you set are cleared.
- When removing paper, pull it out slowly so that it does not tear. If pieces of paper remain inside the machine, they may cause another paper jam or malfunction of the machine.
□ If paper jams occur regularly, contact your sales or service representative.
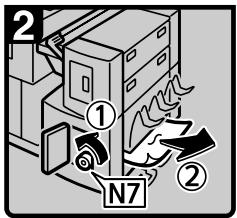
When J01 Is Displayed
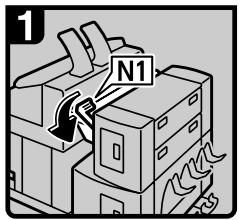
- Lower lever N1.
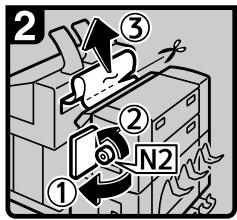
- Open the upper side cover (①), turn knob N2 counterclockwise, and then remove the misfed paper (②).
- If you cannot remove the misfed paper, cut it with scissors or a cutter (3), and then remove the pieces from both the main unit and the finisher side. For details about removing misfed paper from the main unit side, see "When C is lit".
- Close the upper side cover, and then return lever N1 to its original position.
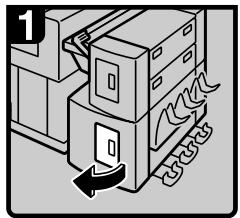
When J03 Is Displayed
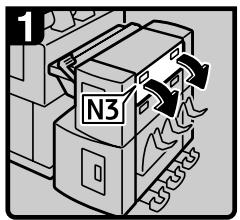
- Open cover N3.
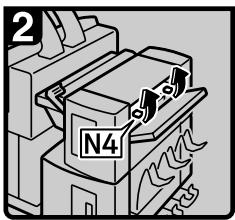
- Open cover N4.
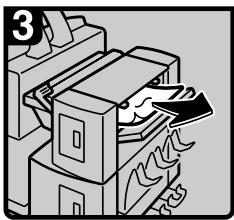
- Remove the jammed paper.
- Close covers N4 and N3.
ATK016S
When J05 Is Displayed
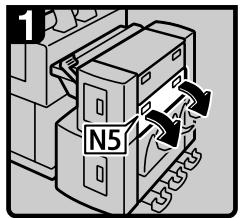
- Open cover N5.
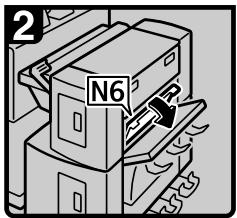
- Open cover N6.
- Remove the jammed paper.
- Close covers N6 and N5.
ATK017S
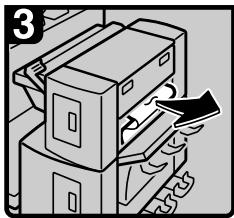
When J07 Is Displayed
- Open the lower side cover.
- Turn knob N7 counterclockwise (①), and then remove misfed paper (②).
- Close the lower side cover.
ATK018S
When J31 or J32 Is Displayed
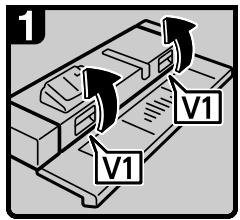
- Open cover V1.
- Remove the jammed paper.
- Close cover V1.
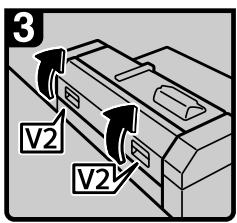
- If you cannot remove the misfed paper, open cover V2.
- Remove the jammed paper.
- Close cover V2.
ATS001S
Alert Tones
The Folding Finisher uses tones to alert users about its condition. The following table explains the meaning of the various alert tones.
| Tone pattern | Folding Finisher condition |
| Single short beep | ·When keys are pressed. ·When paper is placed on the Paper Feed Table. |
| Single long beep | ·When a cover is opened or closed. ·When a paper jam occurs. ·When the Folding Finisher detects an error. ·When the paper was folded more than the maximum number of folds. |

Note
□ Users cannot stop a tone after it has started sounding.
To mute or unmute tone alerts, see "Changing the Folding Finisher Settings".

Reference
p.37 "Changing the Folding Finisher Settings"
3
This chapter explains how to maintain and operate the machine.
Where to Put the Machine
The Folding Finisher's location should be carefully chosen because environmental conditions greatly affect its performance.
Moving
Observe the following precautions when moving the machine.
CAUTION:
- Contact your service representative if you need to lift the machine (such as when relocating it to another floor). Do not attempt to lift the machine without the assistance of your service representative. The machine will be damaged if it topples or is dropped, resulting in malfunction and risk of injury to users. The machine's various handling areas are for service engineer use only. Do not touch these areas.
Optimum Environmental Conditions
Observe the following precautions when installing the machine.
CAUTION:
- Keep the machine away from humidity and dust. Otherwise a fire or an electric shock might occur.
- Do not place the machine on an unstable or tilted surface. If it topples over, an injury might occur.
-
Make sure the room where you are using the machine is well ventilated and spacious. Good ventilation is especially important when the machine is used heavily.
-
Temperature: 10 to 30^ (50 to 86^ )
- Humidity: 15 to 90% .
- A strong and level base.
- The machine must be level within 5mm (0.2 inches): both front to rear and left to right.
Environments to Avoid
- Locations exposed to direct sunlight or other sources of strong light (1,500 lux or more).
- Locations directly exposed to cool air from an air conditioner or heated air from a heater. (Sudden temperature changes can cause condensation to form inside the machine.)
- Locations close to machines generating ammonia, such as a diazo copy machine.
- Places where the machine will be subject to frequent strong vibration.
- Dusty areas.
- Areas with corrosive gases.
Access to the Machine
Place the machine near the power source, providing the clearance areas shown.
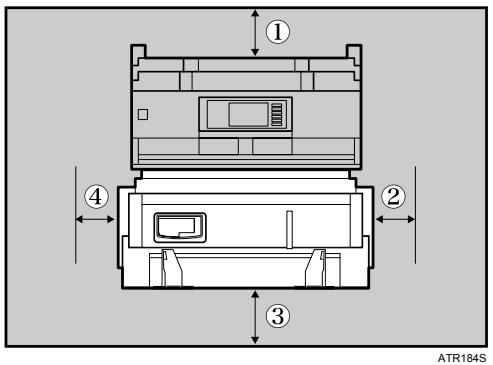
| ① Rear | Varies depending on the connected printer. |
| ② Right | 80 cm (31.5 inches) or more |
| ③ Front | 100 cm (39.4 inches) or more |
| ④ Left | 80 cm (31.5 inches) or more |

Note
For details about the space required behind the machine, see the Troubleshooting manual of the printer's operating instructions.
Power Connection
Observe the following precautions regarding the power supply.
WARNING:
- Connect the machine only to the power source described on the inside front cover of this manual. Connect the power cord directly into a wall outlet and do not use an extension cord.
- Do not damage, break or make any modifications to the power cord. Do not place heavy objects on it. Do not pull it hard nor bend it more than necessary. These actions could cause an electric shock or fire.
WARNING:
- If the power cord is damaged (exposure of the core, disconnection, etc.), contact your service representative to change a new one. Operating the machine with a damaged power cord may cause an electric shock or fire.
CAUTION:
- When you disconnect the power plug from the wall outlet, always pull the plug (not the cable).
CAUTION:
- To disconnect the power code, pull it out by plug. Do not drag the code itself. Doing so may result in damage to the code, leading to fire or electric shock.
- Make sure the plug is inserted firmly in the wall outlet.
Make sure the plug is inserted firmly in the wall outlet.
Maintaining the Machine
Important
- Do not use chemical cleaners or organic solvents, such as thinner or benzene. If such substances get inside the machine or melt plastic parts, malfunctions might occur.
□ Internal parts should only be cleaned by your service representative.
Cleaning the machine:
Wipe the machine with a soft, dry cloth. If this does not remove the dirt, wipe the machine with a damp and tightly wrung cloth. If a damp cloth still does not remove the dirt, use a mild detergent. After wiping the machine with a damp cloth, wipe it again with a dry cloth to remove any moisture.
5. Appendix
When Folding Paper by Hand
This section explains how to fold already-folded paper by hand to make it A4 size. Use the Folding Guide of the Paper Feed Table to fold paper by hand.
Match the left paper guide to A4 .
ATR203S
Place the paper, adjusting the paper guide to the left end of the paper.
ATR204S
Pull the Folding Guide down.

ATR205S
Supporting the guide firmly with your hand, fold the paper from right to left.
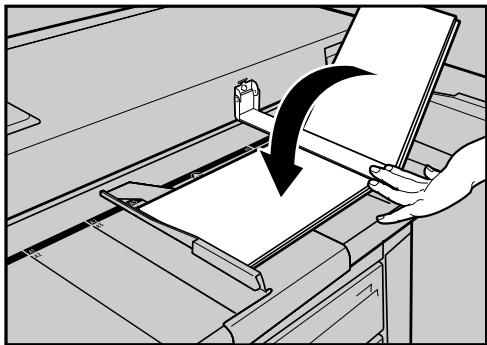
ATR206S
Repeat folding as required.
Changing the Folding Finisher Settings
This section explains how to change the Folding Finisher settings.
Available Settings
The Folding Finisher settings can be changed using the control panel. This section explains the items that you can set.
Adjustment of the Fan fold width
Makes fine adjustments to the width of fan folds.
- Item number: 1
- Default: 0.0 mm
• Value range (0.5 mm units): -6.0 to +6.0 mm
Adjustment of margins
Sets the margin when fan-folded A0 or A1 paper.
- Item number: 3
- Default: 40 mm
- Value range (1 mm units): 35 to 40 mm
Time to wait until starting paper feed
Sets the wait time until the paper is fed after the front edge of paper set on the Paper Feed Table touches the Folding Finisher.
- Item number: 11
- Default: 1 second
- Value range (1 second units): 1 to 5 seconds
Time to suspend manual paper feed
Sets the length of time that paper placed on the Paper Feed Table pauses after starting to be fed.
- Item number: 12
- Default (second): 1 second
- Value range (1 second units): 1 to 5 seconds
Method of starting folding operation
Sets whether the Folding Finisher starts folding paper placed on the Paper Feed Table automatically, or after the [Start] key is pressed.
- Item number: 13
- Default: 0 (fold automatically)
- Value range: 0 (fold automatically), 1 (fold after the [Start] key is pressed)
Tone alert
Sets whether or not the Folding Finisher produces sounds to alert users about changes in the machine's condition.
- Item number: 16
- Default: 0 (tone alerts)
- Value range: 0 (tone alerts), 1 (mute)
Time to clear settings automatically
Sets the length of time until current settings are cleared when the Folding Finisher is not operated. To preserve the current settings, set this to 0.
- Item number: 17
- Default: 0 (do not clear)
- Value range (one minute units): 0 (do not clear) to 10
Time to exit offline mode automatically
Sets the length of time until the Folding Finisher exits offline mode when not operated. To not exit offline modes set this to 0.
- Item number: 18
- Default: 0 (do not exit)
- Value range (one minute units): 0 (do not exit) to 10
Note
- Folding widths and margins can only be adjusted in millimeter units, not inch units.
- Item numbers 4, 6 and 20 are displayed. However, changes in these item numbers are not applied to the Folding Finisher.
Changing the Settings
This section explains how to change the Folding Finisher settings.
1 Confirm that the Folding Finisher is in offline mode.
Press the [User Tools] key.
![RICOH AFICIO MP W2400 - Press the [User Tools] key. - 1](/content/2025/01/136379/images/59150e79ea8df7ab92f271dac3eb02cfbab635d58e317ff108103c23354f251b.jpg)
Press the [Online/Offline] key to enter the mode to select a setting.
![RICOH AFICIO MP W2400 - Press the [User Tools] key. - 2](/content/2025/01/136379/images/ab7bc987f67ae1522e066e17deff2e0c2ec4599c87ed7eeafa850d9644528707.jpg)
Press the [+][-] keys to select the number of the setting you want to change.
![RICOH AFICIO MP W2400 - Press the [User Tools] key. - 3](/content/2025/01/136379/images/07b8803651e15dc213d15a2ceef3ae69a2f28b8133948da30700ac146f624a4b.jpg)
Press the [Online/Offline] key to enter the mode to input a setting value.
![RICOH AFICIO MP W2400 - Press the [User Tools] key. - 4](/content/2025/01/136379/images/6c8173b4018af8404b72c35fa646129dd597503713534a4644faee06a726fdb3.jpg)
Press the [+][-] keys to select the setting value.
![RICOH AFICIO MP W2400 - Press the [+][-] keys to select the setting value. - 1](/content/2025/01/136379/images/33339e1a47fdf67986f36bb7df8e0f6754d89e63e7e4960ce0d29913118b06a9.jpg)
Press the [Enter] key to apply the setting.
![RICOH AFICIO MP W2400 - Press the [Enter] key to apply the setting. - 1](/content/2025/01/136379/images/05591c2b1c6fe3194bee6cfe805cd260cdc869ddff91121352205de038b49398.jpg)
Press the [User Tools] key.
![RICOH AFICIO MP W2400 - Press the [User Tools] key. - 1](/content/2025/01/136379/images/1494e26221859019588c47de4e70b7a2d8737b10d50bb84812180a2276bb5c63.jpg)
Reference
p.9 "Offline Mode"
Specifications
| Non-folded Paper Exit | Outputs non-folded paper. ·Supported paper types All paper types supported by the printer. ·Supported paper sizes All paper sizes supported by the printer. Paper that is 200 to 320 mm (7.9 to 12.6 inches) in length is output from the Paper Exit. ·Paper capacity 10 sheets (A1) ·Paper weight 64.0 to 81.4 g/m2(17.1 to 21.7 lb) |
| ExitPaper Exit | Outputs folded paper. ·Supported paper types Plain Paper, Recycled Paper ·Supported paper sizes Width: All paper sizes supported by the printer. Length: Offline mode: 297 to 6000 mm (11.7 to 236.3 inches) Online mode: 320 to 6000 mm (12.6 to 236.3 inches) Regardless of paper length, the number of folded surfaces cannot exceed 30 (i.e., 29 folds). ·When the Folding Finisher detects an error. ·Paper capacity 1 sheet ·Paper weight 64.0 to 81.4 g/m2(17.1 to 21.7 lb) |
| Fold type | Five patterns ·Fan fold: four patterns ·Fan fold (Margin Fold): one pattern |
| Available fold widths | Fan fold: 140 mm (5.6 inches), 170 mm (6.7 inches), 210 mm (8.3 inches), 297 mm (11.7 inches) Fan fold (Margin Fold): 210 mm (8.3 inches) |
| Folding speed | ·Fan fold A0 □: 2 sheets/minute A1 □: 3 sheets/minute A2 □, A1 □: 4 sheets/minute |
| Power source | 220-240 V, 50/60 Hz, 1.2 A |
| Maximum power consumption | 150 W |
| Machine dimensions (W × D × H) | 126 × 545 × 995 mm (49.9 × 21.5 × 39.2 inches) |
| Weight | 145 kg (319.7 lb) |
INDEX
A
Adjusting folding width, 20
Adjusting margins, 21
Adjusting the Folding Position, 19
Appendix, 35
C
Cancelling a Folding Operation, 16
CAUTION, i, iii
Changing the Settings, 37, 38
Cleaning the machine, 33
Clear Modes key, 4
Control Panel, 2, 4
D
Display, 4
Drying Heater Switch, 2, 8
E
Enter key, 4
F
Fan Fold, 4, 17
Fan Fold (Marging Fold), 17
Fan Fold Type List, 17
Folding guide, 2
Folding Paper by Hand, 35
Fold Type, 17
Fold Type No., 4, 17
H
How to Read This Manual, 1
1
Independent Offline mode, 9
L
Length/Width key, 4
M
Main Power Indicator, 4
Margin, 17
N
Name and Function, 2
Names and Functions, 4
Non-Folded Paper Exit, 2
0
Offline mode, 9, 18
Online mode, 11, 19
Online/Offline Key, 4
P
Paper Exit, 2, 12
PaperFeedPaper,14
Paper Feed Table, 2, 9, 15
Paper Guide, 2, 14
Paper size, 12
Paper Size Key, 4
Paper type, 12
Position of title block, 4
Positions of WARNING and CAUTION
labels, iii
Power, 7
Power Connection, 33
Power Switch, 2
R
Recycling, iv
Remarks, 31
Removing the paper, 26
s
Specifications, 41
Startkey,4
Status Display, 4, 23
Supported Paper Types and Size, 12
System Offline mode, 9
T
Title block position, 17, 18
Tone, 29
U
Unsupported paper, 13
User Tools Key, 4
Use The Holding Finsherr, 9
WARNING, i, iii
Waste, iv
In accordance with IEC 60417, this machine uses the following symbols for the main power switch:
I means POWER ON.
means STAND BY.
In accordance with IEC 60417, this machine uses the following symbols for the anti-humidity heater switch:
I means POWER ON.
means POWER OFF.

sounonssnne
- Operating Instructions
- Introduction
- Important
- Notes:
- Operator Safety
- Power Source
- Safety Information
- Safety During Operation
- WARNING:
- CAUTION:
- Position of WARNING and CAUTION label
- User Information on Electrical & Electronic Equipment
- Users in the EU, Switzerland and Norway
- All Other Users
- TABLE OF CONTENTS
- Preparation Before Using the Folding Finisher
- Functions of the Folding Finisher
- Troubleshooting
- Removing Jammed Paper 26
- Alert Tones 29
- Remarks
- Where to Put the Machine 31
- Appendix
- When Folding Paper by Hand 35
- Changing the Folding Finisher Settings 37
- Specifications 41
- INDEX 42
- How to Read This Manual
- Symbols
- Note
- Reference
- 【】
- Guide to the Folding Finisher
- Control panel (Option)
- Paper Feed Table (Option)
- Folding Guide (Option)
- Paper Guide (Option)
- Power switch
- Paper Exit
- Paper Exit Tray
- Non-folded Paper Exit Tray
- Non-folded Paper Exit
- Drying Heater switch
- Control Panel
- Main Power indicator
- Paper orientation indicator
- Display
- [Paper size] key
- 5.【Length/Width】key
- Status Display
- 【User Tools】key
- 8.【Clear Modes】key
- 9.【Start】key
- 【Stop】key
- 【Enter】key
- Fold Type No.
- [+ ][-] keys (Fold Type selection)
- Position of title block
- Turning the Folding Finisher On and Off
- Turning the Folding Finisher On
- Turning the Folding Finisher Off
- Operating the Drying Heater Switch
- Offline Mode
- System offline mode
- Independent offline mode
- Entering System Offline Mode
- Entering Independent Offline Mode
- P Reference
- Online Mode
- Entering Online Mode
- Paper
- Supported Paper Types and Sizes
- Fan fold
- Unsupported Paper Types
- Placing Paper on the Paper Feed Table
- Basic Operation of the Folding Finisher
- Cancelling a Folding Operation
- Press the [Stop] key.
- Fan fold (Margin Fold)
- Fan Fold Type List
- Fan Fold in Offline Mode
- Fan Fold in Online Mode
- Adjusting the Folding Position
- Adjusting folding width
- Adjusting margins
- When a Status Display Indicator Lights Up
- When a Paper Jam Occurs
- When Covers Are Open
- When Other Errors Occur
- Removing Jammed Paper
- When J01 Is Displayed
- When J03 Is Displayed
- When J05 Is Displayed
- When J07 Is Displayed
- When J31 or J32 Is Displayed
- Alert Tones
- Where to Put the Machine
- Moving
- Optimum Environmental Conditions
- Environments to Avoid
- Access to the Machine
- Power Connection
- Maintaining the Machine
- Cleaning the machine:
- When Folding Paper by Hand
- Changing the Folding Finisher Settings
- Available Settings
- Adjustment of the Fan fold width
- Adjustment of margins
- Time to wait until starting paper feed
- Time to suspend manual paper feed
- Method of starting folding operation
- Tone alert
- Time to clear settings automatically
- Time to exit offline mode automatically
- Changing the Settings
- Confirm that the Folding Finisher is in offline mode.
- Press the [User Tools] key.
- Press the [+][-] keys to select the setting value.
- Press the [Enter] key to apply the setting.
- Specifications
- INDEX
- A
- C
- D
- E
- F
- H
- 1
- L
- M
- N
- 0
- P
- R
- s
- T
- U
Brand : RICOH
Model : AFICIO MP W2400
Category : Multifunction Printer