
RT-320 - VHF portable radio NAVICOM - Free user manual and instructions
Find the device manual for free RT-320 NAVICOM in PDF.
| Product type | Portable VHF marine radio |
| Brand | NAVICOM |
| Model | RT-320 |
| Dimensions (with battery) | 150 x 65 x 37 mm |
| Weight (with battery) | 280 g |
| Power supply | 7.4 V DC, rechargeable Li-ion battery |
| Transmit power | 1 W (low) or 5 W (high), selectable |
| Transmit frequencies | 156.025 to 157.425 MHz |
| Receive frequencies | 156.300 to 162.000 MHz |
| Modulation type | FM |
| Channels | All international VHF marine channels |
| Antenna impedance | 50 Ω |
| Operating temperature | -15°C to +55°C |
| Display | Backlit LCD screen |
| Main functions | Dual watch, triple watch, normal scan, memory and priority, channel memory, priority channel 16, key lock, high/low power selection, adjustable squelch, ATIS ID, reset |
| Protection | Key lock to prevent accidental operation |
| Battery indicator | Yes, battery level displayed |
| Charger | Charger base with LED (red charging, green charged) |
| Charging time | Approximately 3 h 30 |
| Maintenance and cleaning | Wipe with a damp cloth using fresh water; do not use chemicals; clean the screen with a soft non-abrasive cloth |
| Safety | Use only with antenna installed; do not expose to extreme temperatures in a closed vehicle; follow WEEE directive for recycling |
| Spare parts and repairability | Replaceable Li-ion battery; for any other repair, contact the authorized dealer |
| General information | Device designed for international use, compliant with ITU directives. Note serial number on back. |
Frequently Asked Questions - RT-320 NAVICOM
User questions about RT-320 NAVICOM
0 question about this device. Answer the ones you know or ask your own.
Ask a new question about this device
Download the instructions for your VHF portable radio in PDF format for free! Find your manual RT-320 - NAVICOM and take your electronic device back in hand. On this page are published all the documents necessary for the use of your device. RT-320 by NAVICOM.
USER MANUAL RT-320 NAVICOM
VHF portable Uship 5W

by

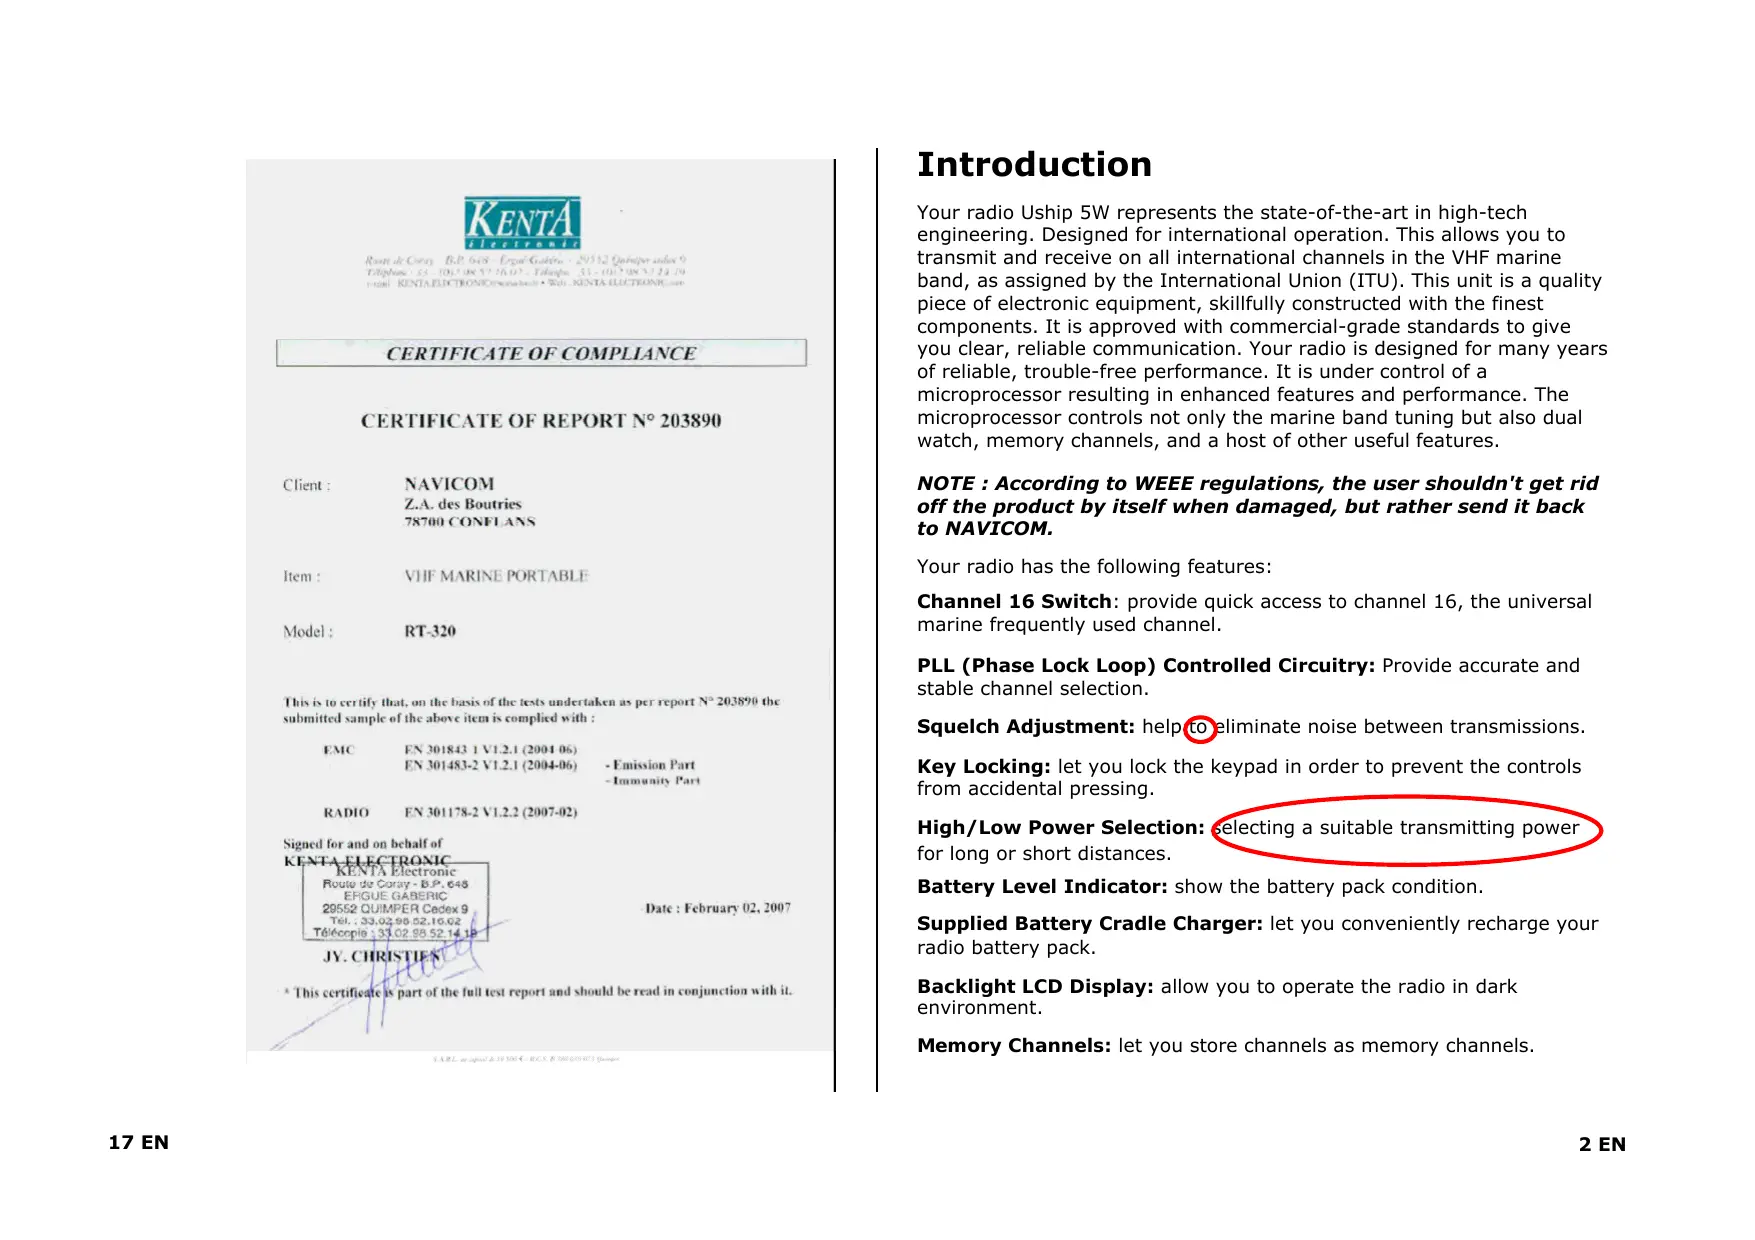
This is to certify that, on the basis of the tests undertaken as per report N°203890 the submitted sample of the above item is complied with:
EMC EN301843-1V1.2.1(2004-06) EN301483-2V1.2.1(2004-06)
RADIO EN 301178-2 V1.2.2 (2007-02)
- Emission Part
- Immunity Part
Date: February 02, 2007
Signed for and on behalf of
KENTA ELECTRONIC
KENTA Electronic
Route de Coray-B.P.648
ERGUE GABERIC
29552 QUMPER Cedex 9
Tel.:33.02.58.52.10.02
Téléphone:33.02.58.52.14.1
JY.CHristien
This certificate is part of the full test report and should be read in conjunction with it.
(全)
Specifications techniques
This is to certify that, on the basis of the tests undertaken as per report N° 203890 the submitted sample of the above item is complied with:
EMC EN301843-1V1.2.1(2004-06) EN301483-2V1.2.1(2004-06)
RADIO EN301178-2V1.2.2(2007-02)
- Emission Part
- Immunity Part
Date: February 02, 2007
Signed for and on behalf of
KENTA ELECTRONIC
KENTA Electronic
Route de Coray-B.P.648
ERGUE GABERIC
28552 QIMPER Cedex 9
Tel.:33.02 88.52,10.02
Tel:33.02 88.52 14.14
JY. CHRISTIAN
This certificate is part of the full test report and should be read in conjunction with it.
CONTENTS
Introduction 2
Safety Information 3
Display 3
Function and Location of The Control 4
Before Using Your Radio 4
- Charging and Installing the battery pack 5
- Installing the antenna 6
3.Installing the belt clip 7
Using Your Radio 7
- Turning the power on/off 8
- Adjusting squelch
- Transmitting and receiving 8
- Accessing the priority channels 16
- Selecting channels 9
- Selecting high/low power 9
- Locking the keypad 9
- Reducing/Updating channels to from Memory 1
- Scanning 1
- Accessing channels saved to memory 1
- Using the watch monitor mode 1
- Programming the ATIS ID number 1
- Resetting the radio 1
Maintenance 14
Technical Specifications 15
Frequency Charts 16
Certificate CE 16
Contidente
Introduccion 2
Tilipnue 35-001002-TiHg 41-100
KENTA PECTRONCnnebde - Wt. KENTA HETONN
CERTIFICATE OF COMPLIANCE
CERTIFICATE OF REPORT No 203890
Client: NAVICOM
Z.A. des Boutries
78700 CONFLANS
Item : VHF MARINE PORTABLE
Model: RT-320
This is to certify that, on the basis of the tests undertaken as per report N° 203890 the submitted sample of the above item is complied with:
EMC
FN 301178-2 V1.2.2 (2007-02)
Signed for and on behalf of
KENTA ELECTRONIC
RE
electronic 电
Route de Courly B.P.648 EFIGUE GABERIC
29552 QUIMPER Cedex 9
Tel.:33.02.98.52.16.02
Gicopie:33.02.88.52.141
JY.CHristien
* This certificate is part of the full test report and should be read in conjunction with it.
2A
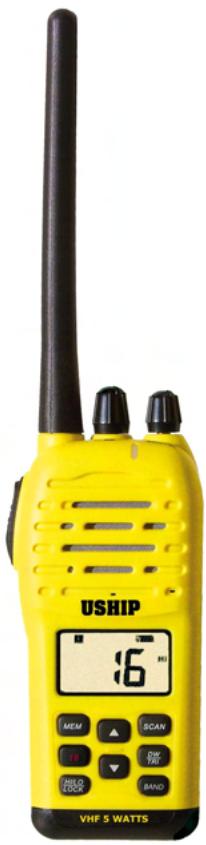
Introduction
Your radio Uship 5W represents the state-of-the-art in high-tech engineering. Designed for international operation. This allows you to transmit and receive on all international channels in the VHF marine band, as assigned by the International Union (ITU). This unit is a quality piece of electronic equipment, skillfully constructed with the finest components. It is approved with commercial-grade standards to give you clear, reliable communication. Your radio is designed for many years of reliable, trouble-free performance. It is under control of a microprocessor resulting in enhanced features and performance. The microprocessor controls not only the marine band tuning but also dual watch, memory channels, and a host of other useful features.
NOTE : According to WEEE regulations, the user shouldn't get rid off the product by itself when damaged, but rather send it back to NAVICOM.
Your radio has the following features:
Channel 16 Switch: provide quick access to channel 16, the universal marine frequently used channel.
PLL (Phase Lock Loop) Controlled Circuitry: Provide accurate and stable channel selection.
Squelch Adjustment: help to eliminate noise between transmissions.
Key Locking: let you lock the keypad in order to prevent the controls from accidental pressing.
High/Low Power Selection: selecting a suitable transmitting power for long or short distances.
Battery Level Indicator: show the battery pack condition.
Supplied Battery Cradle Charger: let you conveniently recharge your radio battery pack.
Backlight LCD Display: allow you to operate the radio in dark environment.
Memory Channels: let you store channels as memory channels.
Dual/Scan Butto: let you to select the reception of a programmed channel or scan all the channels for existing channels.
We recommend you record your transceiver's serial number here. This number is on the radio rear panel.
Serial Number:
SAFETY INFORMATION
Your hand-held marine VHF radio is NOT approved for use by the general population in an uncontrolled environment. This radio is restricted to occupational use, work related operations only where the radio operator must have the knowledge to control its RF exposure conditions.
- When transmitting, hold the radio in a vertical position with its microphone 1 to 2 inches ( 2.5 to 5 cm ) away from your mouth and keep the antenna at least 1 inch ( 2.5 cm ) away from your head and body.
- The radio must be used with a maximum operating duty cycle not exceeding 50% , in typical Push-to-Talk (Manual PTT) configurations.
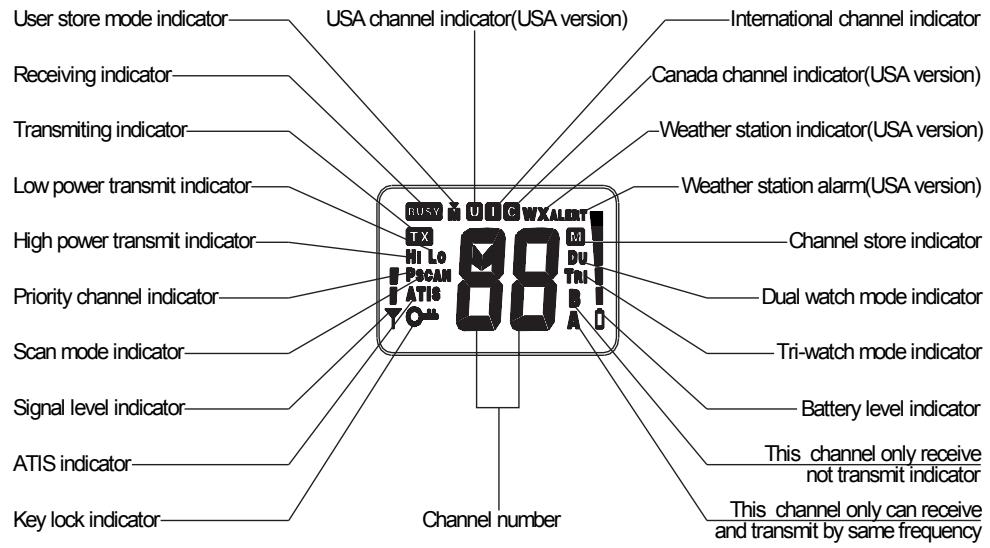
DISPLAY
Your radio comes with a multifunctional display:
Frequency charts
| CH | INT | CH | INT | ||||||
| FREQUENCY (MHz) | FREQUENCY (MHz) | ||||||||
| TX | RX | MODE | REMARK | TX | RX | MODE | REMARK | ||
| 01 | 156.050 | 160.650 | D | 60 | 156.025 | 160.625 | D | ||
| 02 | 156.100 | 160.700 | D | 61 | 156.075 | 160.675 | D | ||
| 03 | 156.150 | 160.750 | D | 62 | 156.125 | 160.725 | D | ||
| 04 | 156.200 | 160.800 | D | 63 | 156.175 | 160.775 | D | ||
| 05 | 156.250 | 160.850 | D | 64 | 156.225 | 160.825 | D | ||
| 06 | 156.300 | 156.300 | S | 65 | 156.275 | 160.875 | D | ||
| 07 | 156.350 | 160.950 | D | 66 | 156.325 | 160.925 | D | ||
| 08 | 156.400 | 156.400 | S | 67 | 156.375 | 156.375 | S | ||
| 09 | 156.450 | 156.450 | S | 68 | 156.425 | 156.425 | S | ||
| 10 | 156.500 | 156.500 | S | 69 | 156.475 | 156.475 | S | ||
| 11 | 156.550 | 156.550 | S | 70 | 156.525 | 156.525 | S | DSC | |
| 12 | 156.600 | 156.600 | S | 71 | 156.575 | 156.575 | S | ||
| 13 | 156.650 | 156.650 | S | 72 | 156.625 | 156.625 | S | ||
| 14 | 156.700 | 156.700 | S | 73 | 156.675 | 156.675 | S | ||
| 15 | 156.750 | 156.750 | S | 1W | 74 | 156.725 | 156.725 | S | |
| 16 | 156.800 | 156.800 | S | 75 | 156.775 | 156.775 | S | 1W | |
| 17 | 156.850 | 156.850 | S | 1W | 76 | 156.825 | 156.825 | S | 1W |
| 18 | 156.900 | 161.500 | D | 77 | 156.875 | 156.875 | S | ||
| 19 | 156.950 | 161.550 | D | 78 | 156.925 | 161.525 | D | ||
| 20 | 157.000 | 161.600 | D | 79 | 156.975 | 161.575 | D | ||
| 21 | 157.050 | 161.650 | D | 80 | 157.025 | 161.625 | D | ||
| 22 | 157.100 | 161.700 | D | 81 | 157.075 | 161.675 | D | ||
| 23 | 157.150 | 161.750 | D | 82 | 157.125 | 161.725 | D | ||
| 24 | 157.200 | 161.800 | D | 83 | 157.175 | 161.775 | D | ||
| 25 | 157.250 | 161.850 | D | 84 | 157.225 | 161.825 | D | ||
| 26 | 157.300 | 161.900 | D | 85 | 157.275 | 161.875 | D | ||
| 27 | 157.350 | 161.950 | D | 86 | 157.325 | 161.925 | D | ||
| 28 | 157.400 | 162.000 | D | 87 | 157.375 | 157.375 | S | ||
| 88 | 157.425 | 157.425 | S | ||||||
Technical specifications
| Channels: | All International Channels |
| Frequency Method: | Phase Lock Loop |
| Frequency Range: | TX : 156.025 ~ 157.425 MHzRX : 156.300 ~ 162.000 MHz |
| Antenna Impedance: | 50 Ohms |
| Power Supply: | 7.4 V dc |
| Operating Temperature: | -15°C to +55°C |
| Dimensions: | (With 7.4V Battery Pack)150 x 65 x 37 mm |
| Weight: | (With 7.4V Battery Pack)280 g |
Transmitter
| Power Output: | 1 ou 5 W (Switch Selectable) |
| Modulation Type: | FM |
| Hum and Noise Attenuation: | 40 dB |
| Audio Distortion: | 5% |
| Spurious Suppression: | 0.25 μW |
Receiver
| Sensitivity at 12dB SINAD: | 0.3 μV |
| Squelch Sensitivity: | Threshold -12dB μV (EMF) |
| Adjacent Channel Selection: | 70 dB |
| Spurious Response Rejection: | 70 dB |
| Intermodulation Rejection: | 68 dB |
| Audio Power Output: | 250 mW at 5% TDH |
| Hum and Noise Attenuation: | 40 dB |
Note:
The data are typical, and the practical ones may be varied.
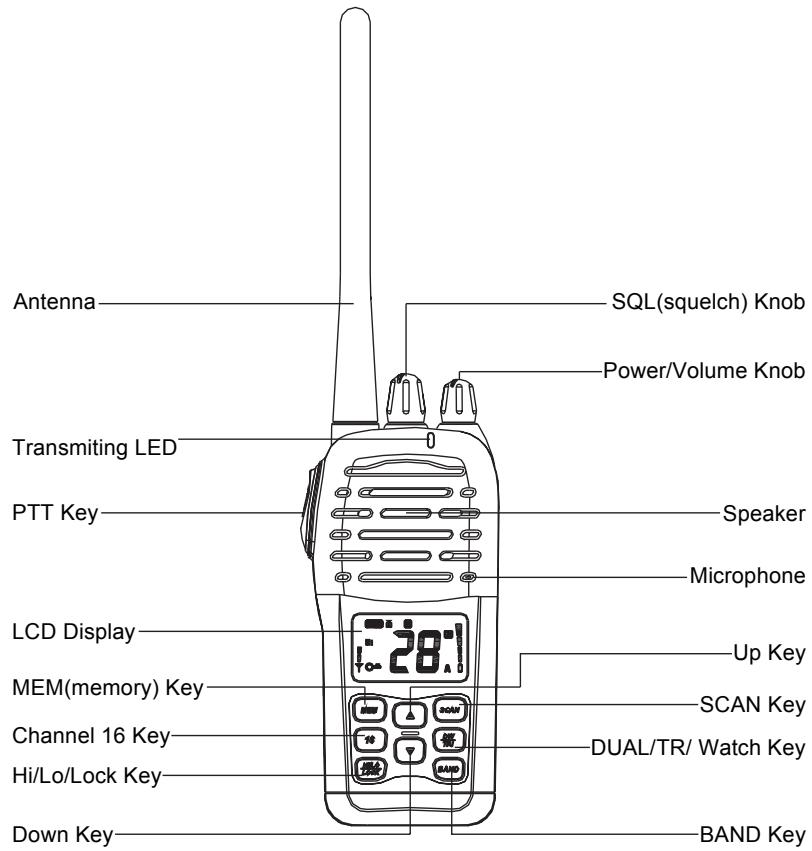
FUNCTION AND LOCATION OF THE CONTROLS
BEFORE USING YOUR RADIO
Before using your radio, you should make the following preparations:
- Fully charge a Li-ion polymer battery pack and install it onto the radio.
- Install the antenna onto the radio.
- Install the belt clip onto the radio.
- In addition, you may want to perform the additional optional step.
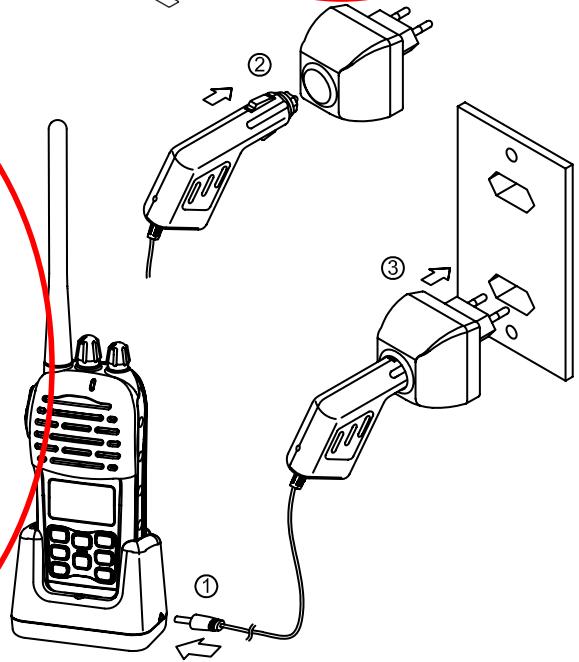
1. Charging and Installing the battery pack
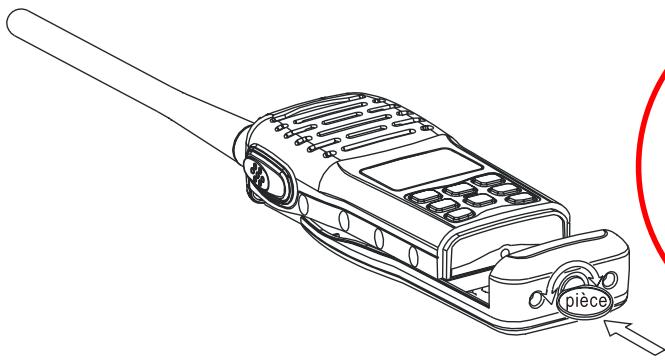
You can either charge the Li-ion polymer battery pack indoor or on board. Installing the Li-ion Polymer battery pack onto the radio: Use a coin or screwdriver rotate the screw lock clockwise to lock the battery pack onto the radio.
You can either charge the Li-ion polymer battery pack when it is attached to the radio or when it is not :
Charging Battery Pack at home:
- Insert the cigarette lighter plug into the cradle charger;
- Insert the cigarette lighter into the AC adapter;
- Plug in the AC adaptor into a wall jack;
- Insert the battery pack or the radio with the battery pack into the cradle charger.
Charging Battery pack on board:
- Insert the cigarette lighter plug into the cradle charge;
- Insert the cigarette lighter into the cigarette lighter jack on board;
- Insert the battery pack or the radio with the battery pack into the cradle charger.
The cradle charger indicator LED on the front of the charging lights when it is receiving voltage from the cigarette lighter:
- RED means the batteries are charging
- GREEN means the batteries are fully charged
To exit ATIS programming mode without saving, press 16 key at any time to jump to priority channel 16.
Note: After this programming, only your distributor can modify or erase the ATIS ID.
13. Resetting the Radio
You can reset any radio settings back to the factory default settings. Resetting the radio will:
- Erase any channel stored in memory.
- Return to international channels, if another mode is currently selected at the time of reset.
- Return power settings to their original state.
To reset the radio:
- Turn the radio off by rotating PWR/VOL knob to the OFF position.
- Simultaneously press and hold both SCAN and BAND keys.
- Then turn on the radio, continue to hold the SCAN and BAND keys down for 3 seconds, then release both keys.
Maintenance
To keep your radio working properly, perform the following maintenance are needed. If your unit comes into contact with salt spray, simply wipe the affected surfaces with a cloth dampened in fresh water. Do not use a chemical glass cleaner on the lens, as chemicals in the solution may cause cracking in the lens. When cleaning the LCD display protective lens, use a chamois and non-abrasive, mild cleaner.
Do not wipe while dirt or grease is on the lens. Be careful to avoid scratching the lens.
WARNING:
Never leave your radio in a closed car or trunk; the extremely high temperatures generated in hot weather can damage the electronics.
- Press and hold DW/TRI Watch key for 3 seconds to activate the Tri Watch mode. The TRI icon will appear on the LCD display.
- Press and hold DW/TRI Watch key again for 3 seconds to terminate Tri Watch Mode and to return to the previous working channel.
or...
- Press and release DW/TRI Watch key to terminate Tri Watch mode and enter into Dual Watch mode. The DU icon will appear on the LCD display.
NOTE: During Tri Watch mode, SCAN, MEM, BAND and [▲] or [▼] (Up/Down) keys are inactive and will sound an error beep when pressed.
12. Programming the ATIS ID code
The Automatic Transmission Identification System (ATIS) is used in some European countries to identify vessels in their inland waterways. After the PTT key is released following a transmission, the vessel's ATIS ID number is also transmitted.
To program the ATIS ID number:
- With the radio powered off, simultaneously press and hold HI/LOW/LOCK key and BAND key together.
- While still pressing the two keys, turn on the radio.
- Use
or(Up/Down) key to change the first digit to the correct value for your particular ATIS ID. - When the correct value is flashing, press SCAN key for 3 seconds to confirm the selection.
- Press
or(Up/Down) key to change the second digit to the correct value. - Continue this process until all nine ATIS numbers have been entered.
- You must now re-enter the ATIS ID a second time to confirm.
- Store the ATIS ID permanently into the radio by turning the radio off.
You should charge the battery pack for about 3.5hours. Attach the battery pack to the radio when it is finished charging.

CAUTION:
Remember to take the radio/battery pack out of the charger when it has been fully charged. Overcharging batteries may result in damage to both the battery pack and radio.
2. Installing the Antenna
You will need to make sure that the flexible antenna is attached to the radio.
Installing the antenna:
Rotate the antenna clockwise to fasten securely to the threaded connector on the top of the radio.

NOTE :
Do not operate the radio or press PTT key without an antenna installed.
3. Installing the Belt Clip
For handy carry your radio, a belt clip is supplied whit your radio allows you to attach the radio to your belt.
To installing the belt clip:
Installing the belt clip to the back of your radio, make sure that the fitting Groove is aligned.

USING YOUR RADIO
You should familiar with several operating procedures:
- Turning the power on.
- Adjusting Squelch.
- Transmitting and receiving.
- Accessing the priority channel16.
- Selecting channels.
- Selecting high/low power.
- Locking the keypad.
- Adding channels to memory.
- Scanning channels.
- Accessing channels saved to memory.
- Using the monitor modes.
- Programming the ATIS ID code.
- Resetting the radio
10. Accessing Channels Saved to Memory
Once channels have been saved, you can easily access them by pressing the MEM key.
In Memory mode, only the channels saved in memory can be accessible using the Up or Down Channel keys.
To access saved channels:
- Press the MEM key. The Stored and "M" icons will appear on the LCD to indicate that you are in Memory mode.
- Use the [] or [] (Up/Down) keys to scan through the saved channels.
- Press the MEM key again to regain access to all channels.
11. Using the Watch Monitor Modes
The radio is equipped with two types of monitor modes: Dual Watch and Tri Watch.
Dual Watch monitors the current working channel and Channel 16 alternately.
To activate and terminate Dual Watch mode:
- Press and release DW/TRI Watch key to activate the Dual Watch mode. The DU icon will appear on the LCD display.
- Press and release DW/TRI Watch key again to terminate Dual Watch mode and return to the previous working channel. or...
- Press and hold DW/TRI Watch key for 3 seconds to terminate Dual Watch mode and enter into Tri Watch mode. The TRI icon will appear on the LCD display.
NOTE: During Dual Watch mode, SCAN, MEM, BAND, and [▲] or [▼] (Up/Down) keys are inactive and will sound an error beep if pressed.
Tri Watch monitors Channel 16, Channel 9 and the current working channels.
To activate and terminate Tri Watch mode:
Normal scan will automatically check for transmission on the channel is being scanned. If a signal is received, the scan stops on the channel as long as it present and the "SCAN" icon is flashing will appear on the LCD display. If the signal is lost for five seconds or more, the radio resumes scanning.
- Memory Scan: In Memory Scan mode, only the channels that have been saved in memory are scanned in sequence. After the last saved channel number has been scanned, the cycle repeats.
- Priority Scan: In Priority Scan mode, you can scan all channels while alternately scanning Channel16 to make sure that you don't miss distress or emergency calls.
To activate scan modes:
- Press SCAN key once when no channels are stored in memory to activate the Normal scan function. The Scan icon will appear on the LCD display. or...
- Press SCAN key once when there is at least one channel in memory to activate the Memory Scan function. The Stored and Scan icons will appear on the LCD display. or...
- Press and hold SCAN key for 3 seconds to enter Priority Scan mode. The Priority Scan "P" icon will appear on the LCD display just before "SCAN" icon.
- During any of the Scan modes, press the [▲] or [▼] (Up/Down) keys to change the scan direction. Up key to scan the channel upward, Down key to scan the channel downward.
- Press and release SCAN key to terminate Scan mode.
NOTE: During Scan mode, the BAND, MEM, and DW/TRI Watch keys will not function and will sound an error beep if pressed.
1. Turning the Power On/Off
Use PWR/VOL knob to turn on/off the radio, Once on, adjust the volume as well.
To turn on the radio:
- Clockwise rotate the PWR/VOL knob to turn on the radio. The knob will make a clicking sound when the radio is turned on.
- Once on, rotate the PWR/VOL knob further to adjust the volume.
To turn off the radio:
- Once the radio is on, turn the PWR/VOL knob count clockwise to turn off the radio. The knob will make a clicking sound when the radio is turned off.
2. Adjusting Squelch
Squelch is used to eliminate static and background noise in between transmissions, and allows silent operation of the radio until a transmission is received. If Squelch is set too high, only the strongest transmissions can be heard, and if it is set too low, intermittent static and noise may be annoying. Squelch is controlled by SQL knob located on the top of the radio.
To set Squelch:
- Turn SQL knob counter-clockwise as far as it. You will hear a lot of static.
- Then turn SQL knob clockwise until the static stop, this is the correct position for the SQL knob.
3. Transmitting and Receiving
Use Push-To-Talk (PTT) key to transmit (speak) on the selected channel.
To transmit and receive:
- Press and hold Push-To-Talk (PTT) key, then speak about 3 to 4^ away from the microphone, The TX icon will appear on the LCD display while you are transmitting.
- Release Push-To-Talk (PTT) key when finish and switch the radio to listening mode.
- For receiving, the VOL (volume) knob can be adjusted for the best listening audio output from the speaker.
NOTE: Before transmitting, make sure that the channel you have selected is not a
receive-only channel.
4. Accessing the Priority Channels 16
Channel 16 key allows you to access the emergency channel 16 quickly; pressing and holding this key also allows you to access channel 9.
To access the channel16:
- Press Channel 16 key to access Priority channel 16.
- To access the alternate channel 9 which is available in some areas, press and hold the Channel 16 key for 3 seconds, when Channel appears then release.
5. Selecting Channels
Use [▲] or [▼] (Up/Down) key to scroll through the available channels.
For a list of channels and their frequencies, see marine Frequency Charts on page 16.
To select a channel:
Use [▲] or [▼] (Up/Down) key to find a channel. Stop when you find the
desired channel.
NOTE: Not all channel numbers are available in INT bands.
6. Selecting High/Low Power
You must press and release HI/LOW/LOCK key to toggle the transmit power between high and low. Select high (High power transmit) for long-range communications, and select low (Low power transmit) for short-range communications to save battery power.
To change the transmit power:
Press HI/LOW/LOCK key to toggle between High and Low transmit power. When the radio is operating at high power, the "Hi" icon appears on the LCD display, and when operating at low power, the "Lo" icon appears on the LCD display.
7. Locking the Keypad
Use HI/LOW/LOCK key to activate the Key Lock function in order to avoid accidental key press of the radio keypad.
To lock and unlock the keypad:
- To lock the keypad, press and hold the HI/LOW/LOCK key until the Key Lock icon appears on the LCD display
- To unlock the keypad, press and hold the HI/LOW/LOCK key again until the Key Lock icon disappear from the LCD display.
NOTE: Once Key Lock is turned on, pressing any keys will have no effect except for the Push-To-Talk (PTT) key, which is not affected by Key Lock.
8. Adding/Deleting Channels to/from Memory
Your radio can store any channel (including private channels). The stored channels are the one scanned in the Memory Scan mode.
To add channels to memory:
- During normal operating mode, use [▲] or [▼] (Up/Down) keys to select the desired channel for programming.
- Press and hold MEM key for 3 seconds. The Stored icon will appear, indicating that the current channel has been saved into memory. Any channel scan number can be saved as memory channels.
To delete channels from memory:
- During normal operating mode, use [] or []
(Up/Down) keys to select the saved channel you wish to delete. - Press and hold MEM key for 3 seconds. The selected channel will be deleted from memory.
9. Scanning
Your radio comes with three scan options:
- Normal Scan: If there are no channels in memory, the default is Normal Scan. In Normal Scan mode, all channels in the channel set are scanned in sequence. After the last channel number has been scanned, the cycle repeats.