
DHT-M330DV - Soundbar DENON - Free user manual and instructions
Find the device manual for free DHT-M330DV DENON in PDF.

| Brand | DENON |
| Model | DHT-M330DV |
| Product type | Soundbar with built-in DVD player |
| Dimensions (approx.) | 800 mm (W) x 60 mm (H) x 100 mm (D) |
| Weight (approx.) | 2.5 kg |
| Power supply | 220-240 V AC, 50/60 Hz |
| Power consumption | 40 W (standby < 1 W) |
| Supported audio formats | MP3, WMA, AAC, CD, DVD |
| Main functions | DVD player, Bluetooth, auxiliary input, HDMI ARC output |
| Maintenance and cleaning | Wipe with a soft, dry cloth. Do not use chemical products. |
| Safety | Do not obstruct ventilation openings. Disconnect if not in use for extended periods. Avoid moisture and dust. |
| Spare parts and repairability | Remote control, power cable, HDMI cable, manual. For repairs, contact a DENON authorized center. |
| General information | Instruction manual available as free PDF. Complies with standards EN60065, EN55013, EN55020, EN61000-3-2, EN61000-3-3. |
Frequently Asked Questions - DHT-M330DV DENON
User questions about DHT-M330DV DENON
0 question about this device. Answer the ones you know or ask your own.
Ask a new question about this device
Download the instructions for your Soundbar in PDF format for free! Find your manual DHT-M330DV - DENON and take your electronic device back in hand. On this page are published all the documents necessary for the use of your device. DHT-M330DV by DENON.
USER MANUAL DHT-M330DV DENON
The lightning flash with arrowhead symbol, within an equilateral triangle, is intended to alert the user to the presence of uninsulated "dangerous voltage" within the product's enclosure that may be of sufficient magnitude to constitute a risk of electric shock to persons.

The exclamation point within an equilateral triangle is intended to alert the user to the presence of important operating and maintenance (servicing) instructions in the literature accompanying the appliance.
WARNING: TO REDUCE THE RISK OF FIRE OR ELECTRIC SHOCK, DO NOT EXPOSE THIS APPLIANCE TO RAIN OR MOISTURE.
- DECLARATION OF CONFORMITY
We declare under our sole responsibility that this product, to which this declaration relates, is in conformity with the following standards: EN60065, EN55013, EN55020, EN61000-3-2 and EN61000-3-3. Following the provisions of 73/23/EEC, 89/336/EEC and 93/68/EEC Directive.
The ventilation should not be impeded by covering the ventilation openings with items, such as newspapers, table-cloths, curtains, etc.
- No naked flame sources, such as lighted candles, should be placed on the apparatus.
- Please be care the environmental aspects of battery disposal.
- The apparatus shall not be exposed to dripping or splashing for use.
- No objects filled with liquids, such as vases, shall be placed on the apparatus.
INTRODUCTION
Thank you for choosing the DENON DHT-M330DV HOME THEATER SYSTEM. This remarkable component has been engineered to provide superb surround sound listening with home theater sources such as DVD, as well as providing outstanding high fidelity reproduction of your favourite music sources.
As this product is provided with an immense array of features, we recommend that before you begin hookup and operation that you review the contents of this manual before proceeding.
We greatly appreciate your purchase of this unit.
To be sure you take maximum advantage of all the features this unit has to offer, read these instructions carefully and use the set properly. Be sure to keep this manual for future reference should any questions or problems arise.
"SERIAL NO.
PLEASE RECORD UNIT SERIAL NUMBER ATTACHED TO THE REAR OF THE CABINET FOR FUTURE REFERENCE"
TABLE OF CONTENTS
1 BEFORE USING 5
2 CAUTIONS ON INSTALLATION 5,6
3 CAUTIONS ON HANDLING 6
4 FEATURES. 6
5 CONNECTIONs 7~14
6 PART NAMES AND FUNCTIONS 15~18
7 REMOTE CONTROL UNIT. 19~26
8 SETTING UP THE SYSTEM 27-28
9 OPERATING THE SURROUND FUNCTIONS. 29~32
10 SURROUND PLAYBACK 33-41
11 LISTENING TO THE RADIO. 42-46
12 EXPANDING TO A 6.1-OR 7.1 CHANNEL SYSTEM 47,48
13 DOLBY / DTS SURROUND. 49~52
14 USING THE SLEEP TIMER 53
15 SYSTEM FUNCTIONS. 54
16 LAST FUNCTION MEMORY 55
17 INITIALIZATION OF THE MICROPROCESSOR 55
18 TROUBLESHOOTING 56
19 SPECIFICATIONS 57
■ ACCESSORIES
Check that the following parts are included in addition to the main unit:
① Operating instructions
④ R6P/AA batteries 2
⑦ Optical cable 1
② Service station list
⑤ AM loop antenna 1
③ Remote control unit (RC-996) 1
⑥ FM indoor antenna
(3)

④
⑤

6
⑦
⑧ Cord A 2
(Used to connect the Speakers)
Length: Approx. 10 meters
⑨ Cord B. 1
(Used to connect the Speakers)
Length: Approx. 3 meters
⑧

9
1 BEFORE USING
Pay attention to the following before using this unit:
- Moving the set
To prevent short circuits or damaged wires in the connection cords, always unplug the power cord and disconnect the connection cords between all other audio components when moving the set.
Before turning the power switch on
Check once again that all connections are proper and that there are not problems with the connection cords. Always set the power switch to the standby position before connecting and disconnecting connection cords.
2 CAUTIONS ON INSTALLATION
(1) AV SURROUND RECEIVER (AVR-M330)
Noise or disturbance of the picture may be generated if this unit or any other electronic equipment using microprocessors is used near a tuner or TV.
If this happens, take the following steps:
- Install this unit as far as possible from the tuner or TV.
- Set the antenna wires from the tuner or TV away from this unit's power cord and input/output connection cords.
- Noise or disturbance tends to occur particularly when using indoor antennas or 300 / ohms feeder wires. We recommend using outdoor antennas and 75 / ohms coaxial cables.
(2) SPEAKER SYSTEM (SYS-M330)
When installing, carefully examine the place and method of installation for safety.
When using a stand, brackets, etc., follow the instructions included with the stand or brackets and check for safety before installing and using. Denon will accept no responsibility for damages or accidents caused by the unit falling.
The quality of the sound produced from the speaker system is affected by the size and type (Japanese or Western) of the room, as well as by the method of installation. Consider the points listed below before installing the speaker system.
Note that placing the speaker system on the same stand or shelf as a record player may result in howling.
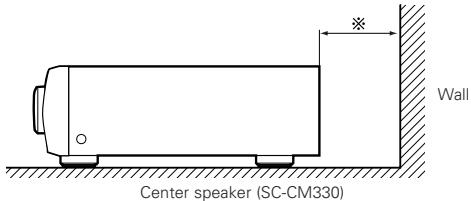
If there is a wall, glass door, etc., directly in front of or behind the speaker system, cover the wall or door with a thick curtain to prevent resonance and reflection.
The SYS-M330 speaker systems are of the low-leakage-flux type and can be used near televisions, but depending on the TV there may be color blotching on the picture. If this happens, turn off the TV's power, wait 15 to 30 minutes, then turn the TV's power back on. The TV's automatic degaussing circuit should reduce the blotching on the picture. If blotching persists, move the speaker further away.
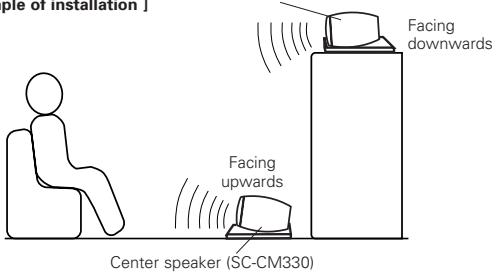
- Set the center speaker (SC-CM330) so that its front surface is facing upwards or downwards, according to the place of installation. We recommend setting it so that the front surface is facing downwards when installed at a position above the ears, upwards when installed on the floor. Use the included pedestal to adjust the angle of installation as shown on the diagram at the right.
When mounting the satellite speaker system (SC-AM330) on a stand or bracket, M5 nuts are inserted into the bottom of the satellite speaker system (SC-AM330) at intervals of 60mm . When mounting, following the instructions in the manual included with the speaker stand or ceiling mount bracket, and be sure to install properly and securely.
- Store this instructions in a safe place.
After reading, store this instructions along with the warranty in a safe place.
- Note that the illustrations in this instructions may differ from the actual set for explanation purposes.
For heat dispersal, leave at least 10cm / 4 inch of space between the top, back and sides of this unit and the wall or other components.
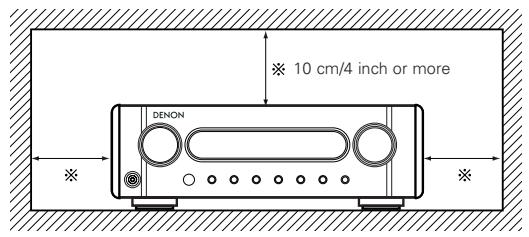
※ 10cm / 4 inch or more
[Example of installation]
[ Rear of front/surround speaker (SC-AM330)]
[Bottom of front/surround speaker (SC-AM330)]
Speaker STAND/speaker bracket mount screw hole
CAUTION:
- To ensure safety, do not place any objects on top or lean objects against the speaker system.
- The speaker may topple down or fall if force is applied to the sides. Be particularly careful to avoid this, as this could cause injury or other serious accidents.
WARNING:
- When installing the speaker systems on the ceiling or wall, to ensure safety, have specialists do the installation work.
- Be sure to fasten the speaker cords to a wall, etc., to prevent people from tripping over them or otherwise pulling on them accidentally, causing the speaker systems to fall.
- Be sure to check for safety after installing the speaker systems. Afterwards, perform safety inspections at regular intervals to be sure there is no danger that the speaker systems will fall. Denon will accept no responsibility for damages or accidents caused by inappropriate choice of the place of installation or improper installation procedures.
3 CAUTIONS ON HANDLING
(1) AV SURROUND RECEIVER (AVR-M330)
- Switching the input function when input jacks are not connected
A clicking noise may be produced if the input function is switched when nothing is connected to the input jacks. If this happens, either turn down the MASTER VOLUME control or connect components to the input jacks.
- Muting of PRE OUT jacks, HEADPHONE jack and SPEAKER terminals
The PRE OUT jacks, HEADPHONE jacks and SPEAKER terminals include a muting circuit. Because of this, the output signals are greatly reduced for several seconds after the power switch is turned on or input function, surround mode or any other-set-up is changed. If the volume is turned up during this time, the output will be very high after the muting circuit stops functioning. Always wait until the muting circuit turns off before adjusting the volume.
- Whenever the power switch is in the STANDBY state, the apparatus is still connected on AC line voltage.
Please be sure to unplug the cord when you leave home for, say, a vacation.
(2) SPEAKER SYSTEM (SYS-M330)
Note that color blotching may occur on a TV, etc., due to interaction with the speaker system if there is a magnet or an object generating magnetic force nearby.
Examples: (a) When there are magnets on the door of the rack, stand, etc.
(b) When a health device, etc., equipped with magnets is placed nearby.
(c) When toys or other objects using magnets are placed nearby.
Note that the illustrations in this instructions may differ from the actual set for explanation purposes.
- Be sure to keep the operating instructions.
After reading these operating instructions, store them in a safe place. We also recommend filling in the necessary items on the back cover.
4 FEATURES
- Dolby Digital
Using advanced digital processing algorithms, Dolby Digital provides up to 5.1 channels of wide-range, high fidelity surround sound. Dolby Digital is the default digital audio delivery system for DVD.
- DTS (Digital Theater Systems) and DTS NEO:6
DTS provides up to 5.1 channels of wide-range, high fidelity surround sound, from sources such as laser disc, DVD and specially-encoded music discs.
The AVR-M330 can be also decoded with DTS Neo:6, a surround mode allowing 5.1 channels playback of regular stereo sources.
- DOLBY PRO LOGIC II Game mode compatibility
In addition to the previously offered Music and Cinema modes, the AVR-M330 also offers a Game mode optimum for games.
- Dolby Virtual Speaker compatibility
Dolby Virtual Speaker is an proprietary technology of Dolby Laboratories. A high performance digital signal processor enables playback of Dolby Digital and DTS multi-channel surround signals in the Dolby Virtual Speaker mode. Surround sound can be achieved with the Dolby Virtual Speaker mode for CDs and other 2-channel sources in combination with the Dolby Pro Logic II decoder.
- Remote control unit with preset memory function
The AVR-M330 comes with a remote control unit equipped with a preset memory function including the remote control operation
codes for DVD-M330 DVD player, MD recorders, cassette decks and DENON remote control compatible components as well as the remote control operation codes of other major brands of TVs and video decks.
- Convenient system functions
When system connections are made with a DVD-M330 DVD player, such system functions as auto function selection, synchronized recording can be performed easily.
- Equipped with 6.1- and 7.1-channel playback expansion function (surround back channel pre-out connectors)
When the 6.1- or 7.1-channel mode is set with the Quick Setup function, the unit is compatible with decoding of various types of multi-channel formats.
- Dolby Digital EX
DTS-ES -
Dolby ProLogic IIx
-
A commercially available amplifier and speaker must be connected to the DHT-M330DV's surround back channel pre-out connector in order to achieve 6.1- and 7.1-channel playback.
5 CONNECTIONS
- Do not plug in the AC cord until all connections have been completed.
- Be sure to connect the left and right channels properly (left with left, right with right).
-
Insert the plugs securely. Incomplete connections will result in the generation of noise.
-
Note that binding pin plug cords together with AC cords or placing them near a power transformer will result in generating hum or other noise.
- Noise or humming may be generated if a connected audio equipment is used independently without turning the power of this unit on. If this happens, turn on the power of the this unit.
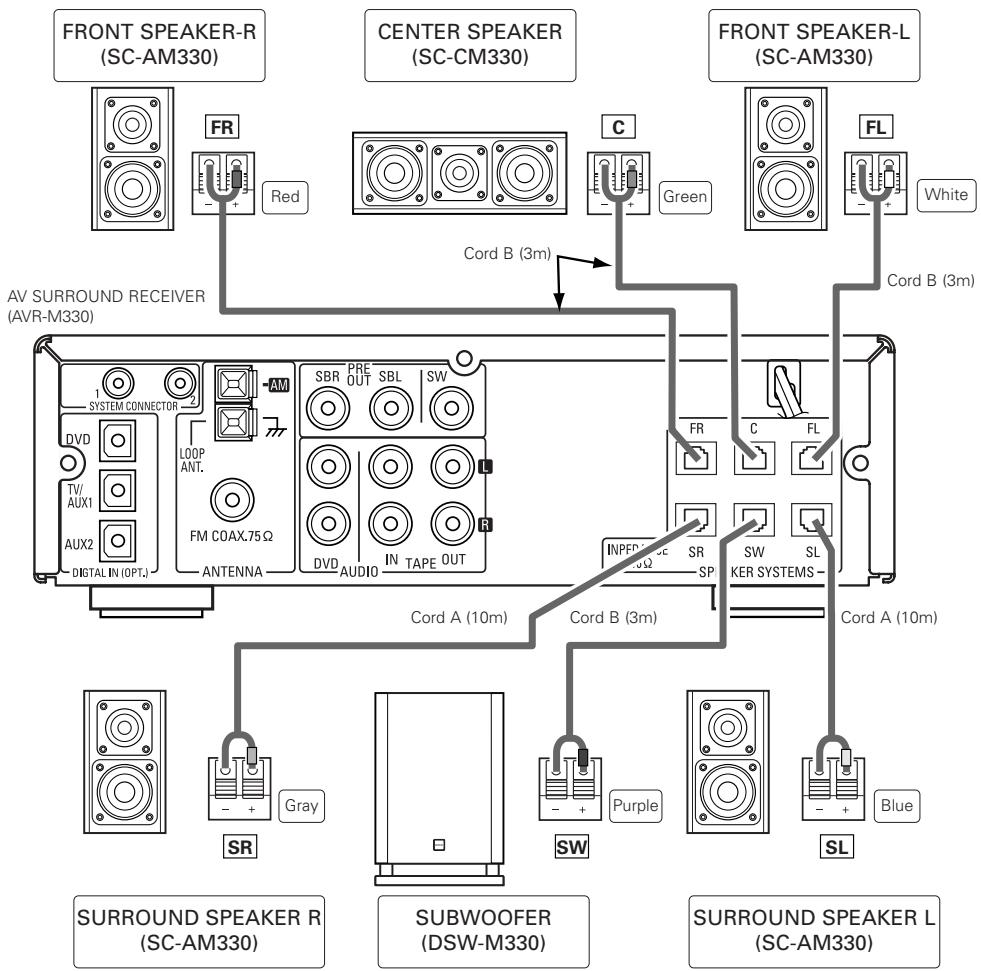
(1) Speaker system connections
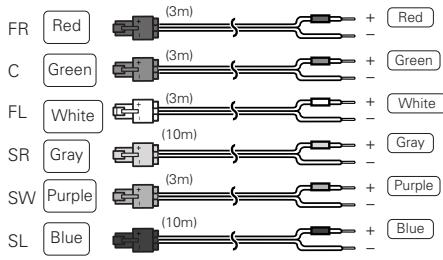
- When connecting, use connection cords A and B included with the DHT-M330DV. The connection cords are color-coded by different colored plugs and labels. Connect in such a way that the colors are the same as the AV surround receiver's speaker terminals.
- Connect the side of the included connection cord with the colored label to the "+" (plus) side.
[ Description of speaker label ]
![DENON DHT-M330DV - [ Description of speaker label ] - 1](/content/2025/01/135506/images/d9545d7f9424ca76776eeddd953f702e371fea3e6edb6753719bbe47f4774a5f.jpg)
- Use connection cords of the colors corresponding to the position of speaker installation, and connect to the AV surround amplifier.
Precautions when connecting speakers
If a speaker is placed near a TV video monitor, the colors on the screen may be disturbed by the speaker's magnetism. If this should happen, move the speaker away to a position where it does not have this effect.
Be sure to turn the amplifier's power off when connecting the speaker systems.
-
Use the included cables to connect the input terminals on the back of the speaker systems (see diagram) to the amplifier's speaker output terminals. Inverting the polarities will result in unnatural sound, with the phase off or no low bass sound.
-
Connect the side of the included connection cord with the colored label to the "+" (plus) side.
- Connect connection cords A (10 meters) and B (3 meters) as follows:
To the AVC-M330's speaker terminals
To the various speaker terminals
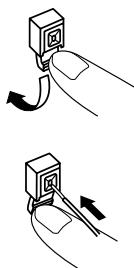
① Press the terminal's lever down.
② Insert the cord's core wires into the hole.
③ Release the lever.
Connecting the speaker cords
Use the included connection cords to connect the input terminals on the backs of the speaker systems (see the diagram) to the AVR-M330's speaker output terminals.
- Insert the connection cords' plugs securely to the back. Incomplete connections will cause noise and malfunction.
① Connect according to the speaker terminals' colors.
② Insert the plug securely to the back until a click is heard. Red, green and white: Raise the lock lever to insert. Gray, violet and blue: Lower the lock lever to insert.
③ To disconnect, press the lock lever and pull out.
Replacing the speaker connection cords
- The speaker connection cords can be replaced, for example when you want to extend the included connection cords.
① Press the release button on the side opposite the lock level to detach the cord from the plug.
② Peel off the sheathing at the tip of the cord you want to replace, and twist firmly so the tip remains tightly wound.
③ Pressing the release button, insert the core wires, making sure to match the cord's "+" and "-" polarities with the "+" and "-" sides of the plug.
(4) Release the release button, then gently pull on the cord to check that it is firmly attached.
①
②

3
4
Protector circuit
- The AV surround amplifier (AVC-M330) is equipped with a built-in protection circuit. The purpose of this circuit is to cut off the output to the speakers in order to protect them under circumstances such as when the output of the amplifier is inadvertently short-circuited and a large current flows or when there is an extremely large output.
The protection circuit is also activated when the internal temperature is unusually high. (When the protection circuit is activated due to high internal temperature, the volume indicator flashes and the speaker output is restricted. If the internal temperature rises further, the power is set to the standby mode and the power indicator flashes red.) In such cases, be sure to unplug the AV surround amplifier's power cord from the power outlet, check the wiring of the connection cords and input cords for any abnormalities, and if the AV surround amplifier's temperature is extremely high, wait for it to cool down, improve ventilation around the amplifier, then turn the power back on.
If the protection circuit is activated even though there are no problems with the wiring or with ventilation around the AV surround amplifier, there may be a problem with the AV surround amplifier. Unplug the AV surround amplifier's power cord from the power outlet, then contact a DENON service or repair center.
Note on speaker impedance
- The protector circuit may be activated if the set is played for long periods of time at high volumes when speakers with an impedance lower than the specified impedance (for example speakers with an impedance of lower than 4 Ω/ohms) are connected. If the protector circuit is activated, the speaker output is cut off. Turn off the set's power, wait for the set to cool down, improve the ventilation around the set, then turn the power back on.
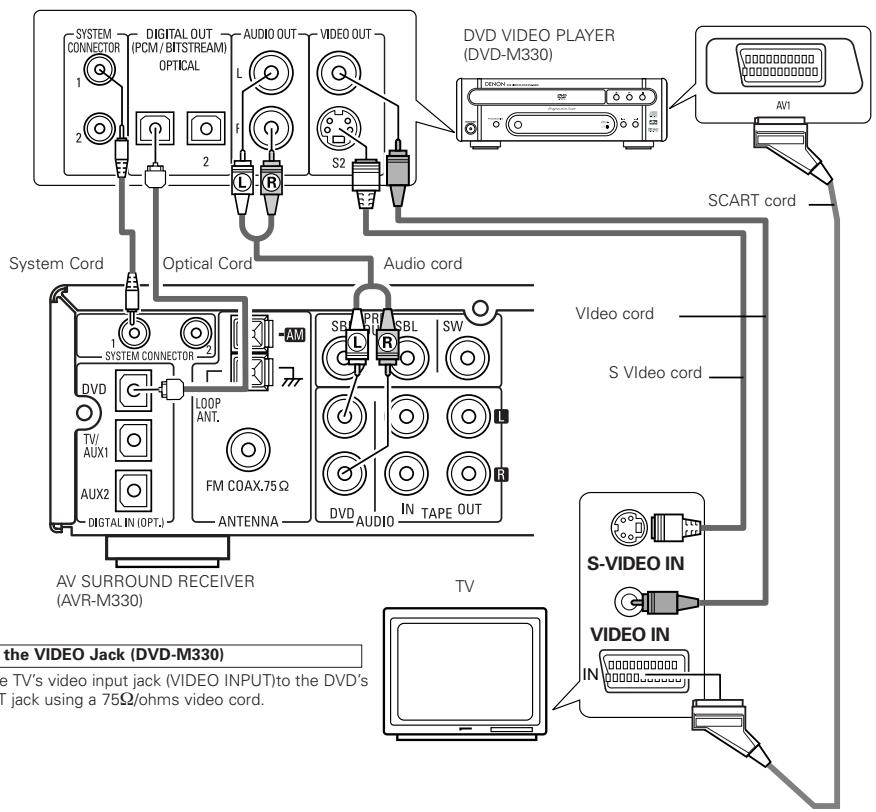
(2) Connecting the DVD Player and TV
- Connect the DVD player's video signals directly to the TV and switch the picture on the TV.
- When making connections, also refer to the operating instructions of the other components.
Connecting the AUDIO Jack
- Connect the video disc player's analog audio output jacks (ANALOG AUDIO OUT) to the DVD IN jacks using pin plug cords.
Connecting the DIGITAL Jack
- Use a commercially available optical transmission cable for connection to the optical transmission terminal (OPTICAL).
(3) Connecting the Audio Signals of a Digital Satellite Tuner and VCR
- Connect the video signals directly to the TV and switch the picture on the TV.
- When making connections, also refer to the operating instructions of the other components.
Connection to the optical digital input terminal
- Only audio signals are input to the optical digital input terminal.
- Use a commercially available optical transmission cable for connection to the optical transmission terminal (OPTICAL).

Digital satellite/cable tuner
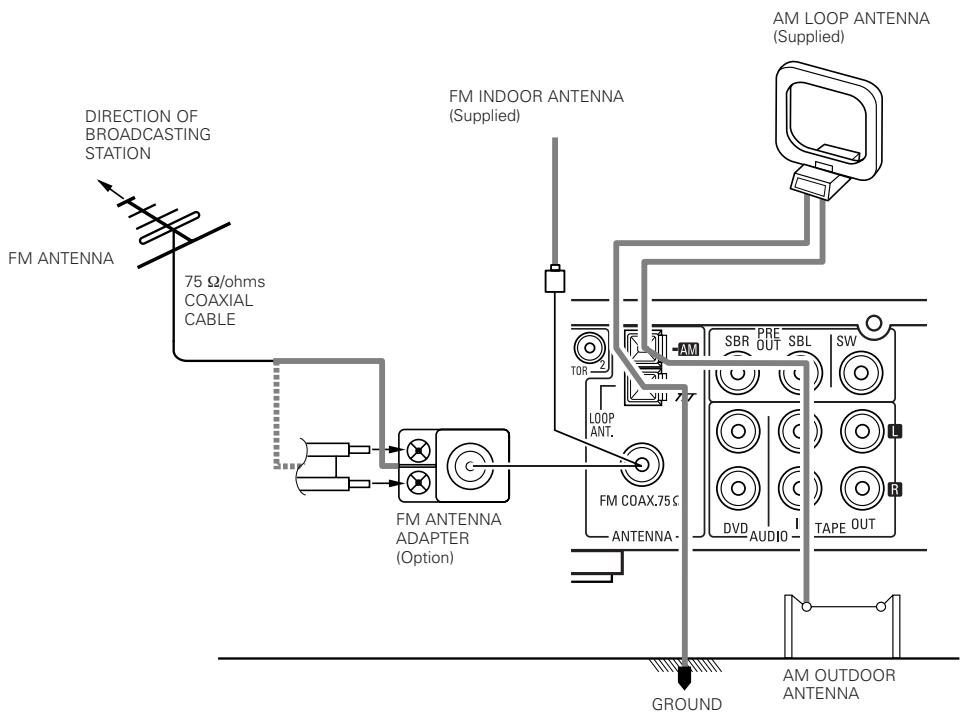
(4) Connecting the antenna terminals
- An PAL-type FM antenna cable plug can be connected directly.
- If the FM antenna cable's plug is not of the PAL-type, connect using the PAL-type antenna adapter (Option).
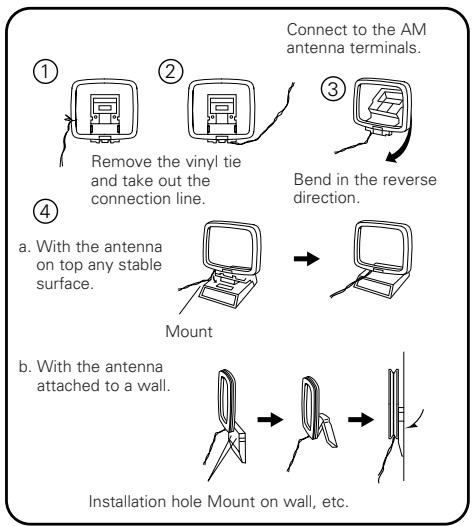
AM loop antenna assembly
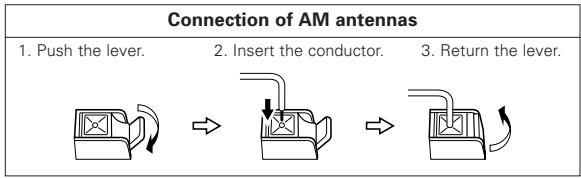
NOTES:
- Do not connect two FM antennas simultaneously.
- Even if an external AM antenna is used, do not disconnect the AM loop antenna.
- Make sure AM loop antenna lead terminals do not touch metal parts of the panel.
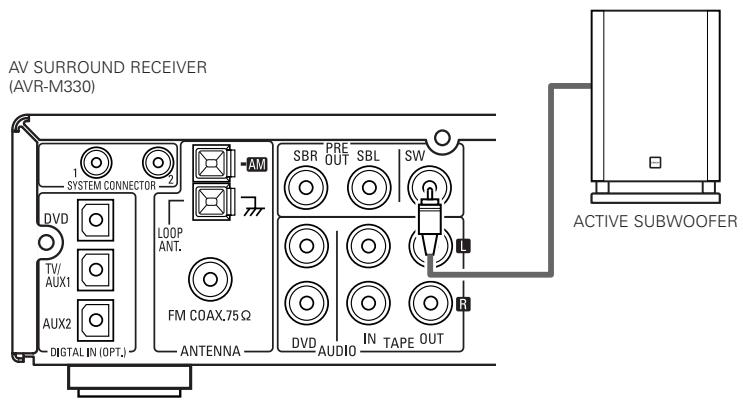
(5) Using the active subwoofer
- Use Subwoofer jack to connect in case you had additional active subwoofer.
- You can connect a larger active subwoofer to the system. Connect the active subwoofer to the SW (Subwoofer) PRE-OUT jack using a shielded audio cable.
(6) Using SURROUND BACK PRE OUT (SBL/SBR)
- Use SURR. BACK PRE OUT jack to connect additional POWER AMPLIFIER and speaker systems.
You can enjoy 6.1CH or 7.1CH surround system. - When making connections, also refer to the operating instructions of the other components.
To make the 6.1 or 7.1-channel setting, set the speakers to "6.1CH" or "7.1CH" in the quick setup and select "Room Setup". (See pages 27.)
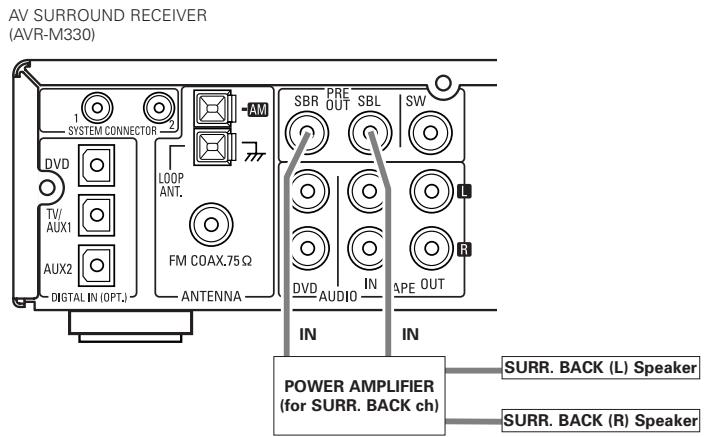
- Connect the power amplifier for SURR.
BACK speaker system.
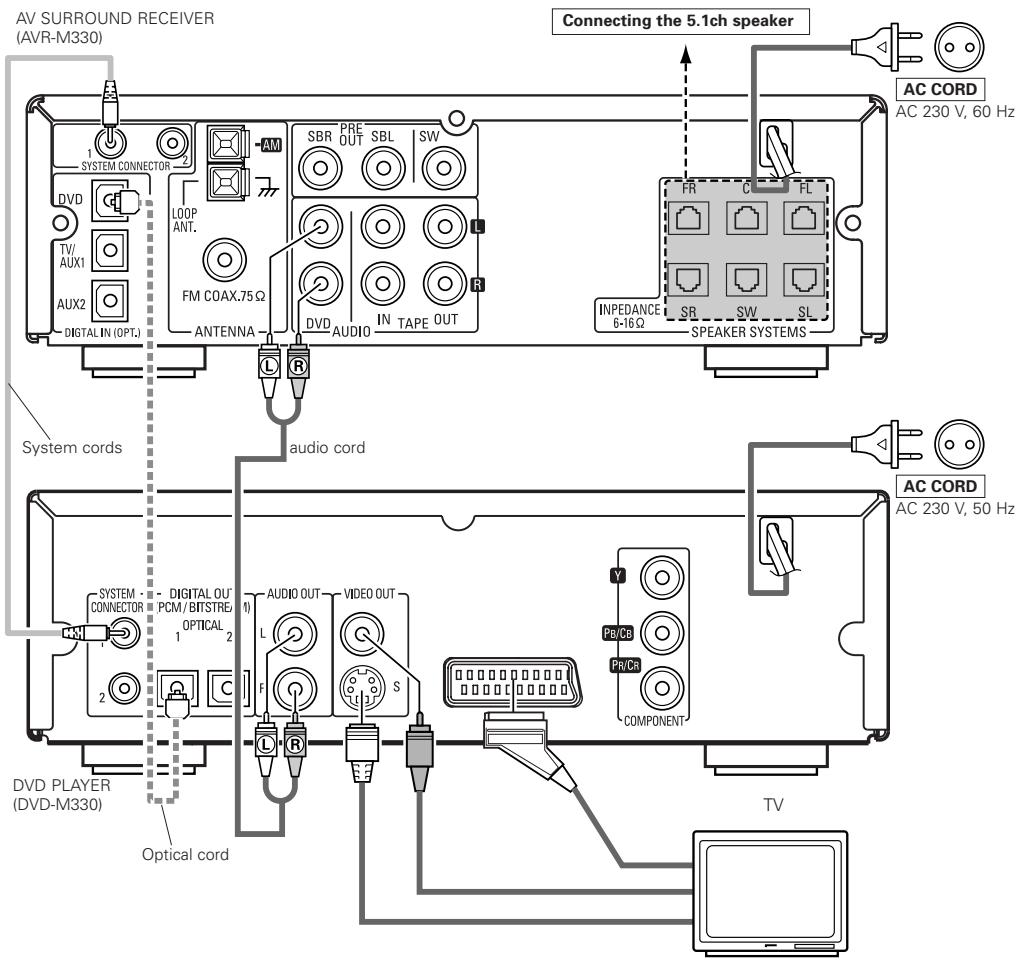
(7) Connecting the audio components (DVD-M330)
- The AVR-M330 can be used connected in a system with the DVD-M330 DVD player.
- For instructions on operating the DVD-M330 DVD player, refer to their respective operating instructions.
- Only the DVD-M330 DVD player can be connected directly to the AVR-M330 using system connections.
NOTES:
This system includes digital circuitry which may cause interference such as color blotching or changes in the color on TVs. If this happens, move the system and the TV as far apart as possible.
- Do not plug the power cord into the power outlet until all connections are completed. Be sure to interconnect the channels (L to L (white) and R to R (red)) properly, as shown on the diagram.
- Insert the plugs securely. Incomplete connections may result in noise.
- Be sure to connect the speaker cords between the speaker terminals and the speaker systems with the same polarities (+ to +, - to -). If the polarities are switched, the sound at the center will be weak, the position of the different instruments will be unclear, and the stereo effect will be lost.
After unplugging the power cord, wait about 5 seconds before plugging it back in.
Note that setting the connection cords (pin-plug cords) next to the power cords may result in humming or other noise.
CAUTION:
- Only one DVD player can be connected to the AVR-M330 using system connections. System operations cannot be performed properly if two DVD players are connected using system connections.
- Whenever the power operation switch is in the STANDBY position, the unit is still connected to AC line voltage.
- Please be sure to unplug the power cord when you leave home for, e.g., a vacation, etc.
System operations
Such system operations as the auto power on functions, as well as remote control operations cannot be performed unless all the RCA pin-plug cords and system connector cords are connected between the units, so be sure to make all the connections properly as shown in the diagram. Also, disconnecting system connectors while the system is operating may result in malfunctions. Be sure to unplug the power cord before changing connections.
Connecting the speaker systems
Connect the speaker system for the left channel (the left side as seen from the front) to the L terminals, the speaker system for the right channel to the R terminals. Refer to the instructions supplied with the speaker system for details. Be sure to use speaker systems with an impedance of 6 /ohms or greater.
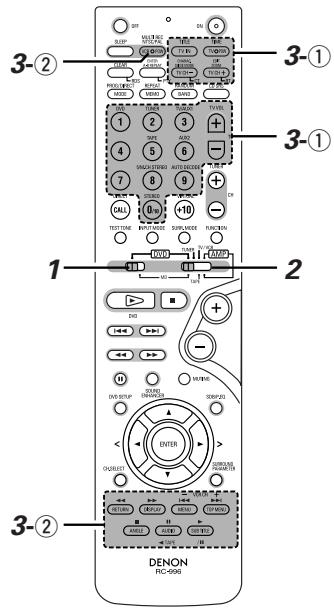
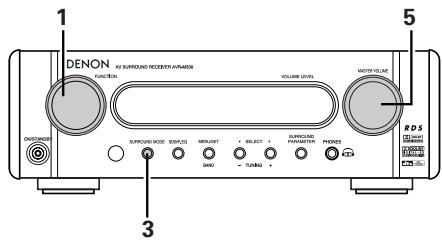
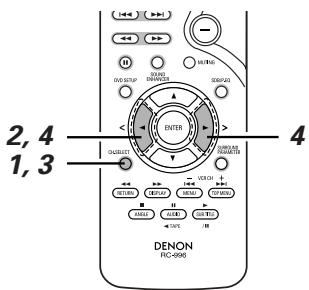
6 PART NAMES AND FUNCTIONS
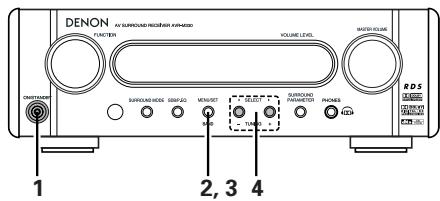
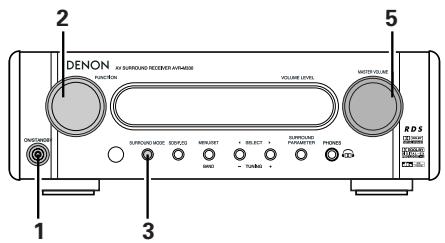
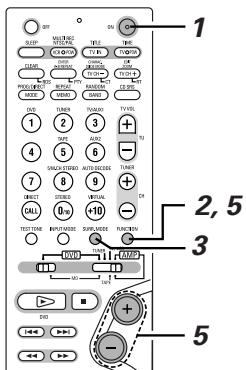
AV SURROUND RECEIVER (AVR-M330) Front Panel
- For details on the functions of these parts, refer to the pages given in parentheses ( ).
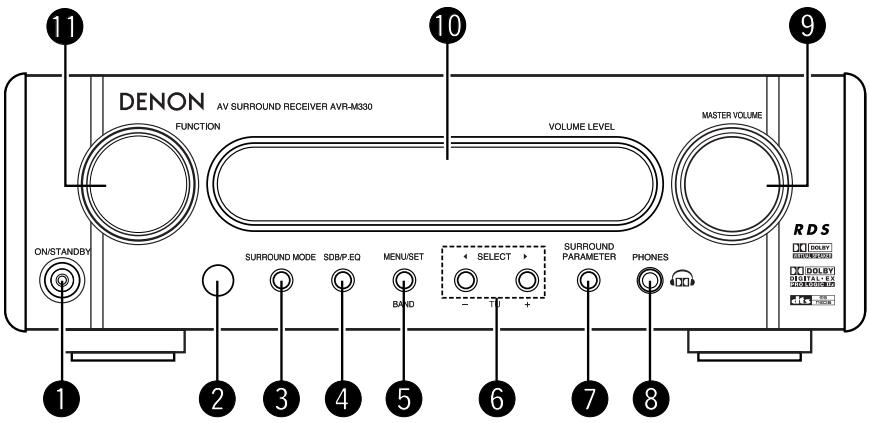
1 Power operation switch (ON/STANDBY). (29)
Remote control sensor. (19)
3 Surround mode button (SURROUND MODE) (30)
4 Super Dynamic Bass/Preset EQ button (SDB/P.EQ) (32)
5 Menu/set button (MENU/SET) (27, 31, 42)
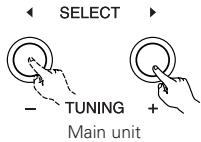
6 Select button (SELECT and ).(31, 37, 38, 42)
7 Surround parameter button (SURROUND PARAMETER).....(34)
8 Headphones jack (PHONES) (38)
9 Volume control (MASTER VOLUME) (29)
10 Display
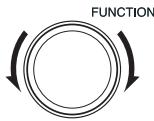
11 Function selector knob (FUNCTION) (30)
Remote control unit
- For details on the functions of these parts, refer to the pages given in parentheses ( ).
- Some of the buttons on the remote control unit have some functions.
The functions are switched using the remote control mode selector switches.
1 Transmission indicator
2 Sleep timer button (53)
3 NTSC/PAL button
4 Clear button
5 A-B repeat button
6 Program/direct
Repeat button
8 Input source/surround mode selector button
- System buttons. (18, 20, 21, 26)
9 Call button
10 Test tone button (33)
11 Input mode selector button. (30)
DVD play button
DVD stop button
DVD skip buttons
DVD search buttons
DVD pause button
Sound enhancer button. (32)
18 DVD Setup button
19 Channel select button (33, 39)
20 Return button
21 Display button
2 Angle button
23 Audio selector button
24 Remote control signal transmission window. (19)
25 Power button. (29)
26* System buttons. (18, 20, 21, 26)
Zoom button
23 Slide mode button
29 CD SRS button
30 Random button
31 Tuner tuning + / - buttons. (42)
32 Tuner preset + / - buttons. (43, 44)
33 Function selector button (29)
34 Surround mode selector button. (30)
35 Mode selector switches(1 and 2) (17, 18, 20, 21, 26)
36 Main volume control buttons (31)
37 Muting button. (32)
38 SDB/PEQ button (32)
39 Enter button
40 Cursor button
41 Surround parameter button (34~36, 38)
42 Top menu button
43 Menu button
44 Subtitle button
45* System buttons. (18, 20, 26)
- For details on the function and operation of the various parts, refer to the pages indicated in (parentheses).
- Buttons indicated are DVD control buttons and can be operated when the remote control mode selector switch is set to the DVD position.
- The functions of the system buttons (*) are switched using the remote control mode selector switch.
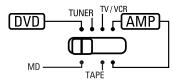
Names and functions of remote control unit buttons on the DHT-M330DV
- Buttons in sections ① ③ can be operated regardless of the position of mode switches 1 and 2.
- Consider AMP as standard positions, and switch as necessary to operate.
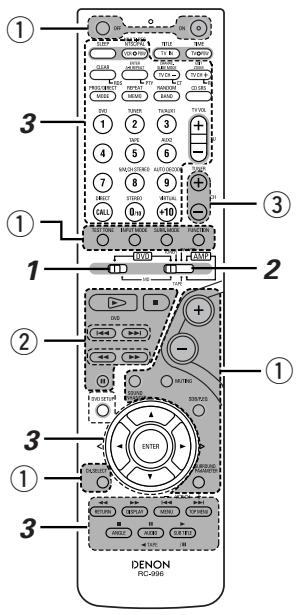
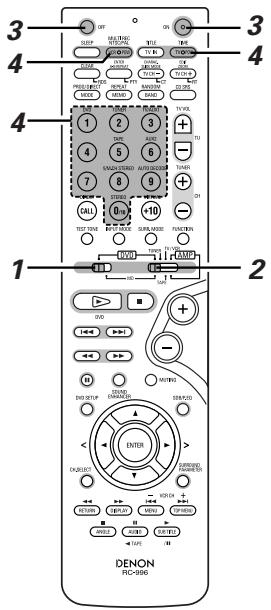
1 Set mode switch 1 to the "DVD" position.

2 Set mode switch 2 to the position of the function you want to operate (DVD, TUNER or AMP.).
① Surround amplifier control buttons
ON :Turns the AVR-M330's power on.
OFF :Turns the AVR-M330's power off.
FUNCTION : Function selection (in order)
SURROUND : Surround mode selection
INPUT MODE : Input mode selection
TEST TONE : Test tone on/off
+
:Ma
一
: Main volume down
MUTING : Muting on/off
SOUND ENHANCER: Sound enhancer selection
SDB/P.EQ : SDB/P.EQ selection and setting
SURROUND : Surround parameter selection and setting
PARAMETER
CH SELECT : Channel level/Delay time selection and setting
② DVD control buttons

: Play (auto power on and auto function selection)
:Stop
:Skip(cueing)
: Search (fast-reverse and fast-forward)
: Pause and frame-by-frame
③ Tuner control buttons
CH + / - : Preset channel up/down
(autom power on and auto function selection)

Operate the DHT-M330DV.
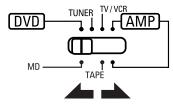
[1] Surround amplifier system buttons (Operated with mode switch 2 set to "AMP.")
- These operations are possible with mode switch 1 at any position.
![DENON DHT-M330DV - [1] Surround amplifier system buttons (Operated with mode switch 2 set to "AMP.") - 1](/content/2025/01/135506/images/1111ad15c47aeb1731adbe479b3ce6d70262f935acadaee3fc86788d71ce9430.jpg)
SLEEP : Sleep on/off
DVD : Function DVD
TUNER : Function TUNER
TV/AUX1 : Function TV/AUX1
TAPE : Function TAPE
AUX2 : Function AUX2
5CH STEREO : 5ch stereo mode set
AUTO DECODE: Auto decode mode set
VIRTUAL : Dolby VS surround mode set or 2.1/3.1/5.1ch mode switching when Dolby VS mode
STEREO : Stereo mode set
DIRECT :Directmode set
:Selectionleftandright
[2] DVD system buttons (Operated with mode switch 2 set to "DVD")
![DENON DHT-M330DV - [2] DVD system buttons (Operated with mode switch 2 set to "DVD") - 1](/content/2025/01/135506/images/32ce7a2e54c1534d97f9ebc23125c73bee1302286df0e66a57469f1d8260537b.jpg)
NTSC/PAL : NTSC/PAL selection
ZOOM : Zoom on/off
SLIDE MODE : JPEG image slide mode selection
A-B REPEAT : A-B repeat playback setting
CLEAR : Program clear
SEARCH MODE: Title and chapter search
selection
RANDOM : Random play on/off
REPEAT : Repeat play setting
PROG/DIRECT:Program/direct play
selection
CALL : Program call
0~9, +10 : Number buttons
DVD SETUP : DVD setup mode on/off
, , , :Cursorup,down,left,right
ENTER : Enter setting
TOP MENU : Top menu call
MENU : Menu call
DISPLAY : Display call/selection
SUBTITLE : Subtitle language selection
AUDIO : Audio language selection
ANGLE : Angle selection
[3] Tuner system buttons (Operated with mode switch 2 set to "TUNER")
![DENON DHT-M330DV - [3] Tuner system buttons (Operated with mode switch 2 set to "TUNER") - 1](/content/2025/01/135506/images/b631d8846380121aa5937fe303ab563a5dc7b0afa43b9c37c273e6e75035a195.jpg)
BAND : FM/AM band selection
MEMO : Preset memory
MODE : FM auto/mono mode selection
TUNER + / - : Tuning up/down
0 9, + 10 : Preset channel number buttons
RDS : Use this button to automatically tune to stations using the radio data system.
![DENON DHT-M330DV - [3] Tuner system buttons (Operated with mode switch 2 set to "TUNER") - 2](/content/2025/01/135506/images/15e4115512ec92f2f6c6b7e375b7c3ec26b5abc5e0b9ff783075a80569e65e5b.jpg)
PTY : Press this button after selecting"PTY" with the RDS button to select one of the 29 program types.
CT : Use this to display the time of the clock on the AVR-M330. Press this button when the time service of an RDS station is being properly received. "TIME" is displayed for 4 seconds. "NO TIME DATA" is displayed if the RDS station does not offer a time service and when the broadcast is not being received properly.
RT : Press this button when receiving RDS stations to select the frequency, PS (or Station name), PTY or RT display.
Note that this button will not function if the reception is poor.
The display mode changes as follows each time the button is pressed.
![DENON DHT-M330DV - [3] Tuner system buttons (Operated with mode switch 2 set to "TUNER") - 3](/content/2025/01/135506/images/f218f504339453dc63c4cabdceb4e8d9425dbf31828def0fba126e38e59b9649.jpg)
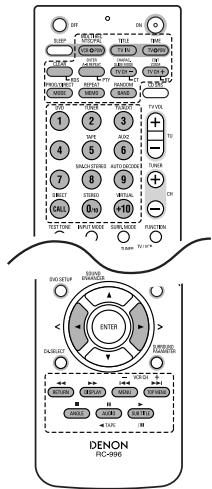
7 REMOTE CONTROL UNIT
- The included remote control unit (RC-996) can be used to operate not only this unit but other remote control compatible DENON components as well. In addition, the memory contains the control signals for other remote control units, so it can be used to operate non-DENON remote control compatible products.
(1) Inserting the batteries
① Remove the remote control unit's rear cover.
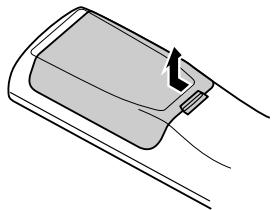
② Set three R6P/AA batteries in the battery compartment in the indicated direction.
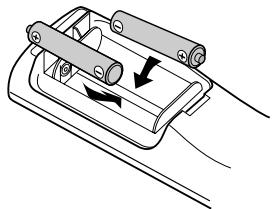
③ Put the rear cover back on.

Notes on Batteries
- Use R6P/AA batteries in the remote control unit.
- The batteries should be replaced with new ones approximately once a year, though this depends on the frequency of usage.
- Even if less than a year has passed, replace the batteries with new ones if the set does not operate even when the remote control unit is operated nearby the set. (The included battery is only for verifying operation. Replace it with a new battery as soon as possible.)
- When inserting the batteries, be sure to do so in the proper direction, following the “ ” and “ ” marks in the battery compartment.
-
To prevent damage or leakage of battery fluid:
-
Do not use a new battery together with an old one.
- Do not use two different types of batteries.
-
Do not short-circuit, disassemble, heat or dispose of batteries in flames.
-
Remove the batteries from the remote control unit when you do not plan to use it for an extended period of time.
- If the battery fluid should leak, carefully wipe the fluid off the inside of the battery compartment and insert new batteries.
- When replacing the batteries, have the new batteries ready and insert them as quickly as possible.
(2) Using the remote control unit
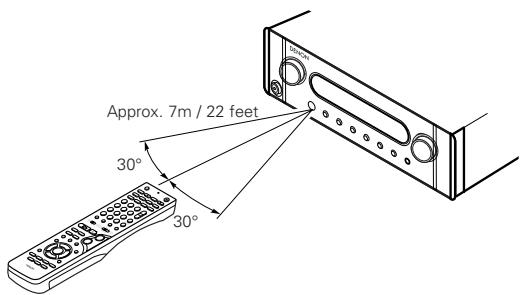
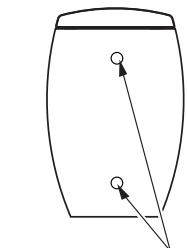
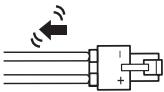
- Point the remote control unit at the remote sensor on the main unit as shown on the diagram.
- The remote control unit can be used from a straight distance of approximately 7 meters/22 feet from the main unit, but this distance will be shorter if there are obstacles in the way or if the remote control unit is not pointed directly at the remote sensor.
- The remote control unit can be operated at a horizontal angle of up to 30 degrees with respect to the remote sensor.
NOTES:
- It may be difficult to operate the remote control unit if the remote sensor is exposed to direct sunlight or strong artificial light.
- Do not press buttons on the main unit and remote control unit simultaneously. Doing so may result in malfunction.
-
Neon signs or other devices emitting pulse-type noise nearby may result in malfunction, so keep the set as far away from such devices as possible.
-
The included remote control unit (RC-996) can be used to operate not only the DHT-M330DV but also and to operate other remote control compatible DENON products. In addition, the remote control operation codes of other major brands of TVs and video decks are also stored in the remote control unit, so the unit can be used to operate these TVs and video decks as well.
(3) Operating DENON audio components
- Turn on the power of all the components before operating them.
- Depending on the model and year of make of your component, some of the keys may not work.
1 Set mode switch 1 to the "MD" position. (Blue print)

2 Set mode switch 2 to the position for the component to be operated (MD or TAPE). (Blue print)
3 Operate the audio component. For details, refer to the component's operating instructions. ※ Operation may not be possible for some models.
[1] MD recorder system buttons (operated with mode switch 2 set to "MD")
TIME :Disc time display
TITLE : Name display
MULTI REC : Recording
EDIT : Edit mode selection
CHARAC : Selection of characters when inputting names
ENTER : Entering of edited values
CD SRS : CD synchronized recording
CLEAR : Program clearing
RANDOM : Random play on/off
REPEAT : Repeat play setting
PROG/DIRECT:Program/direct playback selection
CALL : Program calling
1~10, +10 : Track number selection
Auto search (cueing)
: Manual search (fast-reverse and fast-forward)
(/II) :Play
:Pause
:Stop
[2] Tape deck system button (operated with mode switch 2 set to "TAPE")
REC : Recording
CD SRS : CD synchronized recording
: Rewind and fast-forward
Forward direction play
TAPE : Reverse direction play
:Stop
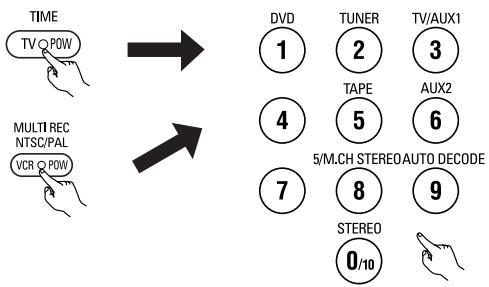
(4) TV and video deck preset memories
- Components of other brands can be operated with the included remote control unit by storing their codes in the preset memory. Note that depending on the model some operations may not be possible and some buttons may not operate properly.
Not set upon shipment from the factory.
1 Set mode switch 1 to the "DVD" position.
2 Set mode switch 2 to the "TV/VCR" position.
Press the power ON button and the OFF button simultaneously. The transmission LED (indicator) flashes.

Press the TV button to preset a TV, the VCR button to preset a video deck, then input the 3-digit number corresponding to the brand of the component whose signals are to be stored in the preset memory (refer to the tables of remote control codes on pages 22 to 25).
NOTES:
- When buttons are pressed while setting the preset memory, their signals are sent from the remote control transmitter, so cover the remote control sensor when setting the preset memory to prevent accidental operation.
- Depending on the model and year of make, some of the remote control codes for the brands included on the tables may not operate properly.
- For some brands there are multiple types of remote control codes. If an operation does not work, try changing to one of the other codes.
Combinations of preset codes for different brands
TV
| Admiral | 045, 121 |
| Adventura | 122 |
| Aiko | 054 |
| Akai | 016, 027, 046 |
| Alleron | 062 |
| A-Mark | 007 |
| Amtron | 061 |
| Anam | 006, 007, 036 |
| Anam National | 061, 147 |
| AOC | 003, 007, 033, 038, 039, 047, 048, 049, 133 |
| Archer | 007 |
| Audiovox | 007, 061 |
| Bauer | 155 |
| Belcor | 047 |
| Bell & Howell | 045, 118 |
| Bradford | 061 |
| Brockwood | 003, 047 |
| Candle | 003, 030, 031, 032, 038, 047, 049, 050, 122 |
| Capehart | 003 |
| Celebrity | 046 |
| Circuit City | 003 |
| Citizen | 029, 030, 031, 032, 034, 038, 047, 049, 050, 054, 061, 095, 122, 123 |
| Concerto | 031, 047, 049 |
| Colortyme | 003, 047, 049, 135 |
| Contec | 013, 051, 052, 061 |
| Cony | 051, 052, 061 |
| Craig | 004, 061 |
| Crown | 029 |
| Curtis Mathes | 029, 034, 038, 044, 047, 049, 053, 095, 118 |
| Daewoo | 027, 029, 039, 048, 049, 054, 055, 106, 107, 137 |
| Daytron | 003, 049 |
| Dimensia | 044 |
| Dixi | 007, 015, 027 |
| Electroband | 046 |
| Electrohome | 029, 056, 057, 058, 147 |
| Elta | 027 |
| Emerson | 029, 051, 059, 060, 061, 062, 118, 123, 124, 139, 148 |
| Envision | 038 |
| Etron | 027 |
| Fisher | 014, 021, 063, 064, 065, 118 |
| Formenti | 155 |
| Fortress | 012 |
| Fujitsu | 004, 062 |
| Funai | 004, 062 |
| Futuretech | 004 |
| GE | 020, 036, 037, 040, 044, 058, 066, 088, 119, 120, 125, 147 |
| Goldstar | 015, 029, 031, 039, 048, 051, 056, 057, 067, 068, 069, 116, 165 |
| Grundy | 062 |
| Hitachi | 029, 031, 051, 052, 070, 111, 112, 113, 124, 134 |
| Hitachi Pay TV | 151 |
| Infinity | 017, 071 |
| Janeil | 122 |
| JBL | 017, 071 |
| JC Penny | 020, 034, 039, 040, 041, 044, 048, 050,058, 066, 069, 076, 088, 090, 095, 125, 136, 159 |
| JCB | 046 |
| JVC | 019, 051, 052, 072, 073, 091, 117, 126 |
| Kawasho | 018, 046 |
| Kenwood | 038, 056, 057 |
| Kloss | 010, 032 |
| Kloss Novabeam | 005, 122, 127, 131 |
| KTV | 074, 123 |
| Loewe | 071 |
| Logik | 144 |
| Luxman | 031 |
| LXI | 008, 014, 017, 024, 040, 044, 063, 071, 075, 076, 077, 118, 125 |
| Magnavox | 005, 010, 017, 030, 033, 038, 050, 056, 071, 078, 079, 085, 089, 108, 109, 110, 127, 131, 132, 145 |
| Marantz | 015, 017, 071, 080 |
| Matsui | 027 |
| Memorex | 014, 027, 045, 083, 118, 144 |
| Metz | 160, 161, 162, 163, 164 |
| MGA | 001, 039, 048, 056, 057, 058, 065 081, 083 |
| Midland | 125 |
| Minutz | 066 |
| Mitsubishi | 001, 016, 039, 048, 056, 057, 058, 065, 081, 082, 083, 105 |
| Montgomery Ward | 011, 020, 144, 145, 146 |
| Motorola | 121, 147 |
| MTC | 031, 034, 039, 048, 095 |
| NAD | 008, 075, 076, 128 |
| National | 002, 036, 061, 147 |
TV
| National Quenties | 002 |
| NEC | 031, 038, 039, 048, 057, 084, 086, 135, 147 |
| Nikko | 054 |
| NTC | 054 |
| Optimus | 128 |
| Optonica | 011, 012, 093, 121 |
| Orion | 004, 139 |
| Panasonic | 002, 009, 017, 036, 037, 071, 141, 143, 147 |
| Philco | 005, 010, 030, 050, 051, 056, 079, 085, 127, 131, 132, 145, 147 |
| Philips | 005, 015, 017, 050, 051, 056, 078, 087, 088, 089, 131, 132, 147 |
| Pioneer | 124, 128, 142 |
| Portland | 054 |
| Price Club | 095 |
| Proscan | 040, 044, 125 |
| Proton | 035, 051, 092, 129 |
| Pulsar | 042 |
| Quasar | 036, 037, 074, 141 |
| Radio Shack | 011, 044, 063, 093, 118 |
| RCA | 040, 044, 125, 130, 137, 151, 152 |
| Realistic | 014, 063, 093, 118 |
| Saisho | 027 |
| Samsung | 003, 015, 034, 053, 055, 057, 094, 095, 136, 153 |
| Sansui | 139 |
| Sanyo | 013, 014, 021, 022, 063, 064, 081, 096 |
| SBR | 015 |
| Schneider | 015 |
| Scott | 062 |
| Sears | 008, 014, 021, 022, 023, 024, 025, 040, 052, 057, 062, 063, 064, 065, 073, 075, 076, 097, 098, 125, 159 |
| Sharp | 011, 012, 013, 026, 093, 099, 100, 104, 121 |
| Siemens | 013 |
| Signature | 045, 144 |
| Simpson | 050 |
| Sony | 043, 046, 138, 146, 150 |
| Sounddesign | 030, 050, 062 |
| Spectricon | 007, 033 |
| Squareview | 004 |
| Supre-Macy | 032, 122 |
| Supreme | 046 |
| Sylvania | 005, 010, 017, 030, 078, 079, 085, 089, 101, 127, 131, 132, 145, 155 |
| Symphonic | 004, 148 |
| Tandy | 012, 121 |
| Tatung | 036, 124 |
| Technics | 037 |
| Teknika | 001, 030, 032, 034, 052, 054, 078, 083, 095, 144, 156, 157 |
| Tera | 035, 129 |
| Toshiba | 008, 014, 034, 063, 075, 076, 095, 097, 136, 158, 159 |
| Universal | 020, 066, 088 |
| Victor | 019, 073, 126 |
| Video Concepts | 016 |
| Viking | 032, 122 |
| Wards | 005, 045, 066, 078, 085, 088, 089, 093, 102, 103, 131, 132, 148 |
| Zenith | 042, 114, 115, 140, 144, 149 |
| Zonda | 007 |
VCR
| Admiral | 081 |
| Aiko | 095 |
| Aiwa | 009 |
| Akai | 026, 027, 070, 072, 082, 083, 084 |
| Alba | 055 |
| Amstrad | 009 |
| ASA | 042 |
| Asha | 087 |
| Audio Dynamic | 005, 085 |
| Audiovox | 088 |
| Beaumark | 087 |
| Broksonic | 086, 093 |
| Calix | 088 |
| Candle | 006, 087, 088, 089, 090 |
| Canon | 049, 057 |
| Capehart | 025, 055, 056, 071 |
| Carver | 015 |
| CCE | 095 |
| Citizen | 006, 007, 087, 088, 089, 090, 095 |
| Craig | 007, 087, 088, 091, 115 |
| Curtis Mathes | 006, 049, 073, 080, 087, 090, 092 |
| Cybernex | 087 |
| Daewoo | 025, 055, 059, 074, 089, 093, 095, 096 |
| Daytron | 025, 055 |
| DBX | 005, 085 |
| Dumont | 053 |
| Dynatech | 009 |
| Electrohome | 001, 088, 097 |
| Electrophonic | 088 |
| Emerson | 001, 009, 017, 027, 086, 088, 089, 092, 093, 097, 100, 101, 102, 103, 104, 117 |
| Fisher | 009, 028, 031, 053, 054, 091, 098, 099, 115 |
| GE | 007, 011, 049, 050, 051, 052, 073, 080, 087 |
| Go Video | 047, 048 |
| Goldstar | 006, 012, 062, 088, 129 |
| Gradient | 094 |
| Grundig | 042 |
| Harley Davidson | 094 |
| Harman Kardon | 040, 062 |
| Hi-Q | 091 |
| Hitachi | 009, 013, 023, 026, 058, 108, 109, 110, 111 |
| JC Penny | 004, 005, 007, 023, 028, 049, 062, 085, 087, 088 |
| Jensen | 013, 026 |
| JVC | 004, 005, 006, 026, 029, 043, 044, 045, 046, 085 |
| Kenwood | 004, 005, 006, 026, 029, 033, 045, 085, 090 |
| Kodak | 088 |
| Lloyd | 009, 094 |
| LXI | 088 |
| Magnavox | 015, 016, 042, 049, 063, 106 |
| Magnin | 087 |
| Marantz | 004, 005, 006, 015, 042, 049, 085, 090 |
| Marta | 088 |
| MEI | 049 |
| Memorex | 009, 033, 049, 053, 060, 081, 087, 088, 091, 094, 115 |
| Metz | 123, 124, 125, 126, 127, 128 |
| MGA | 001, 017, 027, 041, 097 |
| MGN Technology | 087 |
| Midland | 011 |
| Minolta | 013, 023 |
| Mitsubishi | 001, 003, 008, 013, 014, 017, 027, 029, 039, 040, 041, 045, 097 |
| Motorola | 081 |
| Montgomery Ward | 001, 002, 007, 009, 049, 063, 081, 115, 117 |
| MTC | 009, 087, 094 |
| Multitech | 007, 009, 011, 087, 090, 094 |
| NAD | 038 |
| NEC | 004, 005, 006, 018, 026, 029, 045, 061, 062, 085 |
| Nikko | 088 |
| Noblex | 087 |
| Optimus | 081, 088 |
| Optonica | 021 |
| Panasonic | 024, 049, 064, 066, 067, 068, 069, 107 |
| Perdio | 009 |
| Pentax | 006, 013, 023, 058, 090 |
| Philco | 015, 016, 049 |
| Philips | 015, 021, 042, 049, 105 |
| Pilot | 088 |
| Pioneer | 005, 013, 029, 036, 037, 038, 045, 085 |
| Portland | 025, 055, 090 |
| Proscan | 063, 080 |
| Pulsar | 060 |
| Quartz | 033 |
| Quasar | 034, 035, 049 |
| Radio Shack | 001, 002, 021, 081, 087, 088, 091, 094, 097, 098, 115 |
| Radix | 088 |
VCR
| Randex | 088 |
| RCA | 007, 013, 019, 023, 058, 063, 064, 065, 073, 080, 082, 087 |
| Realistic | 009, 021, 031, 033, 049, 053, 081, 087, 088, 091, 094, 097, 098 |
| Ricoh | 055 |
| Salora | 033, 041 |
| Samsung | 007, 011, 051, 059, 070, 083, 087, 089, 113 |
| Sanky | 081 |
| Sansui | 005, 026, 029, 045, 061, 085, 114 |
| Sanyo | 032, 033, 053, 087, 091, 115, 116 |
| SBR | 042 |
| Scott | 017, 020, 086, 089, 093, 117 |
| Sears | 013, 023, 028, 031, 033, 053, 054, 088, 091, 098, 099, 115 |
| Sentra | 055 |
| Sharp | 001, 002, 021, 097 |
| Shogun | 087 |
| Sony | 075, 076, 077, 078, 079, 121, 122 |
| STS | 023 |
| Sylvania | 009, 015, 016, 017, 041, 049, 094 |
| Symphonic | 009, 094 |
| Tandy | 009 |
| Tashiko | 009, 088 |
| Tatung | 004, 026, 030 |
| Teac | 004, 009, 026, 094 |
| Technics | 024, 049 |
| Teknika | 009, 010, 022, 049, 088, 094 |
| TMK | 087, 092 |
| Toshiba | 013, 017, 020, 041, 059, 089, 098, 099, 117 |
| Totevision | 007, 087, 088 |
| Unirech | 087 |
| Vector Research | 005, 062, 085, 089, 090 |
| Victor | 005, 045, 046, 085 |
| Video Concepts | 005, 027, 085, 089, 090 |
| Videosonic | 007, 087 |
| Wards | 013, 021, 023, 087, 088, 089, 091, 094, 097, 118, 119, 120 |
| XR-1000 | 094 |
| Yamaha | 004, 005, 006, 026, 062, 085 |
| Zenith | 060, 078, 079 |
(5) Operating the TV/video deck after storing its remote control signals in the preset memory
3 Monitor TV (TV) and video deck (VCR) system buttons
① TV system buttons
TV POW : Power on/off
0~9 : Channel numbers
TV IN : TV input switching
TV VOL +, - : Volume up/down
TV CH +, - : Channel switching
② Video deck system buttons
VCR POW : Power on/off
VCR CH +, - : Channel switching , : Manual search (fast-forward and fast-backward)
▶ : Play
■ : Pause
■ : Stop
1 Set mode switch 1 to the "DVD" position.
2 Set mode switch 2 to the "TV/VCR" position.
3 Operate the video component. For details, refer to the component's operating instructions. ※ It may not be possible to operate some models.
NOTE:
- The TV's "TV (POWER)" and "TV IN" buttons can be operated as long as mode switch 1 is set to the "DVD" position, regardless of the position of mode switch 2.
8 SETTING UP THE SYSTEM
(1) Quick setup procedure
- Generally used system settings have already been made on the DHT-M330DV upon shipment from the factory, so the DHT-M330DV can be used as such if there is no need to make changes to the system.
- In the cases described below, use the Quick Setup function to make the system settings before using the DHT-M330DV.
① When expanding the system configuration to a 6.1- or 7.1-channel system (see page 13, 47, 48)
② When installing the speakers in a large room (select at “ROOM SETUP” below)
③ When setting the TAPE function to the TV/AUX1 function and connecting both the digital and analog inputs (set "FUNC. SETUP" below to "TV/AUX1").
Quick system settings
:Factory default
| Setup | Settings <> Display | |||
| Speaker configuration SPEAKER SETUP | Select the speaker configuration you plan to use. | <5.1CH> | <6.1CH> | <7.1CH> |
| 2 front channels Center channel 2 surround channels Subwoofer channel | 2 front channels Center channel 2 surround channels Surround back channel Subwoofer channel | 2 front channels Center channel 2 surround channels 2 surround back channels Subwoofer channel | ||
| Room settings ROOM SETUP | Select the speaker installation space. | S (3.6X4.5) | M (4.5X5.4) | L (6.0X6.0) |
| Equivalent to 3.6 x 4.5 meters | Equivalent to 4.5 x 5.4 meters | Equivalent to 6.0 x 6.0 meters | ||
| Function settings FUNC. SETUP | Select the TAPE or MD function (analog input/output connectors only) or the TV/AUX1 function (analog input/output connectors and digital input connectors). | <TAPE> | <MD> | <TV/AUX1> |
| Use as analog input/output connector TAPE function. | Use as analog input/output connector MD function. | Use analog input/output connectors (TAPE) and digital input connector (TV/AUX1) as the TV/AUX1 function. | ||
Quick Setup procedure
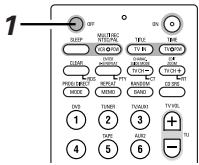
1 Turn off the power.
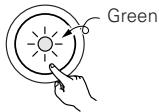
- The standby mode is set and the power indicator turns red.

ON/STANDBY
Red

OFF
Main unit
Remote control unit
Press the MENU/SET button for at least 2 seconds.
- The display lights and "QUICK SETUP" is displayed.

MENU/SET
Main unit
3 The items you want to set are displayed each time the MENU/SET button is pressed (for less than 1 second).
- The item changes each time the button is pressed, as follows:

MENURESET
Main unit
SPEAKER SETUP ROOM SETUP FUNC. SETUP (END)
After one second, the currently set value is displayed.
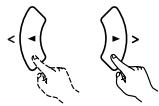
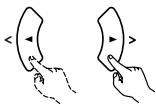
Use the select and buttons to select the item you want to set.
- If you do not want to change the value, press the MENU/SET button to continue.
After going once through pressing the MENU/SET button, the DHT-M330DV is set back to the standby mode.
(2) Speaker system layout
Basic system layout
- The following is an example of the basic layout for a system consisting of eight speaker systems and a television monitor:
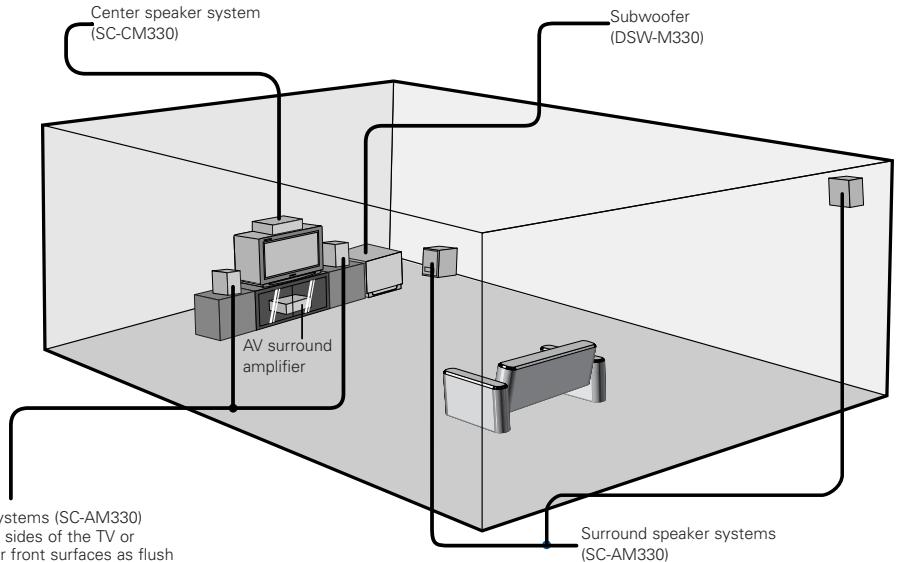
Front speaker systems (SC-AM330) Set these at the sides of the TV or screen with their front surfaces as flush with the front of the screen as possible.
Achieving the optimum surround sound
- Surround sound can be achieved using the settings made upon shipment from the factory (the default settings), but to achieve even more optimum surround sound, we recommend using the test tones to adjust the levels of the different channels, set the speaker distances (delay time), etc.
For details, make the settings referring to page 39.
(1) Playing DVDs in the surround mode
Refer to pages 14 and check that all the connections are correct.
- Operate the remote control unit at the "AMP" position.
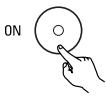
Turn on the power.
The display lights.
- The mute mode is set for several seconds after the power is turned on to prevent noise from being produced.
ON/STANDBY
Main unit
Remote control unit
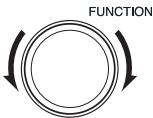
2 Select the DVD input source.
Main unit

FUNCTION
Remote control unit
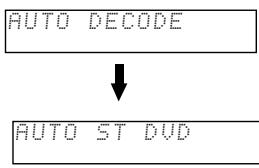
3 Set the surround mode to "AUTO DECODE". The display becomes as shown below.

SURROUND MODE
Main unit

SURR. MODE
Remote control unit
※ If no signal is being input
Play the DVD. The display changes as shown below, depending on the type of disc.
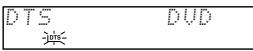
Example: When playing a pre-recorded ( DOLBY DIGITAL ) disc.

- Playback in the Dolby Digital Surround mode.
Example: When playing a pre-recorded ( discs ) disc
- Playback in the DTS Surround mode.
Example: When playing a pre-recorded ( ) disc
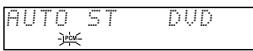
- Auto stereo - stereo playback.
Adjust the volume.
- When the input mode is set to "AUTO" and the surround mode is set to "AUTO DECODE", depending on the signals of the disc being played, Dolby Digital, DTS or PCM is selected and the signals are automatically decoded and played in the Dolby Digital, DTS or auto stereo mode.
- For details on the surround modes and the surround parameters, see " SURROUND PLAYBACK " (pages 33 to 39).

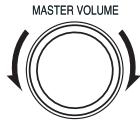
MASTER VOLUME
Main unit
Remote control unit

- The volume is indicated on the main volume level display.
(2) Input mode setting
Press the FUNCTION button to select the input function to be played.
Main unit

Remote control unit
- The function switches as shown below.
- The function only changes in the “ ” direction when operated from the remote control unit.
Factory default (TAPE) = TAPE

2 When DVD, TV/AUX1, AUX2 was selected as the input function, press the remote control unit's INPUT MODE button to select the input mode.
- Consider "AUTO" as standard position.

INPUT MODE
Remote control unit

- "ANALOG" cannot be selected when TV/AUX1 or AUX2 was selected as the input function.
- "ANALOG" can be selected when "TAPE" is set to "TV/AUX1" at "FUNCTION SETUP" under "QUICK SETUP" in the detailed settings.
Input mode selection function
- The input mode can be selected when the input function is set to DVD, TV/AUX1, AUX2.
- Different input modes can be selected for each input function. The selected input mode is stored in the memory for the individual input functions.
- When the input function is set to something other than the above, "ANALOG ONLY" is displayed and the input mode cannot be selected.
① AUTO (auto mode)
In this mode, the type of signal being input to the digital and analog input terminals is detected and the program in the set's surround decoder is switched automatically to play the signals for the selected input function.
The presence or absence of digital signals is detected, the signals input to the digital input are identified and decoding and playback are performed automatically in DTS, Dolby Digital or PCM (2 channel stereo) format.
If no digital signal DVD is being input, the analog input jacks are selected. Use this mode to play Dolby Digital signals.
② PCM (exclusive PCM signal playback mode)
Decoding and playback are only performed when PCM signals are being input.
③ DTS (exclusive DTS signal playback mode)
Decoding and playback are only performed when DTS signals are being input.
(4) ANALOG (exclusive analog audio signal playback mode) The signals input to the analog input jacks are played. (This cannot be selected in the TV/AUX1, AUX2 mode.)
The input mode automatically switches to "AUTO" if you switch the input function to DVD from anything other than DVD.
Press the SURROUND button to select the surround mode.

SURROUND MODE
Main unit

SURR. MODE
Remote control unit
- The function switches as shown below.
AUTO DECODE 5CH STERO HALL DOLBY VS
STEREO DIRECT AUTO DECODE ---
Start playback on the selected component.
- For operating instructions, refer to the component's manual.
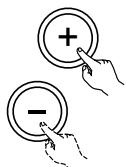
Either turn the MASTER VOLUME dial on the main unit or use the VOLUME buttons on the remote control unit to adjust the volume.


MASTER VOLUME
Main unit
Remote control unit
- The volume can be adjusted within the range 0 to 60. Note that depending on the input signal, surround mode, speaker settings and channel level setting, it may not be possible to adjust the volume up to 60.
To check the currently playing program source, etc.
Press the MENU/SET button. Display "STATUS" then press the select and control.

MENUSET
Main unit

SELECT
Main unit
The current program source and surround settings are shown on the display each time the button is pressed or turned.
Input mode display
In the AUTO mode
Lit AUTO DIG ANA DTS PCM AAC DIGITAL
In the DIGITAL PCM mode
de Cone of these lights, depending on the input signal.
AUTODIGANALDTSPCMLACDDIGITAL
- In the DIGITAL DTS mode
AUTODIGANA DTSPCM LAC DIGITAL
In the ANALOG mode
AUTO DIG ANA DTS PCM AAC DIGITAL
Input signal display
DOLBY DIGITAL
AUTO DIG ANA DTS PCM AAC DIGITAL
DTS
AUTO DIG ANALDTS|PCM|AAC|DD DIGITAL
PCM
AUTO DIG ANA LDSLPCM LAAC DDIGITAL
- "DIG" lights when digital signals are input properly. If "DIG" is flashing, check whether the connections are proper and whether the input component's power is on.
Input mode when playing CD sources
- When playing CDs containing recordings of live concerts, etc., in the "AUTO" mode, the sound may be slightly broken at the beginning. If this happens, switch to the "PCM" mode.
Input mode when playing DTS sources
- If DTS-compatible CDs are played in the "PCM" mode, noise is output because DTS playback is not possible. To play a DTS-compatible source, be sure to set the input mode to "AUTO" or "DTS".
- Noise may be generated at the beginning of playback and while searching during DTS playback in the AUTO mode. If so, play in the DTS mode.
(3) After starting playback
[1] Adjusting the sound quality (SDB/P.EQ)
The SDB/P.EQ function will not work in the direct mode.
![DENON DHT-M330DV - [1] Adjusting the sound quality (SDB/P.EQ) - 1](/content/2025/01/135506/images/6afbb549b9e35aa4f84d846011bea53ef2a6169c766736c54eb1ff1ee5d2ccb5.jpg)
![DENON DHT-M330DV - [1] Adjusting the sound quality (SDB/P.EQ) - 2](/content/2025/01/135506/images/43a4cc4f459845df8bf1dfd865ba720acdb1e0e9f27b96a599b7fa01d8b9d966.jpg)
Press the SDB/P.EQ button.
- The tone switches as follows each time the SDB/P.EQ button is pressed.

SDB/P.EQ
Main unit

SDB/P.EQ
Remote control unit

DEFEAT
The signals do not pass through the SDB, DRC and P.EQ1~3 adjustment circuits, providing higher quality sound.
SDB ON
- SDB (Super Dynamic Bass) is turned on.
DRC ON
- DRC (Dynamic Range Compression) is turned on.
- This parameter adjusts the dynamic range of the Dolby Digital or DTS sound. When listening with the volume turned relatively low, at night for example, set this to the "ON" to lower the peak of the sound and amplify the quieter sounds, narrowing the dynamic range and making the sound easier to listen to.
- With DTS source, only displayed for sources compatible with dynamic range compression.
P.EQ1\~3
- Preset Equalizer is turned on
- Three types of bass/treble balances and surround channel delay settings are preset. Select them as desired.
※ If no operation is performed within 4 seconds, the display switches back to what was previously displayed.
[2] Adjustment the Sound Enhancer
The SOUND ENHANCER function will not work in the direct mode.
![DENON DHT-M330DV - [2] Adjustment the Sound Enhancer - 1](/content/2025/01/135506/images/544353b5a18460e68c2aadb237844c6facc70260c419137d6940723fbeddc2e5.jpg)
![DENON DHT-M330DV - [2] Adjustment the Sound Enhancer - 2](/content/2025/01/135506/images/4630a683393370fa26aff84a9c38a3ffea1ea21bbffd229da766bf3cf47d2bcb.jpg)
Remote control unit
Press the SOUND ENHANCER button.
- The tone switches as follows each time the SOUND ENHANCER button is pressed.

ENHANCER OFF
- The SOUND ENHANCER setting is turned off.
VOCAL ENH
The VOCAL ENHANCER is turned on.
- The center channel is emphasized and DRC is turned on.
- When listening quietly at night, the vocals are easier to hear.
SURR. ENH
- The SURROUND ENHANCER is turned on.
- The surround channel is emphasized for a stronger sense of presence.
When SURROUND ENHANCED is turned on, SDB/P.EQ is defeated. When SDB/P.EQ is turned on, SURROUND ENHANCED is set to "ENHANCED OFF".
[3] Turning the sound off temporarily (MUTING)
![DENON DHT-M330DV - [3] Turning the sound off temporarily (MUTING) - 1](/content/2025/01/135506/images/31b28940b1c19b75387d2699e3a992bea77f72ad96115a7cd41c1e07addb3f83.jpg)
Use this to turn off the audio output temporarily. Press the MUTING button.
Cancelling MUTING mode.
Press the MUTING button again.

Remote control unit
NOTES:
- The mute mode is cancelled when the main unit's main volume control or one of the main volume control buttons on the remote control unit is operated.
- The setting is cancelled if the set's power is turned off.

SURROUND PLAYBACK
(1) Before playing with the surround function
- Adjustments using the test tones can only be performed in the "Auto" mode and are only valid for the AUTO DECODE Surround modes. The adjusted levels are automatically stored in the memory.
1
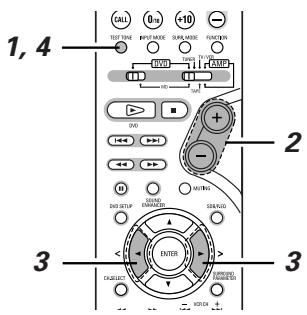
Press the TEST TONE button.

TEST TONE
Remote control unit
2
Test tones are output from the different speakers. Either turn the MASTER VOLUME dial on the main unit or use the VOLUME buttons on the remote control unit to adjust the volume.
Main unit
Remote control unit
3
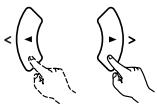
Use the channel volume adjust buttons to adjust so that the volume of the test tones is the same for all the speakers.
- The (< and >) cursor buttons on the remote control unit during the adjustments using the test tones.
Remote control unit
4
After adjusting using the test tones, adjust the channel levels either according to the playback sources or to suit your tastes, as described below.

TEST TONE
Remote control unit
- Even after adjusting using the test tones, the various channels can be adjusted using the procedure described below to suit the program source and your preferences.
1
Press the CH_SELECT button on the remote control unit.
The following is displayed:


CH.SELECT
Remote control unit
2
Use the select < button while the above is displayed to select "LEVEL".
The level display shown below appears.


Remote control unit
3
Select the speaker whose level you want to adjust.
- The channel switches as shown below each time the button is pressed.


CH SELECT
Remote control unit
4
Adjust the volume level of the selected speaker while the channel level is displayed.
Remote control unit
※ Once the channel level setting is completed, select "END" at step
- The display returns to normal after several seconds.
(2) Playing in the AUTO DECODE mode
- In the auto decode mode it is possible to play in the Dolby Digital or DTS Surround mode, depending on the format of the input signal.
- It is also possible to play in the Auto Stereo, Dolby Pro-Logic II Cinema/Music/Game or DTS NEO:6 Cinema/Music mode, according to the 2-channel mode setting.
[1] Dolby Digital and DTS surround playback (digital inputs only)
Applicable sources
- Digital inputs (DVD, TV/AUX1 and AUX2 functions)
Dolby Digital multi-channel sources
DTS sources
![DENON DHT-M330DV - [1] Dolby Digital and DTS surround playback (digital inputs only) - 1](/content/2025/01/135506/images/2d92b7be049b1fb36c1ab0e5426fcb3cf104419a455431e5e2194f0f930b0407.jpg)
- Operate the remote control unit at the "AMP" position.
Set the remote control selector switches Switch1 to DVD Switch2 to AMP
![DENON DHT-M330DV - [1] Dolby Digital and DTS surround playback (digital inputs only) - 2](/content/2025/01/135506/images/cdd2f7d599ac821495f7273fca40bcd1cbfc08a40a59827ae4c209424405a457.jpg)
![DENON DHT-M330DV - [1] Dolby Digital and DTS surround playback (digital inputs only) - 3](/content/2025/01/135506/images/72b0779d1078fa227feebca76e923ce69a5ed1bf799770d330a9e473213bcd9c.jpg)
1 Select the digital input function. (DVD or TV/AUX1 or AUX2 digital input)
![DENON DHT-M330DV - [1] Dolby Digital and DTS surround playback (digital inputs only) - 4](/content/2025/01/135506/images/be5966c5081e80c0ca8142cc390d5febc87df42206f15f04745a033589034e3c.jpg)
Main unit
![DENON DHT-M330DV - [1] Dolby Digital and DTS surround playback (digital inputs only) - 5](/content/2025/01/135506/images/1a15d5bf7e65e1793970e1c24bee9268ead83bdebd465289ad55bce67e7a33ea.jpg)
Remote control unit
2 Set the input mode to "AUTO". DTS sources can also be played in the input mode "DTS".
![DENON DHT-M330DV - [1] Dolby Digital and DTS surround playback (digital inputs only) - 6](/content/2025/01/135506/images/e5137066e4e70a30f9bdb5d9182c9e304019a467b7ad25f37f6cfe7f89137cc3.jpg)
Remote control unit
3 Set the surround mode to "AUTO DECODE".

SURROUND MODE
Main unit

SURR. MODE

AUTO DECODE
Remote control unit
※If the mode is set to anything other than AUTO DECODE, the AUTO DECODE mode can be set using the AUTO DECODE button on the remote control unit.
4 Play a program source containing the DO DOLLEY or dits mark
- The Dolby Digital indicator lights when playing a Dolby Digital source.
- The DTS indicator lights when playing a DTS source.
※ The mode is selected automatically according to the format of the source being played.
Display the surround parameters for the source.
- Nothing is displayed if there are no parameters that can be adjusted.

SURROUND PARAMETER
Remote control unit
C Select the various surround parameters and set them.
- The display returns to normal if no operation is performed for 4 seconds while the parameters are displayed.
Remote control unit
- Stop operating buttons once the surround parameter settings have been completed. After several seconds the normal display reappears and the settings are automatically set.
NOTES:
- Signals encoded in Dolby Digital can only be played in the Auto decode (Dolby Digital, Dolby Pro Logic II or Auto stereo), Direct, stereo or virtual modes. Other modes do not work when playing Dolby Digital signals.
- DTS signals can only be played in the Auto decode (DTS), Direct, stereo or virtual modes. Other modes do not work when playing DTS signals.
[2]2-channel mode settings
-
In the AUTO DECODE mode, it is possible to automatically conduct multi-channel playback in the Dolby Digital or DTS surround mode or play in the stereo 2-channel mode (AUTO STEREO mode: factory default setting). For 2-channel input signals, one of four play modes can be set with the 2-channel mode setting (Auto Stereo, Dolby Pro Logic II Cinema, Dolby Pro Logic II Music and Dolby Pro Logic II Game). For analog and PCM sources, it is also possible to select DTS NEO:6 Cinema and DTS NEO:6 Music.
-
When the function is set to TAPE or TUNER, the "Auto Stereo" 2-channel mode cannot be selected. To play in stereo, set the surround mode to "STEREO" (page 29).
![DENON DHT-M330DV - [2]2-channel mode settings - 1](/content/2025/01/135506/images/9b346e17460bbefb84bccdc51605f4479d3ba40feb3048d779619f09dad8edf0.jpg)
- Operate the remote control unit at the "AMP" position.
Set the remote control selector switches
Switch1 to DVD
Switch2 to AMP
![DENON DHT-M330DV - [2]2-channel mode settings - 2](/content/2025/01/135506/images/c82a4a8172dd7560ff514618062ae170534dda349ae17c07f2ea3cf4c854214c.jpg)
![DENON DHT-M330DV - [2]2-channel mode settings - 3](/content/2025/01/135506/images/4f9d2af500528bd395d871429554c5656db2faa10565c4fab4e4ee949b50e9a7.jpg)
1 Set the surround mode to "AUTO DECODE".
"AUTO DECODE" is displayed, then the normal display reappears.
![DENON DHT-M330DV - [2]2-channel mode settings - 4](/content/2025/01/135506/images/2dc1c7fc37aab48d15b454abdef2d1de26dcfe36c92ae040914f0568709eb145.jpg)
SURROUND MODE
Main unit
![DENON DHT-M330DV - [2]2-channel mode settings - 5](/content/2025/01/135506/images/cfd65bb6482389f0bcc1d3f24fa376c49784490ed950280790a8b57f0a833234.jpg)
SURR MODE
![DENON DHT-M330DV - [2]2-channel mode settings - 6](/content/2025/01/135506/images/3475f5768cf04ce70a9f50553757fedd1b4c4270f1efe67a98791cdaf4b5b58d.jpg)
AUTO DECODE
Remote control unit
- If the mode is set to anything other than AUTO DECODE, the AUTO DECODE mode can be set using the AUTO DECODE button on the remote control unit.
2 Press the SURROUND PARAMETER button on the remote control unit and select the 2-channel decode mode.
![DENON DHT-M330DV - [2]2-channel mode settings - 7](/content/2025/01/135506/images/06ab8aa7b9c6d682a76156db79d6df3edeb10ccde199a80e73b50d6540556c44.jpg)
![DENON DHT-M330DV - [2]2-channel mode settings - 8](/content/2025/01/135506/images/7df91fd11e67d77b2bb4fa043559c73903797be49ba49e2beaf62363f27a06a9.jpg)
SURROUND PARAMETER
Main unit
![DENON DHT-M330DV - [2]2-channel mode settings - 9](/content/2025/01/135506/images/98ef138763a40a4ba66a5308e9d3cd1e96b0efadfc85be164e51579183020d45.jpg)
SURROUND PARAMETER
Remote control unit
- This can be selected when the digital input consists of no signal, PCM signals, Dolby Digital 2-channel signals, as well as when the analog input is selected.
3 Select the desired 2-channel decode mode using the (< and >) SELECT buttons.
- The mode switches as follows each time one of the buttons is pressed:
![DENON DHT-M330DV - [2]2-channel mode settings - 10](/content/2025/01/135506/images/73b9b5c346d818fc9e6330a228f1ea32bed999ef6d4e8d89816b9ecbfae02f65.jpg)
SELECT
Main unit
![DENON DHT-M330DV - [2]2-channel mode settings - 11](/content/2025/01/135506/images/e6a54fe2485531c6b0398ffa941c91e7f729e86a2d33b49552e1e6d7e5c14c14.jpg)
![DENON DHT-M330DV - [2]2-channel mode settings - 12](/content/2025/01/135506/images/1f2fa769766265d0b5f238e3870340d040bb89ad60c2e73c66ed5f9c579b4f4a.jpg)
Remote control unit
![DENON DHT-M330DV - [2]2-channel mode settings - 13](/content/2025/01/135506/images/200c5096bfb27044bae4f92edfc4843dfd8ad842988051a8aea0ea717de57cbb.jpg)
-
DTS NEO:6C and DTS NEO:6M can be selected for analog and PCM sources.
The Auto Stereo mode can be selected when the function is set to DVD, TV/AUX1 or AUX2. -
Once the surround parameters have been set, stop operating buttons. After several seconds the display returns to normal and the settings are automatically validated.
NOTES:
- The 2-channel decode mode cannot be set when Dolby Digital 5.1-channel signals or DTS signals are being input.
Surround parameters (1) (2-channel mode)
AUTO-ST (auto stereo) mode
2-channel sources are played in 2-channel stereo.
When this mode is selected in the auto decode mode, multi-channel sources (DVD, BS digital, etc.) are played in the multi-channel mode, while 2-channel sources (CDs, etc.) are automatically played in stereo.
PLII CINEMA / PLII MUSI / PLII GAME
Even 2-channel sources undergo Dolby Pro Logic II processing and are played in the multi-channel mode.
Dolby Digital Pro-Logic II processing is applied to 2-channel sources as well to play them in the multi-channel mode.
- PLII CINEMA (Dolby Pro Logic II CINEMA) mode
The Cinema mode is for use with stereo television shows and all programs encoded in Dolby Surround.
- PLII MUSIC (Dolby Pro Logic II MUSIC) mode
The Music mode is recommended as the standard mode for auto sound music systems (no video), and is optional for AV systems.
- PLII GAME (Dolby Pro Logic II GAME) mode
The Game mode for playing games. The game mode can only be used with 2-channel audio sources.
DTS NEO:6 CINEMA/NEO : 6 MUSIC mode
- NEO:6 CINEMA mode
This mode is optimum for playing movies. Decoding is performed with emphasis on separation performance to achieve the same atmosphere with 2-channel sources as with 5.1 or 6.1-channel sources.
This mode is effective for playing sources recorded in conventional surround formats as well, because the in-phase component is assigned mainly to the center channel (C) and the reversed phase component to the surround (SL and SR channels).
- NEO:6 MUSIC mode
This mode is suited mainly for playing music. The front channel (FL and FR) signals bypass the decoder and are played directly so there is no loss of sound quality, and the effect of the surround signals output from the center (C) and surround (SL and SR) channels add a natural sense of expansion to the sound field.
(3) Playing in the Dolby Virtual Speaker mode
- The Dolby Virtual Speaker mode is a mode using 3D sound technology from Dolby Laboratories to achieve multi-channel surround sound using only two speakers for the front channels.
- With two speakers for the front channels, one of two modes can be selected: Reference or Wide.
The Dolby Virtual Speaker mode can be used not only with Dolby Digital and DTS multi-channel sources but also with 2-channel sources.
[1] Playing Dolby Virtual Speaker
Applicable sources
- Digital input (DVD, .TV/AUX1, AUX2 functions)
Dolby Digital multi-channel sources
DTS sources
PCM sources (Except-Fs, 96kHz PCM)
- Analog input (DVD, TUNER, TAPE-functions)
![DENON DHT-M330DV - [1] Playing Dolby Virtual Speaker - 1](/content/2025/01/135506/images/7b4732356d007d0628ac4a43921902cb1d6c613d209a6aa4f59fc88d6c63d9a3.jpg)
- Operate the remote control unit at the "AMP" position.
Set the remote control selector switches
Switch1 to DVD
Switch2 to AMP
![DENON DHT-M330DV - [1] Playing Dolby Virtual Speaker - 2](/content/2025/01/135506/images/7fa50a5a6e30fb1a6c3d722cb8bb919f5b2504283e02724e01a7e6310dcf7f59.jpg)
![DENON DHT-M330DV - [1] Playing Dolby Virtual Speaker - 3](/content/2025/01/135506/images/4da0cbb1cb5badca1720aa79e24ca264c1ed575e75c5bb377985a110e8f5904e.jpg)
1 Set the surround mode to "DOLBY VIRTUAL SPEAKER".
![DENON DHT-M330DV - [1] Playing Dolby Virtual Speaker - 4](/content/2025/01/135506/images/aed9398aa17896f50ede3715f4c45d73c25488d8123bee487e7b87e9e140097d.jpg)
Main unit
![DENON DHT-M330DV - [1] Playing Dolby Virtual Speaker - 5](/content/2025/01/135506/images/68c90ae6d3ba3720c019f0572fc438c7918761644a7270e4067b42ecdb5f56af.jpg)
SURR.MODE
VIRUAL
![DENON DHT-M330DV - [1] Playing Dolby Virtual Speaker - 6](/content/2025/01/135506/images/10e571f459073d8a8b02f5252ab43f2a2bc3e1864b3a99941320ba7b7470d5c7.jpg)
Remote control unit
- In the Dolby Virtual Speaker mode, this indicator lights.
![DENON DHT-M330DV - [1] Playing Dolby Virtual Speaker - 7](/content/2025/01/135506/images/fecf8067e31b0c52df7aa88afee5073f86fc2b6606c79407cf936193682c53dc.jpg)
Play a program source.
- The Dolby Digital indicator lights when playing Dolby Digital sources.
![DENON DHT-M330DV - [1] Playing Dolby Virtual Speaker - 8](/content/2025/01/135506/images/a8e53f95166fc8ecfe9bd91db43fedcf53511a65c70c9dd63cd202e4d887385b.jpg)
Lit
- The DTS indicator lights when playing DTS sources.
![DENON DHT-M330DV - [1] Playing Dolby Virtual Speaker - 9](/content/2025/01/135506/images/0dc48d91a38505cfeafc8aafd0b0b62115ebb4879e5b1eb705b39a02ea9a7a93.jpg)
Lit
- The PCM indicator lights when playing PCM sources.
![DENON DHT-M330DV - [1] Playing Dolby Virtual Speaker - 10](/content/2025/01/135506/images/8aefa22957df3e15be9f20f74dc043784989eb5580566487b92c860153c1fae8.jpg)
Lit
※ When 2-channel sources, the DPL II indicator lights.
This switches automatically according to the format of the playback source.
3 Display the surround parameters for that source.
![DENON DHT-M330DV - [1] Playing Dolby Virtual Speaker - 11](/content/2025/01/135506/images/70cfeb3fd52181cedebec7d8a552012ccd94590faba563b16dac8852b0bdcaae.jpg)
SURROUND PARAMETER
Main unit
![DENON DHT-M330DV - [1] Playing Dolby Virtual Speaker - 12](/content/2025/01/135506/images/6f2d905a6224a79cd89ec47e3f7231982dc46ff219107be1c74985768b1e92b8.jpg)
SURROUND PARAMETER
Remote control unit
![DENON DHT-M330DV - [1] Playing Dolby Virtual Speaker - 13](/content/2025/01/135506/images/e3ce08d26a71b991d83d815235fcdc8bf152d45044eea66712697944b9ab2243.jpg)
Select and set the surround parameters.
(On the remote control unit, use the < , > cursor buttons to set the parameters.)
If nothing is done for 4 seconds from when the parameter is displayed, the normal display reappears.
Setting the DOLBY VS mode
SELECT
![DENON DHT-M330DV - [1] Playing Dolby Virtual Speaker - 14](/content/2025/01/135506/images/ce4981665bfed4c5722bddae5f7092dcbf82ddc88e3e144d4fcd15df44041d48.jpg)
![DENON DHT-M330DV - [1] Playing Dolby Virtual Speaker - 15](/content/2025/01/135506/images/cfc3f657735eae653396055d4fb52773ae2f822b63d9fd1f2429dfbbe93309e2.jpg)
Remote control unit
2SP Ref.→2SP Wide
※ The mode is not displayed if it cannot be selected.
- Once the surround parameters have been set, stop operating the buttons. After several seconds, the normal display reappears and the settings are automatically entered.
Surround parameters (2)
DOLBY VS (Dolby Virtual Speaker mode)
- REF (Reference mode)
This is the standard mode.
- WIDE (Wide mode)
This mode expands the front channel sound field.
NOTES:
- Press the VIRTUAL button on the remote control unit during playback in the Dolby Virtual Speaker mode to switch between the 2-speaker, 3-speaker and 5-speaker modes.
2- and 3-speaker modes
The reference and wide modes can be selected for the sound field of the front 2-channel speakers. This is convenient when it is difficult to install a surround speaker.
5-speaker mode
The sound is played in the wide mode expanding the 5.1-channel playback and front 2-channel speaker sound field. This is convenient when the front speakers cannot be moved very far apart.
- Switch between the reference and wide modes by selecting the surround parameters in steps 3 and 4.
(4) Playing in the DSP surround modes
- This unit is equipped with a high performance DSP (Digital Signal Processor) which uses digital signal processing to synthetically recreate the sound field. One of 2 preset surround modes can be selected according to the program source. (Analog and PCM sources only. Except 96kHz PCM source.)
| 1 | 5CH STEREO (M. CH STEREO) | The Front left channel signals are output to the surround and surround back signal left channels, the front right channel signals are output to the surround and surround back signal right channels, and the in-phase component of the left and right channels is output to the center channel. Use this mode to enjoy stereo sound. |
| 2 | HALL | When playing recordings of live music, this mode provides a feeling similar to actually being in a concert hall. When this mode is selected, the normal program source is directed to the main speakers and a reverberated sound is directed to the surround speakers. This mode is suited to program sources which contain a large amount of reverberation. |
Personal Memory Plus
This set is equipped with a personal memorize function that automatically memorizes the surround modes and input modes selected for the input different sources. When the input source is switched, the modes set for that source last time it was used are automatically recalled.
- Settings automatically stored in the memory for the individual input functions using the Personal Memory Plus function:
① Surround mode (including 2-channel decode mode and Dolby Pro Logic II mode settings)
② Input mode selection function
The surround parameters, SDB/P.EQ control settings and playback level balance for the different output channels are memorized for each surround mode.
(5) Playback using the Dolby Headphone mode
- The AVR-M330 is equipped with the Dolby Headphone mode, a technology developed jointly by Dolby Laboratories and Lake Technology for achieving 3D sound over regular headphones.
- The Dolby Headphone mode is set when headphones are connected to the AVR-M330's headphones jack.
- There are actually four Dolby Headphone modes creating different sound field effects: DH1, DH2, DH3 and Bypass (normal stereo playback).
- The Dolby Headphone mode is compatible with Dolby Digital and DTS multi-channel sources. With 2-channel sources, playback in the Cinema and Music modes can be selected with the 2-channel mode setting.
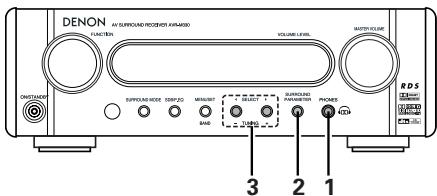
- Operate the remote control unit at the "AMP" position.
1 Connect headphones (sold separately) to the headphones jack.
- When headphones are plugged in, the output to the speakers is automatically turned off and no sound is produced from the speakers.
Press the surround parameter button and display the surround parameters.

SURROUND
PARAMETER
Main unit

SURROUND PARAMETER
Remote control unit
Set the various surround parameters.
※ If nothing is done for 6 seconds from when the parameter is displayed, the normal display reappears.
SELECT
Main unit

1


Remote control unit
- Dolby H mode setting

PH3
BYPHSS
DHI

D42

CINEMA
CINEMA MUSIC
2-channel mode setting
※ To play with normal two-channel stereo, select the "STEREO" or "DIRECT" mode using the surround mode switch.
When using headphones, the mode switches as follows each time the surround mode button is pressed:

Surround parameters (3)
DOLBY H (Dolby Headphone modes)
DH1 .Reference room
(small room with little reverberation)
DH2 ....Live room
(Larger room than DH1. Use this mode to achieve a sense of distance and diffusion of the sound.)
BYPASS ...... Stereo playback.
2-channel modes
These can be selected when playing 2-channel sources (analog, PCM, etc.). The signals are processed by one of the following decoders to achieve multiple channels then played in the Dolby Headphone mode.
In the Bypass mode, these are not displayed.
CINEMA .......Dolby Pro Logic II Cinema mode
MUSIC .........Dolby Pro Logic II Music mode
(6) Setting the speaker distance
- Input the distances from the listening position to the speakers and set the surround delay time.
- The default settings below are set upon shipment from the factory.
Preparations:
Measure the distances from the listening position to the speakers (L1 to L3 on the diagram at the right).
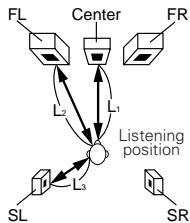
L1: Distance from center speaker to listening position
L2: Distance from front speakers to listening position
L3: Distance from surround speaker to listening position
- Operate the remote control unit at the "AMP" position.
Set the remote control selector switches
Switch1 to DVD
Switch2 to AMP

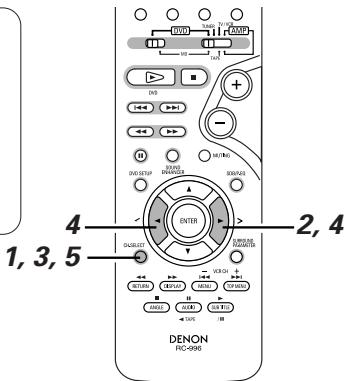
4
While the delay time is displayed, use the select < and > buttons to set the distance between the speaker and listening position.
- The value changes in units of 0.3 meters each time the select < or > button is pressed. Select the value closest to the actually measured distance.
※ Make sure the difference of the distances set for the different speakers is no more than 4.5 meters. If an inappropriate distance is set, the distance display will flash. Change the position of the speaker and reset.
5
Once the settings are completed, use the CH_SELECT button to select "END".
The settings are completed if no operations are performed for several seconds.
- The display returns to normal.

CH.SELECT
Remote control unit
Press the CH.SELECT button on the remote control unit.
The following is displayed:
LEVEL<->DELAY

CH.SELECT
Remote control unit
Use the select button while the above is displayed to select "DELAY".
- The level display shown below appears.
FRT/SW<1.8m>

Remote control unit
Press the CH.SELECT button on the remote control unit to select the speaker whose distance is to be set.
The mode switches as follows each time the CH_SELECT button is pressed:

CH SELECT
Remote control unit

- When the 6.1- or 7.1-channel mode is set, the surround back channel can also be selected and adjusted.
Table of Surround Mode Parameters (1)
| Surround Mode DVS: Dolby Virtual Speaker DH: Dolby Headphone | Presence/absence of signals and controllability in the various modes | |||||
| SPEAKER | SP/PREOUT | PREOUT | ||||
| FRONT L/R | CENTER | SURROUND L/R | SUB-WOOFER | SUB-WOOFER | ||
| AUTO DECODE | DOLBY DIGITAL | ○ | ○ | ○ | ○ | × |
| DTS SURROUND | ○ | ○ | ○ | ○ | × | |
| DOLBY PLII | ○ | ○ | ○ | ○ | × | |
| AUTO STEREO | ○ | × | × | ○ | × | |
| DTS NEO:6 | ○ | ○ | ○ | ○ | △ | |
| DOLBY PLIIx | △ | △ | △ | △ | △ | |
| DOLBY DIGITAL EX/+PLIIx | △ | △ | △ | △ | △ | |
| DTS SURR.+NEO:6 | △ | △ | △ | △ | △ | |
| DTS-ES DISCRETE/MATRIX | △ | △ | △ | △ | △ | |
| DVS | 2SPEAKER MODE | ○ | × | × | ○ | × |
| 3SPEAKER MODE | ○ | ○ | × | ○ | × | |
| 5SPEAKER MODE | ○ | ○ | ○ | ○ | × | |
| DH | DH1 | ○ (H/P ONLY) | × | × | × | × |
| DH2 | ○ (H/P ONLY) | × | × | × | × | |
| DH3 | ○ (H/P ONLY) | × | × | × | × | |
| BYPASS | ○ (H/P ONLY) | × | × | × | × | |
| STEREO | ○ | × | × | ○ (H/P×) | × | |
| DIRECT | ○ | × | × | ○ (H/P×) | × | |
| 5CH STEREO | ○ | ○ | ○ | ○ | × | |
| M.CH STEREO | △ | △ | △ | △ | △ | |
| HALL | ○ | ○ | ○ | ○ | △ | |
Table of Surround Mode Parameters (2)
| Surround Mode DVS: Dolby Virtual Speaker DH: Dolby Headphone | Presence/absence of signals and controllability in the various modes | ||||||
| Playback signals and surround modes for the various input functions | |||||||
| DVD,TV/AUX1,AUX2 | DVD,TUNER,MD,TAPE | ||||||
| When playing Dolby Digital signals | When playing DTS signals | When playing PCM signals | When playing analog signals | ||||
| 2-channel | Multi-channel/EX | Multi-channel/-ES | 2-channel | Fs:96kHz | 2-channel | ||
| AUTO DECODE | DOLBY DIGITAL | × | ○ | × | × | × | × |
| DTS SURROUND | × | × | ○ | × | × | × | |
| DOLBY PLII | ●PLII | × | × | ●PLII | × | ●PLII | |
| AUTO STEREO | ● | × | × | ● | × | × | |
| DTS NEO:6 | × | × | × | ●NEO:6 | × | ●NEO:6 | |
| DOLBY PLIIx | ●PLIIx | × | × | ●PLIIx | × | ●PLIIx | |
| DOLBY DIGITAL EX/+PLIIx | × | ●PLIIx | × | × | × | × | |
| DTS SURR.+NEO:6 | × | × | ●NEO:6 | × | × | × | |
| DTS-ES DISCRETE/MATRIX | × | × | ○ FLAG | × | × | × | |
| DVS | 2SPEAKER MODE | ○ | ○ | ○ | ○ | × | ○ |
| 3SPEAKER MODE | ○ | ○ | ○ | ○ | × | ○ | |
| 5SPEAKER MODE | ○ | ○ | ○ | ○ | × | ○ | |
| DH | DH1 | ●PLII | ○ | ○ | ●PLII | × | ●PLII |
| DH2 | ●PLII | ○ | ○ | ●PLII | × | ●PLII | |
| DH3 | ●PLII | ○ | ○ | ●PLII | × | ●PLII | |
| BYPASS | ○ | ○ D.MIX | ○ D.MIX | ○ | × | ○ | |
| STEREO | ○ | ○ D.MIX | ○ D.MIX | ○ | ○ | ○ | |
| DIRECT | ○ | ○ D.MIX | ○ D.MIX | ○ | ○ | ○ | |
| 5CH STEREO | × | × | × | ○ | × | ○ | |
| M.CH STEREO | × | × | × | ○ | × | ○ | |
| HALL | × | × | × | ○ | × | ○ | |
: Mode only usable when "5.1CH" set with quick setup procedure.
:Mode only usable when "6.1CH" or "7.1CH" set with quick setup procedure. D.MIX : Compatible with down-mixing.
: Usable when "6.1CH" or "7.1CH" selected at the Quick Setup procedure. When "6.1CH" selected: SBL preout used (1 channel) for SB.
When "7.1CH" selected: SBL/SBR preout used (2 channels)
:Playback signal present or selectable.
Mode selectable according to parameters
For details, see Tables 3 and 4.
X : No signal or not controllable.
PL II: Compatible with PL II processing.
PL IIx : Compatible with PL IIx processing.
NEO:6 : Compatible with DTS NEO:6 processing
FLAG : Selected automatically by "DTS ES DISCRETE FLAG"/"MATRIX FLAG"
Table of Surround Mode Parameters (3)
| Surround ModeDVS: Dolby Virtual SpeakerDH: Dolby Headphone | Presence/absence of signals and controllability in the various modes | |||||||
| SDB/PEQ(Default: DEFEAT all OFF) | Surround parameter | |||||||
| 2ch Mode | DH Mode | DVS Mode | ||||||
| Digital 2-channel | Analog 2-channel | DH1/2/3/BYPASS | Front chRef./Wide | |||||
| SDB ON | DRC ON *1 | PEQ1/2/3 | ||||||
| AUTO DECODE | DOLBY DIGITAL | ○ | ○ | ○ | ○*2(AUTO ST) | × | - | - |
| DTS SURROUND | ○ | ○ | ○ | × | - | - | ||
| DOLBY PLII | ○ | ○ | ○ | ○*3 (PLIIC) | - | - | ||
| AUTO STEREO | ○ | ○ | ○ | × | - | - | ||
| DTS NEO:6 | ○ | ○ | ○ | ○*3 | - | - | ||
| DOLBY PLIIx | ○ | ○ | ○ | × | × | - | - | |
| DOLBY DIGITAL EX/+PLIIx | ○ | ○ | ○ | × | × | - | - | |
| DTS SURR.+NEO:6 | ○ | ○ | ○ | × | × | - | - | |
| DTS-ES DISCRETE/MATRIX | ○ | ○ | ○ | × | × | - | - | |
| DVS | 2SPEAKER MODE | ○ | ○ | ○ | CINEMA only | CINEMA only | - | ○*6 (Ref.) |
| 3SPEAKER MODE | ○ | ○ | ○ | - | ○*6 (Ref.) | |||
| 5SPEAKER MODE | ○ | ○ | ○ | - | Wide only | |||
| DH | DH1 | ○ | × | ○ | ○*4 (CINEMA) | ○*4 (CINEMA) | ○*5 (DH1) | - |
| DH2 | ○ | × | ○ | - | ||||
| DH3 | ○ | × | ○ | - | ||||
| BYPASS | ○ | × | ○ | × | × | - | ||
| STEREO | ○ | ○ | ○ | × | × | - | - | |
| DIRECT | × | × | × | × | × | - | - | |
| 5CH STEREO | ○ | × | ○ | × | × | - | - | |
| M.CH STEREO | ○ | × | ○ | × | × | - | - | |
| HALL | ○ | × | ○ | × | × | - | - | |
Table of Surround Mode Parameters (4) Details of parameters for "6.1CH"/"7.1CH"
| Surround Mode DVS: Dolby Virtual Speaker DH: Dolby Headphone | Presence/absence of signals and controllability in the various modes | ||||||
| Various playback sources and surround parameter selection for "6.1CH"/"7.1CH" | |||||||
| PCM 6.1/7.1 setting | Analog 6.1/7.1 setting | DOLBY DIGITAL/D.D. EX | DTS/DTS-ES | ||||
| 6.1ch setting | 7.1ch setting | 6.1ch setting | 7.1ch setting | ||||
| 2channel source | AUTO STEREO | ◎ | ◎ | ◎ | ◎ | - | - |
| DTS NEO:6 CINEMA | ○ | ○ | × | × | - | - | |
| DTS NEO:6 MUSIC | ○ | ○ | × | × | - | - | |
| DOLBY PLIIx CINEMA | ○ | ○ | ○ | ○ | - | - | |
| DOLBY PLIIx MUSIC | ○ | ○ | ○ | ○ | - | - | |
| DOLBY PLIIx GAME | ○ | ○ | ○ | ○ | - | - | |
| Mulch channel source | DOLBY DIGITAL EX | - | - | ◎ | ○ | - | - |
| DOLBY DIGITAL+PLIIx C | - | - | × | ◎ | - | - | |
| DOLBY DIGITAL+PLIIx M | - | - | ○ | ○ | - | - | |
| DTS SURROUND | - | - | - | - | ◎ | ◎ | |
| DTS SURR. +NEO:6 | - | - | - | - | ○ | ○ | |
| DTS-ES DISCRETE | - | - | - | - | ○*FLAG | ○*FLAG | |
| DTS-ES MATRIX | - | - | - | - | ○*FLAG | ○*FLAG | |
Mode only usable when "5.1CH" set with quick setup procedure..
: Factory defaults when "6.1CH" or "7.1CH" set with quick setup procedure.
:Mode only usable when "6.1CH" or "7.1CH" set with quick setup procedure..
:Playback signal present or selectable..
*FLAG: Selected automatically by "DTS ES DISCRETE FLAG"/"MATRIX FLAG"
× : Playback signal absent or not selectable.
Not applicable.
():Factory defaults of parameters.
1: Only selectable for Dolby and DTS DRC (dynamic range compression) compatible [discs]
2: Auto stereo, DOLBY PLII cinema, PLII music and PLII game selectable.
DTS NEO:6 cinema and NEO:6 music also selectable for PCM sources (other than [those with sampling frequencies of 96 kHz])
3: DOLBY PLII cinema, PLII music, PLII game, DTS NEO:6 cinema and NEO:6 music selectable.
4: Cinema (DOLBY PLII cinema) and music (PLII music) selectable.
5: DH1, DH2, DH3 and "BYPASS" selectable.
6: "Reference" and "Wide" selectable.
*7: "MAIN" (main audio), "SUB" (sub audio) and "MAIN/SUB" selectable.
Example: Tuning in FM/AM stations
1 Select the FUNCTION "TUNER".
Main unit

Remote control unit
Select "FM" or "AM".
- The selected "FM AUTO", "FM MONO" or "AM" is displayed.
- When using the remote control, the mode button is used to select FM AUTO and MONO.
MENU/SET
Main unit
Remote control unit
Adjust the receiving frequency.
- When a station is received, the "TUNED" indication will light.
Main unit
Remote control unit
Set the remote control selector switches
Switch1 to DVD Switch2 to TUNER
NOTE:
A humming sound may be heard when using a TV nearby while receiving AM programs. If this happens, move the system as far from the TV as possible.
Auto tuning
- When one of the Tuning +/- button is pressed, the frequency changes in steps of 50kHz in the FM band, 9kHz in the AM band.
- If one of the Tuning +/- button is held for over 1 second, the frequency continues to change when the button is released (auto tuning) and stops when a station is tuned in. Tuning will not stop at stations whose reception is poor.
- To stop the auto tuning function, press the Tuning +/- button once.
FM Stereo Reception
- When a program being broadcast in "FM AUTO" is received, the "ST" indicator lights and the program is received in stereo.
- If reception is poor and there is much noise in the stereo signals, press the BAND or MODE button to set the FM MONO mode.
(2) Presetting stations (remote control unit only)
A total of 40 stations (including both FM and AM stations) can be preset.
■ Preset stations using the including remote control unit.

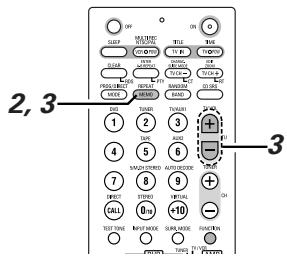
1 Tune in the station you want to preset.

Press the MEMO button.


Remote control unit
3 Use the "+" and "-" preset buttons to select the preset number then press the MEMO button again to store that station at the selected number. (The number can also be specified directly using the +10 and 0 to 9 buttons on the numeric keypad.)
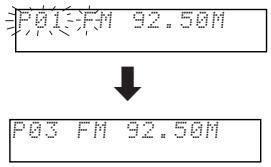
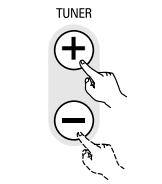
Remote control unit

Remote control unit
(3) Auto tuner presets (remote control unit only)
Use this to automatically search for FM broadcasts and store up to 40 stations at preset channels 1 to 40.
NOTE:
- If an FM station cannot be preset automatically due to poor reception, use the "Manual tuning" operation to tune in the station, then preset it using the manual "Preset memory" operation.
Press the MEMORY button for more than 2 second.
Up to 40 of the best received stations in your area will be stored automatically. Then you can select each stations easily.

Remote control unit
Set the remote control selector switches Switch1 to DVD Switch2 to TUNER
(4) Listening to preset stations (remote control unit only)
Example: Listening to the station preset at number P03 (This operation is only possible from the remote control unit.)
1 Use the "+" and "-" preset buttons to select preset number "3" or press the "3" button on the numeric keypad to display preset number "P03".
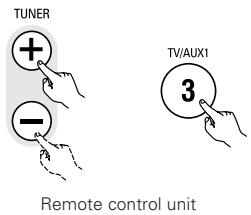
※ The preset buttons on the remote control unit (TUNER CH " + " and "-") can be used at any time.
(5) RDS (Radio Data System)
RDS (works only on the FM band) is a broadcasting service which allows station to send additional information along with the regular radio program signal.
The following three types of RDS information can be received on this unit:
■ Program Type (PTY)
PTY identifies the type of RDS program.
The program types and their displays are as follows:
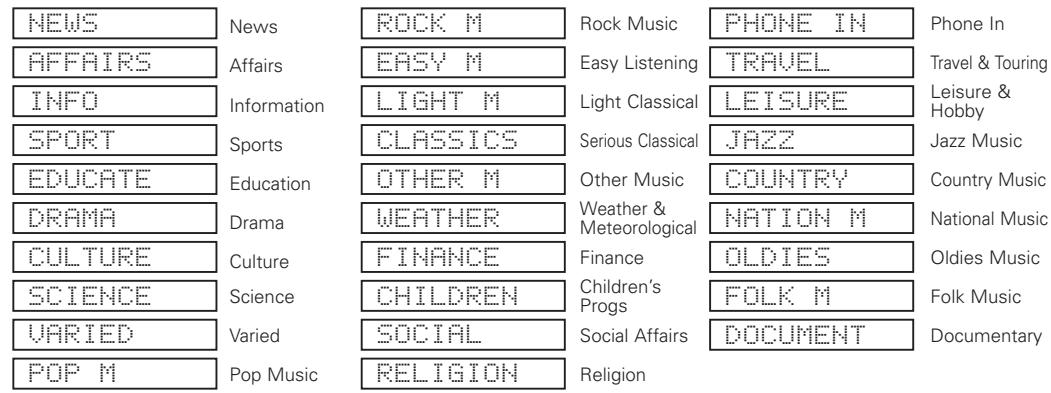
Traffic Program (TP)
TP identifies programs that carry traffic announcements.
This allows you to easily find out the latest traffic conditions in your area before you leaving home.
Radio Text (RT)
RT allows the RDS station to send text messages that appear on the display.
NOTE: The operations described below using the RDS, PTY and RT buttons will not function in areas in which there are no RDS broadcasts.
(6)RDS search
Use this function to automatically tune to FM stations that provide RDS service.
1 Set the band to "FM".

Remote control unit
Press the RDS button until "RDS" appears on the display.
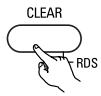
Remote control unit
3 Press the TUNING ^+ (UP) or-(DOWN) button to automatically begin the RDS search operation.
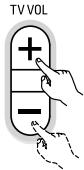
Remote control unit
When a broadcast station is found, that station's name appears on the display.
- If no RDS station is found when all the frequencies are searched, "NO PROGRAMME" is displayed.
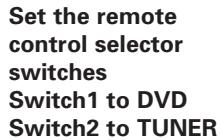
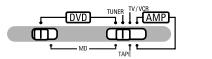

(7) PTY search
Use this function to find RDS stations broadcasting a designated program type (PTY). For a description of each program type, refer to "Program Type (PTY)".
1 Set the band to "FM".

Remote control unit
Press the RDS button until "PTY" appears on the display.
Remote control unit
3 Watching the display, press the PTY button to call out the desired program type.
Remote control unit
Press the TUNING ^+ (UP) or - (DOWN) button to automatically begin the PTY search operation.
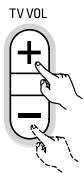
Remote control unit
5 The station name is displayed on the display after searching stops.
- If no station broadcasting the designated program type is found when all the frequencies are searched, "NO PROGRAMME" is displayed.
(8) TP search
Use this function to find RDS stations broadcasting traffic program (TP stations).
1 Set the band to "FM".

Remote control unit
Press the RDS button until "TP" appears on the display.

Remote control unit
3 Press the TUNING ^+ (UP) or-(DOWN) button TP search begins.

TVVOL
Remote control unit
4 The station name is displayed on the display after searching stops.
- If no TP station is found when all the frequencies are searched, "NO PROGRAMME" is displayed.
(9) RT (Radio Text)
"RT" appears on the display when radio text data is received.
To turn the RT mode on, press the RT button on the remote control unit until the RT indicator is lit.
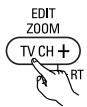
Remote control unit
2 When the station currently tuned in is offering a radio text message service, the message scrolls on the display.
- When the RT mode is turned on while an RDS radio station not offering an RT service is tuned in, "NO TEXT" is displayed on the display, then the mode automatically switches to the PS mode.
- In the same way, the mode automatically switches to the PS mode when the RT service is finished. In this case, the mode automatically switches from the PS mode back to the RT mode when an RT broadcast is resumed.
- The RT mode cannot be set in the AM band or for FM stations not offering RDS broadcasts.
- To turn the RT mode off, press the RT button and switch to the desired display mode. (Refer to page 18.)
12 EXPANDING TO A 6.1- OR 7.1-CHANNEL SYSTEM
- The DHT-M330DV is equipped with a decoder function allowing 6.1- or 7.1-channel playback (Dolby Digital EX, DTS-ES, Dolby Pro-Logic IIx, etc.), as well as PRE OUT connectors for surround back channels (SBL and SBR).
- The DHT-M330DV is also equipped with a pre-out connector for a subwoofer channel, so the system can be improved using a commercially available superwoofer with built-in amplifier. (Signals are constantly output from the subwoofer pre-out connector.)
- A separately sold stereo amplifier and surround back speaker systems can be used in combination with the DHT-M330DV to create a 6.1- or 7.1-channel surround system.
(1) Connections for a 6.1- or 7.1-channel system
When using a commercially available amplifier and speakers
- Use the front left, front right, center, surround left and surround right channels with DHT-M330DV connections.
For a 6.1-channel system, use the AVR-M330's SBL PRE OUT connector to connect the amplifier and one surround back speaker.
For a 7.1-channel system, use the AVR-M330's SBL and SBR PRE OUT connectors to connect the amplifier and two surround back speakers.
(2) 6.1- or 7.1-channel speakers system layout
Basic system layout
- This is an example of a basic system layout using eight speaker systems and a TV.
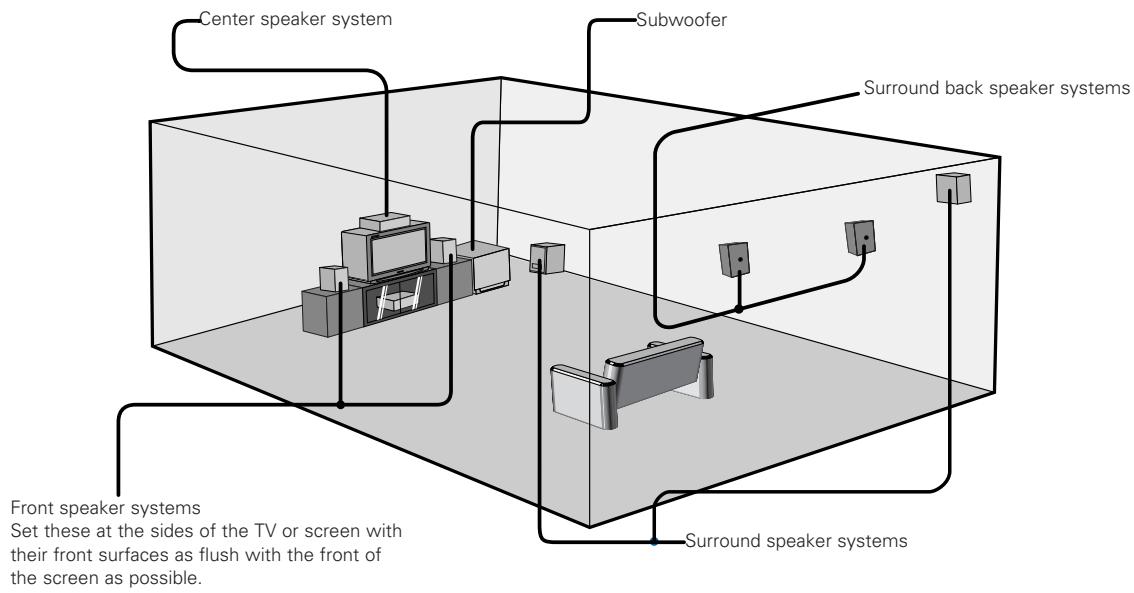
(3) 6.1- or 7.1-channel surround playback
1 Changing the Quick Setup settings
At "SPEAKER SETUP" under "Quick Setup procedure" (page 27), select the configuration to be used, "6.1CH" or "7.1CH".
2 Checking and adjusting the playback level using test tones
Before playing, use test tones to check and adjust the playback level of the different speakers. (Page 33)
- Depending on the 6.1/7.1-channel setting, the surround back channel is also displayed and can be set.
3 Setting the delay time (distance setting)
Set the distance from the different speakers at "(6) Setting the speaker distance" (Page 39) under "10 SURROUND PLAYBACK" (page 33).
Depending on the 6.1/7.1-channel setting, the surround back channel is also displayed and can be set.
4 Surround playback in the auto decode mode
When set for 6.1- or 7.1-channel playback, the signals can be decoded and played in the Dolby Digital EX, DTS-ES and Dolby Pro Logic IIx modes.
- At "1 Dolby Digital and DTS surround playback" on page 34, Dolby Digital and multi-channel sources are played in 6.1 or 7.1 channels in the Dolby Digital EX or Dolby ProLogic IIx mode.
DTS sources are played in 6.1 or 7.1 channels in the DTS-ES or Neo:6 mode.
- For 2-channel sources: Instead of PLII at "2 channel mode setting" on page 35 - PLIIx surround parameter.
- When Dolby Digital EX or DTS-ES sources are played, "EX" or "DTS-ES" is displayed and the source is played in 6.1 or 7.1 channels.
- For Dolby Pro Logic IIx decoding, " PLIIx" is also displayed and the signals are played in 6.1 or 7.1 channels.
- For DTS Neo:6 decoding, "Neo:6" is displayed.
- For playback sources and surround modes, see "Table of Surround Mode Parameters" on pages 40 and 41.
The playing mode for the different sources can be selected using the surround parameters. (See below.)
- Dolby Digital EX
For 6.1 channels: Dolby Digital EX, Dolby Digital + PLL IIx Music
For 7.1 channels: Dolby Digital EX, Dolby Digital + PLL IIx Cinema, Dolby Digital+PLIIx Music
DTS
For 6.1/7.1 channels: DTS surround, DTS+NEO:6
- DTS-ES
For 6.1/7.1 channels: none (fixed to DTS discrete or DTS-ES matrix depending on plug)
- Analog, digital (PCM, Dolby Digital, AAC) 2-channel sources
For 6.1/7.1 channels: Auto stereo, PLIIx Cinema, PLIIx Music, PLIIx Game
For analog and PCM 2-channel sources, DTS-NEO:6 Cinema and DTS-NEO:6 Music can also be used.
DOLBY/DTS SURROUND
Surround
The AVR-M330 is equipped with a digital signal processing circuit that lets you play program sources in the surround mode to achieve the same sense of presence as in a movie theater.
Dolby Surround
(1) Dolby Digital
Dolby Digital is the multi-channel digital signal format developed by Dolby Laboratories.
Dolby Digital consists of up to "5.1" channels - front left, front right, center, surround left, surround right, and an additional channel exclusively reserved for additional deep bass sound effects (the Low Frequency Effects - LFE - channel, also called the ".1" channel, containing bass frequencies of up to 120 Hz).
Unlike the analog Dolby Pro Logic format, Dolby Digital's main channels can all contain full range sound information, from the lowest bass, up to the highest frequencies - 22 kHz. The signals within each channel are distinct from the others, allowing pinpoint sound imaging, and Dolby Digital offers tremendous dynamic range from the most powerful sound effects to the quietest, softest sounds, free from noise and distortion.
Dolby Digital and Dolby Pro Logic
| Comparison of home surround systems | Dolby Digital | Dolby Pro Logic |
| No. recorded channels (elements) | 5.1 ch | 2 ch |
| No. playback channels | 5.1 ch | 4 ch |
| Playback channels (max.) | L, R, C, SL, SR, SW | L, R, C, S (SW - recommended) |
| Audio processing | Digital discrete processing Dolby Digital encoding/decoding | Analog matrix processing Dolby Surround |
| High frequency playback limit of surround channel | 20 kHz | 7 kHz |
Dolby Digital compatible media and playback methods
Marks indicating Dolby Digital compatibility: DOLBY DIGITAL
The following are general examples. Also refer to the player's operating instructions.
| Media | Dolby Digital output jacks | Playback method (reference page) |
| LD (VDP) | Coaxial Dolby Digital RF output jack ※1 | Set the input mode to “AUTO”. (Page 30) |
| DVD | Optical or coaxial digital output (same as for PCM) ※2 | Set the input mode to “AUTO”. (Page 30) |
| Others (satellite broadcasts, CATV, etc.) | Optical or coaxial digital output (same as for PCM) | Set the input mode to “AUTO”. (Page 30) |
※ 1 Please use a commercially available adapter when connecting the Dolby Digital RF output jack of the LD player to the digital input jack. Please refer to the instruction manual of the adapter when making connection.
※ 2 Some DVD digital outputs have the function of switching the Dolby Digital signal output method between "bit stream" and "(convert to) PCM". When playing in Dolby Digital surround on the AVR-M330, switch the DVD player's output mode to "bit stream". In some cases players are equipped with both "bit stream + PCM" and "PCM only" digital outputs. In this case connect the "bit stream + PCM" jacks to the AVR-M330.
(2) Dolby Pro Logic IIx
- Dolby Pro Logic IIx furthers the matrix decoding technology of Dolby Pro Logic II to decode audio signals recorded on two channels into up to 7.1 playback channels, including the surround back channel. Dolby Pro Logic IIx also allows 5.1-channel sources to be played in up to 7.1 channels.
The mode can be selected according to the source. The Music mode is best suited for playing music, the Cinema mode for playing movies, and the Game mode for playing games. The Game mode can only be used with 2-channel audio sources.
(3) Dolby Pro Logic II
- Dolby Pro Logic II is a new multi-channel playback format developed by Dolby Laboratories using feedback logic steering technology and offering improvements over conventional Dolby Pro Logic circuits.
- Dolby Pro Logic II can be used to decode not only sources recorded in Dolby Surround (※) but also regular stereo sources into five channels (front left, front right, center, surround left and surround right) to achieve surround sound.
- Whereas with conventional Dolby Pro Logic the surround channel playback frequency band was limited, Dolby Pro Logic II offers a wider band range (20 Hz to 20 kHz or greater). In addition, the surround channels were monaural (the surround left and right channels were the same) with previous Dolby Pro Logic, but Dolby Pro Logic II they are played as stereo signals.
- Various parameters can be set according to the type of source and the contents, so it is possible to achieve optimum decoding.
※ Sources recorded in Dolby Surround
These are sources in which three or more channels of surround have been recorded as two channels of signals using Dolby Surround encoding technology.
Dolby Surround is used for the sound tracks of movies recorded on DVDs, LDs and Video cassettes to be played on stereo VCRs, as well as for the stereo broadcast signals of FM radio, TV, satellite broadcasts and cable TV.
Decoding these signals with Dolby Pro Logic II makes it possible to achieve multi-channel surround playback. The signals can also be played on ordinary stereo equipment, in which case they provide normal stereo sound.
There are two types of DVD Dolby surround recording signals.
① 2-channel PCM stereo signals
② 2-channel Dolby Digital signals
When either of these signals is input to the AVR-M330, the surround mode is automatically set to Dolby Pro Logic II when the "AUTO DECODE" mode is selected.
Sources recorded in Dolby Surround are indicated with the logo mark shown below.
Dolby Surround support mark: DOLBY SURROUND
Manufactured under license from Dolby Laboratories.
"Dolby", "Pro Logic" and the double-D symbol are trademarks of Dolby Laboratories.
DTS Digital Surround
Digital Theater Surround (also called simply DTS) is a multi-channel digital signal format developed by Digital Theater Systems.
DTS offers the same "5.1" playback channels as Dolby Digital (front left, front right and center, surround left and surround right) as well as the stereo 2-channel mode. The signals for the different channels are fully independent, eliminating the risk of deterioration of sound quality due to interference between signals, crosstalk, etc.
DTS features a relatively higher bit rate as compared to Dolby Digital (1234 kbps for CDs and LDs, 1536 kbps for DVDs) so it operates with a relatively low compression rate. Because of this the amount of data is great, and when DTS playback is used in movie theaters, a separate CD-ROM synchronized with the film is played.
With LDs and DVDs, there is of course no need for an extra disc; the pictures and sound can be recorded simultaneously on the same disc, so the discs can be handled in the same way as discs with other formats.
There are also music CDs recorded in DTS. These CDs include 5.1-channel surround signals (compared to two channels on current CDs). They do not include picture data, but they offer surround playback on CD players that are equipped with digital outputs (PCM type digital output required). DTS surround track playback offers the same intricate, grand sound as in a movie theater, right in your own listening room.
DTS compatible media and playback methods
Marks indicating DTS compatibility: SURROUND
The following are general examples. Also refer to the player's operating instructions.
| Media | Dolby Digital output jacks | Playback method (reference page) |
| CD | Optical or coaxial digital output (same as for PCM) ※2 | Set the input mode to “AUTO” or “DTS” (page 30). Never set the mode to “ANALOG” or “PCM”. ※1 |
| LD (VDP) | Optical or coaxial digital output (same as for PCM) ※2 | Set the input mode to “AUTO” or “DTS” (page 30). Never set the mode to “ANALOG” or “PCM”. ※1 |
| DVD | Optical or coaxial digital output (same as for PCM) ※3 | Set the input mode to “AUTO” or “DTS” (page 30). |
※ 1 DTS signals are recorded in the same way on CDs and LDs as PCM signals. Because of this, the un-decoded DTS signals are output as random "hissy" noise from the CD or LD player's analog outputs. If this noise is played with the amplifier set at a very high volume, it may possibly cause damage to the speakers. To avoid this, be sure to switch the input mode to "AUTO" or "DTS" before playing CDs or LDs recorded in DTS. Also, never switch the input mode to "ANALOG" or "PCM" during playback. The same holds true when playing CDs or LDs on a DVD player or LD/DVD compatible player. For DVDs, the DTS signals are recorded in a special way so this problem does not occur.
※ 2 The signals provided at the digital outputs of a CD or LD player may undergo some sort of internal signal processing (output level adjustment, sampling frequency conversion, etc.). In this case the DTS-encoded signals may be processed erroneously, in which case they cannot be decoded by the AVR-M330, or may only produce noise. Before playing DTS signals for the first time, turn down the master volume to a low level, start playing the DTS disc, then check whether the DTS indicator on the AVR-M330 (see page 31) lights before turning up the master volume.
※ 3 A DVD player with DTS-compatible digital output is required to play DTS DVDs. A DTS Digital Output logo is featured on the front panel of compatible DVD players. Recent DENON DVD player models feature DTS-compatible digital output - consult the player's owner's manual for information on configuring the digital output for DTS playback of DTS-encoded DVDs.
MANUFACTURED UNDER LICENSE FROM DIGITAL THEATER SYSTEMS, INC.
U.S. PAT. NO'S 5,451,942; 5,956,674; 5,974,380; 5,978,762; 6,226,616; 6,487,535 AND OTHER U.S. AND WORLD-WIDE PATENTS ISSUED AND PENDING.
"DTS", "DTS-ES", AND "Neo:6" ARE TRADEMARKS OF DIGITAL THEATER SYSTEMS, INC. © 1996, 2003 DIGITAL THEATER SYSTEMS, INC. ALL RIGHTS RESERVED.
DTS-ES Extended Surround
DTS-ES Extended Surround is a new multi-channel digital signal format developed by Digital Theater Systems Inc. While offering high compatibility with the conventional DTS Digital Surround format, DTS-ES Extended Surround greatly improves the 360-degree surround impression and space expression thanks to further expanded surround signals. This format has been used professionally in movie theaters since 1999.
In addition to the 5.1 surround channels (FL, FR, C, SL, SR and LFE), DTS-ES Extended Surround also offers the SB (Surround Back, sometimes also referred to as "surround center") channel for surround playback with a total of 6.1 channels. DTS-ES Extended Surround includes two signal formats with different surround signal recording methods, as described below.
DTS-ES™ Discrete 6.1
DTS-ES Discrete 6.1 is the newest recording format. With it, all 6.1 channels (including the SB channel) are recorded independently using a digital discrete system. The main feature of this format is that because the SL, SR and SB channels are fully independent, the sound can be designed with total freedom and it is possible to achieve a sense that the acoustic images are moving about freely among the background sounds surrounding the listener from 360 degrees.
Though maximum performance is achieved when sound tracks recorded with this system are played using a DTS-ES decoder, when played with a conventional DTS decoder the SB channel signals are automatically down-mixed to the SL and SR channels, so none of the signal components are lost.
DTS-ES™ Matrix 6.1
With this format, the additional SB channel signals undergo matrix encoding and are input to the SL and SR channels beforehand. Upon playback they are decoded to the SL, SR and SB channels. The performance of the encoder used at the time of recording can be fully matched using a high precision digital matrix decoder developed by DTS, thereby achieving surround sound more faithful to the producer's sound design aims than with conventional 5.1- or 6.1-channel systems.
In addition, the bit stream format is 100% compatible with conventional DTS signals, so the effect of the Matrix 6.1 format can be achieved even with 5.1-channel signal sources. Of course it is also possible to play DTS-ES Matrix 6.1 encoded sources with a DTS 5.1-channel decoder.
When DTS-ES Discrete 6.1 or Matrix 6.1 encoded sources are decoded with a DTS-ES decoder, the format is automatically detected upon decoding and the optimum playing mode is selected. However, some Matrix 6.1 sources may be detected as having a 5.1-channel format, so the DTS-ES Matrix 6.1 mode must be set manually to play these sources.
(For instructions on selecting the surround mode, see page 48.)
The DTS-ES decoder includes another function, the DTS Neo:6 surround mode for 6.1-channel playback of digital PCM and analog signal sources.
DTS Neo:6TM surround
This mode applies conventional 2-channel signals to the high precision digital matrix decoder used for DTS-ES Matrix 6.1 to achieve 6.1-channel surround playback. High precision input signal detection and matrix processing enable full band reproduction (frequency response of 20Hz to 20kHz or greater) for all 6.1 channels, and separation between the different channels is improved to the same level as that of a digital discrete system.
DTS Neo:6 surround includes two modes for selecting the optimum decoding for the signal source.
- DTS Neo:6 Cinema
This mode is optimum for playing movies. Decoding is performed with emphasis on separation performance to achieve the same atmosphere with 2-channel sources as with 6.1-channel sources.
This mode is effective for playing sources recorded in conventional surround formats as well, because the in-phase component is assigned mainly to the center channel (C) and the reversed phase component to the surround (SL, SR and SB channels).
- DTS Neo:6 Music
This mode is suited mainly for playing music. Changes in the sound quality are reduced by decoding with emphasis on the front channel signals (FL and FR), and a natural sense of expansion is given to the sound field by the effect of the surround signals output from the center (C) and surround (SL, SR and SB) channels.
Dolby Virtual Speaker
Dolby Virtual Speaker technology uses proprietary technology of Dolby Laboratories to create a virtual surround sound field using only two speakers for the front channels, allowing the user to experience sound as if surround speakers were actually being used.
Features of Dolby Virtual Speaker sound
Accurate surround sound field positioning
The virtual surround speakers are positioned at 105^ to the left and 105^ to the right.
Multi-channel programs played according to the producer's intentions
The sound of the different channels is played in the position set upon mixing. For example, sound set at the rear left is heard from the rear left.
Stereo programs played in surround
The Dolby Pro Logic II circuit is used together with the Dolby Virtual Speaker circuitry to create a rich virtual surround sound field with stereo programs as well.
Selecting the listening mode
Two listening modes are provided: Reference and Wide.
Reference mode
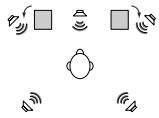
Wide mode
□ : 2 front channels
: Virtual sound field created with the Dolby Virtual Speaker mode
With the AVR-M330, playback in the Dolby Virtual Speaker mode is possible with other speaker configurations as well.
- 3 speakers (2 front channels + center): Reference/Wide modes
- 5 speakers (2 front channels + center + 2 surround channels): Wide mode
Dolby Headphone
Dolby Headphone is a 3D sound technology developed jointly by Dolby Laboratories and Lake Technology of Australia achieving surround sound with regular headphones.
Normally when using headphones all the sounds are sounded in the head, making it uncomfortable to listen with headphones for long periods of time. Dolby Headphone simulates speaker playback in a room and positions the sound sources to the front or the sides, outside of the head, achieving a powerful sound similar to that of a movie theater or home theater. This technology is aimed mainly at multi-channel audio or video equipment including Dolby Digital or Dolby Pro Logic Surround decoding functions and operates inside a high performance digital signal processing chip (DSP).
The Dolby Headphone mode can be used not only with multi-channel sources but also with stereo programs.
14 USING THE SLEEP TIMER
(1) Setting the sleep timer (remote control unit only)
- The included remote control unit can be used to turn the power to the standby mode after a maximum of 120 minutes. (Sleep timer)
- Use this function to automatically switch the power to the standby mode after a specific amount of time (minutes).
Example: To set the power to the standby mode in 50 minutes according to the clock. Be sure to correct the current time setting.
- Operate the remote control unit at the "AMP" position.
Set the remote control selector switches Switch1 to DVD Switch2 to AMP
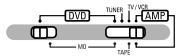
2,3
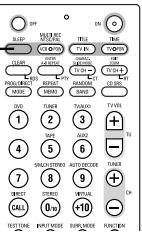
1 Select and play the desired function.
Press the SLEEP button. "120" is displayed and


Remote control unit
The display switches as follows each time the SLEEP button is pressed:

3 When the "SLEEP" indicator is flashing, press the SLEEP button again until "50" is displayed.
- "50" is displayed and the "SLEEP" indicator flashes.
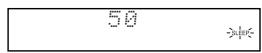

Remote control unit
- After 4 seconds, the display returns to as it was before the sleep timer was set, and the "SLEEP" indicator stops flashing, remaining lit. (This completes the sleep timer setting.)
4 The power is set to the standby mode 50 minutes later.
To turn the sleep timer off, press the SLEEP button repeatedly until the "SLEEP" indicator turns off. The sleep timer can also be turned off by press the power button on the main unit or the remote control unit to turn the entire system's power to the standby mode.

Remote control unit

ON/STANDBY
Main unit

Remote control unit
15 SYSTEM FUNCTIONS
Making system connections between the AVR-M330 and the DVD player (DVD-M330) makes operation even easier. (For instructions on connections, refer to "Connecting the audio components" on pages 14.)
System functions will not work properly if the input/output function settings are not right for the connected components. Be sure to set the input/output functions for the components being used. (See page 28.) The setting contents are maintained until they are next changed even when the power is switched off.
(1) Auto power on function
- When the play button on the DVD unit (▶) or the DVD play button on the remote control unit (▶) is pressed while the power is in the standby mode, the DVD-M330 and AVR-M330's power turns on automatically, and if a disc is loaded in the DVD-M330 the disc is played.
AVR-M330
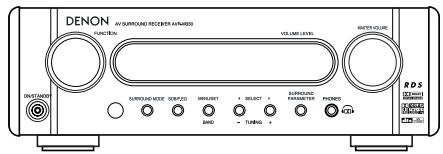
DVD-M330
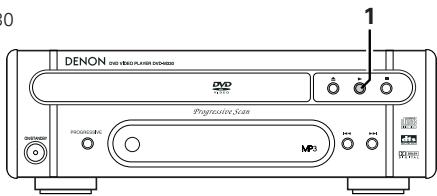
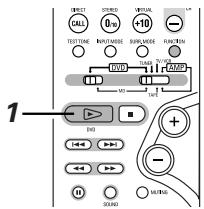
When the DVD-M330 and AVR-M330 are in the standby mode, the power can be turned on simply by pressing the play button on the DVD unit or the DVD play button on the remote control unit. If a disc is loaded, playback starts.

DVD-M330
Remote control unit
- To listen to a radio program, simply press one of the tuner preset buttons (^ + ^ or - - ^ on the remote control unit. The power turns on and a station is tuned in.

TUNER
Remote control unit
(2) Auto function selection
- At the touch of a button, the function switches automatically to "DVD" and disc playback begins.
DVD-M330
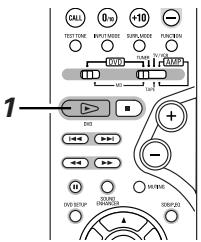
Press the play button on the DVD-M330 or the DVD play button on the remote control unit.
- The AVR-M330's function switches to "DVD" and if a disc is loaded playback of the disc starts.

DVD-M330
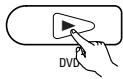
Remote control unit
- To listen to a radio program, simply press one of the tuner preset buttons (" + " " or " - ") on the remote control unit.
- Auto function selection does not work for components connected using the TV/AUX1 or AUX2 input terminals.

TUNER
Remote control unit
16 LAST FUNCTION MEMORY
This unit is equipped with a last function memory which stores the input and output setting conditions as they were immediately before the power is switched off.
This function eliminates the need to perform complicated resettings when the power is switched on.
- The unit is also equipped with a back-up memory. This function provides memory storage when the power switch is off and with the power cord disconnected.
17 INITIALIZATION OF THE MICROPROCESSOR
When the indication of the display is not normal or when the operation of the unit does not show the reasonable result, the initialization of the microprocessor is required by the following procedure.
Press the power button to set the standby mode, then unplug the set's power cord from the wall power outlet.
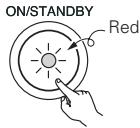
After at least 10 seconds, press the SURROUND MODE button on the AVR-M330, press the SDB/PEQ equalizer button, then press the surround mode button again for at least 2 seconds.
After several seconds, "INITIALIZE" appears on the display and the power turns on.
- The microprocessor is initialized.

NOTES:
- If step 3 does not work, start over from step 1.
- If the microprocessor is reset, all the buttons and the setup settings are reset to the factory default values.
18 TROUBLESHOOTING
Check again before assuming the player is malfunctioning
Are all the connections correct?
Are you following the instructions in the manual?
Are the speakers and other components operating properly?
If this unit does not seem to be functioning properly, check the table below. If this does not solve the problem, this unit may be damaged. Turn off the power, unplug the power cord from the power outlet, and contact your store of purchase or nearest Denon sales office.
| Symptom | Cause | Measures | Page | |
| Common problems when listening to the discs, tapes and FM broadcasts, etc. | DISPLAY not lit and sound not produced when power switch set to on. | • Power cord not plugged in securely. | • Check the insertion of the power cord plug. | 14 |
| DISPLAY lit but sound not produced. | • Speaker cords not securely connected. • Improper position of the audio function button. • Volume control set to minimum. • MUTING is on. • Digital signals not input Digital input selected. • The protection circuit has been activated due to abnormally high temperature inside the unit. | • Connect securely. • Set to a suitable position. • Turn volume up to suitable level. • Switch off MUTING. • Input digital signals or select input jacks to which digital signals are being input. • Unplug the power cord, wait for the unit to cool off, improve ventilation around the unit, then turn the power back on. | 7 30 29 32 30 9 | |
| Volume indicator on display flashing. | ||||
| Monitor doesn't display an image. | • Connections between the video output jack of this unit and the input connector of the monitor are incomplete. • The input setting of the monitor TV is different. | • Check whether the connections are correct. • Set the input switching of the TV to the jack to which the video input is connected. | 10 — | |
| The program cannot be copied from DVD to the VCR. | • Almost all movie software contains a copy prevention signal. | • A copy cannot be made. | — | |
| The subwoofer does not produce sound. | • Connections are incomplete. | • Check the connections. | — 7 | |
| Remote control unit | This unit does not operate properly when remote control unit is used. | • Batteries dead. • Remote control unit too far from this unit. • Obstacle between this unit and remote control unit. • Different button is being pressed. • ⊕ and ⊙ ends of battery inserted in reverse. • The mode selection of the remote control is not properly selected. The DVD mode, AV mode, or audio mode is not properly selected. | • Replace with new batteries. • Move closer. • Remove obstacle. • Press the proper button. • Insert batteries properly. • Press the remote control mode selection button for the item you wish to operate. To operate this unit, use with the DVD mode. | 19 19 19 16 19 17 |
| Tuner | Continuous noise is heard when receiving FM programs | • Antenna cable is not properly connected. | • Connect the antenna cable properly. • Connect an outdoor antenna. | 12 |
| Hissing or continuous noise is heard when receiving AM programs | • This may be noise from a TV or interference from a radio station. | • Turn off the TV. • Change the position and direction of the AM loop antenna. | 12 | |
| Humming noise is heard when receiving AM programs | • The radio waves transmitted over the power cord are being modulated. | • Unplug the power cord, flip the plug over in the opposite direction, then plug the cord back in. | 12 |
19 SPECIFICATIONS
Audio Section
Power Amplifier Section Rated output:
Output terminals:
- Analog Section
- Input sensitivity/Input impedance:
- Frequency response:
- Signal-to-noise ratio:
Tuner Section
Reception frequency range: Receiving sensitivity: FM stereo separation:
- Digital Section Digital input/output:
Timer Section Timer:
General
Power supply:
Power consumption:
Maximum external dimensions:
Weight:
Remote Control Unit Remote control method: Power supply:
Speakers SYS-M330
- Satellite speaker system (SC-AM330)
Type: Speakers:
Input impedance: Max. input:
Dimensions: Mass:
- Center speaker system (SC-CM330)
Type: Speaker:
Input impedance: Max. input
Dimensions: Mass:
- Subwoofer (DSW-3L)
Type:
Speaker:
Speaker impedance:
Frequency range:
Max. input
Dimensions:
Mass:
Front: 17 W + 17 W (6 Ω/ohm load, 1 kHz, T.H.D. 10 %)
Center: 20 W (6 Ω/ohm load, 1 kHz, T.H.D. 10 %)
Surround: 17W + 17W (6 /ohm load, 1kHz T.H.D. 10% Subwoofer: 20W (6 /ohm load, 1kHz T.H.D. 10%
Speaker impedance: 6 to 16 Ω/ohms
400 mV/47 kΩ/kohms
10 Hz to 50 kHz: +0, -3 dB (LINE, Direct mode)
90 dB (LINE, Direct mode)
FM: 87.5 MHz to 108 MHz AM: 522 kHz to 1611 kHz
FM: 1.8 V / 75 /ohms AM: 20~ V 35 dB (1 kHz)
Format — Digital audio interface
Sleep timer: 120 minutes, maximum
230 V AC, 50 Hz
75 W (At standby: Approximately 1 W)
210 (W) x 70 (H) x 325 (D) mm (including feet, knobs, and connectors) 3.9 kg
RC-996
IR pulse method
3 V DC, using two AA batteries
2-way, 2-speakers / Closed box / Low-leakage-flux
5.7 cm cone bass-mid x 1
2,5 cm super-high range x 1
6 Ω/ohms
30 watts (IEC)
80 watts (PEAK)
2-way, 3-speakers / Closed box / Low-leakage-flux
5.7 cm cone bass-mid x 2
2,5 cm super-high range x 1
6 Ω/ohms
30 watts (IEC)
80 watts (PEAK)
1-way, 1-speaker / Reflex box / Low-leakage-flux
16 cm cone woofer x 1
6 Ω/ohms
30 Hz ~ 240 Hz
60 watts
210 (W) x 322 (H) x 304 (D) mm (including base)
4.9 kg (including base)
MEMO
DENON,Ltd.
TOKYO, JAPAN
www.denon.com
- - DECLARATION OF CONFORMITY
- INTRODUCTION
- TABLE OF CONTENTS
- ■ ACCESSORIES
- Check that the following parts are included in addition to the main unit:
- BEFORE USING
- - Moving the set
- Before turning the power switch on
- CAUTIONS ON INSTALLATION
- AV SURROUND RECEIVER (AVR-M330)
- SPEAKER SYSTEM (SYS-M330)
- CAUTION:
- WARNING:
- CAUTIONS ON HANDLING
- FEATURES
- CONNECTIONS
- Speaker system connections
- [ Description of speaker label ]
- Precautions when connecting speakers
- Be sure to turn the amplifier's power off when connecting the speaker systems.
- Connecting the speaker cords
- Replacing the speaker connection cords
- Protector circuit
- Note on speaker impedance
- Connecting the DVD Player and TV
- Connecting the AUDIO Jack
- Connecting the DIGITAL Jack
- Connecting the Audio Signals of a Digital Satellite Tuner and VCR
- Connection to the optical digital input terminal
- NOTES:
- Using the active subwoofer
- Using SURROUND BACK PRE OUT (SBL/SBR)
- Connecting the audio components (DVD-M330)
- System operations
- Connecting the speaker systems
- PART NAMES AND FUNCTIONS
- AV SURROUND RECEIVER (AVR-M330) Front Panel
- Remote control unit
- Names and functions of remote control unit buttons on the DHT-M330DV
- [1] Surround amplifier system buttons (Operated with mode switch 2 set to "AMP.")
- [2] DVD system buttons (Operated with mode switch 2 set to "DVD")
- [3] Tuner system buttons (Operated with mode switch 2 set to "TUNER")
- REMOTE CONTROL UNIT
- Inserting the batteries
- Notes on Batteries
- Using the remote control unit
- Operating DENON audio components
- TV and video deck preset memories
- Combinations of preset codes for different brands
- Operating the TV/video deck after storing its remote control signals in the preset memory
- NOTE:
- SETTING UP THE SYSTEM
- Quick setup procedure
- Quick Setup procedure
- Speaker system layout
- Achieving the optimum surround sound
- Playing DVDs in the surround mode
- Select the DVD input source.
- Set the surround mode to "AUTO DECODE". The display becomes as shown below.
- Adjust the volume.
- Input mode setting
- Input mode selection function
- Start playback on the selected component.
- Either turn the MASTER VOLUME dial on the main unit or use the VOLUME buttons on the remote control unit to adjust the volume.
- To check the currently playing program source, etc.
- Input mode display
- Input signal display
- Input mode when playing CD sources
- Input mode when playing DTS sources
- After starting playback
- [1] Adjusting the sound quality (SDB/P.EQ)
- Press the SDB/P.EQ button.
- DEFEAT
- SDB ON
- DRC ON
- P.EQ1\~3
- [2] Adjustment the Sound Enhancer
- Press the SOUND ENHANCER button.
- ENHANCER OFF
- VOCAL ENH
- SURR. ENH
- [3] Turning the sound off temporarily (MUTING)
- Use this to turn off the audio output temporarily. Press the MUTING button.
- SURROUND PLAYBACK
- Before playing with the surround function
- Playing in the AUTO DECODE mode
- [1] Dolby Digital and DTS surround playback (digital inputs only)
- Set the surround mode to "AUTO DECODE".
- [2]2-channel mode settings
- Surround parameters (1) (2-channel mode)
- AUTO-ST (auto stereo) mode
- PLII CINEMA / PLII MUSI / PLII GAME
- DTS NEO:6 CINEMA/NEO : 6 MUSIC mode
- Playing in the Dolby Virtual Speaker mode
- [1] Playing Dolby Virtual Speaker
- Surround parameters (2)
- DOLBY VS (Dolby Virtual Speaker mode)
- Playing in the DSP surround modes
- Personal Memory Plus
- Playback using the Dolby Headphone mode
- Surround parameters (3)
- DOLBY H (Dolby Headphone modes)
- 2-channel modes
- Setting the speaker distance
- Preparations:
- 4
- 5
- Select the FUNCTION "TUNER".
- Select "FM" or "AM".
- Adjust the receiving frequency.
- Auto tuning
- FM Stereo Reception
- Presetting stations (remote control unit only)
- Auto tuner presets (remote control unit only)
- Listening to preset stations (remote control unit only)
- RDS (Radio Data System)
- ■ Program Type (PTY)
- Traffic Program (TP)
- Radio Text (RT)
- (6)RDS search
- PTY search
- TP search
- RT (Radio Text)
- EXPANDING TO A 6.1- OR 7.1-CHANNEL SYSTEM
- Connections for a 6.1- or 7.1-channel system
- 6.1- or 7.1-channel speakers system layout
- 6.1- or 7.1-channel surround playback
- Changing the Quick Setup settings
- Checking and adjusting the playback level using test tones
- Setting the delay time (distance setting)
- Surround playback in the auto decode mode
- DOLBY/DTS SURROUND
- Surround
- Dolby Surround
- Dolby Digital
- Dolby Digital and Dolby Pro Logic
- Dolby Digital compatible media and playback methods
- Dolby Pro Logic IIx
- Dolby Pro Logic II
- Sources recorded in Dolby Surround are indicated with the logo mark shown below.
- DTS Digital Surround
- DTS compatible media and playback methods
- DTS-ES Extended Surround
- DTS-ES™ Discrete 6.1
- DTS-ES™ Matrix 6.1
- DTS Neo:6TM surround
- - DTS Neo:6 Cinema
- - DTS Neo:6 Music
- Dolby Virtual Speaker
- Features of Dolby Virtual Speaker sound
- Dolby Headphone
- USING THE SLEEP TIMER
- Setting the sleep timer (remote control unit only)
- SYSTEM FUNCTIONS
- Auto power on function
- Auto function selection
- LAST FUNCTION MEMORY
- INITIALIZATION OF THE MICROPROCESSOR
- TROUBLESHOOTING
- Check again before assuming the player is malfunctioning
- SPECIFICATIONS
- Audio Section
- Tuner Section
- Timer Section Timer:
- General
- Speakers SYS-M330
Brand : DENON
Model : DHT-M330DV
Category : Soundbar