
DHT-T110 - Soundbar DENON - Free user manual and instructions
Find the device manual for free DHT-T110 DENON in PDF.


| Product Type | Soundbar |
| Brand | Denon |
| Model | DHT-T110 |
| Dimensions (W x H x D) | 800 x 80 x 100 mm (approx.) |
| Weight | 3.5 kg (approx.) |
| Power Supply | AC 100-240 V, 50/60 Hz |
| Power Consumption | 30 W (typical) |
| Audio Channels | 2.1 (stereo + subwoofer) |
| Total Output Power | 100 W (approx.) |
| Frequency Response | 50 Hz – 20 kHz |
| Audio Inputs | Optical, AUX, Bluetooth |
| Wireless Connection | Bluetooth 4.0 |
| Remote Control | Included (battery type: CR2025) |
| Wall Mountable | Yes (brackets included) |
| Cleaning Instructions | Wipe with a soft, dry cloth. Do not use solvents. |
| Safety Precautions | Do not expose to water or heat sources. Use only provided power adapter. |
| Spare Parts Availability | Remote control, power adapter available from Denon service. |
| Repairability Index | 5.4 / 10 (estimated) |
Frequently Asked Questions - DHT-T110 DENON
User questions about DHT-T110 DENON
0 question about this device. Answer the ones you know or ask your own.
Ask a new question about this device
Download the instructions for your Soundbar in PDF format for free! Find your manual DHT-T110 - DENON and take your electronic device back in hand. On this page are published all the documents necessary for the use of your device. DHT-T110 by DENON.
USER MANUAL DHT-T110 DENON
IMPORTANT SAFETY INSTRUCTIONS

This symbol found on the apparatus indicates hazards arising from dangerous voltages.

This symbol found on the apparatus indicates the user should read all safety statements found in the user manual.

This symbol found on the apparatus indicates double insulation.

Warning!
To reduce the risk of fire or electrical shock, do not expose this apparatus to rain or moisture.
-
Read these instructions.
-
Keep these instructions.
-
Heed all warnings.
-
Follow all instructions.
-
Do not use this apparatus near water.
-
Clean only with dry cloth.
-
Do not block any ventilation openings. Install in accordance with the manufacturer's instructions.
-
Do not install near any heat sources such as radiators, heat registers, stoves, or other apparatus (including amplifiers) that produce heat.
-
Do not defeat the safety purpose of the polarized or grounding-type plug. A polarized plug has two blades with one wider than the other. A grounding-type plug has two blades and a third grounding prong. The wide blade or the third prong is provided for your safety. If the provided plug does not fit into your outlet, consult an electrician for replacement of the obsolete outlet.
-
Protect the power cord from being walked on or pinched particularly at plugs, convenience receptacles, and the point where they exit from the apparatus.
-
Only use attachments/accessories specified by the manufacturer.
-
Unplug this apparatus during lightning storms or when unused for long periods of time.
-
Refer all servicing to qualified service personnel. Servicing is required when the apparatus has been damaged in any way, such as power-supply cord or plug is damaged, liquid has been spilled or objects have fallen into the apparatus, the apparatus has been exposed to rain or moisture, does not operate normally, or has been dropped.
-
Maintain a minimum distance of 2" (50mm) around the front, rear, and sides of the apparatus for sufficient ventilation. The ventilation should not be impeded by covering the ventilation openings or placing on or around the apparatus items such as newspapers, table-cloths, curtains, etc.
-
No open flame sources, such as lighted candles, should be placed on the apparatus.
-
The apparatus shall not be exposed to dripping or splashing. No objects filled with liquids, such as vases, shall be placed on the apparatus.
-
Either the power inlet connector on the rear of the apparatus or the power plug at the wall must remain accessible, to be able to disconnect power from the apparatus.
-
To completely disconnect this apparatus from the AC Mains, disconnect the power supply cord plug from the AC receptacle.
-
Use only with the cart, stand, tripod, bracket, or table specified by the manufacturer, or sold with the apparatus. When a cart or rack is used, use caution when moving the cart/apparatus combination to avoid injury from tip-over.

-
CAUTION: These servicing instructions are for use by qualified service personnel only. To reduce the risk of electric shock, do not perform any servicing other than that contained in the operating instructions unless you are qualified to do so.
-
WARNING: Only use attachments/accessories specified or provided by the manufacturer
-
WARNING: Please refer the information on exterior bottom enclosure for electrical and safety information before installing or operating the apparatus.
-
When not in use and during movement, please take care of the power cordset, e.g. tie up the power cordset with cable tie or something like that. It shall be free from sharp edges that can cause abrasion of the power cordset. When put into use again, please make sure the power cordset is not damaged, If any damage is found, please contact customer service and
-
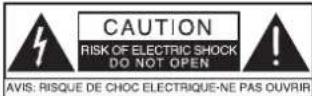
Warning: To reduce the risk of electric shock, do not remove cover (or back) as there are no user-serviceable parts inside. Refer servicing to qualified personnel.
-
Observe and follow local regulations regarding battery disposal. Do not keep the battery in a place exposed to direct sunlight or in places with extremely high temperatures, such as near a heater.
WARNING:

DO NOT INGEST BATTERY, CHEMICAL BURN HAZARD
• The remote control supplied with this product contains a coin/button cell battery. If the coin/button cell battery is swallowed, it can cause internal burns in just 2 hours and can lead to death.
- Keep new and used batteries away from children. If the battery compartment does not close securely, stop using the product and keep it away from children. If you think batteries might have been swallowed or placed inside any part of the body, seek immediate Medical attention.
- Observe and follow local regulations regarding battery disposal.
- Do not keep the battery in a place exposed to direct sunlight or in places with extremely high temperatures, such as near a heater.

American Users:
Note: This equipment has been tested and found to comply with the limits for a Class B digital device, pursuant to part 15 of the FCC Rules. These limits are designed to provide reasonable protection against harmful interference in a residential installation. This equipment generates, uses, and can radiate radio frequency energy and, if not installed and used in accordance with the instructions, may cause harmful interference to radio communications. However, there is no guarantee that interference will not occur in a particular installation. If this equipment does cause harmful interference to radio or television reception, which can be determined by turning the equipment off and on, the user is encouraged to try to correct the interference by one or more of the following measures:
Reorient or relocate the receiving antenna.
Increase the separation between the equipment and receiver. Connect the equipment into an outlet on a circuit different from that to which the receiver is connected.
Consult the dealer or an experienced radio/TV technician for help.
Caution: Unauthorized changes or modifications to the receiver could void the user's authority to operate the equipment.

Canadian Users:
CAN ICES-3 (B) / NMB-3 (B)
FCC Radiation Exposure Statement
This equipment complies with FCC RF radiation exposure limits set forth for an uncontrolled environment.
Caution!
Any changes or modifications not expressly approved by the party responsible for compliance could void the user's authority to operate the equipment.
Canada Statement
The device meets the exemption from the routine evaluation limits in section 2.5 of RSS 102 and compliance with RSS-102 RF exposure, users can obtain Canadian information on RF exposure and compliance.
FCC Information (For US customers)
• Product Name: TV Speaker Base
• Model Number: DHT-T110
• This product FCC ID: 2AAGJDHTT110
This equipment complies with Part 15 of the FCC Rules.
Operation is subject to the two following conditions:
(1) this product may not cause harmful interference, and
(2) this product must accept any interference received,
including interference that may cause undesired operation.
Denon Electronics (USA), LLC
(a D&M Holdings Company)
100 Corporate Drive
Mahwah, NJ 07430-2041
Tel. (201) 762-6665
2. IMPORTANT NOTICE: DO NOT MODIFY THIS PRODUCT
This product, when installed as indicated in the instructions contained in this manual, meets FCC requirements.
Modification not expressly approved by D&M Holdings
may void your authority, granted by the FCC, to use the product.
3. NOTE
This product has been tested and found to comply with the limits for a class B digital device, pursuant to Part 15 of the FCC Rules. The limits are designed to provide reasonable protection against harmful interference in a residential installation. This product generates, uses and can radiate radio frequency energy and, if not installed and used in accordance with the instructions, may cause harmful interference to radio communications. However, there is no guarantee that interference will not occur in a particular installation. If this equipment does cause harmful interference to radio or television reception, which can be determined by turning the equipment OFF and ON, the user is encouraged to try to correct the interference by one or more of the following measures:
- Reorient or relocate the receiving antenna.
- Increase the separation between the equipment and receiver.
- Connect the equipment to an outlet on a circuit different from that to which the receiver is connected.
- Consult the dealer or an experienced radio or television technician for help.
IC Information (For Canadian customers)
1. PRODUCT
This product IC: 11154A-DHTT110
CAN ICES-3 (B) / NMB-3 (B)
2. CAUTION
To reduce potential radio interference to other users, the antenna type and its gain should be so chosen that the equivalent isotropically radiated power (e.i.r.p.) is not more than that permitted for successful communication.
Trademark Information
• Denon is registered trademark of D&M Holdings Inc.
• Manufactured under license from Dolby Laboratories.
Dolby and the double-D symbol are trademarks of Dolby Laboratories.
- The Bluetooth ^® word mark and logos are registered trademarks owned by Bluetooth SIG, Inc. and any use of such marks by D&M Holdings is under license. Other trademarks and trade names are those of their respective owners.
• ©2013 CSR plc and its group companies.
The aptX® mark and the aptX logo are trade marks of CSR plc or one of its group companies and may be registered in one or more jurisdictions.
IC Information (For Canadian customers)
This device complies with Industry Canada licence-exempt RSS standard(s). Operation is subject to the following two conditions: (1) this device may not cause interference, and (2) this device must accept any interference, including interference that may cause undesired operation of the device.
Under Industry Canada regulations, this radio transmitter may only operate using an antenna of a type and maximum (or lesser) gain approved for the transmitter by Industry Canada. To reduce potential radio interference to other users, the antenna type and its gain should be so chosen that the equivalent isotropically radiated power (e.i.r.p.) is not more than that necessary for successful communication.
Specifications
Frequency Range: 40 Hz to 20 kHz
High Frequency Drivers: 1/2" (14 mm) tweeter x 2
Low Frequency Drivers: 2 x 5" (51 x 127 mm) woofer x 2
Dimensions: (H x W x D) 2 7/8 x 23 7/8 x 14" (71 x 608 x 355 mm)
Rating Voltage AC 120 V, 60 Hz
Weight: 9.5 lbs (4.3 kg)
Power consumption: 30 W
Power consumption in standby mode: 0.5 W
Specifications are subject to change without notice.
Introduction
Thank you for choosing Denon. Modern flat-panel televisions are wonders of digital video, but leave little room for serious sound reproduction. The Denon-engineered DHT-T110's accurate, dynamically wide-range sound bridges the gap, with spacious audio reproduction from Music and Movie modes, including Dolby Digital surround decoding, that bring television and movie sound to life. DHT-T110's inputs adapt to any television or system arrangement, with wireless Bluetooth® streaming for convenient audio playback from mobile devices. What's more, an ingenious remote control learning solution lets you continue using your familiar television or cable/satellite remote.
We've worked hard to make DHT-T110 the best performing product of its kind—and just as diligently to ensure it is the simplest to set up and easiest to use.
You're about to hear just how much you've been missing, but first, please take a few moments to leaf through this brief manual. You probably think it is not really necessary, and you may well be correct, but doing so will help you get the best from the DHT-T110.
Please save your original shipping carton and packing materials if at all possible. Should you ever need to move or transport DHT-T110, this is by far the safest way to do so.
Locating DHT-T110
DHT-T110 is designed to support most large flat-panel televisions up to 50" (with a foot base diameter up to 21 1/2 x 12 1/8" (546 x 308 mm)) and 60 lbs (27 kg). The television's base needs to fit entirely within the flat top area of the DHT-T110. There is a "+" mark on the top center of the cabinet. Use that to get the television base centered on DHT-T110.
You may also place DHT-T110 on a shelf, or furniture, above or below the screen. However, it should be centered left/right with the screen, and ideally no more than a few inches above or below. DHT-T110 is not suitable for direct on-wall mounting. DHT-T110 will often sound its best when the DHT-T110's front grille is close to or flush with the front edge of the furniture or shelf on which it rests (this eliminates unwanted sound reflections).
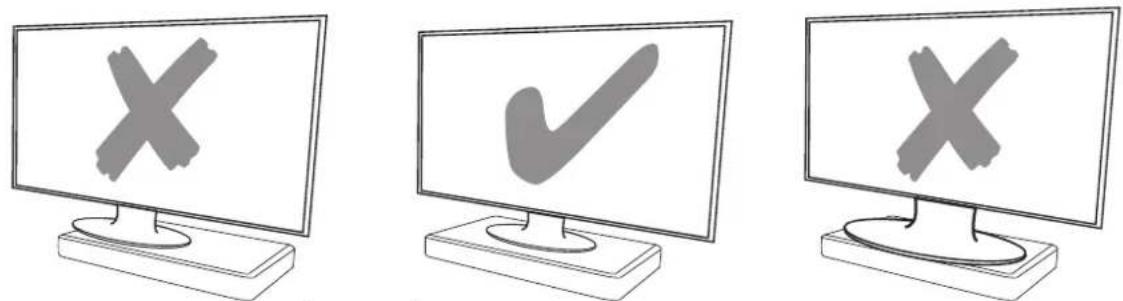
Not Centered Centered Base is too large
CAUTION: Allowing the base of your TV to hang over any edge of this speaker system increases the risk of the TV tipping, which may result in injury.
CAUTION: If your TV comes with an anti-tip device, install it according to the manufacturer's instructions and adjust the tether as instructed after placing the TV on top of the system. Installing an anti-tip device is recommended when using a TV with this product. If your TV did not come with an anti-tip device, you can get one from most retail TV suppliers.
- If the TV base is too large to fit on top of the system- place the sound system in another location such as on an open shelf under the TV, but keep it close to your TV so the audio cable will reach. You also could mount your TV on the wall above the system.
- Never place the equipment in an unstable location. The equipment may fall, causing serious personal injury or death. Many injuries, particularly to children, can be avoided by taking simple precautions.
CAUTION: DO NOT place a CRT type TV on this system. It is not designed for use with this type of TV.
Front Panel Controls
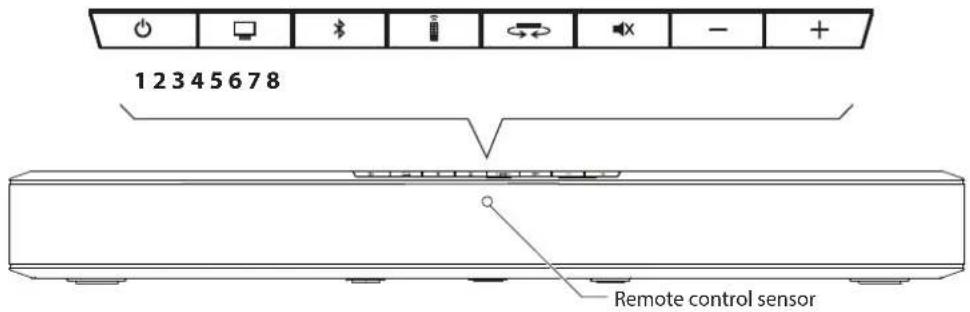
1) Power on/standby
2) Television Input—select to watch television.
3) Bluetooth wireless input—select for Bluetooth pairing or playback.
4) Remote Learning—engages remote control learning.
5) Listening Mode—changes Listening Mode, stepping through the three Modes in sequence.
6) Mute sound—Press to mute the audio, press again to unmute. (Pressing either Volume key also unmutes.)
7) Volume down—press-and-hold to continuously decrease the volume
8) Volume up—press-and-hold to continuously increase the volume
Rear Panel
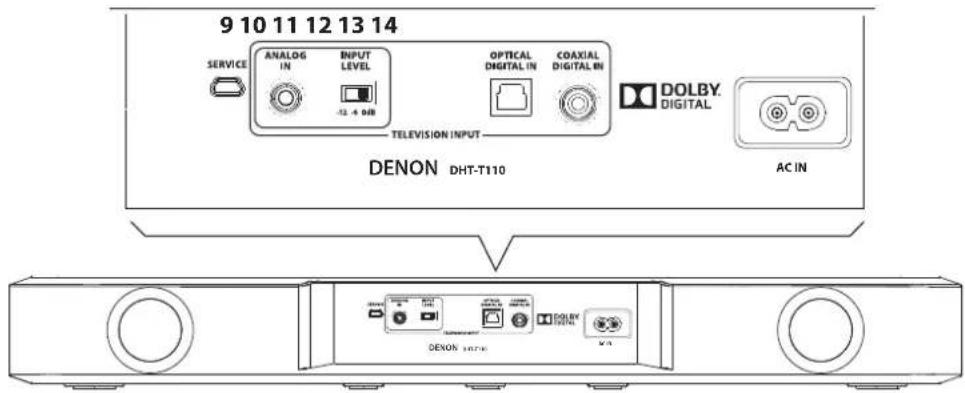
9) Service Port—for service only, do not use.
10) Analog In 18 " (3.5 mm) mini plug stereo—connects to television's rear panel audio out or headphone output if no digital out available.
11) Input Level—input sensitivity for the Analog In.
12) Optical Digital Input (S/PDIF)—connects to television's optical digital out.
13) Coaxial Digital In (RCA jack)—connects to television's coaxial digital audio, if available.
14) Power Input—connect the supplied power cable here.
Accessories

15
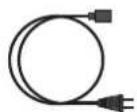
16
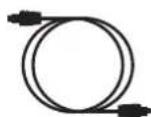
17
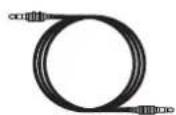
18
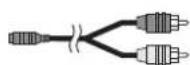
19
15) Remote Control—supplied remote control with included battery.
16) Power Cable—DHT-T110 power cable.
17) Optical Digital Cable—best choice for connecting digital audio sources to DHT-T110.
18) 18 " (3.5 mm) Stereo Cable—for connecting a source to the Analog Input, if needed.
19) RCA to 18 " (3.5 mm) Adapter—adapts a left/right RCA output to a stereo 1/8" (3.5 mm) output.
Connecting DHT-T110 to your television
DHT-T110 offers three audio inputs to route sound from your television to the DHT-T110.
Connect only one type of audio cable at a time.
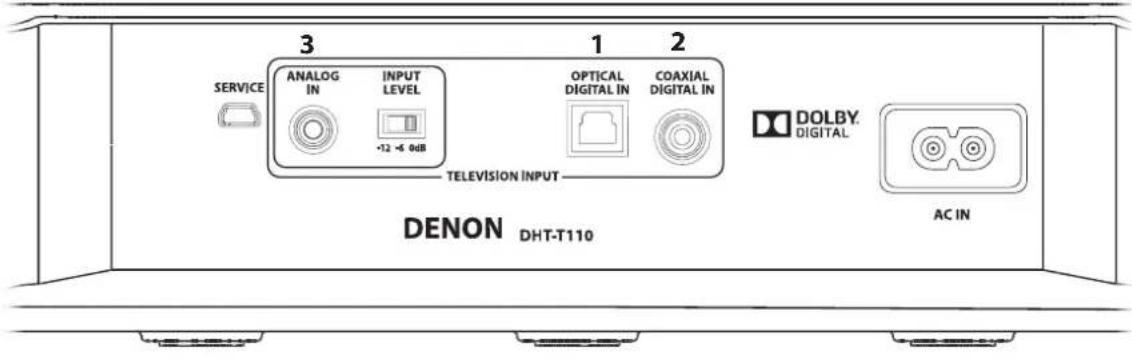
1 BEST Optical Digital Input (S/PDIF) —Connects to television's optical digital out.
or
2 BETTER Coaxial Digital In (RCA jack)—Connects to television's coaxial digital-audio.
or
3 GOOD Analog In 1/8" (3.5 mm) mini plug stereo—Connects to television's rear panel audio out or headphone output if no digital out available.
Which of the three inputs will be selected is determined by auto-priority. If only one input has signal present, that input will play, but if more than one are active Optical takes priority over Coaxial or Analog, and Coaxial over Analog.
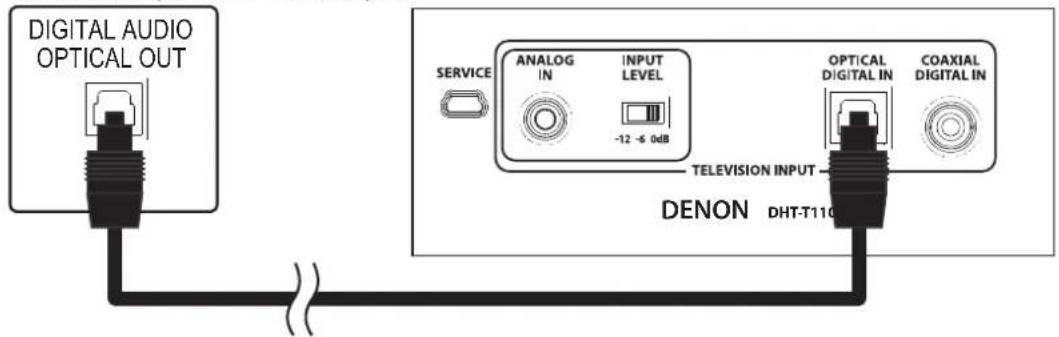
Optical Digital In - BEST
Use the supplied optical cable to connect your television's optical digital output to DHT-T110's Optical Digital Input. Other components connected to the television, such as a DVD/Blu-ray player or cable/satellite tuner, will automatically play through DHT-T110.
The optical connector looks square, but it is "keyed" and will only plug in one way; don't force it.
Television rear panel DHT-T110 rear panel
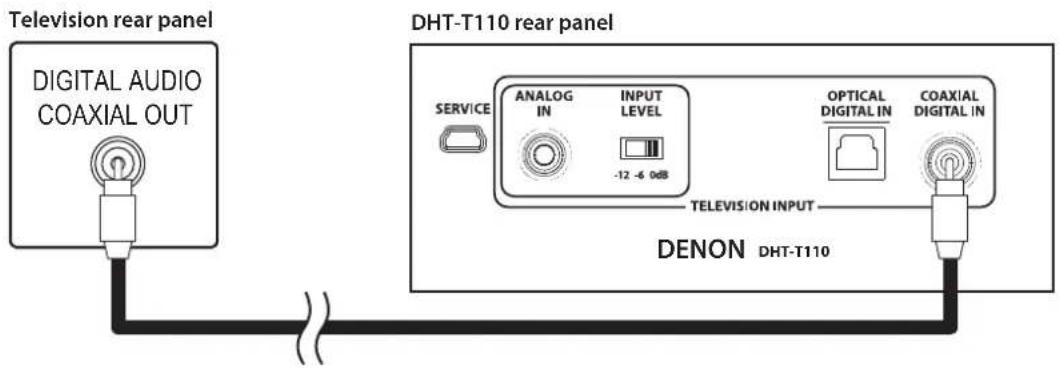
Coaxial Digital In - BETTER
If your television lacks an optical digital out it will probably include a coaxial digital output. Use an "RCA"-type cable (not included) to connect your television's coaxial digital audio output to DHT-T110's Coaxial Digital In. Other components connected to the television, such as a DVD/Blu-ray player or cable/satellite tuner, will automatically play through DHT-T110.
Analog In 1/8" (3.5 mm) mini plug analog audio - GOOD
If your television has no digital audio outputs, connect its analog stereo audio output using the supplied 1/8" (3.5 mm) stereo cable; if this output is in the form of dual RCA jacks (typically red for right and white or black for left), use the supplied adapter. If no other audio output is available, connect the set's headphone jack to the analog input using the supplied cable.
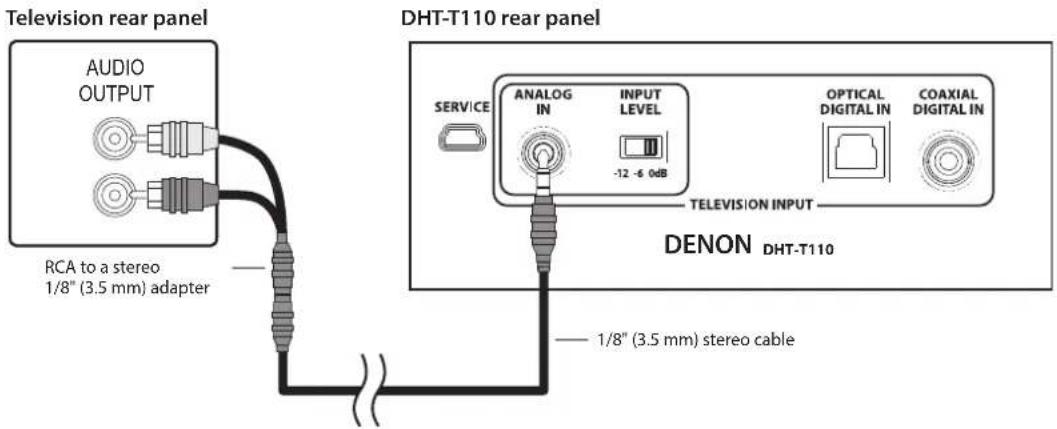
Important Note: Input Sensitivity (Analog Input Only)
The normal setting for this is "0 dB." In rare cases a television's analog audio output may be too strong. Should you hear distorted, harsh, or "buzzy" sound from DHT-T110 via its analog stereo input, adjust the rear panel Input Level switch if you continue to hear distortion.
If you connect multiple inputs to DHT-T110, the DHT-T110 will automatically select the one with the highest priority. For example, if optical and analog ins are both connected with live signal, optical will play through the DHT-T110. If the optical source is turned off, the DHT-T110 must be powered off and then back on in order to detect a different audio input.
Disable Your Television's Speakers
Disable your television's built-in speakers when using DHT-T110. Usually, this is accomplished via an on-screen setup menu on your television. Look for an "Audio" or "Sound" sub-menu, and a "Speakers Off", "Disable Speakers", "External Speakers" or similar menu item. Some televisions have a switch on the rear panel to disable the built-in speakers. If your television does not have these functions, lower the volume of the television all the way down to 0, or mute the television.
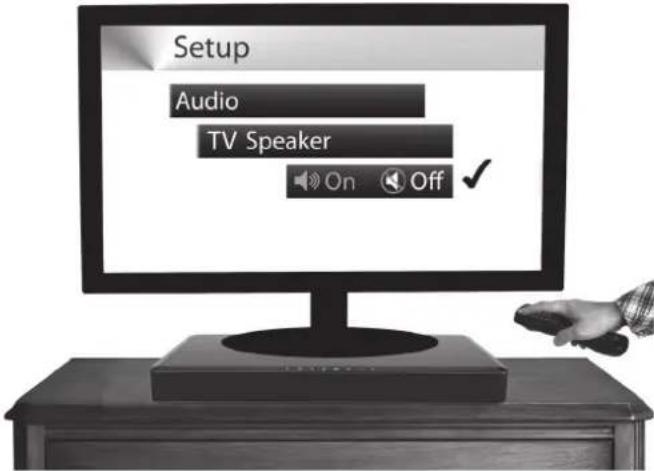
Don't leave the television speakers on so that both systems play simultaneously; this will not yield sound that is louder or "better."
A remote control is supplied with DHT-T110. Its keys duplicate DHT-T110's front-panel buttons (see "The Controls on Top of DHT-T110" on page 13), with one addition (Day/Night), and one deletion (the "Learn" key).
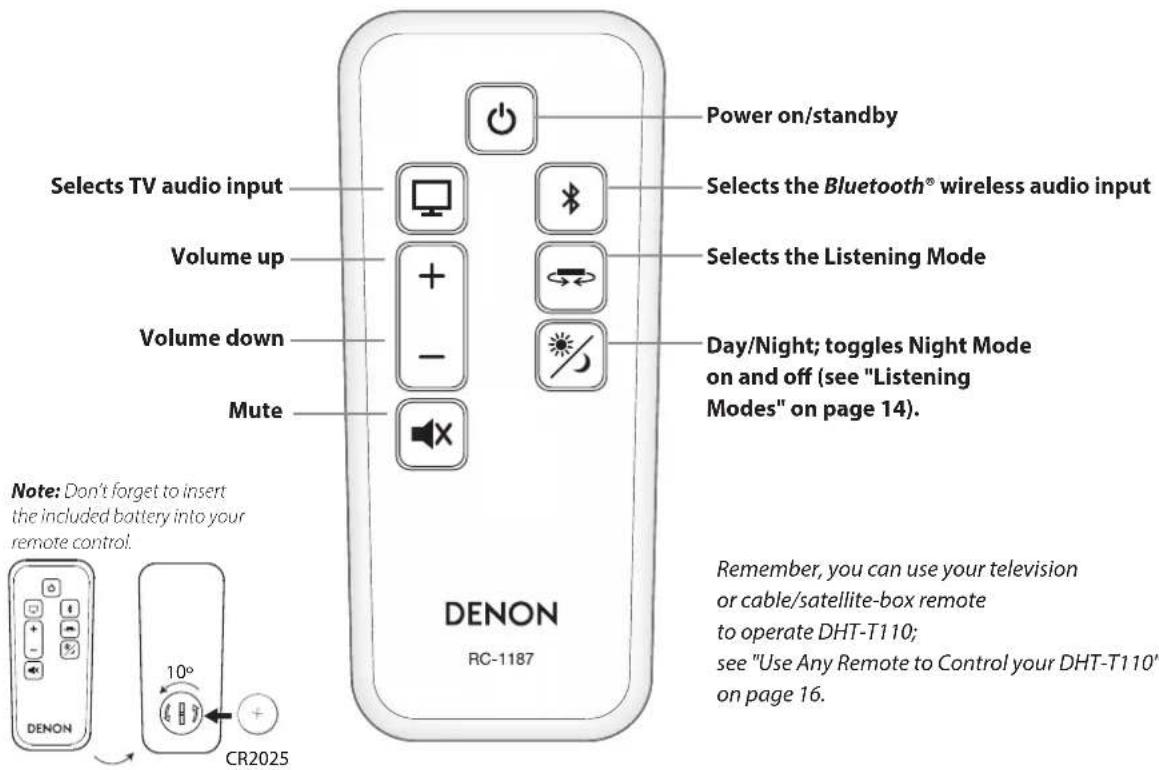
The Controls on Top of DHT-T110
| - | + |
12345678
1) Power on/standby
2) Television Input Listen to sound from the television; auto-selects the active signal.
Should multiple inputs have signal present, priority is given to optical-digital, coaxial-digital, and 1/8" (3.5 mm) analog stereo mini plug, in that order.
3) Bluetooth® Input Listen to wireless audio streamed from your Bluetooth enabled mobile device. (see "Using Bluetooth®" on page 15).
4) Remote Learning Press to engage Learning Mode. (see "Use Any Remote to Control your DHT-T110" on page 16).
5) Listening Mode Toggles through the three Listening modes (see "Listening Modes" on page 14).
6) Mute sound Mutes the audio; press again to unmute. (Pressing either Volume key also unmutes).
7) Volume down Press-and-hold to continuously decrease the volume.
8) Volume up Press-and-hold to continuously increase the volume.
About DHT-T110's Automatic Power Modes
DHT-T110 will automatically "wake-up" whenever any of its wired inputs receives an audio signal. Simply turning on your television will also turn on DHT-T110. (For Bluetooth playback you will need to turn on DHT-T110 manually using the remote control or top panel controls). Because of DHT-T110's power saving design, the system takes five to seven seconds to turn on from standby. Pressing either the front-panel Television Input or Bluetooth keys will also power up the DHT-T110. Press the Power key again to return DHT-T110 to its low-power "standby" mode. DHT-T110 will automatically return to standby after five minutes of not receiving any audio, for example, after you turn off your television set.
If you wish to change this auto-on behavior you may switch between the standard automatic wake-up/standby mode, and a manual power on/standby mode. To change from one to the other, press-and-hold the front panel Power key for three seconds. The power key LED will flash bright for three seconds, then illuminate steadily for three seconds, and then go completely dark, indicating you have changed to manual power mode. Each time you repeat the Power-key press-and-hold it will change to the other mode. In manual power mode DHT-T110 is switched to on or standby with a momentary press of the Power key.
About the DHT-T110 Control Button LEDs
The eight LEDs illuminating the top panel control buttons flash or light in various patterns to indicate different functions.
Power Momentarily bright when DHT-T110 is turning on/waking from sleep; steadily dim while on/awake (operating mode); steadily dark when DHT-T110 is "asleep" in standby mode; flashes when toggling between manual- and auto-on/standby modes.
Television Input Momentarily bright when Television Input is selected, whether manually or automatically by active signal at any wired input.
Bluetooth® Input Flashes bright, rapidly, while Bluetooth is "pairing" a wireless device; steadily bright when selected.
The Bluetooth LED will flash bright, slowly, while attempting to re-pair a device that has passed out of range or otherwise lost wireless contact, and blink rapidly to indicate a Bluetooth error (unable to pair). This will cease after 60 seconds or if any DHT-T110 key is pressed.
Learning Flashes when learning functions from your remote (see "Use Any Remote to Control your DHT-T110" on page 16).
Listening Mode Flashes once when pressed at the front panel, and selects the next Listening Mode (see "Listening Modes" below).
Mute Flashes bright continuously as long as Mute function is invoked.
Listening Modes
DHT-T110 includes three Listening Modes for different kinds of audio programs, room acoustics, or personal preferences. It also has a special "Night Mode," which enhances low-volume listening, which is described in the following section.
Select a Listening Mode using either Listening Mode key (front panel or remote). Each keypress advances in sequence through the three modes – Dialog, Music and Movie. DHT-T110's front panel key LEDs momentarily display a pattern representing each newly selected mode. The following information describes the various listening modes, and shows an illustration of the LED pattern displayed when that mode is selected.
Note: The LED displays used to indicate the various Listening Modes are simple horizontal display patterns—there is no correspondence between the lit LEDs and their underlying key functions.

Dialog mode highlights center-recorded sounds such as movie dialog, television announcers, or musical soloists; it is valuable for everyday television viewing.


Music mode widens the "soundstage" somewhat for a more enveloping, involving sound.

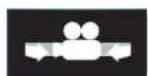
Movie mode deploys DHT-T110's maximum processing for the "biggest" possible sound on action films or other large-scale content.


Night Mode
Night Mode improves low-volume listening by subtly lifting softer sounds, and lowering very loud ones. While you may use Night Mode whenever you like, for maximum dynamic realism from television programming, movies or music, leave night mode turned off.
To engage Night Mode, press the Day/Night ✕ button on the remote control press, or press and hold the front panel Listening Mode button ↩ for three seconds. When Night Mode is engaged, the LED pattern for the current Listening Mode dimly lights. To exit Night Mode, use the same buttons in the same way. When DHT-T110 exits Night Mode, the LED pattern for the current Isitening mode brightly lights.
Volume Change Indication
When you adjust DHT-T110's volume from the remote control, the 8 front-panel LEDs momentarily function as a horizontal "bar-graph" of the volume setting reached, illuminating from 1 to all 8 buttons, the latter indicating maximum volume.
Using Bluetooth®
DHT-T110 can stream music wirelessly, via Bluetooth, from any compatible Bluetooth device such as a mobile phone, tablet, or laptop computer.
Pairing Your Bluetooth Device
Before you can stream Bluetooth audio to DHT-T110, you must pair your device to DHT-T110.
To pair the device to the DHT-T110 for the first time:
1 Press-and-hold the Bluetooth key ✗ (front panel or remote) for at least 3 seconds; the Bluetooth LED will begin to flash rapidly.
2 Go to Bluetooth settings on your device. Make sure the device's Bluetooth feature is set to "on".
3 From the Bluetooth list on your device, select "DHT-T110".
4 Playback audio on the Bluetooth source; you should now hear audio from the DHT-T110. DHT-T110's Bluetooth key LED will remain on as long as DHT-T110's Bluetooth input is selected and active.
DHT-T110 can pair multiple Bluetooth devices; however, only one can play at a time. First come, first served. One Bluetooth Source will need to be disconnected before another paired device can play.
Use Any Remote to Control your DHT-T110
It's easy to "teach" DHT-T110 to respond to nearly any conventional IR (infrared) remote, so that you may continue to use your favorite television or cable/satellite. You may prefer to teach DHT-T110 only selected commands, to avoid unintentional operations and subsequent confusion among some household members. Some DHT-T110 owners teach only Volume Up/Down and Mute, relying on the DHT-T110's front panel, or DHT-T110's own remote, for other functions.
Learning commands (using Volume up as an example):
1 Press-and-hold the front panel's Learn button for 3 seconds; its key LED will flash slowly.
2 Now press the front-panel Volume up key; the Volume up key LED will also commence flashing slowly, in sync with the Learn LED.
3 Within 60 seconds, aim the "source" remote (for example, the television handset) from approximately 18" (0.5 m) directly toward DHT-T110's front panel, and press its Volume up key 4 times in slow succession; both flashing DHT-T110 LEDs will now light steadily for 3 seconds, indicating a successful "learn."
Unlearning commands
1 Press-and-hold the front panel's Learn button for 3 seconds; its LED will flash slowly.
2 Press the button you want to clear; the button's LED will also flash slowly, in sync with the Learn LED.
3 Press the learn button within 60 seconds; both LEDs will flash rapidly for 3 seconds. The command has been unlearned.
Seven of the eight DHT-T110 front-panel buttons can be taught to respond to an external remote. Simply repeat this three-step process for as many of the other DHT-T110 commands (each associated with a front-panel button) as you wish.
Note: Rapid blinking of the two LEDs indicates a failed "learn". Press any other front-panel or DHT-T110 remote key to reset learning, and start again. See the Troubleshooting section for tips to help you successfully teach DHT-T110 to recognize the signals from your remote control.
Once you have programmed DHT-T110 to respond to your "everyday" remote controller, you may wish to put away the DHT-T110 remote for safekeeping. If you do, we recommend that you remove the battery, and wrap it in a slip of paper, masking-tape, or similar to prevent accidental discharge and put it and the DHT-T110 remote someplace safe.
Some remotes can learn by pressing the remote key several times (up to four times)
- Is the DHT-T1 10 plugged into a proven-live wall outlet? Try a lamp or other known-good appliance. Avoid using outlets that are connected to switches or dimmers.
No television sound
- Is DHT-T110's volume turned up? (Don't laugh; we do this one ourselves all the time.)
- Is DHT-T110 muted (if so, the front panel Mute key 📄 LED will be flashing).
- Is the DHT-T110 set to the correct source? A flashing Bluetooth* key LED on the front panel indicates DHT-T110 is trying to "pair" to Bluetooth; press the Television Input key to interrupt this and switch to television sound.
- Is the audio source a volume-controlled television or cable/satellite box output? If so, you must turn up the volume of the television or cable/satellite box to send adequate signal-level to DHT-T110. (For this reason it is best to choose fixed-level outputs where possible; some televisions have separate physical outputs, other employ on-screen menu settings to manage this.)
- Check connections: remember that DHT-T110 auto-prioritizes multiple incoming signals, selecting optical-digital, coaxial-digital, and analog-mini plug, in that order. Confirm that the television is routing audio to the appropriate output; there may be TV-menu settings to manage this.
- Check the signal format. Dolby Digital (5.1ch), PCM (32kHz-96kHz) is supported.
Distorted sound from the DHT-T110
• If the signal source is a volume-controlled output, turn it down a couple of steps from maximum.
• If using the analog stereo input, check the rear-panel Input Sensitivity switch setting (see page 11).
- Check the signal source to be sure the distortion is not originating there.
- If DHT-T110's volume is set to its maximum, turn it down a few steps.
Trouble teaching DHT-T110 remote control commands
- Make sure the source remote is working properly in the first place; check batteries; confirm direct operation.
- Move the DHT-T110 and source remote out of bright sunlight or powerful room lighting (too-bright light will impede infrared-signal transmission).
- Be sure to hold the "source" remote steady, 12 - 18" (0.3 - 0.5 m) in front of the DHT-T110, on its level, with the remote's IR emitter (usually a smooth black-plastic area across the end you point toward the television) aimed straight and level at the center of DHT-T110's front panel.
- Press and release source-remote keys deliberately; hold each keypress down for a half-second or so, and pause a second between repetitions.
- Remember that while DHT-T110 can learn almost all IR (infrared) remote commands, there remain a few rare code formats that cannot be taught (much like some engineers we know).
Television speakers keep getting turned back up
- Disable the television's speakers (usually a setup-menu option, but a rear-panel switch on some televisions). If this is not possible, the problem is likely that the television responds to press-and-hold (ramping) volume commands more quickly than the DHT-T110; in this rare case use DHT-T110's front-panel or supplied remote to turn the DHT-T110's volume up.
Trouble Pairing Bluetooth®
• Make sure DHT-T110 is in Bluetooth pairing mode (Bluetooth key LED should be flashing).
• Make sure your Bluetooth source is in Bluetooth pairing mode (see the source's instructions).
- Bluetooth source device must support A2DP (Advanced Audio Distribution Profile); some Bluetooth products (some tablets, some GPS units, for example) will thus work with Bluetooth keyboards or headsets but are not capable of high-fidelity audio playback.
- Keep your Bluetooth source within 10 ft (3 m) of DHT-T110 while pairing.
- Power cycle the Bluetooth device (complete power off and "hard-reboot"), and try to pair again.
Bluetooth connection problems
- If a Bluetooth fault occurs (the device moves out of range, or stops playing due to low battery or user input), DHT-T110's Bluetooth LED again blinks rapidly; the DHT-T110 will automatically attempt to re-connect, and will resume playback when the Bluetooth source is in range. Note: On some devices you will need to press play again. Bluetooth's effective wireless range varies with the source; 30 to 40' (9 - 12 m) is typical. If the source moves out of range, DHT-T110 will continue trying to re-connect it for 4 minutes; after that interval you will have to re-connect, as above.
• Make sure DHT-T110 is not paired to a different Bluetooth source device.
• Make sure your desired Bluetooth source device is actually playing music or another audio program and is paired to DHT-T110 and not some other device. - On a multifunction source device such as a tablet or mobile phone, not every program or "app" may support Bluetooth audio broadcast (consult the instructions for the program or app).
- Consider possible sources of interference, particularly those operating at 2.4 GHz (Wi-Fi routers, microwave ovens, land-line cordless telephones); power down suspects one at a time to identify a culprit. Often, repositioning an interfering device to another room, or even across the room, will restore Bluetooth function.
DHT-T110 takes several seconds to turn on
- The DHT-T110's power saving design puts the unit into standby mode after five minutes of no sound. DHT-T110 takes a few seconds to start up the next time audio plays
Factory reset
- Unplug unit from wall.
- Hold down Vol - (minus) button.
- Plug into power again.
- Standby button light will blink fast for several seconds indicating that the system has been reset.
- Clears Bluetooth pairing, remote learning, audio mode.
DENON®
www.denon.com
D&M Holdings Inc.
Printed in China 5411 11222 10AD
- IMPORTANT SAFETY INSTRUCTIONS
- Warning!
- WARNING:
- Caution!
- Canada Statement
- FCC Information (For US customers)
- IMPORTANT NOTICE: DO NOT MODIFY THIS PRODUCT
- NOTE
- IC Information (For Canadian customers)
- PRODUCT
- CAUTION
- Trademark Information
- Specifications
- Introduction
- Locating DHT-T110
- Front Panel Controls
- Rear Panel
- Accessories
- Connecting DHT-T110 to your television
- Optical Digital In - BEST
- Coaxial Digital In - BETTER
- Analog In 1/8" (3.5 mm) mini plug analog audio - GOOD
- Disable Your Television's Speakers
- The Controls on Top of DHT-T110
- 12345678
- About DHT-T110's Automatic Power Modes
- About the DHT-T110 Control Button LEDs
- Listening Modes
- Night Mode
- Volume Change Indication
- Using Bluetooth®
- Pairing Your Bluetooth Device
- Use Any Remote to Control your DHT-T110
- Learning commands (using Volume up as an example):
- Unlearning commands
- No television sound
- Distorted sound from the DHT-T110
- Trouble teaching DHT-T110 remote control commands
- Television speakers keep getting turned back up
- Trouble Pairing Bluetooth®
- Bluetooth connection problems
- DHT-T110 takes several seconds to turn on
- Factory reset
Brand : DENON
Model : DHT-T110
Category : Soundbar