
DHT-S416 - Soundbar DENON - Free user manual and instructions
Find the device manual for free DHT-S416 DENON in PDF.


| Product Type | Soundbar with wireless subwoofer |
| Brand | Denon |
| Model | DHT-S416 |
| Soundbar Dimensions (W x H x D) | 900 x 83 x 54 mm |
| Soundbar Weight | 1.8 kg |
| Subwoofer Dimensions (W x H x D) | 318 x 342 x 171 mm |
| Subwoofer Weight | 5.2 kg |
| Power Consumption | 40 W (soundbar), 40 W (subwoofer) |
| Standby Power Consumption | 1.8 W (normal), 0.35 W (deep standby) |
| Power Supply | AC 100 - 240 V, 50/60 Hz |
| Inputs | HDMI (ARC), Optical, AUX (3.5 mm), Bluetooth, Chromecast built-in (Wi-Fi) |
| Audio Formats | Linear PCM, Dolby Digital |
| Listening Modes | Movie, Music, Night, Pure, Dialog Enhancer (Low/Medium/High) |
| Wireless Connectivity | Wi-Fi IEEE 802.11 a/b/g/n/ac, Bluetooth 4.2 |
| Bluetooth Version | 4.2 |
| Chromecast Built-in | Yes, supports multi-room and Google Assistant |
| Dialog Enhancer | 3 levels (LOW, MED, HIGH) to improve dialog clarity |
| Remote Control Learning | Yes, allows TV remote to control soundbar |
| Wall-Mountable | Yes, with included template and spacers |
| Auto Standby | Yes, adjustable (default on) |
| Deep Standby | Yes, reduces power to 0.35 W |
Frequently Asked Questions - DHT-S416 DENON
User questions about DHT-S416 DENON
0 question about this device. Answer the ones you know or ask your own.
Ask a new question about this device
Download the instructions for your Soundbar in PDF format for free! Find your manual DHT-S416 - DENON and take your electronic device back in hand. On this page are published all the documents necessary for the use of your device. DHT-S416 by DENON.
USER MANUAL DHT-S416 DENON
Contents Connections Playback Settings Tips Appendix
DENON®
DHT-S416
HOME THEATER SYSTEM
Owner's Manual

Contents Connections Playback Settings Tips Appendix
Accessories 4
Inserting the battery 5
Operating range of the remote control unit 5
Features 6
Part names and functions 7
Sound bar 7
Subwoofer 10
Remote control unit 11
Connections
Positioning 13
Positioning the sound bar 13
Positioning the subwoofer 15
Connecting a TV 16
Connection 1: TV equipped with an HDMI connector and compatible with the ARC (Audio Return Channel) 17
Connection 2: TV equipped with an HDMI connector and incompatible with the ARC / TV equipped with an optical digital connector 18
Connection 3: TV equipped with an HDMI connector and incompatible with the ARC / TV equipped with an analog connector 19
Connecting the power cords 20
Playback
Enjoying television, movies and music 21
Status LED table 22
Listening to Music via Chromecast built-in 23
Chromecast built-in Setup 23
Listening to music on a Bluetooth device 24
Pairing a Bluetooth device for the first time 24
Pairing with other Bluetooth devices 25
Listening to music with a paired Bluetooth device 25
Settings
Settings 26
Adjusting the volume 26
Adjusting the subwoofer volume 26
Selecting a listening mode 27
Turning off the sound temporarily 27
Volume limiter function 27
Automatically setting to standby (Auto standby function) 28
Reducing the standby power consumption (Deep standby function) 28
Operating this unit using the remote control of a TV 29
Contents Connections Playback Settings Tips Appendix
Tips
| Troubleshooting | 31 |
| Power does not turn on / Power is turned off | 32 |
| Operations cannot be performed through the remote control unit | 32 |
| No sound comes out | 33 |
| Bluetooth playback does not work | 34 |
| The HDMI Control function does not work | 34 |
| Music from the Chromecast cuts out or delays sometimes | 35 |
| Resetting factory settings | 36 |
Appendix
| About HDMI | 37 |
| Trademark information | 38 |
| Specifications | 39 |
| Sound bar | 39 |
| Subwoofer | 42 |
Contents Connections Playback Settings Tips Appendix
Thank you for purchasing this Denon product.
To ensure proper operation, please read this owner's manual carefully before using the product.
After reading this manual, be sure to keep it for future reference.
Accessories
Check that the following parts are supplied with the product.
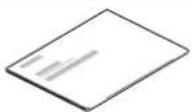 Quick Start Guide Safety Quick Start Guide Safety | 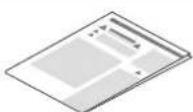 Instructions Wall mount template Instructions Wall mount template | 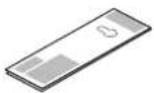 | 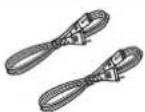 | 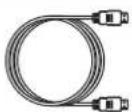 HDMI cablePower co HDMI cablePower co |
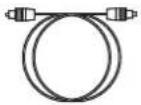 |  Wall mount spacersOptical digital control unit (RC-1242) Wall mount spacersOptical digital control unit (RC-1242) | 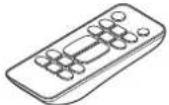 |  R03/AAA battery R03/AAA battery |

Contents
Connections Playback Settings Tips Appendix
Inserting the battery
1 Slide the rear cover off the remote control unit in the arrow direction.
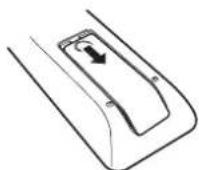
2 Insert 1 battery into the battery compartment as indicated.
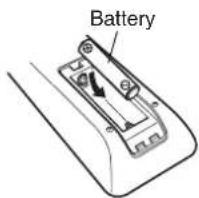
3 Put the rear cover back on.
NOTE
- Remove the battery from the remote control unit if it will not be in use for long periods.
- If the battery fluid should leak, carefully wipe the fluid off the inside of the battery compartment and insert new battery.
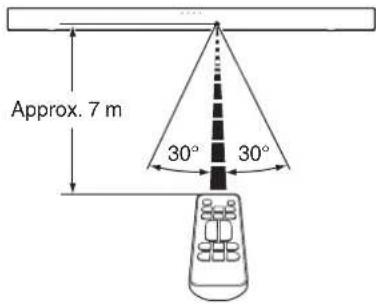
Operating range of the remote control unit
Point the remote control unit at the remote sensor when operating it.

Contents
Connections Playback Settings Tips Appendix
Features
- Two-way sound bar with wireless subwoofer: Powerful, dynamic Denon home theater sound
Easy Setup: Quickly connect to your TV with the supplied HDMI or Optical cables.
Wireless Subwoofer: Powerful bass without the cables. Place the subwoofer within 9 m of the sound bar for optimal enjoyment.
5 cm Low-profile Design: At 5 cm tall, the Denon DHT-S416 fits most spaces and can be placed in front of your TV without blocking your TV's bottom edge or IR remote sensor. -
Google Chromecast built-in
Use Google Chromecast for audio to stream music from your favorite apps and more over Wi-Fi. (p. 23) -
Universal Compatibility with HDMI support ARC (Audio Return Channel)
Send audio from apps built into your Smart TV and other sources via the ARC (Audio Return Channel) on the DHT-S416 and a single HDMI cable (included). Also enables control of the Denon DHT-S416 via your TV's remote control.
• Wireless Music Streaming
Easily enjoy your favorite music by streaming directly from your smart device to your sound bar with Bluetooth. - Denon Dialog Enhancer
Never miss a word of your favorite TV show or movie. Denon Dialog Enhancer improves dialog intelligibility — ideal for movies and TV shows. Turn up the dialog without having to adjust overall volume.
Contents Connections Playback Settings Tips Appendix
Part names and functions
Sound bar
■ Top panel
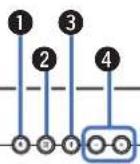
① Power operation button (⏻)
Turns the sound bar power on/off (standby). (音 p. 21)
Links to sound bar power and turns the subwoofer power on/off (standby).
② Input source button (→)
This selects the input source. (1 p. 21)
Switches the input source each time the button is pressed.
③ Bluetooth button (\*)
- Switches the input source to "Bluetooth". (1 p. 24)
• Used to pair with Bluetooth devices. (p. 24)
④ Volume buttons (+, -)
These adjusts the volume level. (p. 26)

Contents Connections Playback Settings Tips Appendix
Front panel

① Status LED
Displays the status of input source / input signal / listening mode, etc. (p. 22)
② Remote control sensor
This receives signals from the remote control unit. (p. 5)
■ Bottom panel

natural_image
Pure technical line drawing of a mechanical component or bracket with no text, numbers, or symbols① USB port
Service terminal. Not used in normal operation.
Contents Connections Playback Settings Tips Appendix
■ Rear panel

① Wall hook hole
Used to mount the sound bar on a wall. (p. 14)
② HDMI connector (TV (ARC))
Use the included HDMI cable to connect an ARC function-compatible TV. (p. 17)
③ AUX audio input connector
Use a commercially available 3.5 mm stereo audio cable to connect an audio device. (17 p. 19)
4 Optical digital input connector (TV OPTICAL)
Use the included optical digital cable to connect a TV with an optical digital terminal. (p. 18)
⑤ RESET button
Used to reset to the default settings. (p. 36)
⑥ Wi-Fi LED (WI-FI)
- When the Wi-Fi connection is complete, the LED will turn solid.
- Resetting the factory setting, the LED will blink 3 times.
⑦ AC inlet
Used to connect the power cord. (☐ p. 20)

Contents
Connections Playback Settings Tips Appendix
Subwoofer
■ Rear panel
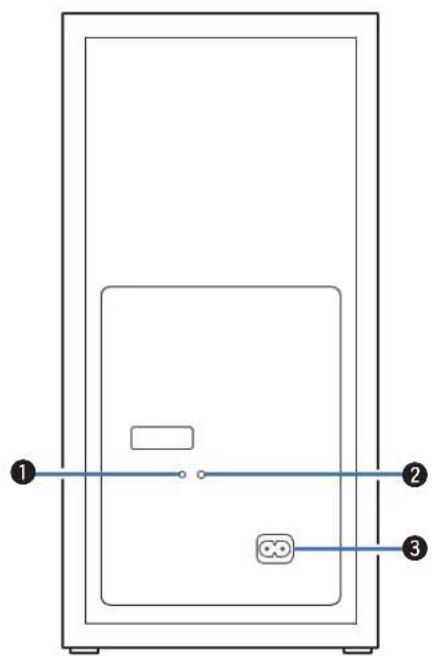
① Status LED
Displays subwoofer status.
| LED indication Status | |
| ○ | When subwoofer power is on/off (standby) |
| When the sound bar and subwoofer are wirelessly connected | |

- The sound bar and subwoofer are wirelessly connected as the factory default. If no audio is output from the subwoofer, wirelessly connect the sound bar and subwoofer again. (p. 33)
② BAR SYNC button
Used to wirelessly connect the sound bar and subwoofer. (p. 33)
③ AC inlet
Used to connect the power cord. (p. 20)

Remote control unit
This section mainly explains remote control operations.
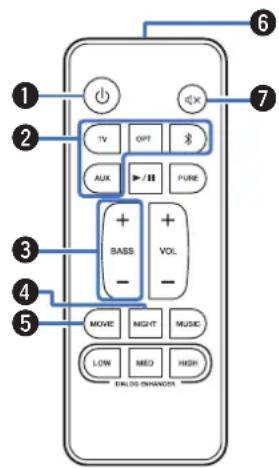
① Power button (⏻)
Turns the sound bar power on/off. (p. 21)
Links to sound bar power and turns the subwoofer power on/off.
② Input source buttons (TV, OPT, *, AUX)
This selects the input source. (p. 21)
③ Button to adjust subwoofer (BASS +, -)
Adjusts the volume level for the subwoofer. (☐ p. 26)
④ Night mode button (NIGHT)
Compresses the dynamic range (difference between loud and soft sounds) to make audio easier to hear at low volumes. (17 p. 27)
⑤ Movie mode button (MOVIE)
Enjoy movie theater-like surround sound. (p. 27)
⑥ Remote control signal transmitter
This transmits signals from the remote control unit. (p. 5)
⑦ Mute button (✗)
This mutes the output audio. Press again to unmute. (1 p. 27)
Contents
Connections Playback Settings Tips Appendix
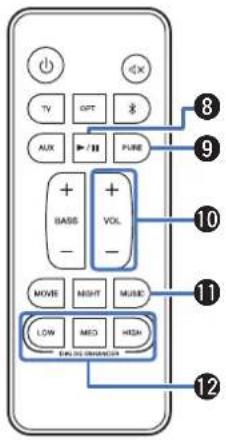
⑧ Play/pause button (▶/III)
This button is only available when the input source is Bluetooth or Chromecast.
⑨ Pure mode button (PURE)
Enjoy high quality sound that is faithful to the original source. (10 p. 27)
⑩ Volume buttons (VOL +, -)
These adjusts the volume level. (p. 26)
⑪ Music mode button (MUSIC)
Enjoy the full presence of a wide, encompassing acoustic field. (195 p. 27)
⑫ Dialog enhancer buttons
(DIALOG ENHANCER LOW, MED, HIGH)
Adjust the volume of dialog in movies, vocals in music, etc. so these can be heard more easily. (☐ p. 27)
Can be set to 3 levels. Set this to the desired value.

flowchart
graph LR
    A["Contents"] --> B["Actions"]
    B --> C["Playback Settings Tips Appendix"]
Positioning
Positioning the sound bar
Position the sound bar in front of your TV, etc., on a flat surface.
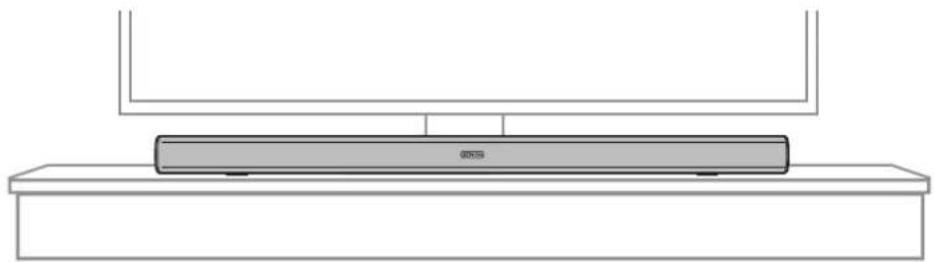
natural_image
Simple line drawing of a monitor setup with a base and top platform (no text or symbols)NOTE
- When positioning the sound bar in front of your TV, make sure the sound bar does not obstruct the TV's remote control light sensor, etc.

Contents
ctions
ettings Tips Appendix
■ When hanging the sound bar on a wall
The sound bar has a wall hook hole to hang it on a wall. When hanging it on a wall, position it in a flat, vertical position.
NOTE
- To ensure safety, request a contractor perform the mounting work when mounting onto a wall.
- In order to use the unit safely, do not place items on or hang items from the unit.
- Be sure to fix connection cables to the wall to ensure that cannot be pulled or tripped over causing this unit to fall. Check that the unit is mounted safely after the mounting work is complete.
- Also, periodically check the safety of this unit and whether there is a possibility that the unit may fall.
- Denon cannot accept any responsibility for damage, injury or accidents caused by problems with the mounting location or mounting method.
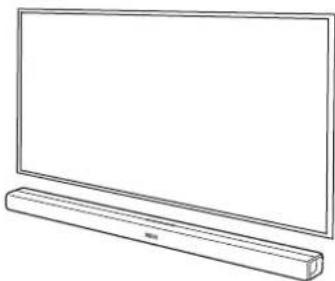
natural_image
Line drawing of a flat-screen TV with a rectangular base (no text or symbols)
- When hanging it on a wall, use the included wall mount template.
[How to use the wall mount template]
① Affix the template to the location you would like to mount the sound bar.
② Screw in the wall mount screws by following the template.
Consult a construction professional about the proper wall mount screws for the material and strength of your wall.
③ Remove the template from the wall.
④ Mount the included wall mount spacer on the spine of the sound bar.
Mounting the wall mount spacer creates a space for cords to pass through between the sound bar and the wall.
⑤ Mount the sound bar on the wall.

Contents
Connections
ayback Settings Tips Appendix
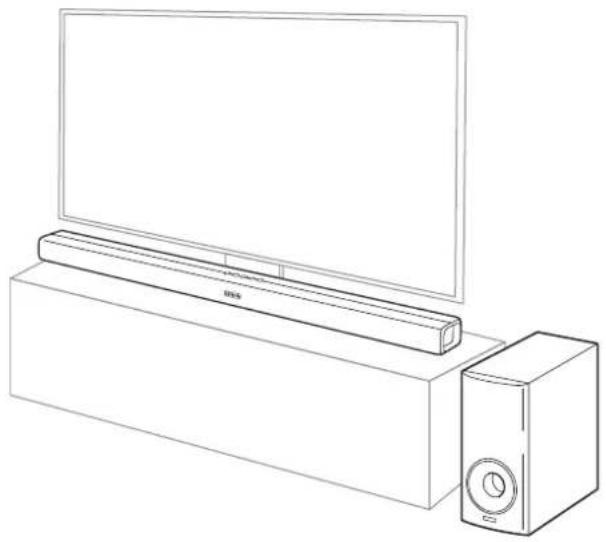
Positioning the subwoofer
Position the subwoofer in a flat location near the sound bar.
natural_image
Line drawing of a rectangular device with a flat top and a speaker unit beside it (no text or symbols)Contents
ctions
ettings Tips Appendix
Connecting a TV
How to connect a TV depends on the connectors and functions equipped on the TV.

- Enable the TV's HDMI control function when using an HDMI cable to connect this device to your TV. (See the TV Owner's Manual for details.)
- Turn off the TV's speaker or minimize the volume when using this device.
- HDMI cable connection is recommended, but connection can be performed without an HDMI cable.
NOTE
- Make sure all devices are off when connecting.
- Do not plug device power cords into an outlet until all devices have been connected.

Contents
ctions
ettings Tips Appendix
Connection 1: TV equipped with an HDMI connector and compatible with the ARC (Audio Return Channel)
Use the included HDMI cable to connect this device to an ARC function-compatible TV.
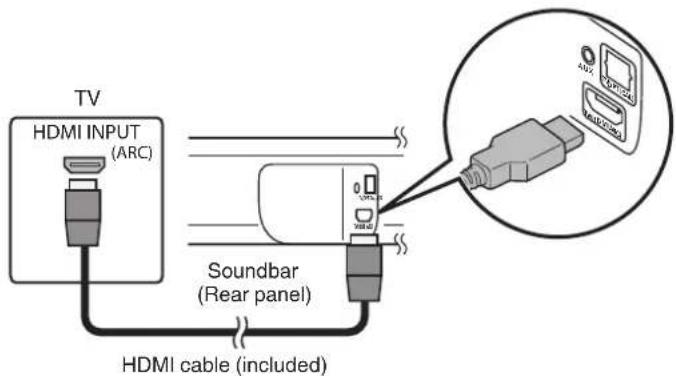

- The TV also needs to be compatible with the ARC function.

Contents
ctions
ettings Tips Appendix
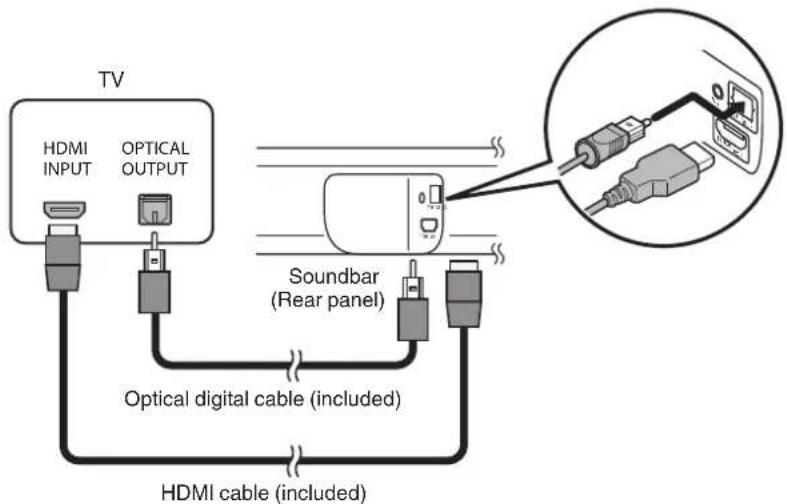
Connection 2: TV equipped with an HDMI connector and incompatible with the ARC / TV equipped with an optical digital connector
Use the included HDMI and optical digital cables to connect this device to your TV.
flowchart
graph TD
    A["TV"] --> B["HDMI INPUT"]
    A --> C["OPTICAL OUTPUT"]
    A --> D["Soundbar (Rear panel)"]
    D --> E["HDMI cable (included)"]
    F["Optical digital cable (included)"] --> D
    G["Diagram inset shows connected components"] --> H["Output"]

- Line up the optical digital cable with the shape of the terminal to insert.

Contents
Connections
Byback Settings Tips Appendix
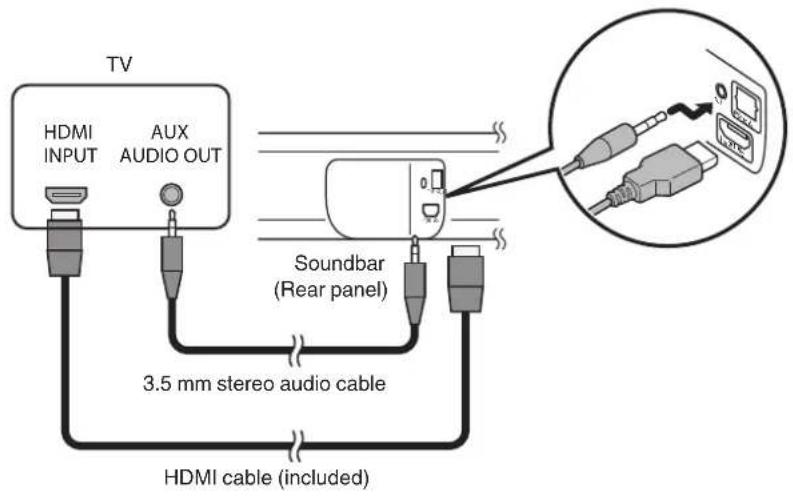
Connection 3: TV equipped with an HDMI connector and incompatible with the ARC / TV equipped with an analog connector
Use the included HDMI cable and a commercially available 3.5 mm stereo audio cable to connect this device to your TV.
Contents
Connections
yback Settings Tips Appendix
Connecting the power cords
After completing all the connections, insert the power plug into the power outlet.
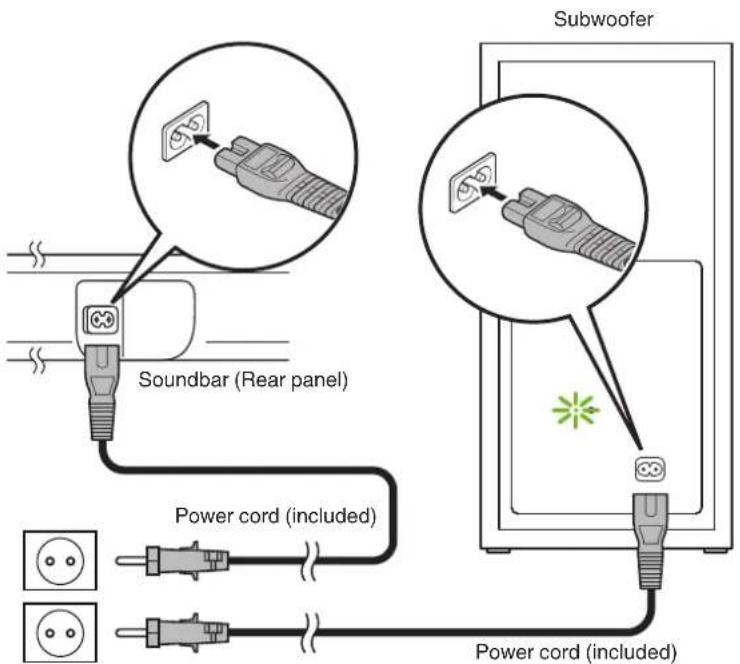
Connect to household power outlet (AC 230 V, 50/60 Hz)
Enjoying television, movies and music
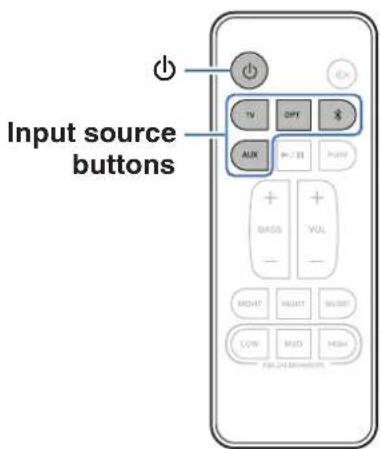
1 Turn on the power of the TV and connected devices.
2 Press ⏻ to turn on power to the unit.
3 Press the input source button.
TV: Device connected to the TV (HDMI ARC)
OPT: Device connected to the TV(OPTICAL)
*: Bluetooth device
AUX: Device connected to the AUX(ANALOG)
4 Play the device connected to this unit.
For details, see the relevant device manual.

- Connect an HDMI control-compatible TV and this device via HDMI and enable the HDMI control to enable linked control from either device. (12 p. 37)

Contents
Connections
back
Appendix
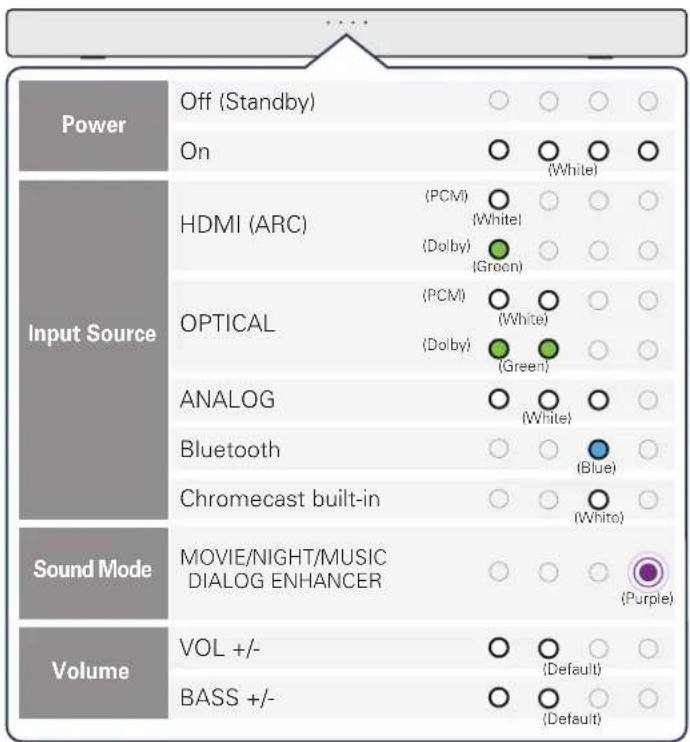
Status LED table
Status LEDs change depending on the input source, input signal, etc.
Listening to Music via Chromecast built-in
This unit supports the Chromecast built-in. Stream music from your favorite apps over Wi-Fi.
• Stream music from your favorite apps over Wi-Fi.
- Create a whole-home audio experience. Multi-room sync let's you play the same song across Chromecast built-in compatible speakers in your house at the same time.
- Use Google Assistant on a Google Home speaker to control music playback on the DHT-S416 using voice commands.
Chromecast built-in Setup
1 Download the free Google Home app and follow the in-app instructions to connect the DHTS416 to your Wi-Fi.
- When streaming from a Chromecast-enabled app, a white light will appear on the sound bar.

- For more detailed setup information about Google Home and Chromecast built-in for audio,
visit: https://support.google.com/googlehome and https://support.google.com/chromecastbuiltin - If streaming operations are performed with a Chromecast-enabled music app while this unit is in standby mode, this unit will turn on automatically.
Contents
Connections
back
Appendix
Listening to music on a Bluetooth device
Music files stored on Bluetooth devices such as smartphones, digital music players, etc. can be enjoyed on this unit by pairing and connecting this unit with the Bluetooth device.
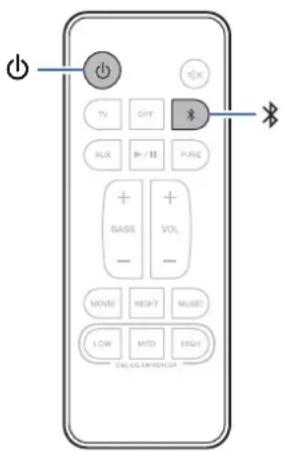
Pairing a Bluetooth device for the first time
Pair a Bluetooth device with this unit.
Once the Bluetooth device has been paired, it does not need to be paired again.
1 Press ⏻ to turn on power to the unit.
2 Press ✝ to switch the input source to "Bluetooth".
Automatically switches to pairing mode the first time it is used. The status display LED blinks in blue when this unit is in pairing mode.
3 Activate the Bluetooth settings on your Bluetooth device.
4 Select "DHT-S416" (Default) from the list of devices displayed on the screen of the Bluetooth device.
The status display LED lights up in blue and this device and the Bluetooth device are paired.

Pairing with other Bluetooth devices
1 Press ⏻ to turn on power to the unit.
2 Press ✝ to switch the input source to "Bluetooth".
3 Activate the Bluetooth settings on your Bluetooth device.
4 Push ✝ on this device until the status display LED blinks in blue.
5 Select "DHT-S416" (Default) from the list of devices displayed on the screen of the Bluetooth device.
The status display LED lights up in blue and this device and the Bluetooth device are paired.

- This unit can be paired with a maximum of 8 Bluetooth devices. When a 9th Bluetooth device is paired, it will be registered in place of the oldest registered device.
Listening to music with a paired Bluetooth device
1 Press ⏻ to turn on power to the unit.
2 Press ✝ to switch the input source to "Bluetooth".
3 Activate the Bluetooth settings on your Bluetooth device.
4 Press *.
The status display LED lights up in blue and connects to the last Bluetooth device connected. If the connection is cut, perform connection again.
5 Play music using any app on your Bluetooth device.
Contents Connections Playback
Tips Appendix
Settings
Perform the below operations and settings as needed.
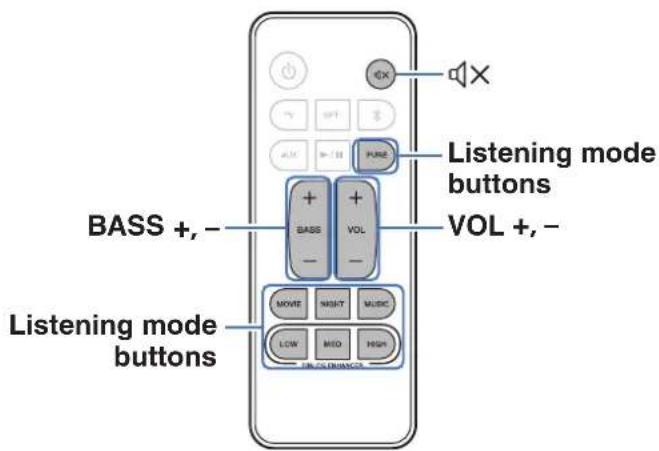
Adjusting the volume
1 Use VOL + or VOL - to adjust the volume.
The status display LEDs change to the volume display when these buttons are pressed.
Each time a volume button is pressed, the volume LEDs blink and the number of LEDs that are blinking increases or decreases according to the volume that is set.
The volume LEDs blink three times when the maximum or minimum volume is reached.
Adjusting the subwoofer volume
1 Use BASS + or BASS - to adjust the subwoofer volume.
The number of LEDs that are blinking increases or decreases according to the subwoofer volume that is set.
The volume LEDs blink three times when the maximum or minimum subwoofer volume is reached.
Contents
Connections Playback
Tips Appendix
Selecting a listening mode
1 Press the listening mode button to select a listening mode.
When the button is pressed, the rightmost status display LED flashes and the listening mode changes.
| MOVIE(Default): | Enjoy movie theater-like surround sound. |
| NIGHT: | Compresses the dynamic range (difference between loud and soft sounds) to make audio easier to hear at low volumes. |
| MUSIC: | Enjoy the full presence of a wide, encompassing acoustic field. |
| DIALOG ENHANCER LOW / MED / HIGH: | Adjust the volume of dialog in movies, vocals in music, etc. so these can be heard more easily. Can be set to 3 levels. Set this to the desired value. |
| PURE: Enjoy sound that is faithful to the original source. | |
Turning off the sound temporarily
1 Press ✗.
The selected input source LED blinks.

- To cancel, press 📄× again.
Volume limiter function
This device is loaded with a volume limiter function which limits excessive output. If volume is above 18 when the power is off, the volume is set to 18 the next time power is turned on.

Automatically setting to standby (Auto standby function)
Switch the auto standby function on or off.
When the auto standby function is turned on, the power supply for this device automatically switches to standby if no operations have been performed for approx. 20 minutes or more and audio is not being output.
1 Press and hold the NIGHT button for 5 seconds or more.
- The auto standby function switches on or off and the status display LED blinks as indicated below.
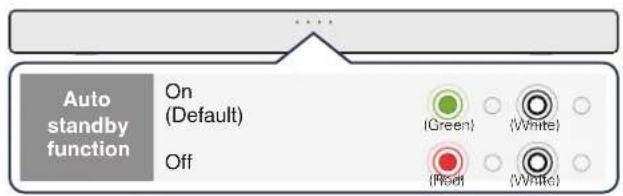
Reducing the standby power consumption (Deep standby function)
This unit can be placed into deep standby mode, in which its standby power consumption is lower than in normal standby mode. Perform the following steps to put this unit into deep standby mode.
1 Press and hold the ⏻ for about 5 seconds or more.
- All of the status display LEDs blink in white 3 times before turning off and the unit enters deep standby mode.
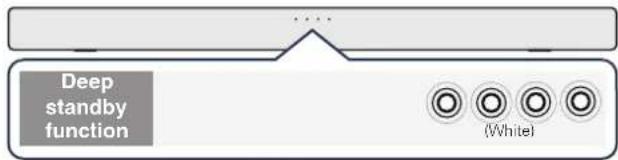

- When you press the ⏻ this unit enters normal standby mode.
NOTE
- When this unit is in deep standby mode, it cannot be turned on by performing streaming operations with a Chromecast-enabled music app or with a Bluetooth connection.
- The automatic software update function is also disabled.
- When in normal standby mode, if this unit is not connected to a Wi-Fi network for a continuous period of 60 minutes or more due to a problem with an external device such as a router or with the Wi-Fi environment, this unit automatically enters deep standby mode.
Operating this unit using the remote control of a TV
There are three ways to operate this unit using the remote control of a TV.
• HDMI control function
Connect this unit to a TV that supports the HDMI control function with an HDMI cable and enable the HDMI control setting on the TV to perform basic operations on this unit (changing the input source, turning the power on and off, adjusting the volume) with the remote control of the TV.
Refer to "HDMI control function" for more information about the HDMI control function. (☐ p. 37)
- Remote control preset function
If your TV is connected via optical, you may be able control the volume and mute functions on this unit from your TV without any further setup if your TV is one of supported brands.
- Remote control learning function
If your TV does not support the HDMI control function, use this unit's remote control learning function. This enables you to operate this unit with the remote control of a TV. ("Using the remote control learning function" (p. 29))
■ Using the remote control learning function
1 Press and hold the main unit's → for 3 seconds until the status display LEDs flash in white for one complete cycle.
2 Point the remote control of this unit at the remote sensor of this unit and press the remote control button to be learned (e.g. VOL +) once.
All status display LEDs blink in white.
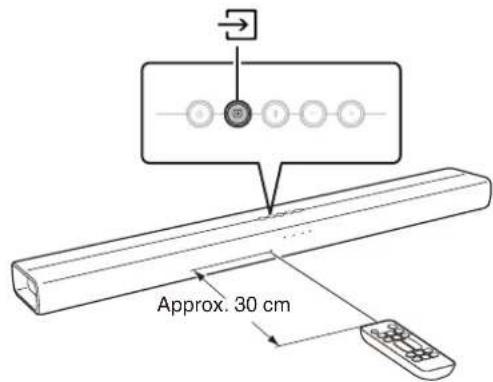

Contents Connections Playback
Tips Appendix
3 Point the remote control of the TV at the remote control sensor of this unit and press the remote control button to be learned (e.g. the button to increase the volume) once.
If learning is successful, the rightmost status display LED blinks in green three times.
If learning is unsuccessful, the rightmost status display LED blinks in red three times. Repeat steps 2 and 3 if this happens.

When the status LEDs blink in white again, press the TV remote control button (e.g. the button to increase the volume) once more.
4 To learn a new function, repeat steps 2 and 3 with the next function.
5 Press and hold the main unit's → for 3 seconds until the rightmost status LED blinks in white three times.
The unit exits remote control learning mode.
6 Confirm that the operation (e.g. increasing the volume) can be performed on this unit with the TV remote control.

- To delete all learned data, press and hold on the sound bar for 10 seconds until the rightmost status display LED blinks white five times.
- Operations cannot be performed with the remote control learning function during the Deep standby.
- Other operations cannot be performed when in remote control learning mode.
- Remote control learning may not be possible depending on the type of TV remote control.

Contents Connections Playback Settings
Appendix
Troubleshooting
If a problem should arise, first check the following:
- Are the connections correct?
- Is the set being operated as described in the owner's manual?
- Are the other devices operating properly?
If this unit does not operate properly, check the corresponding symptoms in this section.
If the symptoms do not match any of those described here, consult your dealer as it could be due to a fault in this unit. In this case, disconnect the power immediately and contact the store where you purchased this unit.
Power does not turn on / Power is turned off
Power does not turn on.
- Check whether the power plug is correctly inserted into the power outlet. (10 p. 20)
- If the power of this unit cannot be turned on with the HDMI control function of the TV, press the ⏻ button to turn on the power of this unit. (p. 37)
- If the power cannot be turned on through a Bluetooth and Wi-Fi connection, this is in the deep standby mode. Press the ⏻ to turn on power to the unit. (168 p. 28)
Power automatically turns off.
- If no operations have been performed for 15 minutes or more and audio is not being input, this device automatically switches to standby. Turn this device's power on again. To prevent the power from turning off automatically, turn off the auto standby function. (p. 28)
Operations cannot be performed through the remote control unit
Operations cannot be performed through the remote control unit.
- Battery is worn out. Replace with new battery. (15p. 5)
- Operate the remote control unit within a distance of about 7 m from this unit and at an angle of within 30^ . (图 p. 5)
- Remove any obstacle between this unit and the remote control unit.
- Insert the battery in the proper direction, checking the and marks. (p. 5)
- The set's remote control sensor is exposed to strong light (direct sunlight, inverter type fluorescent bulb light, etc.). Move the set to a place in which the remote control sensor will not be exposed to strong light.
No sound comes out
No sound comes out.
- Check the connections for all devices. (1 p. 13)
- Insert connection cables all the way in.
- Check that input connectors and output connectors are not reversely connected.
- Check cables for damage.
- Check that a proper input source is selected. (☐ p. 21)
- Adjust the volume. (1 p. 26)
• Make sure volume is not muted. (p. 27)
No sound is produced from subwoofer.
- When there is an obstacle between the sound bar and the subwoofer, remove it or place the subwoofer closer to the sound bar.
- Make sure the subwoofer status display LED is lit in green. If lights are not lit, it may indicate that the sound bar and subwoofer are not wirelessly connected. Perform connection again according to the following steps.
① Press the ⏻ button to turn on power to the unit.
② Press and hold the subwoofer BAR SYNC button for 3 seconds or more.
The subwoofer status display LED blinks once in green.
③ Press and hold the sound bar ✗ and + buttons for 5 seconds or more until the subwoofer status LED will stop flashing.
The sound bar and subwoofer wirelessly connect. Perform steps ① to ③ again if they do not connect.
Contents
Connections Playback Settings
Appendix
Bluetooth playback does not work
Cannot pair with a Bluetooth device.
- It may be that Bluetooth is not enabled on the Bluetooth device. See the Owner's Manual of the Bluetooth device to enable the Bluetooth function.
- This device may be paired with another Bluetooth device. Select this unit from the list of devices displayed on the screen of the Bluetooth device.
- Bring the Bluetooth device near to this unit.
- Turn the power of the Bluetooth device off and on again, and then try again.
- Only 1 Bluetooth device can be connected at a time.
The sound is cut off.
- Bring the Bluetooth device near to this unit.
- Remove obstructions between the Bluetooth device and this unit.
• To prevent electromagnetic interference, locate this unit away from microwave ovens, wireless LAN devices and other Bluetooth devices. - Pair with the Bluetooth device again. (p. 24)
The HDMI Control function does not work
The HDMI Control function does not work.
- You cannot operate devices that are not compatible with the HDMI Control function. In addition, depending on the connected device or the settings, the HDMI Control function may not work. In this case, operate the external device directly.
- Check that the HDMI Control function setting is enabled on all devices connected to this unit.

Contents Connections Playback Settings
Appendix
Music from the Chromecast cuts out or delays sometimes
Music cuts out or delays sometimes
- Make sure your Internet connection is operating correctly. If you are sharing your network with other users or devices, they may be using most of your bandwidth (especially if they are streaming video).
- Make sure the sound bar is within range of your wireless network.
- Make sure the sound bar is not located near other electronic devices that could interfere with it's wireless connectivity (like microwave ovens, cordless phones, TVs, etc...).
Resetting factory settings
Perform this procedure if the display is abnormal or if operations cannot be performed. Various settings are reset to the factory default values. Make settings again.
1 Press ⏻ to turn on power to the unit.
2 Press and hold the back panel's RESET button for at least 5 seconds.
- All the Front LEDs blink simultaneously 3 times in red.
- This unit automatically restarts in a factory default values.
About HDMI
This unit supports the following HDMI functions.
• ARC (Audio Return Channel) function
Enjoy movies, music, etc., on your TV simply by connecting an ARC function-compatible TV to this device via HDMI.
• HDMI control function
Connect an HDMI control-compatible TV and this device via HDMI and enable the HDMI control to enable linked control from either device.
- Input source switching
If the TV is turned on, this device automatically powers on and switches the input source.
- Power off link The TV power off operation is linked so this device also turns off.
• Volume adjustment The volume of this unit can be adjusted using the TV remote control.
- Audio output destination switching If this unit is turned on, TV audio is output from this unit. If this device is turned off, TV audio is output from the speakers of the TV.
NOTE
- Some functions may not operate depending on the connected TV.

Trademark information

Bluetooth®
The Bluetooth ^® word mark and logos are registered trademarks owned by the Bluetooth SIG, Inc. and any use of such marks by D&M Holdings Inc. is under license. Other trademarks and trade names are those of their respective owners.

DOLBY AUDIO
Manufactured under license from Dolby Laboratories. Dolby, Dolby Audio, and the double-D symbol are trademarks of Dolby Laboratories.

HIGH DEFINITION MULTIMEDIA INTERFACE
The terms HDMI, HDMI High-Definition Multimedia Interface, and the HDMI Logo are trademarks or registered trademarks of HDMI Licensing Administrator, Inc.

Chromecast built-in
Chromecast is a trademark of Google LLC.

Contents Connections Playback Settings Tips
Specifications
Sound bar
General
Operating temperature: 5 °C - 35 °C
Power supply: AC 100 - 240 V, 50/60 Hz
Power consumption: 40 W
Power consumption in standby mode: 1.8 W
Power consumption in deep standby mode: 0.35 W
Max Analog Input: 2 Vrms
Sampling frequency: 32 kHz, 44.1 kHz, 48 kHz
Supported audio formats: Linear PCM, Dolby Digital
Contents
Connections Playback Settings Tips
■ Wireless LAN section
Network type (wireless LAN standard): Conforming to IEEE 802.11a/b/g/n/ac, MIMO
Used frequency range: 2.4 GHz, 5 GHz
Bluetooth section
Communications system: Bluetooth Version 4.2
Transmission power: Power Class 2
Maximum communication range: Approx. 10 m in line of sight*2
Used frequency range: 2.4 GHz band
Modulation scheme: FHSS (Frequency-Hopping Spread Spectrum)
Supported profiles: A2DP (Advanced Audio Distribution Profile) 1.3
AVRCP (Audio Video Remote Control Profile) 1.6
Corresponding codec: SBC
Transmission range (A2DP): 20 Hz – 20,000 Hz
*2 The actual communication range varies depending on the influence of such factors as obstructions between devices, electromagnetic waves from microwave ovens, static electricity, cordless phones, reception sensitivity, antenna performance, operating system, application software etc.
Contents Connections Playback Settings Tips
■ Dimensions (Unit: mm)
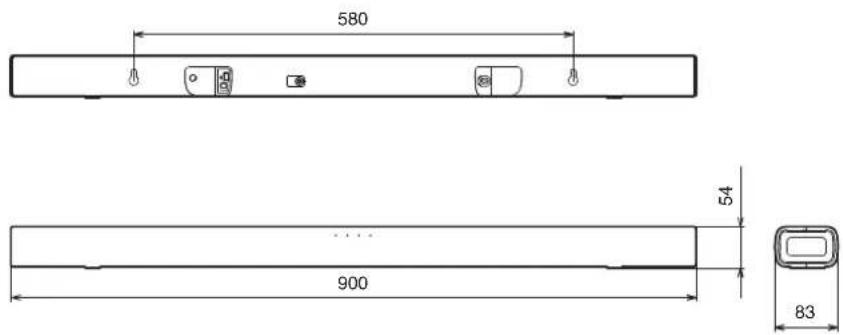
■ Weight: 1.8 kg
Contents Connections Playback Settings Tips
Subwoofer
General
Operating temperature: 5 °C - 35 °C
Power supply: AC 100 - 240 V, 50/60 Hz
Power consumption: 40 W
Power consumption in standby mode: 0.35 W
Power consumption in deep standby mode: 0.35 W
Contents Connections Playback Settings Tips
■ Dimensions (Unit: mm)
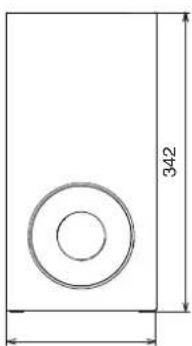
natural_image
Simple geometric diagram showing a rectangle with a central circular hole and a dimension label '342' (no text or symbols beyond the number)
■ Weight: 5.2 kg
DENON®
www.denon.com
3520 10794 00AD
©2020 Sound United. All Rights Reserved.
- DENON®
- DHT-S416
- Owner's Manual
- Contents Connections Playback Settings Tips Appendix
- Accessories 4
- Features 6
- Part names and functions 7
- Connections
- Positioning 13
- Connecting a TV 16
- Connecting the power cords 20
- Playback
- Enjoying television, movies and music 21
- Listening to Music via Chromecast built-in 23
- Listening to music on a Bluetooth device 24
- Settings
- Settings 26
- Tips
- Appendix
- Accessories
- Inserting the battery
- NOTE
- Operating range of the remote control unit
- Features
- Part names and functions
- Sound bar
- ■ Top panel
- ① Power operation button (⏻)
- ② Input source button (→)
- ③ Bluetooth button (\*)
- ④ Volume buttons (+, -)
- Front panel
- ① Status LED
- ② Remote control sensor
- ■ Bottom panel
- ① USB port
- ■ Rear panel
- Subwoofer
- ② BAR SYNC button
- ③ AC inlet
- Remote control unit
- Positioning
- Positioning the sound bar
- ■ When hanging the sound bar on a wall
- Positioning the subwoofer
- Connecting a TV
- Connection 1: TV equipped with an HDMI connector and compatible with the ARC (Audio Return Channel)
- Connection 2: TV equipped with an HDMI connector and incompatible with the ARC / TV equipped with an optical digital connector
- Connection 3: TV equipped with an HDMI connector and incompatible with the ARC / TV equipped with an analog connector
- Connecting the power cords
- Enjoying television, movies and music
- Status LED table
- Listening to Music via Chromecast built-in
- Chromecast built-in Setup
- Download the free Google Home app and follow the in-app instructions to connect the DHTS416 to your Wi-Fi.
- Listening to music on a Bluetooth device
- Pairing a Bluetooth device for the first time
- Pairing with other Bluetooth devices
- Listening to music with a paired Bluetooth device
- Adjusting the volume
- Use VOL + or VOL - to adjust the volume.
- Adjusting the subwoofer volume
- Use BASS + or BASS - to adjust the subwoofer volume.
- Selecting a listening mode
- Press the listening mode button to select a listening mode.
- Turning off the sound temporarily
- Press ✗.
- Volume limiter function
- Automatically setting to standby (Auto standby function)
- Press and hold the NIGHT button for 5 seconds or more.
- Reducing the standby power consumption (Deep standby function)
- Press and hold the ⏻ for about 5 seconds or more.
- Operating this unit using the remote control of a TV
- Contents Connections Playback
- Tips Appendix
- Point the remote control of the TV at the remote control sensor of this unit and press the remote control button to be learned (e.g. the button to increase the volume) once.
- To learn a new function, repeat steps 2 and 3 with the next function.
- Press and hold the main unit's → for 3 seconds until the rightmost status LED blinks in white three times.
- Confirm that the operation (e.g. increasing the volume) can be performed on this unit with the TV remote control.
- Troubleshooting
- Power does not turn on / Power is turned off
- Power does not turn on.
- Power automatically turns off.
- Operations cannot be performed through the remote control unit
- Operations cannot be performed through the remote control unit.
- No sound comes out
- No sound comes out.
- No sound is produced from subwoofer.
- Bluetooth playback does not work
- Cannot pair with a Bluetooth device.
- The sound is cut off.
- The HDMI Control function does not work
- The HDMI Control function does not work.
- Music from the Chromecast cuts out or delays sometimes
- Music cuts out or delays sometimes
- Resetting factory settings
- About HDMI
- • ARC (Audio Return Channel) function
- • HDMI control function
- Trademark information
- Bluetooth®
- DOLBY AUDIO
- Chromecast built-in
- Specifications
- General
- ■ Wireless LAN section
- Bluetooth section
- ■ Dimensions (Unit: mm)
- ■ Weight: 1.8 kg
- ■ Weight: 5.2 kg
Brand : DENON
Model : DHT-S416
Category : Soundbar