
Moverio BT-35ES - Smartwatch EPSON - Free user manual and instructions
Find the device manual for free Moverio BT-35ES EPSON in PDF.


| Product Type | Smart Glasses / Augmented Reality Headset |
| Model | Moverio BT-35ES |
| Brand | Epson |
| Display Technology | Si-OLED (Silicon OLED) |
| Display Resolution | 1280 x 720 pixels (HD) |
| Operating System | Android 5.1 (Lollipop) |
| Weight | Approx. 119 g (without controller) |
| Dimensions (W x H x D) | 170 x 36 x 15 mm |
| Battery Life | Up to 6 hours (continuous use) |
| Charging Port | USB-C |
| Connectivity | Wi-Fi 802.11 a/b/g/n/ac, Bluetooth 4.1 |
| Internal Storage | 16 GB |
| RAM | 2 GB |
| Camera | 5 MP (front-facing) |
| Audio | Built-in speaker and microphone |
| Input | Touchpad on side, control buttons |
| Sensor | Accelerometer, gyroscope, compass |
| Color | Black |
| Cleaning Instructions | Wipe lenses with soft, dry cloth. Avoid liquids. |
| Safety Precautions | Do not expose to extreme temperatures. Do not disassemble. |
| Spare Parts & Repairability | Replacement parts available via Epson service center. Battery non-removable. |
| Warranty | 1 year limited warranty |
Frequently Asked Questions - Moverio BT-35ES EPSON
User questions about Moverio BT-35ES EPSON
0 question about this device. Answer the ones you know or ask your own.
Ask a new question about this device
Download the instructions for your Smartwatch in PDF format for free! Find your manual Moverio BT-35ES - EPSON and take your electronic device back in hand. On this page are published all the documents necessary for the use of your device. Moverio BT-35ES by EPSON.
USER MANUAL Moverio BT-35ES EPSON
Intelligent Controller
BO-IC400
User's Guide
Information on the Moverio Website
Provides useful tips and support information.
https://tech.moverio.epson.com/en/
EPSON®
EXCEED YOUR VISION
See the User's Guide supplied with the headset for precautions on using the headset
© 2020 Seiko Epson Corporation 2020.10
Introduction
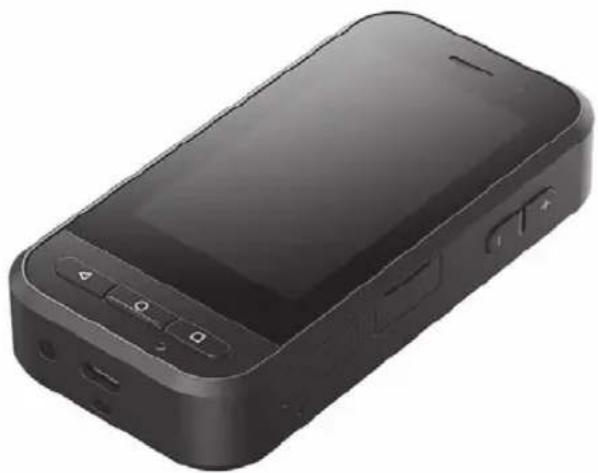
This product is a controller that connects to the EPSON smart glass MOVERIO series headset and uses an app to display and share information. It supports models with USB Type-C connectors.
The MOVERIO series has see-through lenses that allow you to create your own world using AR (Augmented Reality) which overlays images on your actual surroundings.
Contents
Introduction....2
Safety Instructions 5
Product Warnings and Cautions....5
Warnings and Cautions when Using the Headset.....11
Notes on Usage....13
Included Items....14
Part Names....15
Front....15
Back....16
Side....17
Charging 18
LED indicator status....19
Turning On and Off 20
Turning On 20
Turning Off 20
Setting Wi-Fi/Bluetooth ® 21
Wi-Fi settings 21
Bluetooth settings 21
Inserting an SD Card 22
Connecting the headset....23
Switching modes 24
Mode Types 25
Operating the Trackpad....26
Introducing MOVERIO Link Pro 27
Initial Startup Settings 29
Launching MOVERIO Link Pro 30
Installing Apps....31
System Update ....32
Support Information 32
Maintenance....33
Troubleshooting 34
Specifications....36
Product Specifications 36
USB Type-C Connector Features....38
Intellectual Property Rights....39
General Notes 40
List of Safety Symbols and Instructions....44
Contact List....46
About the User's Guide
This guide provides information on safely using this product, basic operating methods, and troubleshooting. Make sure you read this guide before using the product.
Symbols Used in this Guide
■ Safety symbols
| Warning | This symbol indicates information that, if ignored, could possibly result in serious personal injury or even death due to incorrect handling. |
■General information symbols
| Indicates procedures which may result in damage or injury if sufficient care is not taken. | |
| [ ] | Indicates icons and menu items displayed on the screen and the product's key names. |
| Caution | This symbol indicates information that, if ignored, could possibly result in personal injury or physical damage due to incorrect handling. |
| Indicates additional information and points which may be useful to know regarding a topic. | |
| → | Indicates a reference to related topics. |
Safety Instructions
For your safety, read the attached documents carefully to use the product correctly. After you have read the documents, keep them in a safe place so that you can refer to them quickly at a later date.
Product Warnings and Cautions

Warning Charging precautions
When charging, use a commercially available USB power adapter that has received public safety standards certification and meets the necessary specifications of this product.
When charging, use the USB cable supplied or an officially certified USB cable. Using a cable that has not been officially certified could result in heat, fire, explosion, malfunction, or liquid leakage.
Do not charge when the product or the cable are wet.
Do not charge in locations where it may get wet or is subject to high levels of humidity such as in a bath or shower room.
If you need to charge after this product gets wet, wipe off any water on the product with a dry cloth, and then allow it to dry naturally before connecting the USB cable.

Warning Usage environment and condition precautions
Do not leave this product in locations subject to temperatures beyond the specified operating range or that can easily become hot, such as cars with the windows closed, in direct sunlight, in front of air-conditioning or heater outlets, or under heated tables or futons. Also, avoid locations subject to sudden changes in temperature. Doing so may result in fire, breakdown, malfunction, or failure.
Do not use the product in locations where it may get wet or is subject to high levels of humidity such as outdoors or in a bath or shower room. Otherwise, it may result in fire or electric shock.
Do not place this product in locations subject to smoke, steam, high humidity, or dust such as kitchen counters or near humidifiers. Otherwise, it may result in fire or electric shock.
Laws and regulations prohibit viewing the product's display or the screen of the connected headset while driving a car, motorbike, or riding a bicycle.

Warning
Product usage precautions
Do not allow any conductive foreign objects to touch the USB Type-C connector, microSD card slot, or earphone jack, and do not put any conductive foreign objects into the connection ports. Doing so may cause a short circuit and result in fire or electric shock.
Do not use a damaged USB cable. Failure to comply with these precautions could result in fire or electric shock.
Do not subject the product to excessive pressure or damage it. Be careful not to hit or trap the device in anything, especially when carrying the product in your pocket. Failure to do so could cause fire, burns, or injuries due to damage to the touch panel display, the camera glass, or the built-in battery.
Do not expose the camera lens to direct sunlight for a long time. Doing so may result in fire or explosion due to condensed beams of light from the lens.

Do not start using this product at a high volume. Sudden, loud noises could result in hearing impairment. Lower the volume before turning off the product, and gradually increase the volume after turning on the product.
Do not use a wet cloth or solvent such as alcohol, benzine, or thinner.
Do not use a wet cloth or solvent such as alcohol, benzine, or thinner when cleaning this product. In addition, do not apply alcohol, benzine, thinner, or any other organic solvents to the touch panel display or resin cover of this product. Doing so may result in electric shock or malfunction.
Except when explicitly instructed to do so in the User's Guide, the case for the product should only be opened by qualified service personnel. Also, do not disassemble or remodel the product (including consumable items). Many of the parts inside the product carry a high voltage and could cause fire, electric shock, accident, or poisoning.
Do not allow the light or radiated light from the LED part into your eye. Take particular care to keep the light away from infants. Otherwise, it may result in visual impairment. Additionally, being suddenly dazzled by the light can cause an injury to occur.
Do not touch this product or the USB Type-C connector with wet hands. Otherwise, it may result in fire, burns, electric shock, and so on.
Note the following points when inserting/removing all connectors.
- Do not apply excessive force such as pulling on the cables.
- Insert straight into/remove straight out of the connector port. Incomplete or incorrect connections could result in fire, burns,
electric shock, and so on.
Make sure you use the USB cable supplied with the product or a USB certified product to connect to the USB Type-C connector. Using a cable that is not USB certified could result in fire, burns, electric shock, or damage to the product due to incorrect wiring.
For your own safety, do not use a commercially available conversion adapter or extension cable when using the USB Type-C connector.
Do not press too hard on the touch panel display or operate it with pointed objects. If the panel is scratched it may cause a malfunction or damage to occur.
Do not throw the product into a fire and do not heat the product. Do not place combustible items, such as candles, near this product. Doing so may result in heat, fire, or explosion.

Warning
Product abnormality precautions
In the following situations, turn off the power immediately (if the product is being charged, disconnect the USB cable to stop charging), and contact your local dealer or the Epson service call center. Continuing to use under these conditions may result in fire or electric shock. Do not try to repair this product yourself.
- If you see smoke, or notice any strange odors or noises.
- If any water, beverages, or foreign objects get into the product.
- If the product was dropped or the case was damaged.
- If the touch panel display or the camera glass was damaged
Stop using the product if the product itself or the cable is damaged. Otherwise, it may result in fire or electric shock.

Warning
Wireless function precautions
When taking this product into areas in which the use of electromagnetic waves is prohibited, such as in an aircraft or in hospitals, follow the instructions in the area and turn off this product or disable the Bluetooth or wireless LAN function. Do not use the Bluetooth or wireless LAN function near automatically controlled devices such as automatic doors or fire alarms. The electromagnetic waves may cause electromagnetic interference with medical equipment or cause the equipment to malfunction.
Note the following points when using the Bluetooth or wireless LAN function in medical institutions.
- Do not bring this product into operating rooms, Intensive Care Units (ICUs), or Cardiac Care Units (CCUs).
- When on wards, turn off this product or stop the electromagnetic
waves.
- Even when not on wards, turn off this product or stop the electromagnetic waves if there is any electronic medical equipment in the area.
- Follow any rules stipulated by medical institutions that prohibit the use of devices emitting electromagnetic waves, or that prohibit entry to certain areas with such devices.
- If the product has an auto power on function, disable it before turning off the product.
If you have an implanted pacemaker or implanted defibrillator, make sure you keep a distance of at least 22 cm (8.7 inches) between this product and the implanted device when using the Bluetooth or the wireless LAN function. The electromagnetic waves may influence the operation of implanted pacemakers or implanted defibrillators. Turn off this product or stop the electromagnetic waves if you are in a location where someone near you may have a pacemaker, such as a crowded train.
When communicating using the product's wireless LAN (WLAN) function or Bluetooth function, data information could leak or unauthorized access may be possible depending on the security function settings. Note that the user is responsible for handling the security functions.
Epson accepts no responsibility for any data leaks when com-
municating using the product's wireless LAN (WLAN) function or Bluetooth function.

Caution
Usage environment and condition precautions
Do not use in the following locations.
- Locations subject to heat such as near heaters
- Locations subject to vibrations or shocks
Do not use or store the product in locations where the temperature is too high or too low. Also, avoid locations subject to sudden changes in temperature. Otherwise, the product may not work correctly.
Do not place this product near high-voltage lines or magnetized items. Otherwise, the product may not work correctly.
When performing maintenance, make sure you turn off the product, and disconnect all cables. Otherwise, it may result in electric shock.
Stop charging the battery if the charging does not end in the stated period of time. Continuing the charge may result in liquid leakage, heat, explosion, or fire.

Caution
Product usage precautions
Note that the product may become hot during prolonged use or during charging. Furthermore, do not allow the product to remain in contact with your skin for too long, even while wearing the product, as doing so may result in low temperature burns.
Just like computers, when the user installs an app or accesses a Website, this device may become unstable, or sensitive data, such as the user's location information or personal information registered to the device, could be illegally leaked over the Internet by malicious third parties. For this reason, be sure to check the creator of the app or site you are using as well as the processing status before using it.
Do not look at the flashing screen for too long. Otherwise, convulsions or loss of consciousness could occur.
Do not drop this product or treat it with unnecessary force. Also, if the product breaks due to an impact such as a fall, stop using the product. Continuing to use this product may result in injury due to glass fragments from the touch panel display or camera.
Be careful of the tip of the SD card slot pin when installing or removing the microSD card. Touching the tip of the SD card slot pin may cause an injury.
This product should only be used for the purposes stated in the manuals. Using it for any other purpose may result in injury.
Make sure you regularly backup your registered data (documents, movies, images, music data, etc.) to an external storage medium such as a microSD card or computer.
Epson shall not be liable for the loss of any data, damage to data, or loss of profits that occurs due to malfunction, repair, or other handling of this product.
The built-in battery is a consumable item and as such is not covered by the warranty. If you are only able to use the product for a short time even when the battery is fully charged, it is time to replace the built-in battery.
When replacing the built-in battery, contact your local dealer or a dealer in the "Contact Information" provided at the end of this guide.
Li-ion
You can recycle used lithium-ion batteries. For more information on how to recycle the built-in battery of this product, contact a dealer in the "Contact Information" provided at the end of this guide.
When recycling or disposing of this product, do so in accordance with your local laws and regulations.
Water resistance
When the USB Type-C connector (with cover) and the microSD card slot cover are closed securely, this product is compliant with the IPX2 standard based on IEC60529.
However, this does not include the USB Type-C connector (for headset connections). (This is not an evaluation by a third-party evaluator.)
Water resistance level compliant with IPX2
If the product is subjected to a dripping water test at a rate of 3 mm/minute for up to 10 minutes while the product is at an angle of 15 degrees, water does not enter the product and it can be operated normally.

Caution
Water resistance precautions
The water resistance feature does not guarantee protection against damage or malfunctions under all conditions. The warranty is invalid if malfunctions are determined to have occurred due to incorrect handling of the product by the user.
Close the USB Type-C connector (with cover) and the microSD card slot cover securely. If tiny pieces of trash such as hairs or sand become caught in the product, the water resistance is not maintained.
Do not allow other liquids (such as organic solvents, soapy water, hot spring water, and seawater) to splash onto the product.
Do not leave the product in locations subject to humidity such as bathrooms.
If rain or water splashes onto the product, wipe it with a dry cloth as soon as possible.
Warnings and Cautions when Using the Headset

Warning
Product usage precautions
- Malfunction or erroneous operations may occur depending on the usage environment and how the product and the headset are used. Note that Epson is not responsible for any damages arising from the use of the product, headset, or drone. - Note the following precautions when using this product and headset while operating a drone.
- Be sure to comply with any laws and regulations in each country regarding the operation and flight methods of drones, and do not fly drones in no-fly zones.
- Be sure to keep a close eye on the drone and its surroundings while it is in flight.
- Be sure to follow all safety precautions, such as instruction manuals, user guides, guidelines, and any other safety precautions supplied with the drone itself.
- Individuals will experience differences in visibility and having a clear view when wearing the headset. Before you use the drone, be sure to confirm in advance that the surroundings in which you will use it are safe.
1) This product and the headset have not been certified as medical equipment under laws such as medical supplies and medical equipment acts. 2) This product and the headset do not meet medical standards.

Warning
Viewing image precautions
Do not wear this product while driving a car, riding a motor bike or bicycle, or performing any other dangerous tasks. Doing so may result in accident or injury.
Do not use this product in unstable locations such as stairs or at altitude. Also, do not use the product in dangerous locations such as near machining tools, where there is a lot of traffic, or where it is dark. Doing so may result in accident or injury.

Caution
Product usage precautions
When connecting/disconnecting the headset's USB Type-C connector, do not handle it with wet hands or expose it to water or dust.
The headset uses an Si-OLED display panel (organic EL panel). Due to the characteristics of the Si-OLED, you may notice burn-in (after images) or decreasing luminance on the panel. This is not a malfunction.
Methods to reduce burn-in (after images) and decreasing luminance
- Turn off the headset display when it is not being used. By enabling the Power Saving setting in the pre-installed app "MOVERIO Link Pro", the built-in sensors detect when the headset is not being used and automatically turn off the display.
- Do not display the same image for a long time.
- Hide markers or text that always appear in the same position. • Decrease the display brightness.
- Do not make the display any brighter than necessary.
Notes on Usage
Be sure to consider other people when using this product in public locations.
Charge the battery at least once a year even if you do not use the product. If you do not use the product for a long period of time, the battery performance may deteriorate or you may not be able to charge the battery.
The system software for this product may be upgraded to improve quality and add new features. When this occurs, the operating methods may change; therefore, be sure to check the Website provided on the cover for the latest information regarding added functions and changes in operating methods.
Additionally, apps used on the old version of the system software may become unusable or may cause unintended problems to occur.
Before using services and apps provided by third parties, including apps provided by Google™, be sure to check the terms of service and so on provided by Google or any other provider. Epson cannot be held responsible for any problems arising from the use of such services or apps.
Included Items
BO-IC400
→"Part Names" p. 15
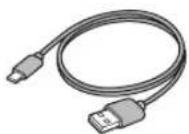
USB cable
→"Charging" p. 18

SD card slot pin
→"Inserting an SD Card" p. 22

User's Guide (this document)
Front
Receiver/Speaker
Outputs audio.
Proximity/ambient light sensor
Detects when faces come close to the device or the brightness of your surroundings. Do not cover this part with fabric or stickers.
◀ BACK key
Displays the previous screen.
○ HOME key
Displays the Home screen.
□ Recents key
Displays recently used apps.
LED indicator
Indicates the status of the product.
→ "LED indicator status" p. 19
Touch panel display
Touch with your finger to operate the product. When you switch modes, this functions as a trackpad and so on.
→ "Operating the Trackpad" p. 26
Transmitter/Microphone
Inputs voice sounds.
Back
LED light
This can be used as a flash when using the camera, or as an LED light.
Microphone
Use this when making a call or using a speakerphone. Be careful not to cover the microphone while using it.
Strap attachment
When using a strap, pass it through this part.
Camera
Shoots photos or videos.
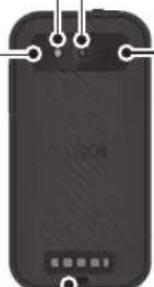
Speaker
Outputs audio.
Side
Power button
Turns the power on or off.
→"Turning On and Off" p. 20
Switch key
Switches the mode.
→"Switching modes" p. 24
Hold this down to turn on the key lock feature. Hold it down again to turn off the key lock feature.
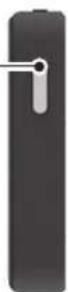


Volume keys
Adjusts the volume.
USB Type-C connector (with cover)
It supports USB 2.0, allowing you to connect and charge USB peripheral devices such as a mouse or keyboard.
→"Charging" p. 18 →"USB Type-C Connector Features" p. 38
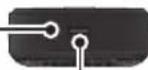
microSD card slot
Insert a commercially available microSD card.
→"Inserting an SD Card" p. 22
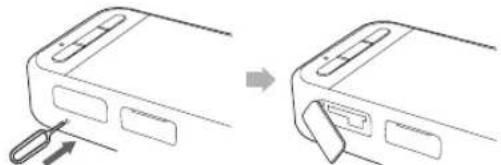
Slot pin insertion hole
Insert the SD card slot pin here to open the microSD card slot.
Earphone jack
You can connect commercially available earphone microphones. Use earphone microphones that conform to the CTIA standard.
USB Type-C connector (for headset connections)
Connects the USB Type-C cable for your headset. It supports USB 2.0/USB 3.0 allowing you to transfer data and charge devices.
→"Charging" p. 18 →"USB Type-C Connector Features" p. 38
Charging
Charge the battery by connecting the included USB cable to a commercially available USB power adapter.
Charging takes approximately 3 hours under the following conditions.
• Turn off the device to charge. Connect to the USB Type-C connector (for headset connections) to charge. • Use a USB power adapter with 5V/2A output.
1. Connect the device to a USB power adapter.
Connect the device to a USB power adapter using the included USB cable.
Charging capacity varies depending on the connector to be connected.
- USB Type-C connector (for headset connections): Up to 1.5 A (depending on the connected power adapter). • USB Type-C connector (with cover): 0.5 A at all times.
2. Plug in the USB power adapter.
The LED indicator turns on.
If the battery is completely dead, the LED indicator does not turn on until a while after you start charging. Charge for at least 30 minutes, and then reconnect the USB cable.
![graph TD A["Smartphone"] -->|1| B["USB Port"] B --> C["Printer"] C -->|1| B B -->|1| A style A fill:#f9f,stroke:#333 style C fill:#ccf,stroke:#333](/content/2026/06/1349701/images/8bcfb019e1f234b3aa6c0ea54f2f5fedf2ba3d88c49919fb0bec53ebbdadae2d.jpg)

You can reduce the charging time by using a commercially available USB Type-C cable and a USB Type-C power adapter that supports PD (Power Delivery).
LED indicator status
This indicates the status of the product using colors and the lit status of the LED.
(The LED indicator provides a rough indication of the amount of remaining battery.)

| Indicator Status | Battery charge status | |
| ○ | Operating 10% or more | |
| ( red ) Operating Less than 10% | ||
| ○ (green) Charging 90% or more | ||
| ○ (yellow) Charging 10 to 89% | ||
| ○/---○ (red) Charging Less than 10% | ||
Turning On and Off
Turning On
The product is not fully charged at the time of purchase.
Charge before use.
→"Charging" p. 18
1 Hold down the Power button for at least two seconds.

Turning off the screen while the product is on (Sleep mode)
Press the Power button briefly to enter Sleep mode. Press the Power button briefly again to wake the product from Sleep mode.
Turning Off
1 Hold down the Power button for at least two seconds.
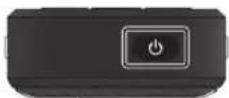
Select (from the menu displayed on the right of the screen.
The power turns off.

- If operations are unstable, you can force the device to restart by holding down the Power button for at least 12 seconds.
- Do not force the device to restart unless operations are unstable. Stored data and settings may be lost.
Setting Wi-Fi/Bluetooth®
Wi-Fi settings
Set up Wi-Fi so that the product can connect to the Internet over a wireless network.
Check the following before setting up.
- The SSID (network name) for the wireless LAN access point or public wireless LAN service you want to connect to.
- The password and security system to connect to the network if security has been enabled.
1 Tap [ ] on the APPS list screen.
2 Select [Network & internet] - [Wi-Fi], and then set [Wi-Fi] to on.
Available SSIDs (network names) are displayed.
3 Select the SSID (network name) you want to connect to, enter the [Password], and then tap [CONNECT].
Bluetooth settings
You need to select Bluetooth settings to allow the product to connect wirelessly to Bluetooth enabled devices.
Check the following before setting up.
- The Bluetooth device must be in pairing mode (see the user's guide supplied with your Bluetooth device for more information on pairing).
- The Bluetooth device supports the profiles supported by the device.
→"Product Specifications" p. 36
1 Tap [ ] on the APPS list screen.
2 Select [Connected devices] > [Pair new devices].
Available devices are displayed.
3 Select the device you want to connect to and pair with it.

You may need to enter a set pairing code depending on the device you are connecting to.
Inserting an SD Card
The following SD cards are supported by the device.
- microSD cards (2 GB maximum)
- microSDHC cards (32 GB maximum)
- microSDXC cards (2 TB maximum) * An SD card is not included with this product.
You may not be able to use SD cards formatted on other devices. Follow the steps below to format the card. Note that any data on the SD card will be deleted when you format the card.
1 Tap [icon] on the APPS list screen. 2 Select [Storage], and then select [SD card] from [Portable storage]. 3 Tap [☐] at the top right of the [SD card] screen, and then select [Storage settings]. 4 Select [Format] or [Format as internal] to format the SD card.
1 Insert the SD card slot pin into the slot pin insertion hole to open the microSD card slot cover.
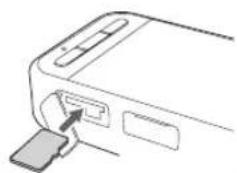
② Insert the microSD card.
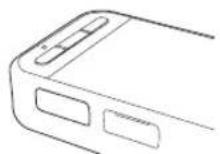
3 Close the microSD card slot cover.
Connecting the headset
Connect the headset cable to the USB Type-C connector on the device (for headset connections).
After connecting, the same screen is displayed on the device and in the headset.
By pressing the Switch key, you can change the combination of the headset image and the device's screen display.
→ "Switching modes" p. 24
![graph LR A["Smart glasses with USB Type-C"] -->|USB Type-C| B["Device with screen"] B --> C["Product with smartphone"]](/content/2026/06/1349701/images/d47a01398276feb8ab6ecd17f5d920c62e2665eaba3cc606502713bee84af4ea.jpg)

• See the User's Guide supplied with the headset for details on how to wear the headset. - You will need a compatible app to use the sensor/camera built into the headset.
* Supported features may change depending on the system software version being used. See the following Website for features supported by the latest version of the system software. https://tech.moverio.epson.com/en/
Switching modes
This device has two modes, and you can switch between these modes by pressing the Switch key twice on the left of the device.
When you switch to Trackpad mode, you can operate the touch panel display as a trackpad.

Mirroring mode (Same display on 2 screens)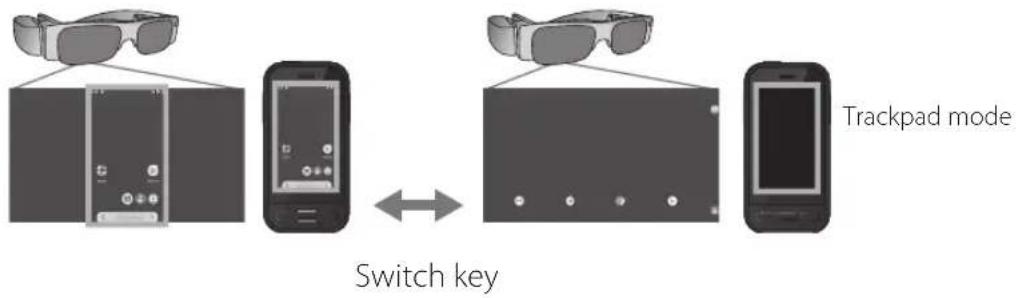
* After switching modes, start the app you want to use. * In Trackpad mode, do not switch modes or connect/remove the headset while using the app. If you switch modes or connect/remove the headset while using the app, the app may close and data may be lost. Epson shall not be responsible for recovery of any lost data, damage caused, or loss of profits that occurs at such a time. * Supported features may change depending on the system software version being used. See the following Website for features supported by the latest version of the system software. https://tech.moverio.epson.com/en/
Mode Types
Mirroring mode
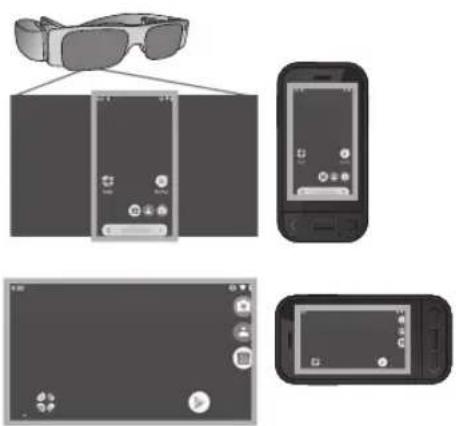
This is the default mode. The same screen is displayed in the headset and on the device.
Trackpad mode
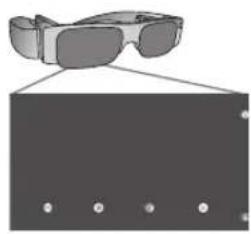
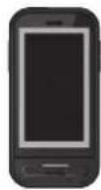
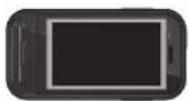
Use this mode when you want to use the device's touch panel display as a trackpad.
Images are only displayed in the headset.
→ "Operating the Trackpad" p. 26

• The Recents key is not available in Trackpad mode. - Some apps do not start in Trackpad mode.
Operating the Trackpad
When you switch to Trackpad mode, the device's touch panel display functions as a trackpad.
When you touch the trackpad with your finger, a pointer is displayed on the screen and you can move the pointer to operate the device.
Tap
Move the pointer to an icon or display item, and then tap the trackpad. This launches applications, selects items, and so on.
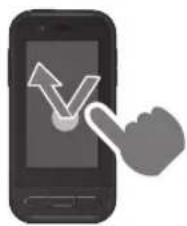
Drag
Touch the trackpad for about one second to select the icon or display item, and then drag your finger on the trackpad to move it. This moves icons, scrolls or changes the screen, and so on.
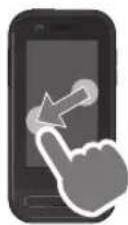
Flick
Swipe your finger with a dragging motion, or swipe the trackpad with two fingers.
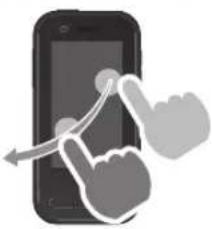
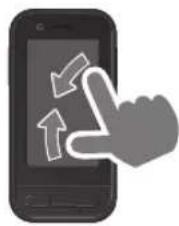
Pinch out
Enlarges the size of the screen by moving two fingers apart.
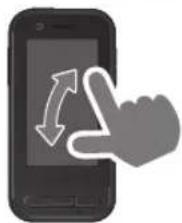
Pinch in
Reduces the size of the screen by moving two fingers closer together.
Introducing MOVERIO Link Pro
The "MOVERIO Link Pro" app allows you to make a variety of settings for the headset.
The following outlines the main features of the "MOVERIO Link Pro".
Available features vary depending on the model of the headset you are using.
| Feature Setting | Description | Model Name | ||
| BT-4x BT-4xx | BT-30C | |||
| Adjust Brightness | Adjust using a slide bar | Adjusts the brightness of the headset screen. | √ | √ |
| Adjust Volume | Adjust using a slide bar | Adjusts the volume. - | √ | |
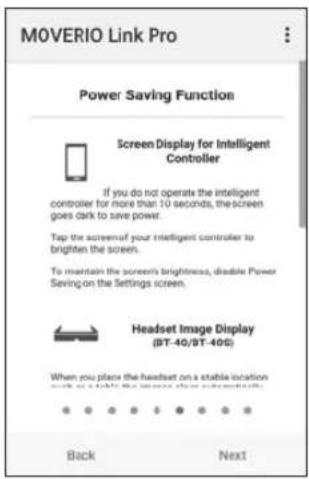
| Power Saving | On/Off | When this is set to On, the screen goes dark after 10 seconds if no operations are performed on the device's screen. Also, the screen closes if the headset remains stationary for 60 seconds or more. | √ | √ * |
| 3D Display | On/Off When this is set to On, the headset screen is displayed as 3D. | √ | √ | |
| Auto Brightness Adjustment | On/Off | When this is set to On, the headset's screen brightness is automatically adjusted to match the brightness of your surroundings. | √ | - |
| Tap to Hide Images | On/Off | When this is set to On, movies pause when you tap the left side of the headset twice with two fingertips (audio does not stop). Tap the left side twice again with two fingertips to restart the movie. | √ | - |
| Movement Usage Warning | On/Off | When this is set to On, a popup note is displayed when you connect the headset to warn you about moving while wearing the headset. | √ | √ |
Introducing MOVERIO Link Pro
| Notification of Reduced Sensor Accuracy | On/Off | When this is set to On, a notification is displayed when the accuracy of the sensor is reduced. | - | √ |
* When the BT-30C is connected, the screen of this device dims, but the headset screen does not close.
Initial Startup Settings
Checking your license
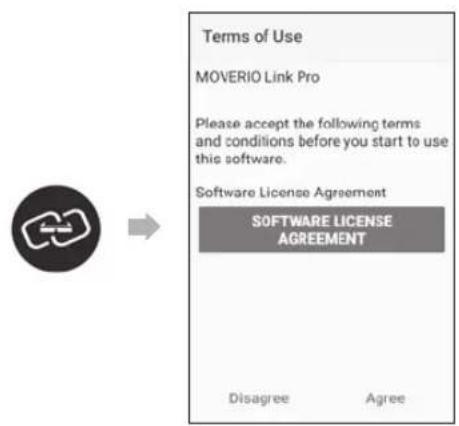
After purchase, tap the MOVERIO Link Pro icon on the APPS list screen. The MOVERIO Link Pro license agreement screen is displayed.
Before you can use the MOVERIO Link Pro, you need to check the Software License Agreement and agree to the terms of the agreement.
Setting app authorizations
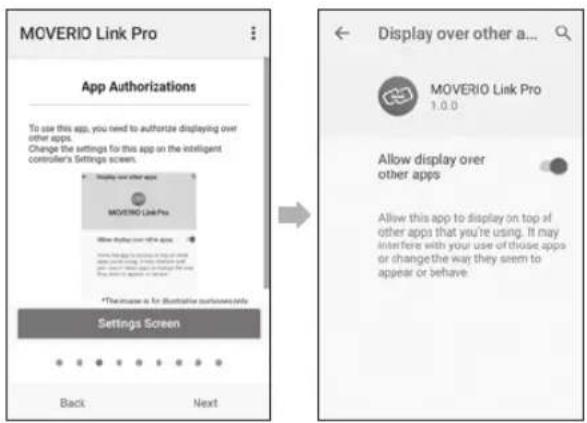
After agreeing to the license agreement, you will see a warning/caution screen, followed by the table of contents, and then finally the App Authorizations screen. On the screen that is displayed when you tap [Settings Screen], enable the MOVERIO Link Pro app. After making this setting, use the BACK key on the device to return to the App Authorizations screen.
Launching MOVERIO Link Pro
When you connect the headset, the start screen is displayed as well as a popup note warning you about moving while wearing the headset. Tap [OK] or [Close] to launch the MOVERIO Link Pro app.
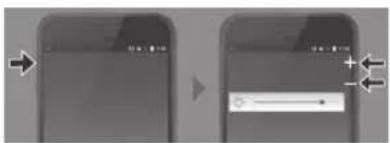
After launching the app, swipe down from the top of the screen on this device to display the MOVERIO Link Pro menu screen. You can make a variety of settings on this screen.
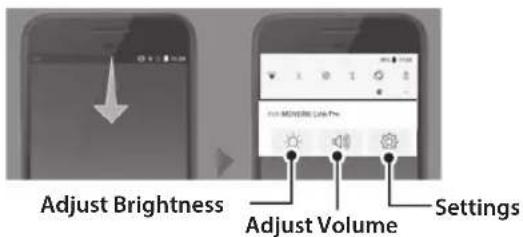

You can also adjust the brightness by pressing the switch key on the left of the device, and then using the volume keys.
The MOVERIO Link Pro app closes when you disconnect the headset.

Tap the MOVERIO Link Pro app icon on the APPS list screen to display the tutorial screen. You can learn more about how to use the app as well as details on each feature.
Installing Apps
Follow the steps below to install apps using the apk file.
1 Save the app (apk file) you want to install onto the SD card or directly to the BO-IC400.

When connecting a computer to the device, connect it to the USB Type-C connector (for headset connections).
Next, swipe down from the top of the screen of the device to open the [USB Preferences] screen, and then make the following settings.
- [USB controlled by]: [This device]
- [Use USB for]: [File Transfer]
2 Tap [ Files] on the APPS list screen.
3 Tap the app (apk file) that you saved.
4 Follow the on-screen instructions to install the app.
System Update
This product comes with a built-in system update function. If necessary, update to the latest system software version before using this device.
Follow the steps below to update the system.
1 Make sure that the device is connected to the Internet.
When a system software update is available, a notification is displayed at the top of the screen.
2 Select [Download], and then follow the on-screen instructions to perform the system update.

- Follow the steps below if you want to change the time at which the device checks for system software updates.
APPS list screen, [+] > [System] > [Advanced] > [System update] > [Settings] > [Check for Updates]
- You can also update the system software manually.
APPS list screen, [icon] > [System] > [Advanced] > [System update] > [Check now].
Support Information
Visit the following Website for information on app development and system updates for this device. https://tech.moverio.epson.com/en/
Maintenance
Cleaning the Charging Connectors
- If the charging connectors on this device are dirty or if there are foreign objects stuck to them, you may not be able to charge or operate the device correctly. Disconnect the USB power adapter and the USB cable, and wipe off any dirt with a dry cloth or a cotton swab. We recommend cleaning the charging connectors regularly (once every three months).

Caution
- Do not damage the charging connectors with your finger or a hard object.
- Do not expose the charging connectors to water. When cleaning the charging connectors, use a dry cloth or a cotton swab.
Troubleshooting
If you think a malfunction has occurred, check the following.
The product does not turn on
- Check that the product is fully charged.
- If the battery is dead, the LED indicator does not turn on until a while after you start charging. Charge for at least 30 minutes, and then reconnect the USB cable.
→"Charging" p. 18
- Press the Power button for two seconds. When startup begins, the start screen is displayed. When startup is complete, the Home screen is displayed. →"Turning On" p. 20
- When charging cannot be performed or operations are unresponsive, hold down the Power button for at least 12 seconds to force the device to restart. →"Turning Off" p. 20
- Contact Epson or your local Service Center if you forget the password for the screen lock. If the system software needs to be reinstalled, the device returns to the status at
the time of purchase.
- If the product gets too hot due to prolonged use or due to the usage environment, battery charging stops, and the product may turn off for safety reasons. Wait for the temperature to fall, and then turn the product back on.
Cannot view movies or listen to audio
- If you cannot see movies in your headset, Tap to Hide Images may be enabled. To release this setting, tap the left side of the headset twice with two fingertips.
- If movies are accidentally hidden, turn off the Tap to Hide Images and Power Saving features in the pre-installed "MOVERIO Link Pro" app.
- Use the earphone microphone to input audio. You may not be able to use it depending on the type of switch earphone microphone or standard earphone microphone.
Images are fuzzy
- Close the app you are using and restart the device.
- The 2D or 3D display may not be suitable for the images displayed. Switch between 2D or 3D in the pre-installed "MOVERIO Link Pro" app.
Troubleshooting
Cannot operate the device
- When you hold down the Switch key, the key lock feature activates and you cannot operate the device. Hold down the Switch key again to release the key lock.
- The device may have entered sleep mode. Press the Power button briefly to wake the product from Sleep mode.
Cannot connect to the network
- Check that the wireless LAN (Wi-Fi) environment where you are using the product can be accessed.
- Check that the product's network settings are correct. Contact your network administrator for more details.
Specifications
Product Specifications
| Model Number BO-IC400 | |
| Exterior dimensions W 55 x D 110 x H 23 mm (2.16 x 4.33 x 0.90 inches) (not including protruding parts) | |
| Mass Approx. 180 g (6.35 ounces) | |
| Processor Qualcomm® Snapdragon XR1 | |
| OS Android | TM g |
| Touch panel display 2.95 inches, 480 x 854, multi-touch capacitance system with AF coating | |
| Memory 4GB | |
| Storage 64GB | |
| External memory microSD (2 GB maximum), microSDHC (32 GB maximum), microSDXC (2 TB maxi-mum) | |
| Operating temperature 5 to 35°C (41 to 95°F), humidity 20 to 80% (no condensation) | |
| Storage temperature -10 to 60°C (14 to 140°F), humidity 10 to 90% (no condensation) | |
| Rated output voltage/Current 5V/2A | |
| Battery 3.8 V (lithium polymer), 3400 mAh, 13 Wh | |
| Charging time | Approx. 3 hours (when charging through the USB Type-C connector (for headset connections) using a 5V/2A power adapter with the device turned off) |
| Camera Approx. 13 million pixels, CMOS 1/3.06 inches, with auto focus and flash LED | |
| Frequency band | IEEE802.11 a/b/g/n/ac, 2 x 2 dual-band, encryption (WEP/WPA/WPA2) |
Specifications
| Bluetooth Standard ver5.0 | |
| Profiles Bluetooth Classic (A2DP 1.3/AVRCP 1.3/HSP 1.2/HID 1.0/PAN PANU/PAN NAP/OPP 1.2.1/SPP), Bluetooth LE (SCPP/HOGP) | |
| Supported movie formats MPEG-2, MPEG-4, H.263, H.264, H.265 (HEVC), VP8, VP9 | |
| Supported still image formats BMP, GIF, JPEG, PNG, WebP, HEIF | |
| Supported audio formats AAC, HE-AAC, AMR, FLAC, MP3 (8 to 320 kbps) CBR/VBR, Vorbis, WAV, Opus | |
| Satellite navigation system GPS/GLONASS/Galileo/QZSS/BDS | |
| Dust and water resistance IPX2 | |
| Connector ports | USB Type-C connector (for headset connections), USB Type-C connector (with cover)→"USB Type-C Connector Features" p. 38 |
| Audio Microphone, receiver, speaker (0.5 W), 3.5 mm audio jack (earphones with micro-phone complying with the CTIA standard)* | |
| User interface Power button, Volume keys, BACK key, HOME key, Recents key, Switch key | |
| Sensors Geomagnetic sensor, accelerometer sensor, gyroscopic sensor, ambient light sen-sor, proximity sensor | |
* Restrictions in operation may occur when using an adapter plug.
USB Type-C Connector Features
| USB Type-C connector(for headset connections) | USB Type-C connector (with cover) | |
| Video output(DP Alt mode compatible) | √ | - |
| Charging | √ | √ |
| USB 2.0 data transfer | √ | √* |
| USB 3.0 data transfer | √ | - |
* The USB Type-C connector (with cover) can only be connected to devices such as a mouse, a keyboard, or a USB memory. Connect the host device, such as a computer, to the USB Type-C connector (for headset connections).

When using two USB Type-C connectors at the same time, you need to connect to the USB Type-C connector (for headset connections) first.
Intellectual Property Rights
"EPSON" is a registered trademark of the Seiko Epson Corporation. "EXCEED YOUR VISION" and its associated logo are registered trademarks or trademarks of the Seiko Epson Corporation.


microSD logo, microSDHC logo, microSDXC logo are trademarks of SD-3C, LLC.
Wi-Fi® and Miracast™ are trademarks of the Wi-Fi Alliance®.
The Bluetooth® word mark and logo are registered trademarks of Bluetooth SIG, Inc., and the Seiko Epson Corporation uses these marks under license.
USB Type-C™ is a trademark of the USB Implementers Forum.
Google and Android are trademarks of Google LLC.
Other product names used herein are also for identification purposes only and may be trademarks of their respective owners. Epson disclaims any and all rights in those marks.
OPEN SOURCE
SOFTWARE
LICENSE
As well as software owned by Epson, this product also uses open source software.
The following provides information on the open source software used in this product.
- This product includes open source software programs according to the license terms of each program. The open source software programs are without warranty; however, any malfunctions (including malfunctions caused by the open source software programs) that occur in this product do not influence the warranty conditions provided for this product.
- We provide the source code of some open source software programs. If you desire to receive the source code above, please see the "http://www.epson.com" and contact the customer support of your region. We provide the source code until five (5) years after the discontinuation of this product. You shall comply with the license terms of each open source software program.
- The open source software programs are WITHOUT ANY WARRANTY; without even the implied warranty of MERCHANTABILITY AND FITNESS FOR A PARTICULAR PURPOSE. See the license agreements of each open source software program for more details, which are described in the product.
- You can check the full text of the license agreement by tapping [10] on the APPS list screen, and then selecting [About phone] > [Legal information] > [Third-party licenses].
General Notes
| Notes when connecting to commercially available, third-party devices. | Please note that we cannot guarantee connection to commercially available, third-party devices. When connecting to commercially available, third-party devices, Epson shall not be responsible for the loss of any data, damage to data, or loss of profits that occurs at such a time. |
| Notes Regarding Wireless LAN | Do not use the Wireless LAN function in France unless you are indoors.If you purchase this product outside of North America and Taiwan, please note that this product emits wireless LAN electromagnetic waves on channels 1 to 13. Therefore, do not use the wireless LAN function in North America and Taiwan where wireless LAN channels are limited to 1 to 11 by the Wireless Telegraphy Act.Follow local laws and regulations when using in other regions. |
| Wireless Telegraphy Act Regulations | The following acts are prohibited by the Wireless Telegraphy Act.Modifying and disassembling (including the antenna)Removing the label of conformanceUsing the 5 GHz bandwidth LAN when outdoors |
| Restrictions on Use | This product is manufactured based on the specifications of the country of sale. When using this product outside the country of sale, contact your nearest support center.If this product is used for applications that require high reliability, safety, and so on in their functionality, accuracy, and so on, such as disaster prevention equipment, and various safety devices directly related to the operation of aircraft, trains, ships, automobiles, and so on, in order to ensure the reliability and safety of these systems, we ask that you take into account safety designs of the entire system such as implementing a failsafe and taking redundancy measures when using this product.Since this product is not intended for use in applications that require high reliability and safety, such as aerospace equipment, trunk line communication equipment, nuclear power control equipment, medical equipment, and so on, we ask that you consider the suitability of using this product for any of these applications. |
| Symbols such as technical standard compliance certification (technical compliance symbols) | You can check the technical compliance symbols by tapping [IMAGE] on the APPS list screen, and then selecting [About phone] > [Regulatory labels]. |
General Notes
Notes on Frequency
This device operates in the same frequency bandwidth as industrial, scientific, and medical devices such as microwave ovens and mobile object identification (RF-ID) systems (licensed premises radio stations, amateur, and unlicensed specified low-power radio stations (hereafter "other radio stations")) used in factory production lines.
- Before using this product, make sure there are no "other radio stations" being used in the vicinity.
- If this device causes RF interference between the device and "other radio stations", promptly move to a different location, stop using the device, and contact your local dealer to ask for advice on preventing interference (for example setting up partitions).
- In addition, when harmful radio wave interference occurs between the device and "other radio stations", contact your local dealer.
Caution (1) Reprinting all or part of this manual without prior permission is strictly prohibited.
(2) The content of this guide is subject to change without notice. (3) The greatest care was taken in the creation of this guide; however, if you have any questions or notice any errors, omissions, and so on in this guide, please contact us directly. (4) Regardless of point 3, we cannot accept any responsibility for the outcome of operation of this product. (5) We cannot accept any responsibility for damage or malfunctions and so on that occur due to ignoring the content of this guide, this product being handled inappropriately, or repairs or modifications performed by a third party other than Epson or a company appointed by Epson (see "Contact Information"). (6) We cannot accept any responsibility for malfunctions that occur due to installation of optional parts, consumable parts, or replacement parts other than genuine Epson products or Epson certified products. (7) The illustrations and screenshots used in this guide may differ to the actual device or screenshots.
CE
DECLARATION of CONFORMITY

The purpose of the WLAN function is to connect to a 2.4 GHz access point.
Radio equipments are restricted to indoor operation only in the band 5150-5250MHz and 5250-5350MHz in Austria (AT), Belgium (BE), Bulgaria (BG), Cyprus (CY), Czech Republic (CZ), Germany (DE), Denmark (DK), Estonia (EE), Spain (ES), Finland (FI), France (FR), United Kingdom (GB), Greece (GR), Croatia (HR), Hungary (HU), Ireland (IE), Italy (IT), Lithuania (LT), Luxembourg (LU), Latvia (LV), Malta (MT), Netherlands (NL), Poland (PL), Portugal (PT), Romania (RO), Sweden (SE), Slovenia (SI) and Slovakia (SK).
General Notes
Supplier's
DECLARATION of
CONFORMITY
According to 47CFR, Part 2 and 15
Class B Personal Computers and Peripherals; and/or
CPU Boards and Power Supplies used with Class B Personal Computers
We : Epson America, Inc.
Located at: 3131 Katella Avenue, Los Alamitos, CA
Tel: 562-981-3840
Declare under sole responsibility that the product identified herein complies with 47CFR Part 2 and 15 of the FCC rules as a Class B digital device. Each product marketed is identical to the representative unit tested and found to be compliant with the standards. Records maintained continue to reflect that the equipment being produced can be expected to be within the variation accepted, due to quantity production and testing on a statistical basis as required by 47CFR 2.906. Operation is subject to the following two conditions: (1) this device may not cause harmful interference, and (2) this device must accept any interference received, including interference that may cause undesired operation.
Trade Name: EPSON
Type of Product: Intelligent Controller
Model: BO-IC400
General Notes
Indication of the manufacturer and the importer in accordance with requirements of EU directive
Manufacturer: SEIKO EPSON CORPORATION
Address: 3-5, Owa 3-chome, Suwa-shi, Nagano-ken 392-8502 Japan
Telephone: 81-266-52-3131
http://www.epson.com/
Importer: EPSON EUROPE B.V.
Address: Atlas Arena, Asia Building Hoogoorddreef 5, 1101 BA Amsterdam Zuidoost
The Netherlands
Telephone: 31-20-314-5000
http://www.epson.eu/
Epson (UK) Ltd. www.epson.co.uk
Address: Westside, London Road, Hemel Hempstead,
Hertfordshire, HP3 9TD, United Kingdom
List of Safety Symbols and Instructions
The following table lists the meaning of the safety symbols labeled on the equipment.
| Symbol mark | Approved standards | Description |
| IEC60417No.5007 | "ON" (power)To indicate connection to the mains. | |
 | IEC60417No.5008 | "OFF" (power)To indicate disconnection from the mains. |
 | IEC60417No.5009 | Stand-byTo identify the switch or switch position by means of which part of the equipment is switched on in order to bring it into the stand-by condition. |
 | ISO7000No.04348IEC3864-B3.1 | CautionTo identify general caution when using the product. |
| Symbol mark | Approved standards | Description |
 | IEC60417No.6042ISO3864-B3.6 | Caution, risk of electric shockTo identify equipment that has risk of electric shock. |
 | IEC60417No.5957 | For indoor use onlyTo identify electrical equipment designed primarily for indoor use. |
 | IEC60417No.5926 | Polarity of d.c. power connectorTo identify the positive and negative connections (the polarity) on a piece of equipment to which a d.c. power supply may be connected. |
 | IEC60417No.5017 | EarthTo identify an earth (ground) terminal. |
 | IEC60417No.5032 | Alternating currentTo indicate on the rating plate that the equipment is suitable for alternating current only; to identify relevant terminals. |
General Notes
| Symbol mark | Approved standards | Description |
| CXZG | IEC60417No.5031 | Direct currentTo indicate on the rating plate that the equipment is suitable for direct current only; to identify relevant terminals. |
 | IEC60417No.5172 | Class II equipmentTo identify equipment meeting the safety requirements specified for Class II equipment according to IEC 61140. |
 | ISO 3864 General prohibitionTo identify actions or operations that are prohibited. | |
 | ISO 3864 Contact prohibitionTo indicate injury that could occur due to touching a specific part of the equipment. | |
 | IEC60417No.5266 | Standby, partial standbyTo indicate that part of the equipment is in the ready status. |
Contact List
This address list is current as of July 2020.
A more up-to-date contact address can be obtained from the corresponding website listed here. If you do not find what you need on any of these pages, please visit the main Epson home page at www.epson.com.
EUROPE, MIDDLE EAST & AFRICA
| ALBANIAITD Sh.p.k.http://www.itd-al.com | AUSTRIAEpson Deutschland GmbHhttps://www.epson.at | BELGIUMEpson Europe B.V.Branch office Belgiumhttps://www.epson.be | BOSNIA AND HERZE-GOVINANET d.o.o. Computer Engineeringhttps://netcomp.rs |
| BULGARIAEpson Service Center Bulgariahttp://www.kolbis.com | CROATIAMR servis d.o.o.http://www.mrservis.hr | CYPRUSA.T. Multitech Corporation Ltd.http://www.multitech.com.cy | CZECH REPUBLICEpson Europe B.V.Branch Office Czech Republichttps://www.epson.cz |
| DENMARKEpson Denmarkhttps://www.epson.dk | ESTONIAEpson Service Center Estoniahttps://www.epson.ee | FINLANDEpson Finlandhttps://www.epson.fi | FRANCE & DOM-TOM TERRITORYEpson France S.A.https://www.epson.fr |
Contact List
| GERMANYEpson Deutschland GmbHhttps://www.epson.de | GREECEInfo Quest Technologies S.A.https://www.infoquest.gr | HUNGARYEpson Europe B.V.Branch Office Hungaryhttps://www.epson.hu | IRELANDEpson (UK) Ltd.https://www.epson.ie |
| ISRAELEpson Israelhttps://www.epson.co.il | ITALYEpson Italia s.p.a.https://www.epson.it | KAZAKHSTANEpson Kazakhstan Rep. Officehttp://www.epson.kz | LATVIAEpson Service Center Latviahttps://www.epson.lv |
| LITHUANIAEpson Service Center Lithuaniahttps://www.epson.lt | LUXEMBURGEpson Europe B.V.Branch office Belgiumhttps://www.epson.be | NORTH MACEDONIADigit Computer Engineeringhttp://digit.net.mk/ | NETHERLANDSEpson Europe B.V.Benelux sales officehttps://www.epson.nl |
| NORWAYEpson Norwayhttps://www.epson.no | POLANDEpson Europe B.V.Branch Office Polandhttps://www.epson.pl | PORTUGALEpson Ibérica S.A.U.Branch Office Portugalhttps://www.epson.pt | ROMANIAEpson Europe B.V.Branch Office Romaniahttps://www.epson.ro |
| RUSSIAEpson CIShttp://www.epson.ru | UKRAINEEpson Kiev Rep. Officehttp://www.epson.ua | SERBIANepo System d.o.o.https://neposystem.rsAIGO Business System d.o.o.Beogradhttps://aigo.rs | SLOVAKIAEpson Europe B.V.Branch Office Czech Republichttps://www.epson.sk |
Contact List
SLOVENIA
Birotehna d.o.o.
http://www.birotehna.si
SPAIN
Epson Ibérica, S.A.U.
https://www.epson.es
SWEDEN
Epson Sweden
https://www.epson.se
SWITZERLAND
Branch office Switzerland
https://www.epson.ch
TURKEY
https://www.epson.co.uk
AFRICA
https://www.epson.co.za
or
https://www.epson.fr
SOUTH AFRICA
Epson South Africa
https://www.epson.co.za
MIDDLE EAST
Epson (Middle East)
https://www.epson.ae
NORTH, CENTRAL AMERICA & CARIBBEAN ISLANDS
CANADA
Epson Canada, Ltd.
https://epson.ca
COSTA RICA
Epson Costa Rica, S.A.
https://epson.co.cr
MEXICO
Epson Mexico, S.A. de C.V.
https://epson.com.mx
ECUADOR
Epson Ecuador
https://epson.com.ec
U.S.A.
Epson America, Inc.
https://epson.com/usa
SOUTH AMERICA
| ARGENTINA | BRAZIL | CHILE | COLOMBIA |
| Epson Argentina S.R.L. | Epson do Brasil | Epson Chile S.A. | Epson Colombia Ltd. |
| https://epson.com.ar | https://epson.com.br | https://epson.cl | https://epson.com.co |
| PERU | VENEZUELA | ||
| Epson Peru S.A. | Epson Venezuela S.A. | ||
| https://epson.com.pe | https://epson.com.ve | ||
| ASIA & OCEANIA | |||
| AUSTRALIA | CHINA | HONG KONG | INDIA |
| Epson Australia Pty. Ltd. | Epson (China) Co., Ltd. | Epson Hong Kong Ltd. | Epson India Pvt., Ltd. |
| https://www.epson.com.au | https://www.epson.com.cn | https://www.epson.com.hk | https://www.epson.co.in |
| INDONESIA | JAPAN | KOREA | MALAYSIA |
| PT. Epson Indonesia | Seiko Epson Co. | Epson Korea Co., Ltd. | Epson Malaysia Sdn. Bhd. |
| https://www.epson.co.id | https://www.epson.jp | http://www.epson.co.kr | https://www.epson.com.my |
| NEW ZEALAND | PHILIPPINES | SINGAPORE | TAIWAN |
| Epson New Zealand | Epson Philippines Co. | Epson Singapore Pte. Ltd. | Epson Taiwan Technology & Trading Ltd. |
| https://www.epson.co.nz | https://www.epson.com.ph | https://www.epson.com.sg | https://www.epson.com.tw |
Contact List
THAILAND
Epson (Thailand) Co., Ltd.
https://www.epson.co.th
Contact List

*413967500*


- INTELLIGENT CONTROLLER
- BO-IC
- USER'S GUIDE
- EPSON®
- INTRODUCTION
- CONTENTS
- ABOUT THE USER'S GUIDE
- SYMBOLS USED IN THIS GUIDE
- SAFETY INSTRUCTIONS
- PRODUCT WARNINGS AND CAUTIONS
- WARNING CHARGING PRECAUTIONS
- WARNING USAGE ENVIRONMENT AND CONDITION PRECAUTIONS
- WARNING
- PRODUCT USAGE PRECAUTIONS
- PRODUCT ABNORMALITY PRECAUTIONS
- WIRELESS FUNCTION PRECAUTIONS
- CAUTION
- USAGE ENVIRONMENT AND CONDITION PRECAUTIONS
- WATER RESISTANCE
- WATER RESISTANCE LEVEL COMPLIANT WITH IPX
- WATER RESISTANCE PRECAUTIONS
- WARNINGS AND CAUTIONS WHEN USING THE HEADSET
- VIEWING IMAGE PRECAUTIONS
- NOTES ON USAGE
- INCLUDED ITEMS
- FRONT
- RECEIVER/SPEAKER
- PROXIMITY/AMBIENT LIGHT SENSOR
- ◀ BACK KEY
- ○ HOME KEY
- RECENTS KEY
- LED INDICATOR
- TOUCH PANEL DISPLAY
- TRANSMITTER/MICROPHONE
- BACK
- LED LIGHT
- MICROPHONE
- STRAP ATTACHMENT
- CAMERA
- SPEAKER
- SIDE
- POWER BUTTON
- SWITCH KEY
- VOLUME KEYS
- USB TYPE-C CONNECTOR (WITH COVER)
- MICROSD CARD SLOT
- SLOT PIN INSERTION HOLE
- EARPHONE JACK
- USB TYPE-C CONNECTOR (FOR HEADSET CONNECTIONS)
- CHARGING
- CONNECT THE DEVICE TO A USB POWER ADAPTER
- PLUG IN THE USB POWER ADAPTER
- LED INDICATOR STATUS
- TURNING ON AND OFF
- TURNING ON
- TURNING OFF THE SCREEN WHILE THE PRODUCT IS ON (SLEEP MODE)
- TURNING OFF
- SETTING WI-FI/BLUETOOTH®
- WI-FI SETTINGS
- BLUETOOTH SETTINGS
- INSERTING AN SD CARD
- CONNECTING THE HEADSET
- → "SWITCHING MODES" P
- SWITCHING MODES
- MODE TYPES
- MIRRORING MODE
- TRACKPAD MODE
- OPERATING THE TRACKPAD
- TAP
- DRAG
- FLICK
- PINCH OUT
- PINCH IN
- INTRODUCING MOVERIO LINK PRO
- INITIAL STARTUP SETTINGS
- CHECKING YOUR LICENSE
- SETTING APP AUTHORIZATIONS
- LAUNCHING MOVERIO LINK PRO
- INSTALLING APPS
- SYSTEM UPDATE
- SUPPORT INFORMATION
- MAINTENANCE
- CLEANING THE CHARGING CONNECTORS
- TROUBLESHOOTING
- THE PRODUCT DOES NOT TURN ON
- CANNOT VIEW MOVIES OR LISTEN TO AUDIO
- IMAGES ARE FUZZY
- CANNOT OPERATE THE DEVICE
- CANNOT CONNECT TO THE NETWORK
- SPECIFICATIONS
- INTELLECTUAL PROPERTY RIGHTS
- GENERAL NOTES
- NOTES ON FREQUENCY
- LIST OF SAFETY SYMBOLS AND INSTRUCTIONS
- CONTACT LIST
- SLOVENIA
- SPAIN
- SWEDEN
- SWITZERLAND
- TURKEY
- AFRICA
- SOUTH AFRICA
- MIDDLE EAST
- NORTH, CENTRAL AMERICA & CARIBBEAN ISLANDS
- CANADA
- COSTA RICA
- MEXICO
- ECUADOR
- U.S.A
- THAILAND
Brand : EPSON
Model : Moverio BT-35ES
Category : Smartwatch