
Moverio BT-35E - Smartwatch EPSON - Free user manual and instructions
Find the device manual for free Moverio BT-35E EPSON in PDF.


| Product Type | Smart Glasses (Augmented Reality) |
| Brand | Epson |
| Model | Moverio BT-35E |
| Display | Si-OLED, 720p (1280x720) per eye, 16:9 aspect ratio |
| Field of View | Approximately 23 degrees diagonal |
| Camera | 5 MP front-facing camera |
| Audio | Built-in speaker and microphone |
| Connectivity | Wi-Fi 802.11a/b/g/n/ac, Bluetooth 5.0, USB-C (data/charging) |
| Operating System | Android 8.1 (Oreo) |
| Processor | Intel Atom x5 (quad-core) |
| Memory | 2 GB RAM, 16 GB internal storage |
| Battery | Rechargeable Li-ion, up to 6 hours continuous use |
| Weight | Approximately 150 g (glasses only) |
| Dimensions | 160 x 180 x 40 mm (glasses folded) |
| Charging | USB-C (5V/1A) |
| Maintenance | Clean lenses with soft, dry microfiber cloth. Avoid solvents. |
| Safety | Do not expose to extreme heat or moisture. Not suitable for children under 13. |
| Spare Parts & Repairability | Battery and frame are not user-replaceable. Contact Epson support for repairs. |
| General Information | Designed for industrial and commercial AR applications; supports smartphone mirroring via Moverio Link app. |
Frequently Asked Questions - Moverio BT-35E EPSON
User questions about Moverio BT-35E EPSON
0 question about this device. Answer the ones you know or ask your own.
Ask a new question about this device
Download the instructions for your Smartwatch in PDF format for free! Find your manual Moverio BT-35E - EPSON and take your electronic device back in hand. On this page are published all the documents necessary for the use of your device. Moverio BT-35E by EPSON.
USER MANUAL Moverio BT-35E EPSON
natural_image
Close-up of a black electronic device with three leads and control buttons (no visible text or symbols)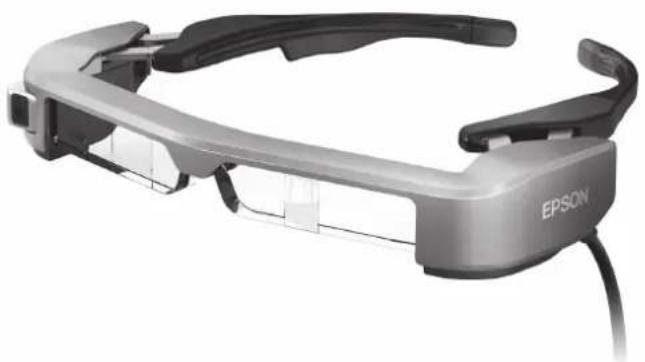
natural_image
Exterior view of a Epson smart glasses headset (no text or symbols visible on body)© 2018 Epson America, Inc., 9/18 CPD-5S906R1
Information on the Moverio Website
Provides technical information.
https://tech.moverio.epson.com/en/bt-35e/
Contents
Safety Instructions....4
Notes on Usage....8
Included Items....9
Part Names and Functions 10
Interface Unit 10
Headset....11
Connecting the Interface Unit and External Devices....12
Inputs and Outputs 12
Connecting by HDMI.... 13
Connecting by USB Type-C.... 14
Turning On/Displaying Images 16
Standby Mode and AV Mute.... 17
Extended Features....18
Wearing the Headset....20
Wearing over Glasses.... 21
Using the Shade....21
Using the Belt Clip/Cable Retainer 22
Replacing the Parts 24
Attaching and Removing the Shield 24
Replacing the Temple Grip 25
Replacing the Nose Pads 26
Supported Equipment and Software....27
Updating the Firmware....28
Maintenance....29
Troubleshooting....30
Specifications....31
Product Specifications.... 31
Video Input 32
Power.... 32
Intellectual Property Rights....33
General Notes 34
List of Safety Symbols 36
Contact List....38
User's Guide Organization
| User's Guide | This guide provides information on safely using this product, basic operating methods, and trouble-shooting. Make sure you read this guide before using the product. |
| Start Guide | Explains procedures for using this product for the first time. |
Symbols Used in this Guide
| ■Safety symbols | |||
 Warning Warning | This symbol indicates information that, if ignored, could possibly result in serious personal injury or even death due to incorrect handling. |  Caution Caution | This symbol indicates information that, if ignored, could possibly result in personal injury or physical damage due to incorrect handling. |
| ■General information symbols | |||
 | Indicates procedures which may result in damage or injury if sufficient care is not taken. |  | Indicates additional information and points which may be useful to know regarding a topic. |
| [] | Indicates buttons and keys on the interface unit. | ### | Indicates a reference to related topics. |
Caution
Safety Instructions
For your safety, read the attached documents carefully to use the product correctly. After you have read the documents, keep them in a safe place so that you can refer to them quickly at a later date.

Warning
Usage environment and condition precautions
Only use this product at the stated power-supply voltage.
Only use the AC adapter and dedicated micro-USB power supply cable supplied with the product. Using other power supply devices could result in heat, fire, explosion, malfunction, or liquid leakage.
Take the following precautions when handling the AC adapter. Failure to comply with these precautions could result in fire or electric shock.
- Do not plug the AC adapter into an outlet being used by many other devices.
- Do not insert the AC adapter into a dusty outlet.
- Insert the AC adapter firmly into the outlet.
- Do not hold the plug with wet hands.
- Do not cover or wrap the AC adapter in a cloth and so on.
- Do not use near a fire, stove, or electric heater.
Do not use the AC adapter, dedicated micro-USB power supply cable, or any USB Type-C cable if they are damaged. Failure to comply with these precautions could result in fire or electric shock.
For your safety, unplug the power supply cable when not using this product. The insulation may deteriorate, which may result in electric shock, fire, or malfunction.
Do not touch the plug during a thunderstorm. Failure to comply with these precautions could result in fire or electric shock.
Do not leave this product in locations subject to temperatures beyond the specified operating range, such as cars with the windows closed, in direct sunlight, or in front of air-conditioning or heater outlets. Also, avoid locations subject to sudden changes in temperature. Doing so may result in fire, breakdown, malfunction, or failure.
This product is not waterproof. Do not touch the AC adapter or the connectors and cables for each of the connector ports with wet hands. Failure to comply with these precautions could result in fire, burns, or electric shock.
Do not use the product in locations where it may get wet or is subject to high levels of humidity such as in a bath or shower. Failure to comply with these precautions could result in fire or electric shock.
Do not place this product in locations subject to smoke, steam, high humidity, or dust such as kitchen counters or near humidifiers. Doing so may result in fire, electric shock, or deterioration in image quality.
Do not cover this product with a cloth or similar material during use. Doing so may change the shape of the case through heat, or fire.
Do not touch the interface unit for too long while it is operating. Doing so may result in low temperature burns if it is in contact with your skin for too long, even if it is in a pocket or over clothing.
Do not expose the camera lens to direct sunlight for a long time. Doing so may result in fire or explosion due to condensed beams of light from the lens.
Safety Instructions

Warning Product usage precautions

Do not start using this product at a high volume. Doing so may result in hearing impairment. Lower the volume before turning off the product, and gradually increase the volume after turning on the product. To prevent possible hearing damage, do not listen at high volume for prolonged periods of time.
Do not pull on the cable when inserting/removing it from the connector for the connector ports. Also, make sure you plug the connector straight into the connector port. If the connection is incomplete or incorrect, it could result in fire, burns, or electric shock.
Make sure you use genuine, certified products for cables connected to the USB-C port or the HDMI port. Failure to comply with these precautions could result in fire, burns, electric shock, or damage to the product due to incorrect wiring and so on when not using certified products.
Do not allow any conductive foreign objects to touch the external device connector or earphone microphone socket, and do not put any conductive foreign objects into the connection ports. Doing so may cause a short circuit and result in fire or electric shock.
Do not allow solvents such as alcohol, benzene, or thinner to touch the product. Also, do not clean this product with a wet cloth or solvents. Doing so may warp or crack the product housing and may result in electric shock, malfunction, or fire.
The product housing should only be opened by qualified service
personnel. Also, do not disassemble or remodel the product (including consumable items). Many of the parts inside the product carry a high voltage and could cause fire, electric shock, accident, or poisoning.
Do not subject the lens of the product to strong shocks or knock it against hard objects. If the lens is damaged, it could splinter and cause serious injuries to the eyes and face.
Do not throw the product into a fire and do not heat the product. Do not place objects with open flames, such as candles, on this product. Doing so may result in heat, fire, or explosion.

Warning Viewing image precautions
Do not wear this product while driving a car, riding a motor bike or bicycle, or performing any other dangerous tasks. Doing so may result in accident or injury.
Do not use this product in unstable locations such as stairs or at altitude. Also, do not use the product while walking in dangerous locations such as near machinery or equipment that might get caught on the cables, where there is a lot of traffic, or where it is dark. Doing so may result in accident or injury.
When walking while viewing images on the product, be aware of your surroundings. If you are too focused on the image, it could result in accidents, falling down, and colliding with other people.
When viewing in dark locations, it is difficult to see your surroundings due to the brightness of the image. Be aware of your surroundings.
Safety Instructions
When using this product in small locations, be aware of your surroundings.
When wearing this product, do not look directly at the sun or other light sources even if you are using the shaded shield. This could cause serious injury to your eyes or loss of eyesight.
Make sure the cable does not catch on anything in the surrounding area while wearing the product. Also, make sure the cable does not wind around your neck. Doing so may result in accident or injury.
Make sure the cable does not get damaged. Otherwise, it may result in fire or electric shock.
- Do not damage the cable.
- Do not place heavy objects on top of the cable.
- Do not bend, twist, or pull the cable with excessive force.
- Keep the power cable away from hot electrical appliances.

Warning Product abnormality precautions
In the following situations, unplug the power supply cable, and contact the Epson service call center. Continuing to use under these conditions may result in fire or electric shock. Do not try to repair this product yourself.
- If you see smoke, or notice any strange odors or noises.
- If any water, beverages, or foreign objects get into the product.
- If the product was dropped or the case was damaged.

Caution Usage environment and condition precautions
Do not place the product in locations subjected to vibrations or shocks.
While using the product to view images, play games, or listen to music, make sure you confirm the safety of your surroundings and do not leave any fragile items in your immediate vicinity. The images you are viewing may cause you to move your body involuntarily, resulting in damage to nearby items or personal injury.
Do not place this product near high-voltage lines or magnetized items. Doing so may result in breakdown, malfunction, or failure.
When performing maintenance, make sure you unplug the power supply cable and disconnect all wires. Otherwise, it may result in electric shock.

Caution Product usage precautions
Stop using this product if the skin that touches the product (face and so on) feels itchy when wearing the product, or any unusual rashes occur, and consult your local dermatologist.
If you sweat while using the product, wipe the sweat from your face and the product. Continuing to use under these conditions may result in itching or a rash.
For your own safety, do not use a conversion adapter or extension cable when using the USB-C port or the HDMI port.
Safety Instructions
Hold the interface unit securely or place it on a stable surface and make sure the cables are not pulled with undue force.
Dispose of this product in accordance with your local laws and regulations.

Caution Viewing image precautions
Always take periodic breaks when viewing images using this product. Long periods of viewing images may result in eye fatigue. If you feel fatigued or uncomfortable even after taking a break, stop viewing immediately.
Do not drop this product or treat it with unnecessary force. Also, if the product breaks due to an impact such as a fall, stop using the product. Continuing to use this product may result in injury due to glass fragments.
When wearing this product, be aware of the edges of the frame. Also, do not place your finger between the moving parts of this product. Doing so may result in injury.
Make sure you are wearing this product correctly. Incorrect usage could make you feel nauseous.
This product should only be used for the purposes stated in the manuals. Doing so may result in injury.
If a problem or malfunction occurs, stop using this product immediately. Continuing to use this product may result in injury or could make you feel nauseous.
Stop using this product if your skin feels unusual when wearing this product and consult your local dermatologist. Sometimes allergies may occur due to the coating or material of the product.
How a 3D image is perceived varies depending on the individual. Stop using the 3D function if you feel strange or cannot see in 3D. Continuing to view the 3D images could make you feel nauseous.
This product must not be used by children under the age of thirteen.
Do not use this product if you are sensitive to light, or feel nauseous. Doing so may aggravate your pre-existing conditions.
Do not use this product if you have prior eye conditions. Doing so may aggravate the symptoms such as strabismus, amblyopia, or anisometropia.
Notes on Usage
This product uses an Si-OLED display panel. Due to the characteristics of the Si-OLED, you may notice burn-in or decreasing luminance on the panel. This is not a malfunction.
To reduce the burn-in, do the following.
- Do not display the same image for a long time.
- Hide markers or text that always appear in the same position.
• Decrease the display brightness.
List of Safety Symbols (corresponding to IEC60950-1 A2)
The following table lists the meaning of the safety symbols labeled on the equipment.
Approved standards: IEC60417 No.5031
Meaning: Direct current
To indicate on the rating plate that the equipment is suitable for direct current only; to identify relevant terminals.
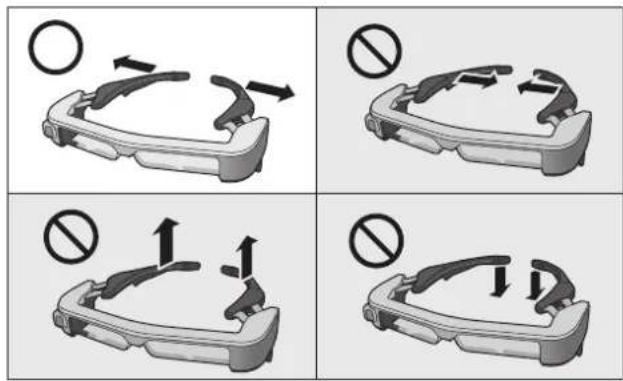
Caution Headset usage precautions
Do not drop this headset or treat it with unnecessary force.
The temples can only be opened outwards. Do not apply force in other directions. If excessive force is applied to the temples, they may be damaged.
When transporting the device, make sure you use the box that the device came in and the dedicated carrying case so as not to apply excessive force to the temples.
Included Items
 | Headset→"Headset" p.11 |
 | Interface unit→"Interface Unit" p.10 |
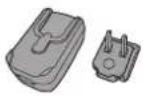 | AC adapter with plug attachment→"Inputs and Outputs" p.12 |
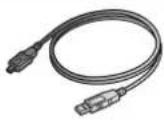 | Dedicated micro-USB power supply cable→"Inputs and Outputs" p.12 |
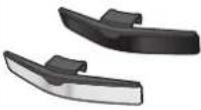 | Clear and shaded safety shields→"Attaching and Removing the Shield" p.24 |
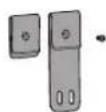
Belt clip
Cable retainer
Installation screw
→"Using the Belt Clip/Cable Retainer" p.22
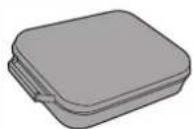
Carrying case
*Not waterproof.
Part Names and Functions
Interface Unit
[ ] (Standby) button
Set and release standby mode and AV mute, and show/hide images.
→"Standby Mode and AV Mute" p.17
[ -] (brightness adjustment) keys
Adjusts the brightness incrementally within a range of 0 to 20. Hold the keys down to increase or decrease the brightness.
[ ] (volume) keys
Adjusts the volume incrementally within a range of 0 to 15. Hold the keys down to increase or decrease the volume.
Headset connector
Connects the headset.
→"Connecting by HDMI" p.13
→"Connecting by USB Type-C" p.14

natural_image
Pure electrical circuit lines without any symbols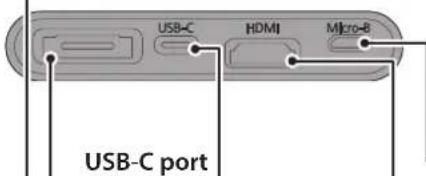
USB-C port
Connects to external devices that support USB Type-C. You can input video signals and supply power from the connected device. You can also output camera data and sensor data from the headset to the connected device.
→"Connecting by USB Type-C" p.14
LED indicator
Indicates the status of the product.
| Orange: On Standby mode | |
| Blue: Flashing No video signal detected | |
| Blue: On Displaying images. | |
| Blue: Flashingslowly | AV mute enabled |
| Orange: Flashing Error has occurred | |
Micro-B port
This port is dedicated to supplying power. (It cannot be used for data communication.)
HDMI port
Inputs video signals from video equipment or computers that support HDMI.
→"Connecting by HDMI" p.13
Part Names and Functions
Headset
Temple grip
If the temple grip gets dirty or deteriorates, it can be replaced.
→"Replacing the Temple Grip" p.25
Ambient light sensor
Senses the brightness of your surroundings and automatically adjusts the brightness of the screen.
Camera
Captures images and movies. Remove the protective film before use.
Interface unit connector
Inserts into the interface unit.
→"Connecting by HDMI" p.13
→"Connecting by USB Type-C" p.14
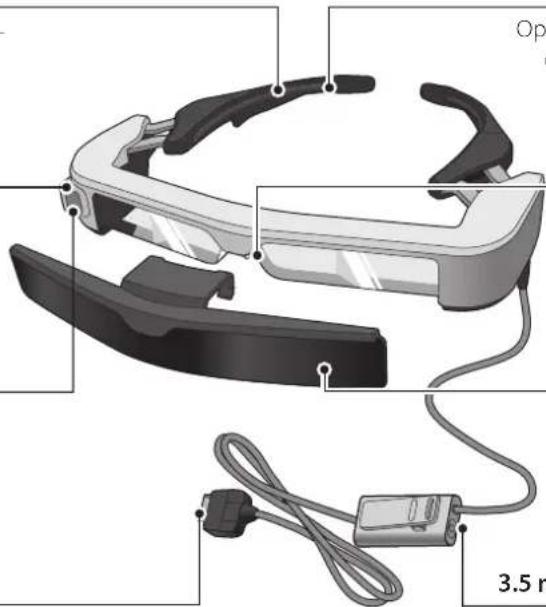
Temples
Open the temples to wear.
→"Wearing the Headset" p.20
Nose pads
If the nose pads get dirty, it can be replaced.
→"Replacing the Nose Pads" p.26
Safety shield (shaded shown)
ANSI Z87.1-compliant. Shaded shield helps minimize ambient light.
→"Attaching and Removing the Shield" p.24
3.5 mm audio jack
You can connect commercially available earphones and microphones.
→"Wearing the Headset" p.20
Connecting the Interface Unit and External Devices
Inputs and Outputs
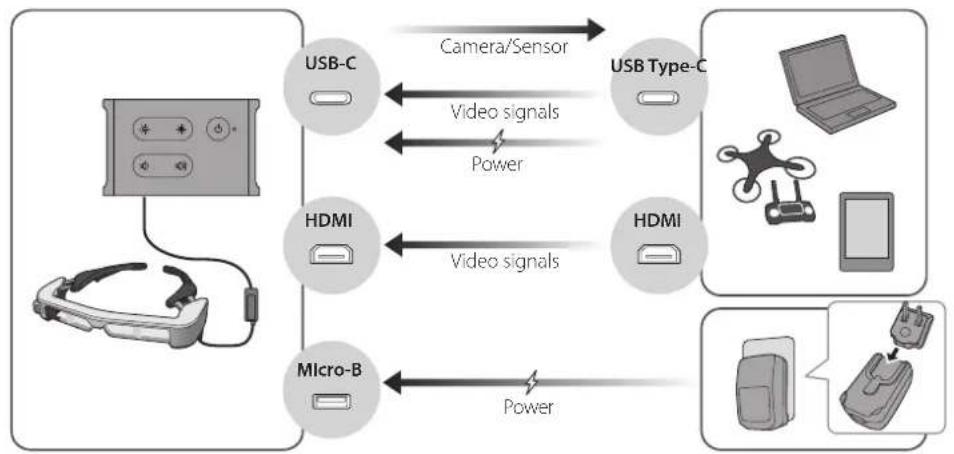
The interface unit and external devices input/output the following data and power supply.
| Port Name Input/Output | |
| USB-C | • Outputs camera or sensor data.• Inputs video signals.• Supplies power. |
| HDMI Inputs video signals. | |
| Micro-B | Only supplies power.(Connects the AC adapter with the dedicated micro-USB power supply cable.) |

USB Type-C cables and HDMI cables are not supplied with this product. You need to obtain your own in advance.
flowchart
graph TD
    A["Micro-B"] -->|Power| B["Micro-B"]
    B -->|Video signals| C["HDMI"]
    C -->|Camera/Sensor| D["USB-C"]
    D -->|Video signals| E["USB Type-C"]
    E -->|Power| C
    C --> F["HDMI"]
    F -->|Video signals| G["Drone"]
    G --> H["Laptop"]
    G --> I["Mobile Device"]
    G --> J["Handheld Device"]
Connecting the Interface Unit and External Devices
Connecting by HDMI
Follow the steps below to display images from external devices connected by HDMI.
1 Connect the headset.
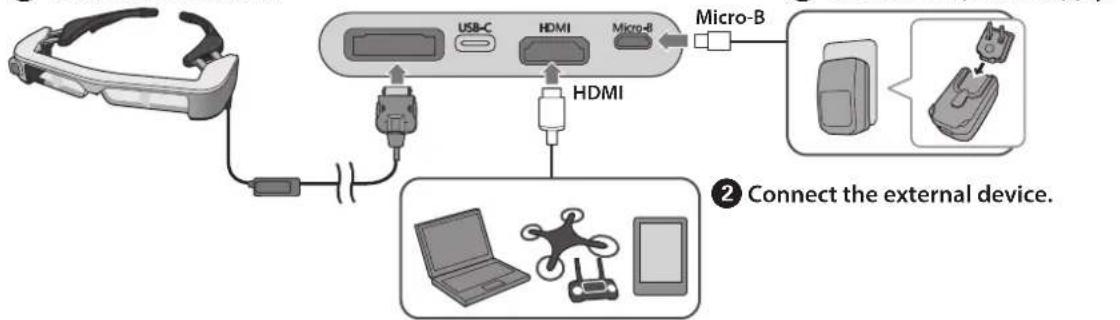
flowchart
graph TD
    A["AR Head"] --> B["USB-C"]
    B --> C["HDMI"]
    C --> D["Micro-B"]
    D --> E["Micro-B"]
    E --> F["Device with Drone"]
    F --> G["External Device with Remote Phone"]

When using the headset sensor or camera data, connect to the USB-C port. Video signals from the HDMI port have priority over video signals from the USB-C port.
→"When using the headset sensors or camera" p.15

- Make sure you connect the headset before you connect the power supply.
- Do not connect or disconnect the headset while it is operating.
-
Make sure you unplug the dedicated micro-USB power supply cable before unplugging the headset cable.
-
HDMI cannot be connected using a conversion adapter.
- To prevent excessive wear on the connectors, do not disassemble the AC adapter once it has been assembled.
Connecting the Interface Unit and External Devices
Connecting by USB Type-C
When connecting to an external device with USB Type-C, you can use data from the headset sensors and camera as well as view the images. Also, since it can be used as a power supply source, you can perform three operations simultaneously using one USB Type-C cable; input video signals, output sensor/camera data, and supply power.
1 Connect the headset.
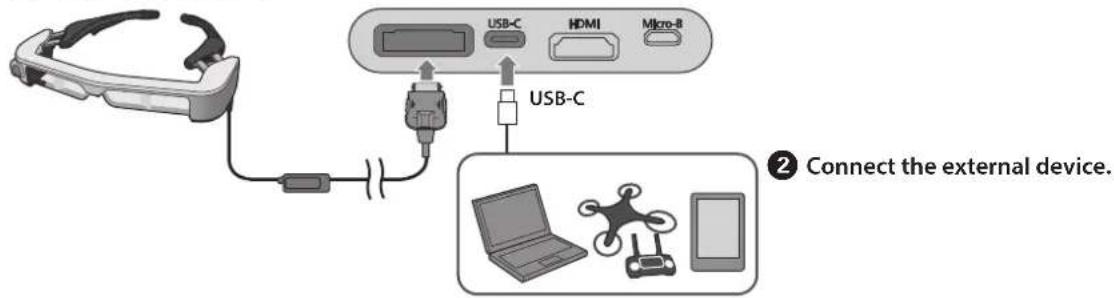

• Make sure you connect the headset before you connect the power supply.
- Do not connect or disconnect the headset while it is operating.
- Make sure you unplug the USB Type C cable before unplugging the headset cable.
• The connected equipment must support USB 2.0/3.0.
- Make sure you use a genuine USB-IF certified USB-C 3.1 cable.
- USB Type-C cannot be connected using a conversion adapter.
Connecting the Interface Unit and External Devices
Notes on displaying images by USB Type-C
- This product supports DisplayPort Alternate mode (DP Alt mode) for USB Type-C.
→"Supported Equipment and Software" p.27
- To display images using USB Type-C, the connected device must support video output by USB Type-C.
- Depending on the device, displaying images may not be supported. See the manual supplied with the equipment you want to connect for more information.
Notes on supplying power by USB Type-C
• This product supports USB Type-C Current @ 1.5 A.
- Check that the connected equipment supports a power supply of 5 V/1.5 A or more by USB Type-C.
- If power cannot be supplied from the connected equipment, connect the AC adapter supplying power to the Micro-B port.
- Power supplied from the Micro-B port has priority over this product. If you change power supply during use, the product turns off temporarily.
If you are using the sensor/camera feature, make sure you reconfigure the connected device as necessary.
When using the headset sensors or camera
Data from the sensors and camera built into the headset are output from the USB-C port. Some devices do not support the use of data from sensors or cameras. See the following for more details.
→"Supported Equipment and Software" p.27
Turning On/Displaying Images
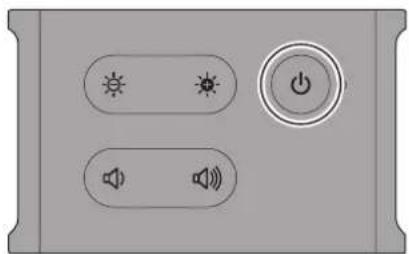
When power is supplied from the Micro-B port or USB-C port, this product turns on. Also, when a video signal is being input, the video is displayed automatically.
When no video signal is being input,
natural_image
Control panel with sun, power button, and speaker icons (no text or labels)While viewing an image, you can hide the images and mute the audio by pressing the [button (AV Mute).
Press the [ ⏻] button again to release AV mute and resume the images and audio.
To turn off the product, disconnect the power supply source.

See the following for information on using the buttons.
→"Interface Unit" p.10
→"Extended Features" p.18

- When playing a movie, the movie continues to playback even though images are hidden and audio is muted in standby mode or AV mute. To stop the movie, you need to stop it on the external device.
- This product is not chargeable. You need to connect equipment that can supply enough power.
→"Connecting by HDMI" p.13
→"Connecting by USB Type-C" p.14
Turning On/Displaying Images
Standby Mode and AV Mute
Although standby mode and AV mute will hide the images and mute the audio, there are a few differences.
Select the appropriate mode to suit your needs.
| Setting | Time to Display Images | Power Consumed | |
| Standby mode | Hold down the [ ⏻ button | Long (approx. 8 secs.) | Low power consumption |
| AV mute | Briefly press the [ ⏻ button | Short | More than in standby mode |

This product automatically switches to standby mode (in Mode 1 only) after 20 minutes of inactivity or after 20 minutes if AV mute is enabled.
→"Extended Features" p.18
Extended Features
You can access extended features by holding down two buttons at the same time.
You can check the status of the extended features in the display or by using the LED indicators.
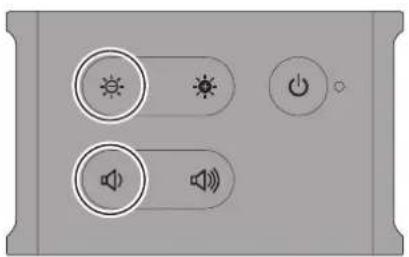
Switching between 2D and 3D display
This product uses the side-by-side 3D display format.
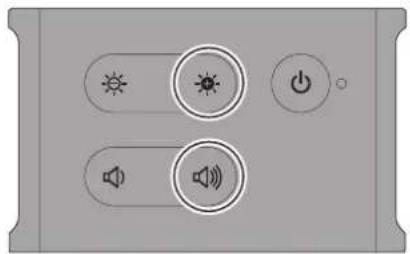
To switch between 2D and 3D mode, hold down the [ ] keys at the same time.
natural_image
Control panel with two switches and three speaker icons (no text or labels)The following is shown on the display when switching modes.
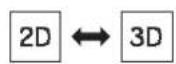
Adjusting the screen brightness automatically
This product can automatically adjust the brightness of the screen according to the brightness of the environment in which it is being used.
To turn auto brightness adjustment on or off, hold down the [-] and the [ ] keys at the same time.
natural_image
Control panel with four function buttons (sun, radio, power, speaker) and a plus sign, no text or symbols present.The following is shown on the display when switching modes.

Changing the mode setting
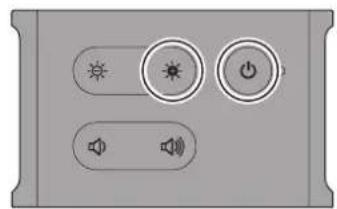
The following three modes are available. To switch the mode, hold down the [●key and the [●] button at the same time.
natural_image
User interface panel with buttons for sun, power, and speaker (no text or symbols)| Power saving feature*1 | [ button *2 | When switching mode | ||
| LED indicator*3 | Display | |||
| Mode 1 (Default setting) | Enabled Operations available | Flashes white once | ( Auto :ON | |
| Mode 2 Disabled Operations | available Flashes white twice | ( Auto :OFF | ||
| Mode 3 Disabled Operations | unavailable | Flashes white three times | ( Auto :OFF | |
*1 This feature automatically switches to standby mode after 20 minutes of inactivity when no image is being input, or after 20 minutes when AV mute is enabled.
*2 The [button shows/hides images. Hold down to switch to standby mode.
→ "Standby Mode and AV Mute" p.17
*3 You can check the mode by the number of times the LED flashes white immediately after making settings.
In Mode 3, the [ ] button is disabled which helps to avoid operation mistakes when you want to show the display at all times.
Wearing the Headset
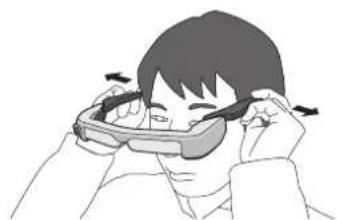
1 Use both hands to open the temples, and then put on the headset.
natural_image
Illustration of a person adjusting their face with hands (no text or symbols)
Do not use too much force when opening the temples of the headset.
2 Adjust the position of the headset so that you can see the image.
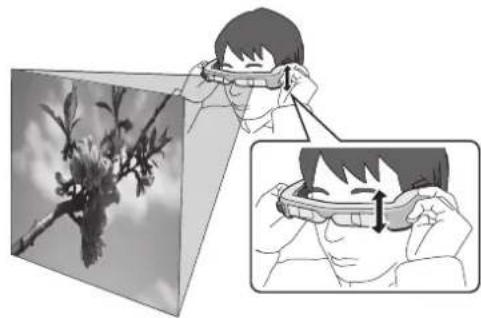
natural_image
Illustration showing a person adjusting glasses with an inset image of a tree branch (no text or symbols present)
• How an image is perceived varies depending on the individual.
- You can connect earphones and microphones using the 3.5 mm audio jack.
Use earphones that conform to the CTIA standard.
You may hear some noise if the cables are disconnected or connected while content is being played.

You can clip the headset cable to your clothes.

Make sure the cable does not catch on anything in the surrounding area while wearing the product. Also, make sure the cable does not wind around your neck.
Wearing over Glasses
The headset can be worn over glasses. (The headset can only be worn over glasses that are approximately 5.8 inches [147 mm] wide.)

• Make sure that you do not damage the glasses and the lens of the headset when wearing.
- You may not be able to wear the headset over the glasses depending on the shape of your glasses.
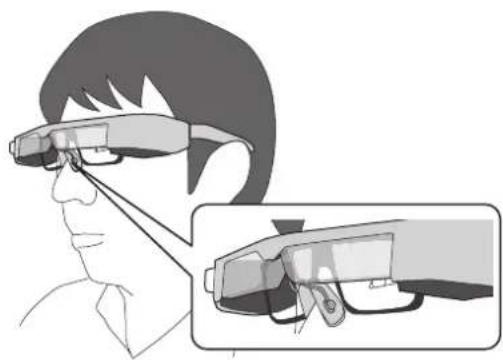
natural_image
Illustration of a person using a smart glasses with an inset close-up showing the device (no text or symbols)
The nose pads fit over your glasses.
Using the Shaded Shield
If the surrounding ambient light is too bright to view the screen when wearing the headset, attach the shaded shield.
→"Attaching and Removing the Shield" p.24
When the shaded shield is unnecessary, leave it flipped up.
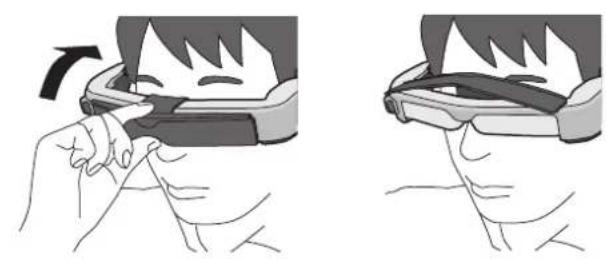
natural_image
Illustration of a person using a smartphone to interact with another person (no text or symbols present)
You can adjust the brightness of the screen by using the [-] keys.
→"Interface Unit" p.10
Using the Belt Clip/Cable Retainer
You can attach the interface unit to the belt by using a belt clip or cable retainer.
You can also secure extra cables to the cable retainer by using a commercially available band.
1 Attach the belt clip to the interface unit using the screw supplied.
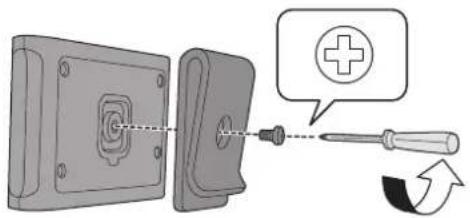
By changing the direction of the belt clip you can rotate the interface unit by 90 degrees.
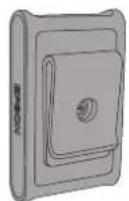

Loosen the screw to lift and rotate the clip. Attempting to rotate the clip without loosening the screw will damage the clip and interface unit.
② Connect the cables.
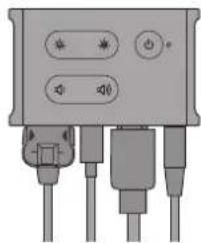
natural_image
Pure electrical connector diagram without any text, numbers, or symbols3 Attach the clip to a belt and so on.
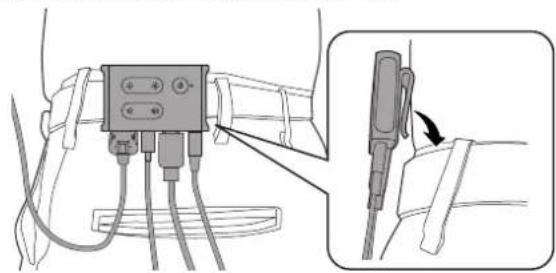
natural_image
Diagram showing a device with three connected ports and a close-up of its cable being inserted (no text or symbols present)Using the Belt Clip/Cable Retainer

Use the same procedure to attach the cable retainer to the belt. You can secure other cables using commercially available bands and so on so that they do not catch on anything in the surrounding area.
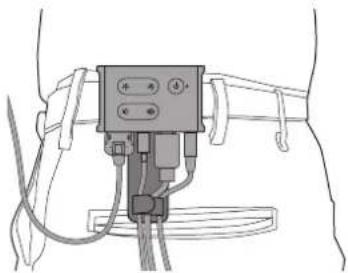
natural_image
Line drawing of a mechanical device with attached clamps and connectors (no text or symbols)
Caution
- Keep the cables as close to your body as possible. Sagging cables may cause accidents or injuries if they become caught or trapped by surrounding objects.
- Do not pull the headset's cable. If the headset comes off, it may result in accident or injury.
- Since the belt clip/cable retainer are designed to grip the belt securely, they could scratch the surface of the belt during attachment or removal. Avoid attaching them to leather or shiny belts, or protect the belt by placing a thin cloth over the section they come in contact with.
Replacing the Parts
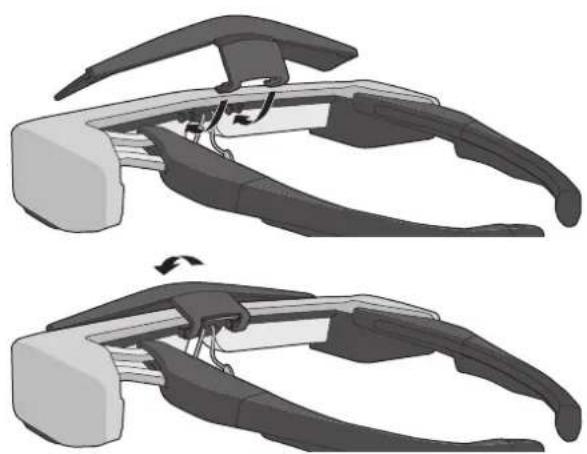
Attaching and Removing the Shield
This product includes clear and shaded safety shields. If it is too bright to view the screen when wearing the headset, attach the shaded shield.
■ Attaching the shield
Hold the shield at an angle and press it against the protruding sections (two points) at the center of the headset.
■Removing the shield
To remove the shield, flip it up, and then push down and pull it towards you.
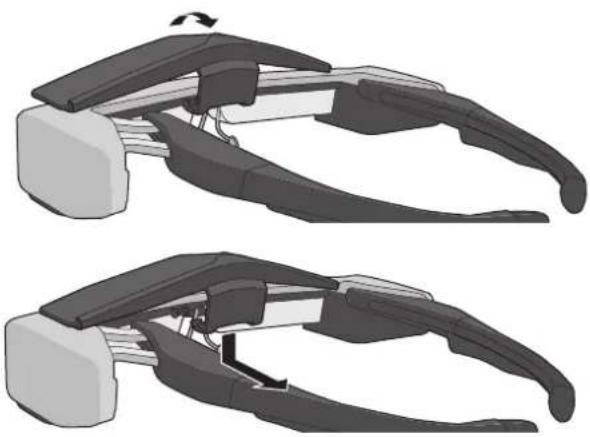
If the shield is pushed or pulled with too much force, the shield and the lens could be damaged. Do not use too much force on the shield.
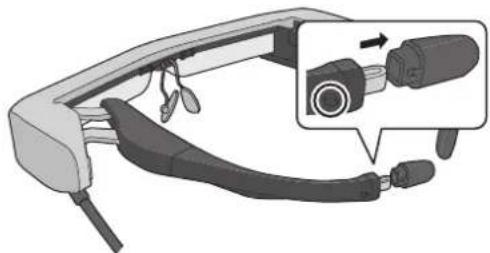
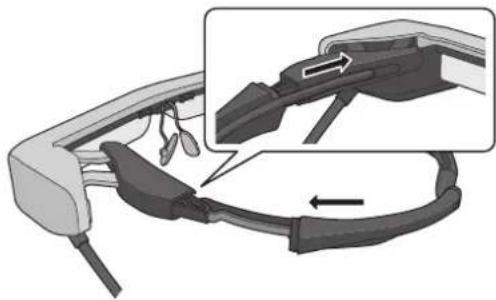
Replacing the Temple Grip
1 Press the part indicated by the circle ( Ⓞ and remove the tip of the temple grip.
natural_image
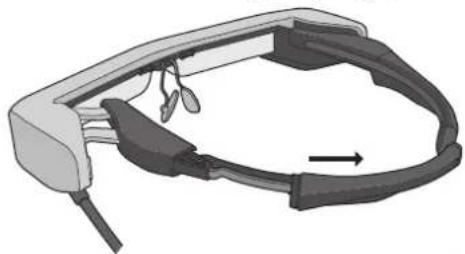
Illustration of a smart glasses headset with attached cable and connector (no text or symbols)② Slide off the remaining temple grip.
natural_image
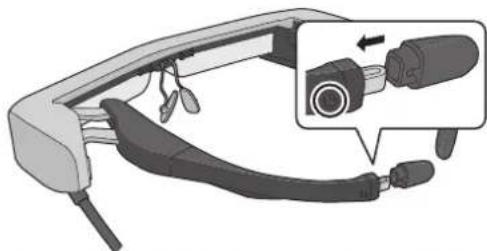
Diagram of a smart glasses headset with earphones and control buttons, showing a directional arrow (no text or symbols present)3 Slide the replacement temple grip into the groove in the headset.
natural_image
Diagram of a smart glasses headset with an inset showing the connector detail (no text or symbols present)4 While pressing the part indicated by the circle ( Ⓤ attach the tip of the temple grip.
natural_image
Illustration of a smart glasses headset with attached cable and connector (no text or symbols)Replacing the Parts
Replacing the Nose Pads
① Pull the nose pads towards you to remove them.
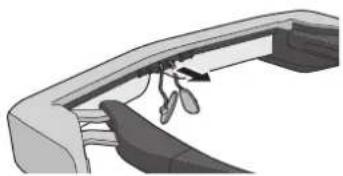
natural_image
Diagram of a car's front wheel and rearview blade assembly (no text or symbols)2 Attach the replacement nose pads.
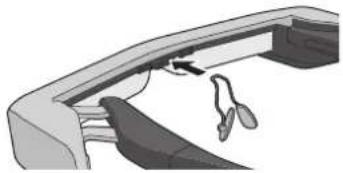
natural_image
Diagram of a car interior showing dashboard, seatbelt, and steering wheel (no text or labels)Supported Equipment and Software
External device
| HDMIe display | Supported equipment | Video output equipment with HDMI ports |
| Resolution (frame rate) | 1920 x 1080 (60 Hz/59.94 Hz), 1280 x 720 (60 Hz/59.94 Hz), 1280 x 720 (30Hz), 640 x 480 (60 Hz) | |
| DisplayPort display | Supported equipment | Computers and smart devices with USB Type-C ports that support DisplayPort Alternate Mode on USB Type-C' |
| Resolution (frame rate) | 1920 x 1080 (60 Hz/59.94 Hz), 1280 x 720 (60 Hz/59.94 Hz), 1280 x 720 (30Hz), 640 x 480 (60 Hz) |
*1 HDMI data transfer is not supported.
Images may not be displayed correctly at other resolutions.
Sensors and camera
| Supported equipment | Computers and smart devices with USB Type-C ports |
| Supported operating systems | Windows 10 and AndroidTM OS Ver. 7.0 or later |
When using the headset's sensors or camera, you need to install a sensor or camera-enabled application on the external device that you want to connect to.
The camera function for this product conforms to UVC1.1.
Software development kit
You need a dedicated SDK (Software Development Kit) to control the sensor, camera, and display from your application.
See the Developer's Guide (https://tech.moverio.epson.com/en/bt-35e/document.html) for more information.
Updating the Firmware
Download the firmware to your computer from the following download site, and then update it using the Epson BT-35E Update Tool.
See the firmware release notes for more information.
https://tech.moverio.epson.com/en/bt-35e/download.html
Maintenance
Cleaning the headset
- If you can see marks in the image or if the image is hazy, check that there is no dirt, dust, fingerprints, and so on, on the lenses.
If there is dust or dirt on the lenses, wipe them carefully with a soft cloth.

When wiping the lenses, do not use lens cleaning liquids or organic solvents.
- If the camera is dirty, wipe it carefully with a soft cloth.
- If any parts other than the lens or camera are dirty, wipe them with a wet tissue.
Storing the headset
- When storing the headset, place it in the packaging that it came in or the dedicated carrying case.
- When placing the headset, make sure it is placed horizontally so that it does not touch against hard objects. If the headset is placed with the lens facing down and the lens touches hard objects, the lens could be damaged.
Cleaning the connector ports
- If the connectors on the interface unit are dirty or if there are foreign objects stuck to them, they may not work correctly. Wipe away any dirt with a dry cloth or cotton swab at least once every three months.

Caution
- Do not damage the connector ports with your finger or a hard object.
- Do not expose the connector ports to water. When cleaning the connector ports, use a dry cloth or a cotton swab.
Troubleshooting
If you think a malfunction has occurred, check the following.
No image is displayed
- Check of any cables are disconnected.
- If the LED indicator flashes orange for more than three seconds, an error has occurred.
→"Part Names and Functions" p.10
Unplug the dedicated micro-USB power supply cable or the USB Type-C cable that is supplying the power, wait for a while, and then reconnect.
- If images are not displayed by a USB Type-C connection, check that the connected equipment supports video output by USB Type-C. This product supports DisplayPort Alternate mode (DP ALT mode) for USB Type-C.
Images are fuzzy
- Reconnect the cables.
- Restart the connected equipment.
The display is not hidden when you press the [button
The product may be set to Mode 3 in extended features. Hold down the [ ] key and the [ ] button at the same time to set Mode 1 or Mode 2.
→"Extended Features" p.18
Cannot hear audio
- Check that the earphones are connected securely.
- Check that the volume is set correctly.
- Check that audio is being output from the output equipment.
- You may not be able to use it depending on the type of standard earphones you are using, such as earphones with a switch.
Cannot adjust the brightness of the screen
- If the product gets too hot, the image brightness may be decreased to protect the product.
You can check if the brightness has been limited by pressing the [-∅-] kns.
| Normal operation Brightness limited | |
Specifications
Product Specifications
| Model Number BT-35E (H935A) | |
| Material | SI-OLED |
| Panel size 0.43" wide panel (16:9) | |
| Resolution | 1280x720 |
| Angle of view Approximately 23 degrees (diagonally) | |
| Virtual screen size 40" support (virtual viewing distance 8.2 ft [2.5 m]) | |
| Color reproduction 24 bit color (approximately 16,770,000 colors) | |
| Supported 3D Side-by-side format | |
| Connector ports | Interface unit connector ports, 4 pin mini jack (earphones with microphone complying with the CTIA standard) ^1 , USB Type-C, HDMI, USB Micro-B (power supply only) |
| Operating temperature 41 to 95°F (5 to 35°C) humidity 20 to 80% (no condensation) | |
| Storage temperature 14 to 140°F (-10 to 60°C) humidity 10 to 90% (no condensation) | |
| AC adapter | Model Number PSAF10R-050Q |
| Manufacturer PHIHONG TECHNOLOGY CO., LTD. | |
| Rated output voltage/current 5 V/2 A | |
| Exterior dimensions (W x D x H) | Headset 7.6 x 7.4 x 1.2 inches (193 x 189 x 30 mm) (without the shield) |
| Interface unit 3.3 x 2.0 x 0.6 inches (85 x 52 x 15 mm) | |
| Mass | Headset Approx. 4.2 ounces (119 g) (without shield and cables) |
| Interface unit Approx. 1.6 ounces (45 g) | |
| Camera | 5 million pixels (Pan focus) |
| Earphone output | Max. voltage 150 mV or lessVoltage with broadband characteristics 75 mV or more |
| Sensors | Geomagnetic sensor/accelerometer sensor/gyroscopic sensor/ambient light sensor |
*1 Restrictions in operation may occur when using an adapter plug.
Video Input
| HDMI (Type A) HDMI Ver. 1.4 | |
| Resolution (frame rate) 1920 x 1080 (60 Hz/59.94 Hz), 1280 x 720 (60 Hz/59.94 Hz), 1280 x 720 (30Hz), 640 x 480 (60 Hz) | |
| EDID Supported | |
| CEC Not supported | |
| HDCP Rev. 1.4 | |
| 3D formats Not supported | |
| HDMI Data Transfer Not supported | |
| USB Type-C Video interface DisplayPort Alternate Mode (DP Alt Mode) | |
| Resolution (frame rate) 1920 x 1080 (60 Hz/59.94 Hz), 1280 x 720 (60 Hz/59.94 Hz), 1280 x 720 (30Hz), 640 x 480 (60 Hz) | |
| EDID Supported | |
| HDCP Rev. 1.3 | |
Power
| Interface USB Type-C USB Type-C Current @ 1.5 A | |
| USB Micro-B 5.0 V/1.5 A (DC input) | |
| Electricity consumption Operating: Approx. 6.5 W | Standby power consumption (Communication On): 2.0 WStandby power consumption (Communication Off): 0.3 W |
Intellectual Property Rights
Notations In this guide, the Microsoft® Windows® 10 operating system is referred to as "Windows 10".
Trademarks
"EPSON" is a registered trademark of the Seiko Epson Corporation. "EXCEED YOUR VISION" is a registered trademark or a trademark of the Seiko Epson Corporation.
Windows is a registered trademark of the Microsoft Corporation in the USA and other countries.
HDMI and High-Definition Multimedia Interface are the trademarks or registered trademarks of HDMI Licensing LLC.

USB Type-C _i is a trademark of the USB Implementers Forum.
Android™ is a trademark of Google LLC.
Other product names used herein are also for identification purposes only and may be trademarks of their respective owners. Epson disclaims any and all rights in those marks.
General Notes
Restriction of Use
This product is manufactured based on the specifications of the country of sale. When using this product outside the country of sale, contact your nearest support center.
When this product is used for applications requiring high reliability/safety such as transportation devices related to aviation, rail, marine, automotive; disaster prevention devices; various safety devices; or functional/precision devices, you should use this product only after giving consideration to including fall-safes and redundancies into your design to maintain safety and total system reliability.
Because this product was not intended for use in applications requiring extremely high reliability/safety such as aerospace equipment, main communication equipment, nuclear power control equipment, or medical equipment related to direct medical care, please make your own judgment on this product's suitability after a full evaluation.
Authentication information
U.S.A/Canada

Europe
Supplier's
DECLARATION of
CONFORMITY
According to 47CFR, Part 2 and 15
Class B Personal Computers and Peripherals; and/or
CPU Boards and Power Supplies used with Class B Personal Computers
We : Epson America, Inc.
Located at: 3840 Kilroy Airport Way MS: 3-13 Long Beach, CA 90806
Tel: 562-981-3840
Declare under sole responsibility that the product identified herein, complies with 47CFR Part 2 and 15 of the FCC rules as a Class B digital device. Each product marketed, is identical to the representative unit tested and found to be compliant with the standards. Records maintained continue to reflect the equipment being produced can be expected to be within the variation accepted, due to quantity production and testing on a statistical basis as required by 47CFR 2.909.
Trade Name : EPSON
Type of Product: Smart Glasses
Model: H935A
General Notes
FCC Compliance Statement
This equipment has been tested and found to comply with the limits for a Class B digital device, pursuant to Part 15 of the FCC Rules. These limits are designed to provide reasonable protection against harmful interference in a residential installation. This equipment generates, uses, and can radiate radio frequency energy and, if not installed and used in accordance with the instructions, may cause harmful interference to radio communications. However, there is no guarantee that interference will not occur in a particular installation. If this equipment does cause harmful interference to radio or television reception, which can be determined by turning the equipment off and on, the user is encouraged to try to correct the interference by one or more of the following measures.
• Reorient or relocate the receiving antenna.
- Increase the separation between the equipment and receiver.
- Connect the equipment into an outlet on a circuit different from that to which the receiver is connected.
- Consult the dealer or an experienced radio/TV technician for help.
- Operation is subject to the following two conditions: (1) this device may not cause harmful interference, and (2) this device must accept any interference received, including interference that may cause undesired operation.
WARNING
The connection of a non-shielded equipment interface cable to this equipment will invalidate the FCC Certification or Declaration of this device and may cause interference levels which exceed the limits established by the FCC for this equipment. It is the responsibility of the user to obtain and use a shielded equipment interface cable with this device. If this equipment has more than one interface connector, do not leave cables connected to unused interfaces. Changes or modifications not expressly approved by the manufacturer could void the user's authority to operate the equipment.
Canada
CAN CES 3 (B)/NMB 3(B)
This Class B digital apparatus complies with Canadian ICES-003.
Indication of the manufacturer and the importer in accordance with requirements of EU directive
Manufacturer: SEIKO EPSON CORPORATION
Address: 3-5, Owa 3-chome, Suwa-shi, Nagano-ken 392-8502 Japan
Telephone: 81-266-52-3131
http://www.epson.com/
Importer: EPSON EUROPE B.V.
Address: Atlas Arena, Asia Building Hoogoorddreef 5, 1101 BA Amsterdam Zuidoost
The Netherlands
Telephone: 31-20-314-5000
http://www.epson.eu/
List of Safety Symbols
The following table lists the meaning of the safety symbols labeled on the equipment.
| No. | Symbol mark | Approved standards | Meaning | |
| 1 | IEC60417No. 5007 | "ON" (power)To indicate connection to the mains. | ||
| 2 |  | IEC60417No. 5008 | "OFF" (power)To indicate disconnection from the mains. | |
| 3 |  | IEC60417No. 5009 | Stand-byTo identify the switch or switch position by means of which part of the equipment is switched on in order to bring it into the stand-by condition. | |
| 4 |  | ISO7000No. 0434BIEC3864-B3.1 | CautionTo identify general caution when using the product. | |
| 5 |  | IEC60417No. 6042ISO3864-B3.6 | Caution, risk of electric shockTo identify equipment that has risk of electric shock. | |
| No. | Symbol mark | Approved standards | Meaning |
| 6 |  | IEC60417No. 5957 | For indoor use onlyTo identify electrical equipment designed primarily for indoor use. |
| 7 | 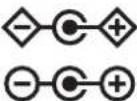 | IEC60417No. 5926 | Polarity of d.c. power connectorTo identify the positive and negative connections (the polarity) on a piece of equipment to which a d.c. power supply may be connected. |
| 8 |  | IEC60417No. 5017 | EarthTo identify an earth (ground) terminal. |
| 9 |  | IEC60417No. 5032 | Alternating currentTo indicate on the rating plate that the equipment is suitable for alternating current only; to identify relevant terminals. |
| 10 | 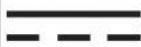 | IEC60417No. 5031 | Direct currentTo indicate on the rating plate that the equipment is suitable for direct current only; to identify relevant terminals. |
General Notes
| No. | Symbol mark | Approved standards | Meaning |
| 11 |  | IEC60417No. 5172 | Class II equipmentTo identify equipment meeting the safety requirements specified for Class II equipment according to IEC 61140. |
| 12 |  | ISO 3864 General prohibition | To identify actions or operations that are prohibited. |
| 13 |  | ISO 3864 Contact prohibition | To indicate injury that could occur due to touching a specific part of the equipment. |
| 14 |  | IEC60417No. 5266 | Standby, partial standbyTo indicate that part of the equipment is in the ready status. |
Contact List
This address list is current as of May 2018.
A more up-to-date contact address can be obtained from the corresponding website listed here. If you do not find what you need on any of these pages, please visit the main Epson home page at www.epson.com.
EUROPE, MIDDLE EAST & AFRICA
| ALBANIAITD Sh.p.k.http://www.itd-al.com | AUSTRIAEpson Deutschland GmbHhttp://www.epson.at | BELGIUMEpson Europe B.V.Branch office Belgiumhttp://www.epson.be | BOSNIA AND HERZEGOV-INANET d.o.o. Computer Engineeringhttp://www.net.com.ba |
| BULGARIAEpson Service Center Bulgariahttp://www.kolbis.com | CROATIAMR servis d.o.o.http://www.mrservis.hr | CYPRUSMechatronic Ltd.http://www.mechatronic.com.cy | CZECH REPUBLICEpson Europe B.V.Branch Office Czech Republichttp://www.epson.cz |
| DENMARKEpson Denmarkhttp://www.epson.dk | ESTONIAEpson Service Center Estoniahttp://www.epson.ee | FINLANDEpson Finlandhttp://www.epson.fi | FRANCE & DOM-TOM TERRITORYEpson France S.A.http://www.epson.fr |
| GERMANYEpson Deutschland GmbHhttp://www.epson.de | GREECEOktabit S.A.http://www.oktabit.gr | HUNGARYEpson Europe B.V.Branch Office Hungaryhttp://www.epson.hu | IRELANDEpson (UK) Ltd.http://www.epson.ie |
Contact List
| ISRAELEpson Israelhttp://www.epson.co.il | ITALYEpson Italia s.p.a.http://www.epson.it | KAZAKHSTANEpson Kazakhstan Rep. Officehttp://www.epson.kz | LATVIAEpson Service Center Latviahttp://www.epson.lv |
| LITHUANIAEpson Service Center Lithuaniahttp://www.epson.lt | LUXEMBURGEpson Europe B.V.Branch office Belgiumhttp://www.epson.be | MACEDONIADigit Computer Engineeringhttp://www.digit.com.mk | NETHERLANDSEpson Europe B.V.Benelux sales officehttp://www.epson.nl |
| NORWAYEpson Norwayhttp://www.epson.no | POLANDEpson Europe B.V.Branch Office Polandhttp://www.epson.pl | PORTUGALEpson Ibérica S.A.U.Branch Office Portugalhttp://www.epson.pt | ROMANIAEpson Europe B.V.Branch Office Romaniahttp://www.epson.ro |
| RUSSIAEpson CIShttp://www.epson.ru | UKRAINEEpson Kiev Rep. Officehttp://www.epson.ua | SERBIAAtom partnerhttp://www.atompartner.rs/wp/EWE Comphttp://www.ewe.rs | SLOVAKIAEpson Europe B.V.Branch Office Czech Republichttp://www.epson.sk |
| SLOVENIABirotehna d.o.o.http://www.birotehna.si | SPAINEpson Ibérica, S.A.U.http://www.epson.es | SWEDENEpson Swedenhttp://www.epson.se | SWITZERLANDEpson Deutschland GmbHBranch office Switzerlandhttp://www.epson.ch |
| TURKEYTecpro Bilgi Teknolojileri Tic. ve San. Ltd. Sti.http://www.tecpro.com.tr | UKEpson (UK) Ltd.http://www.epson.co.uk | AFRICAhttp://www.epson.co.zaorhttp://www.epson.fr | SOUTH AFRICAEpson South Africahttp://www.epson.co.za |
MIDDLE EAST
Epson (Middle East)
http://www.epson.ae
NORTH, CENTRAL AMERICA & CARIBBEAN ISLANDS
| CANADA | COSTA RICA | MEXICO | ECUADOR |
| Epson Canada, Ltd. | Epson Costa Rica, S.A. | Epson Mexico, S.A. de C.V. | Epson Ecuador |
| http://www.epson.ca | http://www.epson.co.cr | http://www.epson.com.mx | http://www.epson.com.ec |
U.S.A.
Epson America, Inc.
http://www.epson.com
SOUTH AMERICA
| ARGENTINA | BRAZIL | CHILE | COLOMBIA |
| Epson Argentina S.R.L. | Epson do Brasil | Epson Chile S.A. | Epson Colombia Ltd. |
| http://www.epson.com.ar | http://www.epson.com.br | http://www.epson.cl | http://www.epson.com.co |
| PERU | VENEZUELA | ||
| Epson Peru S.A. | Epson Venezuela S.A. | ||
| http://www.epson.com.pe | http://www.epson.com.ve | ||
| ASIA & OCEANIA | |||
| AUSTRALIA | CHINA | HONG KONG | INDIA |
| Epson Australia Pty. Ltd. | Epson (China) Co., Ltd. | Epson Hong Kong Ltd. | Epson India Pvt., Ltd. |
| http://www.epson.com.au | http://www.epson.com.cn | http://www.epson.com.hk | http://www.epson.co.in |
Contact List
| INDONESIAPT. Epson Indonesiahttp://www.epson.co.id | JAPANSeiko Epson Co.Toyoshina Planthttp://www.epson.jp | KOREAEpson Korea Co., Ltd.http://www.epson.co.kr | MALAYSIAEpson Malaysia Sdn. Bhd.http://www.epson.com.my |
| NEW ZEALANDEpson New Zealandhttp://www.epson.co.nz | PHILIPPINESEpson Philippines Co.http://www.epson.com.ph | SINGAPOREEpson Singapore Pte. Ltd.http://www.epson.com.sg | TAIWANEpson Taiwan Technology & Trading Ltd.http://www.epson.com.tw |
| THAILANDEpson (Thailand) Co.,Ltd.http://www.epson.co.th |

- Contents
- Caution
- Safety Instructions
- Warning
- Usage environment and condition precautions
- Warning Product usage precautions
- Warning Viewing image precautions
- Warning Product abnormality precautions
- Caution Usage environment and condition precautions
- Caution Product usage precautions
- Caution Viewing image precautions
- Notes on Usage
- List of Safety Symbols (corresponding to IEC60950-1 A2)
- Caution Headset usage precautions
- Included Items
- Part Names and Functions
- Interface Unit
- [ ] (Standby) button
- [ -] (brightness adjustment) keys
- [ ] (volume) keys
- Headset connector
- USB-C port
- Micro-B port
- HDMI port
- Headset
- Temple grip
- Ambient light sensor
- Camera
- Interface unit connector
- Temples
- Nose pads
- Safety shield (shaded shown)
- mm audio jack
- Connecting the Interface Unit and External Devices
- Inputs and Outputs
- Connecting by HDMI
- Connecting by USB Type-C
- Notes on displaying images by USB Type-C
- →"Supported Equipment and Software" p.27
- Notes on supplying power by USB Type-C
- When using the headset sensors or camera
- Turning On/Displaying Images
- Standby Mode and AV Mute
- Extended Features
- Switching between 2D and 3D display
- Adjusting the screen brightness automatically
- Changing the mode setting
- Wearing the Headset
- Wearing over Glasses
- Using the Shaded Shield
- Using the Belt Clip/Cable Retainer
- Replacing the Parts
- Attaching and Removing the Shield
- ■ Attaching the shield
- ■Removing the shield
- Replacing the Temple Grip
- Replacing the Nose Pads
- Supported Equipment and Software
- Software development kit
- Updating the Firmware
- Maintenance
- Cleaning the headset
- Storing the headset
- Cleaning the connector ports
- Troubleshooting
- No image is displayed
- →"Part Names and Functions" p.10
- Images are fuzzy
- The display is not hidden when you press the [button
- Cannot hear audio
- Cannot adjust the brightness of the screen
- Specifications
- Intellectual Property Rights
- General Notes
- FCC Compliance Statement
- Canada
- CAN CES 3 (B)/NMB 3(B)
- List of Safety Symbols
- Contact List
- MIDDLE EAST
- U.S.A.
Brand : EPSON
Model : Moverio BT-35E
Category : Smartwatch