
GX 7000 - Lawn mower BLAUPUNKT - Free user manual and instructions
Find the device manual for free GX 7000 BLAUPUNKT in PDF.


| Product Type | Lawn Mower |
| Brand | Blaupunkt |
| Model | GX 7000 |
| Power Source | Electric (corded) |
| Motor Power | 1800 W |
| Cutting Width | 46 cm |
| Cutting Height Adjustment | 25-75 mm, 6 positions |
| Grass Collection Bag Capacity | 60 L |
| Weight | 25 kg |
| Dimensions (L x W x H) | 1200 x 460 x 300 mm |
| Handle Type | Foldable, ergonomic |
| Wheel Size (Front / Rear) | 200 mm / 250 mm |
| Safety Features | Safety switch, motor brake, handle presence sensor |
| Noise Level | 92 dB(A) |
| Vibration Level | 4.5 m/s² |
| Blade Type | Rotary steel blade |
| Grass Discharge Options | Rear bagging, mulching, side discharge (optional) |
| Maintenance | Blade sharpening, cleaning after each use, check bolts |
| Spare Parts Available | Blade, belt, wheel, handle |
| Warranty | 2 years |
| Environmental Compliance | RoHS, WEEE |
Frequently Asked Questions - GX 7000 BLAUPUNKT
User questions about GX 7000 BLAUPUNKT
0 question about this device. Answer the ones you know or ask your own.
Ask a new question about this device
Download the instructions for your Lawn mower in PDF format for free! Find your manual GX 7000 - BLAUPUNKT and take your electronic device back in hand. On this page are published all the documents necessary for the use of your device. GX 7000 by BLAUPUNKT.
USER MANUAL GX 7000 BLAUPUNKT
Enjoy it.
1800W Lawn Mower
1800W Lawn Mower
ASSEMBLY OF THE GRASS CATCHER

IMPORTANT SAFETY INFORMATION

Warning! When using the machine, the safety rules must be followed. For your own safety and the safety of bystanders, please read these instructions before operating the lawn mower. Please keep the instructions safe for later use. Warning! This machine is not intended for use by persons (including children) with reduced physical, sensory or mental capabilities, or lack of experience
and knowledge, unless they have been given supervision or instruction concerning use of the appliance by a person responsible for their safety. Children should be supervised to ensure that they do not play with the appliance. Safety Notes
- Never allow children or people unfamiliar with the instructions to use the product. Local regulations may restrict the age of the operator. When not in use, store the machine out of reach of children.
- Keep children, bystanders, and pets away while mowing. Stop using the machine while people, especially children, or pets are nearby.
- Consider the environment in which you are working. Keep the working area free from wires, sticks, stones, and debris, etc.
- Keep in mind that the operator or user is responsible for accidents or hazards occurring to other people or their property.
- Work only in daylight or good artificial light.
- While operating the machine, always wear substantial footwear and long trousers. Do not operate the machine when barefoot or wearing open sandals. Avoid wearing clothing that is loose fitting or that has hanging cords or ties.
- Before using, always visually inspect to see that the blades, blade bolts, and cutter assembly are not worn or damaged. Replace worn or damaged blades and bolts in sets to preserve balance.
- Before use, examine the power cord and extension cable for damage or ageing. If there are signs of damage, it must be replaced by a qualified service technician. If the cord becomes damaged during use, disconnect the cord from the supply immediately.
Do not touch the cord before disconnecting the supply.
- Wear safety glasses or goggles when operating this tool. Use a face or dust mask whenever the operations take place in dusty surroundings. Hearing protection should be worn whenever the sound level seems uncomfortable.
- Guard against electric shock. Prevent body contact with earthed or grounded surfaces (e.g. metal railings, lamp posts etc.).
- Before using the machine and after any impact, check for signs of wear or damage and repair as necessary.
- Keep the power and extension cords away from the cutting elements.
- It's recommended for increased electrical safety to use a Residual Current Device (RCD) with a tripping current of not more than 30mA. Always check the RCD every time you use it.
- Do not expose the machine to the rain. Avoid operating the machine in wet grass, where feasible.
- Walk, never run when using this machine. Do not pull the machine towards you or walk backward when using the machine.
- Never operate the machine with defective guards or shields, or without safety devices, for examples defectors and/or grass catchers in place.
- Do not mow excessively steep slopes. Never mow up or down slopes or at an incline greater than 15° .
• Work across the face of slopes, never up and down. Take extreme caution when changing direction on slopes.
- Do not mow excessively steep slopes. Never mow up or down slopes or at an incline greater than 15° . - Work across the face of slopes, never up and down. Take extreme caution when changing direction on slopes.
- Do not tilt the machine when starting or switching on the motor, except if the machine has to be tilted for starting. In that case, do not tilt the machine more than absolutely necessary and lift only the part that is away from the operating. Always ensure that both hands are in the operating position before returning the machine to the ground.
- Do not lift or carry the appliance until the blade has come to a complete standstill.
- Keep your hands and feet well away from the blade. Do not put your hands or feet near or under rotating parts.
- Keep away from discharge openings at all times.
- Do not lift or carry the appliance until the blade has come to a complete standstill. - Keep your hands and feet well away from the blade. Do not put your hands or feet near or under rotating parts. - Keep away from discharge openings at all times.
- Switch on, remove the plug from the socket and ensure that moving parts have stopped rotating before leaving the appliance unattended and before changing, cleaning or inspecting any parts of the appliance or clearing a blockage. After striking a foreign object. Inspect the machine for damage and make repairs before restarting and operating the machine; • If the appliance starts to vibrate abnormally or if you hit a foreign object, switch the appliance off and remove the plug from the socket. Check for any damage to the appliance, replace or repair any damaged parts, check for and tighten any loose parts. • Take care to keep the mains cable away from the blade. Always be aware of the position of the cable.

WARNING! MAKE SURE THAT THE LAWN MOWER IS SWITCHED OFF AND DISCONNECTED FROM THE MAINS SUPPLY BEFORE PERFORMING ANY ADJUSTMENTS.
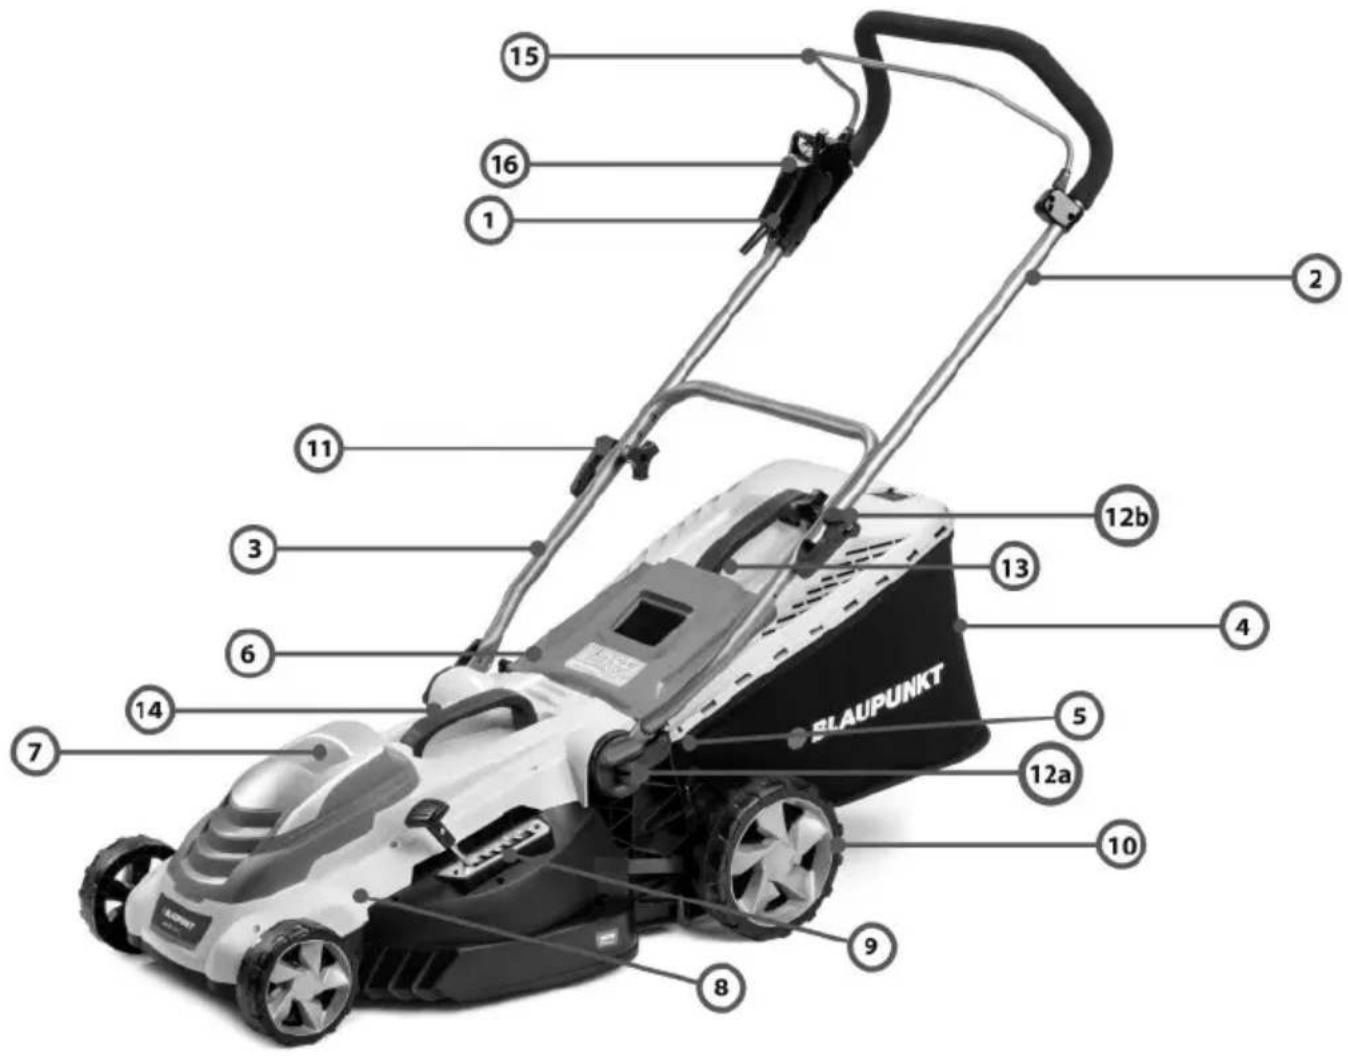
- Switch box 10. Wheel
- Upper handlebar 11. Knob
- Lower Handlebar 12a. Fixed wrench for lower handlebar
- Collection box 12b. Fixed wrench for upper handlebar
- Lock hook 13. Handgrip of collection box
- Shield 14. Handgrip of motor cover
- Motor cover 15. Start lever
- Main body 16. Lock button
- Height adjuster 17. Power plug
ASSEMBLING THE LOWER HANDLEBAR
Rotate the fixed wrench (12a) clockwise, and then press the fixed wrench (12a) toward the lower handle (3).

ASSEMBLING THE LOWER HANDLEBAR

ASSEMBLING THE HANDLE OF COLLECTION BOX
Insert the hook into the hole on the collection box, then push the other end to the cover and ensure it clicks into position.

ASSEMBLING THE GRASS OF COLLECTION BOX
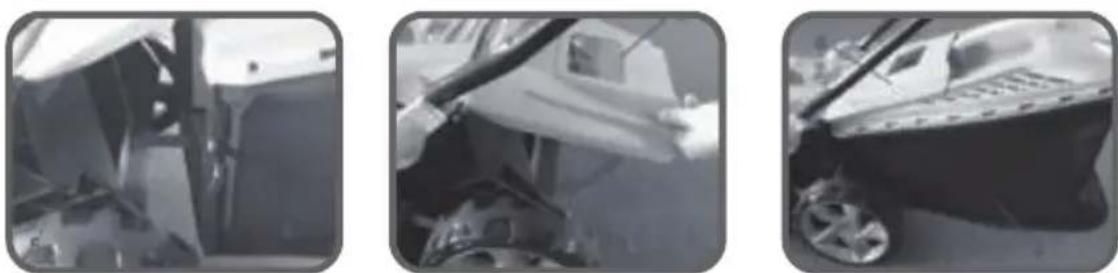
Lift the shield of the mower (6), and put the collection box (4) on the hook of the mower (5).
ADJUSTING THE CUTTING HEIGHT
Ensure the switch is in the 'O' position and disconnect the plug from the mains supply.
- Before making any height adjustments, release the switch to turn the mower off, wait for the blade to stop, and unplug the mower.
- The mower has six cutting heights: 25mm, 35mm, 45mm, 55mm, 65mm, and 75mm.
- Turn the height adjuster (9) to adjust to the desired height.
OPERATING
The mains voltage (230-240V~) indicated on the rating plate must correspond with the mains power supply. Mains connection fuse: min. 10A.
- Insert the mains plug of the unit connection cable into the combined switch/plug.
- Secure with the cable grip. The loop of the mains cable must be adequately long so that the cable grip can slide from one side to the other.
Switching on the motor
- Press the On button on the combined switch/plug. Hold down the On button.
- Pull the safety lever against the handle and hold in position – the safety lever does not lock into position.
- Release the On button.
While mowing, lay the connection cable safely on footpaths and on areas which have already been mown. Switching on the motor
- Release the safety lever. The safety lever automatically returns to the zero position.

WARNING: When the motor has been switched off, the cutter continues running for several seconds – therefore do not touch the underside of the mower until the cutter has come to a standstill. NOTE: Before switching on the unit, always check the connection cable for signs of damage; only an undamaged connection cable may be used. Damaged connection cables are highly dangerous.
MOWING
- Before starting the machine, adjust the lawn mower to the cutting height you need. (Refer to section on Lawn Mower Height Adjustment) 2. Your lawn mower is equipped with a safety switch. To operate the switch, press the lock button then grasp the start lever to start running. 3. The power will be off when the start lever is released. To start the mower, repeat step (2) above.
- MOWING PROCEDURE The key to successful electric lawn mowing is a systematic approach to cutting.
Take a few moments to plan your first cut using the principles described here.
After one or two uses you will find the simplest way of cutting your own particular lawn.
- Lay cord on ground near outlet in neat, loose coils with mower end of cord on top. It is important to arrange cord systematically to avoid annoying loops and knots.
- Starting at point nearest electrical outlet, move back and forth across lawn.
- Each lawn with its trees, shrubs, and other obstructions requires a different mowing procedure. A little experimenting will enable you to choose the easiest method of handling the cord on your lawn.
- When the grass box is full. Switch off, disconnect the mower from mains supply and wait until blade has come to standstill.
- Take the handgrip of collection box (13)
- Lift the grass box backwards.
- Empty the grass box

WARNING: When the motor has been switched on, the cutter continues running for several seconds—therefore do not touch the underside of the mower until the cutter has come to a standstill!
MAINTENANCE
NOTE: Before performing any maintenance or cleaning work, always pull out the mains plug!
- Do not spray the unit with water.
- Ingress of water may destroy the switch plug combination unit and the electric motor.
- Clean the unit with a cloth, hand brush, etc.
Expert inspection is required:
- if the lawn mower strikes an object • if the motor stops suddenly
- if the blade is bent (do not align!)
- if the motor shaft is bent (do not align!)
- if a short-circuit occurs when the cable is connected
- if the gears are damaged
- if the V-belt is defective
REPLACING AND RETARGETING THE MOWING BLADE
At the end of the mowing seasons always re-sharpen the mowing blade or, if required, replace the mowing blade with a new one.
Blade replacement
- Disconnect the lawn mower from mains supply before removing or re-fitting the blade.
- Wear heavy duty gloves when handling the blade.
- Turn the mower over to reveal the blade and blade housing.
- With one gloved hand, firmly hold the blade.
- With the other hand remove the blade securing bolt and washer, using the spanner (not supplied).
- Remove the blade, place the new blade over the central hub and make sure that the two small holes in the blade are located over the two lugs on the blade housing.

Note: The blade side with texts will face outward
- Replace the blade securing bolt and washer. Make sure that the blade is securely tightened and correctly fitted before switch ON.

WARNING: Unbalanced blades will cause the lawn mower to vibrate violently-risk of accident!
Storing the unit
After mowing, clean the unit thoroughly. Store the unit in a dry room allow the motor to cool down beforehand.
To reduce storage space, the upper handle can be folded down. Unscrew the wing nuts by approx.6 revolutions.

Caution: Do not trap the electric cable when folding down the handle
TROUBLESHOOTING
NOTE: Before performing any maintenance or cleaning work, always pull out the mains plug and wait until the cutter has come to a standstill.
| Fault | Remedial action |
| Motor does not run | 1. Check mains connection cable and circuit - breaker (fuse).2. Start on short grass or on an area which has already been mown.3. Clean discharge channel/housing - the mowing blade must rotate freely.4. Correct the cutting height. |
| Motor power drops | 1. Correct the cutting height.2. Clean discharge channel/housing.3. Have mowing blade replaced - customer service centre |
| Grass catcher is not filled sufficiently | 1. Correct the cutting height.2. Allow the lawn to dry.3. Have mowing blade replaced - customer service centre.4. Clean the grille on the grass catcher.5. Clean the discharge channel/housing. |
SPARE PARTS LIST PLUG REPLACEMENT
This Grass Trimmer is supplied with a fitted plug. If you should need to fit a new plug, please follow these instructions. Safely dispose of the old plug. Connect plug as shown in the diagram on the left. Connect the Blue-Neutral and Brown-Live. No connection is to be made to the earth terminal of the plug. Only fit the same specification fuse as fitted to the original plug. Recommended fuse: 13 Amp (BS1362). Note: If a moulded plug is fitted and has to be removed, take great care in disposing of the plug and severed cable. The severed plug must be destroyed to prevent its re-use, or connection to any electrical supply.
CORRECT DISPOSAL OF THIS PRODUCT

This marking indicates that this product should not be disposed with other household waste throughout the EU. To prevent possible harm to the environment or human health from uncontrolled waste disposal, recycle it responsibly to promote the sustainable reuse of material resources. To return your used device, please use the return and collection systems available.
| General hazard safety alert |  |
| Read this manual prior to use |  |
| Danger due to foreign objects being thrown out. |  |
| Always ensure sufficient safety distance is held |  |
| Caution: Do not touch rotating blade. Sharp blades(s). Beware of severing toes or fingersSwitch off and remove plug from mains before adjusting, cleaning or if the cable is entangled and before leaving the garden product unattended for any period. Keep the supply flexible cord away from the cutting blades |   |
| Beware electric shock hazardKeep the connectioncable away from thecutters |   |
| Double insulated |  |
| Certified to European Standards |  |
This product has 3 Years Warranty for manufacturing defects. The warranty period will be counted from the date of purchase of the product, according to purchase invoice. Product warranty only covers manufacturing defects, defects resulting from improper use, such as dropping, improper transportation, connection to the mains power supply not in compliance with the voltage specified in this manual, insertion of foreign objects and natural wear of parts and parts Such as plastic parts (caps, buttons, handles, latch locks, power cables, etc.) and metal parts (wires, motors, etc.).
Also not covered are damages due to agents of nature, lightning, food, sea, oxidation, humidity etc.). The product will lose its warranty if it presents defects, which after analysis by our technicians, are characterised as being improperly used, used for professional use or for the purpose for which it is not intended (according to the Owner's Manual). This warranty will be void if it is found that the device has been tampered with, has been repaired by a person or service not authorised by Blaupunkt. The guarantee is only valid with the receipt/invoice provided at purchase.
We undertake to provide the above-mentioned services within the warranty period only in places where it maintains an authorised service. Consumers not located near an authorised service centre are responsible for the costs and risks of transport to an authorised service.
Territorial Limitations: Any repair, replacement, or support of the Products provided under the Warranty (or any other support service offered in our sole discretion), shall be restricted to, and provided solely within, the Distribution Territory as then in effect on the date the Product is delivered to you. If you purchase a Product within a defined Distribution Territory and later transport the Product outside of the Distribution Territory, we cannot provide returns, warranty, out-of-warranty, or aftermarket support of any kind outside the Distribution Territory.
Natural 'wear and tear' is not covered under warranty.
This product is for domestic use only.
SAVE THESE INSTRUCTIONS

GRASS COLLECTION BOX
CUTTING HEIGHT ADJUSTMENT


CUTTING HEIGHT ADJUSTMENT
ASSEMBLING THE GRASS CATCHER HANDLE


FITTING THE GRASS CATCHER TO THE LAWNMOWER

CUTTING HEIGHT ADJUSTMENT

OPERATION


- ENJOY IT
- ASSEMBLY OF THE GRASS CATCHER
- IMPORTANT SAFETY INFORMATION
- ASSEMBLING THE LOWER HANDLEBAR
- ASSEMBLING THE HANDLE OF COLLECTION BOX
- ASSEMBLING THE GRASS OF COLLECTION BOX
- ADJUSTING THE CUTTING HEIGHT
- OPERATING
- MOWING
- MAINTENANCE
- EXPERT INSPECTION IS REQUIRED
- REPLACING AND RETARGETING THE MOWING BLADE
- BLADE REPLACEMENT
- STORING THE UNIT
- TROUBLESHOOTING
- SPARE PARTS LIST PLUG REPLACEMENT
- CORRECT DISPOSAL OF THIS PRODUCT
- GRASS COLLECTION BOX
- CUTTING HEIGHT ADJUSTMENT
- ASSEMBLING THE GRASS CATCHER HANDLE
- FITTING THE GRASS CATCHER TO THE LAWNMOWER
- OPERATION
Brand : BLAUPUNKT
Model : GX 7000
Category : Lawn mower