RGM 9185 IN - Range hood ROSIERES - Free user manual and instructions
Find the device manual for free RGM 9185 IN ROSIERES in PDF.
Document temporarily unavailable
The manual is currently being transferred to our new server. It will be accessible again in a few hours. Thank you for your patience.
| Brand | ROSIERES |
| Model | RGM 9185 IN |
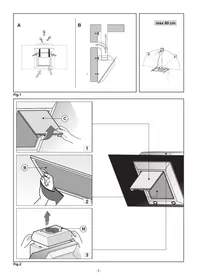
| Product type | Extractor hood |
| Operating mode | Ducted (external evacuation) or recirculating (recycling) |
| Width | 90 cm (estimate based on model) |
| Minimum safety distance | 65 cm between the cooking surface and the lowest part of the hood |
| Electrical class | Class II (double insulation, no earth connection) |
| Power supply | 230 V ~ 50 Hz, fuse 3A |
| Wiring | Brown wire (L), blue wire (N) |
| Controls | Mechanical or luminous: lighting, stop, 3 speeds, 15 min timer, Clean Air function |
| Lighting | Halogen lamps (replace with identical model) |
| Grease filter | Dishwasher safe, clean every 2 months |
| Activated charcoal filter | Not washable, replace every 4 months |
| Saturation indicator | Flashing button A: 2s for grease filter, 0.5s for charcoal filter |
| Exterior maintenance | Cloth soaked in denatured alcohol or non-abrasive neutral detergent |
| Safety instructions | Do not flambé under the hood, monitor frying, adequate ventilation when using gas appliances |
| Troubleshooting | Check the plug, do not repair yourself, contact technical service with the serial number |
| Serial number | 16 characters starting with 3, on the rating plate inside |
| Warranty | Refer to the warranty certificate provided |
| Weight | Not specified in the manual |
Frequently Asked Questions - RGM 9185 IN ROSIERES
User questions about RGM 9185 IN ROSIERES
0 question about this device. Answer the ones you know or ask your own.
Ask a new question about this device
Download the instructions for your Range hood in PDF format for free! Find your manual RGM 9185 IN - ROSIERES and take your electronic device back in hand. On this page are published all the documents necessary for the use of your device. RGM 9185 IN by ROSIERES.