
RDP60GX - Range hood ROSIERES - Free user manual and instructions
Find the device manual for free RDP60GX ROSIERES in PDF.


| Product Type | Chimney Range Hood |
| Model | RDP60GX |
| Brand | Rosieres |
| Width | 60 cm |
| Depth | 50 cm |
| Height (variable) | Min. 70 cm - Max. 110 cm |
| Weight | Approx. 12 kg |
| Power Supply | 220-240 V ~ 50 Hz |
| Motor Power | 280 W |
| Extraction Rate (Max) | 650 m³/h |
| Noise Level (Max) | 62 dB(A) |
| Control Type | Slider with 3 speeds |
| Lighting | 2 x LED (4 W each) |
| Grease Filter | Aluminum mesh (dishwasher safe) |
| Charcoal Filter (optional) | Available for recirculation mode |
| Exhaust Duct Diameter | 150 mm |
| Energy Class | A+ |
| Installation Type | Wall-mounted or recirculation |
| Maintenance | Clean grease filter monthly; replace charcoal filter every 3-6 months |
| Safety Features | Automatic motor delay-off, thermal cut-out |
| Spare Parts Available | Filters, LED bulbs, motor, control switch |
| Certifications | CE, RoHS |
Frequently Asked Questions - RDP60GX ROSIERES
User questions about RDP60GX ROSIERES
0 question about this device. Answer the ones you know or ask your own.
Ask a new question about this device
Download the instructions for your Range hood in PDF format for free! Find your manual RDP60GX - ROSIERES and take your electronic device back in hand. On this page are published all the documents necessary for the use of your device. RDP60GX by ROSIERES.
USER MANUAL RDP60GX ROSIERES
natural_image
Modern stainless steel kitchen range hood with black ventilation cover (no text or symbols visible)
natural_image
Exterior view of a stainless steel kitchen air conditioner unit (no text or symbols visible)Dear Customer,
THANKS FOR CHOOSING OUR HOOD. In the sections provided here in, there is necessary information which will enable you to use the device efficiently and safely. Please, read these instructions carefully before installation of the device

Section 1 Important points which must be observed before using the chimney

Section 2 Technical specifications of the chimney hood.

Section 3 Technical dimensions of the chimney hood

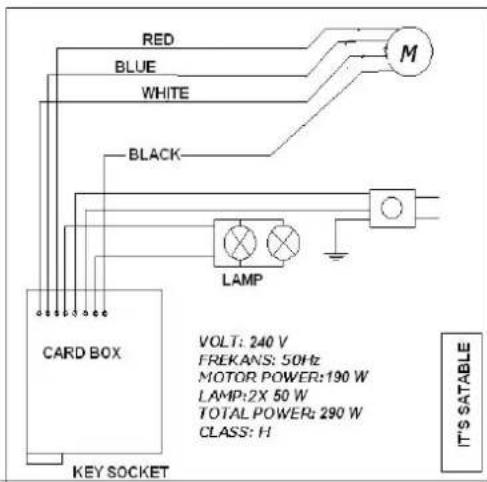
Section 4 Electrical diagram of the chimney hood.
Section 5 Information about installation connection of the chimney hood.

Section 6 Information about use of the chimney hood.

Section 7 Information about maintenance of the chimney hood.
THE DEVICE IS PRODUCED AS EARTHED.
DO NOT USE IT WITH UNEARTHED PLUG.
IMPORTANT PRECAUTIONS AND POINTS WHICH MUST BE OBSERVED
- The electrical and installation connections must be done by the service staff who is well-informed of the subject;
- The operating voltage is 220 – 240 Volts. Do not operate the device in lower or higher voltage.
- Do not connect to the chimneys where the heating stove is connected, to the gas flue or to the chimneys where the fire rises.
- Plug the product into the socket where there is an earthed connection.
- Fire catching food should not be cooked under the device.
- Do not use other materials instead of aluminum filter in the device.
- Do not plug into the socket without completion of the installation of the device.
- Do not run the device without aluminum filter.
- Do not touch the bulb of the device when it is left on for a long time
- Do not remove the aluminum filter when the device is running.
- Do not turn off the device directly by plugging it out when it is running. Turn it off from control panel.
- The device should be cleaned periodically.
- The height between the lower surface of the chimney hood and oven must be 65 cm for electrical ovens, and 75 cm for gas-fired or mix ovens
- Keep the packaging material away from the children because they may be dangerous for them.
- Run the chimney hood after the kettle or frying pan is put on the oven.
- Run the chimney hood for 15 minutes more after the operation of cooking or frying is finished in order to clean the air of the kitchen off the smell and vapor which appeared during cooking..
- Let some fresh air into environment when the chimney hood is running, especially, when it is used in the same time with the gas-fired ovens.
- Contact the nearest service if your device is failed to run with any reason.
- Our Company may not be held responsible from the failures arising from use which is not consistent with the cautions stated above.

Section 2

-
Chimney
-
Control panel
-
Aluminium Filter
-
LED 5. Body of the chimney hood
-
Glass
TECHNICAL SPECIFICATIONS OF THE CHIMNEY HOOD
| LENGTH | 600 mm |
| WIDTH | 454 mm |
| HEIGHT | 700 mm - 1030 mm |
| CONTROLLER | TOUCH CONTROL |
| AIR SUCTION | 650 m3 |
| BULB POWER | 2X1W |
| MOTOR POWER | 190W |
| TOTAL POWER | 192W |
| DIAMETER OF AIR OUTLET PIPE | 120 MM |
| SUPPLY VOLTAGE | 220 – 240 V 50Hz |
TECHNICAL DIMENSIONS
Section 3

RDP620GBX - RDP920GBX
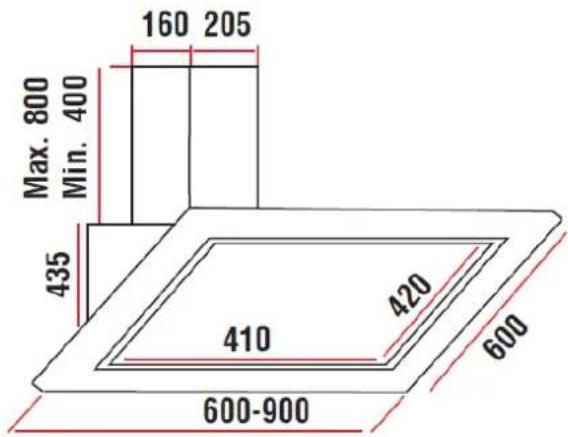
RDP90GX
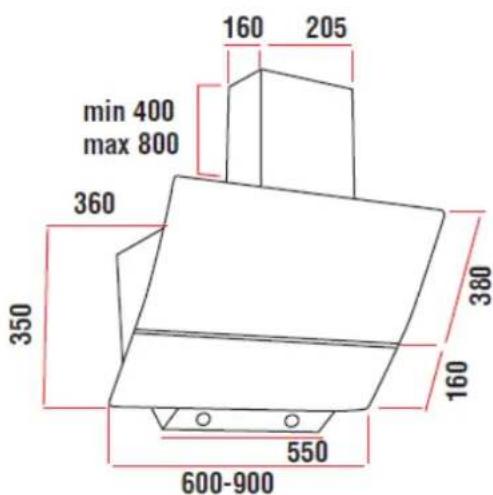
RDP60GX

RTP90GX
Note: All dimensions are in mm.
Section 4
Digital Touch Button
INSTALLATION DIAGRAM

Section 5
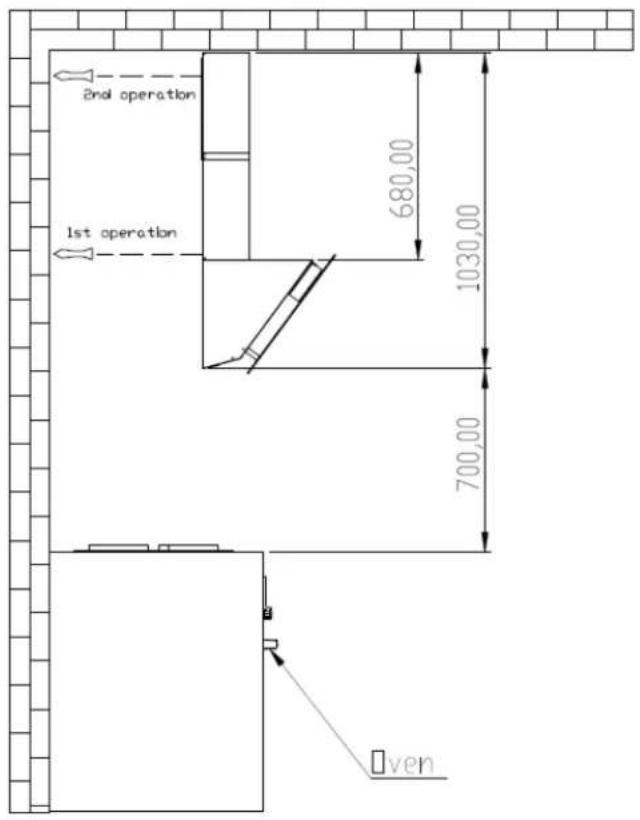
Draw a straight line by a measuring stick starting from the surface of the oven to 700+280: 990 mm if you want to save a space of 700 mm between the oven and the lower surface of the chimney hood. Align the drawn line to the right and left edges. Draw a 67,5 mm axis line from aligned center to every two sides. Make a hole by 6 mm diameter electrical drill through two drawn points. Penetrate the expansion bolt and install the hangers.
Doing installation of secondary chimney of the chimney hood: draw 75 mm line from the top surface towards the lower section. Make sure that the line is equal to right and left parts. Draw 50 mm line each at both sides of the line and, then, make a hole through these two lines. Penetrate an 8 mm diameter expansion bolt and tighten until 2 mm space is left in-between of a 2,5 diameter slat screw and the expansion bolt. Later, the product is mounted on its place and the installation will be completed by installing the inner chimney.
The operation order:
1^st operation: Installation of hanger
2 ^nd operation: Installation of chimney connection metal sheet
3 ^rd operation: Hanging the chimney hood
4^th operation: Installation of lower chimney of the chimney hood
5^th operation: Installation of inner chimney
6 ^th operation: Making electrical connection
INSTALLATION :

INFORMATION ABOUT USE OF THE CHIMNEY HOOD

Section 6
INFORMATION ABOUT USE OF DIGITAL TOUCH-OPERATED SWITCH
How To Use Touch Control

-
Turn /off lamp
-
Turn and 1 level (also off the hood and timer)
- Turn and Second level (also off the hood and timer)
- Turn and Thirt level (also off the hood and timer)
How To Use Remote Controller

- Turn on/off hood
- Turn on/off lamb
- Turning off the hood slowly
- Reduce the cycle of the motor
- Increase the cycle of the motor
- Timer
INFORMATION ABOUT MAINTENANCE
Section 7-1
Plug out the product, or turn off the power switch, or loosen or turn off the safety fuse supplying the chimney hood, before starting maintenance operation.
Aluminum Filter
This filter is used to catch the oil particles in the air and, thus, it will be blocked after a period of time which will change depending on the frequency of use of the device. We recommend that this filter is cleaned once a month at most to make sure that the device does not pose a danger. For this operation, firstly, remove the aluminum filter. Wash the filters with liquid washing agent and flush, and mount it on its place after drying. The change in color may be observed as the aluminum filters are washed. This is normal and there is no need to replace the filters. It is also possible to wash the aluminum filter in the dishwashing machine.
Removing Aluminum Filter
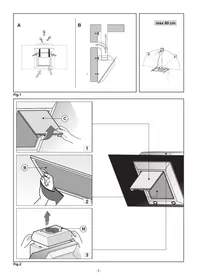
- Push the lock of the aluminum filter forward.
- Then, slightly lower it downwards and push forward. Otherwise, the filter can be defected. Wash the aluminum filter and mount it again into its place by applying the steps mentioned above in reverse.
Carbon filter (it is for flueless use)
This filter removes the cooking smell. It cleans the circulating air within the kitchen in case there is no possibility to use chimney. Physical life of the carbon filter of the device will expire depending on the frequency of use and mode of cooking, and that of aluminum filter will expire depending on the cleaning regularly.
In usual use, it should be replaced once in every 4 months at most.
Removing Carbon Filter:
- Remove the aluminum filter.
- To remove the carbon filter, turn it to the left and pull it towards yourself.
- Mount a new carbon filter.
- Mount the aluminum filters.

Section 7-2
Use soft cloth wetted with water to clean the exterior surface of the chimney hood. Never use abrasive and scratching products for cleaning. The cloth must be applied in the same direction with the brush in order to avoid scratching of the steel drum. The bulb glasses must not be removed during cleaning.
CAUTION!
You may cause fire if you do not observe the rules pertaining to cleaning and replacing the filters of the chimney hood.
- Dear Customer,
- TECHNICAL DIMENSIONS
- Section 4
- INSTALLATION DIAGRAM
- Section 5
- The operation order:
- INSTALLATION :
- How To Use Touch Control
- How To Use Remote Controller
- INFORMATION ABOUT MAINTENANCE
- Section 7-1
- Aluminum Filter
- Removing Aluminum Filter
- Carbon filter (it is for flueless use)
- Removing Carbon Filter:
- Section 7-2
- CAUTION!
Brand : ROSIERES
Model : RDP60GX
Category : Range hood