
DESKTOP MK120, WIRELESS DESKTOP MK270, WIRELESS DESKTOP MK330, WIRELESS DESKTOP MK710 - Wireless keyboard and mouse LOGITECH - Free user manual and instructions
Find the device manual for free DESKTOP MK120, WIRELESS DESKTOP MK270, WIRELESS DESKTOP MK330, WIRELESS DESKTOP MK710 LOGITECH in PDF.

| Product Type | Wireless Keyboard and Mouse Combo |
| Brand | Logitech |
| Compatible Models | Desktop MK120, MK270, MK330, MK710 |
| Keyboard Dimensions (approx.) | 44 x 12.5 x 2 cm |
| Mouse Dimensions (approx.) | 10.5 x 6 x 3.5 cm |
| Keyboard Weight (approx.) | 500 g (with batteries) |
| Mouse Weight (approx.) | 100 g (with battery) |
| Keyboard Power | 2 AA batteries (up to 3 years battery life) |
| Mouse Power | 1 AA battery (up to 3 years battery life) |
| Receiver | Logitech Unifying, USB port |
| Wireless Range | Up to 10 m (depending on conditions) |
| Keyboard Features | Programmable F keys, multimedia keys, LCD screen (MK710), Num Lock, Caps Lock, Scroll Lock |
| Mouse Features | Multidirectional wheel with free-spin and click-to-click scrolling, zoom, Back/Forward buttons, application switching |
| Customization | Logitech SetPoint software (Windows) |
| Battery Indicator | Keyboard: icon on LCD screen; Mouse: green/red LED indicator |
| System Compatibility | Windows, Mac (some advanced features require Windows) |
| Maintenance and Cleaning | Clean with a soft, slightly damp cloth; do not use abrasive cleaners |
| Safety | Avoid contact with liquids; do not open the casing; do not expose to excessive heat |
| Spare Parts and Repairability | Standard AA batteries; Unifying receiver optional; other parts not available separately |
| General Information | 2-year manufacturer warranty; customer support at www.logitech.com |
Frequently Asked Questions - DESKTOP MK120, WIRELESS DESKTOP MK270, WIRELESS DESKTOP MK330, WIRELESS DESKTOP MK710 LOGITECH
User questions about DESKTOP MK120, WIRELESS DESKTOP MK270, WIRELESS DESKTOP MK330, WIRELESS DESKTOP MK710 LOGITECH
0 question about this device. Answer the ones you know or ask your own.
Ask a new question about this device
Download the instructions for your Wireless keyboard and mouse in PDF format for free! Find your manual DESKTOP MK120, WIRELESS DESKTOP MK270, WIRELESS DESKTOP MK330, WIRELESS DESKTOP MK710 - LOGITECH and take your electronic device back in hand. On this page are published all the documents necessary for the use of your device. DESKTOP MK120, WIRELESS DESKTOP MK270, WIRELESS DESKTOP MK330, WIRELESS DESKTOP MK710 by LOGITECH.
USER MANUAL DESKTOP MK120, WIRELESS DESKTOP MK270, WIRELESS DESKTOP MK330, WIRELESS DESKTOP MK710 LOGITECH
Getting started with
English Setup, 3 Features and troubleshooting, 8
Your Keyboard and mouse are now ready for use. Install the Logitech SetPoint Software to do the following:
- Enable some of the F-keys and customize up to 14 keys on the keyboard
- Enable the Mute icon on the LCD
- Enable the tilt wheel and customize up to 6 buttons on the mouse
Espanol
Keyboard features: F-key usage
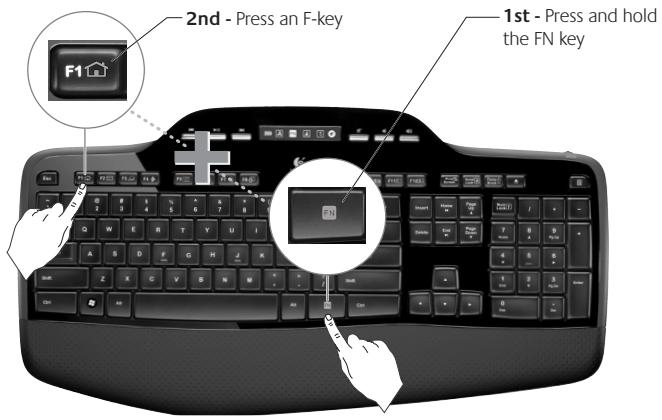
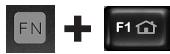
User-friendly enhanced F-keys let you launch applications easily. To use the enhanced functions (yellow icons), first press and hold the FN key; second, press the F-key you want to use.
Tip In the software settings, you can invert the FN mode if you prefer to access directly the enhanced functions without having to press the FN key.
Keyboard features: F-keys and more
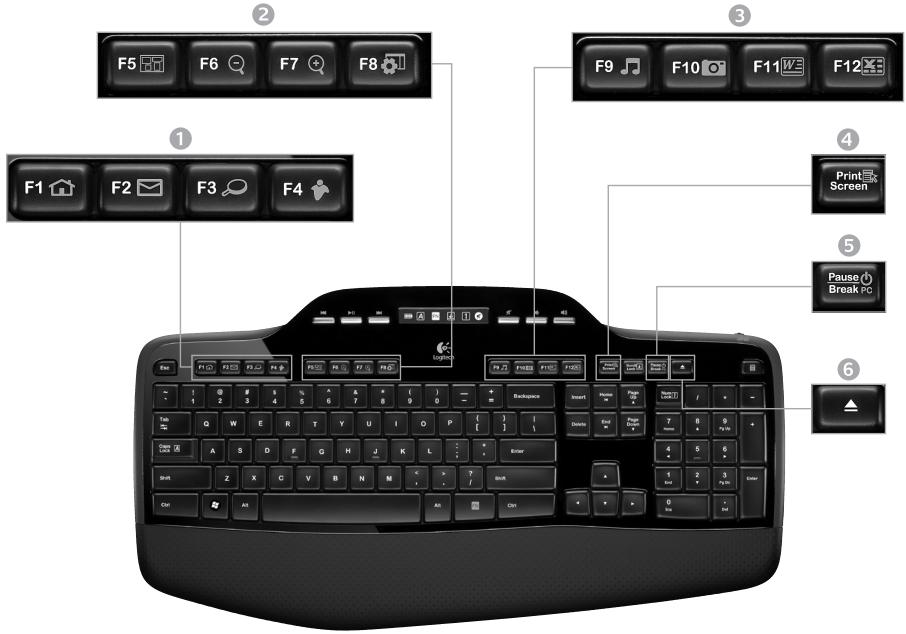
1. Internet zone
Launches Internet browser

Launches e-mail application

One Touch Search

Launches instant message application*
2. Convenience zone

Launches application switcher*

Zoom in*

Zoom out*

Windows
Gadget*
3. Productivity zone

Launches media player

Launchs Photo Gallery*

Launches document application*

Launches spreadsheet application*
4. Context menu

Display contextual menu of selected item.
5. PC sleep mode
Places your computer in energy-saving sleep mode.
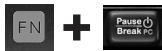
6. Eject button*

Opens CD/DVD-ROM drive drawer.
Keyboard features: Media keys and status icons
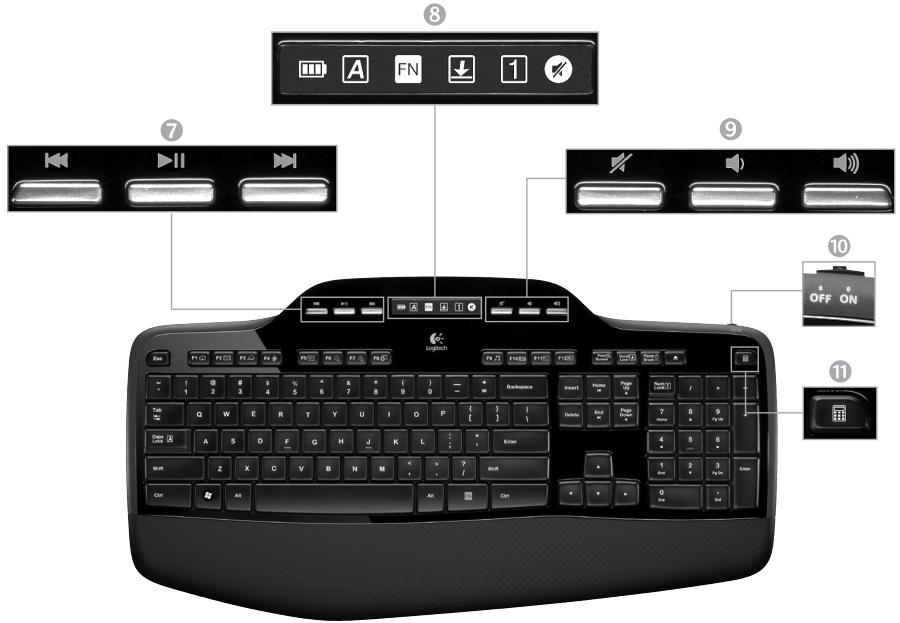
7. Multimedia navigation

Back/previous track

Play/pause

Forward/next track
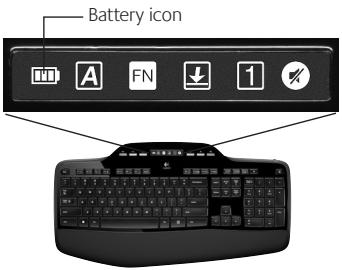
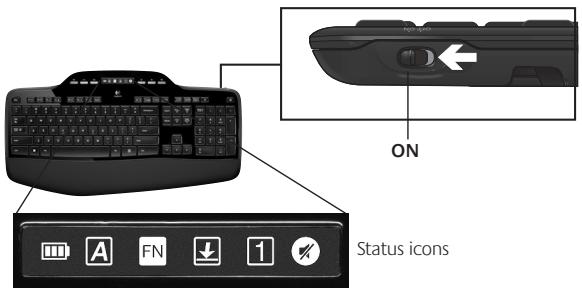
8. LCD Dashboard icon status

Battery status indicator (see Battery management for more information)


Caps lock on

FN on

Scroll lock on

Num lock on

Mute on*
- Logitech® SetPoint™ Software installation is required.
9. Volume control

Mute

Volume down

Volume up
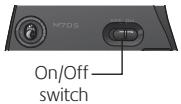
10. Keyboard off/on switch

11. Launches calculator

Mouse features
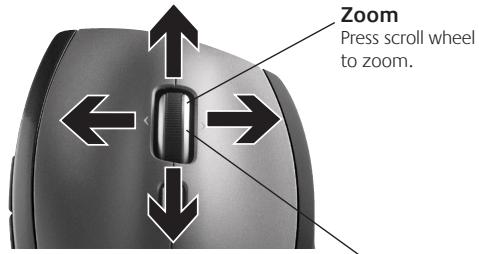
MicroGear precision scroll wheel
Tilt wheel for side-to-side (horizontal) scrolling through spreadsheets or wide documents. The scroll wheel doubles as a middle button. Press down to use and press again to release.
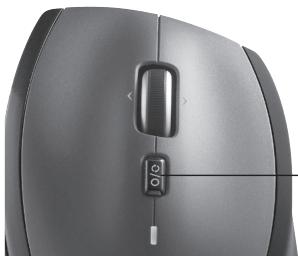
Scroll toggle
With the flick of a switch, change between precision (click-to-click) scrolling and hyper-fast scrolling.
Precision scrolling
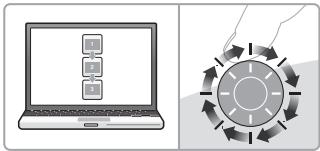
Use click-to-click mode to navigate lists or slides.
Hyper-fast scrolling
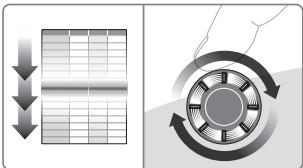
The wheel spins freely, allowing you to fly through long documents and Web pages.
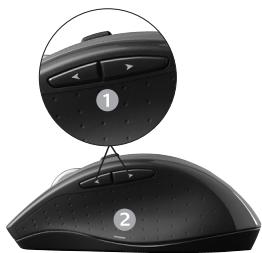
More mouse features
- Back and Forward Buttons* - Press to flip between web pages.
- Application Switch* - Press rubber grip to switch between applications.
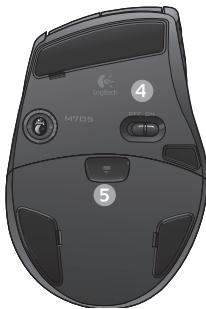
- Battery Indicator Light - Turns red when a couple weeks of battery life remain.
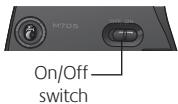
- On/Off Switch - Slide to turn mouse on and off.
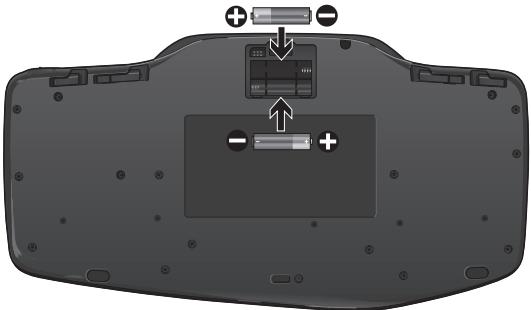
- Battery Door Release - Press where indicated and slide door off mouse. Reduce weight by installing a single battery.
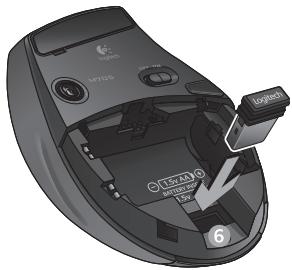
6. Receiver Storage Space Inside the Mouse
- Application Switcher and side-to-side scrolling require Logitech software. Depending on your operating system, the back, forward, and middle buttons may also require Logitech software.

Customizing the keyboard and mouse
- Double-click the Mouse and Keyboard Settings icon on the Windows desktop to make changes.
- To customize the keyboard, click the My Keyboard tab. For the mouse, click the My Mouse tab.
- For either the keyboard or mouse, a series of tabs is shown on the left.
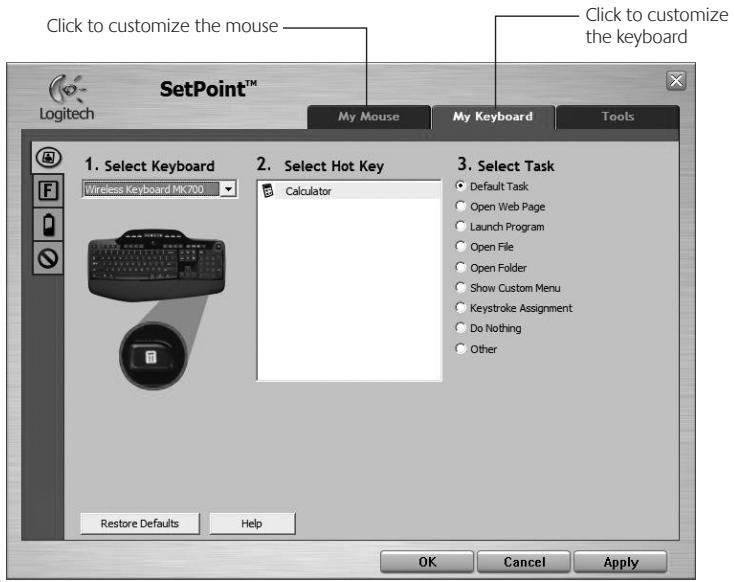
- Choose a tab, such as the keyboard F-key Settings. A picture of the keyboard is displayed showing F-keys (list 2) to which tasks can be assigned (list 3).
- In the 2. Select F-key list, highlight the F-key to be reassigned a task.
- In the 3. Select Task list, highlight the new task.
- When you are done, click OK to save the new F-key assignments.
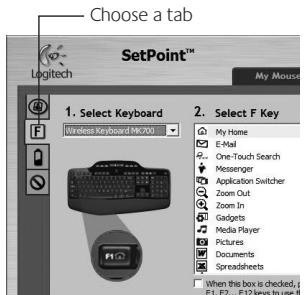
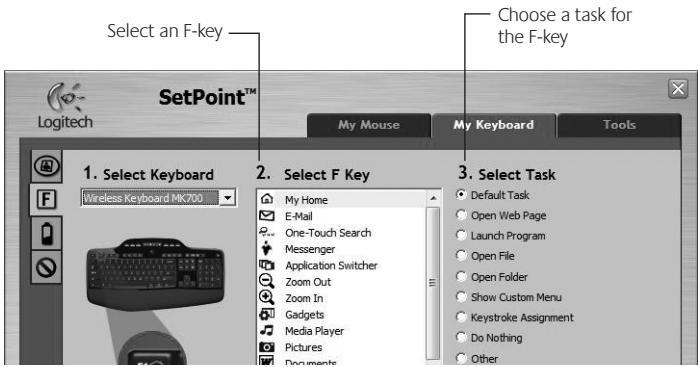
Keyboard F-key Settings tab
Battery management
Your keyboard and mouse have up to three years of battery life.*
Battery sleep mode
Did you know that your keyboard and mouse go into sleep mode after you stop using them for a few minutes? This feature helps limit battery usage and eliminates the need to keep switching your devices on and off. Both your keyboard and mouse are up and running immediately once you begin using them again.
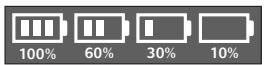
How to check the battery level for the keyboard
The battery icon on the keyboard LCD shows the current battery level for the keyboard. As the battery level decreases, the battery icon shows how much battery power remains, as shown in the image to the right.
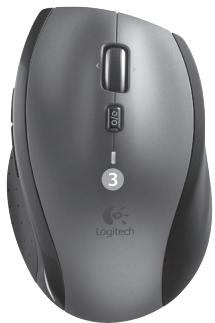
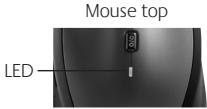
How to check the battery level for the mouse
Option 1: Turn the mouse off then back on using the On/Off switch on the mouse bottom. If the LED on top of the mouse glows green for 10 seconds, the batteries are good. If the LED blinks red, the battery level has dropped to 10% and you have only a few days of battery power left.
Option 2: Launch the SetPoint Software, and click the Mouse Battery tab to see the current battery level of the mouse.
Mouse bottom
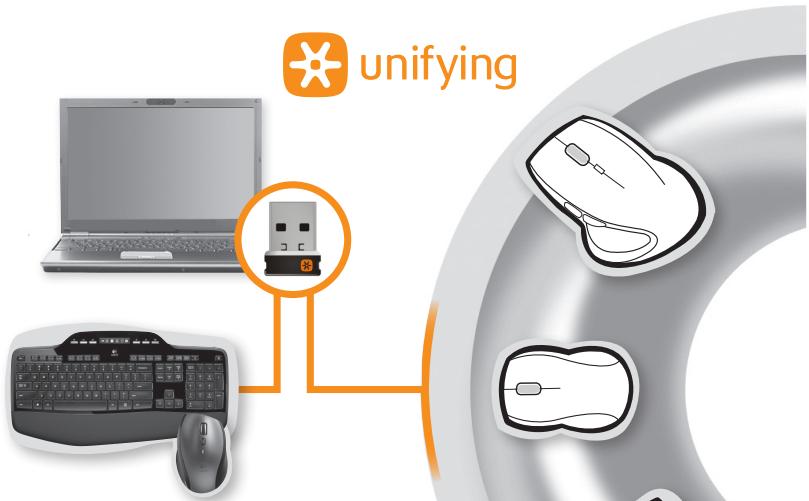
Plug it. Forget it. Add to it.
You've got a Logitech Unifying receiver. Now add a compatible wireless keyboard or mouse that uses the same receiver. It's easy. Just start the Logitech Unifying software* and follow the onscreen instructions. For more information and to download the software, visit www.logitech.com/unifying
*Go to Start / All Programs / Logitech / Unifying / Logitech Unifying Software
Troubleshooting
Keyboard and mouse are not working
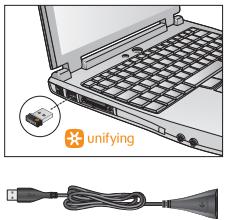
Check the USB connection. Also, try changing USB ports.
Move closer? Try moving the keyboard and mouse closer to the Unifying receiver, or plug the Unifying receiver into the receiver extender cable to bring it closer to the keyboard and mouse.
Check battery installation. Also check the battery power of each device. (See Battery management for more information.)
On the mouse bottom, slide the On/Off switch right to turn on the mouse. The Battery LED on the mouse top case should light green for 10 seconds. (See Battery management for more information.)

Mouse bottom
Troubleshooting
Are you experiencing slow or jerky cursor movement?
Try the mouse on a different surface (e.g., deep, dark surfaces may affect how the cursor moves on the computer screen).
Is the keyboard turned on? Slide the keyboard Off/On switch to the On position, as shown in the image below. The keyboard Status icons should light up.
Re-establish the connection. Use the Unifying software to reset the connection between the keyboard/mouse and Unifying receiver. Refer to the Unifying section in this guide for more information (p. 18).
For more information about using your product, and for ergonomics.
www.logitech.com/support
United States +1 646-454-3200
Argentina +00800-555-3284
Brasil +0 800-891-4173
Canada +1 866-934-5644
Chile 12300205484
Latin America +1 800-578-9619
Mexico 0018005789619
| FC CE C US Listed LTZ ACCESSORY WOO | EN 60950-1 |
| M/N:C-U0003 Rating: 5V ---, 100mA Approval No: ETA-0035/2009/WRLO CMTT ID: 2009DJ1025 11059/POSTEL/2009 2100 FCC ID: JNZCU0003 IC: 4418A-CU0003 MADE IN CHINA | M/N:C-U0004 Rating: 5V ---, 100mA FCC ID: JNZCU0004 IC: 4418A-CU0004 MADE IN CHINA |
| M/N:C-U0007 Rating: 5V ---, 100mA FCC ID: JNZCU0007 IC: 4418A-CU0007 MADE IN CHINA |
www.logitech.com
© 2010 Logitech. All rights reserved. Logitech, the Logitech logo, and other Logitech marks are owned by Logitech and may be registered. All other trademarks are the property of their respective owners. Logitech assumes no responsibility for any errors that may appear in this manual. Information contained herein is subject to change without notice.
- Getting started with
- Espanol
- Keyboard features: F-key usage
- Keyboard features: F-keys and more
- Internet zone
- Convenience zone
- Productivity zone
- Context menu
- PC sleep mode
- Eject button*
- Keyboard features: Media keys and status icons
- Multimedia navigation
- LCD Dashboard icon status
- Volume control
- Keyboard off/on switch
- Launches calculator
- Mouse features
- MicroGear precision scroll wheel
- Scroll toggle
- Precision scrolling
- Hyper-fast scrolling
- More mouse features
- Receiver Storage Space Inside the Mouse
- Customizing the keyboard and mouse
- Battery management
- Battery sleep mode
- How to check the battery level for the keyboard
- How to check the battery level for the mouse
- Plug it. Forget it. Add to it.
- Troubleshooting
- Are you experiencing slow or jerky cursor movement?
- www.logitech.com/support
Brand : LOGITECH
Model : DESKTOP MK120, WIRELESS DESKTOP MK270, WIRELESS DESKTOP MK330, WIRELESS DESKTOP MK710
Category : Wireless keyboard and mouse