
SUS 17 A1 - Radio SILVERCREST - Free user manual and instructions
Find the device manual for free SUS 17 A1 SILVERCREST in PDF.


| Product Type | Portable DAB+/FM Radio |
| Brand | SilverCrest |
| Model | SUS 17 A1 |
| Dimensions (approx.) | 180 x 120 x 70 mm |
| Weight (approx.) | 300 g |
| Power Supply | 3 x AA batteries (not included) or USB DC 5V |
| Radio Bands | DAB+ (Band III) and FM (87.5-108 MHz) |
| Bluetooth | Yes, for wireless audio streaming |
| Display | LCD with station information, time and date |
| Alarm | Dual alarm with snooze function |
| Sleep Timer | Yes, selectable up to 90 minutes |
| Headphone Jack | 3.5 mm stereo output |
| Auxiliary Input | 3.5 mm for external audio sources |
| USB Port | USB-C for charging only |
| Preset Stations | 20 presets (10 DAB, 10 FM) |
| Cleaning | Wipe with a soft, dry cloth. Do not use solvents. |
| Safety | Keep away from moisture and heat sources. |
| Spare Parts | Not available; device is not user-serviceable. |
| Operating Temperature | 0 °C to 40 °C |
| Storage Temperature | -10 °C to 50 °C |
Frequently Asked Questions - SUS 17 A1 SILVERCREST
User questions about SUS 17 A1 SILVERCREST
0 question about this device. Answer the ones you know or ask your own.
Ask a new question about this device
Download the instructions for your Radio in PDF format for free! Find your manual SUS 17 A1 - SILVERCREST and take your electronic device back in hand. On this page are published all the documents necessary for the use of your device. SUS 17 A1 by SILVERCREST.
USER MANUAL SUS 17 A1 SILVERCREST
Package Contents ....4
Overview....5
Technical Specifications....6
Important Safety Notice....8
Batteries 8
Children 10
Operating Environment 10
Danger Through Noise Disturbance.... 10
Copyright....11
Before Getting Started 11
Inserting the Batteries.... 11
Connecting the Headphones 12
Getting Started 12
Powering On and Adjusting the Volume 12
Tuning a Radio Station 12
Setting the Time....13
Setting the Alarm Clock.... 14
Enabling the Alarm 14
Maintenance / Cleaning.... 15
Environmental Considerations and Recycling 15
Conformity 16
Details of Guarantee.... 17
Introduction
Thank you for choosing a SilverCrest product.
This scan radio receiver offers simple and convenient radio listening. Via the one-touch button functionality you can easily toggle to the next available station.
Intended Use
This is a consumer electronics device. It has been designed to receive radio broadcasting stations. It may only be used for private use, not industrial or commercial purposes. Furthermore, the device may not be used in tropical climates. Only connection cables and external devices may be used that comply with safety standards and the electromagnetic compatibility and shielding quality of this device. This device fulfils all that relates to CE Conformity, relevant norms and standards. Any modifications to the equipment other than recommended changes by the manufacturer may result in these directives no longer being met. The manufacturer is not liable for any damage or interference caused by unauthorized modifications. Only use the accessories recommended by the manufacturer. If you are not using the device within the Republic of Germany, you must observe the regulations and laws in the country of use.
Package Contents
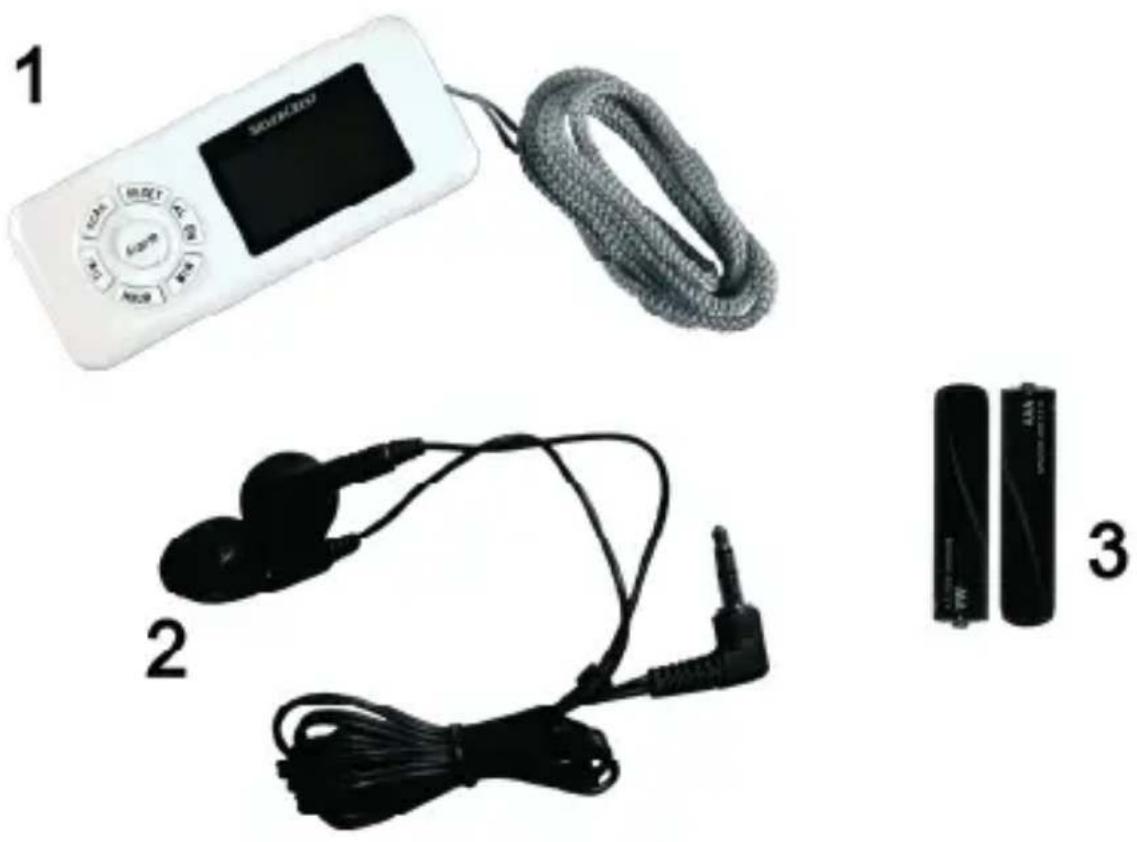
1 Scanradio SUSR 17 A1 with strap 2 Earphones 3 2 batteries (1.5V, size AAA) 4 User manual with service information (not illustrated)
4 - English
Overview

1 TIME (to set the time) 2 SCAN (to search a radio station) 3 RESET (to reset the unit) 4 AL ON (to enable/disable the alarm) 5 Display 6 Earphones jack (on the side) 7 On/Off switch and volume control 8 MIN (to set the minutes) 9 Alarm (to set the alarm time) 10 HOUR (to set the hours) 11 Battery compartment (back panel)

12 Post-meridian icon for clock and alarm clock 13 Radio mode icon 14 Alarm enabled icon 15 Alarm programming mode icon 16 Frequency unit for radio reception 17 Frequency, clock or alarm time display
Technical Specifications
| Scanradio | |
| Operating Environment | 5 °C to 35 °C, max. 85 % RH |
| Operating voltage 3 V | |
| Battery Type 1.5 V, AAA-size | |
| Power consumption 45 mW | |
| Operating time approx. 65 h |
6 - English
| Frequency rangePlease note that the given tuning bands may slightly vary upwards or downwards because of product tolerances. | 87,5 - 108 MHz |
| Dimensions | 75 x 32 x 21 mm(W x H x D) |
| Weight 27 g (without batteries) | |
| Max. output voltage on headphones jack | approx. 30 mV |
| Max. sound pressure level with supplied headphones SUSR 17 A1 | approx. 85 dB(A) |
| Nominal voltage for supplied headphones SUSR 17 A1 | approx. 120 mV |
The technical details about the frequency band describe the technical characteristics of your device.
Different national regulations may apply in different countries regarding the frequency bands that are free for public use. Any information received from frequency bands located outside those that are explicitly free for public use may not be used, nor may its contents be forwarded to any third parties.
Important Safety Notice

This icon denotes important information for the safe operation of the product and for the user's safety.

This symbol denotes further information on the topic.
Before you use this device for the first time, please read the following notes in this manual and heed all warnings, even if you are familiar with handling electronic devices. Keep this manual safe for future reference. If you sell the device or pass it on, it is essential you hand over this manual also.

Batteries
Insert the batteries / rechargeable batteries respecting the polarity. Never attempt to recharge non-rechargeable batteries or open any type of battery. Do not throw batteries into fire, as they may explode. Do not mix batteries (old and new or carbon and alkaline, etc.). If you will not be using the device for a long period of time, remove the batteries and store the device in a dry and dust-free place. Non-intended use may cause explosion as
well as battery leakage. If the batteries leak, use gloves and clean the device thoroughly with a dry cloth.

Always make sure that:
No direct heat sources (e.g. heating) can affect the device; no direct sunlight or bright artificial light reaches the device; contact with sprayed and dripping water and abrasive liquids must be avoided and the device should never be operated near water. It must especially never be immersed (do not place any recipients containing liquids such as beverages, vases, etc. onto or next to the device); the device is never placed in the immediate vicinity of magnetic fields (e.g. loudspeakers); no fire sources (e.g. burning candles) are placed on or near the device; no foreign bodies are introduced into the device; the device is not subject to any great temperature changes as this may cause moisture through condensation and short-circuit; the device is not subject to excessive shocks and vibrations.

Children
Electrical appliances do not belong in the hands of children! Do not allow children to use electrical devices when not under supervision. Children may not comprehend the presence of potential risks. Small parts can represent choking hazards. Keep the packaging away from children too as there is danger of suffocation. Batteries and rechargeable batteries can represent choking hazards. Keep batteries out of reach of children. If a battery is swallowed, seek medical help immediately.
Operating Environment
The device is not for use in environments with a high temperature or humidity (e.g. bathrooms), and must be kept free of dust. Operating temperature and operating humidity: 5 °C to 35 °C, max. 85 % RH.
Danger Through Noise Disturbance

Caution when using headphones. Listening at high volume can harm the user's auditory system.
Copyright
The entire content of this User's Manual is copyrighted and is provided to the reader for information purposes only.
Copying data and information without the prior written and explicit authorization from the author is strictly forbidden. This also applies to any commercial use of the contents and information.
All texts and figures are up-to-date as per the date of print release.
Before Getting Started
Inserting the Batteries
Insert the supplied batteries. Open the battery compartment cover on the back panel of the device by sliding it in the direction of the printed arrow. Insert the batteries with the correct polarity (+ and -). The correct polarity is labelled on the batteries and inside the battery compartment. Next close the battery compartment cover.
If the output volume weakens or the device fails to respond, replace the batteries with new batteries of the same type. The device will not inform you about weak batteries.
Connecting the Headphones
Insert the jack-type plug of the supplied headphones into the headphones receptacle (6) on the side panel of the unit.
Getting Started
Powering On and Adjusting the Volume
- Rotate the volume adjustment knob (7) counter-clockwise to power the radio on. This will adjust the audio volume at the same time. Turn the volume adjustment knob counter-clockwise to increase the sound volume, or turn it clockwise to lower the volume. ■ Turning the volume adjustment knob clockwise as far as it goes will power the device off.
Tuning a Radio Station

To be able to receive any radio stations, the supplied headphones must be connected to the headphones receptacle. The cable of the headphones is used as antenna.
■ Use the volume adjustment button (7) to set the desired sound volume. - Press the SCAN button (2) to launch an automatic station search. As soon as a station has been found, the scan will stop and the radio programme can be listened to.
12 - English
- To switch to a different station, press the SCAN button (2) again. The next available station will be searched for.
- The scan is always performed up to the end of the frequency band. To launch a scan from the beginning of the frequency band, press the RESET button (3).
Setting the Time
The time can only be set while the device is powered off. If it is still powered on, power the device off by using the volume control knob (7).
■ Press and hold the TIME button (1). - Then press the HOUR button (10) repeatedly to set the hour. You can also keep the HOUR button (10) pressed down to accelerate the digit adjustment. To distinguish ante meridian (morning) and post meridian (afternoon) time, "PM" will display for post meridian clock hours.
- Keep the TIME button (1) pressed. Then press the MIN button (8) repeatedly to set the minutes. You can also keep the MIN button (8) pressed down to accelerate the digit adjustment.
Release the TIME button (1) after the clock has been set correctly.
Setting the Alarm Clock
Verify that the clock displays the correct time. The alarm time can only be set while the device is powered off. If it is still powered on, power the device off by using the volume control knob (7).
Press and hold the Alarm button (9). Then press the HOUR button (10) repeatedly to set the hours of the alarm time. You can also keep the HOUR button (10) pressed down to accelerate the digit adjustment. To distinguish ante meridian (morning) and post meridian (afternoon) time, "PM" will display for post meridian clock hours. Keep the Alarm button (9) pressed. Then press the MIN button (8) repeatedly to set the minutes of the alarm time. You can also keep the MIN button (8) pressed down to accelerate the digit adjustment. Release the Alarm button (9) after the alarm clock has been set correctly.
Enabling the Alarm
After the desired alarm time has been set, you can enable the alarm as follows:
- Press the AL ON button (4). The alarm icon will show on the display (5). To disable the alarm, press the AL ON button (4) again. The alarm icon will disappear from the display (5).
A repetitive sound will be heard at the time of the set alarm. To disable the alarm sound, press the AL ON button (4).
Maintenance / Cleaning
Servicing is required when this device has been damaged in any way, for example, when the device housing is damaged, when liquids or objects have entered the device or when the product has been exposed to rain or moisture. Servicing is also necessary when the product does not perform normally or when it has been dropped. If smoke, unusual noises or smells are noticed, power off the device immediately. In this case the device should not be used further and should be inspected by authorized service personnel. Please contact qualified personnel when servicing is needed. Never open the housing of the device. Only use a clean, dry cloth for cleaning. Never use any corrosive liquids. Do not attempt to open the housing of the device otherwise you will void your warranty.
Environmental Considerations and Recycling

If the product is labelled with a crossed-out waste bin, it is subject to the European Guideline 2002/96/EC. All electric and electronic devices must be disposed of separately from household waste at established bodies.
With the proper disposal of old devices you avoid damage to the environment and your personal health. For further information about proper disposal, contact your local government, disposal bodies or the shop where you bought the device.
Respect the environment. Old batteries do not belong in with domestic waste. They must be handed in to a collection point for old batteries.
Also recycle the packaging material properly. Cardboard packaging can be taken to paper recycling containers or public collection points for recycling. Any films or plastic contained in the packaging should be taken to your public collection points.
Conformity
CE This device complies with the basic and other relevant requirements of the EMC Directive 2004/108/EC.
For more information about the Conformity of this product, please visit our website www.service.targa.co.uk. The Declaration of Conformity can also be found at the end of this User's Manual.
Details of Guarantee
Warranty of Targa GmbH
This device is sold with three years warranty from the date of purchase. Please keep the original receipt in a safe place as proof of purchase. Before using your product for the first time, please read the enclosed documentation or online help. Should any problems arise which cannot be solved in this way, please call our hotline. Please have the article number and, if available, the serial number to hand for all enquiries. If it is not possible to solve the problem on the phone, our hotline support staff will initiate further servicing procedures depending on the fault. Within the warranty period the product will be repaired or replaced free of charge as we deem appropriate. No new warranty period commences if the product is repaired or replaced. Consumables such as batteries, rechargeable batteries and lamps are not covered by the warranty.
Your statutory rights towards the seller are not affected or restricted by this warranty.
Service
Phone:
E-mail contact form:
https://service.targa.co.uk/supportform.php?lang_id=2
IAN: 72145

MANUFACTURER
TARGA GmbH
Postfach 22 44
D-59482 Soest
www.targa.de
Table of contents
Introduction 20
https://service.targa.co.uk/supportform.php?lang_id=2
IAN: 72145

Manufacturer
TARGA GmbH
Postfach 22 44
D-59482 Soest
www.targa.de
Seller:
Lidl d.o.o.k.d., Žeje pri Komendi 100, SI-1218 Komenda
52 - Slovenian
CE
EC-Declaration of Conformity
Address:
Targa GmbH
Lange Wende 41
59494 Soest, Germany
Brand:
SilverCrest
Product:
Scan Radio
Model:
SUSR 17 A1
The product complies with the requirements of the following European directives:
2004/108/EC
Electromagnetic Compatibility
Compliance was proved by the application of the following standards:
EMC:
EN 55013: 2001 + A1: 2003 + A2: 2006
EN 55020: 2007
Year of CE marking: 2011
Soest, 26th of Oct. 2011

Matthias Klauke, Managing Director


- INTRODUCTION
- INTENDED USE
- PACKAGE CONTENTS
- OVERVIEW
- ENGLISH
- IMPORTANT SAFETY NOTICE
- BATTERIES
- ALWAYS MAKE SURE THAT
- CHILDREN
- OPERATING ENVIRONMENT
- DANGER THROUGH NOISE DISTURBANCE
- COPYRIGHT
- BEFORE GETTING STARTED
- INSERTING THE BATTERIES
- CONNECTING THE HEADPHONES
- GETTING STARTED
- POWERING ON AND ADJUSTING THE VOLUME
- TUNING A RADIO STATION
- SETTING THE TIME
- SETTING THE ALARM CLOCK
- ENABLING THE ALARM
- MAINTENANCE / CLEANING
- ENVIRONMENTAL CONSIDERATIONS AND RECYCLING
- CONFORMITY
- DETAILS OF GUARANTEE
- WARRANTY OF TARGA GMBH
- SERVICE
- MANUFACTURER
- TABLE OF CONTENTS
- CE
- EC-DECLARATION OF CONFORMITY
Brand : SILVERCREST
Model : SUS 17 A1
Category : Radio