
19032-22 - Irrigation timer GARDENA - Free user manual and instructions
Find the device manual for free 19032-22 GARDENA in PDF.


| Product Type | Irrigation Timer |
| Brand | Gardena |
| Model | 19032-22 |
| Dimensions (H x W x D) | 12.5 x 7.5 x 5.5 cm |
| Weight | 0.25 kg |
| Power Source | 9V alkaline battery (not included) |
| Number of Programs | 3 independent programs |
| Maximum Watering Duration per Start | 99 minutes |
| Watering Intervals | 1 hour to 7 days |
| Start Times per Day | Up to 6 start times |
| Manual Override | Yes, manual watering without affecting program |
| Rain Delay Feature | Yes, adjustable delay up to 72 hours |
| Waterproof Rating | IP54 (splash-proof) |
| Connection Type | Hose connection with 3/4 inch thread |
| Operating Pressure | 0.5 bar to 8 bar |
| Cleaning | Clean with a damp cloth; do not use solvents |
| Safety Features | Automatic shut-off on low battery |
| Spare Parts Availability | Battery compartment cover, sealing O-rings |
| Repairability | Replaceable battery; O-ring replacement possible |
| Warranty | 2 years from date of purchase |
Frequently Asked Questions - 19032-22 GARDENA
User questions about 19032-22 GARDENA
0 question about this device. Answer the ones you know or ask your own.
Ask a new question about this device
Download the instructions for your Irrigation timer in PDF format for free! Find your manual 19032-22 - GARDENA and take your electronic device back in hand. On this page are published all the documents necessary for the use of your device. 19032-22 by GARDENA.
USER MANUAL 19032-22 GARDENA
Art. 19032
EN Operator's manual
smart Irrigation Control
- SAFETY 4
- ASSEMBLY 6
- INSTALLATION.... 8
- OPERATION....19
- MAINTENANCE 22 6.STORAGE 22
- TROUBLESHOOTING 23
- TECHNICAL DATA 24
- ACCESSORIES 25
- SERVICE/WARRANTY....26

For safety reasons, children and young people under 16 as well as anyone who is not familiar with these operating instructions should not use the product. Persons with reduced physical or mental abilities may use the product only if they are supervised or instructed by a responsible person. Children must be supervised to ensure that they do not play with the product. Never operate the product when you are tired, ill or under the influence of alcohol, drugs or medicine.
Intended use:
The GARDENA smart Irrigation Control is intended for private use in domestic and hobby gardens, exclusively for outdoor use, to control sprinklers and watering systems. It can be used for automatic watering during holidays.
The GARDENA smart Irrigation Control is part of a garden irrigation system and can only be programmed together with the GARDENA smart Gateway Art. 19000.
The GARDENA smart Irrigation Control is controlled automatically with the GARDENA smart system App. Sprinklers, a sprinkler system or a drip head watering system can be used for watering.
The GARDENA smart Irrigation Control carries out watering fully automatically according to the set program and can therefore also be used during holidays. Early in the morning or late in the evening, evaporation and therefore water consumption is lowest.

DANGER! Risk of injury!
The product must not be used for industrial purposes or in conjunction with chemicals, foodstuffs, easily flammable and explosive materials.
Important!
Read the operator's manual carefully before use and keep for future reference.
Electrical safety

DANGER! Cardiac arrest!
This product makes an electromagnetic field while it operates. This field may under some conditions interfere with active or passive medical implants. To decrease the risk of conditions that can possibly injure or kill, we recommend persons with medical implants to speak with their physician and the medical implant manufacturer before you operate the product.

DANGER!
Electric shock!
Risk of injury due to electric shock.
The product must be supplied through a residual current device (RCD) having a rated residual operating current not exceeding 30 mA.
The product must only be operated with the 24 V (AC) power supply unit provided.
Protect the 24 V (AC) power supply unit from moisture and direct sunlight when connected.
Check the power cord for damage before use.
The product must be used only for controlling commercially available 24 V (AC) valves. The electric power consumption per channel must not exceed 500 mA (a GARDENA Irrigation Valve Art. 1278 requires 150 mA).
Cable cross-section of the connection cable:
The maximum permissible distance between the product and the valve depends on the cross-section of the connection cable. For a distance of 30 m, the cross section is 0.5 mm² and 0.75 mm² for a distance of 45 m. No more than 3 valves must be in operation at the same time. The GARDENA Connection Cable Art. 1280 is 0.5 mm² in size and is 15 m long.
Up to 6 valves can be connected using this cable. The connection cable can be connected so that it is watertight using the GARDENA Cable Clip Art. 1282.
Personal safety

DANGER!
Risk of suffocation!
Small parts can be easily swallowed. There is also a risk that the polybag can suffocate toddlers. Keep toddlers away when you assemble the product.
Protect the product from direct sunlight.

Be careful when touching the valves!
Metal parts can heat up.
2. ASSEMBLY
To assemble the irrigation control on the wall:
The both screws and dowels are in the scope of delivery.
The distance between the holes is 120 mm.

- Remove the cover①.

- Mark the positions of the holes. To do this, hold the Irrigation Control against the wall, bring it straight and mark 2 holes at a distance of 120 mm.
- Drill the holes and assemble the Irrigation Control to the wall with the 2 plugs and screws supplied.
NOTE:
The cables must be led downwards!
Pay attention to the cable lengths, especially during initial installation.
If you want to mount several irrigation controls, the distance between the holes is 150 mm.
Due to the cable routing, up to 3 Irrigation Controls can be assembled on top of each other.
3. INSTALLATION
To remove the cable strain relief:

→ Loosen both screws③ and remove the cable strain relief ④.

Valve Box Art. 1255
To connect the valves to the Valve Box:
Make sure that the terminal block has been correctly installed in the valve box.
1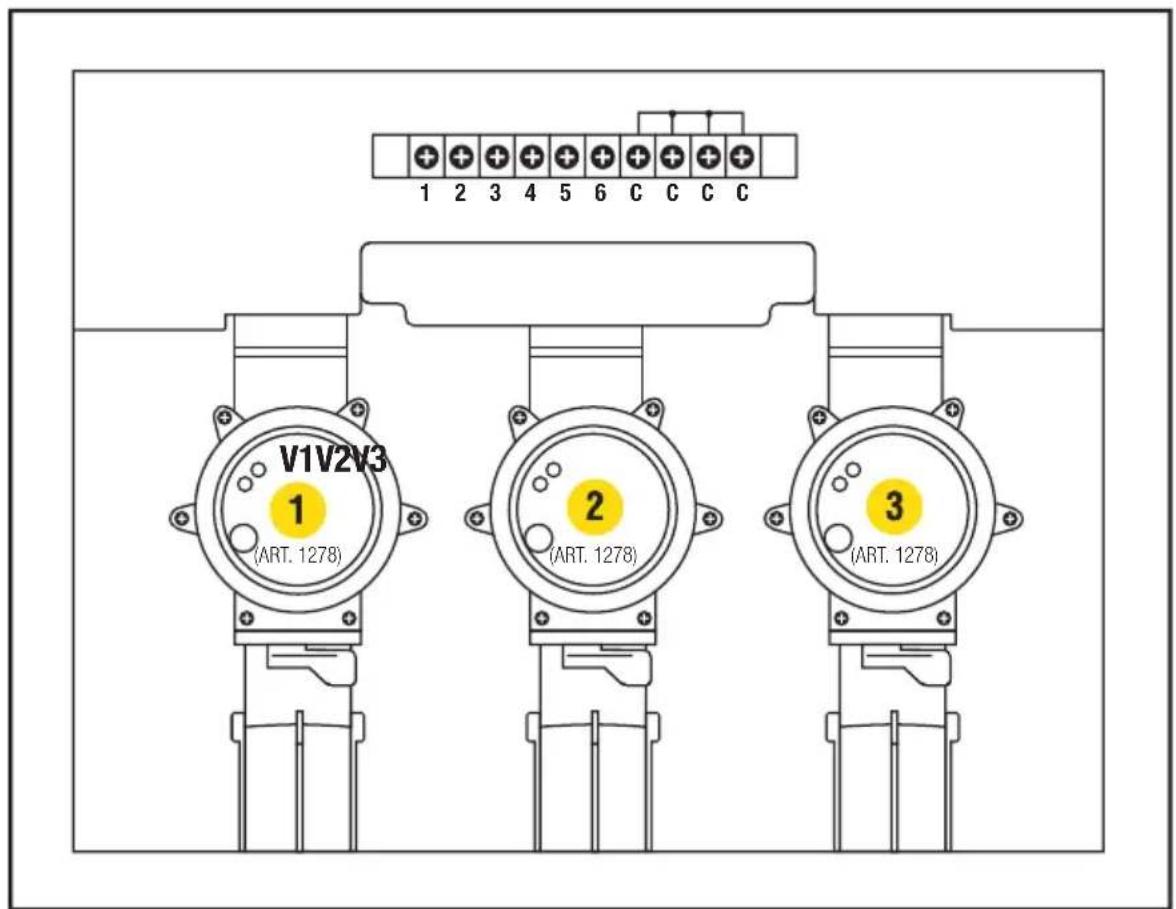
→ Label the valves (1 – 6) with the yellow stickers of the valve box.
(Therefore the cable terminals VALVES 1 - 6 of the Irrigation Control can be clearly assigned to the valves).
2
→ Connect a cable of the valve V1 to the cable terminal 1 of the Valve Box. → Connect a cable of the valve V2 to the cable terminal 2 of the Valve Box. → Connect a cable of the valve V3 to the cable terminal 3 of the Valve Box.
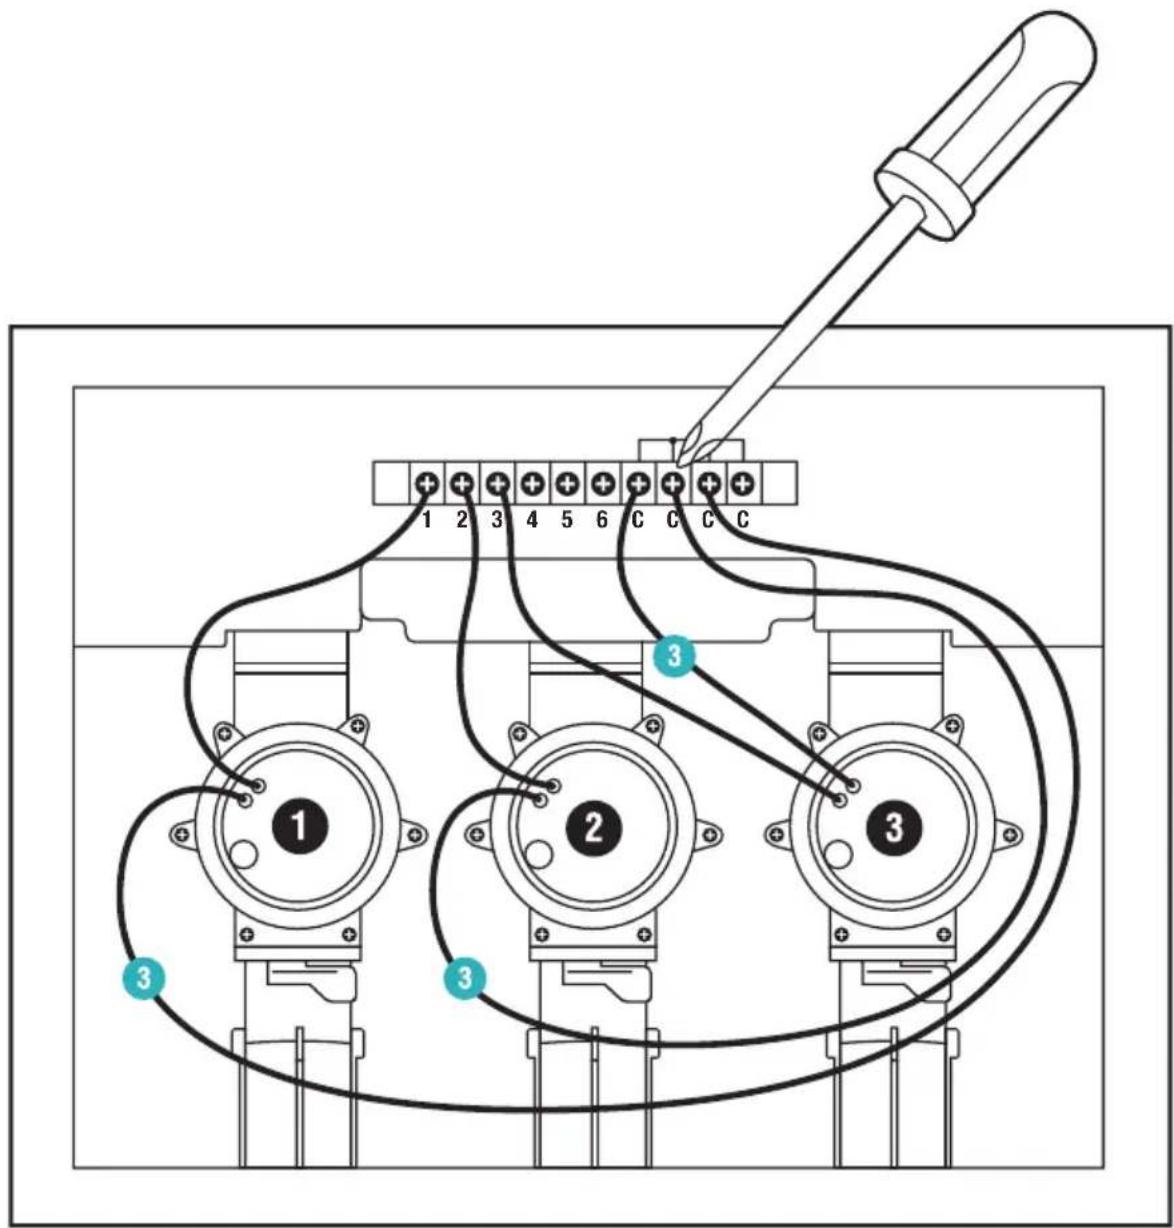
→ Connect the other cable of the valve V1 to a cable terminal C of the Valve Box. (All 4 cable terminals C are connected to each other and equivalent). → Connect the other cable of the valve V2 to a cable terminal C of the Valve Box. → Connect the other cable of the valve V3 to a cable terminal C of the Valve Box.
To connect the Valve Box to the Irrigation Control:
Tip: Press down the cable terminal with your index finger, screwdriver or ballpoint pen to connect the cables.
With the GARDENA Connection Cable Art. 1280 you can connect up to 6 valves with the Irrigation Control.
4
→ Connect the cable terminal 1 of the Valve Box to the cable terminal VALVES 1 of the Irrigation Control. → Connect the cable terminal 2 of the Valve Box to the cable terminal VALVES 2 of the Irrigation Control. → Connect the cable terminal 3 of the Valve Box to the cable terminal VALVES 3 of the Irrigation Control.

→ Connect one cable terminal C of the Valve Box to the blue cable terminal C of the Irrigation Control.
To connect the pump:
Master Channel:
The master channel M is activated as soon as a valve is activated.
For example, you can activate a garden pump via the master channel so that the pump supplies the irrigation system whenever a valve is activated.
For example, the pump can be operated using the GARDENA Pump Control Art. 1273 that is connected to the master channel.
6
→ Connect both cables to the cable terminals M and C of the Irrigation Control (polarity does not have to be considered).
To connect the power supply:

CAUTION!
The irrigation control is damaged if the power supply unit is connected to cable terminals other than the 24 V (AC) cable terminals!
→ Connect the power supply unit to the 24 V (AC) terminals only!

CAUTION!
Damaging of the irrigation control system by short circuit!
→ Check all wiring before you plug in the power supply.
7

- Connect both cables to the cable terminals 24 V (AC) of the Irrigation Control (polarity does not have to be considered).
- Plug the power supply unit into a socket.
To close the cover:

- Attach the cable strain relief ④ and tighten the two screws ③.

- Push the cover onto the Irrigation Control.
LED Display:

① LED Power:
Green: Power On
② LED Connection display/Signal:
Green flashing: While connecting
Green: Signal strength high
Yellow: Signal strength medium
Red: Overcurrent/undercurrent
Red flashing: Valve error
③ LED Active watering:
Green
Operation with the GARDENA smart system App:
You can use the GARDENA smart system app to control all smart system products from anywhere at any time. You can download the free GARDENA smart system app from the Apple App Store or from the Google Play Store.
In order to include, a GARDENA smart Gateway with internet connectivity is needed. All GARDENA smart products are integrated via the app. Follow the instructions inside the App.
Settings of the Irrigation Control:
- According to the timings in the smart system App: Watering days, start, duration
- As required in the smart system App: Start and finish

The smart Irrigation Control will be reset to the factory settings.
→ Push the Reset key⑤ for a short time. New connection.
-or-
→ Push and hold down the Reset key⑤ for at least 5 seconds. Cancels the existing connection and allows a new connection to be established, e. g. different Gateway.
5. MAINTENANCE
To clean the Irrigation Control:
Do not use caustic / abrasive cleaning agents.
→ Clean the Irrigation Control with a damp cloth (do not use solvent).
6. STORAGE
To put into storage:
The product must be stored away from children.
→ Do not store the Irrigation Control outdoors if not in use.
Disposal:
(in accordance with RL2012/19/EC)

The product must not be disposed of to normal household waste. It must be disposed of in line with local environmental regulations.
IMPORTANT!
Dispose of the product through or via your municipal recycling collection centre.
7. TROUBLESHOOTING
Problem Possible Cause Remedy
| LED illuminates red Overcurrent/undercurrent. | → Check the power connection. | |
| LED flashes red | Valve error. | → Check whether the valve requires too much current. |
| Watering program is not being undertaken (no watering) | The valve has previously been manually opened. | → Avoid any program overlap. |
| Water tap closed. → Open the water tap. | ||
| No function | Faulty wiring. | → Check the cable terminals. |
| Power supply unit is not connected. | → Connect the power supplyunit. | |
| Power supply unit is too hot. | → Disconnect the power supply unit and let it be cooled down. Connect the power supply unit again. | |
| → Protect the power supply unit from direct sunlight. | ||
| Inclusion is not possible (Inclusion) | No wireless connection to the Gateway. | → Select another position for the irrigation control or the Gateway. |
| No power supply available. → Check the mains cable. | ||
| Irrigation Control does not respond | Faulty wiring. → Check the cable terminals. | |
| No wireless connection to the Gateway. | → Check the wireless connection to the Gateway. | |

NOTE: For any other malfunctions please contact the GARDENA service department. Repairs must only be done by GARDENA service departments or specialist dealers approved by GARDENA.
8. TECHNICAL DATA
| Unit Value (Art. 19032) | |
| Operation temperature range (outdoors) | °C +5 - +40 |
| SRD: | |
| Frequency range MHz 863 - 870 | |
| Maximum power mW 25 | |
| Free field radio range (approx.) | m 100 |
| Power supply | |
| Mains voltage V (AC) 230 | |
| Mains frequency Hz 50 | |
| Rated Power W 22 | |
| Standby power (approx.) W 3 | |
| Output voltage | V (AC) 24 |
| Max. Output current | mA 900 |
EC Declaration of Conformity:
Hereby, GARDENA Manufacturing GmbH declares that the radio equipment type (smart Irrigation Control Art. 19032) is in compliance with directive 2014/53/EU.
The full text of the EC declaration of conformity is available at the following internet address:
http://www.gardena.com/int/support/safety-regulations
9. ACCESSORIES
GARDENA Pump Control Art. 1273
| GARDENA Watering Valve 24V | Art. 1278 |
| GARDENA Valve Boxes | Art. 1254/ 1255 |
| GARDENA Connection Cable | Art. 1280 |
| GARDENA Cable Clips | Art. 1282 |
Service:
Please contact the address on the back page.
Warranty:
In the event of a warranty claim, no charge is levied to you for the services provided.
GARDENA Manufacturing GmbH offers a two-year warranty (effective as of the date of purchase) for this product. This warranty includes all significant defects of the product that can be proved to be material or manufacturing faults. This warranty is fulfilled by supplying a fully functional replacement product or by repairing the faulty product sent to us free of charge;
we reserve the right to choose between these options. This service is subject to the following provisions:
- The product was used for its intended purpose as per the recommendations in the operating instructions.
- Neither the purchaser nor a third party has attempted to repair the product.
This manufacturer's warranty does not affect warranty entitlements against the dealer/retailer.
If problems arise with this product, please contact our Service department or send the defective product along with a brief description of the fault to GARDENA Manufacturing GmbH, making sure to have sufficiently covered any shipping costs and to have followed the relevant postage and packaging guidelines. A warranty claim must be accompanied by a copy of the proof of purchase.
Product liability:
In accordance with the German Product Liability Act, we hereby expressly declare that we accept no liability for damage incurred from our products where said products have not been properly repaired by a GARDENA approved service partner or where original GARDENA parts or parts authorised by GARDENA were not used.
Germany
GARDENA Manufacturing GmbH Central Service
(C1428ARP) Buenos Aires
Phone: (+54) 11 5194 5000
info.gardena@
ar.husqvarna.com
Armenia
Garden Land Ltd.
61 Tigran Mets
0005 Yerevan
Australia
Husqvarna Australia Pty. Ltd.
Locked Bag 5
Central Coast BC
NSW 2252
Phone: (+61) (0) 2 4352 7400
customer.service@
husqvarna.com.au
Brampton, Ontario L6T 4X3
Phone: (+1) 905 79293 30
info@gardenacanada.com
Chile
Maquinarias Agroforestales
Ltda. (Maga Ltda.)
Santiago, Chile
Avda. Chesterton
# 8355 comuna Las Condes
Phone: (+56) 2 202 4417
Dalton@magá.cl
Zipcode: 7560330
China
Husqvarna (Shanghai)
Management Co., Ltd.
Husqvarna (Shanghai) Management Co., Ltd.
3F, Beng Square B,
No207, Song Hong Rd.,
Chang Ning District
Shanghai, PRC. 200335
Mingji Square B, 3rd Floor, No. 207 Song Hong Road, Changning District, Shanghai, 200335
Shanghai, PRC. 200335
Colombia
Husqvarna Colombia S.A.
Calle 18 No. 68 D-31, zona
Industrial de Montevideo
Bogotá, Cundinamarca
Tel. 571 2922700 ext. 105
jairo.salazar@
husqvarna.com.co
Costa Rica
Compania Exim
Euroiberoamericana S.A.
Aycliffe Industrial Park
Newton Aycliffe
County Durham
DL5 6UP
info.gardena@
husqvarna.co.uk
Greece
P. PAPADOPOULOS AEBE
92 Athens Avenue
Athens
P.O. Box 104 42
Greece
Tel. (+30) 210 5193100
info@papadopoulos.com.gr
Hungary
Aycliffe Industrial Park
Newton Aycliffe
County Durham
DL5 6UP
info.gardena@
husqvarna.co.uk
Italy
Husqvarna Italia S.p.A.
Via Santa Vecchia 15
23868 VALMADRERA (LC)
Phone: (+39) 0341.203.111
assistenza.italia@
it.husqvarna.com
Japan
KAKUICHI Co. Ltd.
Sumitomo Realty &
Development Kojimachi
BLDG., 8F
5-1 Nibanncyo
Chiyoda-ku
Tokyo 102-0084
Phone: (+81) 33 264 4721
m_ishihara@kaku-ichi.co.jp
Kazakhstan
LAMED Ltd.
155/1, Tazhibayevoi Str.
050060 Almaty
IP Schmidt
Abayavenue 3B
110 005 Kostanay
Korea
Kyung Jin Trading CO.,LTD.
107-4, SunDuk Bld.,
YangJae-dong,
Seocho-gu
Seoul, (zipcode: 137-891)
Phone: (+82) (0)2 574-6300
Kyrgyzstan
Alye Maki
av. Moladaya Guardir J 3
720014
Bishkek
Latvia
Husqvarna Latvija SIA
Gardena Division
Ulbrokas 19A
LV-1021 Rīga
info@gardena.lv
Lithuania
UAB Husqvarna Lietuva
Gardena Division
Ateities pl. 77C
LT-52104 Kaunas
info@gardena.lt
Luxembourg
Magasins Jules Neuberg
Husqvarna New Zealand Ltd.
PO Box 76-437
Manukau City 2241
Phone: (+64) (0) 9 9202410
support.nz@husqvarna.co.nz
Norway
Husqvarna Norge AS
Gardena Division
Trøskenveien 36


- INTENDED USE
- DANGER! RISK OF INJURY
- IMPORTANT
- ELECTRICAL SAFETY
- DANGER
- CABLE CROSS-SECTION OF THE CONNECTION CABLE
- PERSONAL SAFETY
- ASSEMBLY
- TO ASSEMBLE THE IRRIGATION CONTROL ON THE WALL
- NOTE
- THE CABLES MUST BE LED DOWNWARDS
- INSTALLATION
- TO REMOVE THE CABLE STRAIN RELIEF
- TO CONNECT THE VALVES TO THE VALVE BOX
- TO CONNECT THE VALVE BOX TO THE IRRIGATION CONTROL
- TO CONNECT THE PUMP
- MASTER CHANNEL
- TO CONNECT THE POWER SUPPLY
- CAUTION
- TO CLOSE THE COVER
- LED DISPLAY
- OPERATION WITH THE GARDENA SMART SYSTEM APP
- SETTINGS OF THE IRRIGATION CONTROL
- MAINTENANCE
- TO CLEAN THE IRRIGATION CONTROL
- STORAGE
- TO PUT INTO STORAGE
- DISPOSAL
- TROUBLESHOOTING
- TECHNICAL DATA
- EC DECLARATION OF CONFORMITY
- ACCESSORIES
- SERVICE
- WARRANTY
- PRODUCT LIABILITY
- GERMANY
- ARMENIA
- AUSTRALIA
- CHILE
- CHINA
- COLOMBIA
- COSTA RICA
- GREECE
- HUNGARY
- ITALY
- JAPAN
- KAZAKHSTAN
- KOREA
- KYRGYZSTAN
- LATVIA
- LITHUANIA
- LUXEMBOURG
- NORWAY
Brand : GARDENA
Model : 19032-22
Category : Irrigation timer