
FREESPACE EVO TFV2015 - Cordless vacuum HOOVER - Free user manual and instructions
Find the device manual for free FREESPACE EVO TFV2015 HOOVER in PDF.



| Brand | HOOVER |
| Model | FREESPACE EVO TFV2015 |
| Product type | Cordless vacuum cleaner (bagged) |
| Power supply | Mains 220-240 V, double insulation |
| Adjustable power | Continuous power variator |
| Bag type | Dust bag (paper H69 or microfiber H71) |
| Motor protection filter | HEPA filter (ref. S107) |
| Exhaust filter | Washable micro filter (ref. T102) |
| Fill indicator | Red indicator light |
| Telescopic tube | Yes, adjustable in height |
| Standard accessories | Carpet/hard floor brush, crevice tool, upholstery brush |
| Optional accessories | Parquet care brush, mini turbo brushes, super turbo brush |
| Storage system | Nanopack position with hose winder |
| Safety | Automatic thermal cut-off, double insulation |
| Warranty | According to seller country conditions |
Frequently Asked Questions - FREESPACE EVO TFV2015 HOOVER
User questions about FREESPACE EVO TFV2015 HOOVER
0 question about this device. Answer the ones you know or ask your own.
Ask a new question about this device
Download the instructions for your Cordless vacuum in PDF format for free! Find your manual FREESPACE EVO TFV2015 - HOOVER and take your electronic device back in hand. On this page are published all the documents necessary for the use of your device. FREESPACE EVO TFV2015 by HOOVER.
USER MANUAL FREESPACE EVO TFV2015 HOOVER
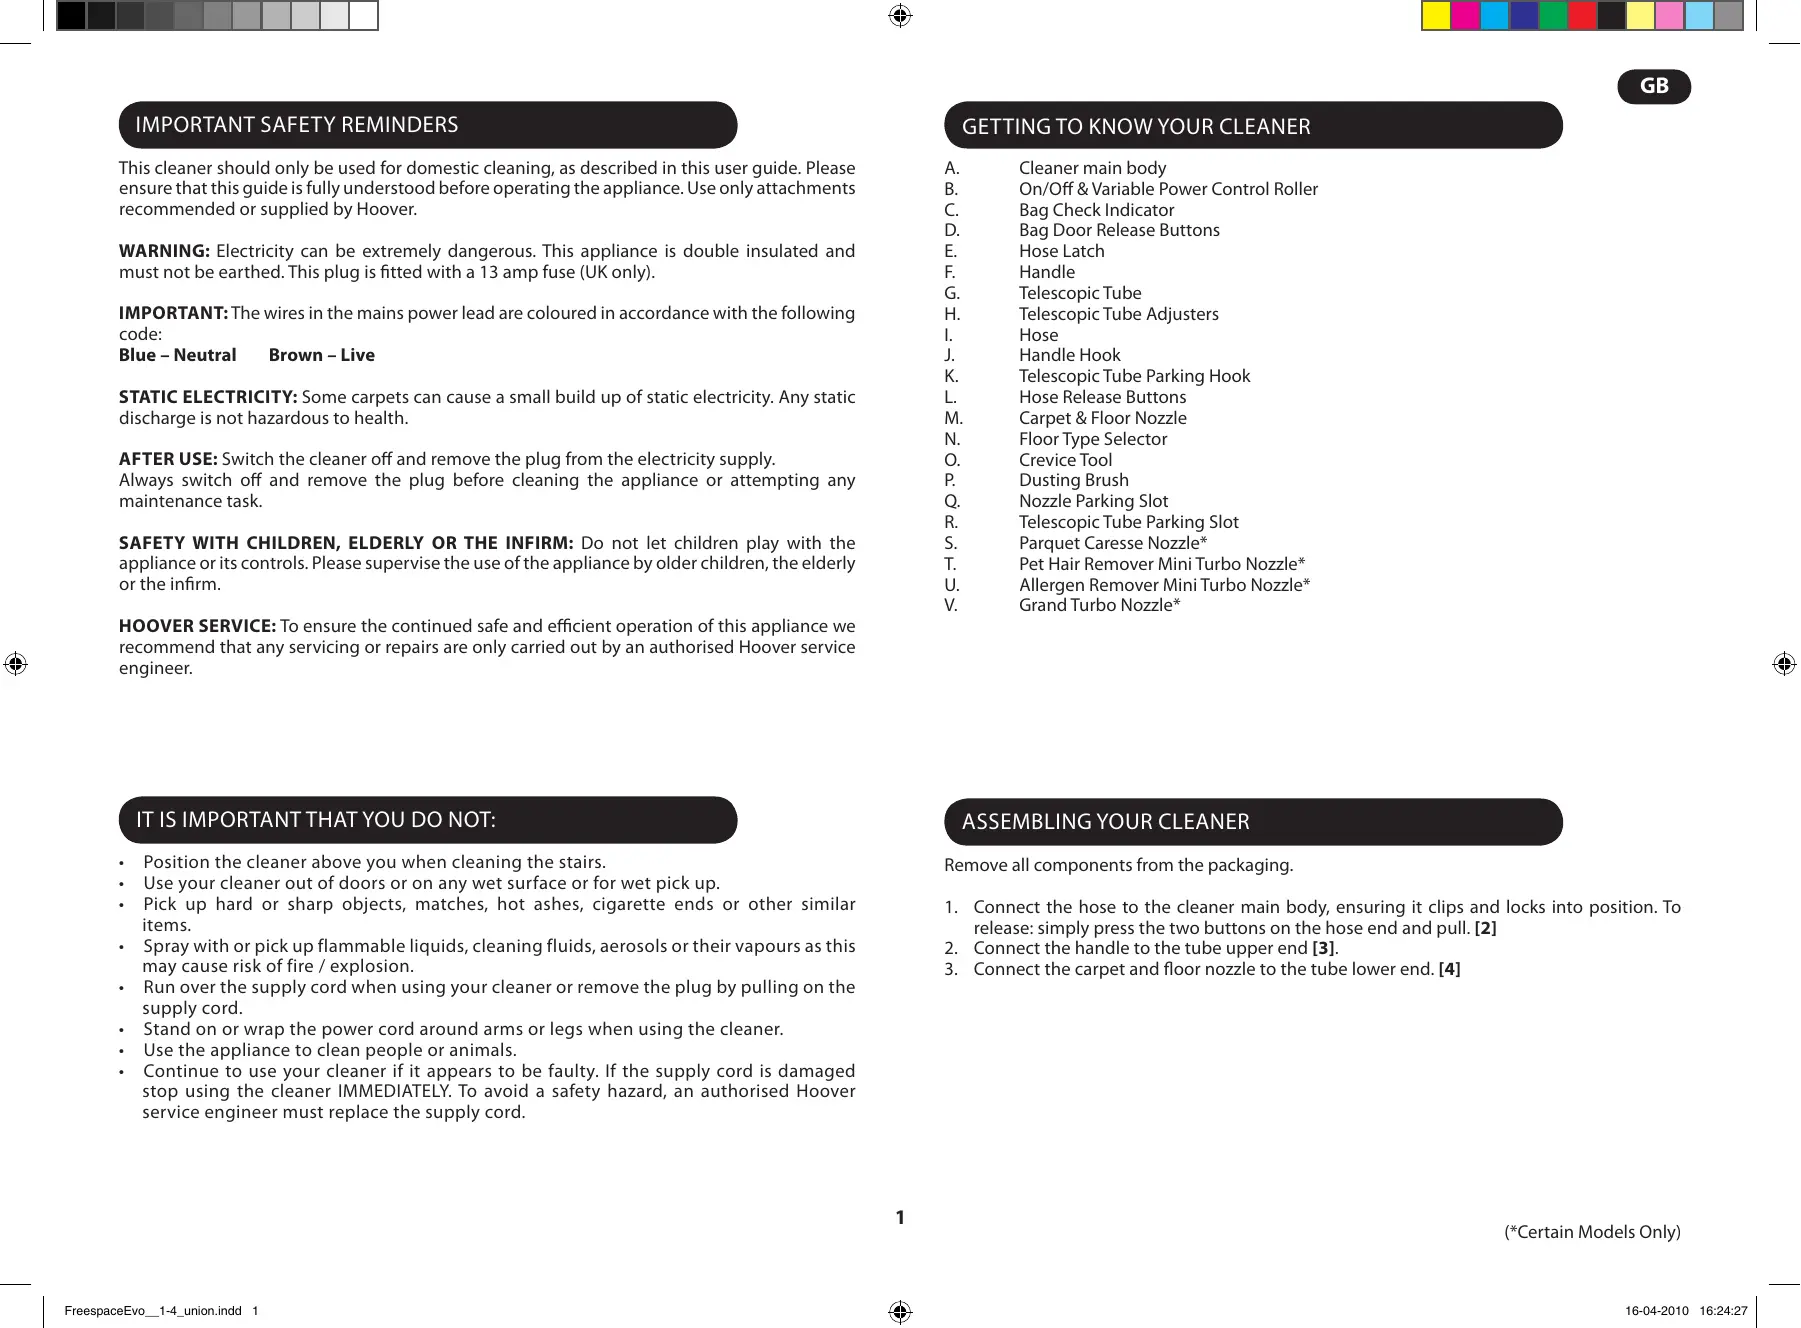
This cleaner should only be used for domestic cleaning, as described in this user guide. Please ensure that this guide is fully understood before operating the appliance. Use only attachments recommended or supplied by Hoover.
WARNING: Electricity can be extremely dangerous. This appliance is double insulated and must not be earthed. This plug is fitted with a 13 amp fuse (UK only).
IMPORTANT: The wires in the mains power lead are coloured in accordance with the following code:
Blue - Neutral Brown - Live
STATIC ELECTRICITY: Some carpets can cause a small build up of static electricity. Any static discharge is not hazardous to health.
AFTER USE: Switch the cleaner off and remove the plug from the electricity supply. Always switch off and remove the plug before cleaning the appliance or attempting any maintenance task.
SAFETY WITH CHILDREN, ELDERLY OR THE INFIRM: Do not let children play with the appliance or its controls. Please supervise the use of the appliance by older children, the elderly or the infirm.
HOOVER SERVICE: To ensure the continued safe and efficient operation of this appliance we recommend that any servicing or repairs are only carried out by an authorised Hoover service engineer.
IT IS IMPORTANT THAT YOU DO NOT:
- Position the cleaner above you when cleaning the stairs.
- Use your cleaner out of doors or on any wet surface or for wet pick up.
- Pick up hard or sharp objects, matches, hot ashes, cigarette ends or other similar items.
- Spray with or pick up flammable liquids, cleaning fluids, aerosols or their vapours as this may cause risk of fire / explosion.
- Run over the supply cord when using your cleaner or remove the plug by pulling on the supply cord.
- Stand on or wrap the power cord around arms or legs when using the cleaner.
- Use the appliance to clean people or animals.
- Do not continue to use your cleaner if it appears to be faulty. If the supply cord is damaged, stop using the cleaner IMMEDIATELY. To avoid a safety hazard, an authorized Hoover service engineer must replace the supply cord.


GETTING TO KNOW YOUR CLEANER
A. Cleaner main body B. On/Off & Variable Power Control Roller C. Bag Check Indicator D. Bag Door Release Buttons E. Hose Latch F. Handle G. Telescopic Tube H. Telescopic Tube Adjusters I. Hose J. Handle Hook K. Telescopic Tube Parking Hook L. Hose Release Buttons M. Carpet & Floor Nozzle N. Floor Type Selector O. Crevice Tool P. Dusting Brush Q. Nozzle Parking Slot R. Telescopic Tube Parking Slot S. Parquet Caresse Nozzle T. Pet Hair Remover Mini Turbo Nozzle U. Allergen Remover Mini Turbo Nozzle V. Grand Turbo Nozzle
ASSEMBLING YOUR CLEANER
Remove all components from the packaging.
- Connect the hose to the cleaner main body, ensuring it clips and locks into position. To release: simply press the two buttons on the hose end and pull. [2]
- Connect the handle to the tube upper end [3].
- Connect the carpet and floor nozzle to the tube lower end. [4]
USING YOUR CLEANER
- Extract power cord and plug it into the power supply. [5] Do not pull the cord beyond the red marker.
- Adjust the telescopic tube to the desired height by moving the telescopic tube adjuster up and raise or lower the handle to the most comfortable cleaning position. [6]
- Carpet & Floor Nozzle. Press the floor type selector on the nozzle [7] to select the ideal cleaning mode for the floor type.
Hard Floor - Brushes are lowered to protect the floor.
Carpet - Brushes are raised for the deepest clean.
- Switch the cleaner on by rotating the On/Off Variable Power Control Roller clockwise on the rear of the cleaner main body. [8]
- Adjust the power level by rotating the On/Off Variable Power Control Roller to the desired level. [8]
- Switch off at the end of use by rotating the On/Off Variable Power Control Roller anticlockwise to the end. [8] Unplug and gently pull the power cord out of the cleaner and the cord will begin to automatically retract back into the cleaner. [9]
- Parking and Storage - The flexible hose and tube can be parked for temporary storage while in use [10] or in the Nanopack storage position when not in use: Retract the telescopic tube to its storage length [6]. Remove the nozzle from the end of the telescopic tube [11] and remove the hose handle from the telescopic tube [12]. Lift the hose latch at the rear of the cleaner [13] and wrap the flexible hose around the product [14]. Park the hose handle on the product [15]. Assemble the nozzle into the parking slot underneath the product [16]. Assemble the telescopic tube into the remaining parking slot underneath the product [17].
CLEANER MAINTENANCE
Replacing The Dust Bag
If the bag check indicator [1C] is red please check and, if necessary, replace the bag.
- Remove the hose from the cleaner [2].
- Press the Bag Door Release buttons and remove bag door [18].
- Pull the bag collar to remove the dust bag [19] and carefully dispose the bag into a bin.
- Fit a new bag into the cleaner by inserting the bag collar into the bag holder [19].
IMPORTANT: The hose must be removed before removing or replacing the dust bag.
Remember: The bag check indicator may be red if an obstruction has occurred. In this case refer to 'Removing A Blockage From the System'.
(*Certain Models Only)
Cleaning the Filters
To maintain optimum performance of your cleaner, please wash the pre-motor filter and exhaust filter after each 5 bag changes.
To remove the pre-motor filter:
- Open the bag door and remove the dust bag from the cleaner (see "Replacing The Dust Bag").
- Press the latch at the top of the pre-motor filter frame to unlock it from the cleaner. Tilt and remove the filter from the cleaner [20].
To remove the exhaust filter:
- Unlock the door by rotating the door along arrows indicated [21].
- Remove the filter pack from the recess [22].
Gently tap and wash the filter packs using hand warm water [23]. Remove excess water from the filters with a dry cloth and leave to dry fully before re-using. Reassemble filter packs once fully dry and refit to the cleaner.
Remember: Do not use hot water or detergents. In the unlikely event of the filters becoming damaged, fit a Genuine Hoover consumable. Do not try and use the product without a dust bag or filter fitted.
Cleaning the permanent dust bag (depending on model)
To maintain optimum performance we recommend that you wash the permanent bag after every 5 full bags. Empty the contents of the Bag into a bin, wash the Bag under handwarm water, remove excess water with a dry cloth and leave to dry fully before replacing.
Removing a Blockage From The System
If the bag check indicator is red:
- Check if the bag is full. If so refer to 'Replacing The Dust Bag'.
- If it is not full, then;
A. Do the filters need cleaning? If so, refer to 'Cleaning the Filter'. B. Check if there is any other blockage in the system - Use a rod or a pole to remove any blockage from the telescopic tube or flexible hose. C. Check for and clear any blockage in the Nozzle.
Warning - The bag check indicator will turn red if the cleaner is used when full, if there is a blockage or if the filters are dirty. If the cleaner is used for a significant period of time with the bag check indicator red, a thermal cut out will switch the cleaner off to prevent overheating. The bag check indicator turns green once the cleaner has switched off to signal that the thermal cut out has been activated. If this should happen, switch the cleaner off, unplug and correct the fault. It will take about 45 minutes for the cut out to automatically reset.
ACCESSORIES
Please see the model specification on the packaging label for inclusion of accessories to individual models.
All accessories can be fitted to the hose handle or the end of the telescopic tube.
Crevice Tool – For corners and hard to reach areas. Remove the Crevice tool from the accessories holder [24] and fit to the hose handle [25] or telescopic tube.
Dusting Brush - For bookshelves, frames, keyboards and other delicate areas. Remove the dusting brush from the accessories holder [24] and fit to the crevice tool then fit to the hose handle [25] or telescopic tube.
Parquet Caresse Nozzle* – For parquet floors and other delicate floors. [1S]
Pet Hair Remover Mini Turbo Nozzle* - Use the mini turbo nozzle on stairs or for deep cleaning on textile surfaces and other hard to clean areas. Particularly suitable for pet hair removal. [1T]
Allergen Remover Mini Turbo Nozzle* - Use the mini turbo nozzle on stairs or for deep cleaning on textile surfaces and other hard to clean areas. Particularly suitable for allergen removal. [1U]
Grand Turbo Nozzle* - Use the Grand Turbo Nozzle for deep cleaning on carpets. [1V]
IMPORTANT: Do not use the Grand Turbo Nozzle or Mini Turbo Nozzles on rugs with long fringes, animal hides and carpet pile deeper than 15mm. Do not keep the nozzle stationary while the brush is rotating.
USER CHECKLIST
Should you have a problem with the product, complete this simple user checklist before calling your local Hoover service.
- Is there a working electricity supply to the cleaner? Please check with another electrical appliance.
- Is the Bag over-filled? Please refer to 'Cleaner Maintenance'.
- Is the filter blocked? Please refer to 'Cleaner Maintenance'.
- Is the hose or nozzle blocked? Please refer to 'Removing a blockage from the system'.
- Has the cleaner overheated? If so, it will take approximately 45 minutes to automatically reset.
IMPORTANT INFORMATION
Hoover Spares and Consumables
Always replace parts with genuine Hoover spares. These are available from your local Hoover dealer or direct from Hoover. When ordering parts always quote your model number.
Consumables
- Paper Bag: H69 - 35601053
- Micro Fibre Bag: H71 - 35601069 (If Available)
- Exhaust Micro Filter: T102 - 35601056
- Hepa Pre-Motor Filter: S107 - 35601057
Spares
- Carpet & Floor Nozzle - G72 - 4845090 Fabric Hose: - D118 - 35601054
- Flexible Hose - D122 - 35601055
- Parquet Caresse Nozzle: G90PCB - 35600934
- Allergen Remover Mini Turbo Nozzle: J32 - 35600817 Grand Turbo Nozzle: J31 - 35600816
Hoover Service
Should you require service at any time, please contact your local Hoover Service Office.
Quality and the Environment
Quality
Hoover's factories have been independently assessed for quality. Our products are made using a quality system which meets the requirements of ISO 9001.
The Environment:
This appliance is marked according to the European Directive 2002/96/EC on Waste Electrical and Electronic Equipment (WEEE). By ensuring this product is disposed of correctly you will help prevent potential negative consequences for the environment and human health, which could otherwise be caused by inappropriate waste handling of this product.
The symbol on the product indicates that this product may not be treated as household waste. Instead it shall be handed over to the appliance collection point for recycling of electrical and electronic equipment. Disposal must be carried out in accordance with the local environmental regulations for waste disposal. For more detailed information about treatment, recovery and recycling of this product, please contact your local city office, your household waste disposal service or the shop where you purchased the product.
Your Guarantee
The guarantee conditions for this appliance are as defined by our representative in the country in which it is sold. Details regarding these conditions can be obtained from the dealer from whom the appliance was purchased. The bill of sale or receipt must be produced when making any claim under the terms of this guarantee.
Subject to change without notice.
FR
IMPORTANT SAFETY INSTRUCTIONS
MAINTENANCE OF THE VACUUM CLEANER
Replacing the dust bag
STATIC ELECTRICITY: During the cleaning of certain types of carpets, static electricity may build up. A discharge of static electricity is not dangerous to health.
AFTER WORK: After finishing work, you should turn off the vacuum cleaner and disconnect the plug from the power source.
Never forget to turn off the appliance and disconnect the plug from the power source before cleaning or maintenance.
SAFETY MEASURES REGARDING CHILDREN, ELDERLY AND DISABLED PERSONS:
Do not allow children to play with the appliance or its controls. Supervise the use of the appliance by older children, elderly and disabled persons.
HOOVER SERVICE: To ensure continuous, trouble-free and efficient operation of this household appliance, the company recommends that any servicing or repair be carried out only by a specialist at an authorized Hoover service center.
PROHIBITED:
- Do not use the vacuum cleaner above the level of your head. Do not use the vacuum cleaner outdoors, on wet surfaces, or to collect wet material. Do not allow hard sharp objects, ashes, burning coal, cigarette butts, etc. to enter the vacuum cleaner. Do not use it to spray or collect flammable liquids, cleaning liquids, aerosols, or their vapors, as this may lead to fire or explosion. While working with the vacuum cleaner, move it by the handle, do not pull the power cord, and do not disconnect the plug from the socket by pulling the cord. While working with the vacuum cleaner, do not stand on the power cord and do not wind it around your arms or legs.
- Use of the vacuum cleaner for cleaning animals is prohibited.
- Do not continue to operate the vacuum cleaner if signs of malfunction appear. Immediately turn off the vacuum cleaner if the power cord is damaged. To avoid accidents, the cord must be replaced only by a specialist at an authorized Hoover service center.
GET TO KNOW THE VACUUM CLEANER
A. Main body of the vacuum cleaner B. "On/Off" switch and power control knob C. Dust bag full indicator D. Button to release the dust bag cover E. Hose latch F. Handle G. Telescopic tube H. Telescopic tube adjustment buttons I. Hose J. Hook for securing the handle K. Hook for securing the telescopic tube L. Release button for the hose M. Nozzle for hard floors and carpets N. Floor type switch O. Crevice nozzle P. Upholstery nozzle Q. Accessory holder for the nozzle R. Accessory holder for the telescopic tube S. Caresse nozzle for parquet* T. Mini-turbo nozzle for removing pet hair U. Mini-turbo nozzle for removing allergens* V. Grand turbo nozzle*
ASSEMBLY OF THE VACUUM CLEANER
N3BNeKeNTe BCE COCTaBHeIe YaCTn 3yNaKOBKn.
TEXHINUECKOE OBCJNYXUBAHNE NbIIECOCA
3aMeHa Meuka JIc6opa nbIIN
Ecni nHdikatop nepenolnHeHn pyIe6bOpHnka [1C] rOpNT KpaChbIM, npOBepeTe coCToHne MeShka n B clyuae Heo6xOaMocTn 3aMeHnte erO.
- OToeDInHInTe 7JHaHr OT nbIneCoca [2].
- Haxmte KhoNky OTnpaHnKpbIuKN pblnc6OpHoro MeuKa n CHMmTe KpbIuKy [18].
- Notarynte neTIO MeIka, YTO6bI BbITaIHTb erO [19] n aKKypaTHo Bbl6pocbTe MeWOK B MycOpHoe BeDpo.
- 3a npabBte HObI MeoK B nIeCoc, BCTaBnB NTIO B depKaTeIb Meoka [19].
BHIMAHHE! Ppexde yem n3BnKaTb nn 3ameHrTb nbIe6OpHbI MeoK, HxHcnaJala oTOcoEHHHTb wlaHr.
- Поберът, He 3anonHeH JI MeoK IJRA c6opa nbIn. Ecnn 3anonHeH, cm. pa3dJe "3ameHa nbIe6bOpHoro Meoka".
- Ecnn OH He 3aOpJHeN, Torga:
A Tpe6yeTcra IIN npOuNCTnTB fInbTp? EcnI 3TO Tpe6yeTcra, cm. pa3dEn "Ounctka fInnbTpa". B. Поберът, HeT Лдугх 3acopeнь B cnsTeMe -При помоцистржнй палкп npocntte Teleckponuueckyю Trpy6y nIn Гбкшланг. C. Поверътей нааду и почистпе ee, ecл она зблесь.
IpeynpexkdeHne: - HndkaTOp 3anolHeHnmeKcStaHET KpaChbIM, ecn MeoK nbIeococ npoh, IIn6o Imeetc3acopeHne, IIn6o 3arpy3HeHb fNlbtpbl. Ecn nbIeococ NcNoIb3yETcC nOlnbHM MeKOM B TeueHne DInTeJbHoro BpeMeHN, peJe TepNOBOB 3aunTbI OTKIOUHT nbIeococ BO n36ExAHne erO neperpeBa. INdkaTOp 3anolHeHnmeKcCTaHET 3eJeHbIM nocLe BbIKLooHEny nbIeococ, ppeynpexkda O cpaBaTBaHnnp eJe TepNOBOB 3aunTbI. B 3tOM CInyae BbIKLIOuHTe nbIeococ, oTcoEduHnte erO ot cEtN PntAHnN 3aMeHNTe MeoK. PeJe TepNOBOB 3aunTbI ABTomatueckn BrcxOHOe noloXeHne uepe345 MNHyT.
(*Tolbko OII ONpeJeHnBbIX MOeJIeN)
IIOONHHTeJIbHbIE IPNICNOCOBJEHNAI INPINAADJEKHOCTNI
For a complete set of additional accessories, please refer to the model specification.
All accessories can be installed on the handle of the hose or on the end of the telescopic tube.
The upholstery nozzle is intended for cleaning corners and hard-to-reach places. Remove the upholstery nozzle from the accessory holder [24] and install it on the handle of the hose [25] or on the telescopic tube.
The dusting brush is for cleaning bookshelves, picture frames, keyboards, and other delicate surfaces. Remove the dusting brush from the accessory holder [24] and install it on the upholstery nozzle, which in turn is installed on the handle of the hose [25] or on the telescopic tube.
Parquet nozzle* - For parquet floors and other floors requiring careful handling. [1S]
Mini turbo nozzle for pet hair* - The mini turbo nozzle is intended for cleaning stairs or for deep cleaning of fabric surfaces and other hard-to-reach places for cleaning. Especially suitable for removing pet hair. [1T]
Mini turbo nozzle for upholstery* - The mini turbo nozzle is intended for cleaning stairs or for deep cleaning of fabric surfaces and other hard-to-reach places for cleaning. Especially suitable for removing pet hair. [1U]
Grand turbo nozzle* - The Grand turbo nozzle is intended for deep cleaning of carpets. [1V]
WARNING! Do not use the Grand turbo nozzle and mini turbo nozzles for cleaning rugs with long fringe, places where pets sleep, and carpets with pile longer than 15 mm. Do not hold the nozzle stationary while the brush is rotating.
USER QUESTIONNAIRE
If you have any difficulties using this product, please fill out this simple questionnaire before contacting your local Hoover service center.
- Is the vacuum cleaner receiving the operating voltage? Check with another electrical appliance. Is the dust bag full? See the section "Vacuum cleaner maintenance".
- Is the filter clogged? See the section "Vacuum cleaner maintenance". Are the hose or nozzle clogged? See the section "Clearing blockages in the system". Is the vacuum cleaner overheating? In this case, the vacuum cleaner will automatically return to normal operating mode after about 45 minutes.
IMPORTANT INFORMATION
Spare parts and accessories from Hoover
When replacing filters, use only genuine Hoover spare filters and consumables. They can be purchased from your local Hoover dealer or directly from Hoover. When ordering spare parts, always quote the model number of the vacuum cleaner.
Consumables
- IT IS IMPORTANT THAT YOU DO NOT
- GETTING TO KNOW YOUR CLEANER
- ASSEMBLING YOUR CLEANER
- USING YOUR CLEANER
- CLEANER MAINTENANCE
- REPLACING THE DUST BAG
- CLEANING THE FILTERS
- CLEANING THE PERMANENT DUST BAG (DEPENDING ON MODEL)
- REMOVING A BLOCKAGE FROM THE SYSTEM
- ACCESSORIES
- USER CHECKLIST
- IMPORTANT INFORMATION
- HOOVER SPARES AND CONSUMABLES
- CONSUMABLES
- SPARES
- HOOVER SERVICE
- QUALITY AND THE ENVIRONMENT
- QUALITY
- THE ENVIRONMENT
- YOUR GUARANTEE
- IMPORTANT SAFETY INSTRUCTIONS
- MAINTENANCE OF THE VACUUM CLEANER
- SAFETY MEASURES REGARDING CHILDREN, ELDERLY AND DISABLED PERSONS
- PROHIBITED
- GET TO KNOW THE VACUUM CLEANER
- ASSEMBLY OF THE VACUUM CLEANER
- TEXHINUECKOE OBCJNYXUBAHNE NBIIECOCA
- AMEHA MEUKA JIC6OPA NBIIN
- BHIMAHHE! PPEXDE YEM N3BNKATB NN 3AMEHRTB NBIE6OPHBI MEOK, HXHCNAJALA OTOCOEHHHTB WLAHR
- IIOONHHTEJIBHBIE IPNICNOCOBJEHNAI INPINAADJEKHOCTNI
- USER QUESTIONNAIRE
- SPARE PARTS AND ACCESSORIES FROM HOOVER
Brand : HOOVER
Model : FREESPACE EVO TFV2015
Category : Cordless vacuum