
CRP10BK - Alarm Clock BLAUPUNKT - Free user manual and instructions
Find the device manual for free CRP10BK BLAUPUNKT in PDF.


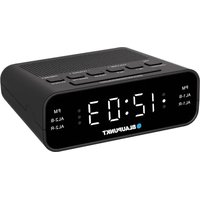
| Product Type | Alarm clock radio |
| Brand | Blaupunkt |
| Model | CRP10BK |
| Dimensions (W x H x D) | 180 mm x 100 mm x 60 mm (approx.) |
| Weight | 0.3 kg (approx.) |
| Power Supply | AC 230V ~ 50Hz or DC 9V (6x AA batteries, not included) |
| Supported Radio Bands | FM (87.5 – 108 MHz) |
| Alarm Functions | Dual alarm with buzzer or radio, snooze (9 min), sleep timer |
| Display | LED with adjustable brightness (high/low/off) |
| Clock Backup | Battery backup maintains time and alarm settings during power outage |
| Controls | Rotary volume/dimming knob, buttons for alarm set, snooze, band, sleep, etc. |
| Speaker | Built-in mono speaker (approx. 2W) |
| Headphone Jack | Yes, 3.5 mm |
| Maintenance | Clean with soft dry cloth; do not use liquids or abrasive cleaners |
| Safety Precautions | Keep away from water and moisture; use only specified power source; do not open device |
| Spare Parts and Repairability | Spare parts not provided by manufacturer; contact authorized service center for repairs |
| General Information | Black plastic housing; suitable for bedside use; CE and RoHS compliant |
Frequently Asked Questions - CRP10BK BLAUPUNKT
User questions about CRP10BK BLAUPUNKT
0 question about this device. Answer the ones you know or ask your own.
Ask a new question about this device
Download the instructions for your Alarm Clock in PDF format for free! Find your manual CRP10BK - BLAUPUNKT and take your electronic device back in hand. On this page are published all the documents necessary for the use of your device. CRP10BK by BLAUPUNKT.
USER MANUAL CRP10BK BLAUPUNKT
• This safety and operating instruction should be retained for future reference. - The apparatus should not be exposed to dripping or splashing or placed in a humid atmosphere such as a bathroom. - Do not install the product in the following areas: - Places exposed to direct sunlight or close to radiators. - On top of other stereo equipment that radiate too much heat. - Blocking ventilation or in a dusty area. - Areas where there is constant vibration. • Humid or moist places. - Do not place near candles or other naked flames. - Operate the product only as instructed in this manual. - Before turning on the power for the first time, make sure the power adaptor is properly connected.
For safety reasons, do not remove any covers or attempt to gain access to the inside of the product. Refer any servicing to qualified personnel.
Do not attempt to remove any screws, or open the casing of the unit; there are no user serviceable parts inside. Refer all servicing to qualified service personnel.
SAFETY INSTRUCTIONS
- Read Instructions - All the safety and operating instructions must be read before the product is operated.
- Retain Instructions - The safety and operating instructions should be kept with the product for future reference.
- Heed warnings - All warnings on the product and in the operating instructions should be adhered to.
- Follow instructions - All operating and users' instructions should be followed.
- Water and moisture - To reduce the risk of fire or electric shock, do not expose the product to train, dripping, splashing or excessive moisture such as in a sauna or bathroom. Do not use this product near water, for example, near a bathtub, washbowl, kitchen sink, laundry tub, in a wet basement or near a swimming pool (or similar).
- Object and Liquid Entry - Never push objects of any kind into this product through openings, as they may touch dangerous voltage points or short-circuit parts that could result in a fire or electric shock. Never spill liquid of any kind on the product. Do not place any object containing liquid on top of the product.
- Servicing - Do not attempt to service this product yourself, as opening or removing covers may expose you to dangerous voltage or other hazards. Refer all servicing to qualified service personnel.
- Replacement parts - When replacement parts are required, ensure that the service technician has used replacement parts specified by the manufacturer or have the same characteristics as the original part. Unauthorized substitutions may result in fire, electric shock or other hazards.
- Place your clock radio on a stable surface, away from sources of direct sunlight or excessive heat or moisture.
- Protect your furniture when placing your units on a natural wood and lacquered finish by
using a cloth or protective material between it and the furniture.
- Clean your unit with a soft cloth moistened only with mild soap and water. Stronger agents such as benzene, thinner or similar materials can damage the surface of the unit. Make sure the unit is unplugged before cleaning.
- Battery
1) The batteries must not be exposed to excessive heat such as sunshine, fire or the like.
2) The batteries should be drawn to the environmental aspects of battery disposal.
3) Battery usage CAUTION - to prevent battery leakage which may result in body injuries, property damage, or damage to the apparatus:
- Install all batteries correctly, + and - as marked on the apparatus.
- Remove batteries when the unit is not used for a long time.
WARNING
This appliance is not intended for use by persons (including children) with reduced physical sensory or mental capabilities, or lack of experience and knowledge, unless they have been given supervision or instruction concerning use of the appliance by a person responsible for their safety.
Children should be supervised to ensure that they do not play with the appliance.
- The apparatus must not be exposed to dripping or splashing and that objects filled with liquids, such as vases, must not be placed on the apparatus.
- To prevent fire or shock hazard, do not expose this equipment to hot places, rain, moisture or dust.
- Do not locate this unit near any water sources e.g. taps, bathtubs, washing machines or swimming pools. Ensure that you place the unit on a dry, stable surface.
- Do not place this unit close to a strong magnetic field.
- Do not place the unit on an amplifier or receiver.
- Do not place this unit in a damp area as the moisture will affect the life of electric components.
- If the clock is brought directly from a cold to a warm location, or is placed in a very damp room, moisture may condense on the lens inside the player. If this occurs, the system will not operate properly. Please leave the system turned on for about an hour until the moisture evaporates.
- Do not attempt to clean the unit with chemical solvents as this might damage the finish. Wipe with a clean, dry or slightly damp cloth.
NOTICE

This product complies with the radio interference requirements of the European community.

Your product is designed and manufactured with high quality materials and components, which can be recycled and reused.

When this crossed-out wheeled bin symbol is attached to a product, it means that the product is covered by the European Directive 2002/96/EC. Please inform yourself about the local separate collection system for electrical and electronic products. Please act according to your local rules and do not dispose of your old products with your normal household waste. Correct disposal of your old product helps to prevent potential negative consequences for the environment and human health.

Your product contains batteries covered by the European Directive 2006/66/EC, which cannot be disposed of with normal household waste. Please inform yourself about the local rules on separate collection of batteries because correct disposal helps to prevent negative consequences for the environment and human health.
Environmental information
All unnecessary packaging has been omitted. We have tried to make the packaging easy to separate into three materials: cardboard (box), polystyrene foam (buffer) and polyethylene (bags, protective foam sheet). Your system consists of materials which can be recycled and reused if disassembled by a specialized company. Please observe the local regulations regarding the disposal of packaging materials, exhausted batteries and old equipment.
Recording and playback of material might require consent. See Copyright Act 1956 and The Performer's Protection Acts 1958 to 1972.


INSTALLATION
Plug the AC/DC adaptor to an AC household outlet, and then plug the DC jack to the back of the unit. Your clock radio is ready to work for you.
BACKUP BATTERY INSTALLATION
- Slide open the battery cover at the back of your unit.
- Insert 2 x AA batteries (not included) into the battery compartment by observing the correct +/- polarity signs.
- Replace the battery cover.
- When only batteries are used, the always-on backlight is disabled.
- Slide open the battery cover at the back of your wireless outdoor sensor. Make sure the channel selector is set at position 1 (top position), then insert 2 x AAA batteries (not included) to the back of it. Replace the battery cover. Then place your outdoor sensor in a dry and shaded area outdoors.
If AC power is interrupted, the LCD display shows time only and both the backlight and radio will not function. The backup battery will keep the time and all settings of your unit. Make sure a fresh 2 x AA battery is used. So the alarm function can work, and the alarm source will switch to buzzer only.
Remarks:
Keep in mind that your outdoor sensor has a 200 feet open-air transmission with no obstructions. Actual transmission range will vary depending on what is in the path of the signal. Each obstruction (roof, walls, floors, ceilings, thick trees, etc.) will effectively cut signal range in half.

Insert the holder to the bottom of the outdoor transmitter for desktop or insert it to the back of the transmitter for wall mount purpose.
SETTING TIME, 12/24HR TIME AND THE SNOOZE DURATION
- Press and hold SET once, the hour digits flash. Press ▲ or ▼ to set the current hour. Press and hold ▲ or ▼ to accelerate setting at high speed.
- Press SET again, the minute digits flash. Press ▲ or ▼ to set minutes. Press and hold ▲ or ▼ to accelerate setting at high speed.
- Press SET again, the display shows "24H" and flashes. Press ▲ or ▼ to select "12H" or "24H" time format.
- Press SET again, the display shows "05" and flashes. Press ▲ or ▼ to select your snooze time from 5 to 60 minutes.
- Press SET again or if no key pressed for approx. 10 seconds to exit the setting mode. Note: when 12-hour time format is selected, the PM icon will appear on the upper left time display to indicate the afternoon time; there is no AM indicator.
TO SET ALARM 1
- At normal time display, press SET once. 6:00 and i appear.
- Press and hold SET until the hour digits flash. Press ▲ or ▼ to set the desired hour. Press and hold ▲ to accelerate setting at high speed. PM will appear on the display to indicate afternoon time if 12-Hr format is selected. There is no AM indicator.
- Press SET once again, the minute digits flash. Press ▲ or ▼ to set desired minutes. Press and hold to accelerate setting at high speed.
- Press SET once again, LCD displays "bu" (buzzer). To select wake to sound sources, press ▲ or ▼ to select :-
bu = wake-by-buzzer, rd = wake-by-radio
- Press SET again to complete set-up. If no key is pressed in approximately 10 seconds at any time during set-up, the clock will exit the alarm set-up mode.
TO SET ALARM 2
- At normal time display, press SET twice. 6:00 and 📋 appears.
- Press and hold SET until the hour digits flash. Press ▲ or ▼ to set the desired hour. Press and hold ▲ to accelerate setting at high speed. PM will appear on the display to indicate afternoon time if 12-Hr format is selected. There is no AM indicator.
- Press SET once again, the minute digits flash. Press ▲ or ▼ to set desired minutes. Press and hold or to accelerate setting at high speed.
- Press SET once again, LCD displays "bu" (buzzer). To select wake to sound sources, press ▲ or ▼ to select :-
bu = wake-by-buzzer, rd = wake-by-radio
- Press SET again to complete set-up. If no key is pressed in approximate 10 seconds at any
time during set-up, the clock will exit the alarm set-up mode.
TO TURN ON OR OFF ALARM 1 AND 2
- Press AL 1.2/ON.OFF once to activate Alarm 1, appears.
- Press once again to activate Alarm 2, ② appears.
- Press once again to activate both Alarm 1 and 2. Both ① and ② appear.
- Press once again to deactivate both alarms (both ① and ② disappear).
TO STOP AND RESET THE ALARM TO COME ON THE NEXT DAY
When alarm 1 or 2 is sounding, the related alarm icon flashes. Press the RADIO/SLEEP or AL 1.2/ON.OFF once to stop the alarm and reset it to come on the following day. After that both ① and/or ② remain on the display.
SNOOZE OPERATION (default snooze duration is 5 minutes)
When the alarm is sounding, press Zz once to silence it; it will sound again after the set snooze duration.
Note: If your second alarm activates while the first alarm is sounding or in snooze mode, the second alarm overrides the first (the first alarm is reset to sound the next day).
USING THE HI-LO DIMMER
Press Zz to adjust the brightness (HI/LO/OFF) of the LCD backlight. This can only be done when the radio is off or the unit is not sounding.
SETTING UP THE FM ANTENNA
Extend the FM wire antenna fully and vary its direction for best FM reception. Do not strip, alter, or attach other antennas to it.
LISTENING TO THE FM RADIO
- To turn on the radio, press RADIO/SLEEP once. The display shows "ON" and then the radio frequency in MHz.
- Press ▲ / ▼ to tune the radio to a desired station. Press and hold ▲ / ▼ to scan for the next clear station.
- To adjust the volume, press VOL once. The display shows "L07". Press ▲ / ▼ to adjust the volume from L00 (minimum) to L15 (maximum).
- Press zz to turn off the radio.
Remark: Keep the radio away from fluorescent lamps or other electronic devices that may cause interference.
USING THE PRESET MEMORY
This clock radio features a total of 10 preset memories for FM stations. These allow you to preset your favorite stations and access them quickly.
- Turn on the radio and select a radio station you like to memorize.
- Press and hold SET until "MEM" appears and "01" flashes. Press SET once to store Memory 1.
- Press ▲ or ▼ to select another station you like to memorize. Then press and hold SET until "MEM" appears and "02" flashes. Press SET once to store Memory 02.
- Repeat Steps 2 to 3 to preset memories 3 through 10.
- To access a preset station at any time, press SET once at a time while the radio is on.
- To edit a preset station, select another station and then repeat Steps 2 to 4. This overrides the original settings.
USING THE SLEEP TIMER
- In RADIO mode, press and hold RADIO/SLEEP to enter sleep mode. The sleep icon and the sleep time "05" (5 minutes) appear on the display.
- Press RADIO/SLEEP again as needed to adjust the sleep timer from 5, 10, 15, 30, 45, 60, 75, 90, or OFF.
- When the display changes back to show the time, press and hold RADIO/SLEEP once to show the sleep time remaining.
- The radio will play for the programmed sleep time and then shut off.
- To turn off the radio before the sleep time has elapsed, press

TO VIEW CELSIUS OR FAHRENHEIT TEMPERATURE READOUT
Simply press ▼ / C / F to select degree Celsius or degree Fahrenheit temperature readout (for both indoor and outdoor temperature readout).
Remarks:
Keep in mind that the display of outdoor temperature will have a tolerance of 2 degrees compared with the actual temperature. It will vary and may not be very precise depending on the location where the temperature sensor was mounted, actual environment, and transmission signal range.
TO USE THE PROJECTION (operated by adaptor only)
- Press PROJECT once to turn on the projection.
- Press PROJECT once again to activate auto scrolling function to view the current outdoor temperature (rounded to the nearest digit) and the current time for 5 seconds alternately. Press C/F to select degree Celsius or degree Fahrenheit temperature readout in projection view.
- Press PROJECT once again to turn off the projection. When the projection is on, press and hold PROJECT to flip the projection view upside down. At the back of your unit, use the rotary knob to rotate the projection view by 90 degrees.
FROST ALERT
Frost Alert Icon will appear and flash when outdoor temperature is between -1°C to 3°C
If You Lose The Outdoor Temperature
When the outdoor temperature digits show "—", the wireless transmission is either interrupted or lost.
At normal display, press and hold Zz button of the weather station, flashes and to start searching for the signal from the outdoor transmitter. Then press the RESET button of the outdoor transmitter. If you continue to lose the outdoor temperature display, try placing the outdoor transmitter in a different location until you have smooth transmission of temperature data.
LOW BATTERY INDICATION OF YOUR OUTDOOR TRANSMITTER
The icon will appear to indicate the battery level of your outdoor transmitter is getting low. You may need to replace the batteries of your outdoor transmitter with new ones.
TROUBLESHOOTING
If your clock displays irrelevant time or does not function properly, which may be caused by electro-static discharge or other interference, unplug the DC jack to disconnect the AC power (and remove the backup battery). The clock radio will be reset to default settings and you need to set it again.
CARE OF YOUR PRODUCT
- Place your clock radio on a stable surface, away from sources of direct sunlight or excessive heat or moisture.
- Protect your furniture when placing your units on a natural wood and lacquered finish by using a cloth or protective material between it and the furniture.
- Clean your unit with a soft cloth moistened only with mild soap and water. Stronger agents such as Benzene, thinner or similar materials can damage the surface of the unit. Make sure the unit is unplugged before cleaning.
- If the unit is not to be used for a prolonged period, such as a month or longer, remove the batteries to prevent possible corrosion. Should the battery compartment become corroded or dirty, clean the compartment thoroughly and replace the batteries.
SPECIFICATIONS
| Alarm duration | 1 hour |
| Snooze duration | 5 to 60 minutes |
| Sleep timer selections | 5, 10, 15, 30, 45, 60, 75, 90 minutes to OFF |
| Volume | L00 (minimum) to L15 (maximum) |
| Preset Memories of radio | 10 |
| Default settings:- | |
| Time format | 24 hour |
| Time | 0:00 |
| Alarm 1 and 2 | 6:00 |
| Volume | L07 (Level 7) |
| Snooze duration | 05 (5 minutes) |
Temperature measuring range:
Indoor: 0°C to +50°C
(display shows HH.H / LL.L if out of this range)
Outdoor: -40°C to +70°C
(display shows HH.H / LL.L if out of this range)
Outdoor Temperature Interval every 1 minute
Temperature resolution: 0.1°C
Transmission frequency 433MHz
Transmission Distance Up to 60 meters (open air with no obstructions)
IMPORTANT INFORMATION
5, 10, 15, 30, 45, 60, 75, 90 minutes
L00 (minimum) to L15 (maximum)
10
LED DISPLAY BRIGHTNESS SETTING
INSERTING THE BACKUP BATTERY
Competence Centre Audio
2N-Everpol Sp. z o.o.
ul. Puławska 403A
02-801 Warsaw, Poland
phone: +48 22 331 99 59
e-mail: info@everpol.pl
www.blaupunkt.com
In case of questions or problems please contact our service.
Tel. 00 48 22 331 99 53
E-mail: info@blaupunkt-audio.pl
All rights reserved. All brand names are registered trademarks of their respective owners. Specifications are subject to change without prior notice.
Enjoy it.



- SAFETY INSTRUCTIONS
- WARNING
- NOTICE
- ENVIRONMENTAL INFORMATION
- INSTALLATION
- BACKUP BATTERY INSTALLATION
- REMARKS
- SETTING TIME, 12/24HR TIME AND THE SNOOZE DURATION
- TO SET ALARM
- TO TURN ON OR OFF ALARM 1 AND
- TO STOP AND RESET THE ALARM TO COME ON THE NEXT DAY
- SNOOZE OPERATION (DEFAULT SNOOZE DURATION IS 5 MINUTES)
- USING THE HI-LO DIMMER
- SETTING UP THE FM ANTENNA
- LISTENING TO THE FM RADIO
- USING THE PRESET MEMORY
- USING THE SLEEP TIMER
- TO VIEW CELSIUS OR FAHRENHEIT TEMPERATURE READOUT
- TO USE THE PROJECTION (OPERATED BY ADAPTOR ONLY)
- FROST ALERT
- IF YOU LOSE THE OUTDOOR TEMPERATURE
- LOW BATTERY INDICATION OF YOUR OUTDOOR TRANSMITTER
- TROUBLESHOOTING
- CARE OF YOUR PRODUCT
- IMPORTANT INFORMATION
- LED DISPLAY BRIGHTNESS SETTING
- INSERTING THE BACKUP BATTERY
- ENJOY IT
Brand : BLAUPUNKT
Model : CRP10BK
Category : Alarm Clock