
P752 - Cooker SMEG - Free user manual and instructions
Find the device manual for free P752 SMEG in PDF.
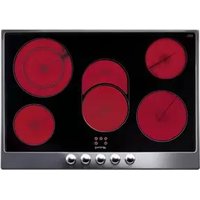


| Product Type | Freestanding Cooker |
| Brand | Smeg |
| Model | P752 |
| Overall Dimensions (H x W x D) | Approx. 900 x 900 x 600 mm |
| Weight | Approx. 55 kg |
| Power Supply | 220-240 V ~ 50/60 Hz |
| Energy Source | Electric / Gas (depending on variant) |
| Hob Type | Gas burners with flame failure safety device |
| Number of Burners | 5 (including triple-ring wok burner) |
| Oven Type | Multifunction electric oven |
| Oven Capacity | Approx. 70 L |
| Oven Functions | Conventional, grill, fan-assisted, pizza, slow cooking |
| Oven Cleaning | Removable door, enamel interior, easy-clean |
| Self-Cleaning | Not available (manual cleaning required) |
| Safety Features | Gas cut-off, child lock, cool-touch door, overheating protection |
| Material | Stainless steel / Painted steel |
| Spare Parts Availability | Authorized Smeg service centers, online shops |
| Repairability Index | Score: 8.0/10 (based on European standards) |
| Energy Efficiency Class (Oven) | A |
| Warranty | 2 years (check local regulations) |
Frequently Asked Questions - P752 SMEG
User questions about P752 SMEG
0 question about this device. Answer the ones you know or ask your own.
Ask a new question about this device
Download the instructions for your Cooker in PDF format for free! Find your manual P752 - SMEG and take your electronic device back in hand. On this page are published all the documents necessary for the use of your device. P752 by SMEG.
USER MANUAL P752 SMEG
- INSTRUCTIONS FOR PROPER USE 19
- SAFETY INSTRUCTION 20
- KNOW YOUR HOB 21
- BEFORE FIRST USE 21
- COOKING ZONES 22
- DESCRIPTION OF CONTROL ON THE FRONT CONTROL PANEL 23
- USE OF THE COOKING HOB 24
- CLEANING AND MAINTENANCE 28
- SOMETHING WRONG? 28
- INSTALLATION 29


INSTRUCTIONS FOR THE USER: these contain user advice, description of the commands and the correct procedures for cleaning and maintenance of the appliance.
INSTRUCTIONS FOR THE INSTALLER: these are intended for the qualified technician who must install the appliance, set it functioning and carry out an inspection test.
Further information about the products can be found at www.smeg.com
1. INSTRUCTIONS FOR PROPER USE

ELECTRICAL CONNECTION: PLEASE REFER TO INSTALLATION INSTRUCTION FOR THE GAS & ELECTRICAL SAFETY REGULATIONS AND THE VENTILATION REQUIREMENTS.
IN YOUR OWN INTEREST, AND THAT OF SAFETY, IT IS THE LAW THAT ALL GAS AND ELECTRICAL APPLIANCES BE INSTALLED AND SERVICED BY COMPETENT PERSONS, WHO WILL COMPLY WITH THE RELEVANT STANDARDS AND REGULATIONS.
CORGI REGISTERED INSTALLERS UNDERTAKE TO WORK TO SATISFACTORY STANDARDS. DISCONNECTION OF GAS AND ELECTRIC APPLIANCES SHOULD ALWAYS BE CARRIED OUT BY A COMPETENT PERSON.

THIS MANUAL IS AN INTEGRAL PART OF THE APPLIANCE AND THEREFORE MUST BE KEPT IN ITS ENTIRETY AND IN AN ACCESSIBLE PLACE FOR THE WHOLE WORKING LIFE OF THE COOKING HOB. WE ADVISE READING THIS MANUAL AND ALL THE INSTRUCTIONS THEREIN BEFORE USING THE COOKING HOB. INSTALLATION MUST BE CARRIED OUT BY QUALIFIED PERSONNEL IN ACCORDANCE WITH THE REGULATIONS IN FORCE. THIS APPLIANCE IS INTENDED FOR DOMESTIC USES AND CONFORMS TO CURRENT REGULATIONS IN FORCE. THE APPLIANCE HAS BEEN BUILT TO CARRY OUT THE FOLLOWING FUNCTIONS: COOKING AND HEATING-UP OF FOOD. ALL OTHER USES ARE CONSIDERED IMPROPER.
THE MANUFACTURER DECLINES ALL RESPONSIBILITY FOR IMPROPER USE. NEVER USE THIS APPLIANCE FOR HEATING ROOMS.

DO NOT LEAVE THE PACKING IN THE HOME ENVIRONMENT. SEPARATE THE VARIOUS WASTE MATERIALS AND TAKE THEM TO THE NEAREST SPECIAL GARBAGE COLLECTION CENTRE.

THIS APPLIANCE IS MARKED ACCORDING TO THE EUROPEAN DIRECTIVE 2002/96/EC ON WASTE ELECTRICAL AND ELECTRONIC EQUIPMENT (WEEE). THIS GUIDELINE IS THE FRAME OF A EUROPEAN-WIDE VALIDITY OF RETURN AND RECYCLING ON WASTE ELECTRICAL AND ELECTRONIC EQUIPMENT.

THE IDENTIFICATION PLATE, WITH TECHNICAL DATA, SERIAL NUMBER AND MARKING IS CLEARLY VISIBLE UNDER THE CASING.

THE PLATE ON THE CASING MUST NOT BE REMOVED.

TAKE CARE NOT TO SPILL SUGAR OR SWEET MIXTURES ON TO THE COOKING HOB WHEN HOT. NEVER PLACE MATERIALS OR SUBSTANCES WHICH MAY MELT (PLASTIC OR ALUMINIUM FOIL) ON TO THE COOKING HOB. IN THE EVENT, PROMPTLY SWITCH OFF AND REMOVE THE MOLTEN MATERIAL WITH THE SCRAPER PROVIDED WHILE THE TOP IS STILL WARM TO PREVENT IT FROM BEING DAMAGED. FAILURE TO INSTANTLY CLEAN THE GLAZED CERAMIC HOB COULD LEAD TO ENCRUSTATIONS WHICH ARE IMPOSSIBLE TO REMOVE ONCE THE HOB HAS COOLED DOWN.
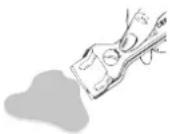

THE MANUFACTURER DECLINES ALL RESPONSIBILITY FOR DAMAGE TO PERSONS OR THINGS CAUSED BY NON-OBSERVANCE OF THE ABOVE PRESCRIPTIONS OR BY INTERFERENCE WITH ANY PART OF THE APPLIANCE OR BY THE USE OF NON-ORIGINAL SPARES.
2. SAFETY INSTRUCTION




INSTRUCTIONS FOR THE INSTALLER: THESE ARE INTENDED FOR THE QUALIFIED TECHNICIAN WHO MUST INSTALL THE APPLIANCE, SET IT FUNCTIONING AND CARRY OUT AN INSPECTION TEST.
IT IS OBLIGATORY FOR THE ELECTRICAL SYSTEM TO BE GROUNDED ACCORDING TO THE METHODS REQUIRED BY SAFETY RULES.
WHEN LINKING UP TO MAINS BY PLUG AND SOCKET, MAKE SURE THAT BOTH ARE COMPATIBLE AND CONNECT BY MEANS OF A POWER CABLE COMPLYING WITH APPLICABLE REGULATIONS.
THE SOCKET MUST BE ACCESSIBLE AFTER THE APPLIANCE HAS BEEN BUILT IN. NEVER UNPLUG BY PULLING ON THE CABLE.
ALWAYS CHECK THAT THE CONTROLS ARE IN THE POSITION 0 (OFF) WHEN YOU FINISH USING THE HOB.
DURING USE THE APPLIANCE BECOMES VERY HOT. TAKE CARE NOT TO TOUCH THE SURFACE OF THE HOB.
THE APPLIANCE IS NOT INTENDED FOR USE BY YOUNG CHILDREN OR INFIRM PERSONS WITHOUT SUPERVISION.
YOUNG CHILDREN SHOULD BE SUPERVISED TO ENSURE THAT THEY DO NOT PLAY WITH THE APPLIANCE.
WARNING: IF THE SURFACE IS CRACKED, SWITCH OFF THE APPLIANCE TO AVOID THE POSSIBILITY OF AN ELECTRIC SHOCK.
THE APPLIANCE BECOMES VERY HOT DURING USE. SUITABLE HEAT-PROOF GLOVES SHOULD BE WORN FOR ALL OPERATIONS.
BEFORE THE APPLIANCE IS PUT INTO OPERATION, ALL THE LABELS AND PROTECTIVE FILMS APPLIED INSIDE OR OUTSIDE MUST BE REMOVED.
THE POWER LEAD MUST BE CHANGED BY THE MANUFACTURER OR BY AN AUTHORISED SERVICE CENTRE TO PREVENT ANY RISKS.
IMMEDIATELY AFTER INSTALLATION CARRY OUT A BRIEF INSPECTION TEST OF THE APPLIANCE, FOLLOWING THE INSTRUCTIONS BELOW. SHOULD THE APPLIANCE NOT FUNCTION, DISCONNECT IT FROM THE SUPPLY AND CALL THE NEAREST TECHNICAL ASSISTANCE CENTRE.
NEVER ATTEMPT TO REPAIR THE APPLIANCE. ALL REPAIRS MUST BE CARRIED OUT BY AN AUTHORISED ENGINEER OR AT AN AUTHORISED SERVICE CENTRE.

Important.
Beware of children in the vicinity as the signal lamps indicating residual heat are out of sight to them. In fact, even after having been turned off, the cooking hob remains hot for a certain period of time.
Make sure that children never touch the cooking hob.

3. KNOW YOUR HOB


Ceramic surface of the appliance
Single plate
Oval dual plate
Circular dual plate
Timer Display
Cooking zones
Control panel
Plate power display
NOT ALL COMPONENTS DESCRIBED ARE PRESENT ON ALL MODELS
4. BEFORE FIRST USE

Do not leave the packing in the home environment. Separate the various waste materials and take them to the nearest special garbage collection centre.
Before cooking for the first time, the hob has to be cleaned. After this, switch on the cooking zones one after the other, without pans, for three minutes at the highest cooking setting. This gets rid of the "factory smell" and evaporates any moisture which may have collected in the heating elements. This is necessary to ensure that the electronic circuits operate correctly.
Remove all the removable label and any protective foils.
To switch on the hob, follow the instructions provided in point "7".
5. COOKING ZONES

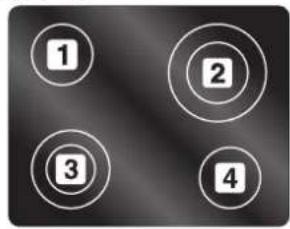
1 REAR LEFT-HAND SINGLE PLATE
2 REAR RIGHT-HAND DUAL PLATE
3 FRONT LEFT-HAND DUAL PLATE
4 FRONT RIGHT-HAND SINGLE PLATE
5 REAR RIGHT-HAND OVAL PLATE
6 CENTRAL OVAL PLATE
7 FRONT LEFT-HAND SINGLE PLATE


The appliance features 4/5 cooking zones of different diameter and power. Their position is clearly indicated by circles and the heat given off is defined by the markings on the glass surface. The 5 cooking zones are of the HIGH-LIGHT type and come on after a few seconds of being activated. Heating intensity can be adjusted by means of the knobs located on the front panel from a minimum setting of 1 to a maximum setting of 6/9 (depending on models).
The cooking zones marked by two concentric circles (◎) and by a circle + fish-kettle (♂) feature double heating either within the inner circle or both circles.
6. DESCRIPTION OF CONTROL ON THE FRONT CONTROL PANEL

FRONT LEFT-HAND PLATE CONTROL ZONE
3 REAR RIGHT-HAND PLATE CONTROL ZONE 5 TIMER ZONE
2 REAR LEFT-HAND PLATE CONTROL ZONE 4 FRONT RIGHT-HAND PLATE CONTROL ZONE 6 CENTRAL PLATE CONTROL ZONE
7. USE OF THE COOKING HOB
7.1 Hobs with knobs
7.1.1 Single plates
Each knob shows the plate it is for.
To heat, turn the knob to the desired position (1 to 6). Adjustment is continuous so that the appliance also operates at any intermediate value.

7.1.2 Dual plates
Each knob shows the plate it is for.
To heat the inner cooking zone, turn the knob to the desired position (1 to 6). To heat both the inner and outer cooking zones, turn the knob to Ⓞ and then release. The knob will thus return to 9. To adjust heating intensity, rotate the knob anticlockwise to the desired position. To return to heating of the inner cooking zone only, set the knob back to 0 and then turn to the desired position (1 to 6).

7.1.3 Description of symbols

REAR LEFT
FRONT LEFT

REAR RIGHT
FRONT RIGHT
7.1.4 Residual heat
The 4 signal lamps located between the cooking zones come on when the temperature of one or more of the heating zones exceeds 60°C.
The lamps go off upon temperature dropping to below approximately 60°C.

7.1.5 Switching off
To turn off, return the knob to 0.
7.2 Hobs with push-buttons

On first connection to the electrical mains, an operating check will be carried out automatically and all the indicator lights will come on for a few seconds.
7.2.1 Single plates
When not in use, all hob components will be switched off. If the ▲ symbol of any push-button is pressed for a few seconds, the hob will switch on and the circular sectors on the buttons indicating the plate controlled by each button will illuminate.
The power level must be set within 30 seconds after the sectors light up; otherwise the hob will switch off automatically.
To set the power level use the ▲ or ▼ push-buttons as follows:

- press the ▲ (0 appears on the display: meaning that the plate has been switched on);
- press the ▲ (9 appears on the display: meaning that the plate is on at full power);
- At this point;
a. Pressing the ▼ symbol repeatedly regulates the plate's power setting from the full power level (9) towards the lowest setting (1); b. Pressing the ▲ symbol repeatedly regulates the plate's power setting from the lowest power level (1) to the highest setting (9);
- To switch off the plate, return the display reading to 0 by pressing the ▼ or ▲ symbol repeatedly.

A "BEEP" of confirmation is heard whenever the ▲ or ▼ symbols are pressed.
7.2.2 Dual plates
Operation of plates with dual heating is different from that of those with single heating. When they are switched on, two indicator lights illuminate beside the number showing the power level, as shown in the diagram.
When not in use, all hob components will be switched off. If the ▲ symbol of any push-button is pressed for a few seconds, the hob will switch on and the circular sectors on the buttons indicating the plate controlled by each button will illuminate.
The power level must be set within 30 seconds after the sectors light up; otherwise the hob will switch off automatically.
To set the power level use the ▲ or ▼ push-buttons as follows:

- Press the ▲ symbol (0 appears on the display, meaning that the plate is on at full power);
- Press the ▲ symbol again (9 appears on the display, meaning that the small plate is on at full power);
- There are now two options available:
a.
- Press the ▲ symbol once (two markers illuminate beside the 9);
- Press the symbol to set the power of the dual plate.
or
b. - after proceeding as described in point 2, press the symbol repeatedly to set the power of the small plate;
- To switch off the plate, return the display reading to 0 by pressing the symbol repeatedly.

7.2.3 Plate lock-out
20 seconds after the last power adjustment, the plate switches to "lock-out" status and no more adjustments to the power levels set will be possible. This function, indicated by a dot which appears alongside the power level (see side), is provided to ensure greater safety in use of the hob.
The "lock-out" can be eliminated by keeping the ▲ or ▼ symbol of any push-button pressed for 2-3 seconds.
7.2.4 Plate layout

REAR LEFT

FRONT LEFT

REAR RIGHT

FRONT RIGHT

MIDDLE

7.2.5 Timer (on some models only)
Some models are equipped with a cooking timer.
To activate the timer, proceed as follows: with the plates on or off;
- keep the symbol pressed for a few seconds (the two displays in the middle of the screen-printing will switch on, showing a flashing figure 30) (if the plate is on, the power display value will drop by one point, but it will return to the previous value at once);
- press the ▲ or ▼ symbols to increase or reduce the cooking time and set it on the number of minutes required (the number of minutes flashes);
- seconds after the last key is pressed, the minutes display will stop flashing and the figure 0 on the power display will start to flash.
- The power level must be set within another 5 seconds as described in points 7.2.1 / 7.2.2; otherwise the hob will switch off automatically. If the power is not adjusted within 5 seconds, the timer will still start the count.
- Timed cooking will start 5 seconds after the last power adjustment.
At the end of the time set, 3 BEEPS will sound in sequence; they are repeated 5 times at 5 second intervals.
To stop the beeps in manual mode, simply press the ▲ or ▼ symbol of any push-button.
7.2.6 Modifying the data set
During timed cooking, each single press on the ▲ or ▼ symbols increases or reduces the power of the plate. 5 seconds after the last button is pressed, a BEEP will sound and the display showing the time left will start flashing. The ▲ or ▼ symbols can now be pressed to increase or decrease the cooking time.
A few seconds after the last cooking time adjustment, the minutes display will also stop flashing and the count will restart with the new settings.
7.2.7 Residual heat
Each plate is equipped with a residual heat warning device.
After any plate is switched off, a flashing "H" may appear on the display.
This warns that the cooking zone concerned is still very hot.
Cooking can be restarted while the H is flashing; proceed as described in points "7.2.1 / 7.2.2".
7.2.8 Control circuit board thermal protection
If the plates overheat the internal electronics board, the heat will be switched off automatically. This switches off power to the front plates, and the letters H and E alternate on the power LEDs.
If the electronics board does not cool down, power to all the plates is switched off, and the power LEDs display the text Ⓗ️. Cooking can be resumed once the temperature has dropped below the safety threshold.
7.2.9 Operator Error

If the user makes a mistake when using the push-buttons, an E appears on the power display; it will remain there as long as the user continues to press the button being used incorrectly.
7.2.10 Switching off
The hob switches off when all the displays read 0.
About 30 seconds after the last plate is set on 0, the hob will switch off automatically.
If the plates are hot, 5 seconds after the switch-off the "H" appears, warning of residual heat.
7.2.11 "DEMO" mode

Some models have a DEMO function (not normally enabled) which deactivates the plates. If, however, you are experiencing problems, the following keystroke sequence, to be executed within 60 seconds of switching on the hob, will deactivate DEMO mode.
Press the leftmost key ▲ one time, then the third key from the left ▲ two times, and finally the second key from the left ▼ three times.

7.3 Cooking tips
The table below shows the power values which can be set, with the relative type of food alongside. Setting may vary depending on the amount of food and personal taste.
| KNOB NUMBER ON TYPE OF FOOD SETTING THE DISPLAY | ||
| 1 1 To melt butter, chocolate, and the like. | ||
| 2 2-3 | To heat food, keep small amounts of water on the boil, and whip up sauces with egg yolk or butter. | |
| 3 | 4-5 | To heat solid or liquid food, keep small amounts of water on the boil, thaw deep-frozen food, cook omelettes of 2 or 3 eggs, fruit and vegetables, and the like. |
| 4 6 | To stew meat, fish and vegetables, simmer food, make jams, and so on. | |
| 5 7-8 | To roast meat, fish, steaks, and liver; to sauté meat, fish, eggs and so on. | |
| 6 9 To deep-fry potatoes, etc and to quick-boil water. | ||
For best results and energy saving, only use receptacles suitable for electric cooking:
- The bottom of the receptacles must be very thick and perfectly flat; before placing on the cooking hob, make sure that it, as well as the cooking hob itself, are perfectly clean and dry.
- To avoid scratching of the cooking hob, never use cast-iron receptacles or receptacles with a rough bottom.
- To avoid waste of energy, make sure that the diameter of the receptacle bottom is the same as that of the circle marked on the cooking hob.

8. CLEANING AND MAINTENANCE
Before any intervention, disconnect the power supply of the device.

8.1 Cleaning the glazed ceramic hob

The cooking hob should be regularly cleaned; best after every use, once the residual heat signal lamps have gone off.
Smudges from aluminium-bottom pans can be easily cleaned off with a cloth dampened in vinegar.

Remove any burnt residues after cooking with the scraper provided; rinse with water and wipe dry with a clean cloth. Regular use of the scraper considerably reduces the need for chemical detergents for the daily cleaning of the hob.
Never use abrasive or corrosive detergents (e.g. cleaning powders, oven sprays, spot-removers, wire sponges).
8.2 Cleaning stainless steel
8.2.1 Ordinary Daily Cleaning
To clean and preserve the stainless steel surfaces, always use only specific products that do not contain abrasives or chlorine-based acids.
How to use: pour the product on a damp cloth and wipe the surface, rinse thoroughly and dry with a soft cloth or deerskin.
Do not use metallic sponges or sharp scrapers: they will damage the surface.
Use normal non-abrasive products for steel, and a wooden or plastic tool if necessary.
Rinse thoroughly and dry with a soft cloth or deerskin.
Do not allow residues of sugary foods (such as jam) to set inside the oven. If left to set for too long, they might damage the enamel lining of the oven.
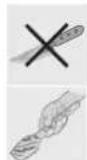

NEVER USE A STEAM JET TO CLEAN THE APPLIANCE.
9. SOMETHING WRONG?
PROBLEM POSSIBLE CAUSES WHAT TO DO?
| The hob doesn’t work | - The hob is not wired in or switch on at the wall.- There is a power failure | - Switch on at the wall- Check power supply |
| The results of cooking are unsatisfactory | - Temperature is too high or too low- Wrong shelf position- Wrong type of dish- Cooking time is incorrect | - Consult cooking tips |
| The hob smokes | - The hob is dirty is finished. Let it cool first.- Food has spilled over | - Clean the hob once cooking- Use a larger pan |
| The plates do not come on during timed cooking | - Timed cooking programming error. | - Check the instruction for timer |
| The front panel will light up but the plates will not switch on | - DEMO mode is now activated | - Refer to paragraph “7.2.11 “DEMO” mode” for how to deactivate DEMO mode |
10. INSTALLATION
10.1 Technical information
Hob type: See rating plate
Electrical connections: 220-240V~ 50/60Hz / 380-415V 2N~ 50/60Hz / 380-415V 3N~ 50/60Hz
Connections: 220-240V ~ 50/60Hz / 380-415V 2N ~ 50/60Hz / 380-415V 3N ~ 50/60Hz
Maximum electrical power: See rating plate
DIMENSION OF THE HOB
10.2 The rating plate
| Width | (mm) | 720 | 588 |
| Depth | (mm) | 510 | 510 |

Make sure that the voltage and capacity of the power line conform to the data shown on the plate located under the casing. Do not remove this plate for any reason.
Make sure that the voltage and capacity of the power line conform to the data shown on the plate located under the casing. Do not remove this plate for any reason.

IT IS OBLIGATORY FOR THE ELECTRICAL SYSTEM TO BE GROUNDED ACCORDING TO THE METHODS REQUIRED BY SAFETY RULES.
IT IS OBLIGATORY FOR THE ELECTRICAL SYSTEM TO BE GROUNDED ACCORDING TO THE METHODS REQUIRED BY SAFETY RULES.


WHEN LINKING UP TO MAINS BY PLUG AND SOCKET, MAKE SURE THAT BOTH ARE COMPATIBLE AND CONNECT BY MEANS OF A POWER CABLE COMPLYING WITH APPLICABLE REGULATIONS.
THE SOCKET MUST BE ACCESSIBLE AFTER THE APPLIANCE HAS BEEN BUILT IN.
IMMEDIATELY AFTER INSTALLATION, CARRY OUT A BRIEF INSPECTION TEST OF THE HOB, FOLLOWING THE INSTRUCTIONS. IF THE HOB FAILS TO OPERATE, AFTER CHECKING THAT YOU HAVE CARRIED OUT THE INSTRUCTIONS CORRECTLY, DISCONNECT THE APPLIANCE FROM THE ELECTRICAL MAINS AND CONTACT YOUR NEAREST SERVICE CENTRE.
NEVER ATTEMPT TO REPAIR THE APPLIANCE.
IF A PLUG AND SOCKET CONNECTION IS BEING USED MAKE SURE THAT THE PLUG AND SOCKET ARE COMPATIBLE. AVOID USE OF ADAPTERS AND SHUNTS AS THESE COULD CAUSE OVERHEATING AND RISK OF BURNS.
IF A FIXED CONNECTION IS BEING USED FIT POWER LINE WITH AN OMNIPOLAR CIRCUIT BREAKER WITH A CONTACT OPENING GAP EQUAL TO OR GREATER THAN 3 MM IN AN EASILY ACCESSIBLE POSITION IN PROXIMITY TO THE OVEN.

For operation on 380-415 V 3N~: use a H05RRF / H05RN-F type five-core cable (5 x 1.5 mm²).
This type of connection cannot be used for models with 5 plates.
For operation on 380-415 V 2N~: use a H05RR-F / H05RN-F type four-core cable (4 x 2.5 mm²).
For operation on 220-240 V 3~: use a H05RR-F / H05RN-F type four-core cable (4 x 2.5 mm²).
For operation on 220-240 V~: use a H05RR-F / H05RN-F type three-core cable.
(3 x 2.5 mm²: cooking hob with 4 plates)
(3 x 4 mm²: cooking hob with 5 plates)
The cable end to be connected to the appliance must be provided with an earth wire (yellow-green) at least 20 mm longer.

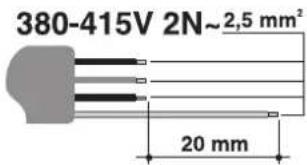

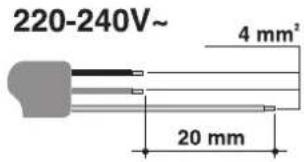

Read the connection layout plate underneath the appliance with care.

If the appliance you have purchased is not fitted with a mains power lead a power lead resistant to a temperature of at least 90°C must be used.
Otherwise, the electrical safety of the appliance may be put at risk.

The manufacturer declines all responsibility for damage to persons or things caused by non-observance of the above prescriptions or by interference with any part of the appliance.

Warning: pass the power cable through hole "A" and fit the cable clamp plate after making the electrical connection.
To fit the plate, simply use the provided bolts to secure it under the casing as shown in the figure.

Warning: close the cable clamp after making the electrical connection. Close the terminal board cover by twisting it down.
TYPE 1 TERMINAL BOARD
TYPE 2 TERMINAL BOARD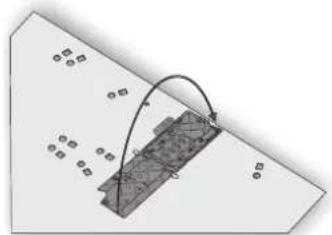
10.4 Positioning of the hob

The following operation requires building and/or carpentry work so must be carried out by a competent tradesman.
Installation can be carried out on various materials such as masonry, metal, solid wood or plastic laminated wood as long as they are heat resistant (T 90°C).
Create an opening with the dimensions shown in the figure in the top surface of the counter, keeping a minimum distance of 50 mm from the rear border.
This appliance can be mounted against walls higher than the work surface on condition that a certain distance "X" be kept between the appliance and the wall as shown in the figure so as to avoid damage from overheating.
Make sure there is a minimum of 750 mm between the hob and any shelf that may be installed directly above them.


The only model requiring a hole of 685 mm in the top of the supporting unit is the model with 5 cooking zones and central fish plate.

Hole in top of supporting unit 560 mm Accurately position the gasket provided all around the outer edge of the hole in the top surface as shown in the figures below, pressing it down so as to make it adhere properly. For measurements, refer to the figure depending on the hob model to be installed, bearing in mind that in both models the front and rear sides must skim the hole. Secure the hob to the counter with brackets A (supplied). Carefully trim any excess from border B of the gasket. The distances in the following drawing refer to the hole on the inner side of the gasket.


Hole in accurately position the gasket provided all top of around the outer edge of the hole in the top supporting unit surface as shown in the figures below, pressing it down so as to make it adhere properly. Refer to the dimensions shown in the diagram, bearing in mind that the sides A must be flush with the hole. Fix the hob to the unit using the brackets B provided.
Carefully trim any excess from border C of the gasket. The distances in the following drawing refer to the hole on the inner side of the gasket.


When fixing the hob to the cabinet, use only the holes provided, illustrated here.



This appliance must not be built-in above a dishwasher.
Installation of an oven without cooling fan underneath the hob is forbidden.

Pass the power supply cable through the back of the unit, taking care that it does not touch the bottom casing of the hob or the oven (if any) installed underneath it.


IMPORTANT: when installing the appliance above a cupboard, a dividing shelf, as shown above, must be installed.
If installed above an under-bench oven, this is not required.
Installation of an oven without cooking fan underneath the hob is forbidden.
- INSTRUCTIONS FOR PROPER USE
- SAFETY INSTRUCTION
- IMPORTANT
- KNOW YOUR HOB
- BEFORE FIRST USE
- COOKING ZONES
- DESCRIPTION OF CONTROL ON THE FRONT CONTROL PANEL
- USE OF THE COOKING HOB
- HOBS WITH KNOBS
- SINGLE PLATES
- DUAL PLATES
- DESCRIPTION OF SYMBOLS
- RESIDUAL HEAT
- SWITCHING OFF
- HOBS WITH PUSH-BUTTONS
- PLATE LOCK-OUT
- PLATE LAYOUT
- TIMER (ON SOME MODELS ONLY)
- MODIFYING THE DATA SET
- CONTROL CIRCUIT BOARD THERMAL PROTECTION
- OPERATOR ERROR
- DEMO" MODE
- COOKING TIPS
- CLEANING AND MAINTENANCE
- CLEANING THE GLAZED CERAMIC HOB
- CLEANING STAINLESS STEEL
- ORDINARY DAILY CLEANING
- SOMETHING WRONG
- INSTALLATION
- TECHNICAL INFORMATION
- MAKE SURE THAT THE VOLTAGE AND CAPACITY OF THE POWER LINE CONFORM TO THE DATA SHOWN ON THE PLATE LOCATED UNDER THE CASING. DO NOT REMOVE THIS PLATE FOR ANY REASON
- IT IS OBLIGATORY FOR THE ELECTRICAL SYSTEM TO BE GROUNDED ACCORDING TO THE METHODS REQUIRED BY SAFETY RULES
- NEVER ATTEMPT TO REPAIR THE APPLIANCE
- POSITIONING OF THE HOB
Brand : SMEG
Model : P752
Category : Cooker