
197 - Electric coffee maker KRUPS - Free user manual and instructions
Find the device manual for free 197 KRUPS in PDF.
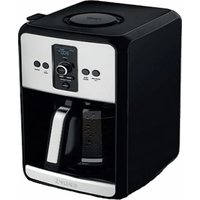
| Product Type | Electric Coffee Maker |
| Brand | KRUPS |
| Model | 197 |
| Capacity | 12 cups (approx. 1.5 L) |
| Power Supply | 120 V, 60 Hz |
| Power | 1000 W (estimated) |
| Brewing Technique | AromaControl with flavor release |
| Carafe | Isothermic (keeps warm up to 5 hours) |
| Drip-stop device | Yes (allows serving during brewing) |
| Automatic shut-off | Yes (at end of brewing) |
| Filter Type | Paper #4 or Gold Tone (reusable) |
| Programmable | No (model 197) |
| Water level indicator | Graduated in cups |
| Materials | Plastic, glass (carafe) |
| Maintenance | Descaling with vinegar every 2 to 4 months |
| Cleaning | Damp sponge, do not immerse the appliance |
| Safety | Polarized plug, hot surfaces, automatic shut-off |
| Spare parts | Isothermic carafe #269, Gold Tone filter #049, paper filter #983 |
| Warranty | 1 year |
| Customer service | USA: (800) 526-5377, Canada: (905) 669-0114 |
Frequently Asked Questions - 197 KRUPS
User questions about 197 KRUPS
0 question about this device. Answer the ones you know or ask your own.
Ask a new question about this device
Download the instructions for your Electric coffee maker in PDF format for free! Find your manual 197 - KRUPS and take your electronic device back in hand. On this page are published all the documents necessary for the use of your device. 197 by KRUPS.
USER MANUAL 197 KRUPS
natural_image
Line drawing of a KRUPS coffee maker with handle and side panel (no text or symbols on the device itself)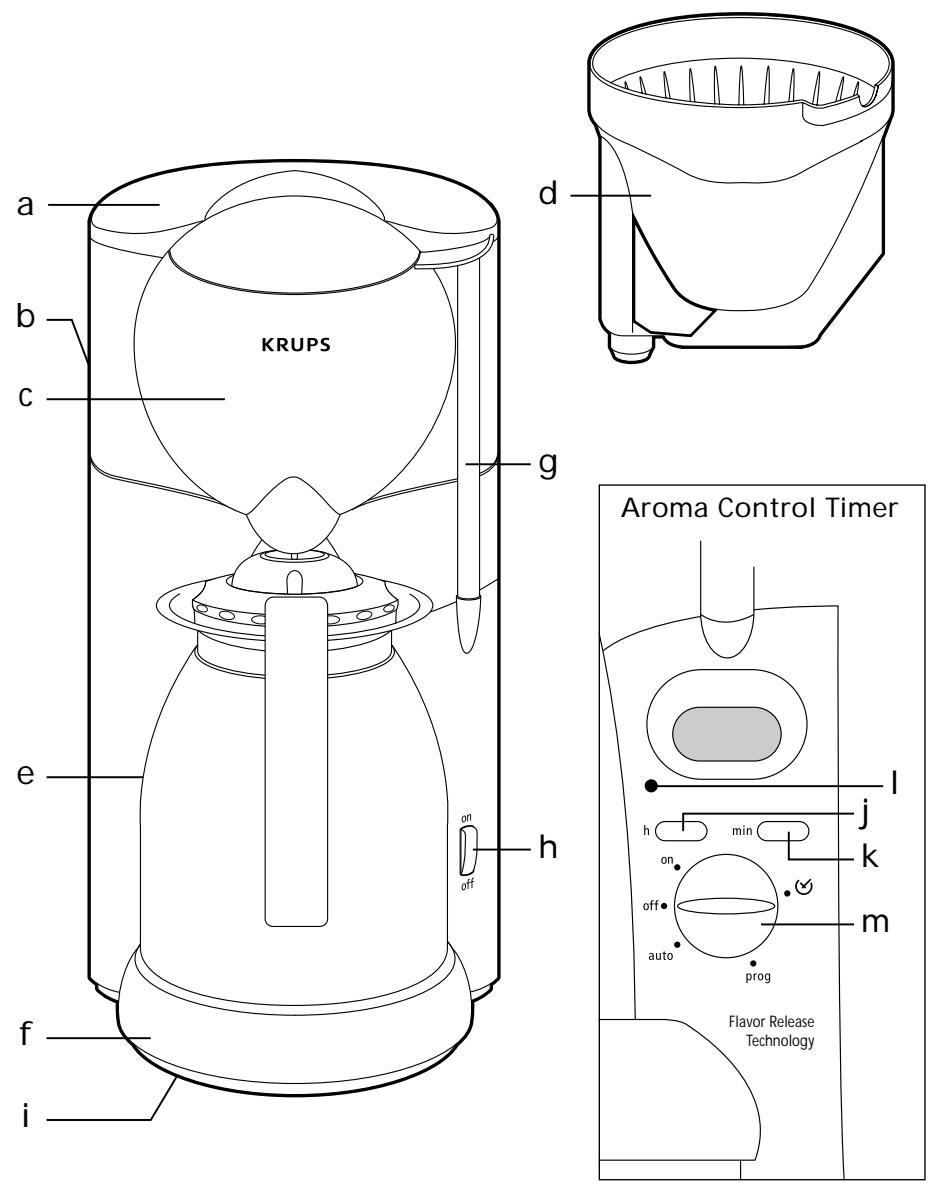

natural_image
Line drawing of a kettle with a rotating knob and handle (no text or symbols)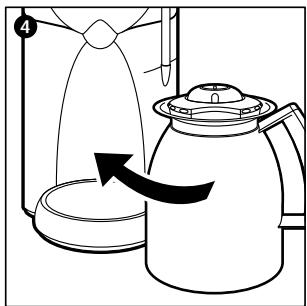
natural_image
Diagram of a kettle with a lid and an arrow indicating rotation (no text or symbols)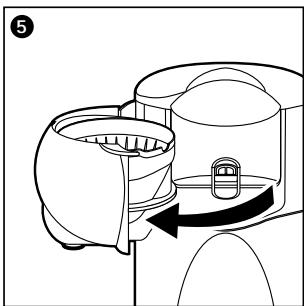
natural_image
Diagram of a kitchen appliance with a rotating handle and fan (no text or symbols)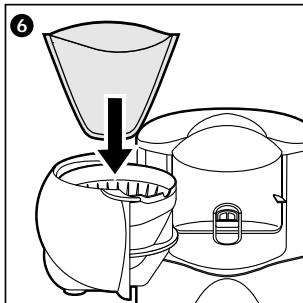
natural_image
Line drawing of a coffee maker with a handle and spout, showing mechanical components (no text or symbols)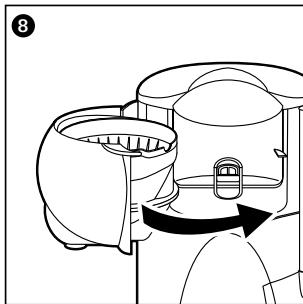
natural_image
Diagram of a kitchen appliance with a curved arrow indicating rotation or movement (no text or symbols)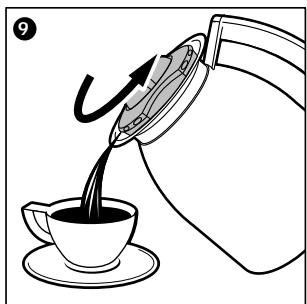
natural_image
Illustration of a teapot pouring liquid into a cup (no text or symbols)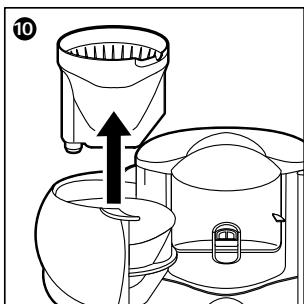
natural_image
Line drawing of a kitchen appliance with a grater and a side table, showing no text or symbols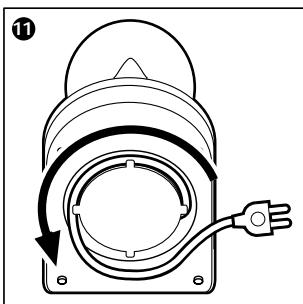
natural_image
Diagram of a mechanical device with a curved arrow indicating rotation or movement, and an electrical plug inserted (no text or symbols present)KRUPS
AromaControl Therm
AromaControl Therm Time
AromaControl Therm Time Steel
Model # 197
Model # 199
Model # 229
USA
6
Instructions for Use
Warranty
Guarantee of Performance
Français
14
Mode d'emploi
Garantie
When using the electrical appliances, basic safety precautions should be always be followed to reduce the risk of fire, electric chock, and/or injury to persons including the following :
- Read all instructions.
- Do not touch hot surfaces. Use handler or knobs.
- To protect against fire, electric shock and injury to persons, do not place cord, plugs or appliance in water or other liquid.
- Close supervision is necessary when any appliance is used by or near children.
- Unplug from outlet when not in use and before cleaning. Allow to cool before putting on or taking off parts, and before cleaning the appliance.
- Do not operate any appliance with a damaged cord or plug or after the appliance malfunctions, or has been damaged in any manner. Return appliance to the nearest KRUPS Service Center for examination, repair or adjustment.
- The use of accessory attachments not recommended by KRUPS may result in fire, electric shock or injury to persons.
- Do not use outdoors.
- Do not let cord hang over edge of table or counter, or touch hot surfaces.
- Do not place on or near a hot gas or electric burner, or in a heated oven.
- To disconnect, turn any control to «off,» then remove plug from wall outlet.
- Do not use the appliance for other than intended use.
- Scalding may occur if the lid is removed during the brewing cycles.
- Do not pour liquids other than water and descaling solutions specified in this manual into the water tank.
To reduce the risk of injury, do not drape cord over the counter top or table top where it can be pulled on by children or tripped over unintentionally.
A. The glass carafe or thermal jug is designed for use with this appliance. It must never be used on a range top.
B. Do not set a hot container on a wet or cold surface.
C. Do not use a cracked container or a container having a loose or weakened handle.
D. Do not clean container with cleansers, steel wool pads, or other abrasive material.
E. Never put an isothermal jug in the microwave oven.
SAVE THESE INSTRUCTIONS
SHORT CORD INSTRUCTIONS
A. A short power supply cord is to be provided to reduce risks resulting from becoming entangled in or tripping over a longer cord.
B. Extension cords are available and may be used if care is exercised in their use.
C. If an extension cord is used,
1) the marked electrical rating of the extension cord should be at least as great as the electrical rating of the appliance,
2) the longer cord should be arranged so that it will not drape over the counter top or table top where it can be pulled on by children or tripped over.
D. This appliance has a polarized plug (one blade is wider than other). To reduce risks of electric shock, this plug is intended to fit into a polarized outlet only one way. If the plug does not fit fully into the outlet, reverse the plug. If it still does not fit, contact a qualified electrician. Do not attempt to modify the plug in any way.
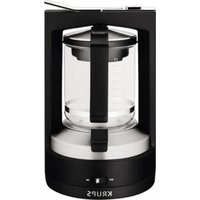
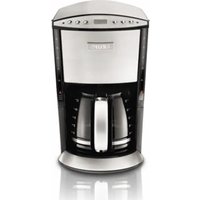
Description
a Lid
b Water Tank
c Pivoting filter holder
d Flavor Release Technology holder
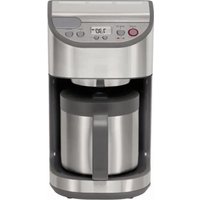
e Thermal coffee carafe with lid
f Thermal carafe base
g Water level indicator
h On/Off indicator switch (#197)
i Cord storage
Timer Models (#199 & #229)
j Hour setting control
k Minute setting control
I On/Off Indicator light
m Rotating selector switch
The benefits of the Aroma-Control Therm coffee maker
Exclusive Flavor Release Technology
- Releases the full aroma of the coffee through a new brewing innovation:
At the beginning of the brewing cycle, the 'Flavor Release' mechanism remains closed so as to keep the hot water in contact with the ground coffee for a longer period of time and thus obtain the maximum flavor from your coffee.
After about 1 - 2 minutes of brewing, the coffee is released and flows into the coffee carafe.
The KRUPS exclusive Flavor Release
Technology thus guarantees you optimal contact between water and ground coffee and the ideal time for brewing, particularly for small quantities.
Thanks to the KRUPS exclusive technology, your coffee will have a fuller, richer aroma and a delicious taste.
- Lid for thermal coffee carafe
When the thermal coffee carafe is inserted in the coffee maker, the middle of the lid retracts to let the coffee filter through while the lid remains tightly screwed on the carafe to retain heat.
When the brewing process is complete, the specially designed sealing system keeps coffee fresh and warm for up to five hours. To pour your freshly brewed coffee, the lid only needs to be turned a half of a revolution counterclockwise, not removed.
'Stop 'n Serve' Feature
Lets you pour a cup or two while brewing. The automatic filter seal will allow you to remove the carafe for 20 seconds without dripping coffee onto the thermal carafe base.
Note: KRUPS AromaControl will shut off automatically after the brewing is complete for added safety.
Before first use
Setting the time (models 199 & 229)
- Plug in the KRUPS “AromaControl Therm Time”. Make sure the rotating selector (m) switch is in the “off” position.
The LCD display will be flashing intermittently. This is your signal to set the digital clock.
- Turn the selector switch to position ⏻ (m). Set the hours and minutes by pressing the "h" and "min" buttons respectively.
The time is now set.
Running with water only
- Before first use, cycle the appliance once or twice with water (without coffee) to help remove any factory sediment.
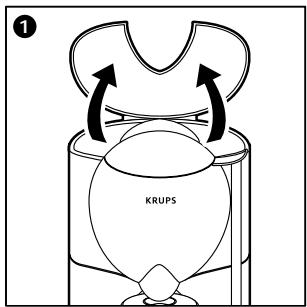
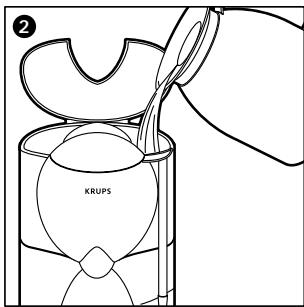
- Open the lid (1).
- Fill the water tank with cold water (2).
The water level indicator (g) of the water tank is measured in cups of water.
- Close the lid.
- Turn the machine 'on' to begin (position (h) for #197, position (m) for #199 & #229). The indicator light will illuminate.
Please note: Your AromaControl coffee maker is fitted with a Flavor Release filter holder (exclusive to KRUPS).
Remember: After about 1 - 2 minutes of brewing, the filter holder allows the water to flow into the coffee carafe. This steeping period allows for maximum flavor extraction from your coffee.
Preparing Coffee
Filling the water chamber
- Open the hinged lid (1). Using the thermal carafe, pour in the desired quantity of cold water (2). The water level indicator (g) shows how much water you are filling into the container.
The amount of freshly brewed coffee delivered after the brewing process will always be slightly less than the amount put into the water container. This is due to the minimum absorption of the water by the ground coffee. Therefore, it is recommended that you add a little extra water at the beginning so that you will have the number of cups you desire.
- Close the thermal coffee carafe lid by twisting it tightly to the right (3).
- Replace the thermal carafe on the thermal carafe base with the lid (4).
Putting in the ground coffee
- Swing out the filter holder container (5).
- Insert a no. 4 filter paper (1X4) or Gold Tone Filter in the filter holder. We recommend that you fold over the edges of the filter paper (6) to make it easier to insert.
You can purchase KRUPS size 4 paper filters (#983) or KRUPS AromaControl Gold Tone Filter (#049) at your local KRUPS retailer or by calling the KRUPS Consumer Service Department at 1-800-526-5377, 24 hours a day, 7 days a week (US customers only).
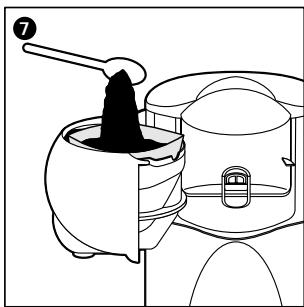
- Pour your ground coffee into the filter paper (7).
We suggest using one level KRUPS measuring scoop of ground coffee for each cup of robust coffee. After using your KRUPS coffee maker several times, you can adjust the measure to suit your own taste.
- Close the filter holder container, check that
it is correctly engaged (8) and make sure the carafe with its cover closed tightly is on the thermal carafe base (4).
- Turn the machine 'on' to begin (position (h) for #197, position (m) for #199 & #229). The indicator light will illuminate and your coffee will begin brewing.
- To serve, remove carafe and twist lid counterclockwise half of a revolution and begin to pour (9).
The “Stop ’n Serve” feature is KRUPS answer to the impatient coffee drinker’s clamor for “a quick cup of coffee!” This device automatically stops the flow of brewed coffee through the filter cone if the thermal carafe is removed from the thermal carafe base during the brewing cycle. You have about 20 seconds between the removal of the carafe and its being reinserted to pour one or two cups of coffee. The “Stop’n Serve” device closes off the filter cone so effectively that there is virtually no coffee-drip onto the thermal carafe base. Once the carafe is replaced, the brewing cycle and the flow of coffee into the carafe are resumed.
!
If coffee does drip onto the thermal carafe base after removal of the carafe, it is usually an indication that too much ground coffee has been placed into the paper filter. This causes the water that jets into the filter cone to overflow between the paper filter and the sides of the filter cone. The overflow carries coffee grounds that interfere with the snapshot action of the filter holder, thus allowing brewed coffee to continue to drip through.
If this blockage and subsequent dripping do occur, replace the carafe immediately and allow the full brewing cycle to run its course. Do not remove the filter until the brewing cycle is completed.
Preparing "wake-up" coffee (model #199 and #229)
This feature enables you to enjoy freshly brewed coffee at any pre-selected time within a 24-hour period.
- First set the digital clock (see "Setting the time").
- Turn the selector switch (m) to the "Prog" Setting. The insert coffee cup symbol will flash intermittently in the display area. Set the hour and minutes in which you would like the brewing process to commence by pressing the "h" and "min" buttons respectively. "Wake-Up" time is now set.
- Fill the water chamber to the desired number of cups. Place the carafe back on its base. Put in ground coffee. Turn the selector switch (m) to the "Auto" setting. The insert coffee cup symbol will remain constant in display, indicating that the coffee maker has been programmed.
At the pre-programmed time, the indicator light will illuminate, indicating that the brewing process has begun.
Note : If the selector switch is left in the "auto" position, the coffee maker will turn itself on everyday at the pre-programmed time. If you do not wish for this to occur, turn the coffee maker to the "off" position after each use.
Maintenance
Decalcifying
When to decaclicfy:
- Minerals found in water can clog the coffee maker or reduce its speed. You will know when such a cleaning is necessary by an obvious slowdown in the brewing time. This extended time indicates that there is a calcium deposit in your coffee maker.
- You will generally only need to descale every two to four months depending on the hardness level of your water.
To decalcify:
- Fill the carafe one quarter full of vinegar, then add cold tap water to the top. Pour the water/vinegar mixture into the reservoir opening (2).
-
Place the empty carafe on the thermal carafe base and turn on the machine. After the water/vinegar mixture has been cycled through, turn off the machine.
-
Rinse by cycling two or three more carafes of plain cold tap water.
- Do not pour any liquid other than cold tap water with vinegar into water chamber when cleaning.
Attention: Do not leave solution within reach of children.
Cleaning
• Always unplug the coffee maker before cleaning.
- Your coffee maker and thermal coffee carafe must only be cleaned with a damp cloth or sponge.
- Carefully place some mild liquid soap and warm water in the carafe and gently shake. Stains can be removed with a soft brush.
- Never clean the thermal coffee carafe with hard objects: scratches on the glass could break the carafe.
- Remove the filter holder (10) and clean the filter holder and carafe lid in a solution of hot water and mild liquid soap. These parts can also be placed in the upper level of your dishwasher for safe effective cleaning.
- Never use scouring agents.
- Never immerse the appliance itself in water or any other liquid. To clean, simply wipe with a soft, damp cloth.
- Never use a cloth to clean the inside of the water chamber, as this might leave remnants or deposits in the chamber. Simply rinse with cold water, periodically.
Accessories
. Thermal carafe and lid: model # 269
. Stainless Steel Thermal carafe and lid : model # 326
. Gold ToneFilter: model # 049
. Paper Filter : model # 983
You can purchase KRUPS accessories at your local KRUPS retailer or by calling KRUPS Consumer Service Department at 1-800-526-5377, 24 hours a day, 7 days a week (US customers only).
Hidden cord storage
- The power cord can be tailored to the length required by utilizing the hidden cord storage located behind the coffee maker (11).
For best results...
......always use fresh, cold water (warm water might be stale and have mineral deposits which would impair the flavor of the coffee).
......we recommend that you grind your own beans. Freshly ground beans deliver more aroma and flavor. Use one KRUPS measuring scoop of beans per cup.
.....serve coffee immediately after brewing.
......never reheat coffee.
Disposal
- The packaging comprises exclusively environmentally-friendly materials which should be disposed of according to the local recycling arrangements.
- Disposal methods for the appliance itself can be found by inquiry at the appropriate department of the local authority.
Limited One Year Warranty
Your KRUPS #197, #199 or #229 is covered by the following warranty:
If from date of purchase within one year this KRUPS product fails to function because of defects in materials or workmanship, KRUPS will, at its option, repair or replace the unit with our charge, provided the owner has a proof of date of purchase.
This warranty will be void if malfunction was caused by damage to the product by accident, misuse, use on frequency or voltage other than marked on the product and/or described in the instructions, abuse including tampering, damage in transit, or use for commercial purposes. This warranty gives you specific legal rights, and you may also have other rights which may vary from state to state.
GUARANTEE OF PERFORMANCE
This fine KRUPS product is manufactured according to a rigid code of quality standards, and, with minimum care, should give years of service. However, should the need arise for repairs or for replacement parts within or after the warranty period, please call our CONSUMER SERVICE DEPARTMENT:
USA : (800) 526-5377 24-hours a day, 7 days a week
Canada : (905) 669-0114 Monday-Friday 8:00 a.m - 4:30 p.m
You will be provided with specific instruction on how to get your product repaired.
The department will also be able to answer any general product questions you may have.
Before calling the Consumer Service Department, please have the type number of your KRUPS appliance available.
You must have this information before calling our Consumer Service Department so that we may better answer your questions. The type number can be located by looking at the bottom of your appliance.
This product is Type #197, 199 or 229
Any general correspondence can be addressed to:
USA : KRUPS North America, Inc.
P.O. Box 3900
Peoria, IL 61612
Canada : KRUPS Service
20 Caldari Rd
Concord, Ontario
L4K 4N8
IMPORTANTES MISES EN GARDE
Canada : Service KRUPS 20 Caldari Rd Concord, Ontario L4K 4N8
- KRUPS
- USA
- Français
- SAVE THESE INSTRUCTIONS
- SHORT CORD INSTRUCTIONS
- Description
- Timer Models (#199 & #229)
- The benefits of the Aroma-Control Therm coffee maker
- Exclusive Flavor Release Technology
- 'Stop 'n Serve' Feature
- Before first use
- Setting the time (models 199 & 229)
- Running with water only
- Preparing Coffee
- Filling the water chamber
- Putting in the ground coffee
- !
- Preparing "wake-up" coffee (model #199 and #229)
- Maintenance
- Decalcifying
- Cleaning
- Accessories
- Hidden cord storage
- For best results...
- Disposal
- Limited One Year Warranty
- GUARANTEE OF PERFORMANCE
- IMPORTANTES MISES EN GARDE
Brand : KRUPS
Model : 197
Category : Electric coffee maker