KM4688 - Electric coffee maker KRUPS - Free user manual and instructions
Find the device manual for free KM4688 KRUPS in PDF.

User questions about KM4688 KRUPS
0 question about this device. Answer the ones you know or ask your own.
Ask a new question about this device
Download the instructions for your Electric coffee maker in PDF format for free! Find your manual KM4688 - KRUPS and take your electronic device back in hand. On this page are published all the documents necessary for the use of your device. KM4688 by KRUPS.
USER MANUAL KM4688 KRUPS
natural_image
Illustration of a hand using a rotating device to press or install a component, no text or symbols visible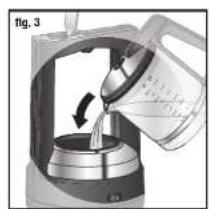
natural_image
Illustration of a kitchen mixer with a hand pouring liquid into a bowl (no text or symbols visible)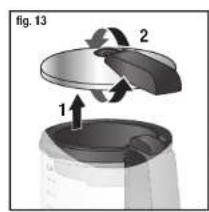
natural_image
Illustration of a hand pouring dark granular material into a container with an arrow indicating flow (no text or symbols)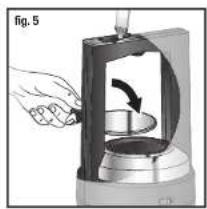
natural_image
Illustration of a hand pouring liquid into a container with a curved arrow indicating flow (no text or symbols)
natural_image
Cross-sectional diagram of a mechanical device with internal components and a marked cross (no text or symbols)
natural_image
Diagram of a mechanical component with an arrow indicating direction, labeled 'fig. 12' (no text or symbols on the diagram itself)DESCRIPTION
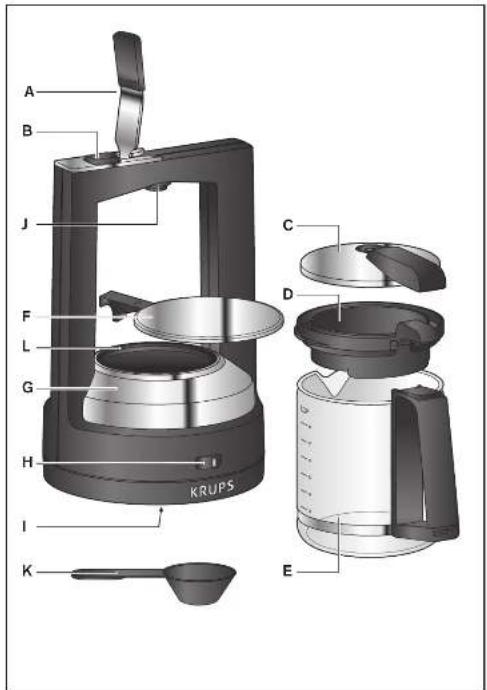
G Water tank
H Power switch
I Cord housing
J Gasket
K Spoon
L Seal of the water tank (Gasket)
BEFORE FIRST USE
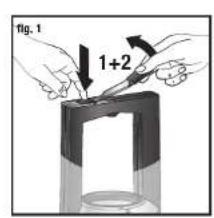
■ To remove the glass carafe (E), press the safety button ⏻ (B), while holding it down, simultaneously lift the locking lever (A). Fig. 1
■ Remove all packaging or other accessories inside as well as outside of the appliance.
■ Run your coffee maker two times without coffee and the equivalent of a carafe of water to rinse it (maximum 1 liter / 33 oz.). Wait for about 5 minutes between the two cycles.
PREPARATION OF COFFEE
■ Remove the glass carafe (E) by pressing the safety button ⏻ (B). While holding it down, simultaneously lift the locking lever (A). Fig. 1
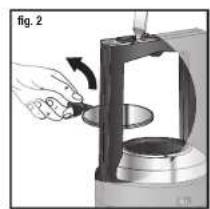
■ Remove the lid (F) of the water tank. Fig. 2
■ Fill the water tank (G) with the required amount of water. Fig. 3
■ Use the glass carafe (E) which is calibrated in order to help you measure the quantity of water required according to the number of cups. Do not put the water tank directly under the tap to fill it.
■ For more convenience, your KRUPS machine comes with a permanent filter (D). Place this permanent filter (D) on the glass carafe (E).
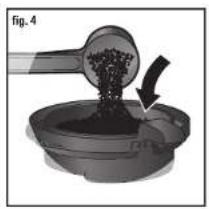
■ Put the necessary quantity of coffee in the permanent filter (D) using the spoon provided (K). Fig. 4
■ For a regular coffee, we recommend 8 spoons of ground coffee for a full carafe. (1 spoon per cup)
■ Spread the ground coffee in the permanent filter (D) and flatten it slightly.
■ Place the lid (F) on the water tank (G) by positioning the handle backwards. Fig. 5
■ The lid of the water tank (F) must be properly fixed, so that the edge of the lid surrounds the ring of rubber.
■ Place the lid (C) on the permanent filter (D) and put this unit back on the glass carafe (E).
■ The handles of the lid (C), of the permanent filter (D) and the glass carafe (E) must be all aligned to lock into place. Fig. 6
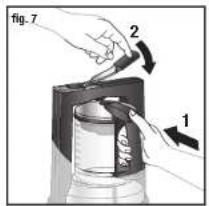
■ Set up the glass carafe (E) until it stops at the front.
■ Then put the locking lever (A) back in place. The glass carafe (E) should be locked in place at that point. Fig. 7
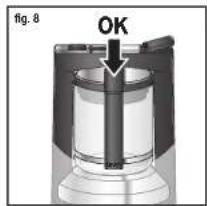
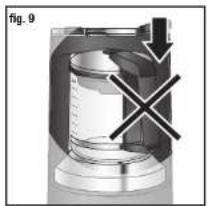
■ The glass carafe (E) must be positioned so that the handle is exactly in the center of the appliance and not turned to the side. Fig. 8 and 9
■ Please DO NOT open the locking lever (A) during a brewing.
■ Plug the appliance and turn it on. Fig. 10
If the appliance was accidentally turned on without water, the color of the boiler may be faded. This has no influence on the functioning of the appliance.
NB : Please note it is normal that some time passes between the beginning of the brewing cycle and the moment when coffee starts dripping in the carafe. This corresponds to the amount of time necessary to increase the pressure inside the appliance. There will also be a small loss of water quantity between what was poured initially and what is in the carafe after a brewing cycle.
■ The pressure inside the appliance is constantly renewed and the coffee will flow little by little.
■ The brewing cycle is over when the coffee no longer drips for about ten seconds.
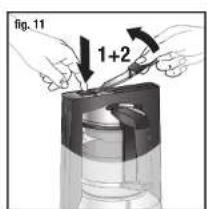
■ When the cycle is finished, press the safety button (B) and simultaneously raise the locking lever (A) GENTLY to release any residual pressure. Fig. 11 Remove the glass carafe.
Attention: Do not touch the stainless steel machine parts: the water tank (G) and the lid of the permanent filter (C). You are likely to burn yourself especially when pouring the coffee.
■ From time to time, the coffee may appear cloudy. This may be due to water quality, type of ground coffee used or ground fineness. We recommend that you stir the coffee in the carafe.
■ If the coffee cycle takes significantly more time than usual, please carry out a descaling cycle. (see DESCALING section).
AUTOMATIC STOP
- Your device will automatically turn off approximately 20 min after the beginning of a cycle.
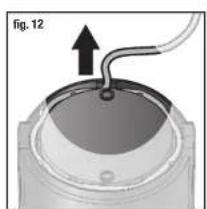
STORING THE POWER CORD
For more convenience, your coffee maker is equipped with a storage space for the cord. It is located at the base of the unit. Fig. 12
CLEANING
■ Never immerse the body of the appliance in water. Always unplug and allow the appliance to cool down before cleaning.
■ The water tank (G) and heater are made of stainless steel and therefore are easy to clean.
■ Clean the water tank (G) with a soft cloth or wet sponge. Do not clean the appliance when it is still hot.
■ Do not attempt to remove scale with abrasive objects or materials; they can be lodged in the pipe and the plug (see the DESCALING section).
■ Wash the glass carafe (E), lids (C and F) and permanent filter (D) using hot water and mild dish detergent then rinse thoroughly and carefully.
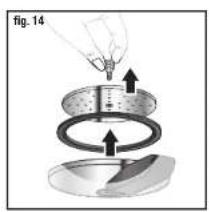
■ If needed, loosen the screw located at the bottom of the lid of the permanent filter (D) and clean the interior of the lid. Fig. 13 and 14
REPLACEMENT OF THE GASKET
■ After a certain period of use, the lid of the water tank (F), the permanent filter (D) or hot water pipe may no longer close properly. This is due to the deterioration of the gasket. To replace them, contact an Authorized KRUPS Service Center.
DESCALING
■ Why descaling
Scale is naturally formed in your coffee maker. Descaling preserves the coffee maker, ensuring a longer life of the appliance and a consistent quality of coffee every single time. Scale may permanently deteriorate the performance of the machine. Machine malfunctions related to scaling will not be covered under warranty if you return the product.
■ When to descale
The frequency of descaling depends on the water hardness and the number of coffee cycles. Longer brewing time, high evaporation, high level of noise at the end of cycle, stops during the cycle, each of these signs show that descaling is necessary.
The descaling of the coffee maker must be done once the machine has gone through 20 to 40 cycles or once a month depending on the water hardness.
How to descale your KRUPS coffee maker
Use the KRUPS ^® F054 descaling solution diluted in 15oz of water or 8oz of commercially available white vinegar in 15oz of water.
Pour the solution into the water tank (without coffee).
Start the cycle (without coffee). After 4 min, manually stop the cycle. Leave it still for an hour. Restart the coffee to resume and complete the cycle.
To rinse the machine, run 2 cycles with water but no coffee.
Repeat the operation if necessary.
■ A coffee maker that is damaged or does not function properly because of lack of descaling will be excluded from KRUPS warranty.
ACCESSORIES
You can get the following spare parts from your local dealer or an authorized KRUPS service center:
- Glass carafe
POSSIBLE BREAKDOWNS AND SOLUTIONS
| PROBLEM SOLUTION | |
| The coffee does not flow or the appliance does not turn on. | ■ Make sure that the appliance is properly plugged in a working outlet and it is in the «ON» position.■ The water tank is empty.■ There was a power outage.■ The automatic stop function has switched off the appliance.Turn the power off and then on again. For more information, see «Preparation of coffee» section. |
| The appliance seems to leak. | ■ Make sure that the water tank was not filled beyond the maximum limit.Lid of the carafe:■ Ensure that the glass carafe (E) is positioned correctly: stop the machine and wait 5 minutes. Unlock the locking lever (A), remove the glass carafe (E), put it back and lock the lever.■ Ensure that the joind is positioned correctlyLid of the water tank:■ Remove it and put it back: the lid of the water tank must be properly fixed, so that the edge of the lid surrounds the ring of rubber.Fig. 5 |
| Brewing cycle takes longer than usual. | ■ Descale the appliance.■ Depending on water hardness, descaling can be required more or less frequently.■ Please note it is normal that some time passes between the beginning of the brewing cycle and the moment when coffee starts dripping in the carafe. This corresponds to the amount of time necessary to increase the pressure inside the appliance. There will also be a small loss of water quantity between what was poured initially and what is in the carafe after a brewing cycle.NOTE : do not disassemble the appliance |
| The coffee is cold. | ■ This coffee machine is not equipped with a self-warming function. At the end of the cycle, drink the coffee before it gets cold. |
| The permanent filter (D) overflows or coffee flows too slowly. | ■ The coffee maker needs to be cleaned.■ There is too much coffee. We recommend that you use your measuring spoon accessory (came with the machine) (K).■ The ground coffee is too fine (the ground coffee for espresso is not suitable for this machine). |
| The coffee tastes bad. | ■ The joint (J) must be cleaned.■ The ground coffee type is not suitable for your appliance.■ The proportion of coffee and water is incorrect. Adjust it according to your taste.■ The quality and freshness of the coffee are not optimal.■ The water is of poor quality. Use filtered water or mineral water. |
| Coffee does not flow. | ■ Make sure the carafe is positioned correctly: stop the machine and wait 5 minutes. Unlock the locking lever (A), remove the glass carafe (E), put it back and lock the lever.■ Make sure the gasket (J) is positioned correctly.■ The coffee flow system may be blocked. You can wash it by simply rinsing it with water. |
DISPOSAL OF MATERIALS

The packaging consists solely of environmentally friendly materials that can be disposed of according to your local recycling facilities.
To find out how to dispose of the appliance itself, contact the relevant department of your local administrative council.
ENVIRONMENTAL PROTECTION
Think of the environment!
① Your appliance contains valuable materials which can be recovered or recycled.
Leave it at a local civic waste collection point.
MANUFACTURER'S WARRANTY

: www.krups.com
With a strong commitment to the environment, most of Krups products are repairable during and after the warranty period. Before returning any defective products to the point of purchase, please call Krups consumer service directly at the phone number below for repair options.
Your help to sustain the environment is appreciated!
The Warranty
This product is guaranteed by Krups for a period of 2 years against any manufacturing defect in materials or workmanship, starting from the initial date of purchase.
The manufacturer's warranty by Krups is an extra benefit which does not affect consumer's Statutory Rights.
The Krups warranty covers all costs related to restoring the proven defective product so that it conforms to its original specifications, through the repair or replacement of any defective part and the necessary labor. At Krups's choice, a replacement product may be provided instead of repairing a defective product.
Krups's sole obligation and your exclusive resolution under this warranty are limited to such repair or replacement.
Conditions & Exclusions
The Krups warranty only applies within USA, Canada & Mexico, and is valid only on presentation of a proof of purchase. The product can be taken directly in person to an authorized service centre or must be adequately packaged and returned, by recorded delivery (or equivalent method of postage), to a Krups authorized service centre. Full address details for each country's authorized service centre are listed on the Krups website (www.krups.com) or by calling the appropriate telephone number listed below to request the appropriate postal address.
Krups shall not be obliged to repair or replace any product which is not accompanied by a valid proof of purchase.
This warranty will not cover any damage which could occur as a result of misuse, negligence, failure to follow Krups instructions, use on current or voltage other than as stamped on the product, or a modification or unauthorized repair of the product. It also does not cover normal tear and wear, maintenance or replacement of consumable parts, and the following:
-using the wrong type of water
-scaling (any de-scaling must be carried out according to the instructions for use);
-ingress of water, dust or insects into the product;
-mechanical damages, overloading
-damages or bad results due to wrong voltage or frequency
-accidents including fire, flood, lightning, etc
-professional or commercial use
-damage to any glass or porcelain ware in the product
This warranty does not apply to any product that has been tampered with, or to damages incurred through improper use and care, faulty packaging by the owner or mishandling by any carrier.
The Krups manufacturer's warranty applies only for products purchased and used in USA, Canada & Mexico. Where a product purchased in one country and then used in another one:
a) The Krups guarantee duration is the one in the country of usage of the product, even if the product was purchased in another listed country with different guarantee duration.
b) The Krups guarantee does not apply in case of non conformity of the purchased product with the local standards, such as voltage, frequency, power plugs, or other local technical specifications
c) The repair process for products purchased outside the country of use may require a longer time if the product is not locally sold by Krups
d) In cases where the product is not repairable in the new country, the Krups guarantee is limited to a replacement by a similar product or an alternative product at similar cost, where possible.
Consumer Statutory Rights
This Krups manufacturer's warranty does not affect the statutory rights a consumer may have or those rights that cannot be excluded or limited, nor rights against the retailer from which the consumer purchased the product. This warranty gives a consumer specific legal rights, and the consumer may also have other legal rights which vary from State to State or Country to Country or Province to Province. The consumer may assert any such rights at his sole discretion.
Additional information
Accessories, Consumables and end-user replaceable parts can be purchased, if locally available, as described in Krups internet site.
| CANADA | GROUPE SEB CANADA345 Passmore Avenue Toronto, ON M1V 3N8 | MEXICO | Groupe SEB MEXICO S.A. de C.V.Goldsmith 38 Desp.401 Col. Polanco Delegacion MiguelHildalgo11 560 Mexico D.F.MEXICO | U.S.A. | GROUPE SEB USA2121 Eden Road Millville, NJ 08332 |
| 1-800-418-3325 | 01800 112 | 8325 800-526-5377 |

: www.krups.com