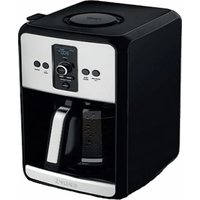
Savoy EC3130 - Electric coffee maker KRUPS - Free user manual and instructions
Find the device manual for free Savoy EC3130 KRUPS in PDF.

User questions about Savoy EC3130 KRUPS
0 question about this device. Answer the ones you know or ask your own.
Ask a new question about this device
Download the instructions for your Electric coffee maker in PDF format for free! Find your manual Savoy EC3130 - KRUPS and take your electronic device back in hand. On this page are published all the documents necessary for the use of your device. Savoy EC3130 by KRUPS.
USER MANUAL Savoy EC3130 KRUPS
natural_image
Illustration of a portable radio machine with a funnel pouring liquid into it (no text or symbols visible)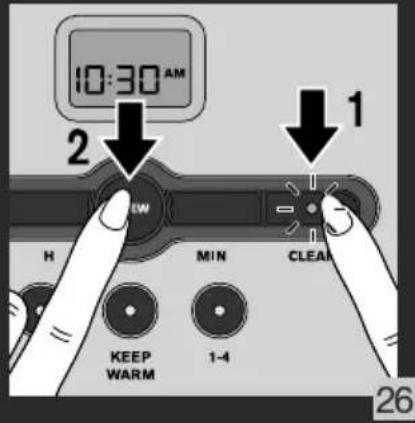
natural_image
Illustration of a portable stove with a kettle pouring liquid from a fan into the oven, accompanied by an inset showing a hand using a tool to cut the lid (no text or symbols present)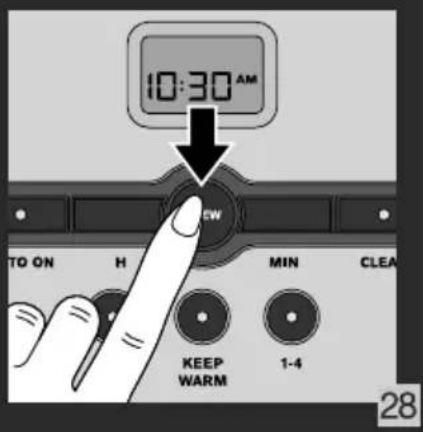
natural_image
Illustration of a hand inserting a device into a portable device with a circular fan inside (no text or symbols)TABLE OF CONTENTS
PAGE
- IMPORTANT SAFEGUARDS 7
- DESCRIPTION 9
- SETTING THE CLOCK 9
- BEFORE FIRST USE 9
- MAKING COFFEE 9
- OTHER FEATURES ...... 10
6A AUTO START FUNCTION
6B REGULAR OR BOLD
6C 1 - 4 CUPS
6D KEEP WARM
- CLEANING 11
- DESCALING 11
- TROUBLESHOOTING 12
- KRUPS INTERNATIONAL LIMITED WARRANTY 14
1. IMPORTANT SAFEGUARDS
When using electrical appliances, basic safety precautions should always be followed to reduce the risk of fire, electric shock, and/or injury to persons including the following:
- Read all instructions.
■ Do not touch hot surfaces. Use handles or knobs.
■ To protect against fire, electric shock and injury to persons, do not immerse cord, plug or machine in water or other liquid. Close supervision is necessary when any appliance is used by or near children.
■ Unplug from outlet when not in use and before cleaning. Allow to cool before putting on or taking off parts, and before cleaning the appliance. - Do not operate any appliance with a damaged cord or plug or after the appliance malfunctions, or has been damaged in any manner. Return appliance to the nearest authorized service facility for examination, repair or adjustment.
■ The use of accessory attachments not recommended by the appliance manufacturer may result in fire, electric shock or injury to persons.
■ Do not use outdoors.
■ Do not let cord hang over edge of table or counter, or touch hot surfaces.
■ Do not place on or near a hot gas or electric burner, or in a heated oven.
■ Always attach plug to appliance first, then plug cord into the wall outlet. To disconnect, turn any control to the “off” position, then remove plug from wall outlet.
■ Do not use appliance for other than intended use.
■ The container is designed for use with this appliance. It must never be used on a range top.
■ Do not place a hot carafe on a wet or cold surface.
■ Do not use a cracked container or a container having a loose or weakened handle.
■ Do not clean container with cleansers, steel wool pads, or other abrasive material.
■ Scalding may occur if the lid is removed during the brewing cycles.
SAVE THESE INSTRUCTIONS CAUTION
This machine is intended for household use only. Any servicing other than cleaning and user maintenance should be performed by the nearest authorized KRUPS Service Center. Visit our website at www.krupsusa.com in the USA or www.krups.ca in Canada or contact your respective country's Consumer Service department for the service center nearest you, or contact your respective country's Consumer Service department. To reduce the risk of fire or electric shock, do not attempt to disassemble the machine.
Repair should be done by an authorized KRUPS Service Center only.
SHORT CORD INSTRUCTIONS
A. A short power cord or a detachable power cord is provided to reduce the risks of becoming entangled in or tripping over a longer cord accidentally.
B. Longer detachable power cords or extension cords are available and may be used if care is exercised in their use.
C. If a long detachable power cord or an extension cord is used:
1) the marked electrical rating of the detachable power cord or extension cord should be at least as great as the electrical rating of the appliance.
2) If the appliance is of the grounded type, the extension cord should be grounding type 3-wire cord.
3) the longer cord should be arranged so that it will not drape over the counter where it can be pulled on by children or tripped over accidentally. The appliance may have a polarized plug (one blade is wider than the other). To reduce the rise of electric shock, this plug is intended to fit into a polarized outlet only one way. If the plug does not fit fully into the outlet, reverse the plug. If it still does not fit, contact a qualified electrician. Do not attempt to modify the plug in anyway.
ADDITIONAL SAFETY INSTRUCTIONS
This appliance is not intended for use by persons (including children) with reduced physical, sensory or mental capabilities, or lack of experience and knowledge, unless they have been given supervision or instruction concerning use of the appliance by a person responsible for their safety.
Children should be supervised to ensure that they do not play with the appliance.
- Your appliance is designed for domestic use only.
It is not intended to be used in the following applications, and the guarantee will not apply for: staff kitchen areas in shops, offices and other working environments; farm houses; by clients in hotels, motels and other residential type environments; bed and breakfast type environments.
This appliance is not designed to be used by children or people without knowledge experience with the product, unless they are supervised or given prior instructions concerning the use of the appliance by someone responsible for their safety.
■ Burns can occur from touching hot plate, hot water or steam. Exercise caution.
■ All machines are subject to stringent quality control. Practical tests using machines taken at random are conducted and this may explain any slight marks or coffee residue showing prior to use.
■ Do not pour liquids other than water and descaling solutions specified in this manual into the water tank.
■ Protect the machine against humidity and freezing.
■ Do not pour water into the appliance if it is still hot.
■ Always place your coffee maker on a flat, stable, heat resistant work surface away from water splashes and any external sources of heat.
■ Never place your carafe or your insulated pot in a microwave oven, in a dishwasher on a stove top.
■ Never put your hand inside the insulated pot.
■ Do not use the carafe or the insulated pot without the lid.
- Do not use the thermal carafe if the glass inner part inside is broken. If the glass inner part of the carafe is broken, pieces of glass can transfer to your cup.
In the interest of improving products, KRUPS reserves the right to change specifications without prior notice.
■ A short power supply cord is provided to reduce the hazards resulting from becoming entangled in or tripping over a long cord.
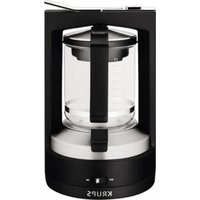
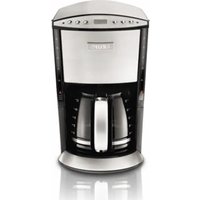
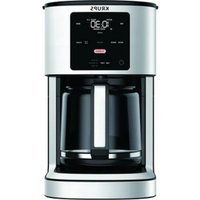
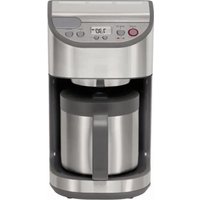
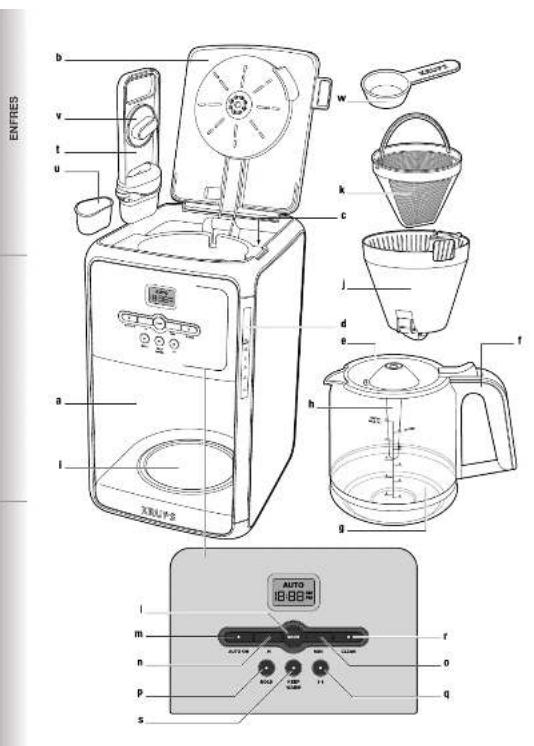
2. DESCRIPTION
a Machine body
b Lid
c Water tank
d Water level indicator
e Carafe lid
f Carafe handle
g Carafe
h Aroma tube
i Warming plate
j Filter holder
k Permanent filter (avoids paper filters)
I Brew button
m AUTO ON button
n H button
- MIN button
p BOLD button
q 1 - 4 cups button
r CLEAN button
s KEEP WARM button
t Filter cartridge holder
u Filter cartridge
v Cartridge replacement indicator
w Spoon
3. SETTING THE CLOCK
■ Place the coffee maker on a hard flat surface.
■ Connect the power cord to a 120V wall socket.
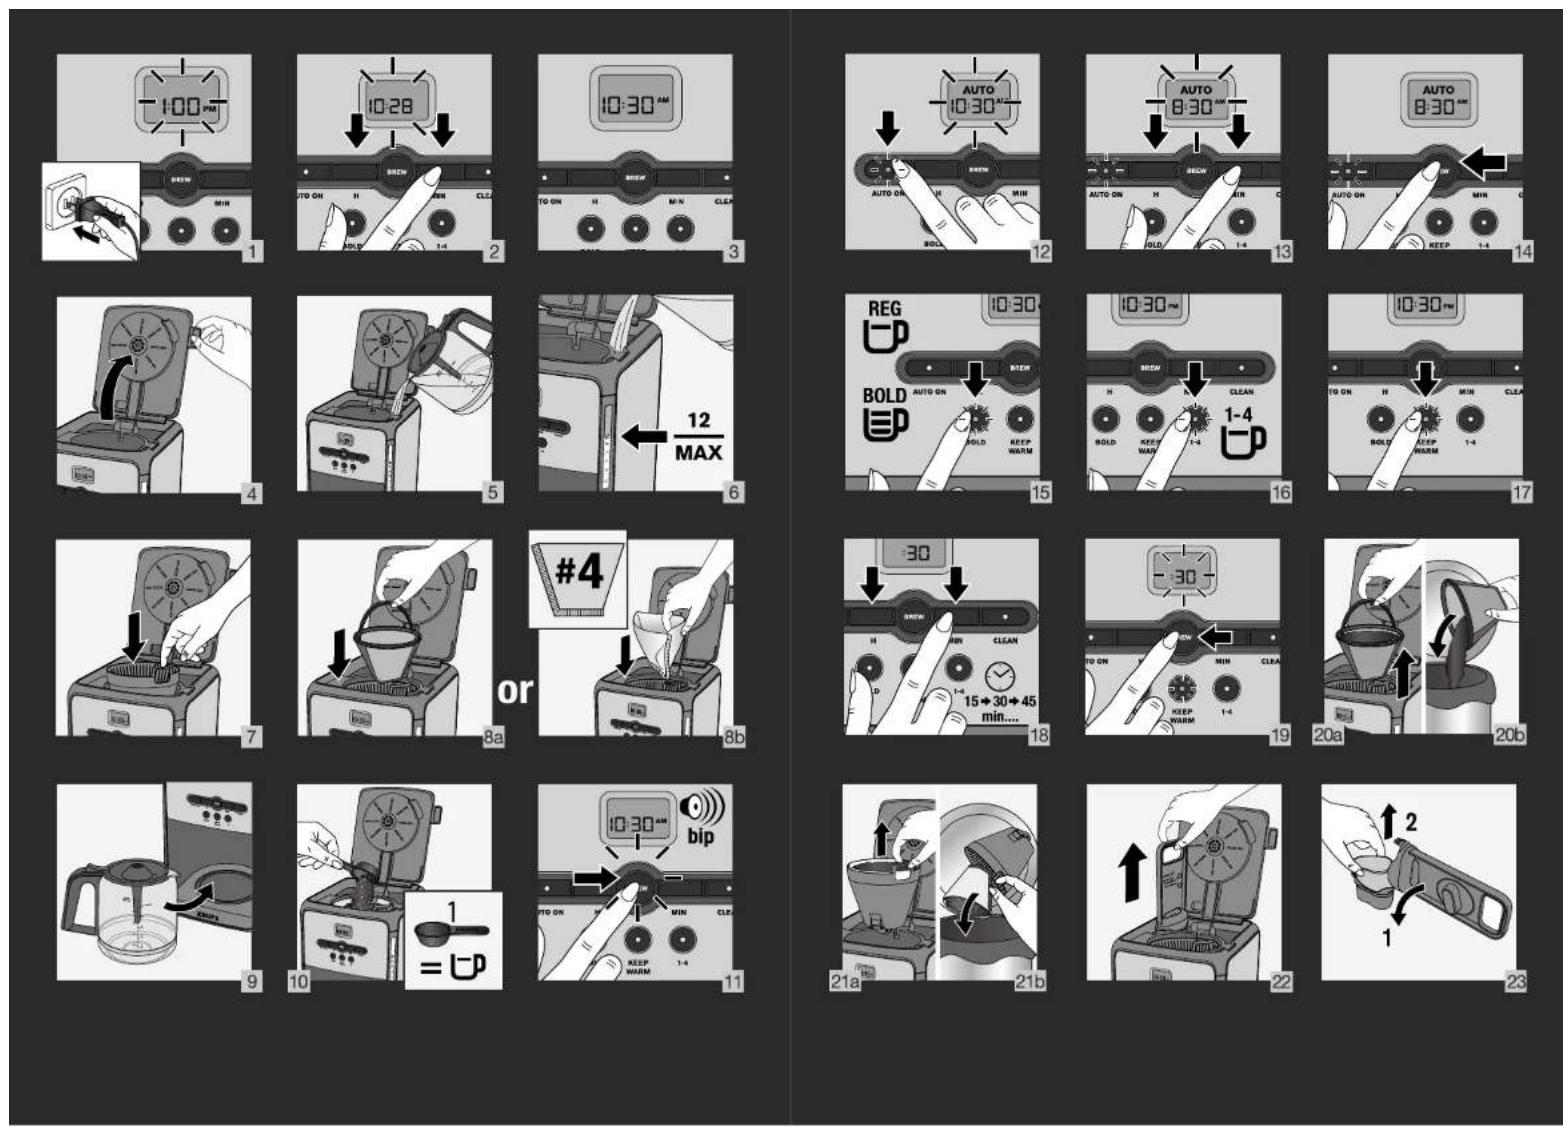
1 - When you plug in the coffee maker for the first time, "1:00 pm" will start flashing on the display. Fig. 1. Set the time by pressing the H button (n) to set the hour and the MIN button (o) to set the minutes. The time will appear on the display. It will be automatically set after 5 seconds or by pressing the BREW button (I).
2 - You can also set or change the time at any other time. Set the time by pressing the H button (n) to set the hour and the MIN button (o) to set the minutes. The time will appear on the display. Figs. 2 and 3. It will be automatically set after 5 seconds or by pressing the BREW button.
NB: Your clock is now set and will continue to show the time, even when your machine is in standby mode. If the machine is unplugged or there is a power failure, the clock will revert to 1:00 pm. Repeat the steps above to reset the clock.
4. BEFORE FIRST USE
■ Remove stickers from your coffee maker.
Before using your coffee maker for the first time, run a cycle without coffee to rinse the circuit. Fill the water tank to the maximum level and start a cycle by pressing the brew button (I).
IMPORTANT : Your machine has been designed to work with cold or water at room temperature only.
5. MAKING COFFEE
■ Open the coffee maker lid (b). Fig. 4.
■ Fill the carafe (g) with cold or water at room temperature, then pour it into the water tank (c) Fig. 5. The number of cups is shown by the water level indicator. Do not exceed 12 cups. Fig. 6.
■ Place the carafe (g) with its lid onto the warming plate (i) making sure that it is properly positioned so as to activate the coffee pouring mechanism. Fig. 9.
■ Make sure that the filter holder (j) is inserted. Fig. 7. Insert the permanent filter (k) Fig. 8a or a #4 paper filter into the filter holder (j). If using a paper filter, make sure it is fully opened and properly positioned in the filter holder. Fig. 8b.
We recommend removing the filter holder with the filter before adding the ground coffee. If you accidentally pour ground coffee into the water tank, do not start the cycle. Clean the tank, otherwise the coffee may block the water circuit.
■ Add 1 KRUPS spoon (w) of ground coffee per cup. Do not exceed 12 spoons (2 ounces). Fig. 10.
■ Close the lid (b).
■ Press the brew button (I). The BREW button light will come on to show that the coffee maker has started the brew cycle. The machine will beep once. Fig. 11.
■ Once the cycle has finished, the keep warm function will switch on automatically. At the end, your machine will beep 3 times and the brew button (I) will turn off.
NB:
- The amount of coffee in the carafe at the end of the cycle is less than the amount of water poured into the tank because about 10% is absorbed by the ground coffee and the filter.
- There is an overflow hole on the back of the water tank. If you add too much water, it will leak out of this hole.
- Clean the permanent filter between each use or use a new paper filter.
- The tip Aroma Tube (h) of the carafe is removable. You can use your coffee maker without Aroma Tube.
CAUTION:
- To avoid any overflow, the carafe must be properly positioned on the warming plate of the coffee maker, otherwise it could cause hot water or hot coffee to overflow.
- The coffee maker becomes very hot during the brew cycle. Please handle with care.
6. OTHER FEATURES
6a - AUTO START FUNCTION
Programming the auto-start settings.
- Your appliance is equipped with auto-start program.
- Check whether the clock is set to the right time. If not, follow the instructions in the SETTING THE CLOCK section.
■ Press the AUTO ON (m) button. The AUTO icon will appear on the display. Figs 12-13-14.
■ Set the time by pressing the H button (n) to set the hour and the MIN button (o) to set the minutes. Set the program by pressing BREW (I).
■ Starting a auto-on function when time has already been set. - See the section MAKING COFFEE.
- Press AUTO ON, then press BREW (I).
■ To cancel the auto-start function, press twice the AUTO ON button or press the BREW button.
6b - REGULAR OR BOLD
■ The BOLD function increases the cycle time for stronger coffee.
■ Press the BOLD (p) button to select the strength of your coffee. Fig. 15.
■ The BOLD button lights up (p).
■ The function is stored in the memory for subsequent cycles.
■ To cancel the BOLD function, press the BOLD button again.
6c - 1 - 4 CUPS
This function is specially designed for making small volumes of coffee, i.e. between 2 and 4 cups. It makes it easier to extract optimal aroma and flavor.
■ To activate this function, press the 1 - 4 cups button (q) before starting the cycle. Fig. 16.
■ The 1 - 4 CUPS button lights up.
■ To cancel the 1 - 4 cups function, press the 1 - 4 CUPS button again.
6d - KEEP WARM
TIME
■ By default, the keep warm function on your appliance is preset to 2 hours
■ To cancel the keep warm function, press KEEP WARM (r); the light on the button will turn off.
To set the keep warm duration:
■ If the keep warm function has already been activated, press KEEP WARM (s) once to deactivate it.
If it has not been activated, press KEEP WARM (s) to select the keep warm duration. The light on the KEEP WARM button will turn on. The keep warm function may be set for 15 minutes up to 4 hours by using the H (n) and MIN (o) buttons. Fig 17 and 18.
■ Set by pressing the brew button (k), alternatively your settings will be validated automatically after 5 seconds, by default. Fig 19.
■ To cancel the keep warm function, press the KEEP WARM button (r); the light on the button will turn off.
■ You can change the keep warm duration while it is in operation by using the H (n) and MIN (o) buttons.
7. CLEANING
■ To remove the used coffee grounds, remove the filter and the filter holder from the coffee maker. Figs 20a. and 21a.
■ Throw the coffee grounds and filter paper in the garbage. Figs 20b. and 21b.
■ Do not clean the machine if it is still hot.
■ Wash the removable filter holder and the permanent filter in warm soapy water. The carafe can go in the dishwasher.
CAUTION: Do not place the carafe in the microwave.
Do not put other parts of the coffee maker into the dishwasher.
■ Clean the coffee maker with a damp cloth or sponge. Never use abrasive or strong products on any part of the coffee maker.
■ To clean the stainless steel parts of your coffee maker, dampen a soft cloth or sponge with warm water. Wipe carefully with a dry cloth.
■ For difficult stains, use a cloth with white vinegar.
■ Do not immerse the appliance in water or under the tap.
8. DESCALING
■ Why descale?
- Limestone forms naturally in your coffee maker. Descaling preserves the coffee maker and ensures it will last longer and provide quality coffee over time. Limestone can permanently affect the machine's performance. Malfunctions associated with scaling will not be covered by the warranty if the product is returned.
■When to descale?
- When your machine needs descaling, the CLEAN button light will come on.
- The descaling frequency depends on the hardness of the water and the number of brew cycles. If you notice the following signs: longer cycle time, excessive steaming, more noise at the end of the cycle, stopping mid-cycle, this means your machine is scaled.
- Your coffee maker should be descaled around once a month depending on the hardness of the water.
- If your machine needs descaling, the CLEAN button (r) light will flash 3 times at the end of the cycle.
NB: If you press the BREW button (l) while the CLEAN button (r) light is on, the descaling cycle will start instead of the brew cycle.
How to descale your KRUPS coffee maker
■ Remove the filter cartridge (u). Figs 22 and 23.
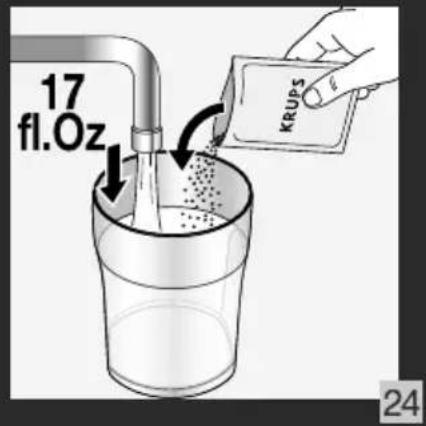
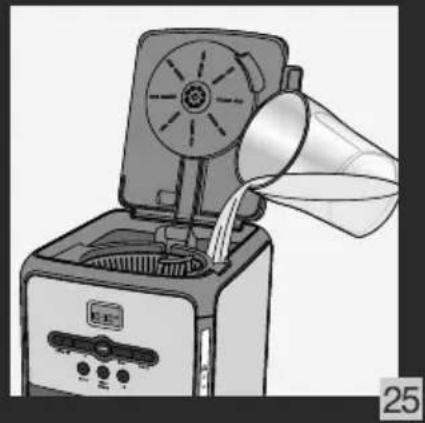
■ Use the KRUPS® descaling solution or 17 fl. oz of white vinegar diluted in 17 fl.oz of cold or water at room temperature or 1.5 oz of citric acid diluted in 17 fl. oz until complete dissolution of crystals. Fig. 24.
■ Pour the solution into the water tank (without coffee). Fig. 25.
■ Press the CLEAN button (r) followed by the BREW button (I) to start the descaling cycle. Fig. 26.
■ The cycle lasts for 30 min.
■ Wait until the end of the cycle.
■ If the water tank is not empty, please launch another descaling cycle by pressing CLEAN button.
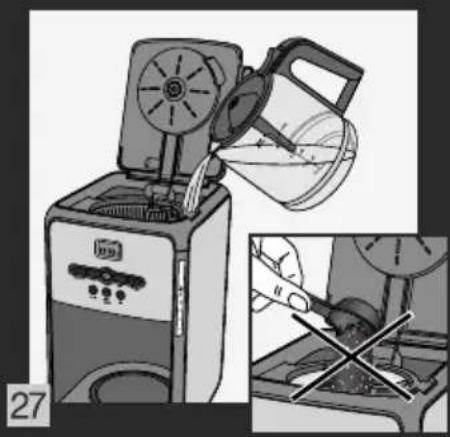
■ To rinse the machine, run 2 full 12 cups cycles with water but without coffee. Fig. 27.
■ Repeat if necessary.
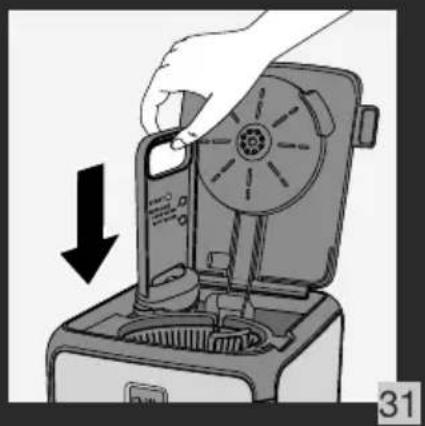
■ Put the filter cartridge back. Figs 30 and 31.
■ The warranty does not cover coffee makers that do not work, or do so poorly, due to lack of descaling.
Filter cartridge
- Your machine can filter water using a DuoFilter: a double action filter (reduces chlorine and scaling) formulated with active plant ingredients. This DuoFilter allows you to enjoy the subtle aromas of your coffee and reduces the descaling frequency.
NB: There is a rotary indicator on the top of the water filter holder that shows when you should replace your DuoFilter.
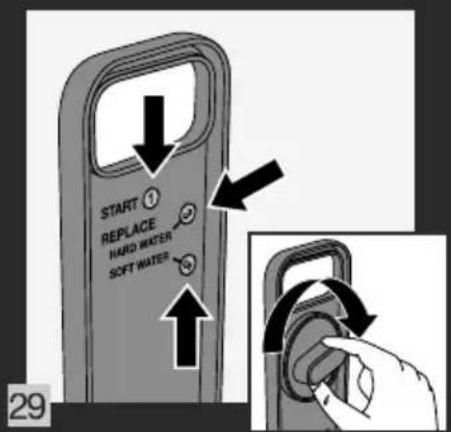
■ Select the number of the month when you replace the filter. The month when you should change your filter depending on the hardness of the water will then be indicated. Fig. 29.
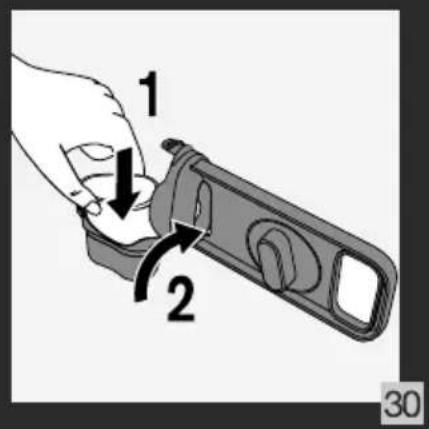
■ To change the filter, remove the filter cartridge from the tank. Fig. 30.
■ Open it by pulling the bottom part and change the filter. Figs 30 and 31.
IMPORTANT:
The DuoFilter must only be used with water.
Your coffee machine will still work if the water filter is not installed.
If you have not used your coffee machine for over a month, rinse the DuoFilter in running water.
We do not recommend leaving the same DuoFilter in your machine for over 5 months.
The duo filter can cause the water to flow slow, excess steam, high noise lever. The filter may need to be replace.
9. TROUBLESHOOTING
If your appliance does not always work properly, call customer service in your country.
| PROBLEM SOLUTION | |
| The coffee does not brew or the appliance does not turn on. | ■ Make sure the appliance is well connected to a working outlet and that it is in the "ON" position.■ The water tank is empty.■ There is a power outage.■ Unplug the machine, then plug it back in.■ The clock should be reprogrammed after a power outage.■ The automatic stop feature has turned off the appliance. Turn off the appliance and then turn it back on to make more coffee. For more information, please consult the "Making Coffee" section. |
| The appliance seems to leak. | ■ Make sure the water tank has not been filled beyond the maximum limit. |
| Brewing takes a long time. | ■ It may be time to descale the appliance.■ Several minerals can accumulate in the coffee maker's circuitry. Regular descaling of the machine is recommended. This may need to be done more often depending on the hardness of your water. For more information, please consult the "Descaling" section.CAUTION: do not take the appliance apart. |
| The filter holder overflows or the coffee flows too slowly. | ■ The coffee maker needs cleaning.■ There is too much coffee. We recommend using one measuring spoon or one soup spoon of ground coffee per cup.■ The ground coffee is too fine (e.g., ground coffee for espresso won't work in a drip coffee maker).■ There is ground coffee lodged between the paper filter and the filter holder.■ The paper filter is not opened properly or is not well placed.■ Rinse the filter holder before inserting the paper filter so it will adhere to the damp walls of the filter basket.■ Be sure you have not inserted a paper filter at the same time as the permanent filter.■ There is more than one paper filter in the filter holder.■ Make sure the filter holder is pushed down all the way. |
| The coffee tastes bad. | ■ Clean the coffee maker.■ The ground coffee is not right for your coffee maker.■ The proportion of coffee and water is not sufficient. Adjust to suit your taste.■ The quality and freshness of the coffee is not the best.■ The water is of poor quality. |
| The coffee does not flow. | ■ See if there is water in the water tank.■ The coffee flow system may be obstructed. You may clean it simply by rinsing with water. |
| The time is not correct (there is a time difference). | ■ The timer is synchronized and depends on your electrical network. If there is a time difference, we recommend that you program the time once a week to be sure it is correct. |
| Stoppage during a cycle, machine stops or the keep warm mode gets activated whereas there is still water in the water tank. | ■ This means your machine is scaled.■ It is highly recommended to perform descaling of your machine every month, depending on the hardness of the water.■ For more information, please consult the "Descaling" section. |
KRUPS INTERNATIONAL LIMITED WARRANTY

: www.krups.com
This product is repairable by KRUPS during and after the warranty period. Accessories, consumables and end-user replaceable parts can be purchased, if locally available, as described on the KRUPS internet site www.krups.com.
The Warranty
This product is guaranteed by KRUPS (company address and details included in the country list of the KRUPS International Warranty) against any manufacturing defect in materials or workmanship for a period of 2 years starting from the initial date of purchase.
The international manufacturer's warranty by KRUPS is an extra benefit which does not affect consumer's Statutory Rights.
The international manufacturer's warranty covers all costs related to restoring the proven defective product so that it conforms to its original specifications, through the repair or replacement of any defective part and the necessary labor. At KRUPS's choice, a replacement product may be provided instead of repairing a defective product. KRUPS's sole obligation and your exclusive resolution under this warranty are limited to such repair or replacement.
Conditions & Exclusions
The international KRUPS warranty only applies within the warranty period and for those countries listed in the Country List attached and is valid only on presentation of a proof of purchase. The product can be taken directly in person to an authorized service center or must be adequately packaged and returned, by recorded delivery (or equivalent method of postage), to a KRUPS authorized service center. Full address details for each country's authorized service centers are listed on KRUPS website (www.krups.com) or by calling the appropriate telephone number as set out in the Country List to request the appropriate postal address.
KRUPS shall not be obliged to repair or replace any product which is not accompanied by a valid proof of purchase.
This warranty will not cover any damage which could occur as a result of misuse, negligence, failure to follow KRUPS instructions, use on current or voltage other than as stamped on the product, or a modification or unauthorized repair of the product. It also does not cover normal wear and tear, maintenance or replacement of consumable parts, or the following:
- using the wrong type of water or consumable
- ingress of water, dust or insects into the product
- scaling (any de-scaling must be carried out according to the instructions for use)
- mechanical damages, overloading
- damages or bad results due to wrong voltage or frequency
- accidents including fire, flood, thunderbolt, etc
- professional or commercial use
- damage to any glass or porcelain ware in the product
This warranty does not apply to any product that has been tampered with, or to damages incurred through improper use and care, faulty packaging by the owner or mishandling by any carrier.
The international KRUPS warranty applies only for products purchased in one of the countries listed, and used for domestic purposes only in one of the countries listed on the Country List. Where a product purchased in one listed country and then used in another listed country:
a) The international KRUPS warranty does not apply in case of non conformity of the purchased product with the local standards, such as voltage, frequency, power plugs, or other local technical specifications.
b) The repair process for products purchased outside the country of use may require a longer time if the product is not locally sold by KRUPS.
c) In cases where the product is not repairable in the new country, the international KRUPS warranty is limited to a replacement by a similar product or an alternative product at similar cost, where possible.
Consumer Statutory Rights
This international KRUPS warranty does not affect the statutory rights a consumer may have or those rights that cannot be excluded or limited, nor rights against the retailer from which the consumer purchased the product. This warranty gives a consumer specific legal rights, and the consumer may also have other legal rights which vary from State to State or Country to Country. The consumer may assert any such rights at his sole discretion.
TABLE DES MATIÈRES
PAGE
- CONSIGNES IMPORTANTES DE SÉCURITÉ 17
- DESCRIPTION 19
- PROGRAMMATION DE L'HORLOGE 19
- AVANT LA PREMIÈRE UTILISATION 19
- PRÉPARATION DU CAFÉ 20
- AUTRES FONCTIONS ...... 20
6A DÉPART DIFFÉRÉ
6B REGULAR OU BOLD
6C 1 - 4 TASSES
6D MAINTIEN AU CHAUD
- NETTOYAGE 21
- DÉTARTRAGE 22
- DÉPANNAGE 23
- GARANTIE DU FABRICANT 24