
SKM 500 A1 - Food Processor SILVERCREST - Free user manual and instructions
Find the device manual for free SKM 500 A1 SILVERCREST in PDF.


| Product Type | Food Processor |
| Brand | SilverCrest |
| Model | SKM 500 A1 |
| Power Rating | 500 W |
| Dimensions (approx.) | 30 x 20 x 25 cm |
| Weight (approx.) | 4 kg |
| Bowl Capacity | 2 liters |
| Bowl Material | Plastic with transparent lid |
| Functions | Chopping, mixing, kneading, whisking, slicing, grating |
| Included Accessories | Chopping blade, whisk, dough hook, slicing/grating disc |
| Speed Settings | 3 speeds + pulse function |
| Safety Features | Lid locking system, overload protection |
| Cleaning | Removable parts dishwasher safe (not motor base) |
| Cord Length | 80 cm |
| Power Supply | 220–240 V, 50 Hz |
| Protection Class | Class II |
| Certification | CE |
| Maintenance | Wipe motor base with damp cloth; do not immerse |
| Spare Parts Availability | Via SilverCrest customer service |
| Manual Languages | Multiple languages available for free download |
| Typical Usage | Home kitchen food preparation |
Frequently Asked Questions - SKM 500 A1 SILVERCREST
User questions about SKM 500 A1 SILVERCREST
0 question about this device. Answer the ones you know or ask your own.
Ask a new question about this device
Download the instructions for your Food Processor in PDF format for free! Find your manual SKM 500 A1 - SILVERCREST and take your electronic device back in hand. On this page are published all the documents necessary for the use of your device. SKM 500 A1 by SILVERCREST.
USER MANUAL SKM 500 A1 SILVERCREST
FOOD PROCESSOR SKM 500 A1
GB IE
FOOD PROCESSOR
Operating instructions
DK
K∅KKENMASKINE
Before reading, unfold the page containing the illustrations and familiarise yourself with all functions of the device.
SE
GB/IE Operating instructions Page 1
| SE | Bruksanvisning | Sidan | 31 |
| DK | Betjeningsvejledning | Side | 59 |
| DE/AT/CH Bedienungsanleitung Seite 89 | |||
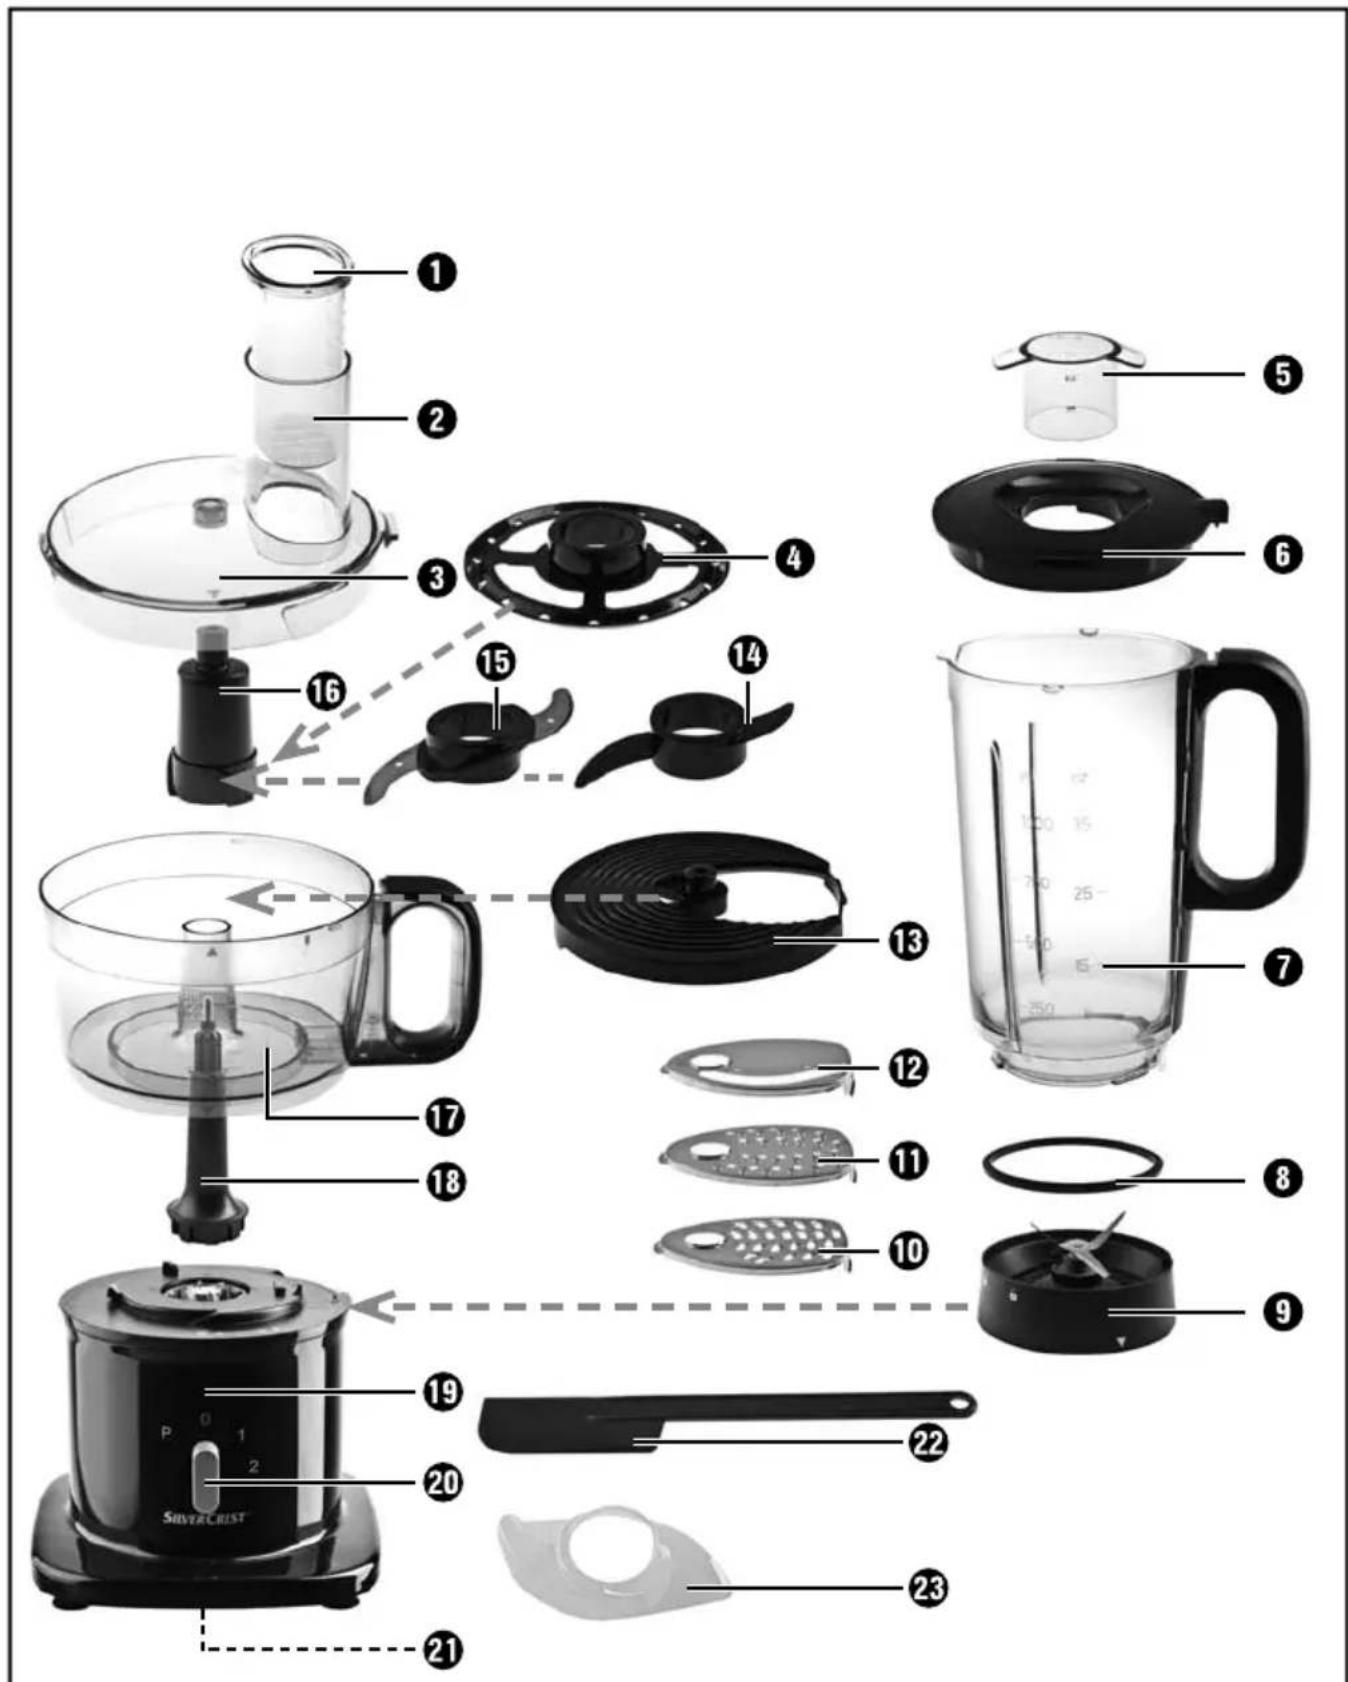
Table of contents
Introduction 2
Intended use 2
Scope of delivery 3
Disposal of packaging.... 3
Appliance description 4
Technical details 4
Safety instructions 5
Initial start-up 6
Assembly 7
Mixing bowl with kneading knife, cutting knife or emulsifying disc 7
Mixing bowl with food processor 8
Blender 8
Operation 9
Using the kneading knife....9
Using the cutting knife 10
Working with the emulsifying disc 12
Working with the food processor.... 13
Working with the blender 14
Cleaning and care 16
Storage 18
Fault rectifi cation....19
Disposal of the appliance 20
EC Declaration of Conformity information .... 20
Importer 20
Warranty 21
Service 21
Recipes 22
Introduction
Congratulations on the purchase of your new appliance!
You have clearly decided in favour of a modern, high quality product. These operating instructions are a constituent of this product. They contain important information with regard to safety, use and disposal. Before using the product, familiarise yourself with all operating and safety instructions. This appliance must be used as described and only for the purposes indicated. Please also, pass these operating instructions on to any future owner(s).
Intended use
This appliance is intended exclusively for processing foodstuffs in household quantities. This appliance is intended exclusively for use in domestic households. It is not to be used for commercial applications!
This appliance is intended only for private use in enclosed, dry spaces. It must not be used outdoors.
The appliance may only be used with original accessories.
WARNING
Danger if used for incorrect purpose!
Failure to use the appliance for its intended purpose can be dangerous.
▶ Only use the appliance for its intended purpose.
▶ Observe the procedures described in these operating instructions.
NOTE
▶ Failure to use the appliance for its intended purpose can be dangerous. Use the appliance only for its intended purposes. Follow the procedures described in these operating instructions. Claims of any kind for damage resulting from unintended use, improper repairs, unauthorised modification or the use of unauthorised spare parts will not be accepted. The user is the sole bearer of the risk.
Scope of delivery
This appliance is supplied with the following components as standard:
- Food processor
● Mixing bowl with lid and pusher
• Cutting knife incl. cover - Kneading knife
- Disk adapter
- Cutting disk
- Shredding disk
- Grating disk
- Emulsifying disc
- Blender with lid and closure
- Dough scraper
- Drive shaft adapter
- Drive shaft
- Operating instructions
1) Remove all parts of the appliance and the operating instructions from the carton.
2) Remove all packaging materials and stickers.
NOTE
▶ Check the contents for completeness and for signs of visible damage.
▶ If the contents are incomplete or damaged due to defective packaging or through transportation, contact the Service Hotline (see chapter Service).
Disposal of packaging
The packaging protects the appliance from transport damage. The packaging materials have been selected in accordance with their environmental friendliness and disposal attributes, and are therefore recyclable.

Recirculation of packaging into the material flow conserves raw materials and reduces the amount of waste that is generated. Dispose of packaging material that is no longer needed in accordance with applicable local regulations.
NOTE
▶ If possible, keep the original packaging of the appliance during the warranty period so that it can be properly packed for returning in the event of a warranty claim.
Appliance description
① Pusher
② Filling shaft
3 Lid
4 Emulsifying disc
5 Blender closure
6 Blender lid
⑦ Blender
8 Sealing ring
9 Holder with mixing knife
10 Shredding disk
11 Grating disk
12 Cutting disk
13 Disk adapter
14 Kneading knife
15 Cutting knife
16 Drive shaft adapter
⑰ Mixing bowl
18 Drive shaft
19 Motor block
20 Speed regulator
21 Cord storage
22 Dough scraper
23 Cutting knife guard
Technical details
| Mains voltage 220 - 240 V | ~, 50 Hz |
| Rated power 500 W | |
| Protection class | II |
Safety instructions

RISK OF ELECTRIC SHOCK
The appliance must only be connected to correctly installed and earthed mains power sockets. Ensure that the rating of the local power supply corresponds with the details on the rating plate of the appliance.
▶ Ensure that the power cord does not become wet or moist during use. Route the cord in such a way that it cannot be crushed or damaged.
▶ Keep the power cord away from hot surfaces.
▶ Do not perform any repairs on the appliance. All repairs must be performed by our Customer Services or by qualified personnel.
▶ NEVER separate or connect the appliance from/to a power supply if your feet are in water.
▶ Remove the plug from the mains power socket when the appliance is being cleaned or in the event of a fault. Switching the appliance off is insufficient, since the appliance receives power for as long as the plug is connected to the mains power socket.
▶ To avoid risks, arrange for defective plugs and/or power cords to be replaced immediately by qualified technicians or our Customer Service Department.

RISK OF ELECTRIC SHOCK

Never submerge the appliance in water or other liquids.

WARNING! RISK OF INJURY!
▶ Always disconnect the appliance from the mains power supply when fitting or removing accessory parts. This will prevent unintentional activation of the appliance.
▶ Only use the original accessory parts for this appliance. Accessory parts from other manufacturers may not be suitable, and this may lead to risks!
This appliance is not intended for use by persons (including children) with limited physical, physiological or intellectual abilities or lack of experience and/or knowledge unless they are supervised by a person who is responsible for their safety, or receive instructions from this person in how to use the appliance. Children should be supervised in order to ensure that they do not play with the appliance.
GB IE
WARNING! RISK OF INJURY!
▶ Caution: the cutting knife, the cutting, shredding and grating discs and the mixing knife are extremely sharp! For this reason, take care when cleaning.
▶ Caution: the cutting knife, the cutting, shredding and grating discs and the mixing knife are extremely sharp! For this reason, take care when emptying the mixing bowl and the blender.
▶ When the appliance is operating, do not put anything other than the ingredients to be processed into the mixing bowl or the blender.
▶ Do not put hands and foreign objects in the to filling shaft or the mixer to avoid the risk of injury or damage to the appliance.
▶ Do not change accessories unless the drive is stationary and the mixer is unplugged from the power supply! The appliance will run on for a short time after being switched off!
▶ Never leave the appliance unattended!
▶ Before changing accessories or additional parts that are in motion during operation, the appliance must be switched off and disconnected from mains power.
CAUTION - PROPERTY DAMAGE!
▶ Never fill the blender with boiling fluids, such as soup! Allow these to cool until lukewarm.
Initial start-up
■ Clean the appliance as described in the chapter "Cleaning and Care".
■ Place the appliance on a flat and clean surface.
■ Attach the appliance to the subsurface with the suction cups so that it is fixed.
■ Unwind the power cord from the cord storage 21 and then attach it to the cable leadthrough.
■ Assemble the appliance as described in the chapter entitled "Assembly" depending on the type of use.
Assembly
Mixing bowl with kneading knife, cutting knife or emulsifying disc
NOTE
▶ Use the diagrams on the fold-out page for assembly assistance!
1) Attach the drive shaft ⑱ to the shaft holder.
2) Place the mixing bowl ⑰ onto the motor block ⑲ in such a way that the arrow is pointing at the symbol ⚙ and rotate the mixing bowl ⑰ until the arrow is pointing at the symbol ⚙. The mixing bowl ⑰ is now fixed.
3) Put the drive shaft adapter 16 onto the drive shaft 18.
4) Now choose your insert:
- the kneading knife 14 for stirring cake dough,
- The cutting knife 15 for chopping onions, Parmesan cheese and the like, or
- the emulsifying disc ④ for whipping cream, beating egg white or making light desserts.
■ Kneading 14 or cutting knife 15: Slide the kneading knife 14 or the cutting knife 15 onto the drive shaft adapter 16 so that the locking mechanisms engage.
■ Emulsifying disc ④: Fit the emulsifying disc ④ to the drive shaft adapter ⑯ in such a way that the locking mechanisms engage.
5) Put the lid ③ onto the mixing bowl ⑰ so that the arrow on the lid ③ points to the symbol 📋 (white square) on the mixing bowl ⑰. Then rotate it until an audible "click" is heard and the arrow is pointing to the symbol 📋 (white arrow).
6) Slide the pusher ① into the filling shaft ②.
7) Insert the plug into the mains power socket.
GB IE
Mixing bowl with food processor
NOTE
▶ Use the diagrams on the fold-out page for assembly assistance!
1) Fit the drive shaft ⑱ to the shaft holder.
2) Place the mixing bowl ⑰ onto the motor block ⑲ so that the arrow is pointing at the symbol ⚙ and rotate the mixing bowl ⑰ until the arrow is pointing at the symbol ⚙. The mixing bowl ⑰ is now fixed.
3) Select a suitable disk 10 11 12 (see chapter "Working with the food processor") and insert it into the disk adapter 13:
- if a different disk is still installed: Press the metal tab of the disk outwards so that it slides over the locking mechanism on the disk adapter ⑬. You can now remove the disk.
- Insert the new disk with the narrower side first into the recess in the disk adapter ⑬ and push the disk firmly downwards so that it engages and is firmly seated.
4) Place the disk adapter ⑬ with the disk fitted onto the drive shaft ⑱.
5) Put the lid ③ onto the mixing bowl ⑰ so that the arrow on the lid ③ points to the symbol 📋 on the mixing bowl ⑰. Then rotate it until an audible "click" is heard and the arrow is pointing to the symbol 🔊.
6) Slide the pusher ① into the filling shaft ②.
7) Insert the plug into the mains power socket.
Blender
NOTE
▶ Use the diagrams on the fold-out page for assembly assistance!
1) Place the blender onto the motor block 19 in a central position so that the arrow on the holder with mixing knife 9 is pointing at the symbol.
2) Turn the blender until the arrow is pointing at the symbol
3) Fit the lid ⑥ to the blender ⑦ so that the lip of the lid ⑥ is exactly in line with the handle of the blender ⑦. Ensure that the lip is positioned exactly at the side next to the handle towards which the guide at the handle opens. Rotate the lid ⑥ clockwise so that the locking mechanism on the lid ⑥ engages in the guide at the handle of the blender ⑦. Press the lip down a little way to ensure that the locking mechanism has engaged in the slot.
4) Fit the blender closure ⑤ to the lid ⑥ of the blender so that the plastic tabs slide into the guides in the lid ⑥. Then rotate the closure ⑤ by 90°, so that it is firmly attached.
5) Insert the plug into the mains power socket.
Operation
Using the kneading knife
The kneading knife 14 can be used to knead dough for cakes, bread rolls or pizzas.
NOTE
Do not attempt to mix liquids with the kneading knife 14. They will over flow or spray out. Always use the blender for liquids!
1) Insert the kneading knife ⑭ as described in the chapter "Assembly".
2) Pour in the necessary ingredients. Do not exceed the quantities specified in the following table.

INGREDIENT MAX. AMOUNT
| Flour (for yeast dough) max. 300 g |
| Flour (for pizza dough) max. 300 g |
| Flour (for cake dough) max. 300 g |
| Eggs (for cakes) max. 4 pieces |
3) Now close the lid ③.
4) Start kneading for 20 seconds by turning the speed regulator 20 to setting 1, then increasing the speed to setting 2 for about 1 minute.
5) The normal processing time for kneading is 30 - 180 seconds.
NOTE
▶ If you wish to add ingredients during the kneading process, add them via the filling shaft ②! The appliance stops if the lid ③ is opened!
Using the cutting knife
Food, such as onions or meat, can be chopped up with the cutting knife 15.
NOTE
Do not attempt to mix liquids with the cutting knife 15. They will overflow or spray out. Always use the blender for liquids!
1) Insert the cutting knife ⑮ as described in the chapter "Assembly".
2) Cut the ingredients into pieces of approximately 2 - 3 cm.
3) Pour the ingredients in. Do not exceed the quantities specified in the following table.
| INGREDIENT | MAX.AMOUNT | SPEED |
| Bread max. 100 g Level 1 - 2 | ||
| Cheese max. 200 g Level 1 - 2 | ||
| Meat max. 500 g Level 1 - 2 | ||
| Herbs max. 50 g Level 1 | ||
| Garlic 150 - 300 g Pulse setting | ||
| Onions max. 500 g Pulse setting |
NOTE
The speeds given in the table are intended as reference values. These can vary depending on the quality and quantity of the ingredients!
4) Now close the lid ③.
5) Start chopping by turning the speed regulator 20. The normal processing time for chopping is 10 - 60 seconds.
If ingredients stick to the sides of the mixing bowl or the knife:
-Switch the appliance off.
- Remove the lid ③.
- Remove the ingredients from the cutting knife 15 and the inside using the dough scraper 22.
- Close the lid ③.
- Restart the appliance.
NOTE
▶ Only process meat that is boneless!
▶ Do not allow the appliance to operate for long periods when chopping (hard) cheese. Otherwise the cheese will heat up, start to melt and agglutinate.
▶ If you wish to add ingredients during the cutting process, add them via the filling shaft ②! The appliance will stop if the lid is opened!
Do not exceed the maximum quantities specified in the table when adding ingredients!
Working with the emulsifying disc
The emulsifying disc ④ can be used to whip cream or egg whites or mix desserts.
NOTE
Do not attempt to mix watery liquids with the emulsifying disc ④. These will overflow or spray out. Always use the blender for watery liquids!
▶ Process no more than 400 ml of liquid! This would spray out or flow over.
1) Insert the emulsifying disc 4 as described in the chapter "Assembly".
2) Pour in the necessary ingredients. Do not exceed the quantities specified in the following table.

INGREDIENT
MAX. AMOUNT
PROCESSING TIME
Runny cream 125 - 350 ml approx. 20 - 30 seconds
Egg white from 2 - 4 eggs approx. 30 - 70 seconds
3) Close the lid ③.
4) Start by turning the speed regulator 20 of the appliance to setting 2.
CAUTION - PROPERTY DAMAGE!
▶ Never use the emulsifying disc ④ for kneading dough or preparing cake dough with butter/margarine! This may damage the emulsifying disc.
NOTE
The mixing bowl 17 and the emulsifying disc 4 must be completely dry and grease-free when you are whisking egg white. Otherwise the egg white will not get fi rm!
The egg white that is being processed should be at room temperature.
Working with the food processor
You can shred, grate or cut using the three disks ⑩ ⑪ ⑫ of the food processor.
1) Select the required disk and assemble everything as described in the chapter "Assembly".
2) Remove the pusher ① from the filling shaft ②.
3) Cut the food into pieces that will easily fit into the filling shaft ②.
4) Start the food processor at setting 1 by turning the speed regulator 20.
5) Then gradually add the food. Push the food in using the pusher ① without applying pressure.
Do not exceed the quantities specified in the following table.
| INGREDIENT SHREDDING DISK CUTTING DISK GRATING DISK | |||
| Apples/carrots max. 500 g max. 500 g - | |||
| Parmesan max. 200 g - max. 200 g | |||
| Cucumber - max. 2 - | |||
| Potatoes max. 500 g max. 500 g max. 500 g | |||
| Onions - max. 300 g - | |||
| Chocolate - - max. 200 g | |||
| Hard cheese (e.g. mature Gouda) max. 300 g - | |||
NOTE
Do not prepare large quantities all at once, but in several portions. Empty the mixing bowl ⑰ each time.
- Do not allow the appliance to operate for long periods when chopping (hard) cheese or chocolate. Otherwise the ingredients will become too hot, start to melt and agglutinate.
Working with the blender
You can prepare milk shakes, for example or chop up ice cubes using the blender (blender ⑦ with installed holder with mixing knife ⑨ and sealing ring ⑧).
CAUTION - PROPERTY DAMAGE!
▶ Never fill the blender with boiling fluids, such as soup! Allow these to cool until lukewarm.
1) Place the blender onto the motor block 19 as described in the chapter "Assembly".
2) Cut the solid ingredients into small pieces.
3) Pour in the necessary ingredients. Do not exceed the quantities specified in the following table.

INGREDIENT MAX. AMOUNT
Bananas/strawberries + milk for a shake max. 500 ml
Broccoli/tomatoes (vegetables) max. 500 ml
Bananas/melons for cocktails max. 500 ml
Boiled pulses (e.g. lentils) max. 250 g
Ice cubes
max. 6 cubes or 140 g (Switch setting "P")
Almonds max. 200 g
Nuts max. 200 g
4) Close the lid ⑥ and ensure that the closure ⑤ has been fitted.
5) Start by turning the speed regulator 20 of the appliance to setting 2.
If ingredients stick to the sides of the blender during processing:
-Switch the appliance off.
-Remove the plug from the mains power socket.
- Open the lid ⑥ and remove the ingredients from the inside using the dough scraper ②.
- Close the lid ⑥ and re-connect the appliance to the power supply.
CAUTION - PROPERTY DAMAGE!
▶ Never open the lid ⑥ of the blender whilst the knife is still rotating! Food could spray out!
▶ If you are mixing an easily foaming liquid such as milk, put no more than 1 litre into the blender so that it does not overfl ow.
NOTE
If you wish to add liquid whilst the mixer is operating remove the closure ⑤ and pour the fluid into the opening in the lid ⑥.
▶ When mixing hard ingredients such as ice cubes, use setting "P" (Pulse) several times.
▶ Do not prepare large quantities all at once, but in several portions.
If you are dissatisfied with the results, switch the appliance off and remove the plug from the mains power socket. Stir the ingredients using the dough scraper 22 or remove some of them. Add some liquid if necessary and mix again.
Cleaning and care
WARNING - RISK OF ELECTRIC SHOCK!
▶ Always remove the plug from the mains power socket before cleaning the appliance.
Under no circumstances must the motor block 19 be submersed in liquid. This could result in a potentially fatal electric shock and the appliance could be damaged.
▶ Never open the appliance housing! You could receive a potentially fatal electric shock.
WARNING - RISK OF INJURY!
Be careful when cleaning the cutting knife 15, the cutting disk 12, the shredding disk 10, the grating disk 11 and the mixing knife. These parts are extremely sharp!
CAUTION - PROPERTY DAMAGE!
▶ Do not use solvents or abrasive cleaners. These will damage the surface of the appliance!
▶ Do not use abrasive, aggressive or chemical cleaning agents! They could irreparably damage the surface!
NOTE
▶ Always clean all parts immediately after use. This makes food residue easier to remove.
NOTE
▶ Disconnect the holder with mixing knife ⑨ from the blender ⑦ for cleaning!
Rotate the blender ⑦ until the arrow on the blender ⑦ is pointing at the symbol 📋 on the holder ⑨. The blender ⑦ can then be released from the holder ⑨.
Remove the sealing ring ⑧ from the holder: Slightly lift the sealing ring ⑧ with a fl at, blunt object (e.g. made from wood) and then carefully guide the sealing ring ⑧ over the knife.
Never use sharp or pointed objects for removing the sealing ring ⑧! These can damage the sealing ring ⑧ and therefore cause leaks!
To assemble, place the sealing ring ⑧ back into the holder ⑨ and place the blender ⑦ onto the holder ⑨ so that the arrow on the blender ⑦ is pointing at the symbol 📋 on the holder ⑨. Rotate the blender ⑦ until the arrow is pointing at the symbol 🔒.
■ Only clean the motor block ⑲, the power cord and the knife guard for the cutting knife ⑳ with a damp cloth. Dry everything properly before re-using it.
- Clean the holder with mixing knife ⑨ and the sealing ring ⑧ in warm dishwater. Afterwards, rinse all parts with clean water so that no detergent residue remain on the parts.
Clean the cutting knife 15, the kneading knife 14, the disk adapter 13, the shredding disk 10, the grating disk 11 and the cutting disk 12, the emulsifying disc 4, the lid 3 with pusher 1, the mixing bowl 17, the drive shaft 18, the drive shaft adapter 16, the blender 7, the blender closure 5, the blender lid 6 and the dough scraper 22 in warm dishwater. Afterwards, rinse all parts with clean water so that no detergent residue remains on the parts.
- You can also clean these parts in the dishwasher! If possible, place the parts in the top basket of the dishwasher. Ensure that the parts are not trapped in any way.
■ Dry all parts thoroughly before re-using the appliance.
Storage
Store the cleaned and dried appliance in a dust-free and dry location.
Wind the cable around the cord storage ② and attach the end to the cable leadthrough.
Proceed as follows in order to store accessory parts in the mixing bowl ⑰ in a space-saving way:
▶ Never start the appliance with the accessory parts stored inside it!

1) Fit the drive shaft ⑱ to the motor block ⑲.
2) Fit the mixing bowl 17 to the motor block 19.
3) Slide the emulsifying disc 4 over the drive shaft 18 in the mixing bowl 17.
4) Slide the cutting knife 15 with the knife guard 23 fitted and the kneading knife 14 over the drive shaft 18 onto the emulsifying disc 4.
5) Place the drive shaft adapter 16 and 2 disks (e.g. cutting 12 and shredding disk 10) at the side next to the drive shaft 18 in the mixing bowl 17.
6) Place the disk adapter 13 with the disk fitted onto the drive shaft 18.
7) Close the lid ③ and slide the pusher ① into the filling shaft ②.
| DEFECT CAUSE SOLUTION | ||
| The appliance does not work. | The plug is not connected. | Insert the plug into a mains power socket. |
| The appliance is not correctly assembled and engaged. | Check the assembly of the appliance and ensure that all marks are correctly aligned. | |
| The appliance is defective. | In this case, contact the Customer Services. | |
| The appliance stops suddenly. | The lid 3 of the appliance may have become loose when processing hard ingredients. | Replace the lid 3. |
| The appliance is defective. | In this case, contact the Customer Services. | |
| The motor runs, but the accessory parts do not rotate. | The drive shaft 18 is not inserted properly. | Check the assembly of the drive shaft 18. |
Disposal of the appliance

Never dispose of the appliance in your normal domestic waste. This product is subject to the provisions of European Directive 2002/96/EC.
Dispose of the appliance through an approved disposal centre or at your community waste facility. Please observe the currently applicable regulations. Please contact your waste disposal centre should you be in any doubt.
EC Declaration of Conformity information
With regard to compliance with essential requirements and other relevant provisions, this appliance complies with the European Electromagnetic Compatibility Directive 2004/108/EC, the Low Voltage Directive 2006/95/EC as well as the ErP Directive 2009/125/EC, Regulation 1275/2008 Annex 1, No. 1.
The full original Declaration of Conformity is available from the importer.

Importer
KOMPERNASS GMBH
BURGSTRASSE 21
44867 BOCHUM, GERMANY
www.kompernass.com
Warranty
The warranty for this appliance is for 3 years from the date of purchase. The appliance has been manufactured with care and meticulously examined before delivery.
Please retain your receipt as proof of purchase. In the case of a warranty claim, please make contact by telephone with our Customer Service Department. Only in this way can a post-free despatch for your goods be assured.
NOTICE
The warranty covers only claims for material and manufacturing defects, but not for transport damage, wearing parts or for damage to fragile components, e.g. buttons or batteries.
This product is for domestic use only and is not intended for commercial use. The warranty is void in the case of abusive and improper handling, use of force and internal tampering not carried out by our authorised service branch.
Your statutory rights are not restricted in any way by this warranty. The warranty period is not extended by repairs made under the warranty. This applies also to replaced and repaired parts.
Damages and defects extant at the time of purchase must be reported immediately after unpacking, resp. no later than two days after the date of purchase.
Repairs made after the lapse of the warranty period are subject to charge.
Service
GB Service Great Britain
Tel.: 0871 5000 720 (£ 0.10/Min.)
E-Mail: kompernass@lidl.co.uk
IAN 86208
IE Service Ireland
Tel.: 1890 930 034
(0,08 EUR/Min., (peak))
(0,06 EUR/Min., (off peak))
E-Mail: kompernass@lidl.ie
IAN 86208
GB IE
Recipes
Salad plate
Ingredients:
■ 1 fresh cucumber
■ 1/4 head of white cabbage
■ 2 peppers
1 onion
For the marinade:
■ 3 - 4 tbsp wine vinegar
■ 2 tbsp cooking oil
Salt
Sugar
■ Freshly ground pepper
■ 1 tbsp chopped herbs
Preparation:
1) Peel the cucumber and divide the cabbage into pieces that will fit into the filling shaft ② of the food processor.
2) Now slice the cucumber, cabbage, prepared peppers and onions with the food processor at level 1 using the cutting disk ⑫.
3) Stir the ingredients for the marinade using the mixer.
4) Combine the vegetables with the marinade and season to taste.
Stuff ed chicken breast with curry sauce
Ingredients:
■ 4 chicken breasts, each approx. 150 g
Salt
■ Freshly ground pepper
For the suffi ng:
■ 150 g minced pork (raw)
■ 1 onion, diced
■ Chinese seasoning
■ 1 pinch of ginger powder
For the sauce:
■ 250 ml white wine
■ 2 - 4 tbsp cream
■ Salt, 1 tbsp curry powder
■ Cornfl our (if required)
Preparation:
1) Season the chicken breasts with salt and pepper and then cut them up using a sharp kitchen knife.
2) Process all of the ingredients for the stuffing into a dough in the mixing bowl using the kneading knife 14, and season to taste.
3) Now fill the chicken breasts with the stuffing and sew them up. (Alternatively, you can also use toothpicks.)
4) Heat the fat and fry all the chicken breasts in it.
5) Pour in the wine and then let the chicken breasts braise for 10-15 minutes.
6) Remove the chicken breasts from the pan and place them where they will keep warm.
7) Season the sauce with cream, salt and curry powder and thicken the sauce as desired with cornfl our.
Now serve the chicken breasts with the sauce on a bed of rice, for example.
GB IE
Potato röstis
Ingredients:
■ 4 large, starchy potatoes
Salt
Pepper
■ Nutmeg, ground
■ 80 g Butter or margarine
Preparation:
1) Wash and peel the potatoes and cut them into strips with the shredding disc ⑩.
2) Wrap the potato mass in a cloth and squeeze the liquid out.
3) Sprinkle the spices on the potato mass and mix everything together.
4) Using a small ladle, put some of the potato mass into the hot fat and press it flat with a spatula.
5) Now fry the röstis on both sides until they are crispy.
Suitable as an accompaniment to meat and game dishes.
Tuna spread
Ingredients:
■ 1 can of tuna in sauce with vegetables
■ 3 tbsp yoghurt
■ 1 tsp lemon juice, freshly pressed
■ 1 pinch salt
■ Freshly ground pepper
■ 2 hard-boiled eggs, diced
To serve:
■ Whole wheat bread in slices
■ Butter for buttering the bread
■ 1 hard boiled egg, diced
Chives, sliced
Preparation:
1) Blend all ingredients in the mixing attachment at the highest level until the desired consistency is reached (approx. 15 seconds) and then season to taste.
2) Spread butter and the tuna mixture onto the bread and sprinkle with chopped egg and chives.
Tomato sauce
Ingredients:
■ 5 tbsp cooking oil
■ 1 large onion
■ 1 large tin (800 g) peeled tomatoes
■ Salt, pepper, 1 pinch sugar, 1 pinch thyme
■ 1 pinch chilli powder
■ 1/2 bunch parsley, chopped
■ 1/2 bunch basil, finely chopped
■ 40 g cold butter or 100 ml sweet cream
Preparation:
1) Peel the onions and roughly dice them with a knife.
2) Heat the oil and fry the onions in it or use the microwave for 2-3 minutes at 600 watts.
3) Add the tomatoes with the juice and stir in all of the spices.
4) Let the sauce simmer covered for 20 minutes or gently cook it all in the microwave.
5) Allow the tomato sauce to cool (to lukewarm) and then purée it in the blender.
6) Then pour the sauce back into a pot and boil it until it has reduced a little.
7) Now stir in the butter or cream.
8) Sprinkle on the herbs and fl avour it to taste.
Serve with any kind of pasta and sprinkle with grated cheese.
GB IE
Pancakes
Ingredients:
■ 2 - 3 eggs
■ 375 ml milk
■ 1 pinch salt
250 g fl our
■ Fat for frying
Preparation:
1) Mix the eggs, milk and salt with the kneading knife ⑭.
2) Sift the fl our through and then add it to the mixture. Mix everything together with the kneading knife 14 until you have a smooth batter.
3) Allow the batter to rise for 20 minutes.
4) Heat the fat and, with a small ladle, place some batter in the pan. (Only as much as is needed to thinly cover the pan bottom.)
5) Fry the pancakes until golden brown on both sides and serve hot.
Marble cake
Ingredients:
■ 125 g soft butter or margarine
■ 125 g sugar
■ 3 eggs
■ 1/2 packet of vanilla sugar
■ 1 pinch salt
■ 250 g wheat fl our
■ 1/2 packet baking powder
75 ml milk
■ 20 g baking cocoa
■ 50 g semisweet chocolate
■ Butter for greasing the tin
Preparation:
1) Break the chocolate into large pieces and chop them using the cutting knife ⑮.
2) Place all ingredients except the chocolate and the baking cocoa into the mixing bowl ⑰ and mix using the kneading knife ⑱.
3) Grease a round cake tin (diameter: 20 - 22 cm) or a loaf tin (30 cm long).
4) Pour half of the dough into the tin and then stir the cocoa and grated chocolate into the remaining pastry.
5) Now place the dark dough onto the light dough and fold in with a fork in a spiral shape.
Tip: If you wish, you can also cover the cake with 100 g of semisweet chocolate and then decorate it with blobs of cream and chocolate biscuits.
Yeast dough
Ingredients:
■ 300 g wheat fl our
■ 15 g fresh yeast or 5 g dried yeast
■ Approx. 150 ml lukewarm milk
■ 50 g butter or margarine (room temperature)
50 g sugar
1 egg
Preparation:
1) Place the fl our, dry yeast or crumbled yeast and all other ingredients (not directly on the yeast) into the mixing bowl ⑰.
2) Mix everything using the kneading knife 14.
3) Remove the dough from the mixing bowl ⑰ and place it in a large bowl.
4) Cover the dough with a dish cloth, place it in a warm place and let the dough rise until it has visibly increased in size.
5) Then knead the dough again by hand.
6) After that, the dough is fi nished and can be further processed.
GB IE
Orange drink
Ingredients:
■ 250 ml orange juice
■ 1 - 2 tbsp lemon juice
■ 150 g tinned apricots
■ 6 ice cubes, crushed
■ 2 tsp sugar or honey
Preparation:
1) Place the ice cubes into the blender and chop using switch setting "P".
2) Put the orange juice, the lemon juice and the apricots and the ice cubes in the blender and mix everything for about 10 seconds at level 2.
3) Now add the sugar or honey to taste and serve the juice ice cold.
Hazelnut biscuits
Ingredients:
■ 200 g hazelnuts
■ 60 g cane sugar
■ 2 egg whites
■ 2 tsp honey
■ Approx. 50 g of plum or rose hip jam
■ 35 g each of semisweet and milk chocolate
Preparation:
1) Chop the nuts in the mixer and put four tablespoons thereof aside.
2) Process the remaining nuts, sugar, egg whites and honey with the kneading knife 14 to a fi rm dough.
3) Sprinkle the remaining nuts onto a work surface and roll the dough out to about a quarter inch thick.
4) Now cut out the biscuits and place them on a baking tray lined with baking paper.
5) Join the cooled biscuits together in pairs with the rose hip or plum jam and then coat them with some milk chocolate and semisweet chocolate.
6) Melt the two types of chocolate separately. Dip the biscuits up to half way in and allow to dry on cake racks.
Bon appetit!
These recipes are provided subject to change. All ingredients and preparation information are guidelines. Enhance these recipe suggestions in accordance with your personal experience.
We hope you enjoy the recipes and wish you "bon appetit".
INGREDIENS MAX. MÄNGD
INGREDIENS MAX. MÄNGD HASTIGHET
INGREDI-ENS
MAX. MÄNGD BEARBETNINGSTID
Vispgrädde 125 - 350 ml ca 20 - 30 sekunder
Äggvita 2 - 4 styck ca 30 - 70 sekunder
INGREDIENS MAX. MÄNGD
| Bananer/Jordgubbar + mjölk till en milkshake | max. 500 ml |
| Broccoli/Tomater (Grönsaker) max. 500 ml | |
| Bananer/Meloner till cocktails max. 500 ml | |
| kokta baljväxter (t. ex. linser) max. 250 g | |
| Isbitar | max. 6 styck eller 140 g(läge "P") |
| Mandel max. 200 g | |
| Nötter max. 200 g |
INGREDIENSER MAKS. MÄNGDE
| Mel (til gærdej) maks. 300 g |
| Mel (til pizzadej) maks. 300 g |
| Mel (til kagedej) maks. 300 g |
| Æg (til rørekager) maks. 4 styk |
3) Luk läget ③.
INGREDIENSER MAKS. MÆNGDE HASTIGHED
INGREDIENSER MAKS. MÄNGDE
1) Sæt drivakslen 18 på motorblokken 19.
2) Sæt røreskålen 18 på motorblokken 19.
3) Sæt emulgeringsskiven ④ på drivakslen ⑱ i røreskålen ⑰.
ZUTAT MAX. MENG E

- FOOD PROCESSOR SKM 500 A1
- FOOD PROCESSOR
- K∅KKENMASKINE
- SE
- TABLE OF CONTENTS
- INTRODUCTION
- INTENDED USE
- WARNING
- DANGER IF USED FOR INCORRECT PURPOSE
- NOTE
- SCOPE OF DELIVERY
- DISPOSAL OF PACKAGING
- APPLIANCE DESCRIPTION
- TECHNICAL DETAILS
- SAFETY INSTRUCTIONS
- RISK OF ELECTRIC SHOCK
- WARNING! RISK OF INJURY
- GB IE
- CAUTION - PROPERTY DAMAGE
- INITIAL START-UP
- ASSEMBLY
- MIXING BOWL WITH KNEADING KNIFE, CUTTING KNIFE OR EMULSIFYING DISC
- MIXING BOWL WITH FOOD PROCESSOR
- BLENDER
- OPERATION
- USING THE KNEADING KNIFE
- USING THE CUTTING KNIFE
- WORKING WITH THE EMULSIFYING DISC
- INGREDIENT
- MAX. AMOUNT
- PROCESSING TIME
- WORKING WITH THE FOOD PROCESSOR
- WORKING WITH THE BLENDER
- CLEANING AND CARE
- WARNING - RISK OF ELECTRIC SHOCK
- WARNING - RISK OF INJURY
- STORAGE
- DISPOSAL OF THE APPLIANCE
- EC DECLARATION OF CONFORMITY INFORMATION
- IMPORTER
- WARRANTY
- NOTICE
- SERVICE
- RECIPES
- SALAD PLATE
- INGREDIENTS
- PREPARATION
- STUFF ED CHICKEN BREAST WITH CURRY SAUCE
- POTATO RÖSTIS
- TUNA SPREAD
- TOMATO SAUCE
- PANCAKES
- MARBLE CAKE
- YEAST DOUGH
- ORANGE DRINK
- HAZELNUT BISCUITS
- BON APPETIT
- INGREDI-ENS
- MAX. MÄNGD BEARBETNINGSTID
Brand : SILVERCREST
Model : SKM 500 A1
Category : Food Processor