
SKMP 1300 B3 - Food Processor SILVERCREST - Free user manual and instructions
Find the device manual for free SKMP 1300 B3 SILVERCREST in PDF.


| Product Type | Food Processor |
| Brand | SilverCrest |
| Model | SKMP 1300 B3 |
| Power Consumption | 1300 W |
| Dimensions (approx.) | 25 x 20 x 40 cm |
| Weight | Approx. 4.5 kg |
| Bowl Capacity | 2.5 L |
| Main Functions | Chopping, Slicing, Shredding, Kneading, Whisking, Blending |
| Speed Settings | Variable speed + Pulse function |
| Accessories Included | Stainless steel chopping blade, slicing disc, shredding disc, kneading hook, whisk attachment |
| Safety Features | Safety interlock lid, non-slip feet, overload protection |
| Cleaning | Removable parts dishwasher safe (except motor base) |
| Material | Plastic housing, stainless steel blades |
| Spare Parts Availability | Bowls, blades, discs and accessories available via SilverCrest service |
| Repairability | Modular design for easy part replacement |
| Documentation | User manual available for free download |
Frequently Asked Questions - SKMP 1300 B3 SILVERCREST
User questions about SKMP 1300 B3 SILVERCREST
0 question about this device. Answer the ones you know or ask your own.
Ask a new question about this device
Download the instructions for your Food Processor in PDF format for free! Find your manual SKMP 1300 B3 - SILVERCREST and take your electronic device back in hand. On this page are published all the documents necessary for the use of your device. SKMP 1300 B3 by SILVERCREST.
USER MANUAL SKMP 1300 B3 SILVERCREST
natural_image
Exterior view of a modern kitchen stand mixer with a bowl and spoon (no text or symbols visible on the main body)PROFESSIONAL FOOD PROCESSOR SKMP 1200 A2
GB
PROFESSIONAL FOOD PROCESSOR
Operating instructions
HU
PROFI KONYHAI ROBOTGÉP
Kezelési útmutató
CZ
KUCHYNSKÝ ROBOT
Návod k obsluze
DE AT CH
Be sure to note the fold-out page.
Polski 18
- Device description .... 2
- Names of parts (see fold-out page).... 3
- Technical data.... 3
- Safety information .... 3
- Unpacking and setting up 6
- Operating the appliance 6
- Recipes.... 10
- Cleaning the appliance 15
- Disposal.... 16
- HOYER Handel GmbH Warranty.... 16
Congratulations on the purchase of your new product.
You have selected a high-quality product. The operating instructions are a constituent part of this product. They contain important information about safety, use and disposal.
Familiarize yourself with all the operating and safety instructions before using the product. Use the product only as described and for the stated spheres of application.
If you pass the product on to a third party, always pass on all the documentation as well.
1. Device description
1.1 Intended purpose
The SilverCrest SKMP 1200 A2 food processor is used to mix, beat, knead,, whip and blend food and produce.
This appliance should only be used in dry rooms. It must not be used out in the open or in humid rooms.
This appliance is intended for use in private households and is not suitable for commercial purposes.
The appliance is likewise suitable for:
-
use in staff kitchens in shops, offices and other commercial areas,
• use in agricultural settings, -
customers in hotels, motels and other accommodations,
• bed-and-breakfast establishments.
1.2 Scope of supply
• 1 food processor, base unit
- 1 splash guard
• 1 blenderjug
- 1 dough hook
- 1 balloon whisk
- 1 beater
• 1 copy of the user instructions
1.3 Variants
The appliance is available in two versions:
- RP100104: red
• RP105590: crème
Operation is identical for both colour variants.
2. Names of parts (see fold-out page)
1 Drive arm
2 Cover
3 Unlock button for cover
4 Speed controller with on/off function
5 Pulse button
6 Unlock lever
7 Base unit
8 Splash guard
9 Filling opening with flap
10 Lid fastening
11 Lid of blender jug
12 Blender jug with lid and lid fastening
13 Dough hook
14 Balloon whisk
15 Beater
16 Mixing bowl
3. Technical data
Power supply: 220 - 240 V
\~ /50 Hz
Output: 1,200 W
Protection class: II
Short-time operation / food processor: 10 minutes
Short-time operation / blender jug: 3 minutes
Short-time operation: indicates how long the appliance may run without interruption.

4. Safety information
4.1 Explanation of terms
The following keywords are used in these user instructions:

Warning!
High risk: ignoring this warning could result in a risk to life and limb.
Caution!
Medium risk: ignoring this warning may result in damage.
Note:
Low risk: points to be noted when handling the appliance.
SKMP 1200 A2 3
GB





4.2 Special information about this appliance

Warning! To avoid injury or damage, please observe the following information.
- This appliance can be used by persons who have reduced physical, sensory or mental ability or lack experience and/or knowledge, provided they are supervised or instructed in the safe use of the appliance and have understood its associated hazards.
• The appliance may not be used by children. - Keep the appliance and its mains power cable away from children.
- Do not allow children to play with the appliance.
- While it is not under supervision and before it is assembled, disassembled or cleaned, the appliance should always be disconnected from the power supply.
- Never immerse the base unit 7 in water.
- Never use scouring, corrosive or abrasive cleaning materials as these might damage the appliance.
4.3 General information
- Please read these user instructions carefully before use. They are a constituent part of the appliance and must be kept to hand at all times.
- Use the appliance only for the purpose described (see "1.1 Intended purpose" on page 2).
-
To prevent damage, check that the mains voltage required (see type plate on the appliance) is compatible with your mains voltage.
-
Please note that any claim under the warranty or for liability will be invalid if accessories are used that are not recommended in these user instructions, or if original spare parts are not used for repairs. This also applies to repairs undertaken by unqualified persons. You will find the service address in "Service Centre" on page 17.
- If the appliance should develop a fault during the warranty period, it may only be repaired by our Service Centre. Otherwise all claims under warranty are null and void. You will find the service address in "Service Centre" on page 17.
4.4 Protection against electric shock

Warning! The following safety information is intended to protect you against electric shock.
- The appliance must not under any circumstances be used if it is damaged. Have the device repaired in such cases by a qualified specialist. The contact data can be found in "Service Centre" on page 17.
- If the mains cable for this appliance is damaged, it must be replaced by the manufacturer or a person with similar qualifications in order to avoid a hazard.
• Under no circumstances should water or other liquids get into the base unit 7. For this reason: - never use it outdoors
- never immerse the base unit 7 in water
- never place containers filled with liquid, such as drinking glasses, vases etc. on the appliance
- never use in very humid environments
- never use in the immediate vicinity of a kitchen sink, bath, shower or a
swimming pool, as water may splash into the appliance.
If liquid should enter the appliance, unplug the mains plug immediately and have the appliance repaired by a qualified technician. The contact data can be found in "Service Centre" on page 17.
- Never touch the appliance, the mains cable or the mains plug with wet hands.
• Always unplug it by pulling out the plug, never pull on the cable itself. - Ensure that the mains cable is not kinked, twisted or crushed.
- Keep the mains cable away from hot surfaces, such as the top of a stove.
- If you are not going to use the appliance for a while, remove the plug from the wall socket. Only then is the appliance completely free of current.
-
Avoid using extension cables. These may only be used under very specific conditions:
-
the extension cable must be able to handle the amount of current drawn by the appliance,
- the extension cable must not be "suspended". Keep children away from it and ensure that it does not present a trip hazard,
- under no circumstances use a damaged extension cable,
- do not connect any other appliances to the mains socket, since it could cause an overload (do not use multiple sockets of any kind).
4.5 Preventing injury

Warning! To avoid injury, please observe the following information.
• Make sure that the mains cable never becomes a trip hazard, that no-one can get tangled in it or tread on it.
- During operation, avoid contact with the moving parts of the appliance such as the blades of the blender jug 12, the dough hook 13, balloon whisk 14 or beater 15. Your hands or hair could be drawn into the appliance, leading to injuries. Only ever switch the appliance on if you have correctly fitted the splash guard 8 when using the mixing bowl 16 or the lid 11 when using the blender jug 12.
• Always remove the power supply plug from the mains socket before cleaning the appliance or changing the attachments.
- Remember that the blades of the blender jug 12 are extremely sharp. Never touch the blades with bare fingers to avoid cutting yourself.
• Always first switch off the appliance using the speed controller 4 before removing the power supply plug. Otherwise the appliance might start up when you insert the power supply plug in a mains socket again.
- If you are not using the blender jug 12, the cover 2 must be fitted. Otherwise the appliance will not work so as to protect the user from injury.
4.6 For the safety of your child

Warning! Children are often unaware of danger and are injured as a result. Please note therefore:
- Ensure that the packing foil does not become a deadly trap for a child. Packing foils are not toys.
4.7 Material damage
Warning! Follow the instructions given below to prevent material damage.
- Only place the appliance on a level, dry, non-slip surface to stop the appliance falling over or sliding off.
- Do not place the appliance on top of a hot stove.
-
Do not use the blender jug 12 and the mixing bowl 16 at the same time. This might overload the appliance.
-
Never use the mixer and the blender jug 12 when empty. This might cause the motor to overheat.
- The mixer should only ever be operated for max. 10 minutes at a time, and the blender for 3 minutes. Afterwards the appliance must be first allowed to cool down to room temperature again.
- Only ever use the blender jug 12 with the lid in place 11 as liquid might otherwise be ejected.
- Do not move the appliance if food or pastry is still inside.
- Only use the blender jug 12 to mix drinks or make dressings.
- Do not overfill the mixing bowl 16 or blender jug 12 as the contents might otherwise be ejected.
- Never add hot or boiling food to the blender jug 12.
5. Unpacking and setting up
- Remove the individual parts from the packaging.
- Check that the individual parts are complete (see "1.2 Scope of supply" on page 2) and are undamaged.
-
Clean the appliance thoroughly before using it for the first time (see "8. Cleaning the appliance" page 15).
-
Place the appliance on a level, dry, non-slip surface so that the appliance can neither fall over nor slide off.
- Check that the speed controller 4 is set to "0".
- Put the plug in a suitable socket (see "3. Technical data" on page 3).
on The appliance is now ready to use.
6. Operating the appliance
6.1 Assembling the appliance
- Press the unlock lever 6 and swing up the drive arm 1.
Note: Press the unlock lever 6 round fully and hold until the drive arm 1 is right down. Then swing the unlock lever 6 back again.
- To fit the mixing bowl 16, insert it in the base unit 7.
- Lock the mixing bowl by rotating it slightly anti-clockwise until it engages.
Caution!
Never use the mixing bowl 16 without the splash guard 8 in position. Otherwise food might be ejected.
- Fit the splash guard 8 onto the drive arm 1 from below. The filling opening with flap 9 should point towards the speed controller 4.
- Press on the splash guard 8 until it engages.
- Select the appropriate attachment:
Dough hook 13: For heavy dough, e.g. bread dough
Balloon whisk 14: For whipping cream, beating egg whites, etc.
Beater 15: For medium to light dough/batter, e.g. batter for (pan)cakes.
- Fit the attachment into the appropriate opening in the drive arm 1 from below.
When doing so, make sure that the little lugs on the shaft of the attachment are inserted into the crosswise slot of the opening. - Press the attachment lightly in and turn clockwise until it engages.
- Press the unlock lever 6 and swing the drive arm 1 down into the working position.
Note: Press the unlock lever 6 round fully and hold until the drive arm 1 is right down. Then swing the unlock lever 6 back again.
The appliance is now ready to use.
Fitting the blender jug 12 : Caution!
- Do not use the blender jug 12 and the mixing bowl at the same time 16. This might overload the appliance.
- Press the unlock button 3 for the lid 2 to the left.
- Take the lid 2 off.
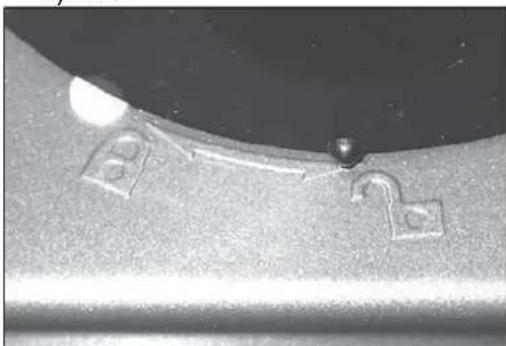
- Position the blender jug 12 so that the little nib points to the open padlock symbol.
natural_image
Close-up of a metallic surface with two small square features and a central droplet, no visible text or symbols.- Turn the blender jug 12 clockwise until it engages. The little nib is now pointing to the closed padlock symbol.
6.2 Dismantle appliance
- Press the unlock lever 6 and swing up the drive arm 1.
Note: Press the unlock lever 6 round fully and hold until the drive arm 1 is right down. Then swing the unlock lever 6 back again.
- To remove an attachment, press lightly in again and unlock by turning anticlockwise slightly.
- Remove the attachment.
-
To remove the splash guard 8, pull it downwards. When doing so, first pull the splash guard 8 down at the back slightly.
-
Unlock the mixing bowl 16 by rotating slightly in a clockwise direction.
-
Remove the mixing bowl 16.
-
Press the unlock lever 6 and swing the drive arm 1 down into the working position.
Note: Press the unlock lever 6 round fully and hold until the drive arm 1 is right down. Then swing the unlock lever 6 back again.
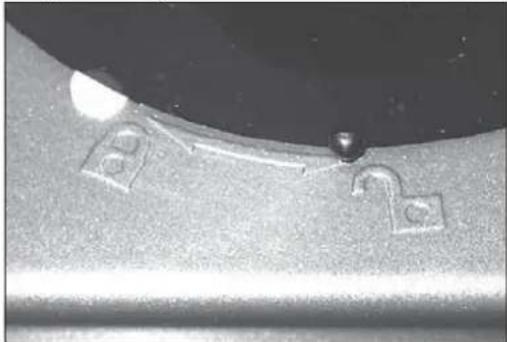
Removing the blender jug12 :
- Turn the blender jug 12 anti-clockwise until that the little nib points to the open padlock symbol.
natural_image
Close-up of a metallic mechanical component with mounting holes and a small circular feature (no visible text or symbols)-
Remove the blender jug 12.
-
Put the lid 2 back on.
6.3 Using the splash guard
You can add ingredients during mixing:
-
Reduce the speed to 1 - 2.
-
Lift the flap over the filling opening 9.
-
Add ingredients.
-
Close the flap over the filling opening 9 again.
6.4 Using the blender jug 12
Caution!
- Never allow the blender to run for more than 3 minutes at a time. It then has to cool down again first to prevent the appliance overheating.
-
Always put the liquid ingredients in the blender jug first, followed by the solid components 12.
-
Chop up the solid ingredients beforehand to stop any lumps jamming the blades.
-
Make sure you always replace the lid 11 on the blender jug 12 before starting the blender as the contents might otherwise be ejected.
-
If you wish to add other ingredients during blending, open the fastening 10 in the lid 11 of the blender jug 12 by turning clockwise.
-
Select the desired speed on the speed controller 4.
Note: The ideal speed mainly depends on the consistency of the food to be blended. The more liquid it is, the faster blending can be carried out.
- Alternatively, you can press the pulse button 5 here. Blending will take place at maximum speed as long as the pulse button 5 is held down.
Note: The pulse button 5 only functions when at least level 1 is set on the speed controller 4.
6.5 Regulating speed, switching on and off
- Switch the appliance on by turning the speed controller 4 to the right.
- Start off at a slightly slower speed when blending or mixing and then increase.
Recommendations for speed levels
Note: The pulse button 5 only functions when at least level 1 is set on the speed controller 4.
| Speed Attachment Description | ||
| 1 - 2 All - Starting position | for all blending / mixing operations.- When adding ingredients | |
| Dough hook 13 or beater 15 | - Kneading and mixing firm dough or ingredients | |
| 2 - 3 Beater 15 - Mixing thick dough/batter | - Mixing butter and flour- Mixing yeast dough | |
| 4 - 6 Beater 15 - Cake batter | - Beating butter with sugar- Biscuit dough | |
| 7 - 10 | Balloon whisk 14 | - Whipping cream- Egg whites- Mayonnaise- Beating butter until fluffy |
| Pulse button 5 | Blender jug 12 | - Blending and liquidising soft or liquid ingredients.- The pulse button 5 only functions when at least level 1 is set on the speed controller 4. |
Move the speed controller 4 to "0" to switch the appliance off.
6.6 Thermal cut-out
The appliance has a thermal cut-out. If the motor gets too hot, the appliance will switch off automatically:
- Switch the appliance off.
- Remove the power supply plug.
- Allow the appliance to cool down to room temperature.
7. Recipes
7.1 White bread
Ingredients
• 1 kg plain flour (type 405, cake flour)
• 4 t s p s a l t
• 4 packs of dried yeast (approx. 25 - 30 g)
• 650 ml lukewarm water
Preparation
- Put the ingredients in the mixing bowl 16.
- Fit the splash guard 8 and dough hook 13.
- Knead for 10 minutes on level 3.
- Remove and cover mixing bowl.
- Allow dough to stand for around 1 - 2 hours in a warm place.
- Shape into a loaf or place dough in a loaf pan.
- Preheat oven to 220 °C.
- Bake bread on middle shelf for 35 - 40 minutes.
7.2 Pizza dough
Note: Pizza dough is particularly good when prepared at least 24 hours in advance and then allowed to rest in the fridge. The following recipe should give you pizza dough "just like Mamma used to make".
Ingredients for 4 people
- 500 g type 00 flour
- 300 ml water
• max. 1/5 of a block of yeast - 20 g salt
Preparation
-
Place 300 g of the flour in the mixing bowl 16.
-
Fit the splash guard 8 and beater 15.
- Set to level 2.
- Slowly pour 300 ml water through the filling opening 9.
- Add the yeast.
- Add the salt.
- Mix at level 4 - 5 until smooth.
- Cover the bowl and allow the dough to rise at room temperature for about 20 minutes.
- Mix the dough again at level 4 for about 3 minutes.
- Remove the beater 15 and insert the dough hook 13.
11.Knead the dough at level 3. - Now gradually add the remaining flour using the filling opening 9.
Note: The amount of flour is exactly right when the dough can be lifted from the surface and forms a ball when kneading. - To finish, knead the dough one more time at level 2 for about 3 minutes.
Note: The pizza dough has exactly the right consistency when it briefly holds a ball shape but loses its shape and flattens out over a longer time (roughly 30 minutes). - Allow the pizza dough to rest in the covered mixing bowl for a further 20 minutes.
- Turn the bowl upside down and let the dough fall onto a well-floured board.
- Dust the surface of the dough well with flour.

- Briefly knead the dough and form into a ball.
- Put the dough ball into a lidded container and place in the fridge for 24 hours.
- Take the dough out of the fridge and place it on a baking sheet dusted with flour.
- Dust the dough well with flour and briefly knead to form a nice ball of dough.
- The dough is now ready and can be made into pizza bases and the toppings added.
Notes.
- The yeast does not need to be first dissolved in water.
- Much less yeast is required as is recommended on the yeast packaging. Only use as much yeast as required for about 200 - 250 g flour according to the packaging instructions.
- If your pizza dough tastes of yeast, reduce the amount of yeast further. The long rising time compensates for the reduced amount of yeast.
- For more aromatic dough, add sea salt.
- When tasting just after adding the salt, the dough should initially taste slightly salty. If you can clearly taste the flour or yeast, add another pinch of salt. The salty taste becomes milder when the rest of the flour is added.
• Do not place the dough near an tional heat source to rise. You may save time, but the flavour will suffer as a result.
• The resting time of 24 hours is extremely important if your pizza dough is to be nice and tasty. - Pizza dough prepared in this way can be stored in the fridge for several days.
7.3 Pound cake with fruit
Ingredients
• 1 tub of yoghurt (150 ml)
- 1 tub of cooking oil or soft butter (150 g)
• 2 tubs of sugar (300 g)
• 3 tubs of flour (320 g)
• 1 sachet of baking powder
• 4 egg yolks
- 4 egg whites
• 1 tin of fruit of your choice or fresh fruit (around 500 g)
Preparation:
- Put the egg whites in the mixing bowl 16.
- Fit the splash guard 8 and the balloon whisk 14.
- Beat the egg whites at level 9 for 1 - 2 minutes until stiff.
- Take the stiffly-beaten egg whites out of the bowl and put to one side.
- Add the yoghurt to the mixing bowl.
- Rinse out the empty yoghurt tub and measure out the other ingredients with it or use a measuring beaker to determine quantities.
- Add 1 tub of oil (150 ml) or soft butter (150 g).
- Add 2 tubs of sugar (300 ml).
- Add 4 egg yolks.
addi10.Beat the ingredients at level 6 or 7 for around 2 minutes until smooth.
11.Add 3 tubs of flour (450 ml or 320 g) and the baking powder.
12. Remove the balloon whisk 14 and fit the beater 15.
13. Mix the ingredients at level 4 for around 5 minutes.







- Stop the food processor.
15.Add the stiffly-beaten egg whites.
-
Drain fruit, cut into pieces if required and add to bowl.
-
Mix fruit and stiffly-beaten egg whites at level 2 for around 10 - 30 seconds.
-
Place mixture in a cake tin.
19.Bake at 200 °C for around 50 minutes.
7.4 Sand cake
Ingredients
- 250 g butter
- 250 g sugar
• 6 e g g s
- 250 g cornflour
- 75 g plain flour
• 1 sachet of baking powder (20 g)
- 1 untreated lemon
• 1 sachet of vanilla sugar (2 tsp)
Preparation
-
Sieve cornflour and flour into a bowl, add baking powder and mix well.
-
Fit the splash guard 8 and beater 15.
-
Add the butter, sugar and vanilla sugar to the mixing bowl 16.
-
Select level 3 to product a loose batter.
-
Gradually beat in the eggs one by one.
-
Grate the lemon rind and add.
-
Spoon in the flour mixture and stir.
-
Once all ingredients are stirred in, beat at level 6 for 3 minutes.
-
Place mixture in a greased cake tin.
10.Bake for around 60 minutes at 180 °C (top and bottom heat) or 160 °C (fan oven).
- Once the cake is cool, ice or decorate with icing sugar. The lemon juice can be added to the icing.
7.5 Waffles
Ingredients
• 6 e g g s
• 1 sachet of vanilla sugar
• 1/2 sachet of baking powder
- 250 g sugar
• 200 g butter or margarine
- 500 g plain flour
- 300 ml milk
• 125 ml carbonated mineral water
Preparation
- Separate the eggs.
- Put the egg whites in the mixing bowl 16.
- Fit the splash guard 8 and the balloon whisk 14.
- Beat the egg whites at level 9 for 1 - 2 minutes until stiff.
- Stop the food processor.
- Take the stiffly-beaten egg whites out of the bowl and put to one side.
- Remove the balloon whisk 14 and insert the beater 15.
- Cream butter and sugar at level 5 - 6.
- Set to level 4.
- Gradually add the egg yolks, milk, mineral water and vanilla sugar.
- Mix the flour and baking powder and spoon in.
- Stop the food processor briefly and add the stiffly-beaten egg whites to the bowl.
- Fold in the stiffly-beaten egg whites at level 2 for around 10 - 30 seconds.
14.Leave the batter to stand for approx. 30 minutes.
15.Then cook the waffles.






7.6 Chocolate cupcakes
Ingredients
- 100 g butter
- 150 g sugar
• 2 e g g s - 100 g plain flour
- 1/2 tsp baking powder
- 1 / 4 tsp bicarbonate of soda
• ¼ t s p s a l t - 75 g cocoa powder
• 130 ml milk, possibly more
• 1 tsp vanilla extract or vanilla paste
Preparation
- Sieve flour and cocoa powder into a bowl, add baking powder, bicarbonate of soda and salt through the sieve and mix well.
- Fit the splash guard 8 and beater 15.
- Add the butter, sugar and vanilla to the mixing bowl 16.
- Select level 3 to product a loose batter.
- Beat in the eggs one at a time.
- Mix in the flour mixture and about 130 ml of milk alternately to form a smooth mixture.
- If the mixture is too dry, add a little milk at a time until it becomes looser.
- Add the mixture to a cupcake maker or grease ovenproof cups to act as baking tins. You can also use suitably shaped pans or moulds.
- Bake for around 20 minutes at 190 °C.
7.7 Piped biscuits
Ingredients
- 230 g plain flour
• 150 g butter, cold and cut into thin slices - 100 g sugar
• 1 e gg
• 1 sachet of vanilla sugar
• 1 pinchof salt
Preparation
- Put the ingredients in the mixing bowl 16.
- Fit the splash guard 8 and the dough hook 13.
- Mix for around 5 minutes at level 2 - 3.
- Add the mixture to a piping bag and pipe out.
- Place the strands on a baking sheet in an S-shape, in straight lines or in circles.
- Bake at 180 °C for 10 minutes.
Notes:
• You can garnish the biscuits with chopped nuts or almonds before baking.
- Once the biscuits have cooled after baking, they can be iced.
7.8 Strawberry shake with buttermilk
Ingredients
• 1/2 l cold milk
• 1/2 l cold buttermilk
• 250 g fresh strawberries
• 4 tbsp strawberry jam
• 4 t b s p h o n e y
• 1 tbsp lemon juice
• 1 pinchof salt
• sugar or sweetener to taste
Preparation
- Remove the lid 11 from the blender jug 12.
- Add the milk, buttermilk, honey, strawberry jam, lemon juice and a pinch of salt.
- Replace the lid 11 on the blender jug 12.
- Place the jug 12 on the appliance.

- Mix the ingredients for around 30 seconds either using the pulse button 5 or at speed level 10.
Note: The pulse button 5 only functions when at least level 1 is set on the speed controller 4.
- Release the pulse button or reduce the speed to level 1.
- Open the fastening 10 in the lid 11 of the blender jug 12 by turning clockwise.
- Add the strawberries.
- If you would like the shake to be sweeter, add extra sugar to taste.
- Mix for 2 minutes at the highest speed setting (pulse button or speed level 10).
- Pour into glasses and garnish with fresh strawberries.
7.9 Banana shake
Ingredients
• 2 very ripe bananas
• 1/2 l cold milk
• 4 t b sp v a n i l l a i c
• chocolate sprinkles
Preparation
- Peel bananas and cut into pieces.
- Remove the lid 11 from the blender jug 12.
- Put all ingredients in the jug 12.
- Replace the lid 11 on the blender jug 12.
- Place the jug 12 on the appliance.
- Mix the ingredients for around 60 seconds either using the pulse button 5 or at speed level 10.
Note: The pulse button 5 only functions when at least level 1 is set on the speed controller 4.
- Pour into glasses and decorate with chocolate sprinkles.
7.10 Sour cherry smoothie
Ingredients
• 250 g jar of pitted sour cherries
• 150 g yoghurt
- sugar to taste
Preparation
- Remove the lid 11 from the blender jug 12.
- Put the sour cherries plus juice in the blender jug 12.
- Replace the lid 11 on the blender jug 12.
- Place the jug 12 on the appliance.
- Blend the sour cherries using the pulse button 5 for 15 seconds.
Note: The pulse button 5 only functions when at least level 1 is set on the speed controller 4.
-
Add the yoghurt and sugar.
-
Mix the ingredients either using the pulse button 5 or at speed level 10 (max. 2 minutes) until the mixture is smooth and thick.






8. Cleaning the appliance

Warning! To prevent the risk of electric shock, injury or damage:
- Disconnect the power supply plug from the mains socket before cleaning.
- Never immerse the base unit 7 in water.
Caution! Never use scouring, corrosive or abrasive cleaning materials as these could damage the appliance.
8.1 Cleaning the base unit (7)
- Clean the base unit 7 with a damp cloth. A little detergent may also be used.
- Wipe over with clean water.
- Do not use the base unit 7 again until it is completely dry.
8.2 Cleaning the splash guard (8), dough hook (13), balloon whisk (14) and beater (15)
Caution!The splash guard 8 is not dishwasher-safe.
The dough hook 13, balloon whisk 14 and beater 15 can also be wash dishwasher.
- Put the parts in cold or lukewarm water to soften dough residues.
Note You can also add a little detergent to the water.
- Remove softened dough residues with a washing-up brush.
- Rinse off with clean water.
- Allow parts to dry completely before using them again.
8.3 Cleaning the mixing bowl (16)
The mixing bowl 16 is made of stainless steel and can be cleaned in the sink or dishwasher.
8.4 Cleaning the blender jug (12)
Note: The blender jug 12 and the lid 11 are dishwasher-proof.
- Place the blender jug 12 on the appliance.
- Fill up around halfway with warm water containing detergent.
- Put on lid 11.
- Check that the speed controller 4 is set to "0".
- Put the power supply plug in a mains socket (see "3. Technical data" on page 3).
- Press the pulse button 5 briefly several times.
Note: The pulse button 5 only functions when at least level 1 is set on the speed controller 4.
- Take the jug 12 off the appliance.
- Pour out the detergent solution.
- Rinse out blender jug 12 with clean water.
- Allow the jug 12 to dry completely before using again.
9. Disposal
9.1 Appliance
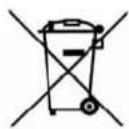
The symbol with the crossed-out rubbish bin on wheels means that within the European Union, the product must be disposed of to a sorted rubbish collection. This applies to the product and all accessories which are marked with this symbol. Marked products must not be disposed of via the regular domestic waste but must be handed in to a recycling centre
for electrical or electronic devices. Recycling helps to reduce the use of raw materials and to relieve the environment. It is therefore imperative that you follow the disposal regulations applicable in your country.
9.2 Packaging
If you wish to discard the packaging, please observe the applicable environmental regulations in your country.
You have a warranty on this product which is valid for 3 years from the date of purchase. In the event of this product being defective, you have statutory rights against the seller of the product. These statutory rights are not limited by our warranty as set out below.
Warranty conditions
The warranty period begins with the date of purchase. Please keep the original till receipt in a safe place. This is required as your proof of purchase.
If a defect in materials or workmanship occurs within three years of the date your product was purchased, we will repair or replace the product at our discretion at no charge to you. This service under warranty assumes that the defective product and the proof of purchase (till receipt) are submitted within the three-year period and that a brief description in writing is provided of what the defect is and when it occurred.
If the defect is covered by our warranty, the repaired product or a new one will be sent back to you. There is no new warranty period following repair or replacement of the product.
Warranty period and statutory claims relating to defects
The warranty period is not extended when a service is provided under warranty. This also applies to replaced and repaired parts. Any damage or defects present at purchase must be reported immediately the product is unpacked. Repairs incurred once the warranty period has expired are chargeable.
Scope of warranty
The product has been carefully manufactured in accordance with strict quality guidelines and was thoroughly checked before being delivered.

The warranty applies to defective materials or workmanship. This was extend to product parts exposed to normal wear and tear (and which can therefore be considered wear parts) or to damage to fragile parts such as switches, batteries or parts made of glass.
This warranty is void if the product is damaged or if it is not used or maintained properly. All the information in the operating instructions should be observed precisely to ensure that the product is used properly.
It is essential to avoid intended uses and actions which are discouraged or warned against in the operating instructions.
The product is intended for only private use and not for commercial purposes.
The warranty is void in the event of misuse, incorrect treatment, use of force or interference by anyone other than our authorized service centre.
Warranty process
Please follow the instructions below to ensure that your claim is processed quickly.
• In case of any enquiry, please keep the article number (for this product: IAN 100104: red/105590: crème) and the till receipt as proof of purchase.
- The article number can be found on the rating plate, as an engraving, on the cover sheet of your instructions (bottom left) or as a label on the back or underside of your appliance.
- If malfunctions or any other defects should occur, in the first instance contact the Service Centre mentioned below by telephone or e-mail.
- Once a product has been recorded as defective, you can then send it Freepost to the service address you are given, enclosing the proof of purchase (till
receipt) and quoting what the defect is
r a n band whereitsocoured.

You can download these instructions and many other manuals, product videos and software from www.lidl-service.com.

Service Centre
GB Service Great Britain
Tel.: 0871 5000 720 (£ 0.10/Min.)
E-Mail: hoyer@lidl.co.uk
IR Service Ireland
Tel.: 1890 930 034
(0,08 EUR/Min., (peak))
(0,06 EUR/Min., (off peak))
E-Mail: hoyer@lidl.ie
CY Service Cyprus
Tel.: 8009 4409
E-Mail: hoyer@lidl.com.cy
MT Service Malta
Tel.: 80062230
E-Mail: hoyer@lidl.com.mt
IAN: 100104: red/105590: crème

Supplier
Please note that the address below is not a service address. In the first instance, contact the service centre mentioned above.
HOYER Handel GmbH
Kühnehöfe 5
22761 Hamburg
Germany






Spis treści
natural_image
Close-up of a metallic surface with small square cutouts and a droplet on top (no text or symbols visible)natural_image
Close-up of a metallic surface with two small square indentations and a central hole, showing no text or symbols.natural_image
Close-up of a metallic mechanical component with two small square cutouts and a pointed tip, no visible text or symbols.natural_image
Close-up of a metallic mechanical component with mounting holes and a curved edge (no visible text or symbols)natural_image
Close-up of a metallic surface with two small square cutouts and a dark contact area, no visible text or symbols.natural_image
Close-up of a metallic surface with two small square indentations and a dark circular feature, no visible text or symbols.-
Odstranite blender 12.
-
Namestite ponovno pokrov 2.
natural_image
Close-up of a metallic surface with embedded metal components and a small droplet (no text or symbols visible)natural_image
Close-up of a metallic surface with two small square indentations and a central droplet (no text or symbols visible)natural_image
Close-up of a metallic mechanical component with two mounting holes and a curved surface (no visible text or symbols)- Mixovaciu nádobu 12 otáčajte v smere hodinových ručičiek, až zapadne. Malý výstupok teraz ukazuje na symbol uzavretej zámky.
natural_image
Close-up of a metallic surface with two small square features and a central droplet, no visible text or symbols.-
Odoberte mixovaciu nádobu 12.
-
Znovu nasad'te kryt 2.
6.3 Použivanie ochrany proti striekaniu
natural_image
Close-up of a metallic surface with two small electronic components and a dark contact, no visible text or symbols.natural_image
Close-up of a metallic surface with two small square indentations and a small droplet on top (no text or symbols visible)

- PROFESSIONAL FOOD PROCESSOR SKMP 1200 A2
- PROFESSIONAL FOOD PROCESSOR
- PROFI KONYHAI ROBOTGÉP
- KUCHYNSKÝ ROBOT
- Polski 18
- Congratulations on the purchase of your new product.
- Device description
- Intended purpose
- Scope of supply
- Variants
- Names of parts (see fold-out page)
- Technical data
- Safety information
- Explanation of terms
- Warning!
- Caution!
- Note:
- Special information about this appliance
- General information
- Protection against electric shock
- Preventing injury
- For the safety of your child
- Material damage
- Unpacking and setting up
- Operating the appliance
- Assembling the appliance
- Fitting the blender jug 12 : Caution!
- Dismantle appliance
- Removing the blender jug12 :
- Using the splash guard
- Using the blender jug 12
- Regulating speed, switching on and off
- Thermal cut-out
- Recipes
- White bread
- Ingredients
- Preparation
- Pizza dough
- Ingredients for 4 people
- Notes.
- Pound cake with fruit
- Preparation:
- Sand cake
- Waffles
- Chocolate cupcakes
- Piped biscuits
- Notes:
- Strawberry shake with buttermilk
- Banana shake
- Sour cherry smoothie
- Cleaning the appliance
- Cleaning the base unit (7)
- Cleaning the splash guard (8), dough hook (13), balloon whisk (14) and beater (15)
- Cleaning the mixing bowl (16)
- Cleaning the blender jug (12)
- Disposal
- Appliance
- Packaging
- Warranty conditions
- Warranty period and statutory claims relating to defects
- Scope of warranty
- Warranty process
- Service Centre
- IAN: 100104: red/105590: crème
- Supplier
- Spis treści
- Použivanie ochrany proti striekaniu
Brand : SILVERCREST
Model : SKMP 1300 B3
Category : Food Processor