
SMZ 400 A1 - Food Processor SILVERCREST - Free user manual and instructions
Find the device manual for free SMZ 400 A1 SILVERCREST in PDF.


| Product Type | Food Processor |
| Model | SMZ 400 A1 |
| Brand | SilverCrest |
| Motor Power | 400 W |
| Bowl Capacity | 1.5 L |
| Dimensions (approx.) | 30 x 20 x 25 cm |
| Weight | 3.5 kg |
| Power Supply | 220-240 V ~ 50 Hz |
| Cable Length | 1.2 m |
| Main Functions | Chopping, blending, kneading, slicing, shredding |
| Included Attachments | Stainless steel blade, dough hook, whisk, slicing disc, shredding disc |
| Material | Plastic housing, stainless steel blade |
| Safety Features | Safety lock, non-slip feet |
| Dishwasher Safe Parts | Yes (except motor base) |
| Warranty | 2 years |
Frequently Asked Questions - SMZ 400 A1 SILVERCREST
User questions about SMZ 400 A1 SILVERCREST
0 question about this device. Answer the ones you know or ask your own.
Ask a new question about this device
Download the instructions for your Food Processor in PDF format for free! Find your manual SMZ 400 A1 - SILVERCREST and take your electronic device back in hand. On this page are published all the documents necessary for the use of your device. SMZ 400 A1 by SILVERCREST.
USER MANUAL SMZ 400 A1 SILVERCREST
natural_image
Modern glass laboratory brush tool with green liquid inside, placed on a white surface with fresh green herbs nearby (no text or symbols visible)ES Picadora
Operating instructions
DE Multizerkleinerer
AT
CH
Bedienungsanleitung

natural_image
Line drawing of a blender with a handle and lid, showing a drop from top to bottom (no text or symbols)ES
5


natural_image
Simple line drawing of a portable stove with a lid and tray, no text or symbols presentnatural_image
Diagram showing a circular ring being processed into a multi-layered mechanical component (no text or symbols present)flowchart
graph TD
    A["Top Box"] --> B["Shrimp Bowl"]
    B --> C["Blender with Shape"]
natural_image
Line drawing of a mechanical device with a downward arrow and three vertical stripes (no text or symbols)natural_image
Diagram showing a circular component being lifted into a smaller circular housing (no text or symbols)natural_image
Line drawing of a kitchen appliance with a lid and base, showing a drop from top to bottom (no text or symbols)natural_image
Simple line drawing of a container with a lid and internal components, no text or symbols present.- Safety instructions ....33
- Items supplied ....34
- Cleaning 34
- Assembly 35
- Operation ....35
- Storage ....36
- Troubleshooting ....37
- Disposal 37
- Technical data ....37
- Warranty ....38
- Table of processing times ....38
- Recipes ....39

Overview
1 One-touch button
2 Sealing ring
3 Lid
4 Container (max. 450 ml)
5 Blade unit
6 Power base
7 Mains cable with plug
8 Cable storage
9 Purée disc
1. Safety instructions
- Before using the appliance, carefully read through these operating instructions and ensure you comply with the safety instructions in all respects!
- This appliance should only be used for its intended purpose as described in these instructions.
- Do not discard these instructions.
- If you pass the appliance on to someone else, please include the operating instructions.
Intended purpose
The multi chopper is designed solely for chopping and puréeing foodstuffs. The appliance is intended for use in the home environment. It must be used indoors only. This appliance must not be used for commercial purposes.
Possible misuse

WARNING! Do not use the appliance to chop particularly hard foodstuffs such as frozen food, bones, nutmeg, grain, coffee beans or spices.
Warnings
If necessary, the following warnings will be used in these operating instructions:

DANGER! High risk: failure to observe this warning may result in injury to life and limb.
WARNING! Moderate risk: failure to observe this warning may result in injury or severe material damage.
CAUTION: Low risk: failure to observe this warning may result in minor injury or material damage.
NOTE: Points and special considerations which should be remembered when using the appliance.
DANGER for children
- Packaging material is not a toy. Children must not play with the plastic bags. There is a risk of suffocation.
- This appliance is not designed to be used by people (including children) with limited physical, sensory or mental capabilities or people without adequate experience and/or understanding unless they are supervised by someone responsible for their safety or are instructed by same how to use the appliance.
• Children must be supervised to ensure that they do not play with the appliance. - The appliance should be kept out of the reach of children.

DANGER of electric shock due to moisture
- Do not immerse the power base, the mains cable or the power plug in water or any other liquid.
- Protect the power base from moisture, dripping and splashes.
• If liquid gets into the power base, remove the power plug immediately. Have the appliance checked before using it again. - Never operate the appliance with wet hands.

DANGER of electrocution
- Only plug the power plug into a socket when the appliance has been assembled and filled.
- Only connect the power plug to a properly installed wall socket that is easily accessible and delivers voltage matching the rating plate. The wall socket must also be easily accessible after connection.
• Take care that the mains cable is not damaged by sharp edges or hot surfaces. Do not wind the mains cable around the appliance.

• The appliance is not completely disconnected from the mains even after being switched off. To do this, remove the power plug.
- When using the appliance, make sure that the mains cable is not trapped or crushed.
- When removing the power plug from the wall socket, always pull the plug, never the cable.
- Disconnect the power plug from the wall socket ...
... if there is a fault,
... if you are not using the multi chopper,
... before assembling the multi chopper or taking it apart,
... before you clean the multi chopper and ... during thunder storms.
- If there is visible damage to the appliance or the mains cable, do not use the appliance.
• To avoid any risk, do not make modifications to the product. The mains cable must not be replaced by a non-specialist. Repairs must be carried out by a specialist workshop or at the Service Centre.
- This appliance is not designed to be operated with an external timer or a separate telecontrol system.

DANGER of injury from cuts
- Never reach inside when the blades are rotating. Do not hold spoons or similar items in rotating parts. If your hair is long, make sure it does not get caught. The same applies to loose clothing.
• The blade unit is sharp. Please take care when handling it. When washing in the sink, the water should be clear enough for the blades to still be visible. - Under no circumstances must the appliance be operated without the container.
WARNING about material damage
• The maximum capacity is 450 ml.
• To prevent damage to the appliance, always stop blending when the blade unit / purée disc is no longer turning or has slowed down. Unplug and check whether something is blocking the container or the food is too tough. Also check whether the appliance has been properly assembled.
- Only use genuine accessories.
- Do not use any astringent or abrasive cleaning agents.
2. Items supplied
1 power base 6
1 container 4
1 lid 3
1 sealing ring 2
1 blade unit 5
1 purée disc (two parts) 9
1 set of operating instructions
3. Cleaning
Clean the appliance before using for the first time!

DANGER! Remove the power plug 7 from the socket before cleaning the multi chopper.
- Do not immerse the power base 6, the mains cable or the power plug 7 in water or any other liquid.
- When washing in the sink, the water should be clear enough for the blade unit 5 to still be visible.
WARNING! Do not use any astringent or abrasive cleaning agents.
- If necessary, wipe the power base 6 and the mains cable 7 with a slightly damp cloth. Make sure that the power base 6 is fully dry before using it again.
- All accessories, with the exception of the power base 6, can be cleaned by

hand or in the top rack of the dish-washer.
- Leave all parts to dry completely before you tidy them away.
A few tips on cleaning
- Clean the appliance as soon as possible after use so that food residue does not dry on.
- Whenever processing very salty foods, wash the blade unit 5 at once.
4. Assembly

DANGER! Only plug the power plug 7 into a socket when the multi chopper is fully assembled and filled.
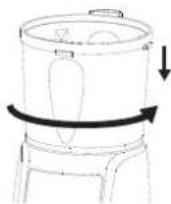
- Place the container 4 on the power base 6. Twist the container 4 anticlockwise.
natural_image
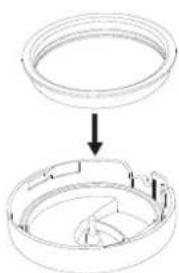
Diagram showing a circular component being lifted into a ring, with no text or symbols present.- Insert the sealing ring 2 into the lid 3. Make sure that the sealing ring 2 is positioned in the intended groove so that the lid 3 seals properly.

- Before using for the first time, fit the two parts of the purée disc 9 together. NOTE: It will not be possible to take the purée disc apart again.
natural_image
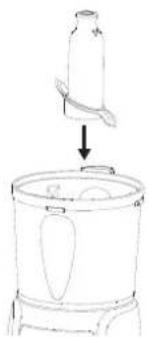
Line drawing of a bottle being placed into a container with an arrow indicating the process (no text or symbols)- Now insert the blade unit 5 or purée disc 9 as required into the container 4. Use the blade unit to chop harder food-stuffs and the purée disc to blend, for example, dips and sauces.
- To remove, twist the container 4 clockwise and lift it off the power base 6.
5. Operation

DANGER! Never reach inside when the blades are rotating. Do not hold spoons or similar items in rotating parts. If your hair is long, make sure it does not get caught. The same applies to loose clothing.
- Do not open or untwist the lid 3 or container 4 until the blade unit 5 or purée disc 9 has come to a complete stop.
WARNING!
• To prevent damage to the appliance, always stop blending when the blade unit 5 / purée disc 9 is no longer turning or has slowed down. In this case, unplug the power plug 7 and check whether something is blocking the container 4 or the food is too tough. Also check whether the appliance has been properly assembled.







Uses
CAUTION: Depending on the hardness and consistency of the food, do not fill the container 4 to the maximum mark as otherwise the blade unit 5 might jam. Follow the instructions in the section "Table of processing times" on page 38.
- The multi chopper is suitable for puréeing, for example, fruit and vegetables, soups, dips and sauces, as well as for mixing drinks and making milkshakes.
- You can also use the purée disc 9 to whip cream or egg whites.
• The maximum capacity is 450 ml.
Preparing foodstuffs
- Wash or wipe the foodstuff.
- Chop the food into small cubes (approx. 2-3 cm edge length).
- Shell nuts. The seedcoat, such as on almonds, may be left on as required.
- Strip herbs from their stems and tear them into small pieces when dry.
- Remove bones, sinew and skin from meat.
Chopping / blending
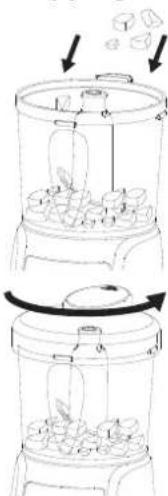
- Fill the container 4 with the prepared foodstuffs. The maximum capacity is 450 ml.
-
Place the lid 3 on the container 4. Twist the lid 3 anticlockwise and check that the container 4 is properly closed.
-
Insert the power plug 7 into a wall socket.
- Press the one-touch button 1 and then release it. Chop / blend the foodstuff in short pulses (approx. 1 second). The number of pulses required will vary according to the amount and consistency of the foodstuff.

natural_image
Simple line drawing of a portable stove with a lid and internal shelves, no text or symbols present.Check the result repeatedly after every few pulses. Guidelines for different foodstuffs may be found in the section "Table of processing times" on page 38.
- Remove the power plug 7 from the socket after chopping.
- Twist the container 4 clockwise, lift it off and place it on the work surface.
- Hold the container 4 firmly. Twist the lid 3 clockwise and remove.
- Carefully remove the blade unit 5 / purée disc 9.
- Empty the container 4.
6. Storage

DANGER! The appliance should be kept out of the reach of children.
- To prevent accidents, the power plug 7 must not be plugged into a socket during storage.
- Choose a place where neither heat nor moisture can affect the appliance.
- Wrap the mains cable 7 around the cable storage 8 provided on the bottom of the power base 6.
- Choose a place where neither heat nor moisture can affect the appliance.
- Wrap the mains cable 7 around the cable storage 8 provided on the bottom of the power base 6.
- Choose a place where neither heat nor moisture can affect the appliance.
- Wrap the mains cable 7 around the cable storage 8 provided on the bottom of the power base 6.


7. Troubleshooting
If your appliance fails to function as required, please try this checklist first. Perhaps there is only a minor problem and you can solve it yourself.

DANGER! Do not attempt to repair the appliance yourself under any circumstances.
| Fault Possible causes/Action | |
| No function | • Is the power supply reliable?• Check the connection.• Have all the accessories been correctly assembled? |
| Blade unit 5 no longer turning or has slowed right down | • Switch off immediately and check:- Is something blocking the container?- Is the food too tough or hard?- Is the appliance assembled properly? |
| The con-tainer 4 looks cloudy due to hard foodstuffs | • This is normal and does not impair function. |

8. Disposal
The symbol showing a wheelie bin crossed through indicates that the product requires separate refuse collection in the European Union. This applies to the product and all accessories
marked with this symbol. Products identified with this symbol may not be discarded with normal household waste, but must be taken to a collection point for recycling electric and electronic appliances. Recycling helps to reduce the consumption of raw materials and protect the environment.
Packaging
When disposing of the packaging, make sure you comply with the environmental regulations applicable in your country.
9. Technical data
| Model: SMZ 400 A1 | |
| Mains voltage: 220-240V ~ 50Hz | |
| Protection class: II | |
| Power: 400 W | |
| max. continuous operation (KB): | After a maximum of 1 minute continuous operation, the required period before next use is 5 minutes. |
Subject to technical modifications.
CE
GB
37
10. Warranty
The warranty for your appliance is valid for 3 years from the date of purchase. The appliance has been manufactured in accordance with strict quality guidelines and tested before delivery. Should operational errors occur despite this, however, please phone the service centre first. Our customer consultants will gladly assist you, and arrange with you how to proceed. The warranty will be invalidated if the appliance is incorrectly connected, if parts from different manufacturers are used, in the case of normal wear and tear, upon the use of force, independent attempts at repairing the appliance or improper use.
Contact details GB:
Service hotline (freephone):
00800/4212 4212
(Monday to Friday
between 9 a.m. and 5 p.m. CET)
E-mail: hoyer-gb@teknihall.com
Contact details CY:
Service hotline (freephone):
800/94400
(Monday to Friday
between 9 a.m. and 5 p.m. CET)
E-mail: hoyer-cy@teknihall.com
Contact details IE:
Service hotline (freephone):
00800/4212 4212
(Monday to Friday
between 9 a.m. and 5 p.m. CET)
E-mail: hoyer-ie@teknihall.com
- Table of processing times
| Ingredients | Recommended quantity | Recommended number of pulses |
| Onions (quartered) | 150 g | approx. 5 pulses |
| Garlic (whole cloves) | 100 g | approx. 10 pulses |
| Herbs (bunch, leaves stripped) | 200 g | approx. 10 pulses |
| Walnuts | 50 g | approx. 4 pulses |
| 100 g | approx. 7 pulses | |
| 200 g | approx. 9 pulses | |
| Hazelnuts | 50 g | approx. 4 pulses |
| 100 g | approx. 8 pulses | |
| 200 g | approx. 10 pulses | |
| Almonds / pistachios | 50 g | approx. 10 pulses |
| 100 g | approx. 15 pulses | |
| 200 g | approx. 15 pulses | |
| Meat (tender, raw) | 250 g | approx. 20 pulses |
| Soft cheese (e.g. Emmental/ Gouda) | 100 g | approx. 10 pulses |
| Hard cheese (Parmesan) | 100 g | approx. 30 pulses |

| Ingredients | Recommended quantity | Recommended number of pulses |
| Vegetables/ fruit (raw) | 100 g | approx. 5 pulses |
| 200 g | approx. 10 pulses | |
| Vegetables/ fruit (cooked) | 100 g | approx. 10 pulses |
| 200 g | approx. 15 pulses | |
| Chocolate (e.g. dark/full milk) | 100 g | approx. 10 seconds |
NOTE: The number of pulses stated here are for guidance only.
• The number of pulses required will vary according to the amount and consistency of the foodstuff.
- Depending on how coarse or fine you wish the food to be, check the result repeatedly after every few pulses.
12. Recipes
WARNING! Depending on the ingredients used, some foodstuffs may need to be consumed shortly after preparation and should not be stored for longer, even in a refrigerator.
NOTE: Ingredients should be at room temperature.
- Chill the container 4 and blade unit 5 / purée disc 9 in cold water before preparation.
• The number of pulses depends on which recipe you use.
Mayonnaise
2 egg yolks
1 tablespoon vinegar 100 ml vegetable oil
1 teaspoon lemon juice salt
pepper
attachment: purée disc 9
-
Put the egg yolks and vinegar into the container 4. Fit the lid 3 and blend.
-
Add a few drops of oil and continue blending until the oil is no longer visible. Repeat this procedure until the mixture gradually becomes firmer.
-
Season to taste with salt and pepper. Add lemon juice to taste.
Adjust the flavour of the mayonnaise if wished with a teaspoonful of mustard.
Pesto (red)
150 g tomatoes (dried)
1 bunch of basil
1 red onion (quartered)
2 tablespoons pine kernels
1-2 cloves of garlic
2 teaspoons balsamic vinegar
5 tablespoons olive oil salt
pepper
attachment: blade unit 5
-
Put the tomatoes, stripped basil leaves, pine kernels, garlic and onion into the container 4. Fit the lid 3 and purée finely.
-
Add vinegar and oil and blend.
-
Season to taste with salt and pepper.
Keep the pesto in a screw-top jar covered with a layer of olive oil. That way it will keep for up to a month in the refrigerator.



Pesto (green)
1-2 bunches of fresh basil
1-2 cloves of garlic
2 tablespoons pine kernels
150 ml olive oil
2 tablespoons Parmesan
salt + freshly ground black pepper attachment: blade unit 5
-
Put the basil, garlic, pine kernels and olive oil into the container 4. Fit the lid 3 and purée finely.
-
Add Parmesan at the end. Season to taste with salt and pepper.
Keep the pesto in a screw-top jar covered with a layer of olive oil. That way it will keep for up to a month in the refrigerator.
Guacamole
2 avocados (very ripe)
2 cloves of garlic
12 lemon
1 / 2 teaspoon mustard
1 teaspoon oil
1-2 tomatoes (quartered)
1 tablespoon cream cheese
sugar
salt
pepper
Tabasco
attachment: blade unit 5
-
Peel the avocado, remove the stone and put the flesh into the container 4.
-
Then put the garlic, lemon juice, mustard, oil, tomatoes and cream cheese into the container 4. Fit the lid 3 and purée finely.
-
Season to taste with salt and pepper and then adjust the flavour with Tabasco.
Barbecue sauce
200 g tomatoes (quartered)
2 tablespoons vegetable oil salt
garlic salt or fresh garlic cloves
50 ml tomato ketchup
30 g tomato purée
2 tablespoon vinegar
2 tablespoons lemon juice
1 teaspoon sugar cinnamon
attachment: blade unit 5
-
Put the quartered tomatoes, oil, salt and garlic into the container 4. Fit the lid 3 and blend for 2-3 brief pulses.
-
Take off the lid 3 and season to taste. The garlic flavour has to be very strong.
-
Add the ketchup, tomato purée, vinegar, lemon juice, sugar and a pinch of cinnamon. Fit the lid 3 and blend the sauce until the mixture is smooth.
-
Take off the lid 3 and season to taste.
-
Put the sauce into a pan. Simmer for about 45 minutes at a low temperature until the mixture thickens.
If required, adjust the flavour of the barbecue sauce with chilli powder.


Herb dip / tzatziki
250 g quark or yoghurt 1 packet herbs (e.g. freezer pack) /
2-3 finely chopped cloves of garlic
2-3 tablespoons mineral water salt
pepper attachment: purée disc 9
- Put the quark or yoghurt, herbs / garlic and 1 tablespoonful of mineral water into the container 4. Fit the lid 3 and purée well.
- If required, add 1-2 tablespoonfuls of mineral water.
- Season to taste with salt and pepper.
NOTE: If you wish to use fresh herbs, first use the blade unit 5 to chop the herbs and then add the quark or yoghurt.
Fruit dream
100-200 g vanilla ice cream fruit (fresh or frozen) attachment: blade unit 5
- Put the vanilla ice cream and fruit into the container 4. Fit the lid 3 and purée finely until the fruit is fully mixed into the ice cream.
To make a milkshake, add 100 ml milk.





GB
41



Inhalt
natural_image
Diagram showing a circular ring being cut into a segmented circular structure (no text or symbols)natural_image
Line drawing of a kitchen appliance with a lid and base, showing a downward arrow indicating a drop (no text or symbols)natural_image
Line drawing of a mechanical device with arrows indicating motion or assembly (no text or symbols)natural_image
Line drawing of a kitchen appliance with a lid and side legs, showing a curved arrow indicating rotation (no text or symbols)natural_image
Line drawing of a blender with a lid and spout, showing liquid level (no text or symbols)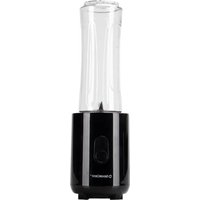

- Overview
- Safety instructions
- Intended purpose
- Possible misuse
- Warnings
- DANGER for children
- DANGER of electric shock due to moisture
- DANGER of electrocution
- DANGER of injury from cuts
- WARNING about material damage
- Items supplied
- Cleaning
- Clean the appliance before using for the first time!
- WARNING! Do not use any astringent or abrasive cleaning agents.
- A few tips on cleaning
- Assembly
- Operation
- WARNING!
- Uses
- Preparing foodstuffs
- Chopping / blending
- Storage
- Troubleshooting
- Disposal
- Packaging
- Technical data
- Warranty
- Contact details GB:
- Contact details CY:
- Contact details IE:
- Recipes
- Mayonnaise
- Pesto (red)
- Pesto (green)
- Guacamole
- Barbecue sauce
- Herb dip / tzatziki
- Fruit dream
- Inhalt
Brand : SILVERCREST
Model : SMZ 400 A1
Category : Food Processor