
PD-6 - Electronic drum ROLAND - Free user manual and instructions
Find the device manual for free PD-6 ROLAND in PDF.
| Product type | Electronic drum pad |
| Brand | Roland |
| Model | PD-6 |
| Diameter | 6 inches (15.2 cm) |
| Striking surface | Mesh rubber, velocity-sensitive |
| Trigger zone | Single zone |
| Sensor | Piezoelectric, precise triggering |
| Connector | 6.35 mm TS jack for signal output |
| Power supply | Phantom power from drum module (not required if module provides it) |
| Weight | Approximately 0.5 kg |
| Materials | Steel frame, rubber surface |
| Mounting | Accepts 9.5 mm rod (standard) |
| Compatibility | Roland modules (TD-6, TD-9, etc.) and other compatible modules |
| Sensitivity adjustment | Via connected drum module |
| Care and cleaning | Wipe with a soft, dry cloth; do not use abrasive products |
| Safety | Place on a stable stand to prevent falls; do not expose to moisture |
| Spare parts and repairability | Parts available (cable, screws, sensor); repair by an authorized technician |
| General information | Entry-level drum pad for electronic drums; ideal for beginners |
Frequently Asked Questions - PD-6 ROLAND
User questions about PD-6 ROLAND
0 question about this device. Answer the ones you know or ask your own.
Ask a new question about this device
Download the instructions for your Electronic drum in PDF format for free! Find your manual PD-6 - ROLAND and take your electronic device back in hand. On this page are published all the documents necessary for the use of your device. PD-6 by ROLAND.
USER MANUAL PD-6 ROLAND
Thank you and congratulations on your choice of the Roland Cymbal Pad CY-6/Pad PD-6.
Before using CY-6/PD-6, you need to make the settings for the percussion sound module (p. 7).
CY-6
Contents of the Package
CY-6 (cymbal pad unit)
Connection Cable (stereo)
Wing Nut
Felt Washer
Stopper
Owner's Manual (this manual)
Before using this unit,
carefully read the
sections entitled:
"USING THE UNIT
SAFELY" (p. 2-3) and
"IMPORTANT NOTES"
(p. 3). These sections provide important
information concerning the proper operation of the unit. Additionally, in order to feel assured that you have gained a good grasp of every feature provided by your new unit, Owner's manual should be read in its entirety. The manual should be saved and kept on hand as a convenient reference.
PD-6
Contents of the Package
PD-6 (pad unit)
- Connection Cable (monaural)
Owner's Manual (this manual)
USING THE UNIT SAFELY
INSTRUCTIONS FOR THE PREVENTION OF FIRE, ELECTRIC SHOCK, OR INJURY TO PERSONS
About WARNING and CAUTION Notices
| ▲WARNING | Used for instructions intended to alert the user to the risk of death or severe injury should the unit be used improperly. |
| ▲CAUTION | Used for instructions intended to alert the user to the risk of injury or material damage should the unit be used improperly. * Material damage refers to damage or other adverse effects caused with respect to the home and all its furnishings, as well to domestic animals or pets. |
About the Symbols
| ▲ | The △ symbol alerts the user to important instructions or warnings. The specific meaning of the symbol is determined by the design contained within the triangle. In the case of the symbol at left, it is used for general cautions, warnings, or alerts to danger. |
| ◎ | The ⊙ symbol alerts the user to items that must never be carried out (are forbidden). The specific thing that must not be done is indicated by the design contained within the circle. In the case of the symbol at left, it means that the unit must never be disassembled. |
| ◆ | The ● symbol alerts the user to things that must be carried out. The specific thing that must be done is indicated by the design contained within the circle. In the case of the symbol at left, it means that the power-cord plug must be unplugged from the outlet. |
ALWAYS OBSERVE THE FOLLOWING
WARNING
Before using this unit, make sure to read the instructions below, and the Owner's Manual.

- Do not open or perform any internal modifications on the unit.

- Do not attempt to repair the unit, or replace parts within it (except when this manual provides specific instructions directing you to do so). Refer all servicing to your retailer, the nearest Roland Service Center, or an authorized Roland distributor, as listed on the "Information" page.

- Never use or store the unit in places that are:

- Subject to temperature extremes (e.g., direct sunlight in an enclosed vehicle, near a heating duct, on top of heat-generating equipment); or are

- Damp (e.g., baths, washrooms, on wet floors); or are
- Humid; or are
- Exposed to rain; or are
- Dusty; or are
-
Subject to high levels of vibration.
-
This unit should be used only with a rack or stand that is recommended by Roland.

WARNING
- When using the unit with a rack or stand recommended by Roland, the rack or stand must be carefully placed so it is level and sure to remain stable. If not using a rack or stand, you still need to make sure that any location you choose for placing the unit provides a level surface that will properly support the unit, and keep it from wobbling.

- Do not allow any objects (e.g., flammable material, coins, pins); or liquids of any kind (water, soft drinks, etc.) to penetrate the unit.


- In households with small children, an adult should provide supervision until the child is capable of following all the rules essential for the safe operation of the unit.

- Protect the unit from strong impact. (Do not drop it!)

- Try to prevent cords and cables from becoming entangled. Also, all cords and cables should be placed so they are out of reach of children.

- Never climb on top of, nor place heavy objects on the unit.


- Should you remove wing nut (for CY-6), washers (for CY-6), or stand fixing screw (for PD-6) make sure to put them in a safe place out of children's reach, so there is no chance of them being swallowed accidentally.
IMPORTANT NOTES
In addition to the items listed under "USING THE UNIT SAFELY" on page 2-3, please read and observe the following:
Placement
- Do not expose the unit to direct sunlight, place it near devices that radiate heat, leave it inside an enclosed vehicle, or otherwise subject it to temperature extremes. Excessive heat can deform or discolor the unit.
- To avoid possible breakdown, do not use the unit in a wet area, such as an area exposed to rain or other moisture.
- Do not allow rubber, vinyl, or similar materials to remain on the piano for long periods of time. Such objects can discolor or otherwise harmfully affect the finish.
- Do not put anything that contains water (e.g., flower vases) on the piano. Also, avoid the use of insecticides, perfumes, alcohol, nail polish, spray cans, etc., near the unit. Swiftly wipe away any liquid that spills on the unit using a dry, soft cloth.
Maintenance
- For everyday cleaning wipe the unit with a soft, dry cloth or one that has been slightly dampened with water. To remove stubborn dirt, use a cloth impregnated with a mild, non-abrasive detergent. Afterwards, be sure to wipe the unit thoroughly with a soft, dry cloth.
- Never use benzine, thinners, alcohol or solvents of any kind, to avoid the possibility of discoloration and/or deformation.
Additional Precautions
- Use a reasonable amount of care when using the unit's buttons, sliders, or other controls; and when using its jacks and connectors. Rough handling can lead to malfunctions.
- This instrument is designed to minimize the extraneous sounds produced when it's played. However, since sound vibrations can be transmitted through floors and walls to a greater degree than expected, take care not to allow these sounds to become a nuisance to neighbors, especially when performing at night and when using headphones.
Features
- Velocity sensitive cymbal pad provides rich expression.
- Designed specially for cymbals, the pad offers superior playing feel. Even the movement caused by playing is simulated.
- You can use bow shots, edge shots, and choking techniques.
- Compatible with all Roland percussion sound modules (p. 7).
Making the Settings
Attaching the Cymbal Pad to a Stand
Attach the CY-6 to a separately sold cymbal mount (MDY series).
1. Use a commercially available tuning key to tighten the stopper bolt.
The stopper keeps the cymbal pad from turning, and prevents the cables from catching or getting tangled on the stand.
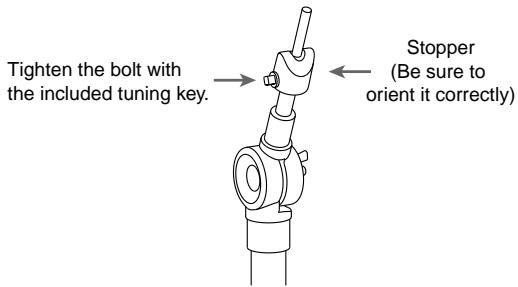
2. Attach the CY-6 so the unit is oriented as shown in the diagram.
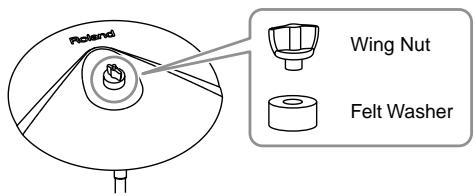
3. Tighten the wing nut to obtain the desired movement.
Use the included felt washer and the wing nut.
Connecting to a Percussion Sound Module (TD-6, TD-8, TD-10, etc.)

To prevent malfunction and/or damage to speakers or other devices, always turn down the volume, and turn off the power on all devices before making any connections.
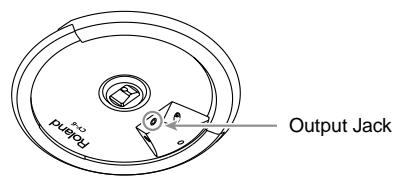
1. Use the included connection cable and connect the output jack of the CY-6 to the trigger input jack of the percussion sound module.
Connect the L-shaped plug of the included cable to the CY-6. This will prevent strain from being applied to the CY-6.

To make use of edge shot and choking play techniques, you'll need to connect to a trigger input jack on the percussion sound module that accommodates rim shots.
2. Make the trigger settings for the percussion sound module. For the recommended values, refer to p. 7.

Should you neglect to make the appropriate settings for the percussion sound module, you could likely experience the following problems:
- Sometimes it does not sound (uneven volume)
- The volume is too low (reduced sensitivity)

For information on how to change the parameters for a percussion sound module, refer to the documentation for the percussion sound module you're using.
Playing the CY-6
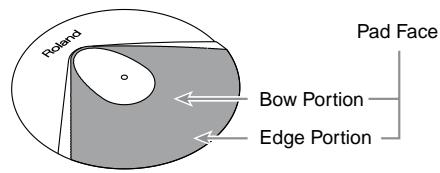
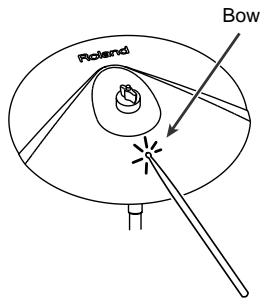
Bow Shot
This is the most common playing method, playing the pad face of the cymbal. It corresponds to the sound of the "head-side" of the connected trigger input.
Edge Shot
This playing method involves striking the edge with the shoulder of the stick. It corresponds to the sound of the "rimside" of the connected trigger input.

To make use of edge shot, you'll need to connect to a trigger input jack on the percussion sound module that accommodates rim shots.

Choking
Choking (pinching) the cymbal's edge with the hand immediately after hitting the cymbal makes the sound stop.

To make use of choking play techniques, you'll need to connect to a trigger input jack on the percussion sound module that accommodates rim shots.

Specifications
CY-6: Cymbal Pad
Pad Size: 12 inches
Triggers: 2 (Bow, Edge)
Dimensions: 290 (W) x 295 (D) x 45 (H) mm
11-7/16 (W) x 11-5/8 (D) x 1-13/16 (H) inches
Weight: 0.6kg / 1lb6oz
Accessories: Owner's Manual, Connection Cable, Wing Nut, Felt Washer, Stopper
Options: Cymbal Mounts (MDY-10U) Drum Stands (MDS-6, MDS-7U, MDS-8, MDS-10)

In the interest of product improvement, the specifications and/or appearance of this unit are subject to change without prior notice.
Features
- Velocity sensitive pad provides rich expression.
- Compact, 8.5-inch pad allows for greater versatility when setting up.
- Compatible with all Roland percussion sound modules (p. 7).
- When used with a percussion sound module capable of positional sensing, you can obtain tonal changes by varying the location at which the pad is struck.

For details on positional sensing, refer to the documentation for the percussion sound module you're using.
Making the Settings
Attaching the Cymbal Pad to a Stand
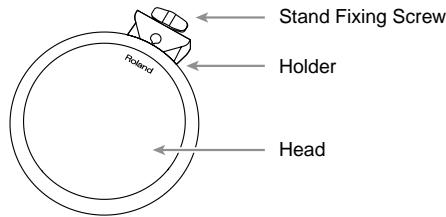
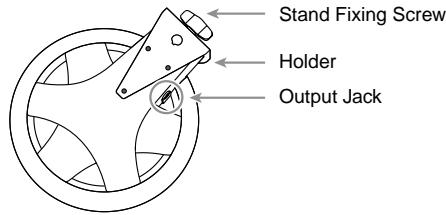
Attach the PD-6 to a separately sold drum stand (MDS-6, MDS-7U, MDS-8, or MDS-10).

When attaching the PD-6 to the pad mount, be sure to tighten the stand fixing screw securely. If any of them remain loose, the pad could fall off.

Pass the rod through the pipe that is inside the holder.

When attaching the PD-6 to a commercially available tom stand, check the dimensions of the rod. Depending on the dimensions of the rod, it may not be possible to attach the pad to the stand.
Acceptable rod diameters: 8.5-11.5 (3/8 to 1/2 inch)
Connecting to a Percussion Sound Module (TD-6, TD-8, TD-10, etc.)

To prevent malfunction and/or damage to speakers or other devices, always turn down the volume, and turn off the power on all devices before making any connections.
- Use the included connection cable and connect the output jack of the PD-6 to the trigger input jack of the percussion sound module.
Connect the L-shaped plug of the included cable to the PD-6. This will prevent strain from being applied to the PD-6.
- Make the trigger settings for the percussion sound module. For the recommended values, refer to p. 7.

Should you neglect to make the appropriate settings for the percussion sound module, you could likely experience the following problems:
- Sometimes it does not sound (uneven volume)
- The volume is too low (reduced sensitivity)

For information on how to change the parameters for a percussion sound module, refer to the documentation for the percussion sound module you're using.
Specifications
PD-6: Pad
Pad Size: 8.5 inches
Trigger: 1 (Head)
Dimensions: 221 (W) x 274 (D) x 64 (H) mm
8-3/4 (W) x 10-13/16 x 2-9/16 (H) inches
Weight: 1.2kg / 2 lbs 11 oz
Accessories: Owner's Manual, Connection Cable
Options: Pad Mounts (MDH-10U)
Drum Stands (MDS-6, MDS-7U, MDS-8, MDS-10)

In the interest of product improvement, the specifications and/or appearance of this unit are subject to change without prior notice.
Recommended Parameters for the Percussion Sound Module
Recommended settings for the trigger parameters when using the CY-6/PD-6 with various percussion sound modules.
- Edge shots and choking techniques are possible with the CY-6 (p. 5).
- The PD-6 can be used with the same settings as the PD-7 and PD-9. When connected to the trigger input jack capable of positional sensing, you can obtain tonal changes by varying the location at which the pad is struck.
- The trigger parameters should be adjusted as necessary to match the actual state of your configuration, and the environment in which it is being used.
TD-10 (TDW-1 V-Cymbal Control, TDW-1)
| CY-6 | PD-6 | ||
| Trigger Type | CrB | P9A | |
| Sensitivity | 8 | 6 | |
| Threshold | 4 | 4 | |
| Curve | Linear | Linear | |
| Scan Time | (*1) | 2.0 | 0.4 |
| Retrigger Cancel | (*1) | 10 | 4 |
| Mask Time | (*1) | 8 | 8 |
| Xtalk Cancel | (*1) | 40 | 40 |
| Mount Type | (*1) | CymMount | PadMount |
TD-10 (Non expanded)
| CY-6 | PD-6 | ||
| Trigger Type | PD9 | PD9 | |
| Sensitivity | 6 | 3 | |
| Threshold | 3 | 2 | |
| Curve | Linear | Linear | |
| Scan Time | (*1) | 2.0 | 0.3 |
| Retrigger Cancel | (*1) | 1 | 3 |
| Mask Time | (*1) | 12 | 12 |
| Xtalk Cancel | (*1) | 30 | 30 |
TD-8
| CY-6 | PD-6 | ||
| Trigger Type | PD9 | PD9 | |
| Sensitivity | 10 | 5 | |
| Threshold | 3 | 3 | |
| Curve | Linear | Linear | |
| Scan Time | (*1) | 2.0 | 0.5 |
| Retrig Cancel | (*1) | 3 | 3 |
| Mask Time | (*1) | 8 | 12 |
| Xtalk Cancel | (*1) | 40 | 40 |
TD-6
| CY-6 | PD-6 | |
| TrigType | CY6 | PD6 |
| Sensitivity | 10 | 7 |
| Threshold | 3 | 3 |
| TrigCurve | LINEAR | LINEAR |
| Xtalk Cancel | 30 | 40 |
| Scan Time (*1) | 2.0 | 1.0 |
| Retrig Cancel (*1) | 3 | 3 |
| Mask Time (*1) | 8 | 4 |
TD-7 (*2)
| CY-6 | PD-6 | |
| Cross Talk Group | OFF | OFF |
| Velocity Curve | Norm3 | Norm3 |
| Choke | ON | OFF |
| Max Dyna | 5 | 8 |
| MIn Dyna | 1 | 5 |
| Min Velo | 1 | 1 |
| Mask Time | 0 | 0 |
| Threshold | 1 | 1 |
TD-5
| CY-6 | PD-6 | ||
| Trigger Type | P 1 | Pd9 | |
| Sensitivity | 10 | 3 | |
| Threshold | 2 | 2 | |
| Curve | Lnr | Lnr | |
| Scan Time | (*1) | 2.0 | 0.0 |
| Retrigger Cancel | (*1) | 4 | 1 |
| Mask Time | (*1) | 12 | 12 |
| Xtalk Cancel | (*1) | 50 | 50 |
SPD-20
| CY-6 | PD-6 | |
| Trig Sens | 10 | 6 |
| Trig Threshold | 0 | 0 |
| Trig Type | Pd5 | Pd9 |
| Trig Curve | 0 | 0 |
SPD-11
| CY-6 | PD-6 | |
| Trig Sens | 10 | 7 |
| Trig Threshold | 2 | 1 |
| Trig Mask Time | 8 | 0 |
| Trig Scan Time | 20 | 0 |
HPD-15
| CY-6 | PD-6 | |
| Input Mode | HD/RM (*3) | TRIGx2 |
| Trig Type | PD-5 | PD-9 |
| Trig Sens | 10 | 8 |
| Curve | Linear | Linear |
| Threshold | 3 | 2 |
| Scan Time | 2 | 1 |
| Retrig Cancel | 3 | 2 |
| Mask Time | 8 | 4 |
| X-Talk Rate | 20 | 20 |
1: You need to set each advanced trigger parameter after setting the trigger type.
2: Each trigger parameter can be set independently for the "head-side" and "rim-side." Set to the same value for the head and rim. Trigger parameters can be set individually for each patch.
*3: The HPD-15 supports the use of edge shots with the CY-6, but it does not support choking techniques.
Information
When you need repair service, call your nearest Roland Service Center or authorized Roland distributor in your country as shown below.
AFRICA
EGYPT
Al Fanny Trading Office P.O.Box 2904.
El Horrieh Heliopolos, Cairo, EGYPT
TEL: (02) 4185531
REUNION
That Other Music Shop (PTY) Ltd.
11 Melle St., Braamfontein, Johannesburg
Republic of SOUTH AFRICA
P.O.Box 32918, Braamfontein 2017 Republic of SOUTH AFRICA
TEL: (011) 403 4105
Paul Bothner (PTY) Ltd.
17 Werdmuller Centre Claremont
7700
Republic of SOUTH AFRICA
P.O.Box 23032
Claremont, Cape Town
SOUTH AFRICA, 7735
TEL: (021) 674 4030
ASIA
CHINA
Beijing Xinghai Musical Instruments Co., Ltd.
6 Huangmuchang Chao Yang
District, Beijing, CHINA
TEL: (010) 6774 7491
Shanghai Xingtong Acoustics Equipment CO.,Ltd.
Rm.1108, No.2240 Pudong South
Road Shanghai, CHINA
TEL: (021) 6873 4123
HONG KONG
Tom Lee Music Co., Ltd.
Service Division
22-32 Pun Shan Street, Tsuen
Wan, New Territories,
HONG KONG
TEL: 2415 0911
INDIA
Rivera Digitec (India) Pvt. Ltd. 409, Nirman Kendra Mahalaxmi
Flats Compound Off. Dr. Edwin
Moses Road, Mumbai-400011,
INDIA
TEL: (022) 498 3079
INDONESIA
PT Citra IntiRama
J1. Cideng Timur No. 15J-150
Jakarta Pusat
INDONESIA
TEL: (021) 6324170
KOREA
Cosmos Corporation
1461-9, Seocho-Dong.
Seocho Ku, Seoul, KOREA
TEL: (02) 3486-8855
MALAYSIA
G.A. Yupangco & Co. Inc.
339 Gil J. Puyat Avenue
Makati, Metro Manila 1200,
PHILIPPINES
TEL: (02) 899 9801
SINGAPORE
Swee Lee Company
150 Sims Drive.
SINGAPORE 387381
TEL:846-3676
CRISTOFORIMUSIC PTE
LTD
Blk 3014, Bedok Industrial Park E,
02-2148, SINGAPORE 489980
TEL: 243 9555
TAIWAN
ROLAND TAIWAN
ENTERPRISE CO.,LTD.
Room 5, 9fl. No. 112 Chung Shan
N.Road Sec.2, Taipei, TAIWAN.
RO.C
TEL: (02) 2561 3339
THAILAND
Theera Music Co., Ltd.
330 Verng NakornKasem, Soi 2.
Bangkok 10100, THAILAND
TEL: (02) 2248821
VIETNAM
Saigon Music
138 Tran Quang Khai St.,
District 1
Ho Chi Minh City
VIETNAM
TEL: (08) 844-4068
AUSTRALIA/
NEW ZEALAND
AUSTRALIA
Roland Corporation
Australia Pty., Ltd.
38 Campbell Avenue
Dee Why West. NSW 2099
AUSTRALIA
TEL: (02) 9982 8266
NEW ZEALAND
Roland Corporation Ltd.
32 Shaddock Street, Mount Eden
Auckland, NEW ZEALAND
TEL: (09) 3098 715
CENTRAL/LATIN
AMERICA
ARGENTINA
Instrumentos Musicales S.A.
Florida 656 2nd Floor
Office Number 206A
Buenos Aires
ARGENTINA, CP1005
TEL: (54-11) 4-393-6057
BRAZIL
Roland Brasil Ltda
Rua San Jose, 780 Sala B
Parque Industrial San Jose
Cotia - Sao Paulo - SP, BRAZIL
TEL: (011) 4615 566
COSTA RICA
JUAN Bansbach
Instrumentos Musicales
Boulevard Andrews, Albrook,
Panama City,
REP. DE PANAMA
TEL: (507) 315-0101
PARAGUAY
Distribuidora De
Instrumentos Musicales
J.E. Oleary ESQ. Manduvira
155.New National Road
26422 Patras, GREECE
TEL: 061-435400
HUNGARY
Intermusica Ltd.
Warehouse Area DEPO'Pf.83
H-2046 Torokbalint, HUNGARY
TEL: (23) 511011
IRELAND
Roland Ireland
Audio House, Belmont Court,
Donnybrook, Dublin 4
Republic of IRELAND
TEL: (01) 2603501
ITALY
Roland Italy S. p. A.
Danvik Center 28, 2 tr
S-131 30 Nacka SWEDEN
TEL: (08) 702 0020
SWITZERLAND
Roland (Switzerland) AG
Musitronic AG
Enterprise Park, SWANSEA
SA7 9FJ.
UNITED KINGDOM
TEL: (01792) 700139
MIDDLE EAST
BAHRAIN
Moon Stores
Bab Al Bahrain Road,
P.O.Box 20077
State of BAHRAIN
TEL: 211 005
CYPRUS
Radex Sound Equipment Ltd.
17 Diagorou St., P.O. Box 2046,
Nicosia CYPRUS
TEL: (02) 453 426
IRAN
MOCO, INC.
No.41 Nike St.Dr.Shariyati Ave.
Roberoye Cerahe Mirdamad
Tehran, IRAN
TEL:2854169
ISRAEL
Halilit P. Greenspoon &
Sons Ltd.
8 Retzif Ha'aliya Hashnya St.
Tel-Aviv-Yafo ISRAEL
TEL: (03) 6823666
JORDAN
AMMAN Trading Agency
Prince Mohammed St. P.O. Box
825 Amman 11118 JORDAN
TEL: (06) 4641200
KUWAIT
Easa Husain Al-Yousifi
Abdullah Salem Street,
Safat KUWAIT
TEL: 5719499
LEBANON
A. Chahine & Fils
P.O.Box 16-5857 Gergi Zeidan St.
Chahine Building, Achrafieh
Beirut,LEBANON
TEL: (01) 335799
QATAR
Al Emadi Co. (Badie Studio
& Stores)
P.O.Box 62
DOHA QATAR
TEL:4423-554
SAUDI ARABIA
aDawliah Universal
Electronics API
Corniche Road, Aldossary Bldg.
1st Floor
SAUDI ARABIA
P.O.Box 2154, Alkhobar 31952
SAUDI ARABIA
TEL: (03) 898 2081
SYRIA
Technical Light & Sound
Center
Khaled Ibn Al Walid St.
P.O.Box 13520
Damascus - SYRIA
TEL: (011) 2235 384
TURKEY
Barkat muzik aletleri ithalat
ve ihracat Ltd Sti
Siraselviler cad.Guney is hani 84
86/6, Taksim. Istanbul. TURKEY
TEL: (0212) 2499324
U.A.E.
Zak Electronics & Musical
Instruments Co. L.L.C.
Zabeel Road, Al Sheroq Bldg.
No. 14, Grand Floor DUBAI
U.A.E
TEL: (04) 3360715
NORTH AMERICA
CANADA
Roland Canada Music Ltd.
(Head Office)
5480 Parkwood Way Richmond
B.C.,V6V2M4 CANADA
TEL: (0604) 270 6626
Roland Canada Music Ltd.
(Toronto Office)
Unit 2, 109 Woodbine Downs
Blvd, Etbicoke, ON
M9W 6Y1 CANADA
TEL: (0416) 213 9707
U.S.A.
Roland Corporation U.S.
5100 S. Eastern Avenue
Los Angeles, CA 90040-2938
U.S.A.
TEL: (323) 890 3700
As of May 15, 2001 (Roland)