
FUS-6116IT - Washer dryer FAGOR - Free user manual and instructions
Find the device manual for free FUS-6116IT FAGOR in PDF.
| Product type | Washer-dryer |
| Brand | FAGOR |
| Model | FUS-6116IT |
| Dimensions (W x D x H) | Approx. 60 x 55 x 85 cm |
| Net weight | Approx. 70 kg |
| Power supply | 220-240 V, 50 Hz, grounded plug |
| Wash capacity | 6 kg |
| Drying capacity (max) | 4 kg for normal drying, 3 kg for delicate drying |
| Maximum spin speed | 1000 rpm (estimated) |
| Number of programs | 16 programs (normal, delicate, additional, drying) |
| Main functions | Delayed start (up to 24h), child lock, easy iron, extra rinse, intensive wash |
| Installation type | Freestanding or built-in (removable top cover possible) |
| Maintenance and cleaning | Clean pump filter, clean detergent drawer, regular descaling |
| Safety | Child lock, spin safety (imbalance), safety stop in case of fault |
| Spare parts and repairability | Filter, hoses, belt, solenoid valve, electronic board – available through after-sales service |
| General information | 92-page user manual available for download |
Frequently Asked Questions - FUS-6116IT FAGOR
User questions about FUS-6116IT FAGOR
0 question about this device. Answer the ones you know or ask your own.
Ask a new question about this device
Download the instructions for your Washer dryer in PDF format for free! Find your manual FUS-6116IT - FAGOR and take your electronic device back in hand. On this page are published all the documents necessary for the use of your device. FUS-6116IT by FAGOR.
USER MANUAL FUS-6116IT FAGOR
INSTALLATION AND ASSEMBLY 72
USING THE APPLIANCE.
PRACTICAL TIPS 76
MAINTENANCE
AND CLEANING 86
SAFETY
AND TROUBLESHOOTING 88
ENVIRONMENTAL
WARNING 91
advertising
Touche:Rincageextra(
Nivele a这其中 is a非常好. It's the best way to get your hair.
d Opçao: flot/anti-vincos

To avoid the risk of fire, electric shocks, injury or damage when using your washing machine, please take the following precautions:
This washing machine comes with a manual that includes operating, maintenance and installation instructions. Please read all the instructions before using the washing machine.
-
Do not wash items that have previously been cleaned, washed, soaked or treated with petrol, solvents for dry cleaning, other inflammable substances or explosives, as they produce fumes that could catch fire or explode.
-
Do not add petrol, solvents for dry cleaning or other inflammable or explosive substances to the wash water as they produce fumes that could catch fire or explode.
-
Do not repair or replace any part of the washing machine or try to carry out any type of servicing unless it is recommended in the maintenance instructions in the manual.
-
Do not climb onto the machine or stand on the open hatch door.
- Do not use an extension lead or adaptor to connect your washing machine to the mains supply.
The machine should only be used for the purpose it is designed for.
■ Follow the washing instructions recommended by the manufacturer of the garment to be washed. -
Do not turn your washing machine on until you are sure that:
-
It has been installed in accordance with the installation instructions.
- All the water, drainage, mains electricity and earth connections meet the local regulations and/or other applicable regulations.
specifications
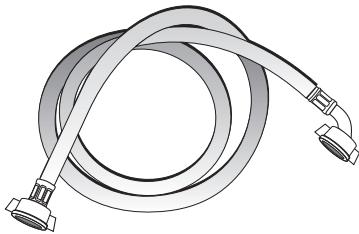
ACCESSORIES
Water inlet hose.
installation and assembly
1 UNPACKING AND UNBLOCKING THE WASHING MACHINE
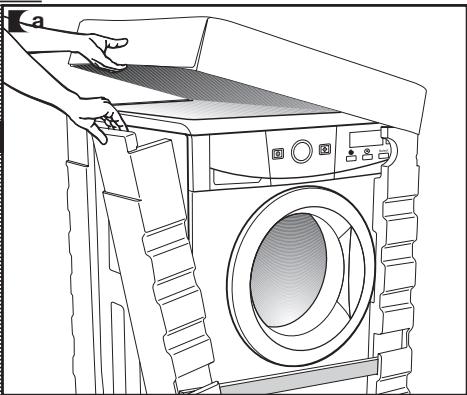
UNPACKING
a Remove the base, corner protectors and top cover.
UNBLOCKING
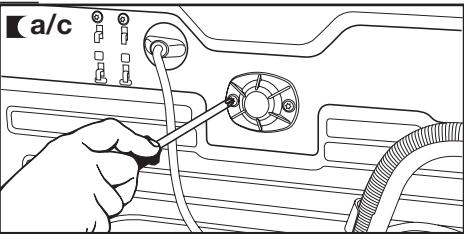
a Remove the screws holding the plastic covers to the back of the washing machine.
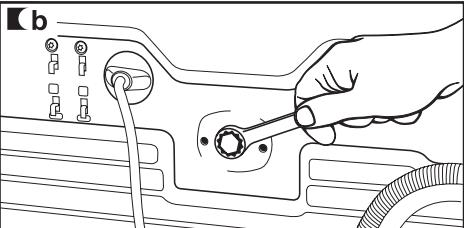
b Loosen and remove the 3 blocking screws.
C Cover the holes with the plastic covers you have just removed.
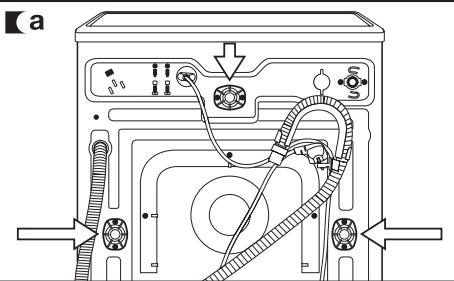
Important
Do not throw the blocking screws away. You may need to move the washing machine at a later date.
2 CONNECTION TO THE MAINS WATER SUPPLY AND DRAINAGE
installation and assembly
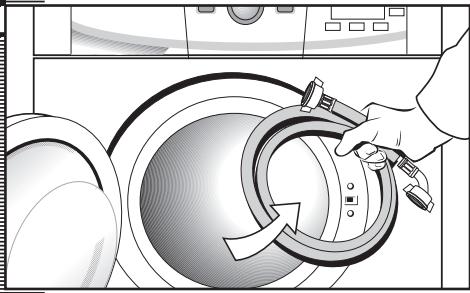
CONNECTION TO THE MAINS WATER SUPPLY
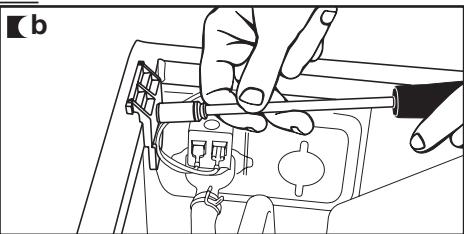
The water supply hose is inside the drum:
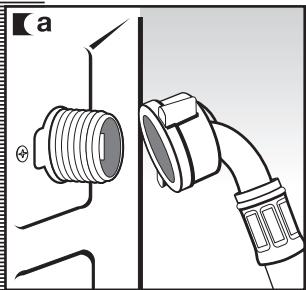
a Connect the bent end of the hose to the threaded inlet of the electrovalve located at the rear of the washing machine.
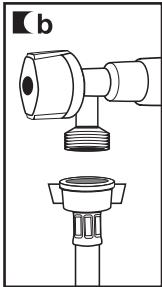
b Connect the other end of the hose to the water intake. Then securely tighten the connection nut.
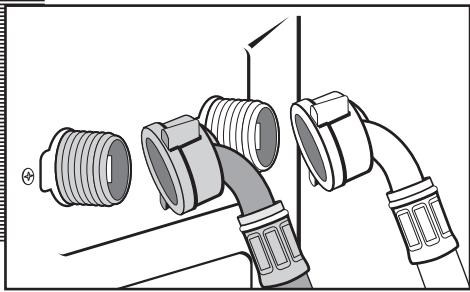
It is important that the drain hose bend is correctly fastened to the outlet, to prevent any risk of it becoming detached and causing flooding.
If your washing machine has a hot water intake, connect the hose with the red threaded end to the hot water tap, and to the electrovalve with the red filter.
The washing machine must be connected to the mains water supply, using the new supply hoses supplied with the appliance. Do not use water supply hoses that have been used before. For your washing machine to work properly, the mains water pressure must be between 0.05 and 1MPa (0.05 and 10Kgr/cm^2 ).
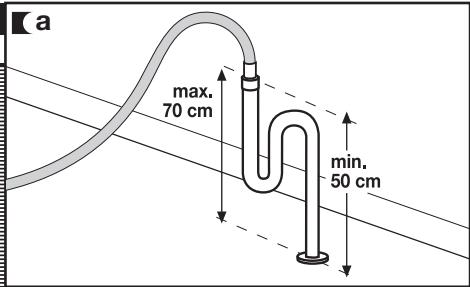
DRAINAGE
CONNECTION
a It is recommended that you have a fixed drainage outlet 50 to 70~cm from the floor. Avoid the drain hose being too tight, kinked or restricted.
3 LEVELING THE WASHING MACHINE AND CONNECTING IT TO THE MAINS ELECTRICITY SUPPLY
installation and assembly
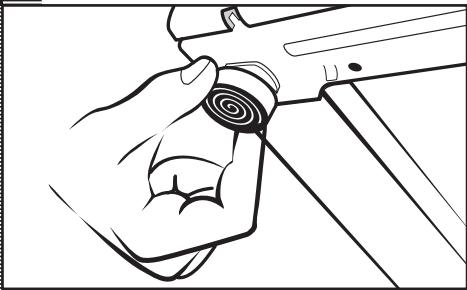
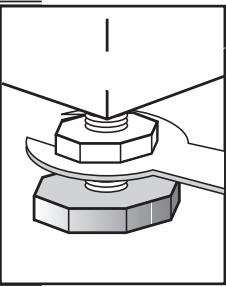
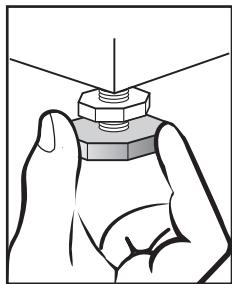
LEVELLING
Prrnnnne
Use the adjustable feet to level the washing machine. This will reduce the noise level and prevent it from moving during use.
Do not bring the feet too far out, you will achieve better stability.
You need to use a spanner for the models that have a nut.
ELECTRICAL CONNECTION
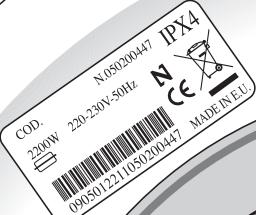
Consult the specifications plate located on the hatch door of the washing machine before making the electrical connections. Ensure that the voltage reaching the plug is the same as that on the plate.
Do not remove the specifications plate. The information on it is important.
Prrnnnne
It is very important to correctly earth the washing machine. The electrical installation, plug, socket, fuses or automatic switch and counter must be correctly dimensioned for the maximum power indicated on the specifications plate.
Do not plug the washing machine plug into the socket with wet or damp hands.
To remove the power cord, pull on the body of the plug.
If the power cord is damaged, it must be replaced by a cord or special unit provided by either the manufacturer or your after-sales service.
With built-in washing machines, the plug must be accessible after installation.
4 INSTALLING THE WASHING MACHINE UNDER A KITCHEN WORKTOP AND PRE-CLEANING
INSTALLATION UNDER
A WORKTOP
Your washing machine may be fitted underneath a kitchen worktop.
If you need to remove the washing machine's worktop, for safety reasons you need to fit a protection plate which you can obtain from your Dealer or Technical Assistance Service.
Follow these steps to fit the plate:
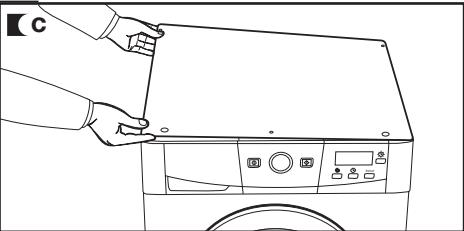
a Remove the washing machine work top by taking out the side screws and moving it gently back.
b Take out the screws and remove the parts holding the worktop in place.
Put the protection plate into place and screw it to the washing machine so it can then be inserted in the place you wish, fitting spongy adhesive all around the perimeter first to prevent noise.

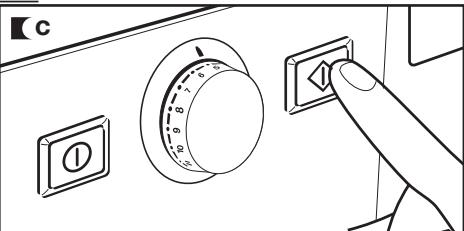
PRE-CLEANING
When your washing machine has been correctly installed, we recommend that you pre-clean the machine.
This is to check that the installation, the connections and the drainage are all correct, and to thoroughly clean the inside of the washing machine before any wash programmes are run (see the operating instructions on the following pages).
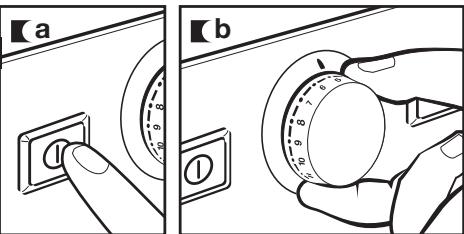
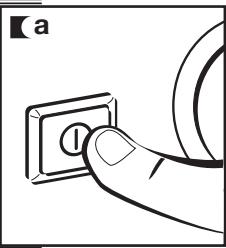
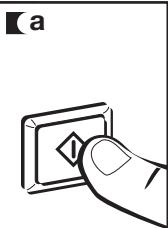
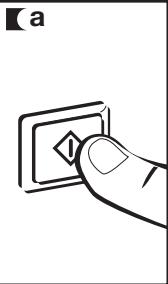
a Press ON/OFF button.
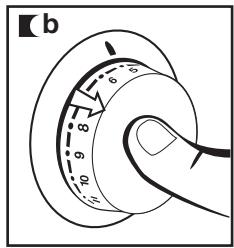
b Select the normal programme at 60^
c Press the start/pause button.
using the appliance and practical tips
PREPARING GARMENTS FOR WASHING
PREPARATION
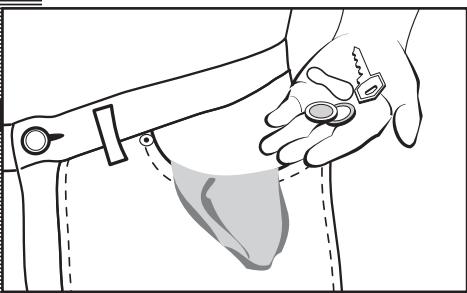
Important
Before placing the clothes in the drum, make sure all the pockets are empty.
Any small objects may block the drain pump.
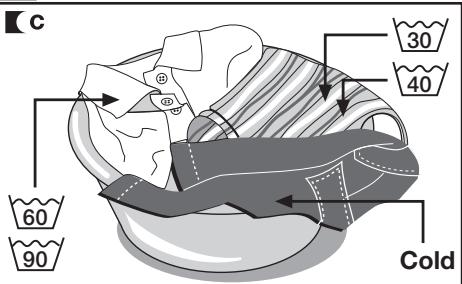
SORTING THE CLOTHES
a Sort the clothes according to fabric and how they are made:
We recommend using the delicate programmes for sensitive fabrics. There is a special wool programme for woollens.
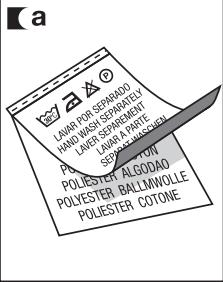
Important
Make sure beforehand that your woollens can be machine-washed.
Before using the drying programme, first check the label on the garment to make sure it can be tumble dried.
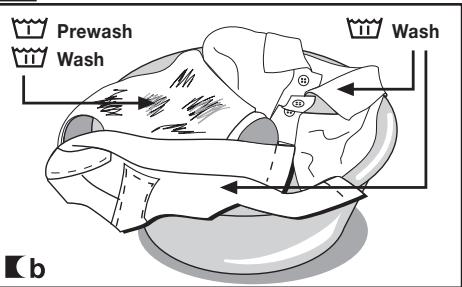
b Sort clothes according to how soiled they are.
- Wash lightly soiled garments using a short programme.
- Use a programme without prewash for medium-soiled garments.
- Wash heavily soiled garments using a long programme with prewash.
a Sort your clothes according to colour. Wash whites and coloured separately.
Important
We recommend loading the washing machine to its full capacity. This means savings on water and energy. Whenever possible, we recommend that you wash garments of different sizes within the same wash programme. This improves the washing action and also aids the correct distribution of the garments in the drum when spin-drying, and the washing machine will therefore be quieter.
It is a good idea to put small garments in a wash bag.
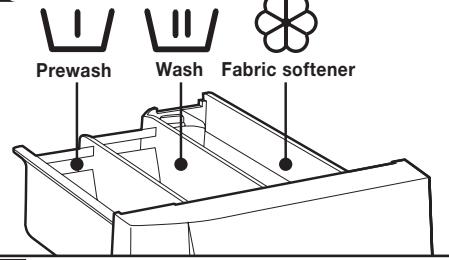
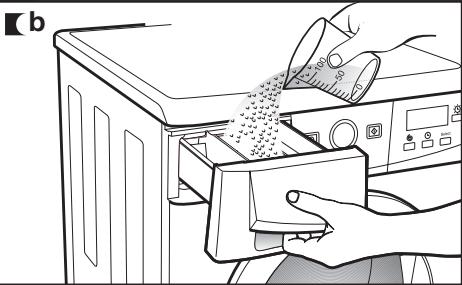
2 USING DETERGENT AND ADDITIVES
using the appliance and practical tips
DETERGENT AND
ADDITIVES
a Your washing machine's detergent dispenser has three compartments.
Put the detergent or additive into the detergent dispenser before starting the wash programme.
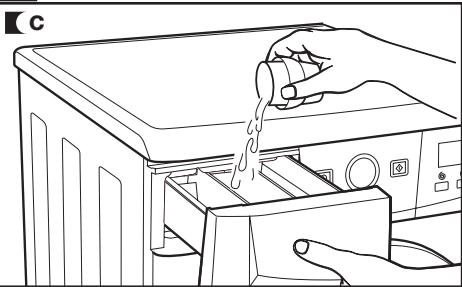
Liquid detergents may also be used in this washing machine. An optional detergent dispenser is to be used for this, which can be obtained from the Technical Service Network.
Place this optional dispenser inside the wash compartment.

The level of liquid must never be higher than the MAX mark printed on the dispenser wall.
Remember that the amount of detergent to be used will always depend on:
The amount of clothes to be washed.
How heavily the clothes are soiled.
The hardness of the water (Information on water hardness in your area can be obtained from the competent local authorities).

We recommend the use of a decalcifying product if the water hardness is high in your area.
a
eco-note
Remember that concentrated detergents exist which are more environment- and nature-friendly.
The use of more detergent than necessary will not improve you washing results, and apart from costing

you money it will have a negative effect on the preservation of the environment.
We therefore recommend you follow the detergent manufacturer's instructions.
3 SELECTING THE WASH AND DRY PROGRAMME
using the appliance and practical tips
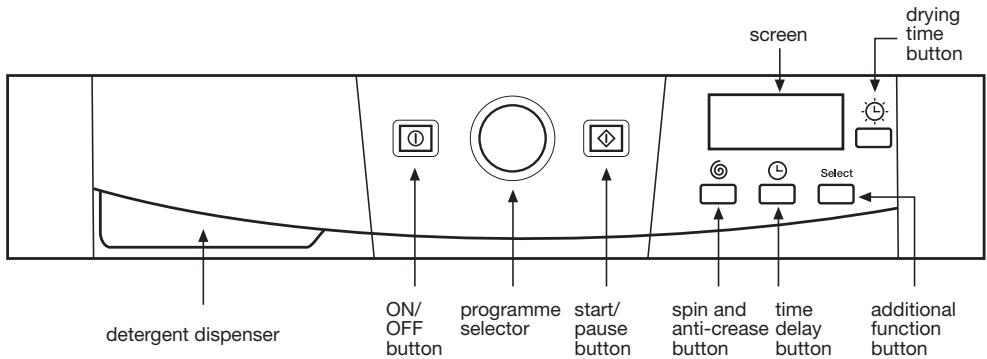
The procedure for selecting the wash and dry programme is as follows:
a Switch the washing machine on by pressing ON / OFF.
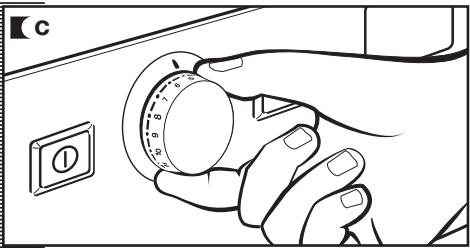
b Activate the programme selector by pressing it to release it.
Select the wash programme by turning the programme selector dial (see programme table).
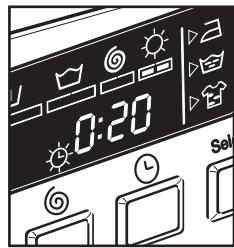
The procedure for selecting the drying time is as follows:
a Select the drying time by pressing the drying time button.
The time will appear on the display, increasing each time the drying time button is pressed.
If you select a wash ^+ dry option, the load must not be over 4 kg. (1.5 kg. for delicate wash programmes).
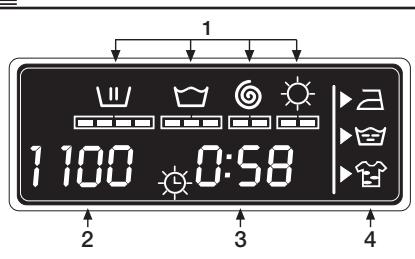
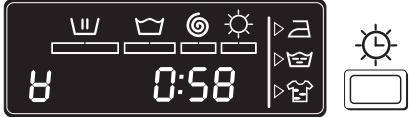
When you select the programme, the following information will be displayed:
1 Wash and dry programme phases:
Wash
Birse
Spin-drying
Dry
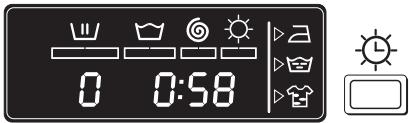
2 Spin speed
3 Programme n° (for a few seconds) and then programme duration.
4 Additional functions
Easy iron
Extra rinse
Intensive wash
There are four types of programme:
Normal programmes
Delicate programmes
Auxiliary programmes
Drying programmes
PROGRAMMES
| Normal | Delicate | Auxiliary | Drying |
| 1 Normal cold | 8 Delicate cold | 12 Rinses | 14 Normal dry |
| 2 Quick 30°C | 9 Delicate 30°C | 13 Spin-drying | 15 Delicate dry |
| 3 Normal 30°C | 10 Delicate 40°C | 16 Drain/End | |
| 4 Normal 40°C | 11 Wool 35°C | ||
| 5 Normal 60°C | |||
| 6 Normal 90°C | |||
| 7 Prewash 60°C |
eco-note
We recommend you choose a wash programme without prewash whenever possible. This will save you money and help protect the environment.

| Programme | Recommended temperature | Fabric type | Possible option buttons | |||||||
| Extra rinse | Intensive wash | Easy-ion | Skin speed selection | No spin | Anti-ase | |||||
| Normal prog. | 1 | Normal cold | Cold | Cotton/Linen delicate colours very light soil | YES | |||||
| 2 | Quick 30°C | 30° | Cotton/Linen whites/colours very light soil | YES | NO | YES | ||||
| 3 | Normal 30°C | 30° | Cotton/Linen delicate colours light soil | YES | ||||||
| 4 | Normal 40°C | 40° | Cotton/Linen fast colours light soil | YES | ||||||
| 5 (*) | Normal 60°C | 60° | Cotton/Linen fast colour medium soil | YES | ||||||
| 6 | Normal 90°C | 90° | Cotton/Linen whites heavy soil | YES | ||||||
| 7 | Prewash 60°C | 60° | Cotton/Linen whites/fast colours heavy soil | YES | ||||||
| Delicate prog. | 8 | Delicate cold | Cold | Synthetic/mix cotton delicate colours very light soil | YES | |||||
| 9 | Delicate 30°C | 30°30° | Synthetic/mix cotton delicate colours light soil | YES | ||||||
| 10 | Delicate 40°C | 40°40° | Synthetic/mix cotton delicate colours medium soil | YES | ||||||
| 11 | Wool 35°C | Wool 35 | Wool/wool mix whites/colours light soil | YES | NO | YES | ||||
| Aux. prog. | 12 | Rinses | — | Cotton/cotton mix Synthetic/Delicate Wool/wool mix | YES | NO | YES | |||
| 13 | Spin-drying | — | Cotton/cotton mix Synthetic/Delicate Wool/wool mix | NO | YES | |||||
| Drying Programmes | 14 | Normal dry | — | Cotton/Linen | — | |||||
| 15 | Delicate dry | — | Synthetic/mixed fabrics | — | ||||||
| 16 | Drain/End | — | Cotton/cotton mix Synthetic/Delicate Wool/wool mix | NO | ||||||
(*) Programme for wash and energy consumption assessment in accordance with standard EN60456, press intensive wash button.
| Max load of clothes (Kg) | Wash product compartment | Programme description | TURBO TIME PLUS | |
| Total consumption KWh/Litres | Approx. duration (minutes) | |||
| 6 | m | Normal wash, rinses, automatic additive absorption if desired and long final spin | 0,15/49 | 60 |
| 1,5 | SHORT wash, rinses, automatic additive absorption if desired and long final spin | 0,20/30 | 30 | |
| 6 | Normal wash, rinses, automatic additive absorption if desired and long final spin | 0,40/49 | 82 | |
| 6 | 0,65/49 | 87 | ||
| 6 | 1,02/49 | 91 | ||
| 6 | 1,90/55 | 110 | ||
| 6 | m | Prewash, normal wash, rinses, automatic additive absorption if desired and long final spin | 1,45/60 | 105 |
| 3 | m | Delicate wash, rinses, automatic additive absorption if desired and gentle final spin | 0,15/55 | 50 |
| 3 | 0,35/55 | 50 | ||
| 3 | 0,60/55 | 55 | ||
| 1 | WOOL wash, rinses automatic additive absorption if desired and gentle final spin | 0,50/60 | 40 | |
| 6 | m | Rinses, automatic additive absorption if desired and long final spin | 0,05/30 | 23 |
| 6 | - | Drain and long final spin | 0,05/0 | 10 |
| 4 | - | Normal dry | 2,8/48 | 160 |
| 3 | 1,8/27 | 100 | ||
| 1,5 | - | Delicate dry | 1,2/26 | 95 |
| 6 | - | Drain and end of programme. Takes programme to final position | 0,00/0 | 2 |
NOTE: the KWh and litre consumptions and programme durations may vary depending on the type and amount of clothes, mains wafer pressure, etc.
4 SPIN SPEED SELECTION
using the appliance and practical tips
SPIN-DRYING
The wash options must always be selected after choosing the wash programme. Any programme change during selection cancels the previously selected options.
a Spin speed selection and anti-crease button
The selected programme has its own particular spin speed.
You can change it by repeatedly pressing the spin button. The spin speed will gradually be reduced at 100 r.p.m. intervals to 400 r.p.m. for display models. On non-display models the LED will light up.
c No spin

Press the spin button again to get to the no spin option. A programme without a final spin. It is used to prevent creasing when washing special fabrics.
Anti-crease option

The wash programme stops on the last rinse, with the clothes left in water. When the function is deactivated, the washing machine continues the programme, draining and spin-drying.
It is used, for example, when you are not at home and want to delay the spindrying until you get home, to prevent the clothes creasing after spin-drying and being left in the drum to be removed.
a


Select
b


Select
【c


Select
d


Select
5 TIME DELAY SELECTION AND ADDITIONAL FUNCTIONS
using the appliance
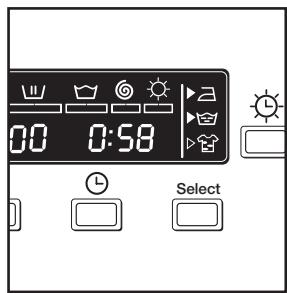
TIME DELAY
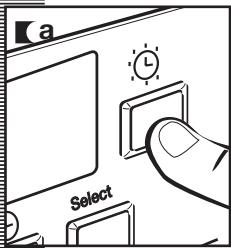
Time delay selection button
A delay of up to 24 hours can be selected. The delay must be selected after choosing the wash programme.
To select the hours of delay, press the clock button. Each time the button is pressed the start of washing is delayed by 1 more hour.
Cancelling the delay
To cancel the delay you have to press the clock button successively. The delay will be cancelled when 24 hours have been reached and the button is pressed once more. If the programme is changed the delay is also cancelled.

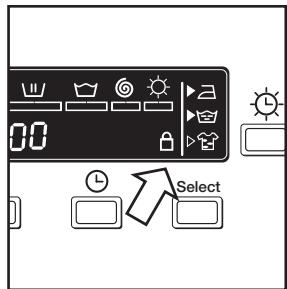
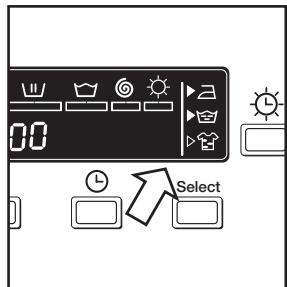
ADDITIONAL FUNCTIONS
Additional function selection button depending on programmes.
a There are 3 options: easy iron, extra rinse and intensive wash. Press the button and the desired option will be displayed.
b By pressing the button several times you can choose between several combinations of one, two and up to three additional functions at the same time depending on the programme selected.
Button: Easy-iron (A)
This option prevents garments from creasing by means of carrying out a special programme with special turns to fluff out the garments after spin-drying and make them easier to iron.
Button: Extra rinse (
Increases the level of the final rinse obtained in the clothes; suitable for large loads and garments belonging to people with sensitive skin. Increases water consumption!
Button: Intensive wash (
This option, specially recommended for heavily soiled, stained clothes, achieves better results by extending the normal wash cycle.

a

b
the
If during the additional function selection, the programme is changed or the ON/OFF button is pressed, all the functions selected until then are cancelled.
6 STARTING UP AND
BLOCK FUNCTION SELECTION
using the appliance
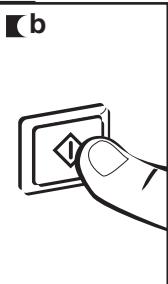
STARTING UP
Start/pause button
To start up the washing machine you have to press the start/pause button. The minutes remaining until the end of washing and drying will appear on the display at all times.
BLOCK FUNCTION
Block function selection
The lock function ensures that the programme will not be affected if any buttons are pressed. It is used when children could press the buttons, etc.
The block function should be activated after the wash programme has been selected together with all its options.
Activating the block function
The block function is activated by pressing the start/pause button and holding it down for at least 3 seconds. The display will show if it is activated.
Deactivating the block function
The block function is cancelled when the wash programme comes to an end. If you want to deactivate the block function before the end of the programme, you have to hold the start button down again for at least 3 seconds. After 3 seconds, the block function indicator will disappear from the display, and it will go into pause status. The ON/OFF button does not cancel the block function.
PROGRAMME PHASES
When the programme is running, the programme phase and the time remaining for it to end will appear on the display..
The active phases will appear successively at the top of the display as the programme progresses. The time remaining until the end of the programme will also appear on the display. It updates at regular intervals, but not minute by minute.
Any option button can be selected provided the wash phase in which it takes effect has not been passed and when the programme accepts the option.
Pressing the delay button during washing will have no effect on the washer-dryer.
Pressing the start/pause button during the wash activates the PAUSE function.
Important
If the programme is changed on the selector dial during the washing and drying process, the washer-dryer will go onto PAUSE status and the programme will be cancelled.
If you need to add or remove a garment, press the start/pause button and make sure that the water level is not above the door overflow level and that the temperature inside is not high. Press the start/pause button again to restart the wash from the same cycle phase it had stopped at.
POWER CUTS
If there is a power cut, when the electricity comes back on the washing machine will continue to run from where it left off (it has several hours of memory). The same will happen if the ON/OFF button is pressed.

warnings
Level the washing machine by adjusting the feet to reduce the noise caused by spin-drying.
Try and wash clothes of different sizes in the same wash programme to favour the distribution of the clothes inside the drum during spin-drying.
All the models have a safety system for spin-drying that prevents spin-drying from being carried out if the distribution of the clothes inside the drum is too concentrated. This prevents the appliance from vibrating too much.
If you find that the clothes are not properly wrung out, try spin-drying them again after having distributed the clothes more evenly in the drum.
maintenance and cleaning
MAINTENANCE
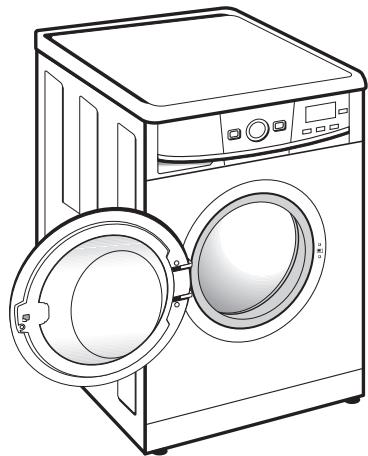
After each wash, leave the door open for a while to allow the air to circulate freely inside the machine.
From time to time, depending on the hardness of your water, it is recommendable to run a full wash cycle using a decalcifying product. This will extend the life of your washing machine.
The washing machine should be disconnected from the mains electricity supply before any cleaning or maintenance is carried out.
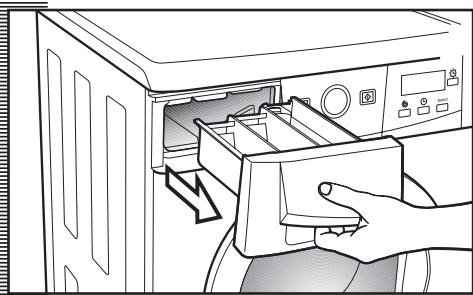
1 CLEANING THE DETERGENT DISPENSER
Clean the detergent dispenser whenever there is any washing product residue left inside.
a Pull outwards on the detergent dispenser to remove it completely.
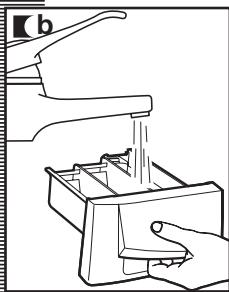
Use warm water and a brush to clean the compartments.
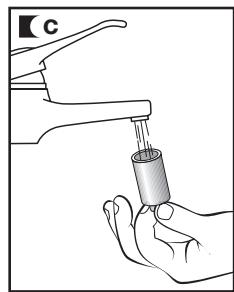
■c Also clean the additive compartment siphons, having removed them first. Once they have been cleaned, put them back making sure that they fit right in to the back. Put the dispenser back into the washing machine.
Important
A dirty or incorrectly fitted siphon will prevent the additives from being taken in and leave water inside the compartment at the end of the wash.
2 CLEANING THE ACCESIBLE FILTER AND THE OUTSIDE
maintenance and cleaning
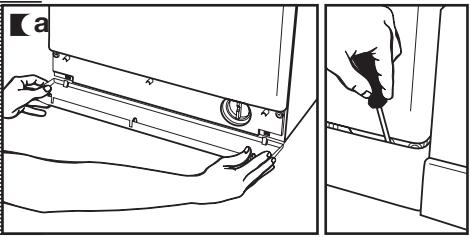
CLEANING THE FILTER
Clean the accessible filter if the drain pump is blocked by any foreign objects.
a Remove the kickplate by pulling gently on its edges and turning it downwards, to release the clips.
If you do not have access from the side, insert a small screwdriver into the three slots at the top of the kickplate, in order to get leverage and release the clips.
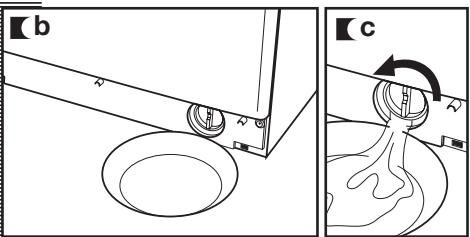
Place a container under the drain pump filter to collect any water that comes out of it.
c Half- or quarter-turn the filter to the left. Water will start to come out.
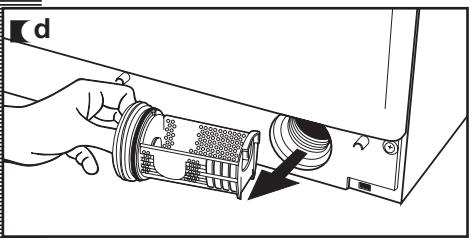
d When all the water has drained out of the washing machine, turn the filter several times until it can be completely removed by gently pulling on it.
Remove the objects or fluff caught in the filter or the drain pump.
Put the filter and kickplate back in place again.
Important
To avoid burns, do not carry out this operation when the wash water is at a temperature of over 30^ .

CLEANING THE OUTSIDE
The outside of the washing machine should be cleaned with warm soapy water or a gentle cleaning agent. Do not use abrasive cleaning products or solvents.
It should then be thoroughly dried with a soft cloth.
Important
When there have been spillages of detergent or additives from the dispenser onto the washing machine cabinet, clean them up right away as they are corrosive.
safety and troubleshooting
If you detect any problems with your washing machine, you will probably be able to rectify them yourself by consulting the following instructions.
If this is not the case, unplug the appliance and contact the TECHNICAL ASSISTANCE SERVICE.

Never open up the appliance. There is no fuse or similar component inside that can be replaced by the user.
| Indicator | Problems |
| FO1 | No water coming in |
| FO2 | Does not drain or spin-dry |
| CO3 | Does not spin-dry |
| FO4 | Does not start |
| FO5 | Call the Technical Assistance Service |
| F10 |
PROBLEMS
Why won't the washing machine start?
Why is the washing machine vibrating or making too much noise?
This may be due to the following:
Check the door is properly shut.
The washing machine is not plugged into the mains or there is no voltage in the mains supply.
The Start/Pause button has not been pressed.
If the washing machine door is not properly shut, F04 will appear on the display.
This may be due to the following:
The blocking and transport screws have not been removed.
The washing machine has not been correctly levelled.
Why doesn't the washing machine take in water?
Indicator F01, no water coming in, this may be due to a cut in the water supply, a tap turned off or a blocked water inlet filter.
Why doesn't the washing machine drain or spin-dry?
The possible solutions are as follows: wait for the water supply to be reconnected, turn on the tap, or remove the water inlet hose and clean the filter. If this failure is detected, F01 will appear on the display.
Why doesn't the washing machine spin-dry?
The reasons for the F02 indicator may be the following: washing machine drain pump blocked, building drainage pipes blocked, or incorrect pump electrical connection.
Solution: if the pump is blocked, gain access to it as described in section 2, maintaining and cleaning the appliance. If this failure is detected, F02 will appear on the display.
Why can't I see any water in the drum during the wash?
This may be due to an uneven distribution of clothes in the drum and may cause an excessive level of vibrations.
The solution is to select a spin-drying programme. If this failure is detected, C3 will appear on the display.
This is due to the fact that the washing machine is provided with a system which is able to adapt to the load and type of fabrics, adjusting the levels of water and energy used, in order to preserve the environment.
So, although the water level you can see through the hatch may look low, there is no cause for concern as washing and rinsing efficiency will still be optimum.
Why is there still some water in the dispenser?
Why can't I open the hatch immediately after the wash has finished?
Why doesn't the remaining time shown on the clock coincide with the real time left until the selected cycle finishes?
Other indications
This may be because the dispenser needs cleaning. This simple operation is described in Maintaining and cleaning the appliance.
1- Cleaning the detergent dispenser.
Washing machines today are provided with safety systems for users. One of them is that the washing machine cannot be opened until it is certain that the drum is quite still. This is why the hatch cannot be opened for 2 minutes.
This time is for guidance purposes only and may be affected by the conditions under which the selected programme is being run, e.g. initial water temperature, size of load or unbalance caused by the garments during spin drying.
The washing machine can detect other indications. When this happens a number of other indicators appear on the display: F05, F06..., F10.
If this happens, call the Official Technical Service.
environmental warnings
eco-note
INFORMATION FOR THE CORRECT DISPOSAL OF WASTE ELECTRICAL AND ELECTRONIC APPLIANCES
When your appliance is of no further use, it should not be disposed of together with general domestic waste.
It can be taken, free of charge, to a specific waste collection centre, run by your local authority, or dealers who provide this service.
Disposing of waste domestic appliances separately means avoiding possible negative consequences for the environment and health, derived from incorrect disposal. This will enable the materials in them to be treated and recycled, obtaining important savings in energy and resources.
To highlight the obligation of collaborating with selective waste collection, the product is marked with a symbol to warn against using traditional containers for disposing of the appliance.

For further information, contact your local authority or the shop where you purchased the product.

Fagor Electrodomésticos, S.Coop.
Apartado 49
Tel. 902 10 50 10
Fax 902 33 32 09
B° San Andres, 18
20500 MONDRAGON (Guipuzcoa)
www.fagor.com
e-mail: info@fagor.com
FAGOR

- advertising
- Touche:Rincageextra(
- specifications
- installation and assembly
- UNPACKING AND UNBLOCKING THE WASHING MACHINE
- UNPACKING
- UNBLOCKING
- Important
- CONNECTION TO THE MAINS WATER SUPPLY AND DRAINAGE
- CONNECTION TO THE MAINS WATER SUPPLY
- DRAINAGE
- CONNECTION
- LEVELING THE WASHING MACHINE AND CONNECTING IT TO THE MAINS ELECTRICITY SUPPLY
- LEVELLING
- Prrnnnne
- ELECTRICAL CONNECTION
- INSTALLING THE WASHING MACHINE UNDER A KITCHEN WORKTOP AND PRE-CLEANING
- INSTALLATION UNDER
- A WORKTOP
- Your washing machine may be fitted underneath a kitchen worktop.
- PRE-CLEANING
- using the appliance and practical tips
- PREPARING GARMENTS FOR WASHING
- PREPARATION
- SORTING THE CLOTHES
- USING DETERGENT AND ADDITIVES
- DETERGENT AND
- ADDITIVES
- eco-note
- SELECTING THE WASH AND DRY PROGRAMME
- SPIN SPEED SELECTION
- SPIN-DRYING
- a Spin speed selection and anti-crease button
- You can change it by repeatedly pressing the spin button. The spin speed will gradually be reduced at 100 r.p.m. intervals to 400 r.p.m. for display models. On non-display models the LED will light up.
- c No spin
- Anti-crease option
- a
- b
- 【c
- d
- TIME DELAY SELECTION AND ADDITIONAL FUNCTIONS
- TIME DELAY
- Time delay selection button
- Cancelling the delay
- ADDITIONAL FUNCTIONS
- Additional function selection button depending on programmes.
- Button: Easy-iron (A)
- Button: Extra rinse (
- Button: Intensive wash (
- the
- STARTING UP AND
- BLOCK FUNCTION SELECTION
- STARTING UP
- Start/pause button
- BLOCK FUNCTION
- Activating the block function
- Deactivating the block function
- PROGRAMME PHASES
- POWER CUTS
- warnings
- maintenance and cleaning
- MAINTENANCE
- CLEANING THE DETERGENT DISPENSER
- CLEANING THE ACCESIBLE FILTER AND THE OUTSIDE
- CLEANING THE FILTER
- CLEANING THE OUTSIDE
- safety and troubleshooting
- PROBLEMS
- environmental warnings
- INFORMATION FOR THE CORRECT DISPOSAL OF WASTE ELECTRICAL AND ELECTRONIC APPLIANCES
Brand : FAGOR
Model : FUS-6116IT
Category : Washer dryer