
CH 600 - Range hood ZANUSSI - Free user manual and instructions
Find the device manual for free CH 600 ZANUSSI in PDF.


| Product type | Kitchen hood |
| Brand | Zanussi |
| Model | CH 600 |
| Width | 60 cm |
| Depth | Approximately 50 cm |
| Height | Approximately 30 cm (varies according to installation) |
| Weight | Approximately 10 kg |
| Power supply | 220-240 V ~ 50 Hz |
| Maximum power | 200 W |
| Number of speeds | 3 |
| Control type | Mechanical push buttons |
| Lighting | 2 incandescent bulbs (max 40 W each) |
| Maximum airflow | Approximately 600 m³/h |
| Energy class | D (according to old standard) |
| Noise level | Approximately 65 dB(A) at maximum speed |
| Filter type | Washable metal grease filter |
| Filter maintenance | Wash in dishwasher every 2 months |
| Charcoal filter replacement | Required for recirculation version, every 6 months |
| Exhaust duct diameter | 150 mm |
| Installation type | Wall or under-cabinet mounting |
| Minimum installation height | 65 cm above electric hob, 75 cm for gas |
| Spare parts available | Filters, bulbs, buttons, motor |
| Repairability | Repairability index not provided |
| General information | User manual available in multiple languages |
Frequently Asked Questions - CH 600 ZANUSSI
User questions about CH 600 ZANUSSI
0 question about this device. Answer the ones you know or ask your own.
Ask a new question about this device
Download the instructions for your Range hood in PDF format for free! Find your manual CH 600 - ZANUSSI and take your electronic device back in hand. On this page are published all the documents necessary for the use of your device. CH 600 by ZANUSSI.
USER MANUAL CH 600 ZANUSSI
Contents page 2
Contents page 12
Contents page 23
Contents page 33
Figure 1

Figure 2
Figure 3
Activated carbon filter
Figure 4
Special accessories

Fig. 3
Charcoal filter
Fig. 4
Accessories (optional)
Fig. 1
Filter version
Fig. 3
Charcoal filter
Fig. 4
Special accessories
Charcoal filter Type 200
For the installer 34
For the user 35
Description of the appliance 36
Extraction mode 36
Recirculation mode 36
Control Panel....37
Correct ventilation 37
Maintenance and care 38
Cleaning the hood 38
Metal grease filter 38
Charcoal filter 39
Changing the light bulb 39
What to do if 40
Special Accessories 40
Technical Specifications 40
Technical assistance service....41
Service and Spare Parts 41
Customer Care Department 41
Guarantee Conditions 42
Installation 43
Unpacking 43
Fitting 43
Electrical connection 43
Wall unit mounting 44
Before you use the cooker hood we recommend that you read through the whole user manual giving a direct description of the cooker hood and its functions.
To avoid the risks, that are always present when you use a product driven by electricity, it is important that the cooker hood is installed correctly and that you read the safety instructions carefully to avoid misuse and hazard. Save the instruction manual and keep it available at use of the cooker hood.

Safety warnings
For the installer
- When used as an extractor unit, the hood must be fitted with a 120mm diameter hose.
Attention: The hose is not supplied and must be purchased separately.
- When installing the hood, make sure you observe the following minimum distance from the top edge of the cooking hob/ring surfaces:
electric cookers 600 mm
gas cookers 700 mm
If the instructions for installation for the gas hob specify a greater distance, this must be adhered to.
- The national Standard on fuel-burning systems specifies a maximum depression of 0.04 mbar in such rooms.
- The air outlet must not be connected to chimney flues or combustion gas ducts. The air outlet must under no circumstances be connected to ventilation ducts for rooms in which fuel-burning appliances are installed.
- The air outlet installation must comply with the regulations laid down by the relevant local authorities.
- When the unit is used in extraction mode, a sufficiently large ventilation hole must be provided, with dimensions that are approximately the same as the outlet hole.
• National and regional building regulations impose a number of restrictions on using hoods and fuel-burning appliances connected to a chimney, such as coal or oil room-heaters and gas fires, in the same room.
- Hoods can only be used safely with appliances connected to a chimney if the room and/or flat (air/environment combination) is ventilated from outside using a suitable ventilation hole approximately 500 - 600 cm² large to avoid the possibility of a depression being created during operation of the hood.
- If you have any doubts, contact the relevant controlling authority or building inspector's office.
- Since the rule for rooms with fuel burning appliances is “outlet hole of the same size as the ventilation hole”, a hole of 500-600 cm², which is to say a larger hole, could reduce the performance of the extractor hood.
- If the hood is used in its recirculation mode, it will operate simply and safely in the above conditions without the need for any of the
aforementioned measures.
- When the hood is used in its extraction mode, the following rules must be followed to obtain optimal operation:
- short and straight outlet hose
- keep bends in outlet hose to a minimum
- never install the hoses with an acute angle, they must always follow a gentle curve.
- keep the hose as large as possible (preferably the same diameter as the outlet hole).
- the length should be no more than:
3 metres with one 90° bend
2 metres with two 90° bends
Bends of more than 90° will reduce the efficiency of the hood and reduce the airflow.
- Failure to observe these basic instructions will drastically reduce the performance and increase the noise levels of the extractor hood.
For the user
- The cooker hood is designed to extract unpleasant odours from the kitchen, it will not extract steam.
• Always cover lighted elements, to prevent excess heat from damaging the appliance. In the case of oil, gas and coal fired cookers it is essential to avoid open flames.
- Also, when frying, keep the deep frying pan on the cooker top/cooker under careful control.
- The hot oil in the frying pan might ignite due to overheating.
- The risk of self-ignition increases when the oil being used is dirty.
- It is extremely important to note that overheating can cause a fire.
- Never carry out any flambé cooking under the hood.
- Always disconnect the unit from the power supply before carrying out any work on the hood, including replacing the light bulb (take the cartridge fuse out of the fuse holder or switch off the automatic circuit breaker).
- It is very important to clean the hood and replace the filter at the recommended intervals. Failure to do so could cause grease deposits to build up, resulting in a fire hazard.
- The appliance is not intended for use by young children or infirm persons without supervision.
- Older children must be supervised if using the appliance.
- Young children should be supervised to ensure that they do not play with the appliance.
- WARNING - Ensure that the appliance is switched off before replacing the lamp to avoid the possibility of electric shock.
This appliance is marked according to the European directive 2002/96/EC on Waste Electrical and Electronic Equipment (WEEE).
By ensuring this product is disposed of correctly, you will help prevent potential negative consequences for the environment and human health, which could otherwise be caused by inappropriate waste handling of this product.

The symbol — on the product, or on the documents accompanying the product, indicates that this appliance may not be treated as household waste. Instead it shall be handed over to the applicable collection point for the recycling of electrical and electronic equipment.
Disposal must be carried out in accordance with local environmental regulations for waste disposal. For more detailed information about treatment, recovery and recycling of this product, please contact your local city office, your household waste disposal service or the shop where you purchased the product.
Description of the appliance
• The cooker hood is designed to extract unpleasant odours from the kitchen, it will not extract steam. - The hood is supplied as an extractor unit and can also be used with a recirculation mode by fitting a charcoal filter. - You will need an original charcoal filter for this function (Available from your local Service Force Centre).
Attention! Certain models are already equipped with charcoal filters. The charcoal filters are attached to one side of the polystyrene protection panels in the packaging and should be fitted into place prior to using the cooker hood in the recirculation version.
Extraction mode
- In this mode fumes are extracted to the outside via a hose connected to the coupling ring A. Fig. 1.
- In order to obtain the best performance the hose should have a diameter equal to the outlet hole.
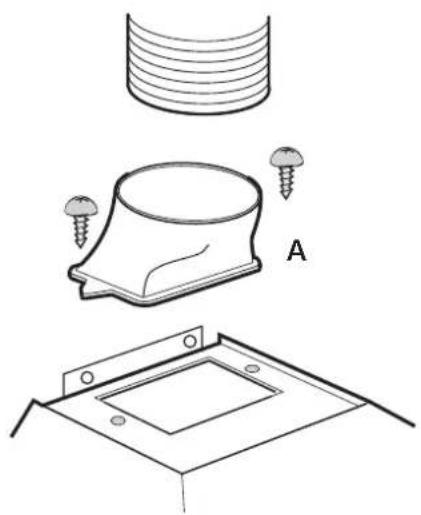
Fig. 1
Recirculation mode
- The air is filtered through a charcoal filter and returned to the kitchen.
- You will need an original charcoal filter for the recirculation mode. (See Special Accessories).
- Fix the deflector using 2 screws ∅ 3.5 x 6.5 mm. Fig. 2.

Fig. 2
Control Panel
- Best results are obtained by using a low speed for normal conditions and a high speed when odours are more concentrated. Turn the hood on a few minutes before you start cooking. The hood should be left on after cooking for about 15 minutes or until all the odours have disappeared. The control switches are located on the hood's front panel:
- The light switch switches the hood lamp on and off. The motor switch switches the motor off. Speed 1: Speed 1 push-button. Speed 2: Speed 2 push-button. Speed 3: Speed 3 push-button.
Light switch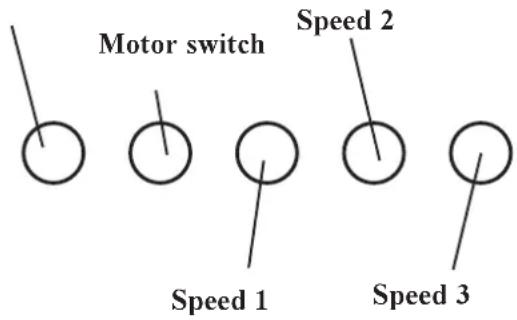
Correct ventilation
If the cooker hood is to work correctly there must be an under pressure in the kitchen. It is important to keep the kitchen windows closed and have a window in an adjacent room open.
Maintenance and care
The hood must always be disconnected from the electricity supply before beginning any maintenance work.
Cleaning the hood
- Clean the outside of the hood using a damp cloth and a solution of water and mild washing up liquid.
- Never use corrosive, abrasive or flammable cleaning products or products containing bleach.
- Never insert pointed objects in the motor's protective grid.
- Only ever clean the switch panel and filter grill using a damp cloth and mild washing up liquid.
- It is extremely important to clean the unit and change the filters at the recommended intervals. Failure to do so will cause grease deposits to build up that could constitute a fire hazard.
Metal grease filter
The purpose of the grease filters is to absorb grease particles which form during cooking and it must always be used, either in the external extraction or internal re-circulation function. Attention: the metal grease filters must be removed and washed, either by hand or in the dishwasher, every four weeks.
Removing the metal grease filters
Push it towards the back of the unit and then pull it down and out. Fig. 3.
Hand washing
Soak grease filters for about one hour in hot water with a grease-loosening cleaner, then rinse off thoroughly with hot water. Repeat the process if necessary. Refit the grease filters when they are dry.
Dishwasher
Place grease filters in the dishwasher. Select most powerful washing programme and highest temperature, at least 65°C. Repeat the process. Refit the grease filters when they are dry. When washing the metal grease filter in the dishwasher a slight discolouration of the filter can occur, this does not have any impact on its performance.
- Clean the inner housing using a hand hot solution only (never use caustic detergents, abrasive powders or brushes).
Warning
- Failure to observe the instructions on cleaning the unit and changing the filters will cause a fire hazard. You are therefore strongly recommended to follow these instructions.
- The manufacturer declines all responsibility for any damage to the motor or any fire damage linked to inappropriate maintenance or failure to observe the above safety recommendations.

Fig. 3
Charcoal filter
- The charcoal filter should only be used if you want to use the hood in the recirculation function.
- To do this you will need an original charcoal filter (available from your local Service Force Centre).
- Replacing the charcoal filter The charcoal filter cannot be washed nor regenerated. The charcoal filter should be replaced every 4 months under normal use. Replacement filters are available from your local Service Force Centre.
- Fitting - Fig. 4 Fit one charcoal filter on the left and one on the right so to cover the plastic grids that protect the fan wheel, then turn clockwise the central handle of the charcoal filter.
• To remove proceed in the reverse order.
- Clean the inner housing using a hand hot solution only (never use caustic detergents, abrasive powders or brushes).
- Always specify the hood model code number and serial number when ordering replacement filters. This information is shown on the registration plate located on the inside of the unit.
- The charcoal filter can be ordered from your local Service Force Centre.
Changing the light bulb
- Disconnect the cooker hood from the main supply.
- Remove the lamp cover.
- Replace the old bulb with a new one of the same type.
- Remount the lamp cover.
- If the light does not come on, make sure the bulb has been inserted correctly before contacting your local Service Force Centre.

Fig. 4
What to do if
If your appliance fails to work properly please carry out the following checks.
| Symptom | Solution |
| The cooker hood will not start... | Check that: The hood is connected to the electricity supply.Check that a fan speed has been selected |
| The cooker hood is not working | Check that: The fan speed is set high enough for the task.The grease filters are clean.The kitchen is adequately vented to allow the entry of fresh air.If set up for recirculation, check that the charcoal filter is still effective.If set up for extraction, check that the ducting and outlets are not blocked. |
| The cooker hood hasswitched off during operation... | The safety cut-out device has been tripped.Turn off the hob and then wait for the device to reset.If the hood has been installed below the heights indicated in the installation instructions the motor will cut-out frequently which will damage the hood. |
If after all these checks, the problem persists, contact your local Service Force Centre, quoting the model and serial number.
Please note that it will be necessary to provide proof of purchase for any in-guarantee service calls.
In-guarantee customers should ensure that the above checks have been made as the engineer will make a charge if the fault is not a mechanical or electrical breakdown.
Special Accessories
Charcoal Filter Type 200
Technical Specifications
| Model Dimensions | Height | Width | Depth absorption | Lighting Grease filter Power Electrical connection | |||
| EFCL 650 | 55-64,5 | 59,9 | 51,5 | 2 x 40W | 2 | 250 W | 220-240 V |
| EFC650 | 87,5-111,6 | 59,9 | 51,5 | 2 x 40W | 2 | 250 W | 230 V |
| EFC950 | 87,5-111,6 | 89,9 | 51,5 | 2 x 40W | 3 | 250 W | 230 V |
| CH 1200 | 87,5-111,6 | 119,9 | 51,5 | 2 x 40W | 4 | 250 W | 230 V |
| CH900 | 87,5-111,6 | 89,9 | 51,5 | 2 x 40W | 3 | 250 W | 230 V |
| CH600 | 87,5-111,6 | 59,9 | 51,5 | 2 x 40W | 2 | 250 W | 230 V |
| For all Models - Fuse rating: 5A Time Delay Fuse | |||||||
Subject to change without notice.
Technical assistance service
You are welcome to telephone our technical assistance service (see list of technical assistance centres) whenever you need information or in the unlikely event of a fault.
For service in Australia call 1300 650 020.
When calling, please be ready to specify:
This information is shown on the registration plate inside the unit behind the grease filter.
We reserve the right to change specifications and colours as a result of our policy of continuing technological development.
Service and Spare Parts
In the event of your appliance requiring service, or if you wish to purchase spare parts, contact your local Service Force Centre by telephoning: 08705 929 929
Your call will be automatically routed to the Service Centre covering your post code area. For the address of your local Service Force Centre and further information about Service Force, please visit the website at www.serviceforce.co.uk
Please ensure that you have read the section "What to do if..." as the engineer will make a charge if the fault is not a mechanical or electrical breakdown even if the appliance is under warranty. Please note that proof of purchase is required for in-guarantee service calls.
Help us to help you
Please determine your type of enquiry before writing or telephoning.
When you contact us we need to know:
- Your name • Clear and concise details of the fault • Serial number*
- Address and post code • Name and model of the appliance*
- Telephone number • E number* * This information can be found on the rating plate, which can be seen when the grease filters are removed.
If you require Customer Service in the Republic of Ireland, please contact us at the address below:
Electrolux
Electrolux Group (Ire) Ltd
Long Mile Road
Dublin 12
Republic of Ireland
Tel: +353 (0) 1 4090751
Email: service.eid@electrolux.ie
CUSTOMER CARE DEPARTMENT
For general enquiries concerning your ELECTROLUX appliance or for further information on ELECTROLUX products, please contact our Customer Care Department by letter or telephone at the address below or visit our website at www.electrolux.co.uk
Customer Services Department
Major Appliances
Electrolux
Addington Way
Luton
Bedfordshire
LU4 9QQ
08705 950 950 (*)
* calls to this number may be recorded for training purposes.
Guarantee Conditions
Standard guarantee conditions
We, Electrolux, undertake that if within 12 months of the date of the purchase this Electrolux appliance or any part thereof is proved to be defective by reason only of faulty workmanship or materials, we will, at our option repair or replace the same FREE OF CHARGE for labour, materials or carriage on condition that:
The appliance has been correctly installed and used only on the electricity supply stated on the rating plate.
The appliance has been used for normal domestic purposes only, and in accordance with the manufacturer's instructions.
The appliance has not been serviced, maintained, repaired, taken apart or tampered with by any person not authorised by us.
All service work under this guarantee must be undertaken by an Electrolux Service Force Centre. Any appliance or defective part replaced shall become the Company's property.
This guarantee is in addition to your statutory and other legal rights.
Home visits are made between 8.30am and 5.30pm Monday to Friday.
Visits may be available outside these hours in which case a premium will be charged.
Exclusions
This guarantee does not cover:
Damage or calls resulting from transportation, improper use or neglect, the replacement of any light bulbs or removable parts of glass or plastic.
Costs incurred for calls to put right an appliance which is improperly installed or calls to appliances outside the European Community (EC) or European Free Trade Area.
Appliances found to be in use within a commercial environment, plus those which are subject to rental agreements.
Products of Electrolux manufacture which are not marketed by Electrolux.
European Guarantee
If you should move to another country within Europe then your guarantee moves with you to your new home subject to the following qualifications:
The guarantee starts from the date you first purchased your product.
The guarantee is for the same period and to the same extent for labour and parts as exists in the new country of use for this brand or range of products.
This guarantee relates to you and cannot be transferred to another user.
Your new home is within the European Community (EC) or European Free Trade Area.
The product is installed and used in accordance with our instructions and is only used domestically, i.e. a normal household.
The product is installed taking into account regulations in your new country.
Before you move please contact your nearest Customer Care centre, listed below, to give them details of your new home. They will then ensure that the local Service Organisation is aware of your move and able to look after you and your appliances.
France Senlis +33 (0)3 44 62 20 13
Germany Nürnberg +49 (0)800 234 7378
Italy Pordenone +39 (0) 800 117511
Sweden Stockholm +46 (0)20 78 77 50
UK Luton +44 (0) 8705 950 950
Installation
Unpacking
Check that the cooker hood has no damages.
Transportation damages should immediately be reported to the company responsible for the transportation.
Damages, faults and any missing parts or documents should immediately be reported to the retailer.
Take care of the packing materials so that small children cannot play with them.
Fitting
The hood is to be mounted on the wall.
When installed, the hood must be not less than 60 cm. above electric burners or 70 cm. above gas or mixed-fuel burners. Fig. 5.
The hood can be installed above these heights but for optimum performance it should be installed at the distance quoted for the appropriate heat source.
Electrical connection
(not for UK)
Safety warnings for the electrician
Before connecting the appliance to the power supply, check that the voltage indicated on the rating plate corresponds to the mains power supply available. Appliances fitted with a plug can be connected to any standard power socket within easy access.
Should it be necessary to provide a fixed connection, the hood must only be installed by an electrician authorised by the local electricity board. When installing, an omnipolar disconnector with a distance of at least 3 mm between contacts must be provided.
Fixed connection of the appliance must only be carried out by an authorised electrician.

Fig. 5
Electrical connection for UK only

WARNING: DOUBLE INSULATED DO NOT EARTH
Electrical Requirements
Any permanent electrical installation must comply with the latest I.E.E. Regulations and local Electricity Board regulations. For your own safety this should be undertaken by a qualified electrician e.g. your local Electricity Board, or a contractor who is on the roll of the National Inspection Council for Electrical Installation Contracting (NICEIC) or a suitably competent person.
Electrical Connection
Before connecting to the mains supply ensure that the mains voltage corresponds to the voltage on the rating plate inside the cooker hood.
This appliance is fitted with a 2 core mains cable and must be permanently connected to the electricity supply via a double-pole switch having 3mm minimum contact gap on each pole. A Switched Fuse Connection Unit to BS1363 Part 4, fitted with a 5 Amp time delay fuse, is a recommended mains supply connection accessory to ensure compliance with the Safety Requirements applicable to fixed wiring instructions.
This appliance conforms to BS 800: 1988 and EEC Directive No. 78 308 regarding suppression of radio and television interference.
Safety warnings for the electrician
The following is valid in Ireland only:
- the wire which is coloured blue must be connected to the terminal which is marked with the letter N.
- the wire which is coloured brown must be connected to the terminal which is marked with the letter L.
Wall unit mounting - Fig. 6
- Put the template onto the wall (1) and drill two 12mm holes (2). Fit two hooks (3) on the drilled holes.
- Remove the metal filters (4) and hang the hood on the hooks and adjust the position of the hood using the two screws on the bottom of the hooks (5).
- Depending on the model, mark 2 or 4 points (6). Remove the hood and drill 2 or 4 8mm holes on the marked points. Fit 2 or 4 8mm wall dowels. Hang again the hood and fix the hood permanently with 2 or 4 screws 5x45 (7). Fix the chimney support (8) with two screws 5 x 45 mm and two wall dowels on the wall close to the ceiling.
- For the extraction version: Fit the connection ring (S) on the top of the hood with two screws 3.5 x 6.5 mm (9S) then fit a vent hose long enough to reach the outside (10S). For the recirculation version: Fix definitively the deflector (K) on the top of the hood with two screws 3.5 x 6.5 mm (9K).
Prepare the electric connection (11) (see relative chapter). Fit the chimney (12) and fix it on the chimney support with two screws 3 x 9 mm (13). The lower part of the chimney must be slid down and inserted on the housing on the upper part of the hood (14).
Fit the two grids (15) on both sides of the chimney.
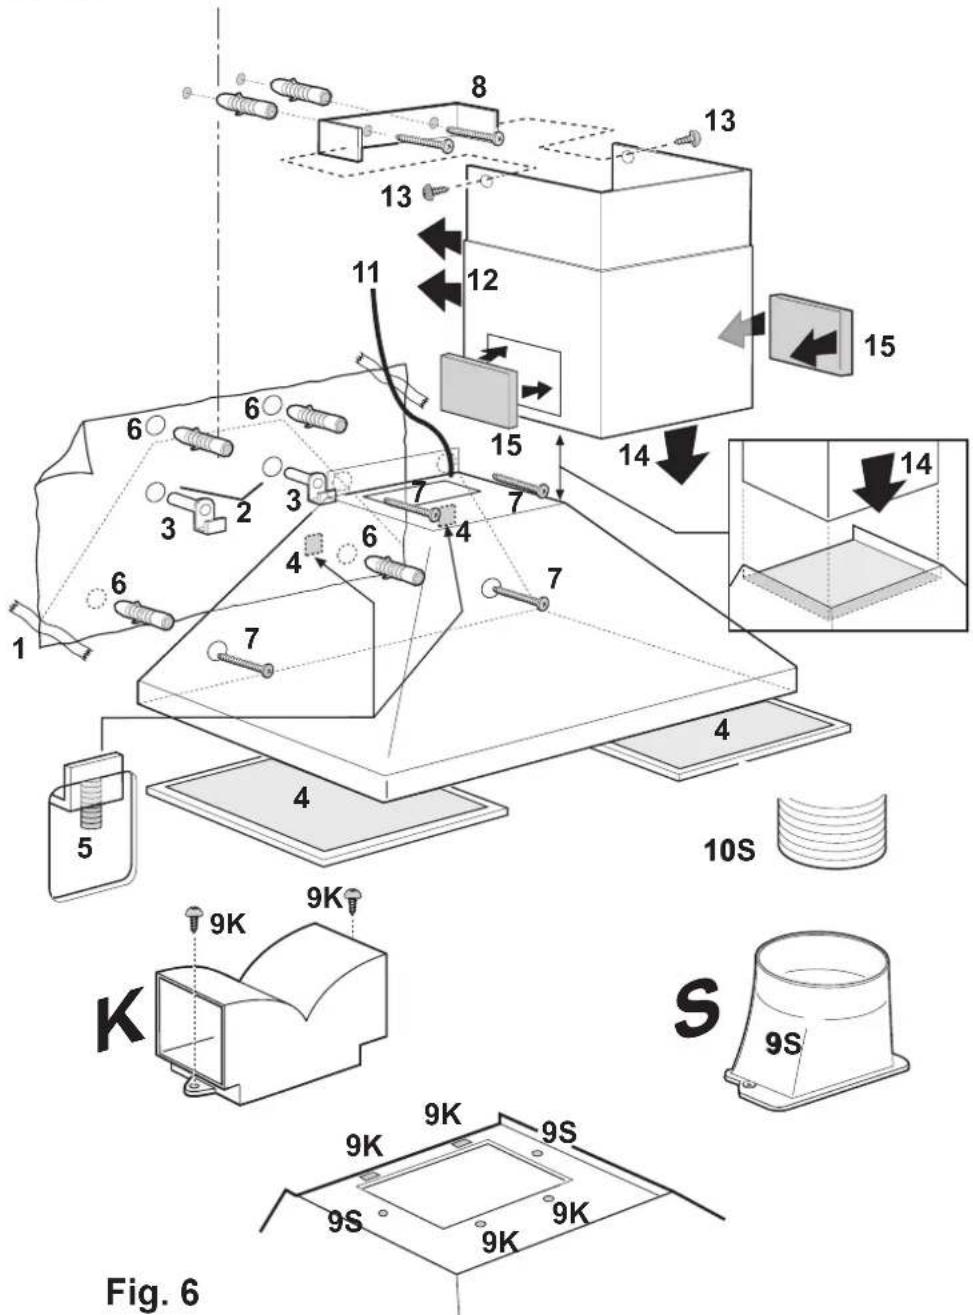


Fig. 4
Extra available accessories
Carbon filter type 200
Fig. 1
Using the extractor hood
Fig. 3
Fig. 4
Accessories
Fig. 1
Fig. 3
Fig. 4
The Electrolux Group. The world's No.1 choice.
The Electrolux Group is the world's largest producer of powered appliances for kitchen, cleaning and outdoor use. More than 55 million Electrolux Group products (such as refrigerators, cookers, washing machines, vacuum cleaners, chain saws and lawn mowers) are sold each year to a value of approx. USD 14 billion in more than 150 countries around the world.

- ACTIVATED CARBON FILTER
- SPECIAL ACCESSORIES
- CHARCOAL FILTER
- ACCESSORIES (OPTIONAL)
- FILTER VERSION
- DESCRIPTION OF THE APPLIANCE
- CONTROL PANEL
- MAINTENANCE AND CARE
- WHAT TO DO IF
- TECHNICAL SPECIFICATIONS
- INSTALLATION
- SAFETY WARNINGS
- FOR THE INSTALLER
- FOR THE USER
- EXTRACTION MODE
- RECIRCULATION MODE
- CORRECT VENTILATION
- CLEANING THE HOOD
- METAL GREASE FILTER
- REMOVING THE METAL GREASE FILTERS
- HAND WASHING
- DISHWASHER
- WARNING
- CHANGING THE LIGHT BULB
- TECHNICAL ASSISTANCE SERVICE
- SERVICE AND SPARE PARTS
- HELP US TO HELP YOU
- CUSTOMER CARE DEPARTMENT
- GUARANTEE CONDITIONS
- STANDARD GUARANTEE CONDITIONS
- EXCLUSIONS
- THIS GUARANTEE DOES NOT COVER
- EUROPEAN GUARANTEE
- UNPACKING
- FITTING
- ELECTRICAL CONNECTION
- (NOT FOR UK)
- SAFETY WARNINGS FOR THE ELECTRICIAN
- ELECTRICAL CONNECTION FOR UK ONLY
- WARNING: DOUBLE INSULATED DO NOT EARTH
- ELECTRICAL REQUIREMENTS
- THE FOLLOWING IS VALID IN IRELAND ONLY
- WALL UNIT MOUNTING - FIG
- EXTRA AVAILABLE ACCESSORIES
- USING THE EXTRACTOR HOOD
- ACCESSORIES
Brand : ZANUSSI
Model : CH 600
Category : Range hood