
ZKF 65 l - Cooker ZANUSSI - Free user manual and instructions
Find the device manual for free ZKF 65 l ZANUSSI in PDF.
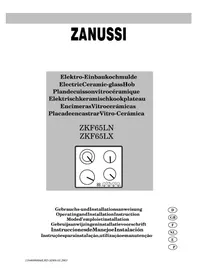


| Product type | Freestanding cooker with gas hob and electric oven |
| Brand | Zanussi |
| Model | ZKF 65 l |
| Width | 60 cm |
| Depth | 60 cm |
| Height | 85 cm (adjustable) |
| Weight | 55 kg |
| Power supply | 220-240 V / 50-60 Hz |
| Hob type | Gas: 4 burners (including one triple ring) |
| Oven type | Electric static and convection oven |
| Oven capacity | 65 litres |
| Oven functions | Conventional cooking, convection, grill, defrosting |
| Cleaning | Pyrolytic (self-cleaning) |
| Child safety | Child safety (control lock) |
| Gas ignition | Built-in electronic ignition |
| Safety shut-off | Automatic gas cut-off device in case of flame extinction |
| Oven door | Removable cool-touch glass for cleaning |
| Included accessories | Grill grid, drip tray, rotisserie spit |
| Repairability | Spare parts available (model code ZKF 65 l) |
| Repairability index | 8.5 / 10 (according to manufacturer data) |
Frequently Asked Questions - ZKF 65 l ZANUSSI
User questions about ZKF 65 l ZANUSSI
0 question about this device. Answer the ones you know or ask your own.
Ask a new question about this device
Download the instructions for your Cooker in PDF format for free! Find your manual ZKF 65 l - ZANUSSI and take your electronic device back in hand. On this page are published all the documents necessary for the use of your device. ZKF 65 l by ZANUSSI.
USER MANUAL ZKF 65 l ZANUSSI
Important hints on safety 14
Overall view and technical information ..... 15
Prior to the first use 15...
Hob instructions 16
Ceramic-glass surface 16.
Switch-on and regulation 16
Switch-off 16
Residual heat indicator 17
Pots and pans 17
Intelligent energy consumption 17
Cleaning and care 18
Special problems 18
What to do in case of an error 22
Type plate 22
Installation instructions
Important hints on safety 14
Installation instructions 19
Unpacking and disposal 19
Installation in the kitchen worktop 19
Built-in dimensions 20
Built-in 20
Electric connection 21
Type plate 22
For the installer


Cleaning and care
Prior to the first use of the appliance, do make yourself familiar with the instruction manual. Pay special attention to the hints on safety. In this manual they are marked with a
This will prevent damage to persons as well as to the appliance itself.
Do carefully keep the manual at a safe place and, if need be, pass it on to your successor user.
The appliance is only to be used for its purpose in the household. This appliance is according to international security instructions and quality norms.
The safety measures existing as a matter of self-understanding would, however, not cover all possible risks of accidents.
Electrical safety
The connection to the power supply must exclusively be carried out by expert electricians. Moreover, electrical safety has been ensured by expert installation in standard built-in cabinets/work-tops.
For safety reasons, repairing, in particular at live parts of the appliance, has to be carried out by expert electricians or trained service technicians only, as potential danger will result for the user. If a fault occurs, please contact our after-sales service.
Children's safety
Always keep small children away. Make sure that playing children do not operate the appliance.
Use and operation
In case of careless handling, there is danger of burning oneself at the heating elements in the cooking area.
Do not switch on cooking zones unless pots or pans are placed on them. Vessels and their bottoms have to be dry and clean.
Do not use hobs for parking any objects.
The preparation of food in aluminum foil or plastic containers is not allowed.
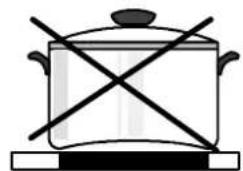
The hob gets damaged when you operate it without placing any vessels on it or when you use empty or unsuitable vessels, e.g. of an uneven bottom or a too small diameter.
Overheated fat or oil may ignite; therefore, watch deep frying and similar methods of preparation during which a lot of fat needs to be heated up.
When taking the hot items from the hot plates, do absolutely make use of pot or thermo-gloves.
When connecting additional electrical appliances, make sure the connecting wires do not come into contact with the hot plates.
After use, make sure that the appliance is switched off. All of the rotary knobs have to be reset into the OFF-position.
Cleaning
No hotplate must be switched on during the cleaning procedure. Make sure that the ceramic-glass surface has cooled down in a way that one may get in touch with interior parts without any danger.
Always keep the ceramic-glass surface clean.
Steam and high-pressure cleaning units are not suitable for cleaning because of the requirements of electrical safety.


ATTENTION! = Symbol for safety hints - if you don't observe this, damages of persons as well to the appliance can happen
STOP! = Symbol for hints of special danger - please observe strictly.
= Symbol for environmental hints and saving of energy
Overall view
ZKF65LN
ZKF65LX
- cooking zone hilight ∅180mm, 1800W 2. two circuit cooking zone hilight
∅120mm, 1200W
∅180mm, 1700W
3. cooking zone hilight ∅145mm, 1200W 4. cooking zone hilight ∅145mm, 1200W 5. Residual heat indicator 6. Hotplate switches
Voltage: AC 230 V
Total connected load: 5.9 kW

Prior to the first use

Please check whether the appliance was delivered in perfect state. Appliances with obvious transport damages must not be connected to the mains.
First cleaning
In order to remove possible production remnants, clean the appliance once prior to the first use.
Remove any possibly existing labels and protective foils from the ceramic glass surface.
Clean the ceramic glass plate and the frame with hot water and a washing-up liquid and wipe it dry.
First heating up
The cooking zones are to be switched shortly at maximum setting, one after another, in order to check the operability.
When using the hot plates for the first time there may result as short-termed, slight molestation by odours.

Hob instructions
Ceramic glass surface
The cooking surface is made of proven ceramic glass. The surface is non-porous and, in addition, insensitive to quick variations in temperature. Therefore pots may be moved from a hot to a cold zone.
When switching on the cooking zones there may occur a short-termed audible buzzing sound of the radiant elements. This sound is physically conditioned, without any harm to the performance of the appliance and fading away with sufficient heating of the cooking zone.

Keep all objects and materials that might melt away from the hobs, e.g. plastic and aluminum foils.
Be careful when using sugar or sugar-containing fluids for the preparation. If anything happens to melt on the cooking surface, remove it immediately - when still hot - using a razor blade scraper in order to avoid damages of the surface.
Switch-on and regulation
The cooking zones are switched and regulated by means of 4 energy controlled switches on the right of the hob. You may set the desired output by setting to positions 1-9.
The setting knobs have to be turned to the other eight to the desired output. Position 9 refers to the highest and 1 to lowest output. 0 is the OFF-position.
The setting chart provides you with hints for practical use.
Switches for dual-circuit zones
Small circuit: turn the switch to the left. The smaller circuit is controlled in the range from 1 to 9.
Dual-circuit: Turn the knob beyond position 9 over a distinct stop to symbol ●, the second circuit is switched on in addition.
Both circuits now are controlled in the range from 1 to 9.
Switch-off
Switch off your cooking zones by turning the knobs in the OFF-position.

After use make sure that the appliance is switched off. All rotary knobs must be set to the OFF-position.


| Hotplatesettingchart | ||
| Function | Examples | |
| OFF | 0 | - |
| keep--warm,heating up,beatingofmelting | 12 | smalleramountofhotpot,sauce,butter,chocolate |
| swellingup defrosting | 3 | rice spinach |
| fryingwithoutcrust | 4 | omelet,friedeggs |
| indulgentcooking swellingup | 5 | vegetables,small amountsoffruitwithlittle liquid,farinaceousproduct |
| boiling | 6 | boiledpotatoes,stews,soups,sauces |
| indulgentfrying baking | 7 | schnitzel,cutlets,meat-balls,fish--filet indeepfat |
| quickfrying inseries | 8 | potatofritters,pan--cakes,friedeggs |
| parboiling,lighly frying | 9 | ...thenswitch--backtoap-propriate setting |
Residual heat indicator
The residual heat indicator with 1 indicator lamp is located between the two front cooking zones. The lamp comes on in case the temperature of switched on cooking zones will reach more than (abt.) 60 °C. Also after switch-off the lamp will remain on until cooling down of the corresponding cooking zone.
Pots and pans
Do not put pots on the cooking surface unless their bottoms are clean and dry. Avoid heating up empty vessels.
Always cook with the pot lid closed.
Pots and pans bottoms might have burrs or edges that scratch and scour the ceramic surface when the vessels are moved around.
This is also true for pots and pans made of cast iron and for enamelware vessels that have an electro-graphitized bottom.
Scratches may also appear if, e.g., grains of sand (left from the preceding cleaning of vegetables) get on the cooking surface when the pot is moved around on it.
Dishes with aluminium and copper bottoms may leave metallic discolouration on the ceramic glass surface which is only hard to remove or even not at all.

Intelligent consumption of energy
To save energy you should...
- exclusively make use of suitable boiling and roasting vessels with smooth and even bottom.
- on principle put on pots and pans before the switch-on of the cooking zone.
- put on pots and pans always with the lid on.
- switch off the cooking zones some minutes before the end of cooking time in order to make use of the residual heat.
- make use of the residual heat of the cooking zones for warm-keeping.
Pots and pans must not be smaller than the cooking zone itself. They should not exceed the cooking zone diameter by more than 2-4 cm either.
Only use vessels that have a smooth bottom.

After use, make sure that the appliance is switched off. All rotary knobs must be set to the OFF position.


Cleaning and care
Clean your glass-ceramic hob thoroughly and regularly, when it is hand-hot or cold. Avoid frequent burning in of soiling.
Suitable for cleaning are:
Clean cloths or paper towels, cleansing agents such as cerafix, Stahl-fix, WKTop, etc., and a razor blade scraper supplied by the manufacturer.
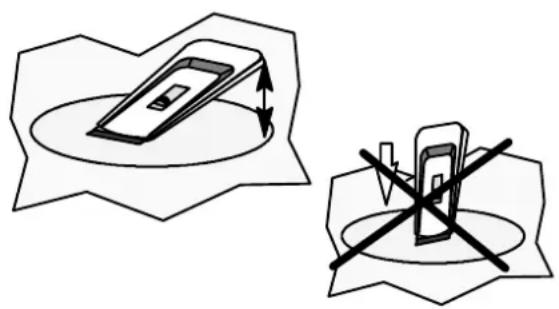
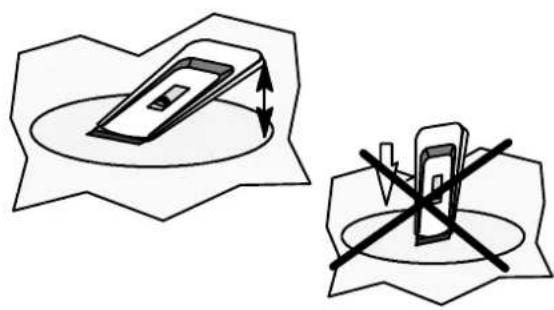
The cleaning scraper is applied at an angle towards the ceramic glass surface; residues from roasting and boiling over are to be scraped off with a sliding blade.
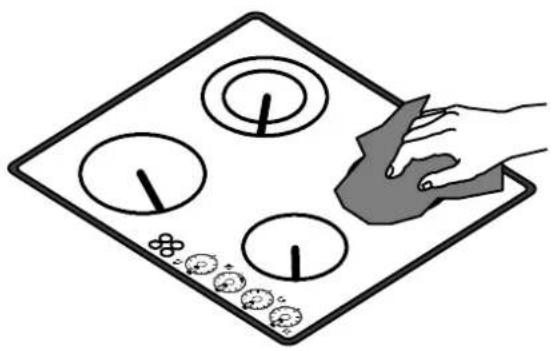
Wipe off light soiling with a damp cloth, possibly using washing-up liquid.
Persistent soiling can be easily removed using the razor blade scraper. Clean calcareous and water rings, fat splashes and metallically gleaming discolourations using ceramic-glass or stainless steel cleansers such as Sigolin-Chrom or Stahlfix.
Cleaning agents must not get onto the hot ceramic glass surface.
Cleansing agents have always to be wiped off completely with a damp cloth, as they have a corrosive effect when reheated. Finally wipe dry.

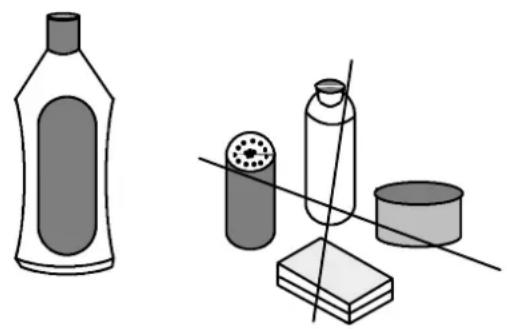
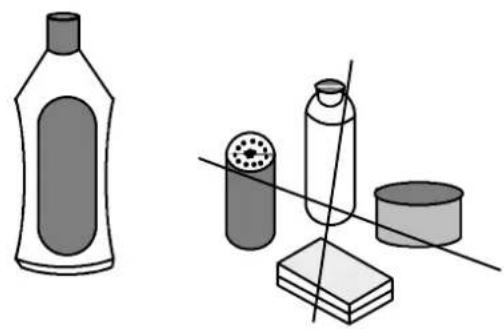
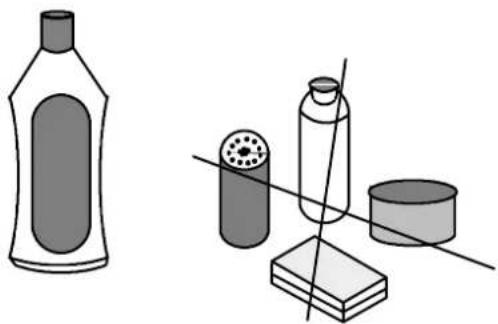
Never use any aggressive or scouring cleansing agents such as grill or oven sprays, stain or rust removers, scouring powder or scouring sponges.
| Specialproblems | |
| whenachemicalcleansingagentisnotsufficient | Therazorbladescrapercanfacilitatethecleaning. |
| ... when dark stains have appeared | If cleaning with the razor blade scraper and Stahl-fix or Sidoldoesnothelpany,thedecorhaspresumably beenrubbeddownbyunsuitablecleansingagentsors scouringpotbottoms. |
| ... whenmetallicdiscolourationappearsinthe cookingsurface | Thecleansingagentsthathavebeenusedwereforthe mostpartunsuitable.Thediscolourationcanonlybe removedwithdifficultyusingSidolorStahl--fix. |
| ... When the surface shows scratches or hollows | These flaws caused by scratching or melted objects cannotberemovedanymore,buttheydonotreduce theefficiency. |
Installation instructions

The appliance must exclusively be connected to the mains by an expert electrician.
With the installation and in case of a service failure, the appliance has to be isolated from the mains. Fuse is to be switched off or removed.
The general rules for the operation of electric appliances, the provisions by the competent electricity supply board, and the specifications of these installation instructions must be strictly adhered to.
Unpacking

Please check whether the appliance was delivered in perfect state. Appliances with obvious transport damages must not be connected to the mains.
Disposal

All packaging parts are recyclable; wooden strips are non-treated, foils and hard foam parts are marked. Packaging material and old appliances are to be disposed of orderly.
Please adhere to the national and regional prescriptions (material separation, waste collection, residuary product yards).
Installation in the kitchen worktop

Electrical safety is to be ensured by professional installation.
Protection against accidental contact according to the regulations set by VDE or other local authorities and EN60335 must be ensured by correct installation of the appliances. The same refers to the back of the appliance which, even in case of built-in solutions away from the wall, must not be freely accessible.
Built-in cupboards have to be located and fastened in a way that they are stable.
Please write the "F.Nr." from the type plate of this hob into the type plate form on page 20. You need this number when calling the after-sales service.


When building in ceramic glass cooking areas, the front cross-rail of the built-in cupboard must be removed in order to have the heat radiating off escape without any obstacles.
The space under the hob unit must be closed at all sides in a way that the lower side of the cooking area is no longer accessible.
The distance from the hob to the furniture part under the hob must be at least 20 mm. If needed, please fix an insulation. Drawers must not be located under a hot plate.
The distance from the hob to a high cupboard beside right or left must be at least 55 mm, to the back wall at least 55 mm.
With regard to the protection against overheating of surrounding furniture surfaces, this appliance corresponds to type Y (EN 60335). This appliance or the built-in cupboard for the appliance, respectively, may be located with the rear wall and one side wall to whatever high walls or furniture, respectively, and with the other side to another appliance or furniture of the same height as this appliance.
Built-in dimensions
The opening in the worktop must correspond to commercial dimensions. The hints required are given in the dimension sketch.
Built-in
Cut out the worktop according to the prescribed cutout size. The tolerance sizes must not be exceeded. Do precisely saw at the mark line. Recommendation: Mark the cut-out with a steel needle. Glue something on the line in order to avoid shattering of the coat when cutting.
With tile-coated worktop areas, the slits in the supporting area for the cooking area must be filled up completely.
Clean the worktop in the cutout area.
From the top, lay the cooking area into the cutout, adjust concentrically and firmly press down.
Check the sealing in the supporting frame for perfect seating and resting without a gap. Please do not apply additional silicone sealing material; the closure will make it harder to dismantle in case of need for service.
5 holes in the bottom of the built-in case are provided for the screws of the fitting plates.
At first, screw on the fitting plates with a screwdriver and afterwards regularly tighten the plates alternatively and diagonally offset, until the frame of the cooking area is perfectly laying on the worktop.
Too strong and one-sided tightening is to be avoided! Electric screwdrivers or pusher air screws are to be exclusively used with slip clutch (setting value 1-1.1 Nm).
| Measurementof | |
| Worktopopening: width:560mm depth:490mm radius: 5mm | Appliance: width: 572mm depth: 502mm height: 49mm |
| Voltage: AC230V50Hz/60Hz Totalconnectedload: 5.9kW | |


Electric connection
The mains connection must be carried out by an expert electrician. The VDE regulations and the valid prescriptions by the local power supply boards have to be complied with.
Prior to connection, it should be checked whether the voltage stated on the type plate—i.e. the nominal voltage of the appliance and of the oven/control box—is identical with the prevailing mains voltage. The type plate is located on the hob's bottom.
The heating element voltage amounts to 230 V ~. The appliance will also perform perfectly with the former mains voltage of 220 V ~.
The mains connection must be carried out in a way that an all-pole insulating device is existing with a contact opening of at least 3 mm, e.g. LS-automatism, earth-leakage circuit-breaker or fuse.
A wire of type H05VV-F or of higher rating is to be used as supply cable.
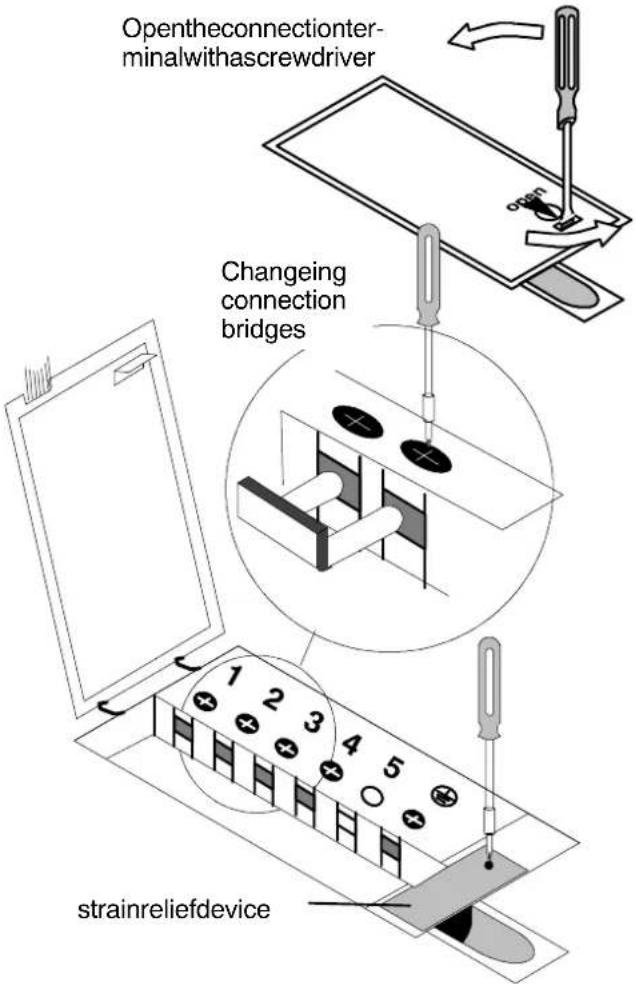
The mains terminal is located in the bottom of the appliance behind a covering slide.
According to existing mains voltage the appliance has to be connected in correspondence with the diagrams of connecting possibilities. The bridges of the terminal board are to be changed accordingly, if need be.
The protective conductor is to be connected to terminal ⏻. The protective conductor must be longer than live leads.
The cable connections have to be established as prescribed and the terminal screws be firmly tightened.
Afterwards the supply cable has to be secured by strain relief device and the covering slide must be closed.
Prior to first use remove any possibly existing labels and protective foils from the ceramic glass plate or the frame of the hob.

After connection to the power supply all heating elements are to be switched on shortly at maximum setting one after another, in order to check the operability.
| Electricalconnection 230V~ | |
1 2 3 4 5  | 230V~1 L+N |
1 2 3 4 5  | 400V 2N~2 L+N |
 | 400V3N~3 L+N |
 | 230V 2 ~2 L |
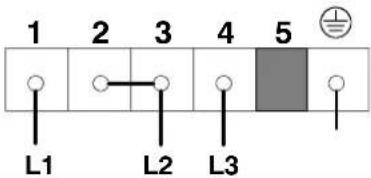 | 230V 3~3 L |
What to do in case of an error?

Put all selectors on the OFF-position.
Fuse is to be switched off or unscrewed.
Call an electrician or the after-sales service.
Urgent!
Note down here the data from the type plate of your appliance. The same is to be seen on the bottom of your hob.
Always make reference to this info:
--when filing a service call --when ordering spare parts or accessories --with technical queries
Spare parts service
Address:
Tel.:
Fax:
After-sales service:
Address:
Tel.:
Fax:
Type plate
The type plate is placed on the bottom of the appliance. After built-in and installation you cannot look at this information. So please note the F.-Nr. into the beside type plate.
MADE IN GERMANY
TYP: PEE2 012 PNC: 949 590 589 MODELL: ZKF 65 LN
AC230V 50/60HZ F.Nr.: ..... Total max. 5.9kW
MADE IN GERMANY
TYP: PEE2 012 PNC: 949 590 590 MODELL: ZKF 65 LX
AC230V 50/60HZ F.Nr.:..... Total max. 5.9kW

This appliance is corresponding
to the EG-rules 73/23/EWG,
89/336/EWG, 90/683/EWG.
ZANUSSI


Cleaning and care


Set the hob switches or the touch controls to the OFF position.
Operating the hob




Cleaning


89/336/EG, 90/683/EG.
ZANUSSI
Description
ZKF65LN ZKF65LX


This appliance complies with
the directives EG 73/23/EWG,
89/336/EWG, 90/683/EWG


Installation
For recessed installation
- INSTALLATION INSTRUCTIONS
- FOR THE INSTALLER
- CLEANING AND CARE
- ELECTRICAL SAFETY
- CHILDREN'S SAFETY
- USE AND OPERATION
- CLEANING
- OVERALL VIEW
- ZKF65LN
- ZKF65LX
- PRIOR TO THE FIRST USE
- FIRST CLEANING
- FIRST HEATING UP
- HOB INSTRUCTIONS
- CERAMIC GLASS SURFACE
- SWITCH-ON AND REGULATION
- SWITCHES FOR DUAL-CIRCUIT ZONES
- SWITCH-OFF
- RESIDUAL HEAT INDICATOR
- POTS AND PANS
- INTELLIGENT CONSUMPTION OF ENERGY
- UNPACKING
- DISPOSAL
- INSTALLATION IN THE KITCHEN WORKTOP
- BUILT-IN DIMENSIONS
- BUILT-IN
- ELECTRIC CONNECTION
- WHAT TO DO IN CASE OF AN ERROR
- URGENT
- SPARE PARTS SERVICE
- AFTER-SALES SERVICE
- TYPE PLATE
- ZANUSSI
- OPERATING THE HOB
- DESCRIPTION
- ZKF65LN ZKF65LX
- INSTALLATION
- FOR RECESSED INSTALLATION
Brand : ZANUSSI
Model : ZKF 65 l
Category : Cooker