
P426 - Air conditioner QLIMA - Free user manual and instructions
Find the device manual for free P426 QLIMA in PDF.


| Product type | Monobloc mobile air conditioner |
| Brand | Qlima |
| Model | P426 |
| Dimensions (L x W x H) | 70 x 35 x 45 cm |
| Net weight | 25 kg |
| Power supply | 220-240 V / 50 Hz |
| Cooling power | 12,000 BTU/h (3.5 kW) |
| Energy class | A |
| Refrigerant | R290 (propane) |
| Max cooling area | Up to 30 m² |
| Airflow rate | 300 m³/h |
| Noise level | 65 dB(A) |
| Water tank capacity | 1 L (drain pan) |
| Functions | Cooling, dehumidification, ventilation, sleep mode, 24-hour timer, automatic oscillation |
| Fan speeds | 3 speeds |
| Remote control | Yes, with batteries included |
| Filter | Washable air filter |
| Maintenance and cleaning | Clean the filter every month, empty the drain pan regularly |
| Safety | Automatic shut-off in case of overheating, anti-freeze protection, child lock |
| Spare parts and repairability | Parts available on Qlima.com, repairability score: 7.5/10 |
| Warranty | 2 years |
Frequently Asked Questions - P426 QLIMA
User questions about P426 QLIMA
0 question about this device. Answer the ones you know or ask your own.
Ask a new question about this device
Download the instructions for your Air conditioner in PDF format for free! Find your manual P426 - QLIMA and take your electronic device back in hand. On this page are published all the documents necessary for the use of your device. P426 by QLIMA.
USER MANUAL P426 QLIMA
guarantee

| D | GEBRAUCHSANWEISUNG | 10 |
| E | INSTRUCCIONES DE USO | 32 |
| F | MANUEL D'UTILISATION | 54 |
| GB | OPERATING MANUAL | 76 |
| I | ISTRUZIONI D'USO | 96 |
| NL | GEBRUIKSAANWIJZING | 120 |
| PL | INSTRUKCJA OBSŁUGI | 142 |
A

B

C

D

E

F

G
H
|
J
F GENERAL SAFETY
K

L
A
B

C
D

E

F

G
GB GENERAL SAFETY
For safety reasons, please read this manual carefully before operating. Persons who are not familiar with this manual must not use this air conditioner. We strongly recommend keeping this manual in a safe place for future reference.
H
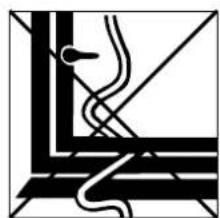
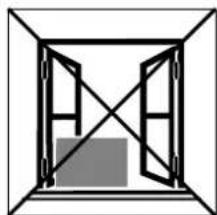
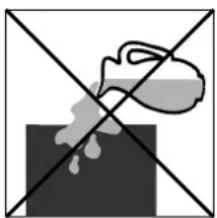
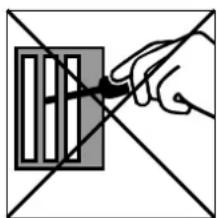
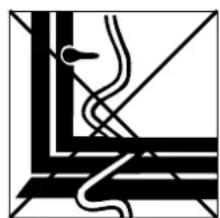
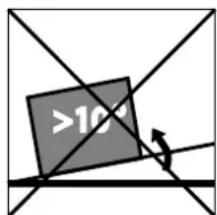
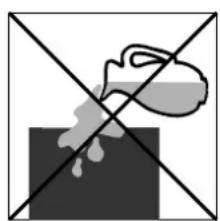
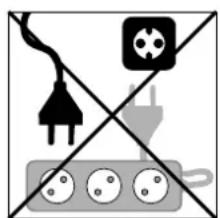
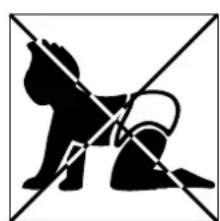
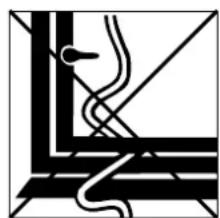
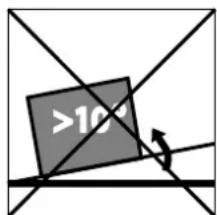
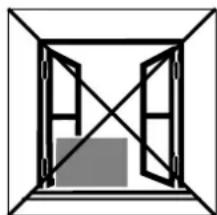
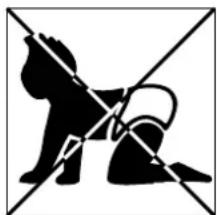
A. Do not use a damaged cable. B. Do not clamp or bend the cable. C. Do not place unevenly. D. Do not place in front of an open window. E. Do not bring in contact with chemicals. F. Do not place near a heat source. G. Do not immerse in water. H. Do not spill. I. Do not insert anything. J. Do not use an extension cord. K. Keep out of the reach of children. L. Do not repair.
|

J
SICUREZZA
K
L
A
B
C

D

E

F

G
H

|
J
K

L
A
B
C
D

E

F

G
H. Do not pour water to the right.
H
SLO GENERAL SAFETY
|
J
K

L
IMPORTANT PARTS

Figure 1
Figure 5
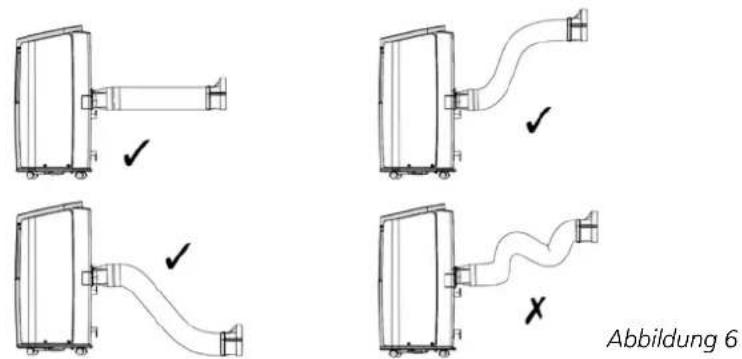
Figure 8
E REMOTE CONTROL
Figure 10
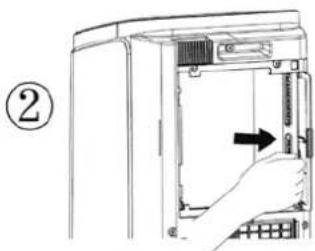
Figure 11
Figure 12
G AIRFLOW DIRECTION
Figure 16
Figure 17
Mounting the power cable hook
Figure 18
Figure 20
Figure 21
Figure 22
J MAINTENANCE

CAUTION
- READ THE USER MANUAL FIRST.
- IF IN DOUBT, CONSULT YOUR DEALER.
Dear Sir/Madam,
Figure 1
Figure 5
Figure 8
E REMOTE CONTROL
Figure 10
Figure 12
G AIR OUTLET
Figure 17
Figure 20
Figure 21
Figure 22

- READ THE USER MANUAL FIRST.
- IF IN DOUBT, CONTACT YOUR DEALER.
Dear Sir or Madam,
Illustration 1

Illustration 6
NOTE
Illustration 8

Illustration 10
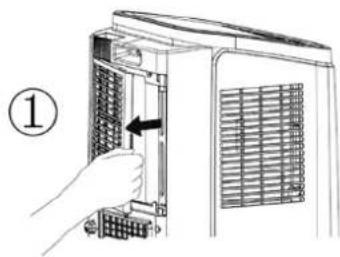
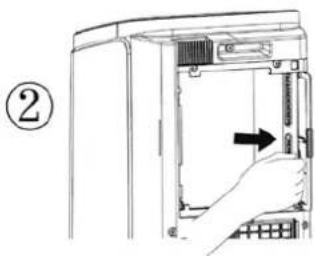
Illustration 11
Illustration 12
G AIR OUTLET
Illustration 17
Illustration 20
Illustration 21
Illustration 22
M WARRANTY CONDITIONS
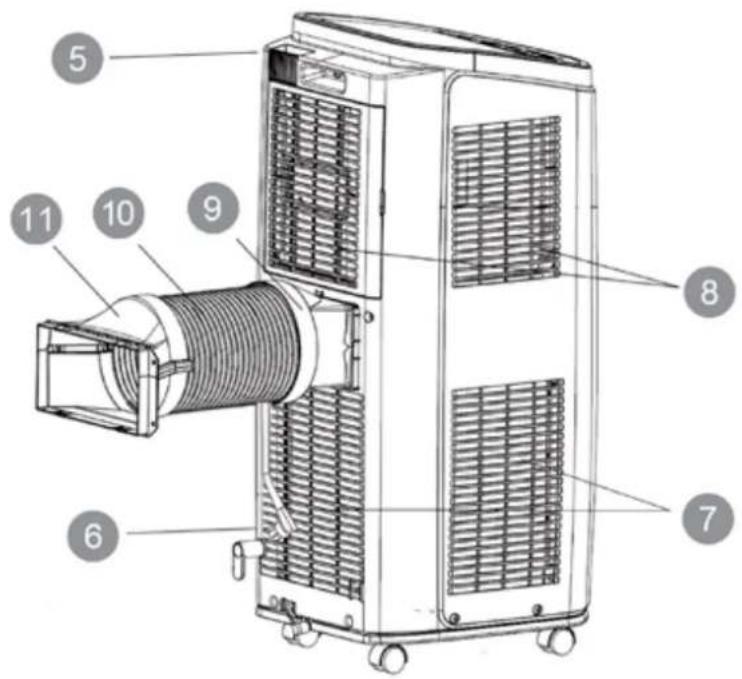
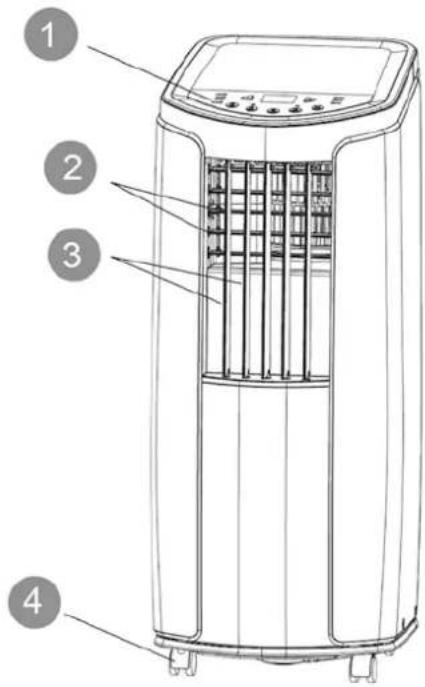
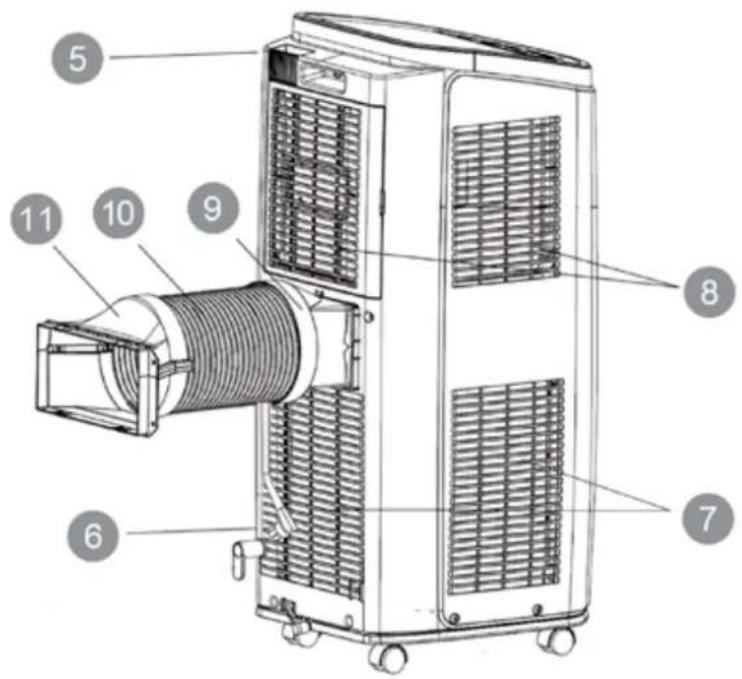
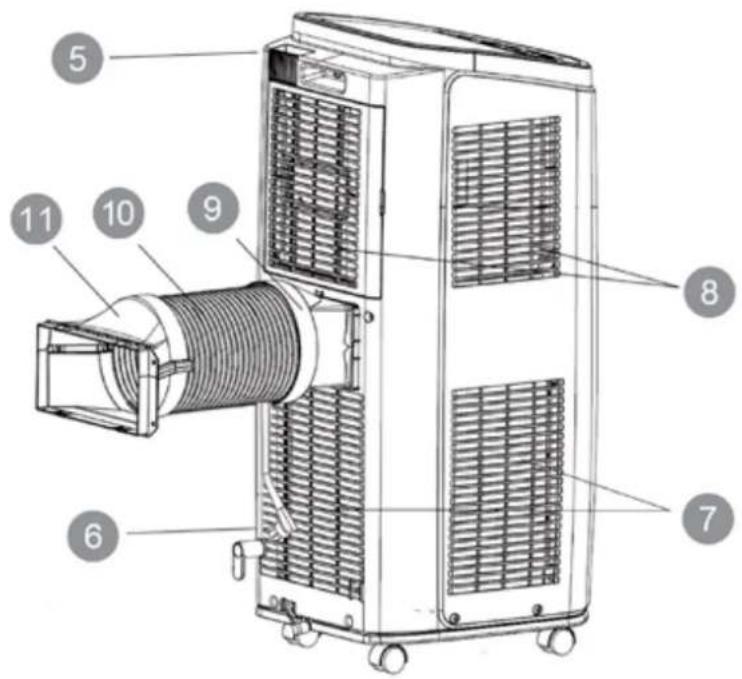
① Control panel ② Vertical air outlet ③ Horizontal air outlet 4 Casters ⑤ Holder for remote control 6 Power cord ⑦ Air inlet (condenser) 8 Air inlet (filters) 9 Connector 10 Hose adapter ⑪ Window air outlet
- READ THE DIRECTIONS FOR USE FIRST.
- IN CASE OF ANY DOUBT, CONTACT YOUR DEALER.
GB
Dear Sir, Madam,
Congratulations on the purchase of your air conditioner. This air conditioner has three functions in addition to cooling the air, namely, air dehumidification, circulation and filtration. The mobile air conditioner is extremely easy to operate and move. You have acquired a high quality product that will provide you with many years of pleasure, on condition that you use it responsibly. Reading these instructions for use before operating your air conditioner will optimise its life span. We wish you coolness and comfort with your air conditioner.
Yours sincerely,
PVG Holding B.V.
Customer service department
A SAFETY INSTRUCTIONS
Read this user manual carefully before using the appliance and keep it for future reference. Install this device only when it complies with local/national legislation, ordinances and standards. This product is intended to be used as an air conditioner in residential houses and is only suitable for use in dry locations, in normal household conditions, indoors in living room, kitchen and garage.

IMPORTANT
- The installation must be completely in accordance with local regulations, ordinances and standards.
- The device is suitable exclusively for use in dry places, indoors.
- Check the mains voltage. This device is suitable exclusively for earthed sockets – connection voltage 230 Volt/ 50 Hz.
- The device MUST always have an earthed connection. You may absolutely not connect the device if the power supply is not earthed.
- The plug must always be easily accessible when the device is connected.
- Read these instructions carefully and follow the directions.
Before connecting the device, check that:
- The connection voltage corresponds to that on the type plate.
- The socket and power supply are suitable for the device.
- The plug on the cable fits the socket.
- The device is on a stable and flat surface.
Have the electrical installation checked by a recognised expert if you are not sure that everything is in order.
- The air conditioner is a safe device, manufactured in accordance with CE safety standards. Nevertheless, as with every electrical device, exercise caution when using it.
- Never cover the air inlets and outlets.
- Empty the water reservoir through the water drain before moving it.
- Never allow the device to come into contact with chemicals.
- Do not insert objects into the openings of the device.
- Never allow the device to come into contact with water. Do not spray the device with water or submerge it as this may cause a short circuit.
- Always take the plug out of the socket before cleaning or replacing the device or a part of the device.
- NEVER connect the device with the aid of an extension cable. If a suitable, earthed socket is not available, have one fitted by a recognised electrician.
- Always consider the safety of children in the vicinity of this device, as with every electrical device.
- Always have any repairs – beyond regular maintenance – carried out by a recognised service engineer. Failure to do so may lead to invalidation of the guarantee.
- Always take the plug out of the socket when the device is not in use.
- A damaged electricity cable may only be replaced by the supplier or an authorised person/service point.
- This appliance is not intended for use by persons (including children) with reduced physical, sensory or mental capabilities, or lack of experience and knowledge, unless they have been given supervision or instruction concerning use of the appliance by a person responsible for their safety.
- Children should be supervised to ensure that they do not play with the appliance.
- This appliance can be used by children aged from 8 years and above and persons with reduced physical, sensory or mental capabilities or lack of experience and knowledge if they have been given supervision or instruction concerning use of the appliance in a safe way and understand the hazards involved. • Children shall not play with the appliance.
- Cleaning and user maintenance shall not be made by children without supervision.
ATTENTION!
- Never use the device with a damaged power cord, plug, cabinet or control panel. Never trap the power cord or allow it to come into contact with sharp edges.
- Never seal the room - where this device will be used - completely airtight. This will prevent under pressure in this room. Under pressure can disrupt the safe operation of geysers, ventilation systems, ovens, etc.
- Failing to follow the instructions may lead to nullification of the guarantee on this device.

B INCLUDED PARTS
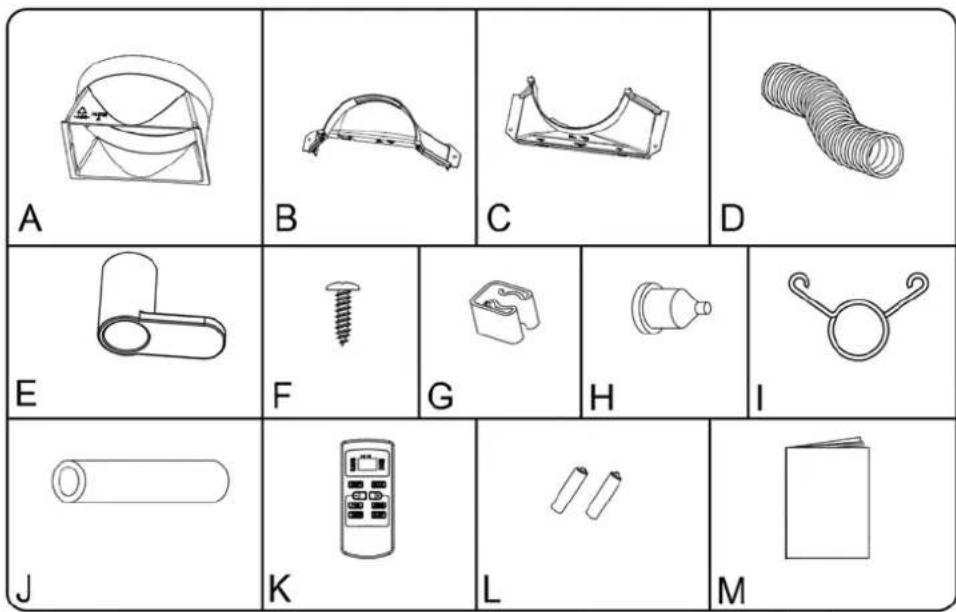
Fig. 1
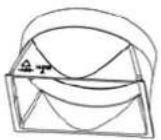
a. Connector to attach exhaust hose to unit. b. Window kit attachment. c. Window kit attachment. d. Exhaust hose e. Cable clips f. Screw g. Condensation hose holder h. Condensation hose grommet. i. Hose clip. j. Condensation hose. k. Remote control I. Batteries m. Manual
C INSTALLATION

WARNING
Before using the air conditioner it should be left in an upright position for at least 2 hours.
This unit is portable and can easily be moved from one room to another. In doing so keep this in mind:

Fig. 2
1 Ensure that the unit is positioned upright and on a level surface. 2 Do not operate the unit inside the bathroom, shower, or in any other very humid environment. 3 Please keep a distance of 30 cm between the unit and the wall or other objects to ensure proper air circulation. See fig.2.
4 Join the two connectors B and C (see fig. 1) by pushing them firmly together in the direction of the arrow (see fig. 2). Then screw connector B and C onto the air hose. 5 Then screw connector A onto the air hose.

6 Join the air hose with connector A (see fig. 1) to the air conditioner by sliding it down through the guides A at the rear of the unit passed clasp B (see fig. 4).
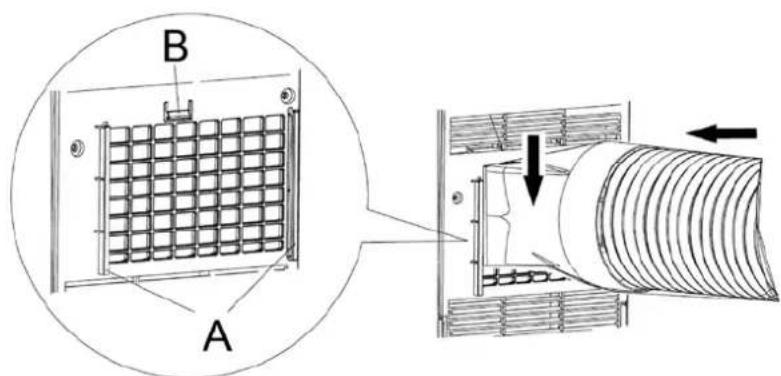
Fig. 4
7 Pass the other end of the hose with connector B/C outside, for instance through an open window (see fig. 5). Make sure that the hose is as straight as possible (see fig. 6).

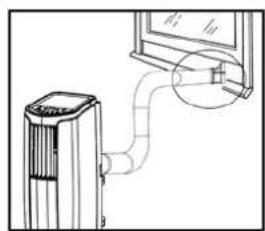
Fig. 5
IMPORTANT
The flexible air exhaust hose can be stretched to a length of approximately 1500 mm. The length of this hose was calculated on the basis of the capacity of the device. The use of other hoses or extensions may cause faults in the device. The air must be able to flow unhindered. If this is not possible, this may lead to overheating or water condensation in the air exhaust hose. This is why you must ensure that there are no kinks or sharp corners in the air hose. To obtain an optimum result, the air hose must be kept shorter than 1 metre while the air conditioner is in use.
D OPERATION
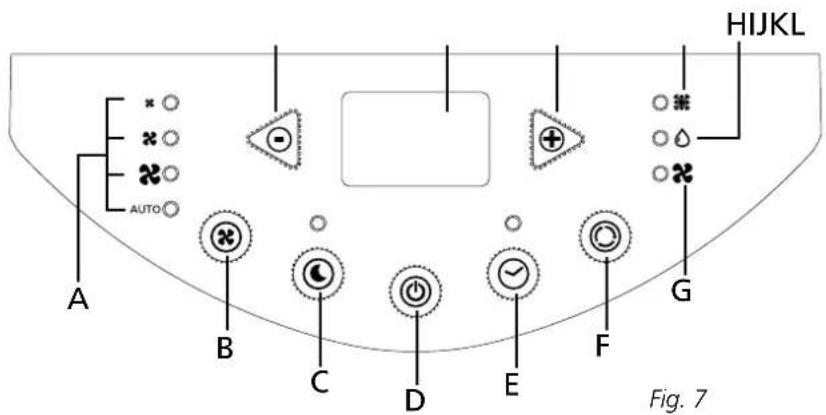
a. Fan mode b. Fan selector button c. Sleep function selector button d. On/Off button e. Timer function selector button f. Cooling / dehumidifier / fan selector button g. Fan speed LED h. Dehumidifier function LED i. Cooling function LED j. Increase set point / increase time on timer function button k. Display, indicates set point or set time l. Reduce set point / reduce time on timer function button
1. Insert the plug into the wall outlet.
2. Press the ⏻ button to switch on the air conditioner.
3. With the Ⓞ button you can change the operating mode of the unit. By pressing the Ⓞ button, the following modes appear:
Cooling, Dehumidifying, Air circulation
COOLING
When the unit is in the cooling mode, the following functions apply:
- The fan speed can be adjusted by pressing the

✗ Lowest setting.
✗ Medium setting.
Maximum setting.
AUTO Automatic speed
In the 'AUTO' position, the fan will rapidly decelerate or accelerate depending on the desired area temperature that has been set, and the actual area temperature.
- The temperature can be set by pressing the

between 16°C and 30°C. The display will show the set temperature.
It depends on the environment whether the required temperature will be reached. It is not a malfunction of the air conditioner if the room temperature remains above the "set temp".
DEHUMIDIFYING
When the unit is primarily used as a dehumidifier, then please follow these instructions: Do not connect the air exhaust hose and let the warm air go back into the room. Connect a drainage hose onto the permanent drain connector on the back of the unit. You must connect a drain tube to the water outlet. See chapter I.
Press the ○ button on the remote or the MODE button on the control panel to select the dehumidifier mode. The fan will operate on low speed.
The dehumidifier indicator light will illuminate and stay solid while the unit is dehumidifying. When the humidity in the room is 50% or lower, the compressor will not run, the unit will not dehumidify, and the dehumidifier light will blink.
AIR CIRCULATION
In this mode the unit only circulates air; the unit will not cool or dehumidify. The air entering the unit is not cooled or dehumidified, but is filtered.
When the unit is in this mode, the following functions apply:
- The fan speed can be adjusted by pressing the -button
* Lowest setting.
✗ Medium setting.
Maximum setting.
AUTO Automatic speed
4 When the unit is switched off the most recent setting will be stored in memory.
5 The timer function allows you to switch the unit on or off at a certain time.
TO SWITCH ON THE UNIT AT A CERTAIN TIME
- Ensure that the unit is set in the required operating mode
- Switch off the unit by pressing the ⏻ button. Ensure that the plug is properly inserted into the wall outlet.
- Press the ⏻-button. The light "Timer set" will flash.
- Use the ▲ and ● buttons to set a time between 1 and 24 hours.
- When the set time has expired the unit will switch on.

SWITCHING OFF
- While the device is running, press the √ button. • The 'Timer set' indicator will light up.
- Now use the ⏻ and ⏻ buttons to set a time between 1 and 24 hours.
- Once the set time has passed the device will switch off.

NOTE!
The compressor has been set so that it starts functioning three minutes after the (re)start of the air conditioner.
The cooling will switch off when the room temperature is lower than the set one. Air circulation will however continue to work on the set level. When the room temperature rises above the selected value, the cooling will work again.
SLEEP
6 By pressing the Sleep button the sleep function is activated. The sleep function can only be activated in the Cool mode. After activating the sleep function, the set temperature will increase by 1 °C after one hour's operation. After two hours' operation the set temperature will be increased by another 1 °C. The air conditioner will now continue to operate at this temperature.

Fig. 8
E REMOTE CONTROL
a. On/Off button b. Timer and set point adjustment button c. Fan speed button d. Sleep function button e. Timer function button. f. Button activating fan continuation after switching off unit g. Function selector button
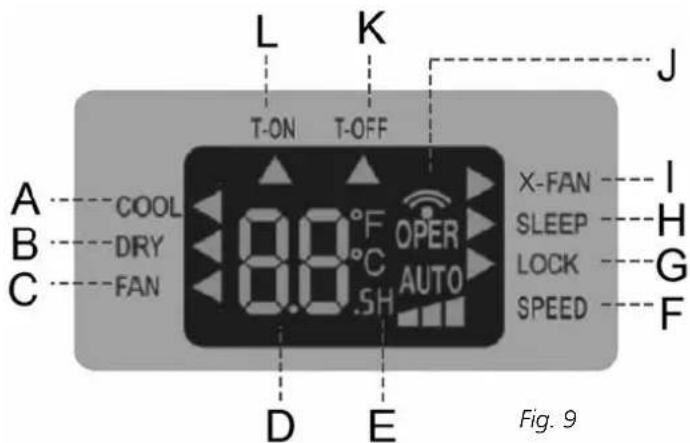
a. Cooling function b. Dehumidifier function c. Fan function d. Time setting in timer mode or temperature setting e. 'H' flashes when timer is being set f. Fan speed setting g. Buttons are locked. h. Sleep function is activated. i. Fan continuation is activated j. Remote control send signal k. Deactivate timer function air conditioner activated I. Activate timer function air conditioner activated
Point the front of the remote control towards the control panel on the air conditioner. The maximum operating range is 5 meters.
The control buttons on the remote control have the same functions as those on the control panel. With the exception of the timer function, the functions can be set with the remote control in the same way as when using the control panel on the air conditioner. The remote control also has an X-fan function; the buttons on the remote control can be disabled to prevent unwanted use.
X-FAN
By pressing the X-Fan button the X-Fan function is activated. After switching off the air conditioner the fan will continue to spin for a short time.
LOCK
Pressing the + and - at the same time locks the remote control. Repeating this action unlocks the buttons.
PROGRAMMING THE TIMER WITH THE REMOTE CONTROL
Setting activation time.
1 Set the desired mode: cooling, drying or fan. 2 Switch the remote control off using the on/off button, after which only the temperature will be displayed. 3 Press the Timer button. The arrow below the T-on and the letter H will start to flash. 4 Use the - and + button to set the required operating time. 5 Whilst the arrow below T-on and the letter H are flashing, point the remote control at the display on the air conditioner and then press the timer button again. There will be an audible signal and the Timer LED on the air conditioner will light up. 6 To switch off the timer function, press the on/off button with the remote control pointed at the air conditioner. The Timer LED will go out. The timer function is now deactivated.
Setting deactivation time
1 Set the desired mode: cooling, drying or fan. 2 Switch the remote control on with the on/off button. 3 Press the Timer button. The arrow below the T-off and the letter H will start to flash. 4 Use the - and + button to set the required deactivation time. 5 Whilst the arrow below T-off and the letter H are flashing, point the remote control at the display on the air conditioner and then press the timer button again. There will be an audible signal and the Timer LED on the air conditioner will light up. 6 To switch off the timer function, press the on/off button with the remote control pointed at the air conditioner. The Timer LED will go out. The timer function is now deactivated.
Replacing batteries
Remove the battery cover by sliding it in the direction of the arrow, see fig. 10. Insert the new batteries making sure to orient the + and - poles properly and replace the cover.
Use 2 LR03 AAA 1.5 Volt batteries. Do not use rechargeable batteries or a different type of batteries.
F AIR FILTER
The air conditioner has two screen filters to purify the air being circulated. Clean these filters after every two weeks of use. First remove the filter at the rear of the air conditioner, after which the filter in the side of the unit can be removed (see fig. 11).
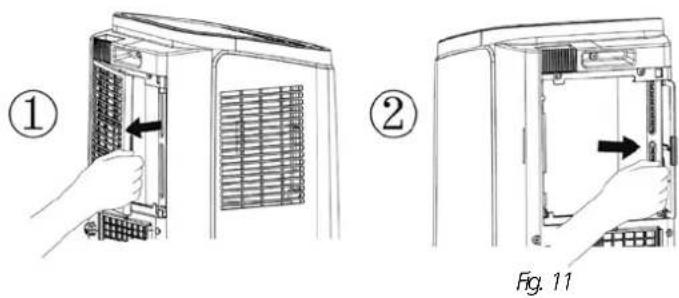
Clean the filters with a soft brush. If there is stubborn dirt, the filter can be rinsed with lukewarm water at a maximum temperature of 40 °C. Allow the filters to dry before replacing them in the air conditioner.

Fig. 10
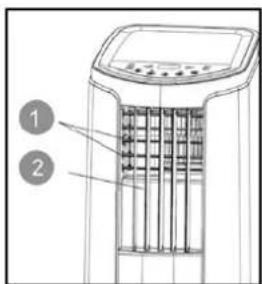
Fig. 12
G AIR FLOW
The air outlet vent can be adjusted both vertically and horizontally. To change the direction of the horizontal airflow, turn the horizontal vanes with handle 1. To change the direction of the vertical airflow, turn the middle horizontal vane 2 (see fig. 12).
H EMPTY INTERNAL WATER CONTAINER
In extreme (environmental) circumstances it may be necessary to empty the internal water container regularly. When the reservoir is full, H8 is displayed. The unit will switch off automatically. To empty the water container do the following:
1 Do not move the unit. Drastic movements can cause water leakage. 2 Switch off the unit and remove the plug from the wall outlet. 3 Place a pan or appropriate tray on the floor underneath the permanent drain tube. 4 Remove the rubber plug from the drain tube and let the water run out. (± 0.5 litres). See fig. 13. 5 Replace the rubber plug, put the plug into the wall outlet, and switch on the unit. Error code H8 will no longer be displayed.
NOTE!
When the air conditioner is in use, under normal circumstances the condensed water will be drained through the air outlet-tube.
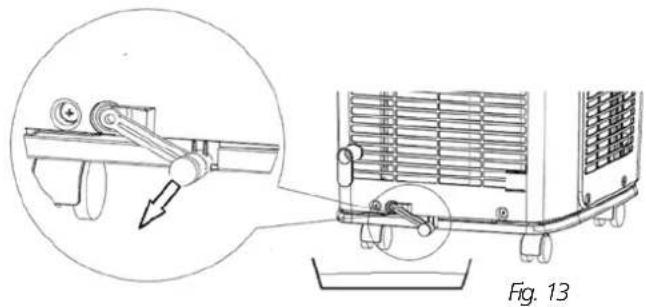
To drain the condensation from the lower water tank it is possible to connect a permanent hose and holder. For instructions on how to fit this hose, see chapter I.
FITTING OTHER SUPPLIED COMPONENTS
Fitting the permanent condensation drain
When the air conditioner is used in the dehumidifier mode, a condensation hose must be fitted.
1 Remove the condensation cover at the rear of the unit by turning it anticlockwise and remove the rubber cap from the drain (see fig. 14).
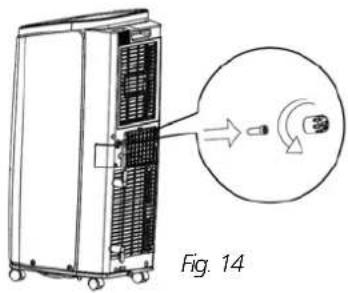
2 Connect the supplied hose grommet H (see fig. 1) to this drain (see fig. 15).

3 Join the water hose (not supplied) to the hose grommet (see fig. 16).
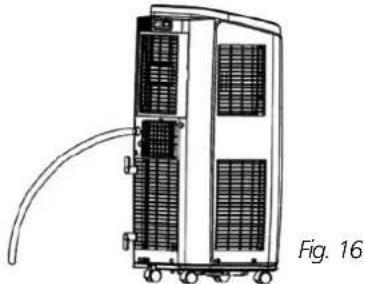
4 Make sure that the condensation hose is connected to a drain or collection tank.
5 Make sure that the drain hose does not hang in the water and that it always runs downwards (see fig 17).
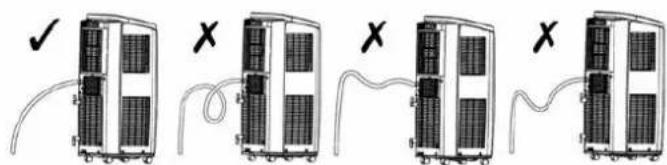
Fig. 17
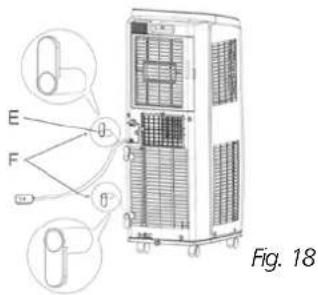
Fitting power cable clips
1 Fit the supplied cable clips E with the screws F (see fig. 1) to the rear of the air conditioner (see fig 18).
Fitting the drain hose and holder
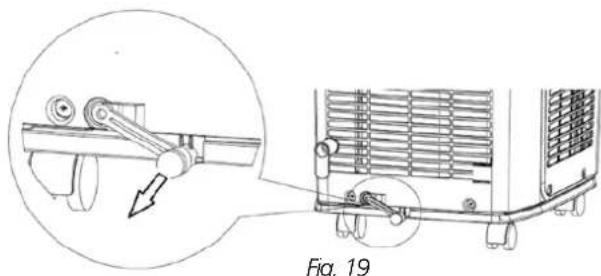
To drain the condensation from the lower water tank, a hose and holder are supplied with the air conditioner.
1. Remove the rubber plug (see fig. 19).
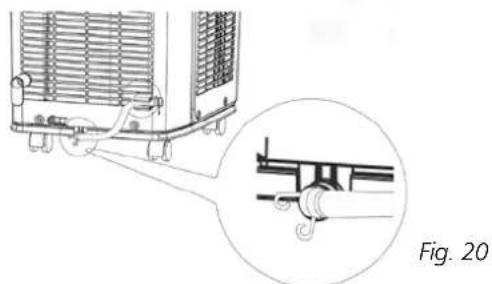
2. Connect the supplied hose J (see fig. 1) to where the rubber plug was (see fig. 20) and fasten the hose with hose clip I.
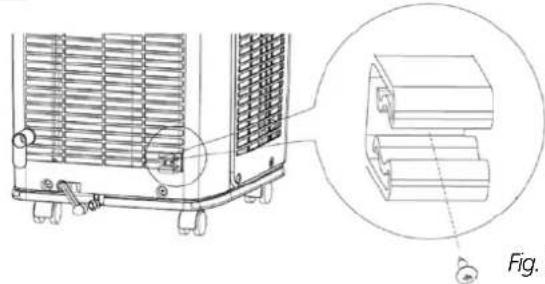
3. Fit the hose holder G (see fig. 1) to the rear of the air conditioner (see fig. 21).
4. If the hose is not being used to drain the condensation, place the hose in the hose holder to prevent leaks (see fig. 22).
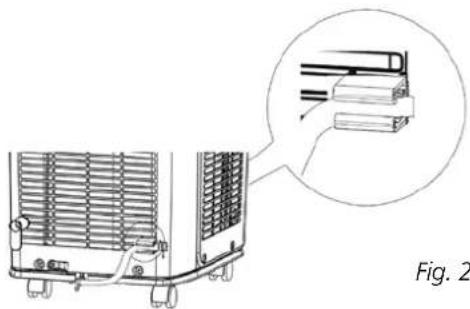
Fig. 22
5. To drain the condensation, take the hose out of the holder and drain the condensation into a floor drain or collection tank (see fig. 23).

J MAINTENANCE

WARNING!
Switch off the unit and remove the plug from the mains before cleaning the appliance or filter, or before replacing the filters.
Clean the housing with a soft, damp cloth. Never use aggressive chemicals, petrol, detergents or other cleansing solutions. For maintenance of the filters, refer to Chapter F "Air Filter".

NOTE!
Never use the air conditioner without screenfilter.
K STORAGE
1. Empty the internal water container (refer to Chapter H). 2. Clean and replace the mesh filter (see also chapter F). 3. Put the unit in air circulation mode for a couple of hours to ensure that the inside becomes completely dry. 4. Store cable, protect the unit against dust and store in a dry place not accessible to children.
TROUBLESHOOTING
| Phenomenon Troubleshooting Solution | ||
| Air conditioner can't operate | Power failure? Wait after power recovery. | |
| Is plug loose? Reinsert the plug. | ||
| Whether the air switch is tripped off or fuse is burnt? | Ask professional person to replace air switch or fuse. | |
| Is there's malfunction for the circuit? Ask professional person to replace circuit. | ||
| Whether the unit is restarted up after stopping immediately? | Wait for 3min, and then turn on the unit again. | |
| Poor cooling (heating) | Is the power too low? Wait after voltage is resumed. | |
| Whether the air filter is too dirty? Clean the air filter. | ||
| Whether the set temperature is proper? Adjust the temperature. | ||
| Whether door and window are closed? Close door and window. | ||
| Air conditioner can't receive signal from remote controller or remote controller is not sensible. | Whether the unit is interfered seriously (such as static pressure, unstable voltage)? | Please pull out the plug. Insert the plug after about 3min, and then turn on the unit. |
| Whether remote controller is within the receiving range? | The receiving range of remote controller is 8m. Do not exceed this range. | |
| Whether it's blocked by obstacles? Remove the obstacles. | ||
| Is sensitivity of remote controller low? | Check the batteries of remote controller. If the power is low, please replace the batteries. | |
| Whether there's fluorescence lamp in the room? | Move the remote controller close to air conditioner. | |
| Turn off the fluorescence lamp and try it again. | ||
| No fan blown out from air conditioner | Whether air outlet or air inlet is blocked? Eliminate the obstacles. | |
| Under heating mode, whether indoor temperature reaches set temperature? | Indoor unit will stop blowing fan after reaching set temperature. | |
| Whether heating mode is started up just now? | In order to prevent cold air, air conditioner will delay for a while to be started up, which is the normal phenomenon. | |
| Whether evaporator is defrosted? (observe it by pulling out the filter) | It's the normal phenomenon. Air conditioner is defrosting. After defrosting is finished, it will resume operation. | |
| Set temperature can't be adjusted. | Whether the unit operates under auto mode? | Temperature can't be adjusted under auto mode. |
| Whether the required temperature exceeds the temperature setting range? | Temperature setting range: 16°C-30°C. | |
| There's off flavour | There's off-flavour source in the room, such as furniture, cigarette etc. | Eliminate the off-flavour source. Clean the filter. |
| There's abnormal sound during operation | Whether the unit is interfered by thunder, radio, etc? | Disconnect power, put through the power again, and then turn on the unit again. |
| You can heard water-flowing sound | Whether the unit is turned on or turned off just now? | There's flowing sound of refrigerant inside the air conditioner, which is the normal phenomenon. |
| E5 Overcurrent protection. | Disconnect power, and then turn on the unit again after 10min. If “E5” still exits, please contact professional person to maintain the unit. | |
| H8 Chassis is full of water. | Pour out the water inside chassis.If “H8” still exits, please contact professional person to maintain the unit. | |
| F1 | Malfunction of ambient temperature sensor. | Please contact professional person to deal with it. |
| F2 | Malfunction of evaporator temperature sensor. | Please contact professional person to deal with it. |
| F0 | Refrigerant is leakingSystem is blocked | Re-energize the unit after turning off and pulling out the plug for 30min;If there’s still malfunction, please contact after-sales service. |
| H3 Overload protection | for compressor | Check if the unit is under high-temperature and high-humidity environment; if ambient temperature is too high, power off the unit and then energize it for operation after the ambient temperature drops to 35°C below. |
| E8 Overload malfunction | Check if the evaporator and condenser are blocked by some objects; if yes, take away the objects, power off the unit and then energize it for operation.If the malfunction still occur, please contact our after-sales service center. | |
| F4 | Outdoor tube temperature sensor is open/short-circuited. | Please contact after-sale service person to deal with it. |
Never attempt to disassemble or repair the device. Inexpert repairs invalidate the guarantee and can endanger the users of the device.
GUARANTEE CONDITIONS
The air conditioner is supplied with a 24-month guarantee, commencing on the date of purchase. All material and manufacturing defects will be repaired or replaced free of charge within this period. The following rules apply:
- We expressly refuse all further damage claims, including claims for collateral damage.
- Repairs to or replacement of components within the guarantee period will not result in an extension of the guarantee.
- The guarantee is invalidated if any modifications have been made, non-genuine parts are fitted, or repairs are carried out by third parties.
- Components subject to normal wear, such as the filter, are not covered by the guarantee.
- The guarantee is valid only when you present the original, dated purchase invoice and if no modifications have been made.
- The guarantee is invalid for damage caused by neglect or by actions that deviate from those in this instruction booklet.
- Transportation costs and the risks involved during the transportation of the air conditioner or air conditioner components shall always be for the account of the purchaser.
- Damage caused by not using suitable Qlima filters is not covered by the guarantee.
To prevent unnecessary expense, we recommend that you always first carefully consult the instructions for use. Take the air conditioner to your dealer for repairs if these instructions do not provide a solution.

Do not dispose of electrical appliances as unsorted municipal waste, use separate collection facilities. Contact your local government for information regarding the collection systems available. If electrical appliances are disposed of in landfills or dumps, hazardous substances can leak into the groundwater and get into the food chain, damaging your health and well-being. When replacing old appliances with new ones, the retailer is legally obligated to take back your old appliance for disposal at least for free of charge. Do not throw batteries into the fire, where they can explode or release dangerous liquids. If you replace or destroy the remote control, remove the batteries and throw them away in accordance with the applicable regulations because they are harmful to the environment.
Environmental information: This equipment contains fluorinated greenhouse gases covered by the Kyoto Protocol. It should only be serviced or dismantled by professional trained personnel.
This equipment contains R32 refrigerant in the amount as stated in the table above. Do not vent R32 into atmosphere: R32 is a fluorinated greenhouse gas with a Global Warming Potential (GWP) = 675.
Waste electrical products should not be disposed with household waste. Please recycle where facilities exist. Check with your local authority or retailer for recycling advice.
TECHNICAL DATA
To be used as indication, subject to modifications
| Model | P426 | |
| Cooling capacity* | W | 2640 |
| EE Class* | A | |
| EER* | 2.62 | |
| Power consumption | kW | 1.01 |
| Power consumption Standby mode | W | 0.3 |
| Current nom. | A | 4.4 |
| Mains | V/Hz/F | 230 / 50 / 1 |
| Air delivery max. | m3/h | 330 |
| Dehumidification max. ** | L/24h | 30 |
| Room size | m3 | 65 - 90 |
| Compressor type | rotary | |
| Refrigerant | type/gr | R-32 / 350 |
| Thermostat range | °C | 16 - 30 |
| Fan speeds | 3 | |
| Max. Sound pressure level / power level | dB(A) | 54 / 64 |
| Dimensions (w x h x d) | mm | 315 x 770 x 395 |
| Weight | kg | 27.5 |
| Unit protection | IP X0 | |
| Remote control | yes | |
| Fuse rating | 3.15A / 250V | |
* Conform EN 14511 ** Moisture removal at 32°C, 80% RH
MAIN COMPONENTS
- READ THE INSTRUCTIONS FOR USE FIRST.
- IF IN DOUBT, CONTACT YOUR DEALER.
Figure 1
Figure 5
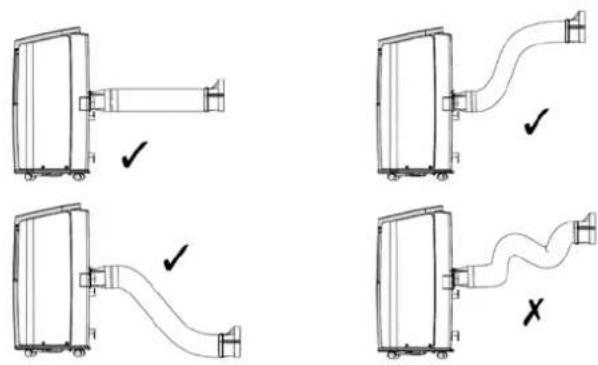
Figure 6
IMPORTANT
Figure 8
Figure 10
AIR FILTER
Figure 11
Figure 12
AIR EXHAUST
Figure 16
Figure 17
Figure 18
Figure 19
Figure 22
CLEANING

IMPORTANT
TROUBLESHOOTING GUIDE


 A A | 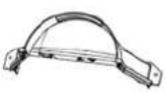 B B | 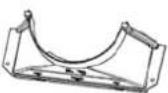 C C | 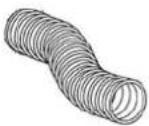 D D | |||
 E E |  F F | [GY2D]G |  H H | 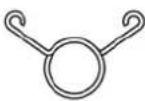 I I | ||
 J J | 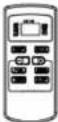 K K |  L L |  M M | |||
Figure 1
Figure 5
Figure 6
NOTE
Image 8
THE REMOTE CONTROL
Image 10

Image 12
AIR DISCHARGE DIRECTION
Image 16
Image 17
Mounting the power cable hooks
Image 20
Image 21
Image 22

- BEFORE FIRST USE, READ THE INSTRUCTIONS AND OPERATING MANUAL.
- IF IN DOUBT, CONTACT YOUR DEALER.
Dear Sir or Madam,
Illustration 5

illustration 6
IMPORTANT
illustration 8
REMOTE CONTROL PILOT
illustration 10
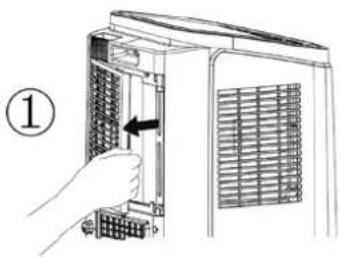

illustration 11
see illustration 12
AIR OUTLET
illustration 13
illustration 15
illustration 16
illustration 17
illustration 18
illustration 20
illustration 21
illustration 22
illustration 23
J CLEANING AND MAINTENANCE

WARNING!
If you need more information or if you have any problems, please visit our website www.qlima.com or contact our customer service (phone number on www.qlima.com).
- F GENERAL SAFETY
- GB GENERAL SAFETY
- SICUREZZA
- SLO GENERAL SAFETY
- IMPORTANT PARTS
- E REMOTE CONTROL
- G AIRFLOW DIRECTION
- MOUNTING THE POWER CABLE HOOK
- J MAINTENANCE
- CAUTION
- G AIR OUTLET
- NOTE
- M WARRANTY CONDITIONS
- A SAFETY INSTRUCTIONS
- IMPORTANT
- ATTENTION
- B INCLUDED PARTS
- C INSTALLATION
- WARNING
- D OPERATION
- COOLING
- DEHUMIDIFYING
- AIR CIRCULATION
- TO SWITCH ON THE UNIT AT A CERTAIN TIME
- SWITCHING OFF
- SLEEP
- X-FAN
- LOCK
- PROGRAMMING THE TIMER WITH THE REMOTE CONTROL
- SETTING ACTIVATION TIME
- SETTING DEACTIVATION TIME
- REPLACING BATTERIES
- F AIR FILTER
- G AIR FLOW
- H EMPTY INTERNAL WATER CONTAINER
- FITTING OTHER SUPPLIED COMPONENTS
- FITTING POWER CABLE CLIPS
- FITTING THE DRAIN HOSE AND HOLDER
- K STORAGE
- GUARANTEE CONDITIONS
- TECHNICAL DATA
- MAIN COMPONENTS
- AIR FILTER
- AIR EXHAUST
- CLEANING
- THE REMOTE CONTROL
- AIR DISCHARGE DIRECTION
- MOUNTING THE POWER CABLE HOOKS
- REMOTE CONTROL PILOT
- AIR OUTLET
- J CLEANING AND MAINTENANCE
Brand : QLIMA
Model : P426
Category : Air conditioner