
SmartTouch-XL HQ9190CC - Razor PHILIPS - Free user manual and instructions
Find the device manual for free SmartTouch-XL HQ9190CC PHILIPS in PDF.


| Product Type | Shaver |
| Model | SmartTouch-XL HQ9190CC |
| Brand | Philips |
| Dimensions (approx.) | 5.5 x 2.5 x 2 inches (14 x 6.5 x 5 cm) |
| Weight (approx.) | 0.5 lbs (225 g) |
| Power Source | Rechargeable NiMH battery |
| Charging Time | 8 hours |
| Usage Time | 30 minutes |
| Cordless Use | Yes |
| Number of Heads | 2 (dual-action) |
| Head Type | Lift & Cut blades |
| Pop-up Trimmer | Yes |
| Wet/Dry Use | Not specified; rinse under water recommended |
| Cleaning | Rinse under running water after removing head |
| Replacement Heads | Philips HQ8-compatible heads |
| Voltage | 100-240V (auto-adjusting) |
| Accessories | Charging base, cleaning brush, protective cap |
| Safe for Sensitive Skin | Yes (rounded blade tips) |
Frequently Asked Questions - SmartTouch-XL HQ9190CC PHILIPS
User questions about SmartTouch-XL HQ9190CC PHILIPS
0 question about this device. Answer the ones you know or ask your own.
Ask a new question about this device
Download the instructions for your Razor in PDF format for free! Find your manual SmartTouch-XL HQ9190CC - PHILIPS and take your electronic device back in hand. On this page are published all the documents necessary for the use of your device. SmartTouch-XL HQ9190CC by PHILIPS.
USER MANUAL SmartTouch-XL HQ9190CC PHILIPS
Read these instructions for use carefully before using the appliance and save them for future reference.
- Only use the powerplug supplied.
- The powerplug transforms 100-240 volts to a safe low voltage of less than 24 volts.
- The powerplug contains a transformer. Do not cut off the powerplug to replace it with another plug, as this will cause a hazardous situation.
- Do not use a damaged powerplug.
- If the powerplug is damaged, always have it replaced by one of the original type in order to avoid a hazard.
- Make sure the powerplug does not get wet.
- Charge and store the appliance at a temperature between 5 °C and 35 °C.
- Never immerse the charging stand in water nor rinse it under the tap.
- Do not recharge the shaver in a closed pouch.
- Always unplug the shaver before cleaning it under the tap.
- The appliance complies with the internationally approved IEC safety regulations and can be safely cleaned under the tap.
Be careful with hot water. Always check if the water is not too hot, to prevent your hands from getting burnt.
Electromagnetic fields (EMF)
This Philips appliance complies with all standards regarding electromagnetic fields (EMF). If handled properly and in accordance with the instructions in this instruction manual, the appliance is safe to use according to scientific evidence available today.

natural_image
Simple line drawing of a container with a handle and a prohibition symbol (no text or labels)
natural_image
Illustration of a hairbrush and a faucet symbol (no text or labels)The display


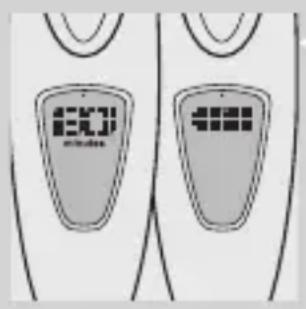
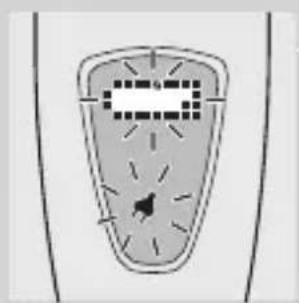
This appliance offers you the unique possibility to choose the display layout you prefer: a number layout or a battery symbol layout.
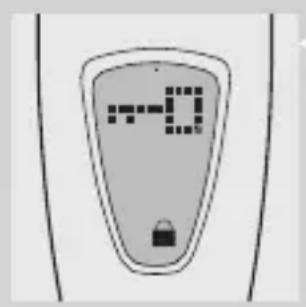
1 Press the on/off button approx. 3 seconds to enter the menu.
The menu has three different modes: the travel lock mode and two display layout modes.
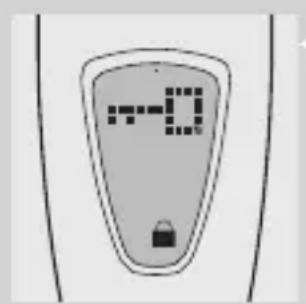
- You will enter the menu in the travel lock mode, indicated by a rotating key symbol.
You can scroll through the three modes (travel lock, battery symbol layout and number layout) by pressing the on/off button briefly in quick succession.
2 To select one of the two display layouts, stop pressing the on/off button when the layout you prefer appears on the display.
3 Wait a few seconds without pressing the on/off button until you hear a beep.
This beep indicates that the display has been set to the selected layout.
Note: The first mode you enter after pressing the on/off button for 3 seconds is the travel lock mode (indicated by a rotating key symbol). If you do not press the on/off button again within a few seconds, the travel lock is activated and the display will not switch to the first display layout mode. To deactivate the travel lock, press the on/off button for 3 seconds again (see chapter 'Storage').
You can change the display layout at any time.
Note: When you start using the appliance for the first time or after a long period of disuse, it could take several minutes before anything appears on the display.
ENGLISH6


natural_image
Simple line drawing of a device with a display and a starburst symbol (no text or labels)

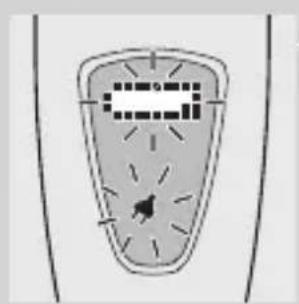
natural_image
Diagram of a device with a central display and surrounding wiring (no text or symbols)The display provides the following information:
Charging
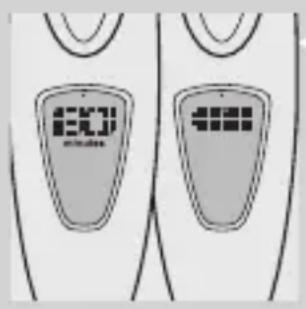
Number layout:
When the shaver is being charged, the display shows the minutes indication and the plug symbol with a blinking power symbol.
▶ Battery symbol layout:
When the shaver is being charged, the display shows the battery symbol and the plug symbol with a blinking power symbol.
Battery fully charged
As soon as the battery has been fully charged, the word FULL runs across the display.
After a few hours the word FULL stops appearing. The display shows the minutes indication and the plug symbol.
Battery running low
Number layout:
When the battery is running low, the display shows a blinking minutes indication and blinking plug symbol when you switch the shaver off. HQ9190 only: you will also hear a few short beeps.
▶ Battery symbol layout:
When the battery is running low, the display shows a blinking battery symbol and blinking plug symbol when you switch the shaver off. HQ9190 only: you will also hear a few short beeps.


Battery empty
To indicate that the battery voltage is too low to operate the appliance, LO appears on the display.
Recharge the battery. See chapter 'Charging'.
Cleaning shaver
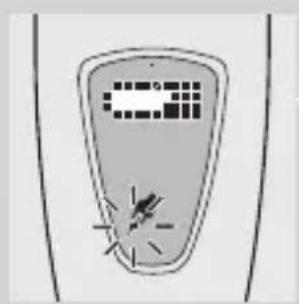
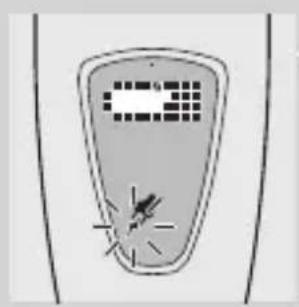
When the shaver is due to be cleaned, the tap symbol with blinking water drops appears on the display.
Replacing shaving heads
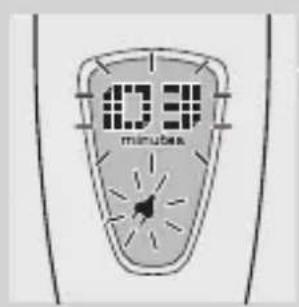
When the shaving heads need to be replaced (every two years), the shaving unit symbol starts blinking when you switch the shaver off. HQ9190 only: at the same time you will hear a beep.
- If you do not replace the shaving heads right away, the shaving unit symbol remains visible during the next 7 shaves.
- You can reset the appliance by pressing the on/off button for 3 seconds while the shaving unit symbol is blinking. The shaving unit symbol then disappears. HQ9190 only: you will hear a short confirming beep.
- If you have not reset the system after these 7 shaves, the system will automatically reset itself.
Demonstration program
The appliance has a unique demonstration program.
▶ Press the on/off button for 6 seconds.
After 3 seconds the lock symbol appears; keep the on/off button pressed.
The demonstration will start automatically.
During the demonstration the appliance will be
automatically switched on 2 times. You can interrupt the demonstration by pressing the on/off button.
Charging
Make sure the appliance is switched off before you start charging it.
Charging normally takes approx. 1 hour.
You can also shave without charging by connecting the shaver to the mains.
A fully charged shaver has a cordless shaving time of up to 30 days.
Charging the appliance

natural_image
Diagram showing a plug inserted into a socket, with an arrow indicating direction (no text or symbols)1 Put the appliance plug in the shaver.
2 Put the powerplug in the wall socket.
3 Remove the powerplug from the wall socket and pull the appliance plug out of the shaver when the battery has been fully charged.
Charging stand

natural_image
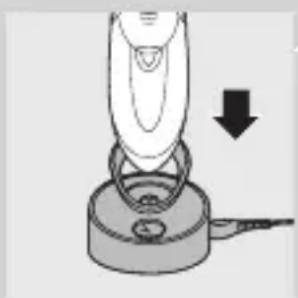
Illustration of a hand holding a medical device with a downward arrow indicating force or pressure (no text or symbols)- You can also charge the appliance by placing it in the charging stand.
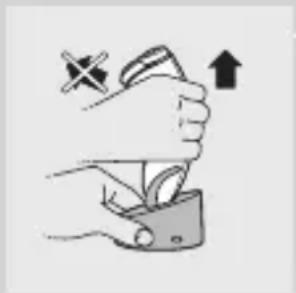
1 Place the shaver properly in the plugged-in charging stand.
2 Lift the shaver from the stand without tilting it.

natural_image
Illustration of a hand holding a device with an upward arrow and a cross symbol (no text or labels)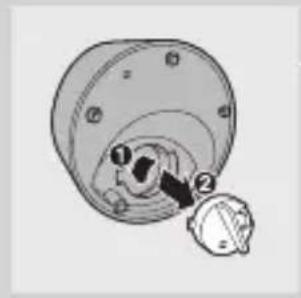
natural_image
Diagram of a mechanical component with numbered parts, no visible text or symbolsRemoving and inserting the clock
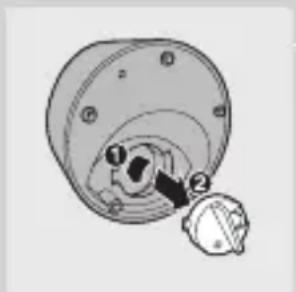
1 Turn the clock anticlockwise (1) ('click') and pull it out (2).
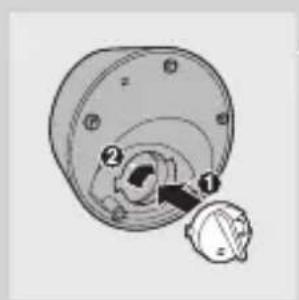
2 Insert the clock (1) and turn it clockwise (2) ('click').

natural_image
Illustration of a hand turning a knob with a clock icon above (no text or symbols)Setting the time
1 Set the time by pressing the small button at the back of the clock.
The time can only be set forward.

natural_image
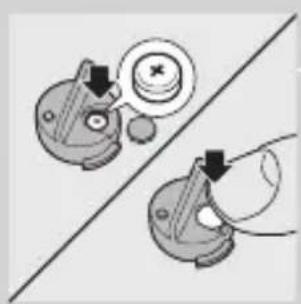
Illustration of two mechanical components with arrows indicating motion, no text or symbols presentReplacing the battery
1 Remove the cap. Then remove the battery by means of a miniature screwdriver.

natural_image
Two mechanical components with arrows indicating motion, one partially visible and the other showing a hand holding a circular component (no text or symbols)2 Insert a new battery and put the cap back into place.
Using the appliance
Personal Comfort Control

natural_image
Illustration of a person wearing a helmet with a circular headpiece, showing a hand gesture (no text or symbols)

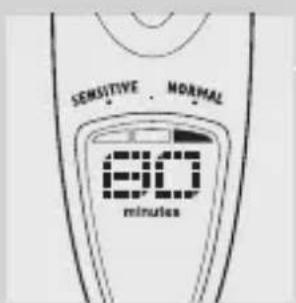
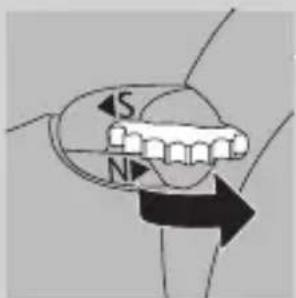
The Personal Comfort Control system allows you to adapt the shaver to your skin type.
- You can set the shaver to 'Normal' for a fast and comfortable close shave.
- You can set the shaver to 'Sensitive' for a comfortable close shave with optimal skin comfort.
The 'S' position is best suited for sensitive skin.
The 'N' position is best suited for normal skin.
The in-between positions are suitable for skin types between normal and sensitive.
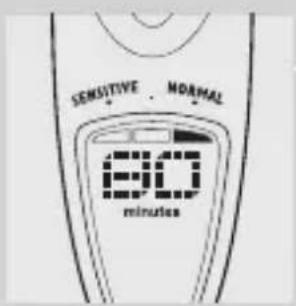
HQ9190 only: the display shows the position selected.
Shaving
1 Switch the shaver on by pressing the on/off button once.

natural_image
Illustration of a person applying facial massage to the ear with directional arrows indicating motion (no text or symbols)
When you switch the shaver on or off, all lights and symbols go on and then the remaining battery capacity is shown for a few seconds.
2 Move the shaving heads quickly over your skin, making both straight and circular movements.
- Shaving on a dry face gives the best results.
- Your skin may need 2 or 3 weeks to get accustomed to the Philips shaving system.
3 Switch the shaver off by pressing the on/off button once.
4 Put the protection cap on the shaver every time you have used it, to prevent damage.
Trimming
natural_image
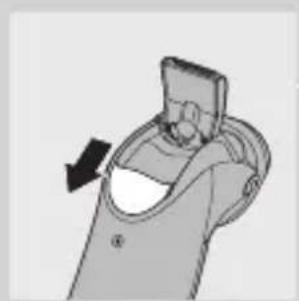
Diagram of a device with a black arrow indicating rotation or movement (no text or symbols)For grooming sideburns and moustache.
1 Open the trimmer by pushing the slide downwards.
The trimmer can be activated while the motor is running.

2 Close the trimmer with your index finger.
Cleaning and maintenance
Clean the shaver when the tap symbol with blinking water drops appears on the display.
Regular cleaning guarantees better shaving performance.
ENGLISH12
The normal way to clean the appliance is to rinse the shaving unit and the hair chamber with hot water every time you have used the shaver.
Be careful with hot water. Always check if the water is not too hot, to prevent your hands from getting burnt.
Every day: shaving unit and hair chamber

natural_image
Illustration of a medical device with internal components and an arrow indicating rotation (no text or symbols)1 Switch the shaver off, remove the powerplug from the wall socket and pull the appliance plug out of the shaver.
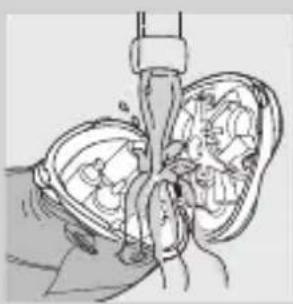
2 Press the release button to open the shaving unit.
3 Clean the shaving unit and the hair chamber by rinsing them under a hot tap for some time.
Make sure the inside of the shaving unit and the hair chamber have been cleaned properly.
natural_image
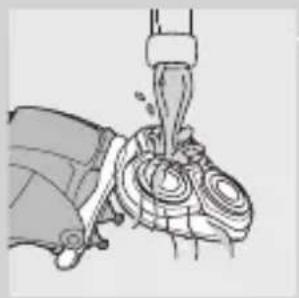
Medical illustration showing a surgical procedure with an incision and surrounding tissue (no text or labels)4 Rinse the outside of the appliance.
5 Close the shaving unit and shake off excess water.
Never dry the shaving unit with a towel or tissue, as this may damage the shaving heads.
natural_image
Illustration of a mechanical device with a lever and gear assembly (no text or symbols)6 Open the shaving unit again and leave it open to let the appliance dry completely.

natural_image
Illustration of a hand holding an open wound wound with internal cavities and radiating lines (no text or symbols)You can also clean the hair chamber without water by using the brush supplied.
Every six months: shaving heads

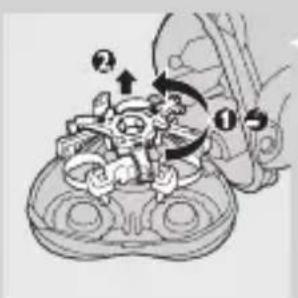
1 Open the shaving unit, turn the lock anticlockwise (1) and remove the retaining frame (2).
2 Clean the cutters and guards with the brush supplied.
Do not clean more than one cutter and guard at a time, since they are all matching sets. If you accidentally mix up the cutters and guards, it may take several weeks before optimal shaving performance is restored.
3 Put the shaving heads back into the shaving unit. Put the retaining frame back into the shaving unit and turn it clockwise.
4 Close the shaving unit.
Trimmer
natural_image
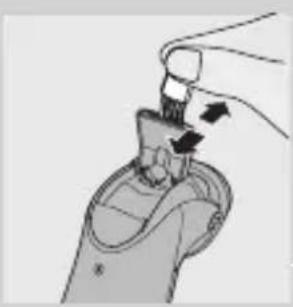
Illustration of a hand holding a small object with arrows indicating motion or force (no text or symbols)Clean the trimmer every time you have used it.
1 Switch the shaver off, remove the powerplug from the wall socket and pull the appliance plug out of the shaver.
2 Clean the trimmer with the brush supplied.
3 Lubricate the trimmer teeth with a drop of sewing machine oil every six months.

natural_image
Illustration of a hand holding a small object with a droplet above it, next to a labeled bottle (no text or symbols on the object itself)Charging stand
Never immerse the charging stand in water nor rinse it under the tap.
You can clean the charging stand with a moist cloth.
Storage

Put the protection cap on the shaver to prevent damage.
natural_image
Illustration of a hand holding a small object with a downward arrow indicating motion (no text or symbols)- Store the appliance in the luxury cassette/pouch or place the appliance in the charging stand.
Travel lock
If you are going to travel, it is possible to lock the shaver. The travel lock prevents the shaver from being switched on by accident.
Activating the travel lock
1 Press the on/off button for 3 seconds to enter the travel lock mode (indicated by a rotating key symbol).
2 Wait a few seconds without pressing the on/off button to activate the travel lock.

3 The motor switches off and the key symbol is visible on the display to indicate that the travel lock has been activated.
Note: If you press the on/off button again within a few seconds after entering the travel lock mode, the travel lock will not be activated. Instead, you will have entered one of the two display layout modes. If you want to return to the travel lock mode, press the on/off button two more times until you are back in the travel lock mode (indicated by rotating the key symbol). Then wait a few seconds without pressing the on/off button to activate the travel lock.
- You can always return to the menu by pressing the on/off button for 3 seconds.
Deactivating the travel lock
▶ Press the on/off button for 3 seconds.
The motor starts running to indicate that the shaver has been unlocked. The shaver is now ready for use again.
Replacement
Replace the shaving heads when the shaving unit symbol appears on the display.
Replace damaged or worn shaving heads with HQ9 Philips shaving heads only.
1 Switch the shaver off, remove the powerplug from the wall socket and pull the appliance plug out of the shaver.
ENGLISH16

natural_image
Illustration of a human hand holding an open cylindrical device with internal components, showing a curved arrow indicating rotation (no text or symbols present)2 Press the release button to open the shaving unit.
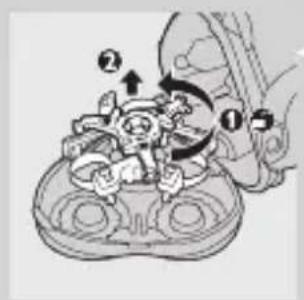
3 Turn the lock anticlockwise (1) and remove the retaining frame (2).

natural_image
Mechanical gear assembly diagram showing a rotating component with a downward arrow indicating motion (no text or labels)4 Remove the shaving heads and place new ones in the shaving unit.
Make sure that the projections of the shaving heads fit exactly into the recesses.
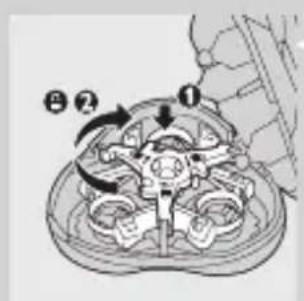
5 Put the retaining frame back into the shaving unit (1) and turn the lock clockwise (2).
6 Close the shaving unit.
The shaving unit symbol will go out if you keep the on/off button pressed for 3 seconds.
Accessories
The following accessories are available:
- HQ8500/HQ8000 powerplug.
- HQ9 Philips Shaving Heads.
- HQ110 Philips Shaving Head Cleaning Spray (not available in China).
- HQ8010 car cord.
Environment

natural_image
Symbol of a trash bin with crossed lines indicating no waste or restriction, and a solid black rectangle below (no text or symbols)Do not throw the appliance away with the normal household waste at the end of its life, but hand it in at an official collection point for recycling. By doing this you will help to preserve the environment.
The built-in rechargeable battery contains substances that may pollute the environment. Always remove the battery before discarding the appliance or handing it in at an official collection point. Dispose of the battery at an official collection point for batteries. If you have trouble removing the battery, you can also take the appliance to a Philips service centre, which will remove the battery for you and will dispose of it in an environmentally safe way.
Disposal of the shaver battery
Only remove the battery if it is completely empty.
1 Remove the powerplug from the wall socket and pull the appliance plug out of the shaver.
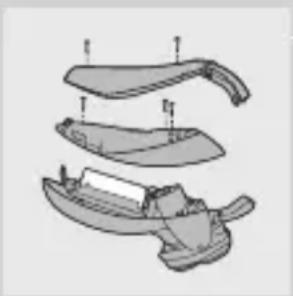
2 Let the shaver run until it stops, undo the screws and open the shaver.
3 Remove the battery.
Do not connect the shaver to the mains again after the battery has been removed.
natural_image
Exploded view diagram of a knife showing three views (top, front, side) with no text or symbolsGuarantee & service
If you need information or if you have a problem, please visit the Philips website at www.philips.com or contact the Philips Customer Care Centre in your country (you will find its phone number in the worldwide guarantee leaflet). If there is no Customer Care Centre in your country, turn to your local Philips dealer or contact the Service Department of Philips Domestic Appliances and Personal Care BV.
Troubleshooting
1 Reduced shaving performance
- Cause 1: the shaving heads are dirty. The shaver has not been rinsed long enough or the water used was not hot enough.
- Clean the shaver thoroughly before you continue shaving. See chapter ‘Cleaning and maintenance’.
- Cause 2: long hairs are obstructing the shaving heads.
- Clean the cutters and guards with the brush supplied. See chapter ‘Cleaning and maintenance’, section ‘Every six months: shaving heads’.
- Cause 3: the shaving heads are damaged or worn.
- Replace the shaving heads. See chapter 'Replacement'.
2 The shaver does not work when the on/off button is pressed.
- Cause 1: the shaving heads are dirty.
- Recharge the battery. See chapter 'Charging'.
- Cause 2: the appliance is not connected to the mains.
- Put the powerplug in the wall socket.

3 The shaving unit has come off the shaver.
- Cause: the shaving unit has not been placed correctly.
- If the shaving unit becomes detached from the shaver, you can easily reattach it ('click').
4 The display shows the word CHECK and a blinking shaving unit symbol and tap unit symbol.
- Cause 1: long hairs and dirt are obstructing the shaving heads.
- Clean the shaver thoroughly before you continue shaving. See chapter 'Cleaning and maintenance'.
- Cause 2: the shaving heads are damaged or worn.
- Replace the shaving heads. See chapter 'Replacement'.
Penting
natural_image
Simple line drawing of a container with a handle and a prohibition symbol (no text or labels)
natural_image
Simple line drawing of a showerhead with a faucet symbol (no text or labels)Layar


natural_image
Simple line drawing of a device with a grid and circular elements, no text or symbols present.natural_image
Diagram showing a connector with an arrow indicating direction (no text or symbols present)natural_image
Illustration of a hand holding a medical device with a downward arrow indicating force or pressure (no text or symbols)natural_image
Illustration of a hand holding a medical device with an upward arrow and a cross symbol (no text or labels)natural_image
Diagram of a mechanical component with numbered parts, no visible text or symbols2 Masukkan jam (1) dan putar searah jarum jam (2) ('klik').

natural_image
Illustration of a hand turning a knob with a clock icon above (no text or symbols)Menyetel waktu
natural_image
Illustration of two mechanical components with arrows indicating motion, no text or symbols presentMengganti baterai
natural_image
Two mechanical components with arrows indicating motion, one partially visible and the other showing a hand holding a circular component (no text or symbols)natural_image
Illustration of a person wearing a smartwatch head with a magnified circular lens (no text or symbols visible)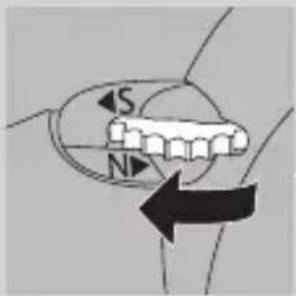


natural_image
Illustration of a person applying a circular massage device to their face (no text or symbols)natural_image
Diagram of a mechanical component with an arrow indicating direction (no text or symbols)natural_image
Illustration of a human torso with open mouth and internal organs, showing a rotation arrow (no text or symbols)natural_image
Medical illustration of a surgical procedure showing tissue manipulation (no text or labels)natural_image
Illustration of a hand pouring liquid into a mechanical component (no text or symbols visible)
natural_image
Illustration of a hand holding an open ear with internal gear-like components (no text or symbols)natural_image
Illustration of a hand holding a small object with arrows indicating motion or force (no text or symbols)natural_image
Illustration of a hairdryer with a downward arrow indicating compression or disassembly (no text or symbols present)Mengaktifkan travel lock
natural_image
Illustration of a medical device with internal components and an arrow indicating rotation (no text or symbols)natural_image
Mechanical gear assembly diagram showing a rotating component with a downward arrow indicating motion (no text or labels)Aksesori
Tersedia aksesori berikut:
- Steker listrik HQ8500/HQ8000.
natural_image
Symbol of a trash bin with crossed lines indicating no waste or restriction, and a solid black rectangle below (no text or symbols)natural_image
Exploded view diagram of a knife showing internal components (no text or labels)Garansi & servis
natural_image
Simple line drawing of a container with a ring and a prohibition symbol (no text or labels)
natural_image
Illustration of a showerhead with decorative patterns and a tap symbol (no text or labels)
natural_image
Simple line drawing of a device with a central screen and circular buttons, no text or symbols present.natural_image
Diagram showing a mechanical component with an arrow pointing to a detail (no text or symbols present)natural_image
Illustration of a hand gripping a device with a downward arrow indicating compression (no text or symbols)natural_image
Illustration of a hand holding a small object with an upward arrow and a cross symbol (no text or labels)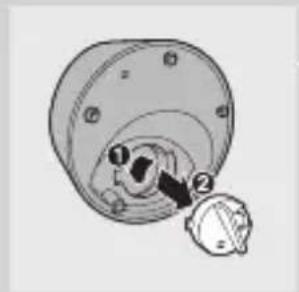
natural_image
Mechanical component diagram showing a knob and dial assembly (no text or symbols)시계 분리 및 삽입
natural_image
Hand holding a small mechanical component with an arrow pointing to it, next to a clock icon (no text or symbols on the diagram itself)시간 설정
natural_image
Illustration of two mechanical components with arrows indicating motion, no text or symbols present배터리 교체
natural_image
Two mechanical components with arrows indicating motion, one with a circular target and the other with a handle (no text or symbols)natural_image
Illustration of a person wearing a head-mounted device with a magnified circular top (no text or symbols visible)

natural_image
Illustration of a person applying a cotton or cotton product to their face, with arrows indicating direction (no text or symbols)natural_image
Diagram of a mechanical component with an arrow indicating direction (no text or symbols)natural_image
Illustration of a hand holding an open pill bottle with internal compartments and a black arrow indicating rotation (no text or symbols)natural_image
Medical illustration showing internal anatomy with surgical instruments (no text or labels)natural_image
Illustration of a hand using a tool to lift a mechanical component (no text or symbols visible)4 제품 외부도 세척하십시오.
natural_image
Illustration of a hand inserting into an open ear with visible internal components (no text or symbols)natural_image
Illustration of a hand holding a small object with arrows indicating motion or force (no text or symbols)충전대
natural_image
Illustration of a hand holding a device with a downward arrow indicating compression or disassembly (no text or symbols present)natural_image
Illustration of a hand holding an open anatomical device with internal components, showing directional arrows (no text or symbols)natural_image
Mechanical gear assembly diagram showing a rotating component with a downward arrow indicating motion (no text or labels)natural_image
Symbol of a trash bin crossed with no text or numbers, representing waste sorting or disposal (no text present)natural_image
Exploded view diagram of a folding knife showing internal components (no text or labels)natural_image
Simple line drawing of a ring atop a cylindrical object with a prohibition symbol (no text or labels)
natural_image
Illustration of a showerhead with decorative patterns and a tap symbol (no text or labels)Paparan

natural_image
Diagram showing a connector with an arrow indicating direction (no text or symbols present)natural_image
Illustration of a hand holding a medical pressure monitor with a downward arrow indicating force (no text or symbols)natural_image
Illustration of a hand holding a tool with an upward arrow and a cross symbol (no text or labels)natural_image
Mechanical component diagram showing a circular housing with two labeled parts (1 and 2), no text or symbols present.natural_image
Mechanical component diagram showing a knob with numbered parts (no text or symbols)2 Masukkan jam (1) dan pusingkannya ke arah jam (2) ('klik').

natural_image
Illustration of a hand turning a small mechanical component with an arrow indicating rotation (no text or symbols)Mengeset masa
natural_image
Diagram showing two mechanical components with arrows indicating motion, no text or symbols presentMenggantikan bateri
natural_image
Two mechanical components with arrows indicating motion, one holding a circular component and the other with a looped cable (no text or symbols)natural_image
Illustration of a person wearing a smartwatch with a scroll wheel (no text or symbols visible)
natural_image
Illustration of a person applying a circular massage device to their face (no text or symbols)natural_image
Diagram of a mechanical component with an arrow indicating direction (no text or symbols)natural_image
Illustration of a person inserting a device into a device housing, with an arrow indicating rotation (no text or symbols present)natural_image
Medical illustration showing a surgical procedure with an open wound and surrounding tissue (no text or labels)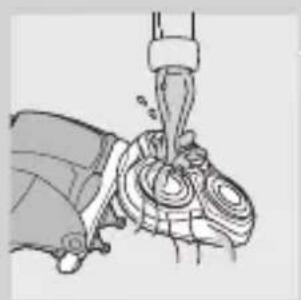
natural_image
Illustration of a hand gripping a mechanical component (no text or symbols visible)
natural_image
Illustration of a hand holding an open ear with internal components, no text or symbols present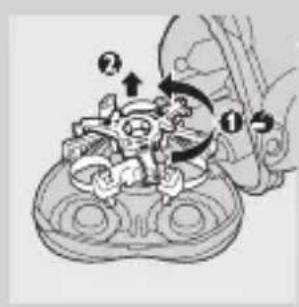
natural_image
Illustration of a hand holding a small object with arrows indicating motion (no text or symbols)natural_image
Illustration of a hairdryer with a downward arrow indicating compression or disassembly (no text or symbols present)natural_image
Illustration of a hand holding an open mechanical device with internal components and directional arrows indicating rotation (no text or symbols)natural_image
Mechanical gear assembly diagram showing internal components and a downward arrow indicating motion (no text or labels)natural_image
Symbol of a trash bin with crossed-out lines and a blank rectangular base (no text or numbers)natural_image
Exploded view diagram of a knife showing internal components (no text or labels)natural_image
Simple line drawing of a ring atop a cylindrical base with a prohibition symbol (no text or labels)
natural_image
Illustration of a showerhead with decorative patterns next to a faucet symbol (no text or labels)natural_image
Simple line drawing of a digital device with a starburst and pixelated outline (no text or symbols)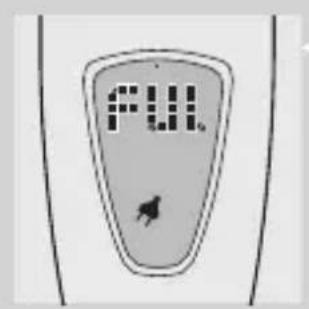


natural_image
Simple line drawing of a shield-like object with internal patterns and arrows, no text or symbols present.

natural_image
Diagram showing a connector with an arrow indicating direction (no text or symbols present)natural_image
Illustration of a hand holding a medical device with a downward arrow indicating force or pressure (no text or symbols)
natural_image
Illustration of a hand holding a wristband with an upward arrow and a cross symbol (no text or labels)
natural_image
Mechanical component diagram showing a knob with two numbered parts (no text or symbols)

natural_image
Hand holding a small mechanical component with a magnified inset showing a clock face (no text or symbols)natural_image
Diagram showing two mechanical components with arrows indicating motion, no text or symbols presentการเปลี่ยนแบตเตอร์
natural_image
Two mechanical components with arrows indicating motion, one above a diagonal line and the other below (no text or symbols)natural_image
Illustration of a person wearing a high-temperature cap with a belt, showing mechanical components (no text or symbols)
natural_image
Illustration of a person applying a circular massage device to their face (no text or symbols)natural_image
Illustration of a mechanical component with an arrow indicating direction (no text or symbols)natural_image
Illustration of a mechanical device with an open lid and internal components, showing a rotation arrow (no text or symbols)natural_image
Medical illustration showing a surgical procedure with an open wound and surrounding tissue (no text or labels)natural_image
Illustration of a hand gripping a mechanical component with a tool inserted (no text or symbols visible)natural_image
Illustration of a hand inserting into an open ear with visible internal components (no text or symbols)natural_image
Mechanical assembly diagram showing gear and motor components (no text or labels)natural_image
Illustration of a hand holding a small object with arrows indicating motion (no text or symbols)natural_image
Illustration of a hairdryer with a downward arrow indicating compression or disassembly (no text or symbols present)natural_image
Illustration of a hand holding an open mechanical device with internal components, showing a curved arrow indicating rotation (no text or symbols present)natural_image
Exploded view diagram of a knife showing internal components (no text or labels)natural_image
Simple line drawing of a container with a handle and a prohibition symbol (no text or labels)
natural_image
Simple line drawing of a hairpin with a faucet symbol (no text or labels)natural_image
Simple line drawing of a device with a display and control knob (no text or symbols)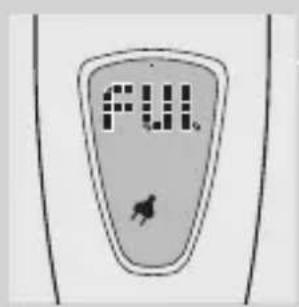


natural_image
Simple line drawing of a container with internal compartments and arrows indicating flow or movement (no text or symbols)natural_image
Diagram showing a connector with a magnified view of its internal structure (no text or symbols)natural_image
Illustration of a hand holding a medical device with a downward arrow indicating force or pressure (no text or symbols)natural_image
Illustration of a hand holding a small object with an upward arrow and a cross mark, no text or symbols present.natural_image
Diagram of a mechanical component with numbered parts, no visible text or symbols
natural_image
Diagram of a mechanical component with numbered parts (1, 2), no visible text or symbols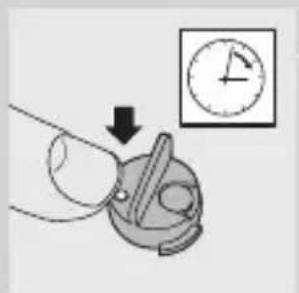
natural_image
Illustration of a hand holding a small mechanical component with an arrow pointing to it, next to a clock icon (no text or symbols present)
natural_image
Illustration of two mechanical components with arrows indicating motion, no text or symbols present
natural_image
Two mechanical components with arrows indicating motion, one partially open and the other holding a circular component (no text or symbols)Cách sử dụng máy
natural_image
Illustration of a person wearing a helmet with a small mouth, showing no text or symbols.


natural_image
Line drawing of a person applying a circular massage or pressure technique to their face (no text or symbols)natural_image
Diagram of a mechanical component with an arrow indicating direction (no text or symbols)natural_image
Illustration of a human hand holding an open pill bottle with internal compartments and a rotation arrow (no text or symbols)natural_image
Medical illustration showing a surgical procedure on internal organs (no text or labels)natural_image
Illustration of a hand holding a mechanical component with a tool inserted (no text or symbols visible)natural_image
Illustration of a person inserting into a device into a device (no text or symbols visible)natural_image
Illustration of a hand holding a small object with arrows indicating motion or force (no text or symbols)Đế sạc pin
natural_image
Diagram of a hand holding a device with a downward arrow indicating motion (no text or symbols present)natural_image
Illustration of a person inserting a device into a device housing, showing internal components and an arrow indicating rotation (no text or symbols present)
natural_image
Mechanical gear assembly diagram showing internal components and a downward arrow indicating motion (no text or labels)natural_image
Symbol of a trash bin with crossed x and y lines, no text or numbers presentnatural_image
Exploded view diagram of a knife showing internal components (no text or labels)natural_image
Simple line drawing of a ring atop a cylindrical object with a prohibition symbol below (no text or labels)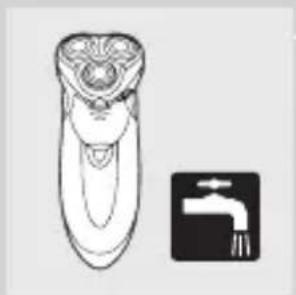
natural_image
Illustration of a showerhead with decorative patterns and a tap symbol (no text or labels)顯示畫面
natural_image
Simple line drawing of a device with a digital display and starburst symbol (no text or labels)
natural_image
Simple line drawing of a shield-like shape with internal patterns and no text or symbols電池符號顯示:
natural_image
Diagram showing a connector with an arrow indicating direction (no text or symbols present)natural_image
Illustration of a hand holding a medical device with a downward arrow indicating force or pressure (no text or symbols)您也可以將電鬍刀插入充電座中進行充電。
natural_image
Illustration of a hand holding a medical or surgical device with an upward arrow and cross symbol (no text or labels)2 從充電座中直直地拔起電鬍刀。
繁體中文102
拆卸及插入計時器
natural_image
Mechanical component diagram showing a knob and dial (no text or symbols)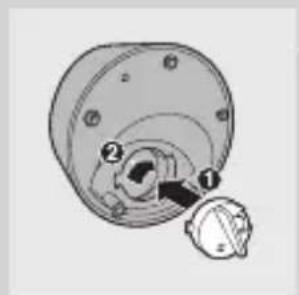
natural_image
Mechanical component diagram showing a knob and dial assembly (no text or symbols)
natural_image
Illustration of a hand turning a circular component with a pointer and a clock icon above (no text or symbols)
natural_image
Illustration of two mechanical components with arrows indicating motion, no text or symbols present
natural_image
Two mechanical components with arrows indicating motion, one partially open and the other holding a circular component (no text or symbols)使用此電器
個人舒適控制系統

natural_image
Illustration of a person wearing a head-mounted device with a curved arrow indicating rotation (no text or symbols)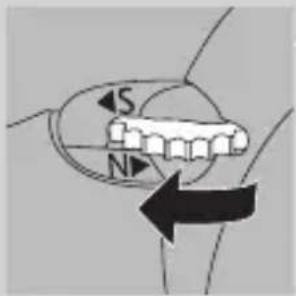

natural_image
Illustration of a person applying a circular massage device to their face (no text or symbols)natural_image
Diagram of a mechanical component with an arrow indicating direction (no text or symbols)1 向下推開關按鈕打開鬢角刀。
馬達轉動時即可以使用鬢角刀。

2 用您的食指關上鬢角刀。
清潔與維護
natural_image
Diagram of a mechanical device with internal components and directional arrows indicating movement (no text or symbols)natural_image
Medical illustration showing a surgical procedure with an incision and surrounding tissue (no text or labels)natural_image
Illustration of a mechanical device with a lever and base mount (no text or symbols)natural_image
Illustration of a hand inserting into a device into a circular socket (no text or symbols)每半年:電鬍刀頭
natural_image
Illustration of a hand holding a small object with arrows indicating motion (no text or symbols)每次使用鬢角刀後,請進行清潔。
natural_image
Illustration of a hand holding a small object with a flame, next to a labeled bottle (no text or symbols on the object itself)充電座
natural_image
Diagram of a medical device with internal components and directional arrows indicating rotation (no text or labels)natural_image
Mechanical gear assembly diagram showing a rotating shaft and housing (no text or labels)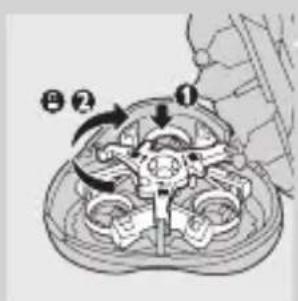
配件
備有下列配件可供另外選購:
natural_image
Symbol of a trash bin with crossed lines indicating no waste or restriction, and a solid black rectangle below (no text or symbols)natural_image
Exploded view diagram of a knife showing three views (top, front, side) with no text or symbols必須將電池電力完全耗盡後才能拆卸電池。
natural_image
Simple line drawing of a device with a circular handle and a prohibition symbol (no text or labels)
natural_image
Illustration of a rotary switch with a tap symbol (no text or labels)显示屏


显示屏提供下列信息:
充电
数字显示:
natural_image
Simple line drawing of a device with a grid and starburst symbol (no text or labels)电池符号显示:
电池电量不足
数字显示:
natural_image
Simple line drawing of a device with a central mouse and a dotted screen (no text or symbols)电池符号显示:
natural_image
Diagram showing a connector with an arrow indicating direction (no text or symbols present)natural_image
Illustration of a hand holding a medical device with a downward arrow indicating force or pressure (no text or symbols)您还可以将产品放入充电座内以给它充电。
1 将剃须刀放在插入式充电座上。
natural_image
Illustration of a hand holding a medical device with an upward arrow and a cross symbol (no text or labels)2 将剃须刀从充电座上提起,不要倾斜。
natural_image
Technical illustration of a mechanical component with labeled parts (no text or symbols)取下和插入时钟
natural_image
Hand holding a small mechanical component with a magnified inset showing a clock (no text or symbols)设置时间
natural_image
Illustration of two mechanical components with arrows indicating motion, no text or symbols present2 插入一节新电池,并将盖子装回原位。
natural_image
Diagram showing two mechanical components with arrows indicating motion, no text or symbols present使用本产品
自我舒适度调节

natural_image
Illustration of a person wearing a smartwatch head with a hand pointing to the ear (no text or symbols visible)natural_image
Illustration of a person applying a medical or therapeutic tool to their face, showing motion arrows (no text or symbols)natural_image
Diagram of a mechanical device with an arrow indicating direction (no text or symbols present)natural_image
Illustration of a hand holding an open pill bottle with internal compartments and a black arrow indicating rotation (no text or symbols)natural_image
Medical illustration showing internal organ structures with no visible text or labelsnatural_image
Illustration of a hand gripping a mechanical component with a tool above (no text or symbols)natural_image
Illustration of a hand holding an open ear with internal gear mechanism (no text or symbols)natural_image
Illustration of a hand holding a small object with arrows indicating motion (no text or symbols)每次使用后都要清洁修发器。
充电座
natural_image
Illustration of a hairdryer with a downward arrow indicating compression (no text or symbols)natural_image
Illustration of a human open-labeling device with internal components and directional arrow (no text or symbols)natural_image
Mechanical gear assembly diagram showing internal components and a downward arrow indicating motion (no text or labels)附件
可选配以下附件:
natural_image
Symbol of a trash bin crossed with a diagonal line, no text or numbers presentnatural_image
Exploded view diagram of a knife showing three views (top, front, side) with no text or symbols仅在电池电量完全耗尽后方可取出电池。
- Electromagnetic fields (EMF)
- The display
- ENGLISH6
- The display provides the following information:
- Charging
- Number layout:
- ▶ Battery symbol layout:
- Battery fully charged
- Battery running low
- Battery empty
- Cleaning shaver
- Replacing shaving heads
- Demonstration program
- ▶ Press the on/off button for 6 seconds.
- Charging the appliance
- Charging stand
- Removing and inserting the clock
- Setting the time
- Replacing the battery
- Using the appliance
- Personal Comfort Control
- Shaving
- Trimming
- Cleaning and maintenance
- ENGLISH12
- Every day: shaving unit and hair chamber
- Every six months: shaving heads
- Trimmer
- Storage
- Travel lock
- Activating the travel lock
- Deactivating the travel lock
- Replacement
- ENGLISH16
- Accessories
- Environment
- Disposal of the shaver battery
- Guarantee & service
- Troubleshooting
- Reduced shaving performance
- The shaver does not work when the on/off button is pressed.
- The shaving unit has come off the shaver.
- The display shows the word CHECK and a blinking shaving unit symbol and tap unit symbol.
- Penting
- Layar
- Menyetel waktu
- Mengganti baterai
- Mengaktifkan travel lock
- Aksesori
- Garansi & servis
- 시계 분리 및 삽입
- 시간 설정
- 배터리 교체
- 충전대
- Paparan
- Mengeset masa
- Menggantikan bateri
- การเปลี่ยนแบตเตอร์
- Cách sử dụng máy
- Đế sạc pin
- 顯示畫面
- 電池符號顯示:
- 繁體中文102
- 拆卸及插入計時器
- 使用此電器
- 個人舒適控制系統
- 清潔與維護
- 每半年:電鬍刀頭
- 充電座
- 配件
- 显示屏
- 显示屏提供下列信息:
- 充电
- 数字显示:
- 电池符号显示:
- 电池电量不足
- 取下和插入时钟
- 设置时间
- 使用本产品
- 自我舒适度调节
- 充电座
- 附件
- 仅在电池电量完全耗尽后方可取出电池。
Brand : PHILIPS
Model : SmartTouch-XL HQ9190CC
Category : Razor