
HV-FX9000 - VCR AIWA - Free user manual and instructions
Find the device manual for free HV-FX9000 AIWA in PDF.


| Product type | Hi-Fi stereo VCR |
| Brand | Aiwa |
| Model | HV-FX9000 |
| Dimensions (W × H × D) | 430 × 95 × 330 mm |
| Weight | 4.5 kg |
| Power supply | 220-240 V, 50 Hz |
| Power consumption | 25 W operating, 4 W standby |
| Video system | PAL / SECAM, VHS and S-VHS compatible |
| Main features | VHS Hi-Fi recording and playback, weekly programming, auto stop, index search |
| Connectivity | Antenna (RF) input, SCART, audio/video input/output (RCA), S-Video |
| Remote control | Included with batteries |
| Maintenance and cleaning | Clean video heads with a dedicated cleaning cassette; dust the casing with a soft cloth |
| Safety | Disconnect before cleaning; do not expose to moisture; use on a stable, ventilated surface |
| Spare parts and repairability | Video heads, belts, fuses, power supply; consult an approved technician for replacement |
| General information | Home appliance, compatible with most analog TVs; available in silver/black finish |
Frequently Asked Questions - HV-FX9000 AIWA
User questions about HV-FX9000 AIWA
0 question about this device. Answer the ones you know or ask your own.
Ask a new question about this device
Download the instructions for your VCR in PDF format for free! Find your manual HV-FX9000 - AIWA and take your electronic device back in hand. On this page are published all the documents necessary for the use of your device. HV-FX9000 by AIWA.
USER MANUAL HV-FX9000 AIWA
(United States and Puerto Rico)
QUICK START GUIDE
Welcome
Thank you for purchasing this AIWA product.
When you unpack your video cassette recorder for the first time, follow the procedures 1 to 5 below for set up.
For Assistance And Information
Call Toll Free 1-800-BUY-AIWA
(United States and Puerto Rico)
AIWA CO., LTD
8A-JFC-902-01
000114ATO-YX
Printed in Korea
You will find these accessories in the package box.
Remote control (1)

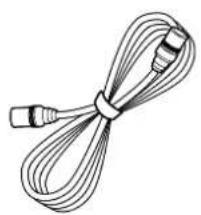
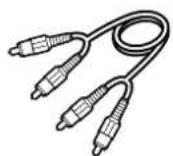
Video cable (1) Antenna cable (1)

Audio cable (1)
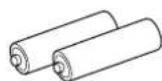
Operating instructions (1) Batteries (2)
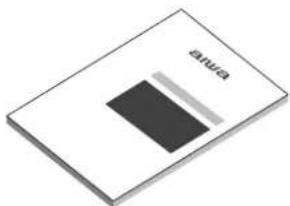
Please read the various informations on page 1 and 2 of Operating Instructions before installing or operating your VCR.
1 Installing Batteries in the Remote Control
Insert two R03 (size AAA) batteries (supplied) with the correct polarity, as indicated inside the battery compartment.

2
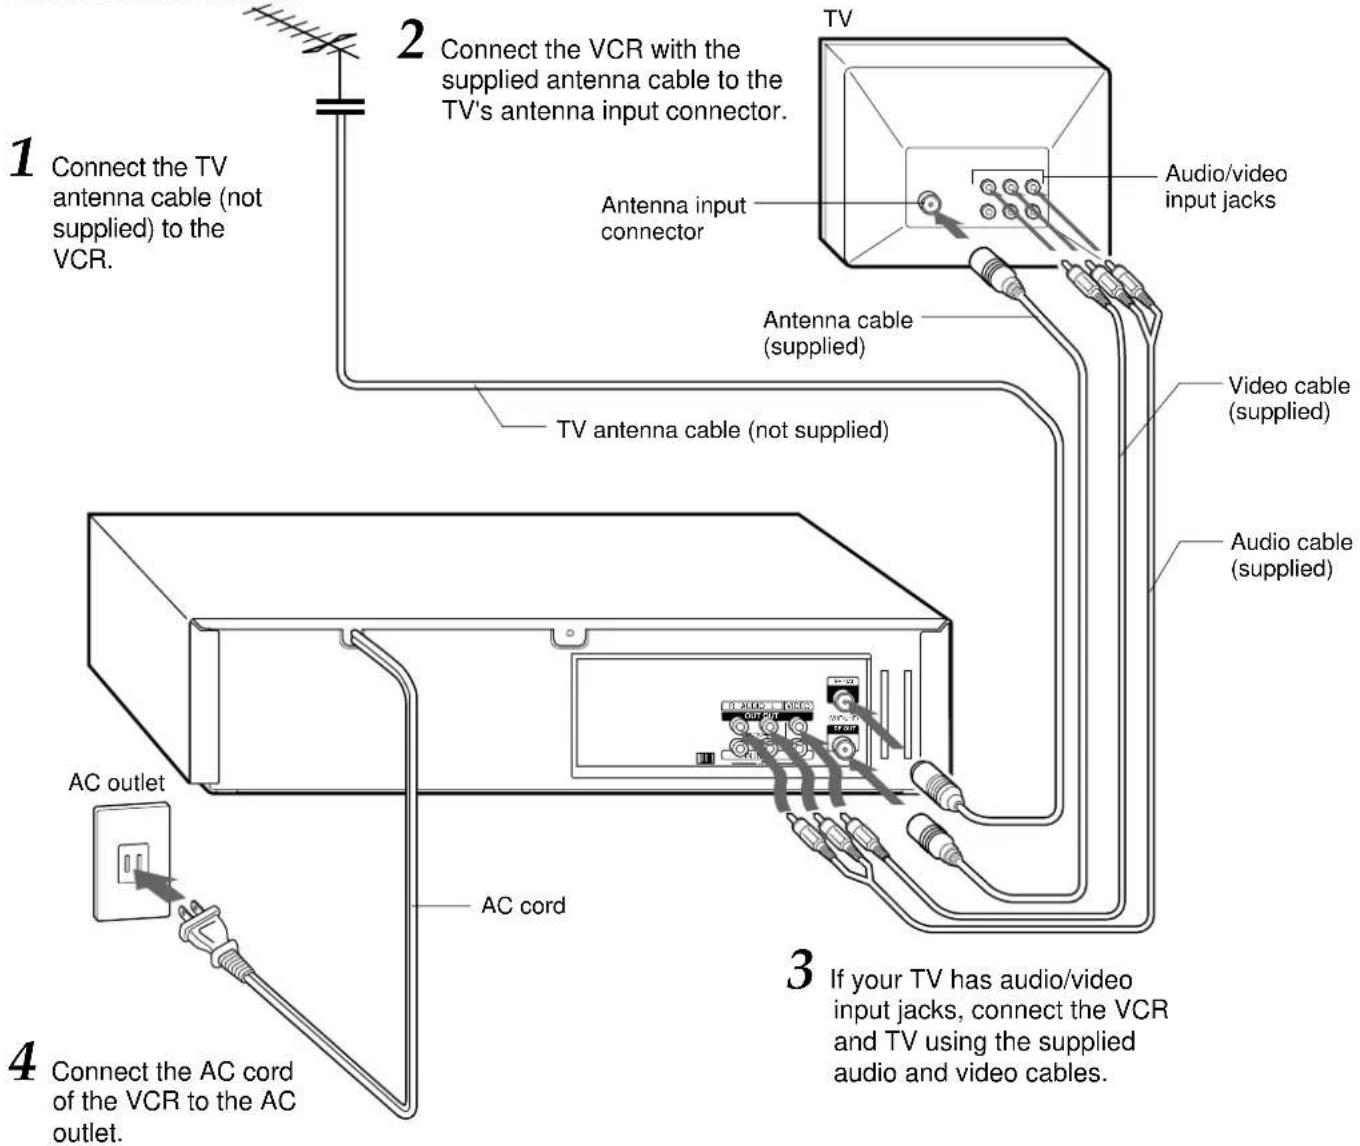
Connecting Antenna (or CATV)-VCR-TV
Basic connections
Important
Connect the AC cord to the AC outlet after all of the connections are complete.
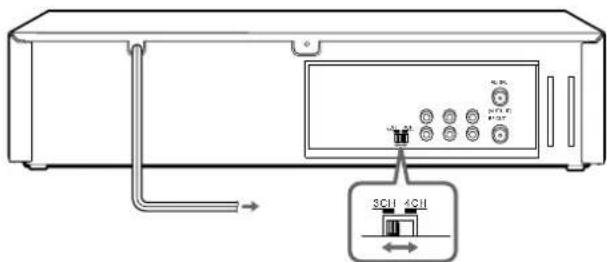
When the TV is connected to OUT TO TV using only an antenna cable
Set the channel selector to 3CH or 4CH, not employed for broadcasts, and select the same channel on the TV.
To select a desired TV channel on the TV
Turn the TV and VCR on, and press TV/VCR to turn off VCR in the display window, or turn off this VCR.
CATV connections
![graph TD A["1 Connect the cable from the CATV system to the input on the CATV converter."] --> B["2 Connect the output on the converter to ANT IN on the VCR with a coaxial cable (not supplied)."] B --> C["3 Connect the VCR with the supplied antenna cable to the TV's antenna input connector."] C -->…](/content/2026/06/1291635/images/2f2704b09fcdcce7da4e78a1f9238acf5bcf2c63511adcd5cad86e650b531720.jpg)
To connect a CATV system without using a CATV converter
Connect the cable from the CATV system to ANT IN on the VCR in step 1 above.
To see a TV program or video program selected on the VCR
Turn the TV and VCR on, and press TV/VCR to display VCR in the display window.

3
Setting the language
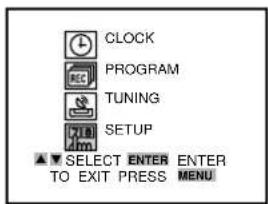
The on-screen menu can display any of three languages, English, Spanish and French.
1

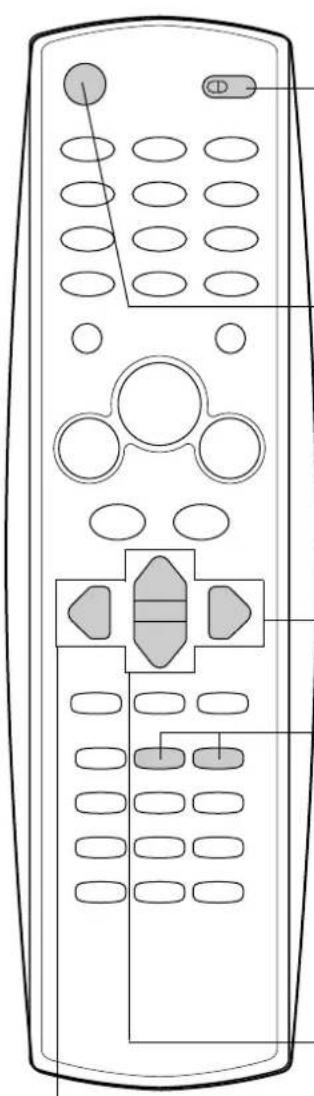
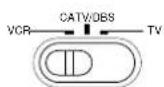
Set the VCR/CATV/DBS/TV selector to VCR.
2

Press POWER to turn on the VCR.
3
![graph TD A["MENU"] --> B["↓"] B --> C["ENTER"] C --> D["→"]](/content/2026/06/1291635/images/f2cbce036254c396b504e0f4fdfa94aea64ff38c050ad3ed76c9fba0f431ec25.jpg)
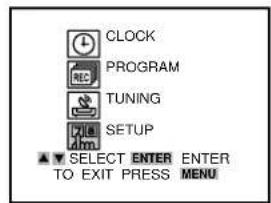
Press MENU, and press ▲ or ▼ to select SETUP, then press ENTER/DISPLAY.
4

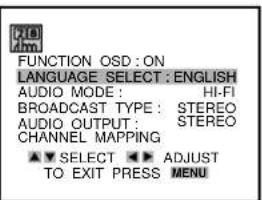
Press ▲ or ▼ to select LANGUAGE SELECT.

5
Press ◀ or ▶ to display the desired language.
Each time the language changes, the on-screen display language changes.
6

Press MENU to return to the normal screen.
4
Setting the Clock
You must set the date and time for timer recordings.

Set the VCR/CATV/DBS/TV selector to VCR.
Press MENU, and press ▲ or ▼ to select CLOCK, then press ENTER/DISPLAY.
Press ◀ or ▶ to set MONTH, then press ▼.
Set DAY, YEAR and TIME as in step 3.
Press and hold ◀ or ▶ to change the setting rapidly.
Press ◀ or ▶ to set AUTO CLOCK SET to ON.
The VCR automatically corrects the clock setting once you set AUTO CLOCK SET to ON.
Press MENU to start the clock. The normal screen returns.
5
Setting the VCR channels
Before starting
Make sure the VCR channel is not selected "LINE 1" or "LINE 2."
![graph TD A["1"] --> B["Set the VCR/CATV/DBS/TV selector to VCR."] B --> C["2"] C --> D["Press MENU, press ▲ or ▼ to select TUNING, then press ENTER/DISPLAY."] D --> E["3"] E --> F["Press ▲ or ▼ to select SOURCE SELECT, then press ◀ or ▶ to display TUNER."] F --> G["4"] G --> H["Press ▲ or ▼ to selec…](/content/2026/06/1291635/images/3d9e2af377ca283b174bffea3a644c1288785f9aaced7fa60e13d914bfb01c3e.jpg)
ENGLISH
Warning
To reduce the risk of fire or electric shock, do not expose this appliance to rain or moisture.

Explanation of Graphical Symbols

The lightning flash with arrowhead symbol within an equilateral triangle, is intended to alert the user to the presence of uninsulated "dangerous voltage" within the products enclosure that may be of sufficient magnitude to constitute a risk of electric shock to person.

The exclamation point within an equilateral triangle is intended to alert the user to the presence of important operating and maintenance (servicing) instruction in the literature accompanying the appliance.
IMPORTANT SAFETY INSTRUCTIONS
Read the Operating Instructions carefully and completely before operating the unit. Be sure to keep the Operating Instructions for future reference. All warnings and cautions in the Operating Instructions and on the unit should be strictly followed, as well as the safety suggestions below.
Warning
To prevent electric shock or injury, these safety instructions should be followed in the installation, use and servicing the unit.
Installation
Attachments - Do not use attachments not recommended by the unit manufacturer as they may result in the risk of fire, electric shock or injury to persons.
Water and Moisture - Do not use this unit near water - for example, near a bathtub, washbowl, kitchen sink, or laundry tub, in a wet basement, or near a swimming pool, and the like.
Heat - Do not use this unit near sources of heat, including heating vents, stoves, or other appliances that generate heat. It also should not be placed in temperatures less than 5° C ( 41° F) or greater than 35° C ( 95° F).
Mounting surface - Place the unit on a flat, even surface.
Accessories - Do not place this unit on an unstable cart, stand, tripod, bracket, or table. The unit may fall, causing serious injury to a child or an adult, and serious damage to the appliance. Use only with a cart, stand, tripod, bracket, or table recommended by the manufacturer, or sold with the unit. Any mounting of the appliance should follow the manufacturer's instructions, and should use a mounting accessory recommended by the manufacturer.
Portable cart - An appliance and cart combination should be moved with care. Quick stops, excessive force, and uneven surfaces may cause the appliance and cart combination to overturn.
PORTABLE CART WARNING

S3125A
Ventilation - The unit should be situated with adequate space around it so that proper heat ventilation is assured. Allow 10 cm clearance from the rear and the top of the unit, and 5 cm from the each side. Slots and openings in the cabinet and the back or bottom are provided for ventilation, and to ensure reliable operation of the unit and to protect it from overheating, these openings must not be blocked or covered. The openings should never be blocked by placing the unit on a bed, sofa, rug or other similar surface. (This unit should never be placed near or over a radiator or heat register.) This unit should not be placed in a built-in installation such as a bookcase unless proper ventilation is provided.
Object and Liquid Entry - Never push objects of any kind into this unit through the cabinet slots as they may touch dangerous voltage points or short-circuit parts that could result in a fire or electric shock. Never spill liquid of any kind on the unit.
Electric Power
Power Sources - This unit should be operated only from the type of power source indicated on the marking label. If you are not sure of the type of power supply to your home, consult your appliance dealer or local power company. To operate unit on battery power, or other sources, refer to the operating instructions.
Grounding or Polarization - This unit is provided with a polarized alternating-current line plug (a plug having one blade wider than the other). This plug will fit into the power outlet only one way. This is a safety feature. If you are unable to insert the plug fully into the outlet, try reversing the plug. If the plug should still fail to fit, contact your electrician to replace your obsolete outlet. Do not defeat the safety purpose of the polarized plug.
Power-Cord Protection - This unit is provided with an attachment plug having overload protection. This is a safety feature. See operating instructions for replacement or resetting of protective device. If replacement of the plug is required, be sure the service technician has used a replacement plug specified by the manufacturer that has the same overload protection as the original plug.
Overloading - Do not allow anything to reset on the power cord. Do not overload wall outlets and extension cords as this can result in fire or electric shock. Do not locate this unit where the cord will be abused by persons walking on it.
Outdoor Antenna
Power lines - An outside antenna system should not be located in the vicinity of overhead power lines or other electric light or power circuits, or where it can fall into such power lines or circuits. When installing an outside antenna system, extreme care should be taken to keep from touching such power lines or circuits as contact with them might be fatal.
Outdoor Antenna Grounding - If an outside antenna or cable system is connected to the unit, be sure the antenna or cable system is grounded so as to provide some protection against voltage surges and built-up static charges. Section 810 of the National Electrical Code, ANSI/NFPA No.70, provides information with regard to proper grounding of the mast and supporting structure, grounding of the lead-in wire to an antenna discharge unit, size of grounding conductors, location of antenna-discharge unit, connection to grounding electrodes, and requirements for the grounding electrode. See the figure.
Antenna Grounding According to the National Electrical Cord

NEC-NATIONAL ELECTRICAL CODE
Lightning
For added protection for this unit receiver during a lightning storm, or when it is left unattended and unused for long periods of time, unplug it from the wall outlet and disconnect the antenna or cable system. This will prevent damage to the unit due to lightning and powerline surges.
Maintenance
Cleaning - Unplug this unit from the wall outlet before cleaning. Do not use liquid cleaners or aerosol cleaners. Use a damp cloth for cleaning.
Damage Requiring Service
Unplug this unit from the wall outlet and refer servicing to qualified service personnel under the following conditions:
1) When the power cord or plug is damaged or frayed.
2) If the liquid has been spilled into the unit.
3) If the unit has been exposed to rain or water.
4) If the unit does not operate normally by following the operating instructions. Adjust only those controls that are covered by the operating instructions as improper adjustment of other controls may result in damage and will often require extensive work by a qualified technician to restore the unit to normal operation.
5) If the unit has been dropped or the cabinet has been damaged.
6) When the unit exhibits a distinct change in performance - this indicates a need for service.
Do not attempt to service this unit yourself as opening or removing covers may expose you to dangerous voltage or other hazards. Refer all servicing to qualified service personnel.
Replacement Parts - When replacement parts are required, be sure the service technician has used replacement parts specified by the manufacturer or having the same characteristics as the original part. Unauthorized substitutions may result in fire, electric shock or other hazards.
Safety Check - Upon the completion of any service or repairs to this unit, ask the service technician to perform safety checks to determine that the unit is in proper operating condition.
Note to CATV system installer:
This reminder is provided to call the CATV system installer's attention to Article 820-40 of the NEC that provides guidelines for proper grounding and, in particular, specifies that the cable ground should be connected to the grounding system of the building, as close to the point of cable entry as practical.
OWNER'S RECORD
For your convenience, record the model number and serial number (you will find them on the rear of your set) in the space provided below. Please refer to them when you contact your AIWA dealer in case of difficulty.
Model No.

Serial No.
Welcome
Thank you for purchasing this AIWA product. To optimise the performance of this unit, please read through this manual carefully.
Main features of this VCR
VCR Plus+ system and One-Touch Playback
You can easily set the timer with the VCR Plus+ system.
The recorded TV programs can be played back quickly with One-Touch Playback.
MTS (Multi-channel TV Sound) broadcast
You can receive, record and play back stereo and bilingual TV programs.
MBR (Multi Brand Remote control)
The remote control can control the TVs of many manufacturers and CATV/DBS converters.
Auto Set-Up
You can easily finish the VCR settings of the TV channels at once.

VCR Plus+ and PlusCode are registered trademarks of Gemstar Development Corporation.
The VCR Plus+ system is manufactured under license from Gemstar Development Corporation.
Table of contents
Preparation
Connecting the VCR 4
Preparing the remote control ....8
Setting the language ......11
Setting the clock....11
Setting the VCR channels....12
Checking the channel set-up to use
VCR Plus+ system 14
Playback
Playing back a tape....16
Various search functions....17
Recording
Recording a TV program....19
Recording with Instant Timer Recording......20
Setting the timer with VCR Plus+ system .....21
Setting the timer manually ....23
Dubbing....24
Other functions
Multichannel TV Sound (MTS) and Hi-Fi audio
sound system....25
On-screen display 27
Additional information
Troubleshooting 28
Specifications....29
Parts and controls ....30
Connecting the VCR
Basic connections
Caution
All connections should be made with both your VCR and TV unplugged from the Power supply.
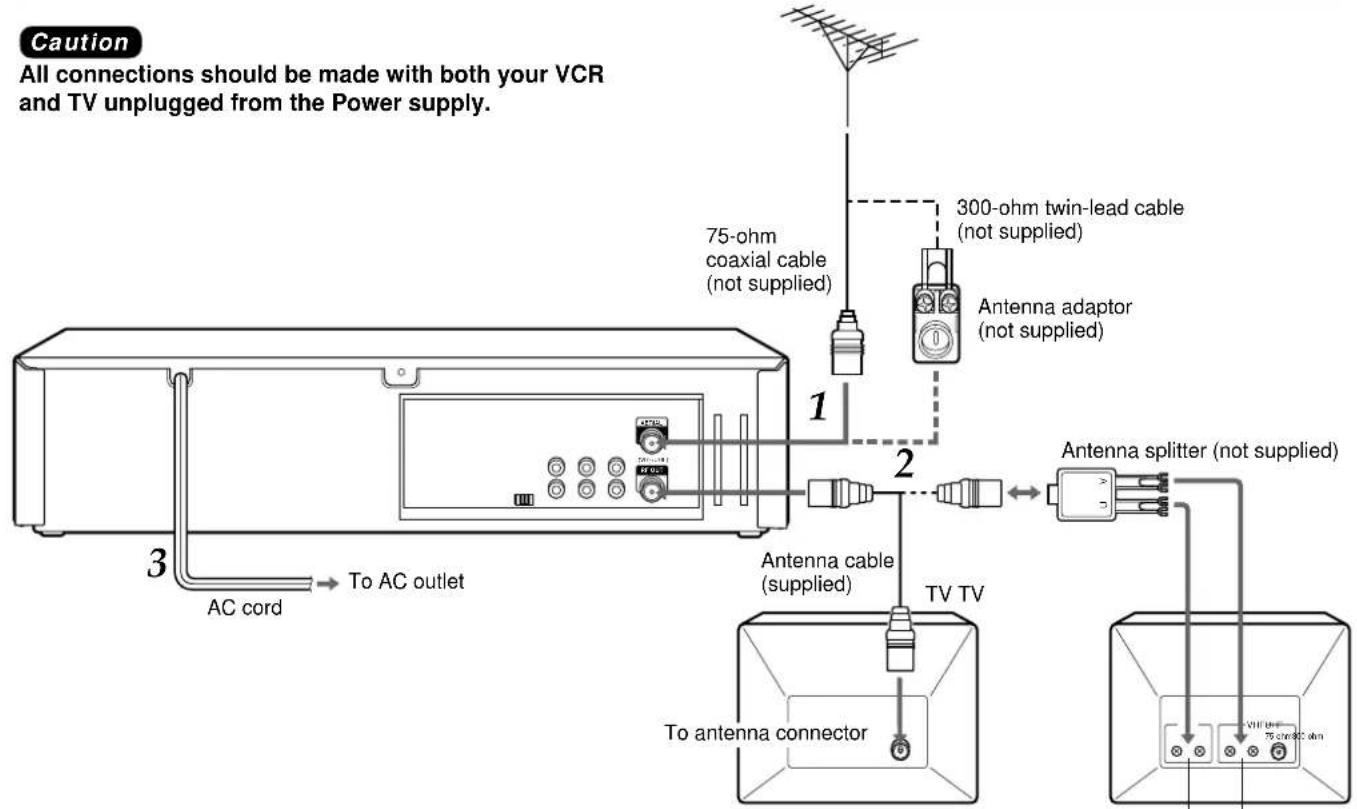
1 Disconnect the antenna cable from your TV and connect it to the AERIAL connector on this VCR.
If the cable is a round-type 75-ohm coaxial cable, connect it directly to the AERIAL connector.
If the cable is a flat-type 300-ohm twin-lead cable, connect it to the antenna adaptor (not supplied), and connect the adaptor to the AERIAL connector.
2 Connect the supplied antenna cable to the RF OUT connector on the VCR and the antenna connector on your TV.
If your TV has a 300-ohm antenna connector, use an antenna splitter (not supplied).
3 Connect the AC cord to the AC outlet.
To Connect a TV using the audio and video cables
If your TV has audio/video input jacks, you can connect the VCR and TV using the supplied audio and video cables.
This connection improves the picture and sound quality.

CONTINUE
CATV connections
To connect a CATV system without using a CATV converter
![graph TD A["AC cord"] -->|3| B["To AC outlet"] B --> C["75-ohm coaxial cable (not supplied)"] C --> D["2"] D --> E["Antenna splitter (not supplied)"] E --> F["TV"] G["To antenna connector"] --> H["TV"] I["CATV system"] --> J["1"] K["Antenna cable (supplied)"] --> L["TV"] M["VHFEF 75-ohm coaxial cabl…](/content/2026/06/1291635/images/305015b6060502f916cd47ae406b16a69c0bd4d9e91747dd837dba81d11abaf5.jpg)
1 Connect the cable from the CATV system to the AERIAL connector on this VCR.
2 Connect the supplied antenna cable to the RF OUT connector on the VCR and the antenna connector on your TV.
If your TV has a 300-ohm antenna connector, use an antenna splitter (not supplied).
3 Connect the AC cord to the AC outlet.
![graph TD A["AC cord"] -->|4| B["To AC outlet"] B --> C["75-ohm coaxial cable (not supplied)"] C --> D["3"] D --> E["Antenna cable (supplied)"] E --> F["TV"] F --> G["To antenna connector"] G --> H["Antenna splitter (not supplied)"] H --> I["TV"] I --> J["75 ohm coaxial cable (not supplied)"] J --> K…](/content/2026/06/1291635/images/6565804e627e5e65200c8322796515be1ed0518986399239551dbf36e01f76fb.jpg)
1 Connect the cable from the CATV system to the input connector on the CATV converter.
2 Connect the output connector on the converter to the AERIAL connector on this VCR.
3 Connect the supplied antenna cable to the RF OUT connector on the VCR and the antenna connector on your TV.
If your TV has a 300-ohm antenna connector, use an antenna splitter (not supplied).
4 Connect the AC cord to the AC outlet.
5 ENGLISH
To connect a CATV system using a CATV converter and 2-way splitter
![graph TD A["CATV system"] --> B["2-way splitter (not supplied)"] B --> C["75-ohm coaxial cable (not supplied)"] C --> D["AC cord"] D --> E["To AC outlet"] E --> F["75-ohm coaxial cable (not supplied)"] F --> G["75-ohm coaxial cable (not supplied)"] G --> H["ATB switch (not supplied)"] H --> I["To an…](/content/2026/06/1291635/images/24c455e3b5e7479c352f1f09ec393305e34e332bcdf4601dd99e958d7fa917b1.jpg)
1 Connect the cable from the CATV system to the 2-way splitter.
2 Connect one of the output connector of the splitter to the input connector of the CATV converter, and the other to the A/B switch.
3 Connect the output on the converter to the AERIAL connector on this VCR.
4 Connect the RF OUT connector on this VCR to the A/B switch using the supplied antenna cable.
5 Connect the A/B switch to the antenna connector on your TV.
6 Connect the AC cord to the AC outlet.
Note
When you use a CATV converter, refer to the Instructions of it.
Additional connections
To connect an AV receiver
![graph TD A["AV receiver"] --> B["5.1 INPUT"] B --> C["VIDEO 2/LD/TV"] B --> D["VIDEO 1/DVD"] B --> E["MONITOR VIDEO OUT"] B --> F["VIDEO 2/LD TV"] B --> G["VIDEO 1/DVD/MD"] B --> H["VIDEO 1/DVD"] B --> I["VIDEO 2/LD TV"] B --> J["VIDEO 1/DVD/MD"] B --> K["VIDEO 2/LD TV"] B --> L["VIDEO 1/DVD/MD"] B…](/content/2026/06/1291635/images/78bc9c214158882c82be7bd2527abbc59eb96b0993f7881d99efa027cabca08b.jpg)
Notes
• To receive an AM band radio broadcast on the AV receiver, turn off the VCR.
• Install the AM antenna of the AV receiver in a location that avoids interference, as far away from the VCR as possible.
- Depending on the AV receiver, it's rear panel may not be the same as above. Please refer to the Operating Instructions of the AV receiver.
VCR reception setting
When using the VCR, the signal passes from the antenna to the VCR and then out to the TV. Before you use the VCR, a video output channel must be set on your TV.


When a TV is connected with an antenna cable
When the TV is connected to the RF OUT connector using a supplied antenna cable, set the channel selector at the rear to 3 CH or 4 CH, not employed for broadcasts, and select the same channel on the TV.
(For watching the VCR, set channel 3 ch or 4 ch on the TV.)
To select a desired TV channel on the TV
Turn the TV on and turn off this VCR.
To see a TV program or video program selected on the VCR
Turn the TV and VCR on, and press TV/VCR to display VCR in the display window.

When a TV is connected with audio and video cables
When the TV is connected using the supplied audio and video cables, turn the TV and VCR on, and select the video input mode on the TV.
Preparing the remote control
Inserting the batteries
Caution
To prevent damage from leakage or explosion, follow the descriptions below.
- Insert two supplied R03 (size AAA) batteries with the and marks correctly as illustrated.
- Do not mix old batteries with new ones or different types of batteries.
- Do not throw the batteries into a fire, apply heat to them or take them apart.
- Do not carry the batteries with keys or other metallic objects.

Note
Remove the batteries when they have no more power, or when you do not use the remote control for a long period of time.
Using the remote control
Point the remote control toward remote sensor.

Notes
- The remote control may not operate when there is any obstruction between the remote control and remote sensor.
- Strong ambient light sources such as a fluorescent lamp or direct sunlight may cause unreliable operation.
- Using a TV with the same type of infrared remote control facing the same direction may cause incorrect operation.
- The maximum distance for effective control between the remote control and remote sensor is 7 meters. When the maximum operable distance becomes shorter, replace both batteries with new ones.
- Although you can use the remote control within an angle of up to 30 degrees in any direction from directly in front of remote sensor, we recommend a narrower angle for stable operation.
Controlling the TVs and CATVs CATV/DBSes
The remote control can control the TVs of many manufacturers and CATV/DBS converters. To control such TVs and CATV/DBS converters, set the manufacturer's code number shown in the table on the right.

1 Set the VCR/CATV/DBS/TV selector to TV or CATV/DBS.
2 While holding TV PRESET, press the number buttons to set the code number referring to the table on the right.
Some manufacturers have more than one code number. If the remote control does not operate with the TV or CATV/DBS after setting the code number, try another number.
To control the TV
POWER, CHANNEL ▲, ▼, VOL. +, -, MUTE, TV/VCR and the number buttons on the remote control are activated.
To control the CATV/DBS
POWER, CHANNEL ▲, ▼ and the number buttons on the remote control are activated.
Notes
- Due to the variety of codes used by manufacturers, AIWA cannot guarantee that the MBR remote control will operate with every model of the brands listed.
- The number buttons can be used only for channel selection, but they may not function correctly with some TV models and CATV/DBS converters.
| TV manufacturer Code number | |
| ADMIRAL 16, 33, 37, 44, 45 | |
| AIWA 70 | |
| AKAI 01 | |
| AMARK 09 | |
| AOC 01 | |
| BELL & HOWELL 33 | |
| BROKSONIC 18, 19 | |
| CANDLE 51 | |
| CCE 07 | |
| CENTURION 08 | |
| CINERAL 43 | |
| CITIZEN 49, 50, 51, 52, 53, 54, 55 | |
| CORONADO 09 | |
| CROWN 09 | |
| CURTIS MATHES 01, 03, 08, 33, 37, 44 | |
| DAEWOO 16, 38, 39, 40, 41, 42, 43 | |
| DAYTRON | 01, 08 |
| EMERSON | 01, 09, 16, 17, 18, 19 |
| FISHER | 28, 29 |
| FUNAI | 46, 47 |
| GENERAL ELECTRIC | 03, 10, 11, 13, 35, 37, 44 |
| GRADIENTE | 01, 56, 57, 63, 67 |
| HITACHI | 09, 14, 15, 43 |
| JC PENNEY | 01, 08, 10, 27, 35 |
| JVC | 20, 21, 63, 67 |
| KIOTE | 43 |
| KMC | 09 |
| KTV | 01, 08, 09, 31 |
| LG (GOLDSTAR) | 01, 07, 08, 09, 35, 39, 40 |
| LODGENET | 33 |
| LOGIK | 33 |
| LXI | 09, 24, 25, 26, 27, 28, 29 |
| MAGNAVOX | 01, 02, 04, 05, 06, 07, 08, 09, 20, 34, 35, 43, 51, 61, 62, 65 |
| MAJESTIC | 33 |
| MARANTZ | 01, 32 |
| MEMOREX | 33 |
| MGA/MITSUBISHI | 01, 08, 32, 34 |
| MONTGOMERY WARD | 01, 06, 08, 09, 23, 24, 32, 33, 34 |
| NEC 01, 08 | |
| NOBLEX 07 | |
| PACKARD BELL | 43 |
| PANASONIC 07, 11, 13, 25, 35, 36 | |
| PHILCO | 01, 06, 07, 08, 09, 15, 38, 43, 58 |
| PHILIPS | 06, 07, 43, 61, 62, 65 |
| PIONEER | 30 |
| PORTLAND | 09 |
| PROSCAN | 03, 37, 44 |
| QUASAR | 11, 13 |
| RADIO SHACK | 16, 17, 23 |
| RCA 01, 03, 37, 44 | |
| REALISTIC | 16, 17, 23 |
| SAMPO 08 | |
| SAMSUNG 01, 08, 09, 25, 68 | |
| SANYO 28, 29 | |
| SCOTT 01, 08 | |
| SEARS 09, 25, 26, 27, 28, 29 | |
| SEMP 64 | |
| SHARP 09, 22, 23, 24, 60, 66 | |
| SIGNATURE 2000 01, 06, 08, 09, 10, 23, 24, 33, 34 | |
| SONY 12, 62 | |
| SOUNDESIGN 51 | |
| SYLVANIA 01, 04, 05, 06, 07, 08, 35, 51 | |
| SYMPHONIC 46, 47 | |
| TATUNG 11 | |
| TEKNIKA 07, 09, 16, 33, 51 | |
| TELERENT 09, 33 | |
| THOMSON 69 | |
| TORX 08 | |
| TOSHIBA | 01, 25, 26, 27, 64 |
| WARDS | 01, 06, 08, 09, 10, 33, 34 |
| XR1000 48 | |
| ZENITH 02, 33, 59 | |
| DBS manufacturer | Code number |
| DIRECTV | 66 |
| EASTERN | 57 |
| GRADIENTE SKY | 56 |
| JERROLD | 60, 61, 65 |
| RCA | 50 |
| SCIENTIFIC ATLANTA | 58, 63, 64 |
| SONY 49 | |
| TOCOM | 58, 59, 62 |
| CATV converter manufacturer | Code number |
| ALLEGRO | 46 |
| ARCHER | 39 |
| CABLEVIEW | 39 |
| CITIZEN | 39 |
| CURTIS MATHES 15 | |
| EAGLE | 24, 25, 28 |
| GEMINI | 04, 05, 22, 23 |
| GENERAL ELECTRIC | 43 |
| GENERAL INSTRUMENT | 04, 05, 07, 09 |
| GOBRAND | 39 |
| HAMLIN | 33, 34, 35 |
| JERROLD | 04, 06, 07, 08, 09, 10, 17, 39 |
| KALE VISION | 29 |
| MACOM | 03, 40, 41 |
| MAGNAVOX 24, 25, 28, 29, 36, 37 | |
| NSC | 38 |
| OAK | 11, 12, 44 |
| PANASONIC | 13, 19, 21 |
| PARAGON | 01 |
| PHILIPS | 24, 25, 26, 27, 28 |
| PIONEER | 13, 14 |
| PULSER | 39 |
| RCA | 13, 50 |
| REGAL | 28 |
| REGENCY | 32 |
| SAMSUNG | 04, 13, 29 |
| SCIENTIFIC ATLANTA | 10, 15, 16, 45, 48 |
| SLMARX | 04, 13 |
| SONY | 49 |
| SPRUCER | 04, 13, 19 |
| STANDARD COMPONENTS | 29 |
| STARGATE | 04, 05, 13 |
| TELEVIEW | 04, 13, 39 |
| TEXSCAN | 31 |
| TOCOM | 12, 17, 18, 19, 38 |
| UNIDEN | 20 |
| UNIKA | 39 |
| UNIVERSAL | 46, 47 |
| VID TECH | 30 |
| VIDEO WAY | 01, 42 |
| VIEWSTAR | 24, 25, 28 |
| ZENITH | 01, 02, 03 |
| ZENITH HT-2000 | 01 |
Note
Some TV or CATV/DBS converter manufacturers may not be listed above.
Setting the language
The on-screen menu can display any of three languages, English, Spanish and French.

Before starting
Set the VCR/CATV/DBS/TV selector to VCR.
1 Press POWER to turn on the VCR.
2 Press MENU.
3 Press ▲ or ▼ to select SETUP, then press ENTER/DISPLAY.

4 Press ▲ or ▼ to select LANGUAGE SELECT.
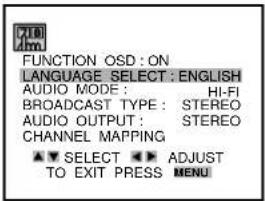
5 Press ◀ or ▶ to display the desired language.
Each time the language changes, the on-screen display language changes.

6 Press MENU to return to the normal screen.
Setting the clock
You must set the date and time for timer recordings.

Before starting
Set the VCR/CATV/DBS/TV selector to VCR.
1 Press MENU.
2 Press ▲ or ▼ to select CLOCK, then press ENTER/DISPLAY.

3 Press ◀ or ▶ to set MONTH, then press ▼. The day of the week will automatically appear.

4 Set DAY, YEAR and TIME as in step 3.
Press and hold ◀ or ▶ to change the setting rapidly.

5 Press ◀ or ▶ to set AUTO CLOCK SET to ON. The VCR automatically corrects the clock setting once you set AUTO CLOCK SET to ON.

6 Press MENU to start the clock.
The normal screen returns.
To correct the digits while setting
Before pressing MENU in step 6, press ▲ to select the item you want to correct. Reset the digits using the ◀ or ▶ button.
Tip
When the power supply is interrupted for more than 60 minutes or the AC cord is disconnected from the AC wall outlet, the clock setting is cleared. In this case, you have to set the clock again.
Notes
• The date can be set from A.D.2000 to A.D.2099.
• AUTO CLOCK functions when
- the VCR's power is turned off.
- the channel of a broadcaster that offers AUTO CLOCK service is preset.
Setting the VCR channels
Before Auto Channel Memory, this VCR can receive all channels in your area by pressing the CHANNEL ▲ or ▼ button repeatedly. After Auto Channel Memory, you can skip the channels which are not preset with the CHANNEL ▲ or ▼ button.

Before starting
- Set the VCR/CATV/DBS/TV selector to VCR.
- Make sure the VCR channel is not selected "LINE1" or "LINE2".
1 Press MENU.
2 Press ▲ or ▼ to select TUNING, then press ENTER/DISPLAY.
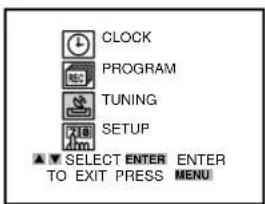
3 Press ▲ or ▼ to select SOURCE SELECT, then press ◀ or ▶ to display TUNER.

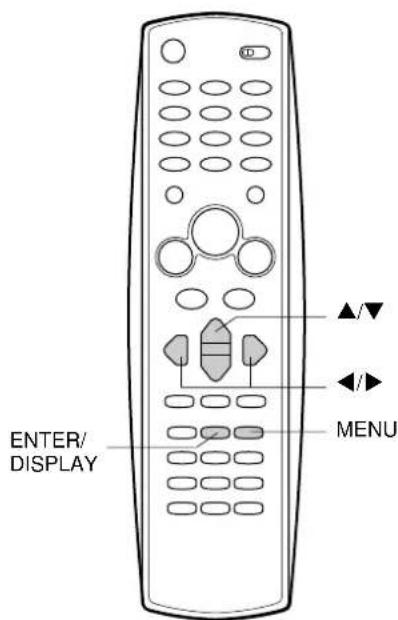
4 Press ▲ or ▼ to select AUTO CHANNEL SET, then press ◀ or ▶.
All available channels in your area are scanned and stored in the memory of the VCR.
After scanning, the TV screen in step 3 appears.
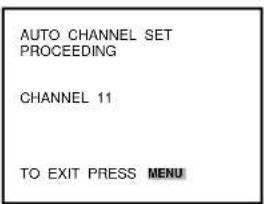
5 Press MENU to return to the normal screen.
If "C" flashes in the display window after Auto Channel Set
Check the antenna connections and repeat the above procedure from step 1.
If you still cannot receive the channels, set the VCR channels manually. See "Adding or erasing VCR channels manually".
(Presetting the VCR channels is necessary for recording TV programs.)
CATV channels
CATV systems use letters and numerals to designate channels. The table below shows the channel numbers of the CATV system and the corresponding channel number displayed on this VCR. For more information on available channels in your area, consult your local CATV company.
Channels displayed on this VCR CATV channels
| 01 5A |
| 02 to 13 2 to 13 |
| 14 to 36 A to W |
| 37 to 94 W+1 to W+58 |
| 95 to 99 A-5 to A-1 |
| 100 to 124 W+59 to W+83 |
| 125 W+84 |
Tips
- When you perform the Auto Channel Set, the VCR automatically selects the band (TV or CATV) in which there are more channels to be preset. To check the band, press ▼ to select TUNING BAND in the TUNING menu.
- In the display window, "c" is for a CATV channel and "ch" is for a TV channel.
Note
Once you conduct Auto Channel Set, the previous settings will be canceled.
Adding or erasing VCR channels manually
If Auto Channel Set does not set the VCR channel, add them manually for recording TV programs. You can also erase the unnecessary VCR channels.
1 Press MENU.
2 Press ▲ or ▼ to select TUNING, then press ENTER/DISPLAY.

3 Press ▲ or ▼ to select TUNING BAND, then press ◀ or ▶ to display TV or CATV.

4 Press ▲ or ▼ to select CH. ADD/DEL.
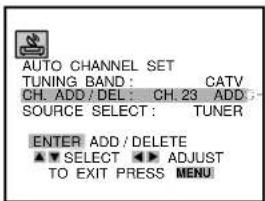
5 Press ◀ or ▶ to select the channel to be erased or added.
When the selected channel has already been set, ADD appears. When it has not been set, DEL appears.
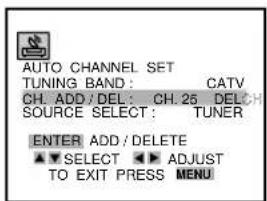
6 Press ENTER/DISPLAY to add or erase the channel.
If you add the selected channel, "c" or "ch" lights for a few seconds in the display window. If you erase the channel, "c" or "ch" flashes for a few seconds in the display window.
7 If you want to add or erase other channels, repeat steps 5 and 6.
8 Press MENU to return to the normal screen.
Tip
In the display window, "c" is for a CATV channel and "ch" is for a TV channel.
Checking the channel set-up to use VCR Plus+ system
To set the timer using VCR Plus+ system, you have to check whether the VCR channel numbers match the guide channels which are assigned to the TV stations.
If they do not match, the VCR Plus+ system does not function correctly. In this case, coordinate the number.
For example
For each channel your VCR receives, use the channel line up chart to check that the channel numbers match. For example, SHOWTIME is listed in the channel line up chart (under the VCR Plus+ Code) as channel 38, your VCR receives SHOWTIME on channel 14, you need to coordinate these numbers by locating guide channel 38 (under GUIDE CH). Next enter your SHOWTIME channel 14 (under CHANNEL).
Continue this process until all channels match.
Sample Channel Line Up Chart
| TV Station | VCR Plus+ Code | Local Cable Company Channel Number | |
| WCBS New York CBS 02 02 | |||
| WNBC New York NBC 04 04 | |||
| WNYW New York NYW 05 05 | |||
| WABC New York ABC 07 07 | |||
| A&E | Arts & Entertainment | 39 44 | |
| BET | Black Entertainment | 57 23 | |
| CNBC | Consumer News & Business | 23 16 | |
| CSPAN Government Business | 28 54 | ||
| DSC Discovery Channel 37 63 | |||
| DIS Disney Channel 53 27 | |||
| MAX Cinemax 45 15 | |||
| SHO Showtime 38 14 | |||
| USA USA Network 44 40 | |||
- Channel Guide listings are available in your local TV Guide and Newspaper.
Checking the channel set-up to use VCR Plus+ system (continued)

Before starting
Set the VCR/CATV/DBS/TV selector to VCR.
1 Press MENU.
2 Press ▲ or ▼ to select SETUP, then press ENTER/DISPLAY.
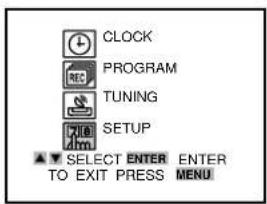
3 Press ▲ or ▼ to select CHANNEL MAPPING, then press ◀ or ▶.

4 Press ▲ or ▼ to select GUIDE CH "38."

5 Press ◀ or ▶ to display CHANNEL "14."

6 Repeat steps 4 and 5 until all necessary channel numbers are set.
7 Press MENU to return to the normal screen.
Tip
To cancel the CHANNEL setting, press CLEAR in step 5.
Playing back a tape
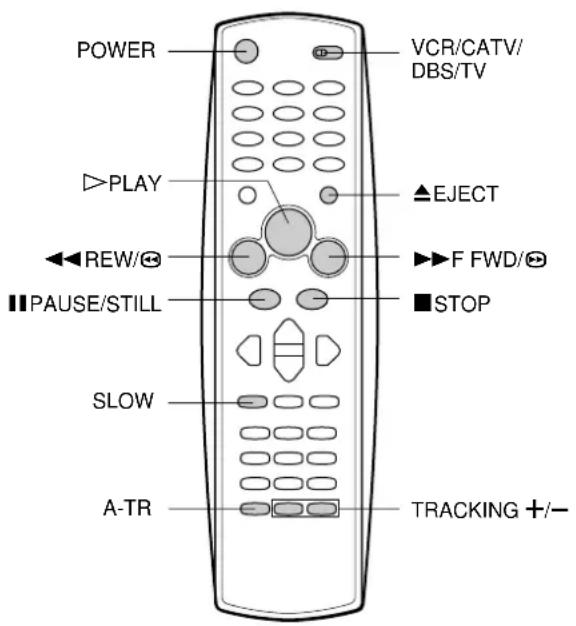
Before starting
- Turn on your TV and set it for the VCR reception.
- Set the VCR/CATV/DBS/TV selector to VCR.
1 Insert a cassette.
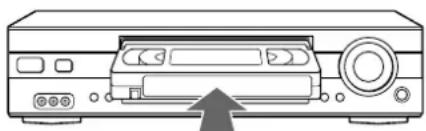
• The power turns on automatically.
- Playback starts immediately if the erasure prevention tab has been removed from the cassette.
2 Press ▷ PLAY to start playback.
To stop playback
Press ■ STOP.
Notes
- When the tape reaches the end during playback, fast-forward, forward search, index search, AD-skip or slow motion playback, the VCR automatically rewinds the tape to the beginning, ejects the cassette, and turns the power off (Auto rewind function).
- The VCR selects the tape speed, SP, LP or EP, automatically.
- When a cassette is inserted, the clock display in the display window changes to the tape counter display.
- You can play frame-by-frame during still by pressing
■ PAUSE/STILL.
If you cannot get a clear playback picture
Although the VCR adjusts the tracking automatically, you may need to adjust the tracking manually if the tape quality is too poor.
While the VCR is adjusting the tracking automatically, "A. TRK" (Automatic Tracking) flashes in the display window. It goes off after the adjustment is complete.
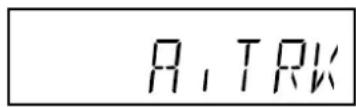
If the picture and the sound have noise, try manual tracking.
To adjust the tracking manually
During playback, press TRACKING +, - on the remote control, CHANNEL ∧ or ∨ on the VCR repeatedly until you get the best possible picture. (Automatic Tracking is canceled.)
To return to the automatic tracking
Press A-TR.
Additional functions
| To | Press | To return to the original mode |
| Make a picture still | ■ PAUSE/STILL during playback | Press ▷ PLAY |
| Fast-forward the tape | ▶▶ F FWD/⊕ during stop | Press ■ STOP. |
| Rewind the tape | ◀◀ REW/⊖ during stop | Press ■ STOP. |
| Eject the cassette | ▲ EJECT | — |
| Search forward at high speed | ▶▶ F FWD/⊖ during playback | Press ▷ PLAY. |
| Search reverse at high speed | ◀◀ REW/⊖ during playback | Press ▷ PLAY. |
| Play back at slow speed | SLOW during playback | Press ▷ PLAY. |
| Play frame-by-frame | ■ PAUSE/STILL repeatedly during still | Press ▷ PLAY. |

To watch the picture of a tape during fast-forward or rewind — Skip search
Hold down ▶▶ F FWD/⊗ or ◀◀ REW/⊗ during fast-forward or rewind. The VCR switches forward or reverse search. Release the button to return to fast-forward or rewind mode.
To skip an advertisement
Press AD-SKIP during playback. The VCR searches forward approximately 30 seconds of the recorded time.
Each press changes the recorded time of forward search in 30 seconds increments to a maximum of 3 minutes. After forward search, VCR returns to the normal playback.
During AD-skip, the counter does not register blank portions with no recorded signal.
To turn off the VCR automatically after rewinding
Press POWER during rewind. REW flashes on the TV screen. The VCR turns the power off after rewinding the tape to the beginning.
Tips
- If you press ▲ EJECT while the power is off, the VCR automatically turns the power on, ejects the cassette, and turns the power off.
- You can adjust unstable pictures by pressing the TRACKING + or - button repeatedly during still.
- Depending on the tape, noise lines may appear or color may fade during still and slow motion playback. You can remove the noise lines by pressing the TRACKING +, - on the remote control, CHANNEL ∧ or ∨ on the VCR repeatedly.
- Noise lines may appear or color may fade during forward, and reverse searches. You can remove the lines by pressing the TRACKING + or - button repeatedly.
Notes
- If a still picture lasts for more than 5 minutes, the VCR will automatically enter stop mode to protect the tape.
- If forward, reverse searches and slow motion playback last for 3 minutes, the VCR will automatically enter playback mode to protect the tape.
- The sound will be muted during forward, reverse searches and still.
17 ENGLISH
Various search functions

Before starting
Set the VCR/CATV/DBS/TV selector to VCR.
Rewinding or fast-forwarding to a specific point — Zero Return
1 Press CLEAR at the point you want to locate later.
- The tape counter in the display window resets to "0:00:00."
- If the clock display appears in the display window, press ENTER/DISPLAY repeatedly.

2 After playback or recording, press ■ STOP, then ZERO ⊃.
The tape automatically stops when the tape counter returns to about "0:00:00."
Tip
You can also see the tape counter in the TV screen. Press ENTER/DISPLAY repeatedly until the tape counter appears.
Notes
- When you insert a cassette, the tape counter is reset to "0:00:00."
- The tape counter not work while playing unrecorded portions of a tape.
Searching with the index function — Index Search
The VCR automatically marks an index signal on the tape each time recording starts. You can use these signals to find the beginning of any recording.
1 Press VISS during playback or stop.
2 Press the number buttons (up to 99) to select the index number.
When selecting the numbers less than 10, press 0 to enter tens digit and then press the buttons 1 through 9 to enter ones digit.

Index number
3 Press ▶▶ F FWD/⊗ (for succeeding programs) or ◀◀ REW/⊗ (for preceding programs).
The VCR starts searching.
Playback starts automatically from the beginning of the specified recording.
FF or REW appears.

To search the next index signal continuously
Press VISS during playback or stop. Then press
▶▶ F FWD/∅ or ◀◀ REW/∅. When the next index signal is found, playback starts automatically. After 5 seconds, the VCR goes to fast-forward or rewind.
At the desired scene, press ▷ PLAY to return to the normal playback.
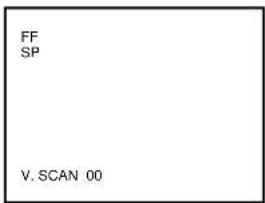
Notes
- You can also use the display window to check the index number you specified. "VISS" and the index number will appear in the display window.
• The index signal should be at least 1 minute apart in SP mode, 2 minutes apart in LP mode, and 3 minutes apart in EP mode. Otherwise, the VCR cannot detect them properly. - The index signal may not be detected on damaged or worn out tapes.
- The index signal at the beginning of a recorded tape may not be detected.
- The index signal may not be detected if it is extremely close to the point where the search began.
- The current tape speed indicator appears during searching. This does not indicate the tape speed of the tape you are using.
Searching the end of the recorded program — REC. End Search
You can fast-forward/rewind the tape at the end of the recorded program automatically.
Before starting
Set the VCR/CATV/DBS/TV selector to VCR.
Press REC. END SEARCH during stop.
The unit starts searching.
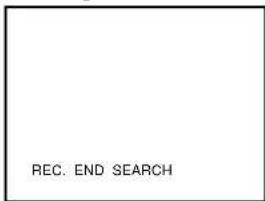
Searching stops automatically after fast-forwarding or rewinding as below;
Fast-forward
![graph TD A["recorded"] -->|Fast-forward| B["blank"] B -->|Stop| C["Press REC.END SEARCH"] C --> D["Previous recorded"] D --> E["later recorded"] E --> F["blankbi"] F -->|Fast-forward| G["Press REC.END SEARCH"] G --> H["stop"]](/content/2026/06/1291635/images/9f01782265d1dadcf899d2a34f9e8292ec8df489f1073d124e6cb20b111441b3.jpg)
Rewind
![graph TD A["recorded"] --> B["blank"] B --> C["Press REC.END SEARCH"] D["Stop"] --> E["Rewind (after fast-forwarding for four seconds)"]](/content/2026/06/1291635/images/180e808c476f1e7f8870da34a022c4b673fcd0fdc79cc3ad237140a3df6e3bdf.jpg)
To stop REC.End Search
Press ■ STOP.
Notes
- When the tape does not have blank space, searching stops at the end of the tape.
- If from the point where REC. End Search begins there is less than 5 minutes of recorded tape left in SP mode, 10 minutes in LP mode or 15 minutes in EP mode, REC. End Search may not work completely.
- If a tape has been recorded over in a different mode, either SP or LP mode, then REC. End Search may not work completely.
Recording a TV program
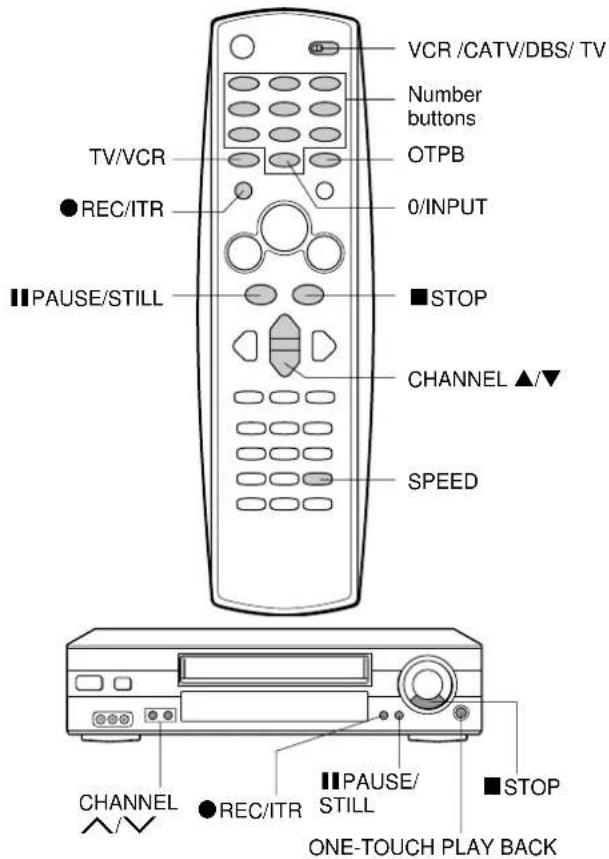
Before starting
- Turn on your TV and see it for the VCR reception.
- Set the VCR /CATV/DBS/ TV selector to VCR.
1 Insert a cassette with its erasure prevention tab in place.
The power turns on automatically.

2 Press SPEED to select the tape speed, SP or EP.

EP provides three times as much recording time as SP, although SP produces better picture and audio sounds.
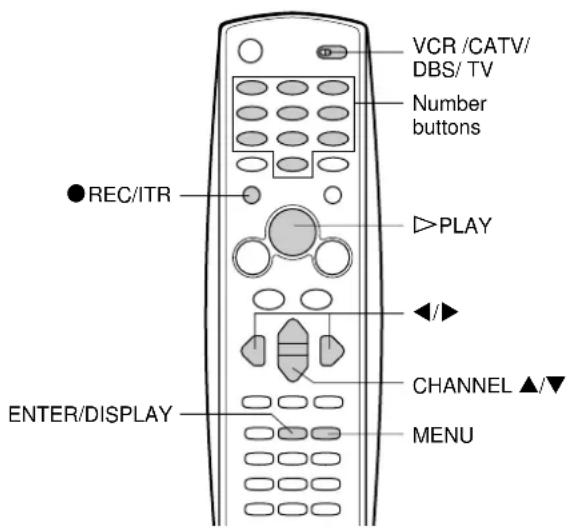
3 Press CHANNEL ▲ or ▼ on the remote control, CHANNEL ∧ or ∨ on the VCR, or number buttons to select the channel to record.
If you use the number buttons, it will take a few seconds after you have pressed the buttons for the channel to change.
4 Press ● REC/ITR to start recording.
"V.MARK" flashes on the TV screen when marking an index signal.
To stop recording
Press ■ STOP.
To pause recording
Press || PAUSE/STILL. "RECP" appears on the TV screen. To resume recording, press || PAUSE/STILL again.
To prevent an accidental recording
Break off the erasure prevention tab on the back edge of the cassette.
To record over the tape again, cover the gap with adhesive tape.


To watch another TV program while recording
Press TV/VCR after starting the recording so that "VCR" in the display window disappears. Then select another channel on the TV.
To monitor the recording, set the channel on the TV to that of the CHANNEL selector, and press TV/VCR again.
Tips
- If you want to record the program through the line input, press 0/INPUT, CHANNEL ▲, ▼ on the remote control, CHANNEL ∧ or √ on the VCR continuously to display "LINE1" (from AUDIO/VIDEO IN jacks at the rear) or "LINE2" (from the AUDIO/VIDEO IN jacks in the front) in the display window in step 3.
- To start recording during playback, press || PAUSE/STILL, and ● REC/ITR, then || PAUSE/STILL.
Notes
- If you try to record on a cassette without its erasure prevention tab, the VCR will eject the cassette.
- If recording pause lasts for more than 5 minutes, the VCR will automatically enter stop mode to protect the tape.
- When using the 0/INPUT button to select the input channel, press 0/INPUT twice.
• The channel cannot be changed during recording.
Playing back the portion you just recorded — One-Touch Playback
Using One-Touch playback after VCR Plus+ system (page 21) or manual timer (page 23) recording is convenient. You can make timer recordings and play back only the portion you just recorded with the timer by pressing a single button later.
1 Stop recording (when recording without timer).
The ONE-TOUCH PLAY BACK button on the VCR lights.
If another operation button is pressed after you stop recording, One-Touch Playback will be canceled.
2 Press ONE-TOUCH PLAY BACK on the VCR or OTPB on the remote control.
The tape rewinds to the start of the recorded portion and playback begins.
When you set the timer for more than two timer programs
The VCR starts playing back from the earliest one when you use One-Touch Playback.
To find the beginning of the second (or later) program, use Index Search (page 18.)
Note
One-Touch Playback does not work for recordings of less than 30 seconds.
Recording with Instant Timer Recording
You can immediately start recording the current channel for a specified time with Instant Timer Recording.

Before starting
- Insert a cassette with its erasure prevention tab in place. Make sure the tape is longer than the recording time.
- Turn on the VCR and TV, and set the TV for VCR reception.
- Select the channel position to record and tape speed.
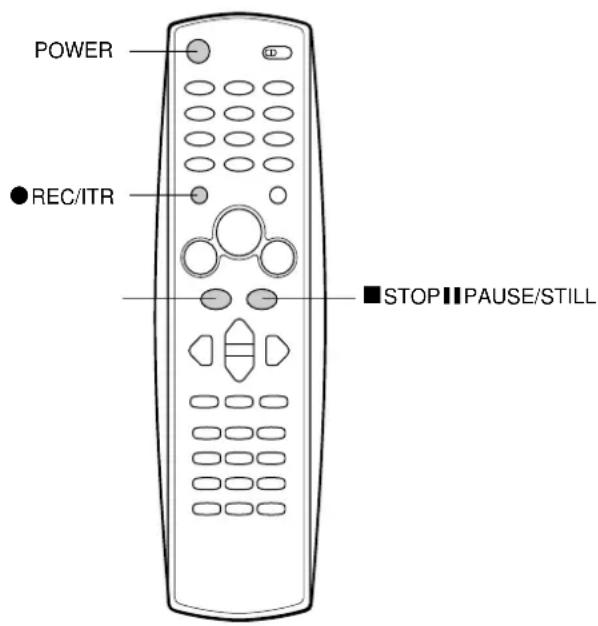
1 Press ● REC/ITR twice.
- The VCR starts recording, and Instant Timer Recording information appears on the TV screen.
- "TIMER" appears in the display window.
INSTANT TIMER RECORD
CHANNEL 10 CATV SPEED EP
START NOW LENGTH 0H30M
2 Within five seconds, press ● REC/ITR repeatedly to set the recording duration.
Each press changes the recording duration on the TV screen in the following way:

When the recording time indicator in the display window counts down to "0H00M," recording stops and the VCR turns off.

Recording with Instant Timer Recording (continued)
To stop, pause, or turn off the power while recording
Press ■ STOP, ■ PAUSE/ STILL or POWER.
To extend the recording duration while recording
Press ● REC/ITR until the new duration you want appears.

When the regular recording is resumed by pressing ● REC/ITR repeatedly to display "0H00M," Instant Timer Recording is canceled.

When the tape reaches the end during Instant Timer Recording, "TIMER" flashes in the display window and the VCR turns the power off.
Setting the timer with VCR Plus+ system
You can greatly simplify timer recordings with VCR Plus+ system. Just enter the PlusCode, a number assigned to each TV program, and the VCR will set the timer recording automatically. You can find PlusCodes in most TV guide magazines.
You can set up to 8 programs.
Before starting
- Check that the VCR clock is set correctly.
- Check that the VCR channel numbers match the guide channels which assigned to the TV stations.
- Insert a cassette with its erasure prevention tab in place. Make sure the tape is longer than the recording time.
- Turn on the VCR and the TV and set the TV for VCR reception.
- Set the VCR/CATV/DBS/TV selector to VCR.
- If the CATV converter is used for the timer recording, check that the CATV (or satellite) converter is turned on and the channel you want to record is selected.
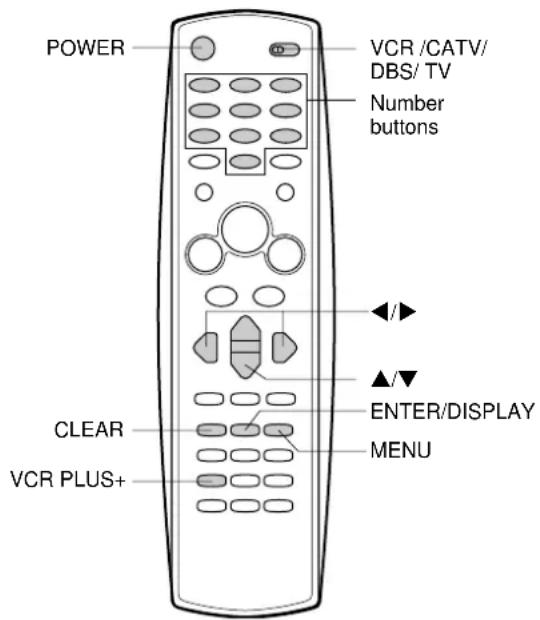
1 Press VCR PLUS+.
2 Enter the PlusCode of the TV program you want to record using the number buttons.
If you make a mistake, press CLEAR to cancel.

3 Press ENTER/DISPLAY.
- The timer information appears on the TV screen.
- If you want to extend the recording time, see "To extend the recording time" below.

4 Press ▲ or ▼ to select SPEED, then press ◀ or ▶ to select the tape speed, SP, EP or AUTO.
If you select AUTO, the VCR determines remaining tape length and switches the speed from SP to EP, if necessary, to complete recording the program.
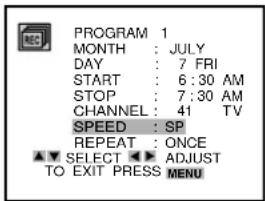
5 Press ▲ or ▼ to select REPEAT, then press ◀ or ▶ to select ONCE, WEEKLY or DAILY.
ONCE: for a single program WEEKLY: for a weekly program such as every Friday DAILY: for a daily program from Monday to Friday

6 If you want to set another program, repeat from step 1.
7 Press MENU to return to the normal screen.
8 Press POWER to turn off the VCR.
- "TIMER" appears in the display window, and the VCR stands by for timer recording.
- If the cassette-in indicator flashes, a cassette is not inserted. If the cassette-in indicator flashes and the cassette is ejected, the cassette's erasure prevention tab is removed.
To extend the recording time
After step 3, press ▲ or ▼ to select STOP, then press ◀ or ▶ to change the end time.
If the program overlaps another
The overlapped portions will be deleted. The program which has a lower program number has priority over the succeeding as illustrated.
![graph LR A["Program 1"] --> B["8:00 9:00 10:00 11:00"] C["Program 2"] --> D["Deleted Parts"] E["Program 3"] --> F["Actual recorded portions"] G["Prog.1 Prog.2 Prog.3"] --> H["End"]](/content/2026/06/1291635/images/b92302ec800adb2fd1d93de627c7dddb3f3d6abb24329d16abf7ae980dd5c565.jpg)
To cancel the program
Press MENU and select PROGRAM by pressing the ▲ or ▼ button. And press ◀ or ▶ to display the program you want to cancel, then press CLEAR to cancel.
Tips
- If "FULLY PROGRAMMED" flashes and the setting of PROGRAM 1 appears. 8 programs are already set. Cancel an unnecessary program.
- To confirm the settings, select PROGRAM in the menu. Then press ◀ or ▶ to display the settings of each program. Press MENU to return to the normal screen.
Notes
- When the power supply is interrupted for more than 60 minutes, the preset program is cleared. In this case, you have to set the timer again.
- The VCR may not work correctly when you use a T-210 tape, even if you select AUTO in step 4.
- When the tape reaches the end during timer recording, "TIMER" flashes in the display window.
- If you make an irregular setting, "ERROR CODE" flashes on the TV screen.
Setting the timer manually
If you cannot use VCR Plus+ system, you can set the timer manually.
You can set up to 8 programs within one year of the current date.

Before starting
- Check that the VCR clock is set correctly.
- Insert a cassette with its erasure prevention tab in place.
- Set the VCR/CATV/DBS/TV selector to VCR.
- If the CATV converter is used for the timer recording, check that the CATV (or satellite) converter is turned on and the channel you want to record is selected.
1 Press MENU.
2 Press ▲ or ▼ to select PROGRAM, then press ENTER/DISPLAY.

3 Press ▲ or ▼ to select MONTH, then press ◀ or ▶ to set the month.
Press and hold ◀ or ▶ to change the setting rapidly.

4 Set DAY, START time and STOP time as in step 3.
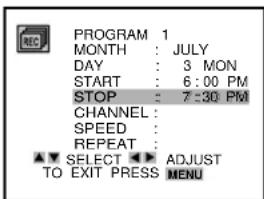
5 Press ▲ or ▼ to select CHANNEL, press ◀ or ▶ to set the VCR channel number.
If you have connected the CATV using the CATV converter, set the CHANNEL to match the cable box output channel (usually CH3 or 4). Change the channel on the CATV converter instead of the VCR.

6 Set SPEED and REPEAT as in step 3.
For details of SPEED and REPEAT, see "Setting the timer with VCR Plus+ system" on page 21.
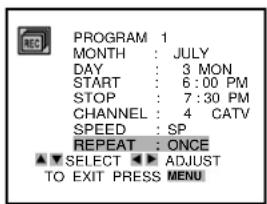
7 If you want to set another program, press ▼ to select PROGRAM, then press ◀ or ▶ to display another program number. And repeat steps 3 through 7.
8 Press MENU to return to the normal screen.
9 Press POWER to turn off the VCR.
- "TIMER" appears in the display window, and the VCR stands by for timer recording.
- If the cassette-in indicator flashes, a cassette is not inserted. If the cassette-in indicator flashes and the cassette is ejected, the cassette's erasure prevention tab is removed.
To correct the data while setting
Press ▲ or ▼ until the item you want to correct highlights, then press ◀ or ▶ to set the correct data.
To cancel the program
Select PROGRAM in the menu. And press ◀ or ▶ to display the program you want to cancel, then press CLEAR to cancel.
Tips
- If "FULLY PROGRAMMED" flashes and the setting of PROGRAM 1 appears. 8 programs are already set. Cancel an unnecessary program.
- To confirm the settings, select PROGRAM in the menu. Then press ◀ or ▶ to display the settings of each program. Press MENU to return to the normal screen.
- If you want to record the program through the line input, press ◀ or ▶ to display "LINE1" (from the AUDIO/VIDEO IN jacks at the rear) or "LINE2" (from the AUDIO/VIDEO IN jacks in the front) in step 5 instead of the VCR channel number.
Notes
- When the power supply is interrupted for more than 60 minutes, the preset program is cleared. In this case, you have to set the timer again.
- When the tape reaches the end during timer recording, "TIMER" flashes in the display window.
- The VCR may not work correctly when you use a T-210 tape, even if you select AUTO in step 6.
Connecting with another VCR
![graph TD A["(Front)"] -->|VIDEO IN jack| B["HV-FX9000 (Recorder)"] B -->|AUDIO IN L/R jacks| C["Yellow"] B -->|Audio in L/R jacks| D["White"] E["(Rear)"] -->|AUDIO IN L (MONO)/R jacks| F["Yellow"] E -->|AUDIO IN jacks| G["White"] H["Another VCR (Player)"] --> I["Video camera (Player)"] J["Audio/vide…](/content/2026/06/1291635/images/72a1b47b620bc60e2b6070c74182e10dc5ecb409b139939736b127a3ca0f9f46.jpg)
Important
When you record a video signal output from this VCR onto another VCR, turn off the on-screen display. Otherwise, the indicators displayed on the TV screen will be recorded on the tape.
Tips
- If the other VCR is monaural type, connect one of the audio plugs only to AUDIO IN L (MONO) at the rear.
- If you use this VCR for playback, connect the AUDIO/VIDEO OUT jacks on this VCR and the audio/video input jacks on the recording VCR.
Note
If both units are; turned on, made by AIWA, and located near each other, do not use the remote control. Use the buttons on the VCR instead.
Operation
Before starting
Select the tape speed.
1 Insert a pre-recorded source cassette into another (playback) VCR.
2 Insert a blank cassette with its erasure prevention tab in place into your HV-FX9000 (recording) VCR.
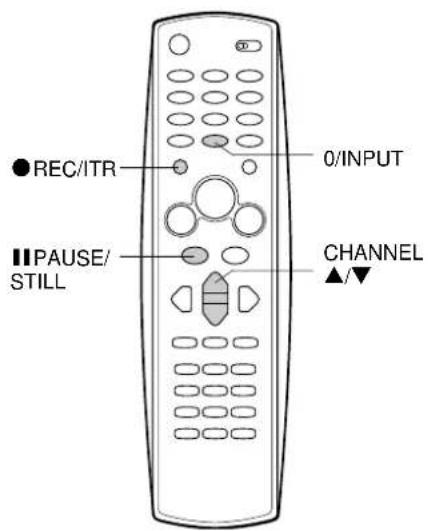
3 Press 0/INPUT repeatedly to display "LINE1" (rear) or "LINE2" (front) on the TV screen.
You can also use the CHANNEL ▲ or ▼ button.
4 Press ● REC/ITR and || PAUSE/STILL on the recording VCR.
The recording VCR is in recording pause mode.
5 Set the other VCR to playback.
6 Press ● REC/ITR or II PAUSE/STILL on the recording VCR.
Dubbing begins.
Multichannel TV Sound (MTS) and Hi-Fi audio sound system
Multichannel TV Sound (MTS)
This VCR is equipped with the MTS (Multi-channel TV Sound) system which decodes stereo and SAP (Second Audio Program) broadcasting signals. It also decodes the stereo TV sound of the local CATV system if it satisfies the assigned cable frequencies and EIA-recommended MTS stereo/bilingual TV sound system.
It can record and play back the audio signal in the VHS Hi-Fi audio sound system.
Second Audio Program (SAP)
This VCR can record and play back a Second Audio Program (SAP) for the second language or additional information. Usually primary language is recorded on the primary sound channel, and the second language or additional information on the SAP channel.
Audio track system
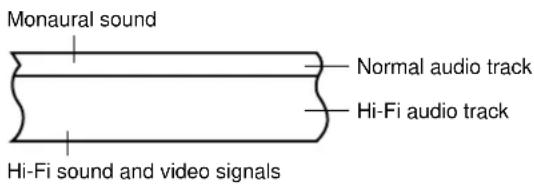
This VCR records a regular monaural audio signal on the normal audio track, and stereo Hi-Fi audio signal on the Hi-Fi audio track.
If you use a VCR equipped with the VHS Hi-Fi audio sound system to play back the tape recorded on this VCR, you can enjoy stereo Hi-Fi sound or bilingual program. If you use a VCR not equipped with the VHS Hi-Fi audio sound system, only a regular audio sound recorded on a normal audio track is played back.
Recording the Hi-Fi audio
The regular audio signal and Hi-Fi audio signal are automatically recorded if the TV program is broadcasted in stereo. No special setting is required for Hi-Fi audio recording.
Recording the sound of the MTS Broadcast
Before starting
- Insert a cassette and select the tape speed.
- Set the VCR/CATV/DBS/TV selector to VCR.
1 Press MENU.
2 Press ▲ or ▼ to select SETUP, then press ENTER/DISPLAY.

3 Press ▲ or ▼ to select BROADCAST TYPE.
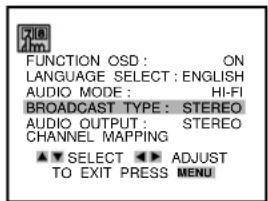
4 Press ◀ or ▶ to select the desired system.
STEREO: for recording the stereo sound
SAP: for recording the SAP program
MONO: for recording the monaural sound
5 Press MENU to return to the normal screen.
6 Press CHANNEL ▲, ▼ or number buttons to select the channel to record.
STEREO and/or SAP appears on the TV screen depending upon the receiving program.
7 Press ● REC/ITR.
Recording begins.
Recorded and output signals of the MTS broadcast
| TV screen | Broadcast | BROADCAST TYPE | Recorded signal | Signal output from AUDIO OUT | ||
| Hi-Fi No track track | rmal track LEFT | RIGHT | ||||
| MONO | Mono | STEREO Mono | Mono Mono | Mono Mono | ||
| SAP Mono Mono | Mono Mono | Mono | ||||
| MONO Mono | Mono Mono | Mono Mono | ||||
| STEREO | Stereo | STEREO Right | Left/Right Mono channel | Left Right channel | channel | |
| SAP Right Mono | Left/ Mono channel | Left Right channel | channel | |||
| MONO Mono | Mono Mono | Mono Mono | ||||
| SAP | Mono+SAP | STEREO Mono | Mono Mono | Mono Mono | ||
| SAP SAP SAP | SAP | AP | ||||
| MONO Mono | Mono Mono | Mono Mono | ||||
| STEREO/SAP | Stereo+SAP | STEREO Right | Left/Right Mono channel | Left Right channel | channel | |
| SAP SAP SAP | SAP | AP | ||||
| MONO Mono | Mono Mono | Mono Mono | ||||
Note
You can also use the display window to check the broadcast type.
When the VCR receives the stereo broadcast, ST appears. When the VCR receives the SAP broadcast, SAP appears. When the VCR receives the Bilingual broadcast, BIL appears.
Playing back a MTS-program recorded tape
Before starting
Set the VCR/CATV/DBS/TV selector to VCR.
1 Press MENU.
2 Press ▲ or ▼ to select SETUP, then press ENTER/DISPLAY.

3 Press ▲ or ▼ to select AUDIO OUTPUT.

4 Press ◀ or ▶ to select the audio output mode.
STEREO: The stereo sound is heard.
LEFT: The left channel sound is heard from both channels.
RIGHT: The right channel sound is heard from both channels.
5 Press ▲ or ▼ to select AUDIO MODE.

6 Press ◀ or ▶ to select HI-Fl.
HI-FI: The sound on the Hi-Fi audio track is played back.
NORMAL: The sound on the normal audio track is played back.
7 Press MENU to return to the normal screen.
8 Insert a cassette.
9 Press ▷ PLAY.
Playback begins.
Output signals
The signals output from the AUDIO OUT jacks and RF OUT to TV connector on the rear panel are as shown below.
| AUDIO OUTPUT | AUDIO MODE | AUDIO OUT | RF OUT | |
| LEFT | RIGHT | |||
| STEREO | HI-FI | Left channel | Right channel | Mono |
| LEFT | HI-FI | Left channel | Left channel | Left channel |
| RIGHT | HI-FI | Right channel | Right channel | Right channel |
| - | NORMAL | Mono | Mono | Mono |
Tips
- If AUDIO OUTPUT is set to STEREO while playing a prerecorded SAP BILINGUAL audio program, the primary language LEFT and the secondary language RIGHT will be heard simultaneously. For SAP BILINGUAL playback, do not use STEREO setting. Select RIGHT setting.
- If the VCR is connected to the TV through the antenna cable, the audio portion of a stereo or SAP BILINGUAL prerecorded tape will be heard in monaural. Set AUDIO OUTPUT to select the desired portion when playing back a SAP BILINGUAL tape. For stereo or SAP BILINGUAL playback, use the connections given on stereo playback.
Notes
- When you play a tape recorded in mono, the sound is always played back in mono regardless of the AUDIO MODE setting.
- The AUDIO MODE setting automatically returns to HI-FI when a cassette is ejected.
On-screen display

Identifying the on-screen display items

Changing the on-screen function display
Press ENTER/DISPLAY. Each press changes the on-screen function display as follows:
![graph TD A["One press"] --> B["Two presses"] B --> C["Three presses"] A --> D["After 3 seconds"] B --> E["After 3 seconds"] C --> F["After 3 seconds"] D --> G["Press ENTER."] E --> H["Press ENTER."] F --> I["Press ENTER."]](/content/2026/06/1291635/images/127944aa4fe58b9c12e0c10be05ca0d89b6f23c049a4199aa59d1ba7ce6b2a83.jpg)
All indicators are turned off.
Notes
- The tape counter and the remaining tape length indicator appear only when a cassette is inserted. Also, the remaining tape length indicator appears after any tape operation.
- The remaining tape length indicator may not be displayed correctly depending on the condition of the tape. There may be errors within plus or minus 2 minutes in SP mode and 6 minutes in EP mode.
To turn the on-screen display off
Caution
When you record a video signal output from this VCR onto another VCR, turn off the on-screen display. Otherwise, the indicators displayed on the TV screen will be recorded on the tape.
Before starting
Set the VCR/CATV/DBS/TV selector to VCR.
1 Press MENU.
2 Press ▲ or ▼ to select SETUP, then press ENTER/DISPLAY.
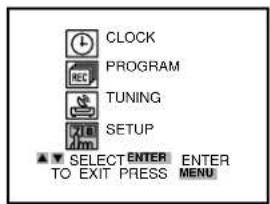
Press ▲ or ▼ to select FUNCTION OSD.
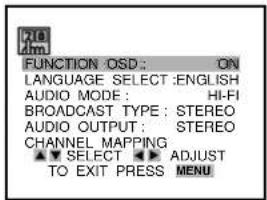
4 Press ◀ or ▶ to display OFF.

5 Press MENU to return to the normal screen.
Tips
- Even if you set FUNCTION OSD to OFF, you can check the clock, tape counter and the remaining tape length in the display window by pressing ENTER/DISPLAY repeatedly.
- Even if you set FUNCTION OSD to OFF, the indications of Zero Return, VISS and REC. End Search appears on the TV screen.
Troubleshooting
If the unit does not seem to operate properly, read the instructions again, then check the information below.
The POWER button does not operate.
Make sure the AC cord is connected securely.
The playback picture is noisy.
- Make sure the TV is set to the video channel or video input.
- Adjust the tracking manually when the tape quality is poor.
- Although the unit cleans the video heads automatically, dirt may be accumulated after a long period of use. Clean the video heads with a commercially available video head cleaning tape.
- Make sure all the connections with the VCR are correct and secure.
There is no playback picture.
Set the TV to the video channel or video input.
TV reception is noisy or there is no TV reception.
- Connect the VCR to the antenna and TV correctly and securely.
- Move the VCR away from the TV set.
Tape operation buttons do not work while the power is on and the cassette is inserted.
Moisture condensation may have occurred. Wait for about two hours until moisture evaporates completely before you operate the VCR.
Abnormal operation has occurred.
External interference may have affected the internal microprocessor.
Disconnect the AC cord from the AC outlet. Then connect it again.
The remote control does not operate.
- Replace both batteries with new ones.
- Make sure the VCR/CATV/CBS/TV selector on the remote is set to VCR.
There is no sound.
Connect the VCR correctly and securely.
The timer does not operate.
- Set the VCR clock correctly.
- Check that the VCR channel numbers match the guide channels which assigned to the TV stations.
There is no sound and picture from an input source.
You may have selected the wrong input. Press CHANNEL
▲, ▼, 0/INPUT on the remote, CHANNEL ∧ or ∨ on the VCR until you select the correct input source.
(e.g. You must select "LINE2" when you connect an input source to the AUDIO/VIDEO IN jacks on the front panel.)
Note on moisture condensation
Moisture may condense inside the unit and cause damage to the unit and tape when the unit is moved from a cold to a warm place, after heating a cold room, or under conditions of high humidity. If any of the above conditions apply, place the unit in a well-ventilated area and wait for about two hours until the unit is warmed to room temperature and the moisture evaporates completely before operating the unit.
Video recording system
Rotary 2 head helical scanning system
Video head Double azimuth 4 head
Tuner system Frequency synthesized tuner
TV system M
Video signal system NTSC color signal,
Usable cassettes 525 lines, 60 fields
VHS video cassette
Recording/Playback time
SP: 3.5 hours with T-210 tape
LP: 7 hours with T-210 tape (playback only)
EP: 10.5 hours with T-210 tape
Tape speed SP: 33.35 mm/sec
LP: 16.67 mm/sec
EP: 11.12 mm/sec
Fast-forward/Rewind time
less than 180 seconds with T-120 tape
Channel coverage VHF: 2 to 13
UHF: 14 to 69
CATV: 5A, A-5 to A-1, A to W, W+84
RF output VHF channel 3 or 4 (switchable), 66 dB µ
Video input 1.0 Vp-p, 75 ohm, unbalanced
Video output 1.0 Vp-p, 75 ohm, unbalanced
Horizontal resolution 230 lines (at SP)
Video S/N 43 dB (at SP)
Audio track 3 tracks (Hi-Fi sound 2 tracks, Normal
sound 1 track)
Audio input -6 dBs, 47 K ohm
Audio output -6 dBs, less than 4.7 K ohm
Audio frequency response
normal: 100 Hz - 10 K Hz (at SP)
Hi-Fi: 20 Hz - 20 K Hz (at SP)
Audio S/N normal: more than 43 dB (at SP)
Hi-Fi: more than 70 dB (at SP)
Hi-Fi dynamic range more than 85 dB (at SP)
Operating temperature 5°C to 35°C
Power requirements 120 V AC, 60 Hz
Power consumption 15 W
TYP 3W (stand by mode)
Dimensions
Supplied accessories
Antenna cable (1)
Batteries (2)
Remote control (1)
Audio cable (1)
Video cable (1)
Design and specifications are subject to change without notice for the purpose of performance improvement.
This equipment has been tested and found to comply with the limits for a Class B digital device, pursuant to Part 15 of the FCC Rules. These limits are designed to provide reasonable protection against harmful interference in a residential installation.
This equipment generates, uses, and can radiate radio frequency energy and, if not installed and used in accordance with the instructions, may cause harmful interference to radio communications. However, there is no guarantee that interference will not occur in a particular installation. If this equipment does cause harmful interference to radio or television reception, which can be determined by turning the equipment off and on, the user is encouraged to try to correct the interference by one or more of the following measures:
- Reorient or relocate the receiving antenna.
- Increase the separation between the equipment and receiver.
- Connect the equipment into an outlet on a circuit different from that to which the receiver is connected.
- Consult the dealer or an experienced radio/TV technical for help.
Caution
Modifications or adjustment to this product, which are not expressly approved by the manufacturer, may void the user's right authority to operate this product.
Front panel
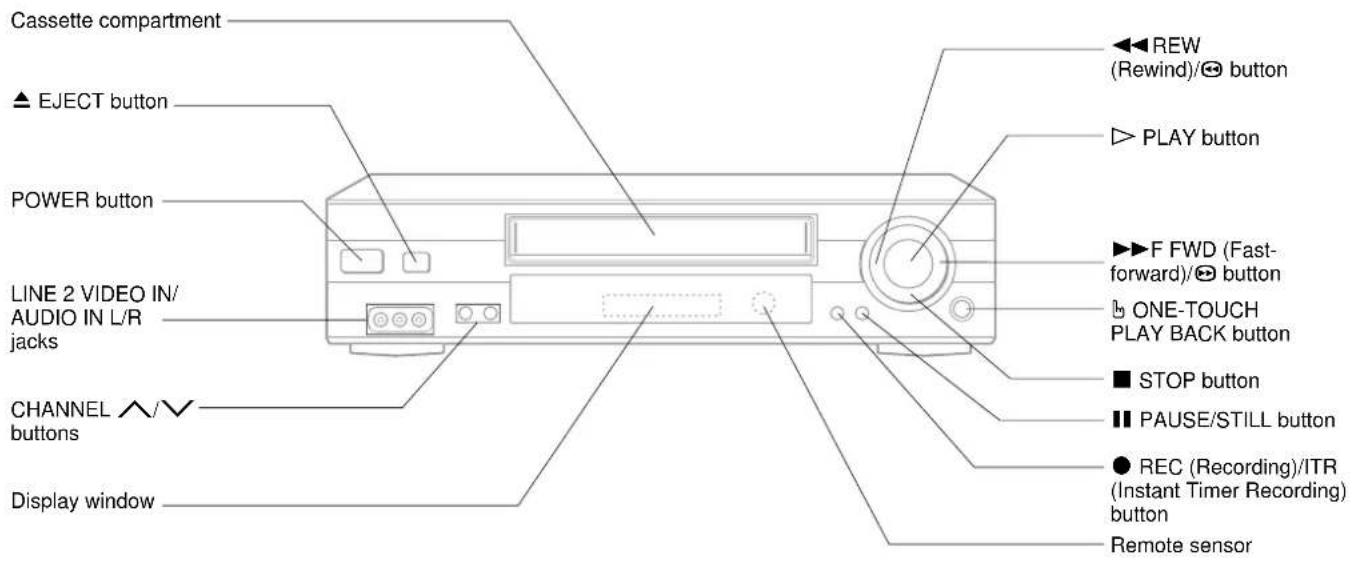
Display window

Rear panel

Remote control with the front cover opened


AIWA CO.,LTD.
For Assistance and Information, Call Toll Free 1-800-BUY-AIWA (United States and Puerto Rico)
2
1
Ajuste el selector VCR/CATV/DBS/TV en VCR.
2

Nota
Notas
CATV: 5A, 2 a 13, A a W, W+1 a W+58, A-5 a A-1, W+59 a W+84
5° C a 35° C
Alimentación 120 V CA, 60 Hz
Consumo 15 vatios
TYP 3W (modo de espera)
Dimensiones
SOMMAIRE DES OPÉRATIONS
Bienvenue
2
1


4

Remarque
Avant de commencer
Remarques
Second programme audio (SAP)
- QUICK START GUIDE
- WELCOME
- AIWA CO., LTD
- 1 INSTALLING BATTERIES IN THE REMOTE CONTROL
- 2
- CONNECTING ANTENNA (OR CATV)-VCR-TV
- IMPORTANT
- WHEN THE TV IS CONNECTED TO OUT TO TV USING ONLY AN ANTENNA CABLE
- TO SELECT A DESIRED TV CHANNEL ON THE TV
- TO CONNECT A CATV SYSTEM WITHOUT USING A CATV CONVERTER
- TO SEE A TV PROGRAM OR VIDEO PROGRAM SELECTED ON THE VCR
- 3
- SETTING THE LANGUAGE
- 4
- SETTING THE CLOCK
- 5
- SETTING THE VCR CHANNELS
- BEFORE STARTING
- ENGLISH
- WARNING
- IMPORTANT SAFETY INSTRUCTIONS
- INSTALLATION
- ELECTRIC POWER
- OUTDOOR ANTENNA
- LIGHTNING
- MAINTENANCE
- DAMAGE REQUIRING SERVICE
- NOTE TO CATV SYSTEM INSTALLER
- OWNER'S RECORD
- MAIN FEATURES OF THIS VCR
- VCR PLUS+ SYSTEM AND ONE-TOUCH PLAYBACK
- MTS (MULTI-CHANNEL TV SOUND) BROADCAST
- MBR (MULTI BRAND REMOTE CONTROL)
- AUTO SET-UP
- TABLE OF CONTENTS
- PREPARATION
- PLAYBACK
- RECORDING
- OTHER FUNCTIONS
- ADDITIONAL INFORMATION
- CONNECTING THE VCR
- BASIC CONNECTIONS
- CAUTION
- TO CONNECT A TV USING THE AUDIO AND VIDEO CABLES
- CATV CONNECTIONS
- TO CONNECT A CATV SYSTEM USING A CATV CONVERTER AND 2-WAY SPLITTER
- NOTE
- ADDITIONAL CONNECTIONS
- NOTES
- VCR RECEPTION SETTING
- WHEN A TV IS CONNECTED WITH AN ANTENNA CABLE
- WHEN A TV IS CONNECTED WITH AUDIO AND VIDEO CABLES
- PREPARING THE REMOTE CONTROL
- INSERTING THE BATTERIES
- USING THE REMOTE CONTROL
- CONTROLLING THE TVS AND CATVS CATV/DBSES
- TO CONTROL THE TV
- TO CONTROL THE CATV/DBS
- TO CORRECT THE DIGITS WHILE SETTING
- TIP
- 4 PRESS ▲ OR ▼ TO SELECT AUTO CHANNEL SET, THEN PRESS ◀ OR
- 5 PRESS MENU TO RETURN TO THE NORMAL SCREEN
- IF "C" FLASHES IN THE DISPLAY WINDOW AFTER AUTO CHANNEL SET
- CATV CHANNELS
- TIPS
- ADDING OR ERASING VCR CHANNELS MANUALLY
- 1 PRESS MENU
- 2 PRESS ▲ OR ▼ TO SELECT TUNING, THEN PRESS ENTER/DISPLAY
- 3 PRESS ▲ OR ▼ TO SELECT TUNING BAND, THEN PRESS ◀ OR ▶ TO DISPLAY TV OR CATV
- 4 PRESS ▲ OR ▼ TO SELECT CH. ADD/DEL
- 5 PRESS ◀ OR ▶ TO SELECT THE CHANNEL TO BE ERASED OR ADDED
- CHECKING THE CHANNEL SET-UP TO USE VCR PLUS+ SYSTEM
- FOR EXAMPLE
- PLAYING BACK A TAPE
- 1 INSERT A CASSETTE
- 2 PRESS ▷ PLAY TO START PLAYBACK
- TO STOP PLAYBACK
- IF YOU CANNOT GET A CLEAR PLAYBACK PICTURE
- TO ADJUST THE TRACKING MANUALLY
- TO RETURN TO THE AUTOMATIC TRACKING
- TO WATCH THE PICTURE OF A TAPE DURING FAST-FORWARD OR REWIND — SKIP SEARCH
- TO SKIP AN ADVERTISEMENT
- TO TURN OFF THE VCR AUTOMATICALLY AFTER REWINDING
- 17 ENGLISH
- VARIOUS SEARCH FUNCTIONS
- REWINDING OR FAST-FORWARDING TO A SPECIFIC POINT — ZERO RETURN
- 1 PRESS CLEAR AT THE POINT YOU WANT TO LOCATE LATER
- 2 AFTER PLAYBACK OR RECORDING, PRESS ■ STOP, THEN ZERO ⊃
- SEARCHING WITH THE INDEX FUNCTION — INDEX SEARCH
- TO SEARCH THE NEXT INDEX SIGNAL CONTINUOUSLY
- SEARCHING THE END OF THE RECORDED PROGRAM — REC. END SEARCH
- TO STOP REC.END SEARCH
- RECORDING A TV PROGRAM
- 1 INSERT A CASSETTE WITH ITS ERASURE PREVENTION TAB IN PLACE
- 2 PRESS SPEED TO SELECT THE TAPE SPEED, SP OR EP
- 3 PRESS CHANNEL ▲ OR ▼ ON THE REMOTE CONTROL, CHANNEL ∧ OR ∨ ON THE VCR, OR NUMBER BUTTONS TO SELECT THE CHANNEL TO RECORD
- 4 PRESS ● REC/ITR TO START RECORDING
- TO STOP RECORDING
- TO PAUSE RECORDING
- TO PREVENT AN ACCIDENTAL RECORDING
- TO WATCH ANOTHER TV PROGRAM WHILE RECORDING
- PLAYING BACK THE PORTION YOU JUST RECORDED — ONE-TOUCH PLAYBACK
- 1 STOP RECORDING (WHEN RECORDING WITHOUT TIMER)
- 2 PRESS ONE-TOUCH PLAY BACK ON THE VCR OR OTPB ON THE REMOTE CONTROL
- WHEN YOU SET THE TIMER FOR MORE THAN TWO TIMER PROGRAMS
- RECORDING WITH INSTANT TIMER RECORDING
- 1 PRESS ● REC/ITR TWICE
- 2 WITHIN FIVE SECONDS, PRESS ● REC/ITR REPEATEDLY TO SET THE RECORDING DURATION
- TO STOP, PAUSE, OR TURN OFF THE POWER WHILE RECORDING
- TO EXTEND THE RECORDING DURATION WHILE RECORDING
- SETTING THE TIMER WITH VCR PLUS+ SYSTEM
- 1 PRESS VCR PLUS
- 2 ENTER THE PLUSCODE OF THE TV PROGRAM YOU WANT TO RECORD USING THE NUMBER BUTTONS
- 3 PRESS ENTER/DISPLAY
- 4 PRESS ▲ OR ▼ TO SELECT SPEED, THEN PRESS ◀ OR ▶ TO SELECT THE TAPE SPEED, SP, EP OR AUTO
- 5 PRESS ▲ OR ▼ TO SELECT REPEAT, THEN PRESS ◀ OR ▶ TO SELECT ONCE, WEEKLY OR DAILY
- 6 IF YOU WANT TO SET ANOTHER PROGRAM, REPEAT FROM STEP 1
- 7 PRESS MENU TO RETURN TO THE NORMAL SCREEN
- 8 PRESS POWER TO TURN OFF THE VCR
- TO EXTEND THE RECORDING TIME
- IF THE PROGRAM OVERLAPS ANOTHER
- TO CANCEL THE PROGRAM
- SETTING THE TIMER MANUALLY
- 2 PRESS ▲ OR ▼ TO SELECT PROGRAM, THEN PRESS ENTER/DISPLAY
- 3 PRESS ▲ OR ▼ TO SELECT MONTH, THEN PRESS ◀ OR ▶ TO SET THE MONTH
- 4 SET DAY, START TIME AND STOP TIME AS IN STEP 3
- 5 PRESS ▲ OR ▼ TO SELECT CHANNEL, PRESS ◀ OR ▶ TO SET THE VCR CHANNEL NUMBER
- 6 SET SPEED AND REPEAT AS IN STEP 3
- 7 IF YOU WANT TO SET ANOTHER PROGRAM, PRESS ▼ TO SELECT PROGRAM, THEN PRESS ◀ OR ▶ TO DISPLAY ANOTHER PROGRAM NUMBER. AND REPEAT STEPS 3 THROUGH 7
- 8 PRESS MENU TO RETURN TO THE NORMAL SCREEN
- 9 PRESS POWER TO TURN OFF THE VCR
- TO CORRECT THE DATA WHILE SETTING
- MULTICHANNEL TV SOUND (MTS) AND HI-FI AUDIO SOUND SYSTEM
- MULTICHANNEL TV SOUND (MTS)
- SECOND AUDIO PROGRAM (SAP)
- AUDIO TRACK SYSTEM
- RECORDING THE HI-FI AUDIO
- RECORDING THE SOUND OF THE MTS BROADCAST
- 2 PRESS ▲ OR ▼ TO SELECT SETUP, THEN PRESS ENTER/DISPLAY
- 3 PRESS ▲ OR ▼ TO SELECT BROADCAST TYPE
- 7 PRESS ● REC/ITR
- PLAYING BACK A MTS-PROGRAM RECORDED TAPE
- OUTPUT SIGNALS
- ON-SCREEN DISPLAY
- TO TURN THE ON-SCREEN DISPLAY OFF
- TROUBLESHOOTING
- THE POWER BUTTON DOES NOT OPERATE
- THE PLAYBACK PICTURE IS NOISY
- THERE IS NO PLAYBACK PICTURE
- TV RECEPTION IS NOISY OR THERE IS NO TV RECEPTION
- TAPE OPERATION BUTTONS DO NOT WORK WHILE THE POWER IS ON AND THE CASSETTE IS INSERTED
- ABNORMAL OPERATION HAS OCCURRED
- THE REMOTE CONTROL DOES NOT OPERATE
- THERE IS NO SOUND
- THE TIMER DOES NOT OPERATE
- THERE IS NO SOUND AND PICTURE FROM AN INPUT SOURCE
- NOTE ON MOISTURE CONDENSATION
- REAR PANEL
- REMOTE CONTROL WITH THE FRONT COVER OPENED
- AIWA CO.,LTD
- NOTA
- NOTAS
- SOMMAIRE DES OPÉRATIONS
- BIENVENUE
- 1
- REMARQUE
- AVANT DE COMMENCER
- REMARQUES
- SECOND PROGRAMME AUDIO (SAP)
Brand : AIWA
Model : HV-FX9000
Category : VCR