
MA200K - Microwave Oven Atag - Free user manual and instructions
Find the device manual for free MA200K Atag in PDF.


| Product type | Microwave oven |
| Brand | Atag |
| Model | MA200K |
| Dimensions (W x H x D) | 45 x 28 x 35 cm |
| Weight | 12 kg |
| Power supply | 230 V, 50 Hz |
| Microwave power | 800 W |
| Capacity | 25 L |
| Main functions | Cooking, reheating, defrosting, combination cooking |
| Power levels | 5 levels |
| Control type | Touch electronic with LED display |
| Timer | Up to 90 minutes |
| Child safety | Control panel lock |
| Automatic stop | Yes, at end of program |
| Door | Glass, push-button opening |
| Interior light | Yes |
| Turntable | Yes, diameter 30 cm |
| Maintenance and cleaning | Clean the interior with a damp cloth and mild detergent |
| Spare parts available | Turntable, support ring, grease filter |
| Repairability | Repairability index 7.5/10 |
| General information | User manual available for free download |
Frequently Asked Questions - MA200K Atag
User questions about MA200K Atag
0 question about this device. Answer the ones you know or ask your own.
Ask a new question about this device
Download the instructions for your Microwave Oven in PDF format for free! Find your manual MA200K - Atag and take your electronic device back in hand. On this page are published all the documents necessary for the use of your device. MA200K by Atag.
USER MANUAL MA200K Atag
instructions for use
mode d'emploi
Gebrauchsanweisung
Postbus 8, 7070 AA Lift
Telefax: 0315 687 888
ATAG consumenteninformatie
0315 687 887
Home Product Service
0544 393939
NL 8 NL 9
automatisch ondooien
(tijd instellen)
warmhoudstand
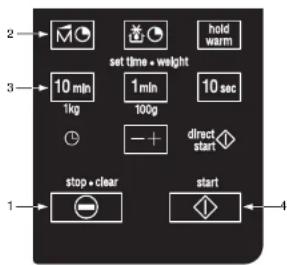
description of control panel
-
stop/clear
-
+/- button
-
clock
-
time setting and weight setting (10 min./1 kg)
-
power
-
automatic defrost with time setting
-
display
-
automatic defrost with weight setting
-
automatic warming
-
automatic cooking
-
automatic warming
-
time setting (10 sec.)
-
time setting and weight setting (1 min./100 g)
-
direct start
-
start
opening remarks
This instruction manual contains information about the installation, safety, operation and maintenance of your appliance.
The installation instructions are intended for the fitter who will install the appliance safely for you.
Reading the other information will quickly teach you about all the facilities which this appliance has to offer.
Please keep this booklet. Future users will find it very useful.
Happy cooking.
introduction
Your new microwave oven is for domestic use only. The appliance is suitable for cooking food. All other uses should be considered improper and dangerous.
N.B.:
Children do not see the dangers which may arise from operating electrical appliances, so do not allow them to operate the microwave oven.
contents
Introduction 1
positioning 2
electrical connection 2
for your safety 3
before first use 4
points for your attention 5
operation 7
- setting the time 7
- cooking without programme 8
-two-stage cooking 9
- automatic defrost (weight) 10
- automatic defrost (time) 11
- automatic warming 12
- automatic cooking 13
- childproof lock 14
keep your appliance looking good 15
faults 16
disposal of packaging and appliance 17
technical information 17
the ATAG guarantee 18
exclusions from the guarantee 18
where do you find ATAG
United Kingdom
ATAG (UK) Limited
19-20 Hither Green
Clevedon, Sommerset BS21 6XU
The Technical and Service Department
Tel: 01275-870606
Fax: 01275-871371
If you need to contact the ATAG
Service Department, please supply us
with the model number of the
appliance in question together with as
many details as possible regarding the
problem.
This guarantee in no way affects your
statutory rights.
ATAGUK is a member of the Dutch
ATAG Group of companies with sister
companies in Holland, Belgium and
Germany
positioning

electrical connection
Place the microwave oven on a firm, flat surface.
Make sure that there is sufficient ventilation around the microwave oven. Keep at least 10 cm free to the rear and sides. Do not cover over the ventilation openings.
The adjustable feet should not be removed.
Do not place the microwave oven near a heat source.
Transmitting and receiving apparatus such as radios and televisions can affect the operation of the microwave oven.
This appliance requires a mains power supply of 230 V, 50 Hz alternating current.
The appliance must be grounded and under no circumstances should it be connected to a direct current supply.
Place the appliance near to a grounded wall socket.
N.B.: the appliance must always be grounded.
for your safety
Turn the power supply off before cleaning or repairing the appliance, preferably by removing the plug from the socket.
This appliance may only be used for the purpose for which it was designed, namely cooking food. All other uses should be considered improper and dangerous. We do not accept responsibility in the event of damage due to improper, incorrect or irrational use of the appliance.
Your microwave oven is only safe if the door closes properly! Never place an object in the door opening of the oven and make sure that the seal is always clean.
Do not use the microwave oven if there is any damage to the door (bent), the hinges and catch (defective or loose) or the seal.
Only use the microwave oven for defrosting and cooking food and not, for example, for drying clothes or paper. These can catch fire.
Switch the microwave oven off and remove the plug from the socket if something in the oven catches fire. Keep the oven door closed.
before first use
Open the door and remove the packaging material.
Clean the inside of the oven and the accessories with a damp cloth. Do not use an abrasive cleaner or any strongly-smelling detergents.
Place the guide ring in the middle of the oven. Place the turntable on top of the guide ring.
The microwave oven may not be used without the guide ring or turntable.
Check that the microwave oven is working correctly. Place a glass of water inside it. Switch the microwave oven on for one minute at its highest setting. The water should be hot at the end of this time.
N.B:
If you want to boil a liquid (e.g. water), put a plastic spoon in the cup. It is possible that the liquid will boil without you seeing any bubbles. When you remove the cup from the oven, the liquid may start to boil violently and splash out of the cup, with the risk of scalding.
points for your attention
Do not switch the microwave oven on if it is empty. This can cause damage.
The microwave oven may not be used without the guide ring or turntable.
The microwave oven is not suitable for:
- Making preserves
- Cooking eggs in their shells, because these burst due to the increase in pressure
- Heating oil for deep-frying.
Remove metal closures from plastic bags and use dishes and plates which are suitable for the microwave oven.
You may only heat liquids in airtight packaging if you first prick the packaging. This is because of the increase in pressure which occurs during heating.
Never heat things for longer than is necessary; take the "standing time" into account.
Use as little water as possible when cooking food and be sparing with salt.
Stir or turn dishes halfway through the cooking time.
Prick the skin of meat, chicken and fish with a fork or any other pointed object. This prevents these foods bursting.
points for your attention
Covering the food prevents it spattering, shortens the cooking time and helps to retain moisture.
The door may be opened if the microwave oven is switched on: the microwave oven then switches itself off automatically and the cooking time is stopped.
Not all materials can be used in the microwave oven. The following table indicates whether the materials listed may or may not be used.
material permitted
paper yes
metal baking tin no
aluminium foil no
plastic yes
heat-resistant plastic yes
pottery yes
normal glass yes
heat-resistant glass yes
plates with metallic decoration no
metal closures for plastic bags no
mercury thermometer no
sealed pot no
bottle with a narrow neck no
operation

setting the time
The clock works as long as the oven is connected to the power supply. If the time has not been set, a '0' is displayed.
- Press the stop/clear button.
- Press the : button.
The display shows '24.00'.
- Set the hour using the '10 Min' and '1 Min' buttons.
For example: to set 13 hours keep the "10 Min" button pressed until "1" appears in the display. Then keep the "1 Min" button pressed until "3" appears in the display.
- Press \ again.
- Set the minutes using the "10 Min" and "1 Min" buttons.
for example:
To set 25 minutes keep the '10 Min' button pressed until '2' appears in the display. Then keep the '1 Min' button pressed until '5' appears in the display.
- Press \ again.
The clock starts to work.
N.B.
In the case of an error in setting the time (for example, 25:00), 'Err' appears in the display. Press the stop button and set the time again. The time can be set from 1:00 to 23:59.
operation
cooking without a programme
You can choose from 5 power levels.
Pressing × activates the power function. This sets the power to maximum automatically. You can then select the power level you require by pressing × several times.
power press
M
High (100%) 1x
Medium high (80%) 2x
Medium (60%) 3x
Defrost (40%) 4x
Low (20%) 5x
for example:
You want to cook fish for 5 minutes 30 seconds on maximum power.
- Press the stop/clear button.
- Press K.
- Enter the cooking time by pressing "1 Min" five times and "10 Sec" three times.
- Press t.
The microwave oven cooks on high power for 5 minutes 30 seconds. You can interrupt the cooking process by pressing stop/clear once.
Close the door and press ± to continue.
Press stop/clear twice to cancel the process. Two short beeps and one long beep can be heard when the cooking process has finished
The microwave oven switches off. "End" appears in the display.
operation

cooking in two stages
for example:
You want to cook on high power for 11 minutes and then on medium-low power (40%) for 32 minutes:
- Press the stop/clear button.
- Press '10 Min' once and '1 Min' once to set a cooking time of 11 minutes for stage 1.
- Press ^14 four times to select 40% power.
- Press "10 Mln" three times and "1 Mln" twice to set a cooking time of 32 minutes for stage 2.
- Press t.
Programme 1 appears, until programme 2 starts. You can interrupt the cooking programme by pressing stop/clear once. Close the door and press to continue.
Press stop/clear twice to cancel the programme.
Two short and one long beep can be heard at the end of the programme. The microwave oven switches off. "End" appears in the display.
operation

automatic defrosting
(by entering the weight)
There are 3 defrost programmes available for defrosting food by entering its weight.
for press
dEF 1 meat 1x
dEF 2 poultry 2x
dEF 3 fish 3x
- Press the stop/clear button.
- Press _q once to select the defrost programme for meat.
dEF 1 appears in the display.
- Enter the weight using the weight buttons.
for example:
For 2.5 kg, press "1 kg" twice and "100 g" five times.
- Press t...
N.B.:
About halfway through the defrosting process, you will hear 5 beeps. The food can now be stirred or turned.
Press = to continue.
At the end of the defrosting process 2 short and 1 long beep can be heard. The microwave oven switches off. "End" appears in the display. Always check that the food is thoroughly defrosted before cooking it.
operation

automatic defrosting
(by setting the time)
Use this programme If you wish to defrost food by setting a defrosting time.
- Press the stop/clear button.
- Press x| once to select the defrost programme with time setting.
- Press *10 Min*, *1 Min* and *10 Sec* to set the defrosting time.
- Press t.
N.B.:
About halfway through the defrosting process, you will hear 5 beeps. The food can now be stirred or turned.
Press to continue.
At the end of the defrosting process, 2 short beeps and 1 long beep can be heard. The microwave oven switches off. "End" appears in the display.
Always check that the food is thoroughly defrosted before cooking it.
operation
automatic warming up
You can choose from 3 categories for warming up:
for press
AUTOM:
- plate with food (2:40) 1x
- sauce, stew (2:30) 2x
-
soup (3:00) 3x
-
Press the stop/clear button.
- Press AutoM once to select the warm-up programme for soup.
- Press (within 2 seconds) the +/- button if you want to adjust the cooking time.
The programme starts.
The programmed time appears in the display, which then shows the count-down of this programmed time.
N.B.:
If possible, stir the food while it is being warmed up, to distribute the heat evenly and prevent some pieces remaining cold.
Put less-solid foods closer to the middle of the plate.
operation

automatic cooking
You can choose from 3 categories for automatic cooking:
for press
AUTOMc
- vegetables (8:00) 1x
- pizza (2:50) 2x
-
potatoes (6:00) 3x
-
Press the stop/clear button.
- Press AutoM_c once to select the cooking programme for vegetables.
- Press (within 2 seconds) the +/- button if you want to adjust the cooking time.
direct-start
By pressing just once on the direct-start button, you can cook for 30 seconds on maximum power. By pressing repeatedly on the button, you can extend the cooking time in steps of 30 seconds. You can set a cooking time of up to 9 minutes and 59 seconds.
- Press the stop/clear button.
- Press direct start twice to cook for 1 minute on maximum power.
At the end of the cooking process, 2 short beeps and 1 long beep can be heard. The microwave oven switches off.

operation
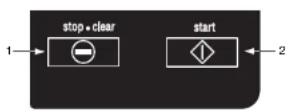
childproof lock
You can "lock" your microwave oven, so that it cannot be started.
switching on the childproof lock:
- Press the stop/clear button.
- Press and keep it pressed until "L" appears at the left of the display and you hear a single "beep".
None of the controls will now work.
switching off the childproof lock:
- Press the stop/clear button.
- Press: and keep it pressed until the 'L' at the left of the display disappears and you hear a single 'beep'.
The microwave oven can now be used normally again.

setting for keeping food warm
- Press "hold warm"
"Hold"appears in the display.
- Press t.
The microwave oven will operate for 60 minutes at minimum power.
N.B.:
Never switch the microwave oven on when it is empty.
keep your appliance looking good
Before starting to clean the microwave oven, remove the plug from the socket or turn the switch in the meter cupboard to zero.
Clean the inside and outside of the oven regularly using soapy water and dry it thoroughly with a dry cloth.
Make sure that the microwave distributer cover (inside the oven on the right) is clean. A cover which is not clean may cause sparking.
Clean the accessories regularly; use soapy water and a brush and dry the accessories thoroughly with a dry cloth.
Check the door closure and the door seal regularly for damage.
Do not use the oven if the door or the door closure is damaged.
faults
If the microwave oven does not cook as well as it should do. If there is sparking inside it, or if it does not start, etc., first try to find the reason for the problem yourself before phoning the service department.
You can do this by referring to the points listed below.
- Is the plug in the socket?
– Is the door closed properly?
- Have the power level and the cooking time been set properly?
- Are there any objects in the microwave oven which shouldn't be there?
- Are you using the correct cooking utensils?
- Are both the guide ring and the turntable in the microwave oven?
– Are the ventilation openings blocked?
- Has the food been defrosted sufficiently?
- Did you stir or turn the food during cooking?
disposal of packaging and appliance
Render discarded appliances unusable immediately by removing the plug from the socket and cutting the cable.
It is important that an old microwave oven is disposed of in a responsible manner and in accordance with the regulations.
The packing materials used for your new microwave oven should also be disposed of in a responsible way.
You can obtain information about the responsible disposal of discarded household appliances from the relevant authorities.
technical information
Power supply 230 V 50 Hz
Connected load 1250 W
Frequency of microwaves 2450 MHz
Microwave oven output (IEC 705) 850 W
Power levels 5
-level 1 180 W
-level 2 360 W
-level 3 540 W
-level 4 720 W
-level 5 900 W
Clock 0.00 to 24.59 hours
Maximum timer setting 99 min. 90 sec.
Dimensions (wxhxd) 530 x 322 x 499 mm
Dimensions of interior (wxhxd) 351 x 222 x 370 mm
Weight 22.5 kg
ATAG's guarantee
scope of the terms of guarantee:
◆ ATAG warrants this appliance for the following guarantee periods:
- 5-year guarantee on parts;
- 1-year service guarantee
◆ The guarantee on ATAG kitchen appliances is valid only if the appliance has been installed for household use and is used only for the purposes for which it was designed.
The guarantee period is effective from the date of delivery of the appliance. Evidence of the date of delivery must be provided upon request, for example with a delivery slip or sales receipt.
◆ Parts which malfunction as a result of material, construction or factory errors will be replaced free of charge for a period of five years effective from the date of delivery.
During the first year starting from the date of delivery, ATAG also provides free service. This means that in case of repairs, there will be no charges for costs such as handling charges, travel expenses or labour costs. In addition, no shipping or handling costs will be charged for free parts sent to you during this year.
whom to contact:
◆ In countries with an ATAG establishment, please contact the ATAG Service Department.
◆ In all other countries, please contact your supplier or your ATAG importer.
excluded from the guarantee:
transport damages:
◆ Check your new appliance before using it.
◆ Contact your supplier If you discover any damages.
installation errors:
◆ Defects or damages resulting from installation errors, are excluded from the guarantee. Insufficient ventilation or faulty electrical connections, for example.
◆ Complaints resulting from changes to the appliance are also excluded from the guarantee.
improper use and incorrect or insufficient maintenance:
◆ Examples include broken glass or damages to the enamel finishing caused by bumps or by dropping objects on or against the appliance.
Insufficient or improper maintenance may also result in discolouration of surfaces or rapid ageing of rubber and plastic parts. These complaints are also excluded from the guarantee.
wear due to use or ageing:
◆ Examples include broken light bulbs, discolouration of synthetic or enamelled parts, and scratches.
– cuire sans programme 8
cuire sans programmation
Auftauautomatik
(Zelt einstellen)
stampi in metallo no
foglio d'alluminio no
plastica si
automatisk optöning
Brug dette program, når De vil to dybfrosne madvarer op ved at indstille optöningstiden.
varmholdningsstand


- ATAG consumenteninformatie
- 687 887
- 393939
- automatisch ondooien
- warmhoudstand
- description of control panel
- opening remarks
- introduction
- N.B.:
- contents
- where do you find ATAG
- positioning
- electrical connection
- for your safety
- before first use
- N.B:
- points for your attention
- material permitted
- operation
- setting the time
- for example:
- N.B.
- cooking without a programme
- power press
- cooking in two stages
- automatic defrosting
- for press
- automatic warming up
- automatic cooking
- direct-start
- childproof lock
- switching on the childproof lock:
- switching off the childproof lock:
- setting for keeping food warm
- keep your appliance looking good
- faults
- disposal of packaging and appliance
- technical information
- ATAG's guarantee
- scope of the terms of guarantee:
- whom to contact:
- excluded from the guarantee:
- transport damages:
- installation errors:
- improper use and incorrect or insufficient maintenance:
- wear due to use or ageing:
- cuire sans programmation
- Auftauautomatik
- automatisk optöning
- varmholdningsstand
Brand : Atag
Model : MA200K
Category : Microwave Oven