KBH 6000 1 HA - Cooker Hotpoint Ariston - Free user manual and instructions
Find the device manual for free KBH 6000 1 HA Hotpoint Ariston in PDF.


| Product type | Cooker |
| Brand | Hotpoint Ariston |
| Model | KBH 6000 1 HA |
| Dimensions (W x H x D) | 60 x 85 x 60 cm |
| Net weight | 50 kg |
| Power supply | Gas (hob) + Electricity (oven) |
| Number of burners | 4 gas burners |
| Oven type | Static oven with thermostat |
| Oven capacity | 65 liters |
| Ignition | Integrated automatic ignition |
| Gas safety | Safety tap and thermocouple |
| Main functions | Gas cooking, traditional oven cooking |
| Cleaning | Removable burners, easy-clean enamel |
| Maintenance | Regularly clean burners and oven |
| Spare parts | Available through after-sales service |
| Repairability | Repairability index: 7.5/10 |
| Energy class | Class A (oven) |
| Electrical supply | 230 V / 50 Hz (for oven) |
| Gas type | Natural gas (G20) or butane/propane (convertible) |
| Included accessories | Grid, drip tray, user manual |
Frequently Asked Questions - KBH 6000 1 HA Hotpoint Ariston
User questions about KBH 6000 1 HA Hotpoint Ariston
0 question about this device. Answer the ones you know or ask your own.
Ask a new question about this device
Download the instructions for your Cooker in PDF format for free! Find your manual KBH 6000 1 HA - Hotpoint Ariston and take your electronic device back in hand. On this page are published all the documents necessary for the use of your device. KBH 6000 1 HA by Hotpoint Ariston.
USER MANUAL KBH 6000 1 HA Hotpoint Ariston
Electrical connection
Disposal
Description of the appliance,10
Radiant zones
The control knobs
Extendable cooking zone control
Precautions and tips, 11
Practical advice on using the appliance
General safety
Care and maintenance, 12
Switching the appliance off
Cleaning the appliance
Disassembling the hob
! Before operating your new appliance please read this instruction booklet carefully. It contains important information concerning the safe operation, installation and maintenance of the appliance.
! Please keep these operating instructions for future reference. Pass them on to possible new owners of the appliance.
Positioning
! Keep all packaging materials out of the reach of children. It may present a choking or suffocation hazard (see Precautions and tips).
! The appliance must be installed by a qualified professional in accordance with the instructions provided. Incorrect installation may damage property or cause harm to people or animals.
Built-in appliance
Use the appropriate cabinet to ensure that the appliance functions properly.
- The supporting surface must be heat-resistant up to a temperature of approximately 100°C.
- If the appliance is to be installed above an oven, the oven must have a forced ventilation cooling system.
- Avoid installing the hob above a dishwasher: if this cannot be avoided, place a waterproof separation device between the two appliances.
- Depending on the hob you want to install, the cabinet must have the following dimensions (see figure):


Ventilation
To allow adequate ventilation and to avoid overheating of the surrounding surfaces the hob should be positioned as follows:

- At a minimum of 40 mm from the back panel and 600 mm from any other vertical surfaces.

- So that a minimum distance of 10 mm is maintained between the installation cavity and the cabinet underneath.
Fixing
The appliance must be installed on a perfectly level supporting surface. Any deformities caused by improper fixing could change the features and the operation of the hob.
REAR SPRING ASSEMBLY

Above an empty cabinet or a drawer
A space of at least 40 mm, or an opening of 5 mm on the width measurement of the cabinet, should be created.

Opening of at least 5 mm on the overall width measurement of the surface.
Connecting the hob to the oven
This appliance can only work if it has been connected to a specific oven, listed on the sheet included in the documents pouch.
KBH 6004/1/HA-KBH 6000/1/HA
![graph TD A["BUILT-IN CERAMIC HOBS"] --> B["White Red"] A --> C["Yellow Blue Green"] A --> D["Oven"]](/content/2026/06/1291479/images/71571ec1ff53713a48daa89c1bc2bfb728c2c3ddf2dc1ffcac96a81cabc7d7b1.jpg)
KBH 6034 DO/HA-KBH 6024 DO/HA-KBH 6024 DO/1/HA
BUILT-IN CERAMIC HOBS
![graph TD A["White Red Yellow Blue Green"] --> B["Process 1"] A --> C["Process 2"] A --> D["Process 3"] A --> E["Process 4"] A --> F["Process 5"] B --> G["Oven Box"] C --> H["Oven Box"] D --> I["Oven Box"] E --> J["Oven Box"] F --> K["Oven Box"]](/content/2026/06/1291479/images/64b6d8fddb112c43c1a9cd01f806b27b3235d3f1d09134d280445e028f905bf8.jpg)
KBH 6014/1/HA-KBH 6014 D/HA
![graph TD A["BUILT-IN CERAMIC HOBS"] --> B["White Red Yellow Blue Green"] A --> C["White Red Yellow Blue Green"] B --> D["OVEN Material"] C --> E["OVEN Material"] style A fill:#f9f,stroke:#333 style B fill:#ccf,stroke:#333 style C fill:#ccf,stroke:#333 style D fill:#dfd,stroke:#333 style E fill:#dfd,…](/content/2026/06/1291479/images/2c29001fd39ea853b4670f1774bfe943905ac56d18cbc0d748b8261e636d9e3f.jpg)
This appliance conforms to the following European Economic Community directives:
- 73/23/EEC dated 19/02/73 (Low Voltage) and subsequent amendments;
- 89/336/EEC dated 03/05/89 (Electromagnetic Compatibility) and subsequent amendments;
- 93/68/EEC dated 22/07/93 and subsequent amendments.
Disposal

- When disposing of packaging material: observe local legislation so that the packaging may be reused.
- The European Directive 2002/96/EC relating to Waste Electrical and Electronic Equipment (WEEE) states that household appliances should not be disposed of using the normal solid urban waste cycle. Exhausted appliances should be collected separately in order to optimise the cost of re-using and recycling the materials inside the machine, while preventing potential damage to the atmosphere and to public health. The crossed-out dustbin is marked on all products to remind the owner of their obligations regarding separated waste collection.
For further information relating to the correct disposal of exhausted household appliances, owners may contact the public service provided or their local dealer.
Radiant zones
This type of burner consists of several coils that guarantee the even distribution of heat over the bottom of the pan and ensure the success of all cooking on low heat: simmering, sauces or reheating.
| HOBS | KBH 6034 DO/HAKBH 6024 DO/HAKBH 6024 DO/1/HA | KBH 6014 D/HAKBH 6014 D/1/HA | ||
| Cooking zones | Power(in W) | Diameter(in mm) | Power(in W) | Diameter(in mm) |
| Back left | R 1200 140 R | 1200 140 | ||
| Front left | RD 1000/2200 210 | RD 1000/2200 210 | ||
| Back right | RO 1000/1800 180 | R 1400 160 | ||
| Front right | R 1400 160 R | 1800 180 | ||
| Overall power 6600 | 6600 | |||
| H = halogen, R = simple radiant, RO = oval radiant, RD = dual radiant | ||||
| HOBS KBH 6014/1/HA KBH 6004/1/HA | KBH 6000/1/HA | |||||
| Cooking zones | Power (in W) | Diameter (in mm) | Power (in W) | Diameter (in mm) | Power (in W) | Diameter (in mm) |
| Back left | R 2300 | 210 | R 2100 | 210 | R 1700 | 180 |
| Front left | R 1200 | 140 | R 1200 | 140 | R 1200 | 140 |
| Back right | R 1400 | 160 | R 1200 | 140 | R 1200 | 140 |
| Front right | R 1800 | 180 | R 1700 | 180 | R 1700 | 180 |
| Overall power | 6700 | 6200 | 5800 | |||
| H = halogen, R = simple radiant, RO = oval radiant, RD = dual radiant | ||||||
The tables below feature information on how to use the zones to their full potential.
KBH 6034 DO/HA-KBH 6024 DO/HA-KBH 6014 D/HA-KBH 6014/1/HA-KBH 6024 DO/1/HA
| Power | Type of dish |
| 1 | Melted butter or chocolate |
| 2/3 | Reheating liquids |
| 4/5 | Preparation of creams and sauces |
| 6/7 | Cooking stews, blanquette, desserts |
| 8/9 | Cooking pasta and rice |
| 10/11 | Sealing meat, fish, omelettes |
| 12 | Fried food |
KBH 6004/1/HA-KBH 6000/1/HA
| Power | Type of dish |
| 0 | off |
| 1 | cooking greens, fish |
| 2 | steaming potatoes, cooking soups, chickpeas, beans |
| 3 | steaming potatoes, cooking soups, chickpeas, beans |
| 4 | for roasting (moderate) |
| 5 | for roasting (high) |
| 6 | for browning, to bring large volumes to the boil |
As long as the temperature of the cooking zones remains above 60° C, even after use, the residual heat indicators stay on to prevent the risk of burns.
The control knobs
These are situated on the oven control panel and allow for the continuous control of the power setting of each cooking zone (from 1 to 12 or from 1 to 6).
Extendable cooking zone control
Extendable cooking zones (concentric or oval) are indicated on the glass hob surface by a dual heating zone.
To use the smaller zone only, set the control knob to between 1 and 12 according to the desired heating power.
To use the large zone, set the knob to ⚙ and then adjust it to the desired heating power.
Specific case - KBH 6034 DO/HA
Using the cooker control knob corresponding to the chosen hotplate you can normally only operate its inner zone. To operate the whole extendible hotplate (both the inner and the outer zone) press the button
found on the hob. Now you can regulate the desired temperature using the same knob up until number 12.
! This appliance has been designed and manufactured in compliance with international safety standards. The following warnings are provided for safety reasons and must be read carefully.
Practical advice on using the appliance
To obtain the best results from your hob:
- Use flat-bottomed pans to ensure that they adhere to the cooking zone perfectly.

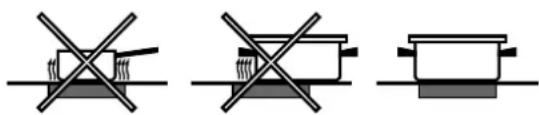
- Always use pans with a diameter that is large enough to cover the hotplate fully, in order to use all the available heat.
- Make sure that the bottom of the cookware is always dry and clean to guarantee correct adherence and durability, not only for the cooking zones but also for the cookware itself.
- Avoid using the same cookware that is used on gas burners: the heat concentration on gas burners may have warped the base of the pan, causing it not to adhere to the surface correctly.
- Never leave a cooking zone on without cookware placed on it because it heats up and rapidly reaches the maximum level, which could damage the heating elements.
General safety
- The appliance was designed for domestic use inside the home and is not intended for commercial or industrial use.
- The appliance must not be installed outdoors, even in covered areas. It is extremely dangerous to leave the appliance exposed to rain and storms.
- Do not touch the appliance with bare feet or with wet or damp hands and feet.
-
The appliance must be used by adults only for the preparation of food, in accordance with the instructions provided in this booklet. Do not use the hob as a worktop or chopping board.
-
The glass ceramic hob is resistant to mechanical shocks, but it may crack (or even break) if hit with a sharp object such as a tool. If this happens, disconnect the appliance from the electricity mains immediately and contact a Service Centre.
- If the surface of the hob is cracked, switch off the appliance to prevent electric shocks from occurring.
- Ensure that power supply cables of other electrical appliances do not come into contact with the hot parts of the hob.
- Remember that the cooking zones remain relatively hot for at least thirty minutes after they have been switched off. An indicator light provides a warning when residual heat is present (see Start-up and use).
- Keep any object which could melt away from the hob, for example plastic and aluminium objects, or products with a high sugar content. Be especially careful when using plastic film and aluminium foil or packaging: if placed on surfaces that are still hot, they may cause serious damage to the hob.
- Always make sure that pan handles are turned towards the centre of the hob in order to avoid accidental burns.
- When unplugging the appliance, always pull the plug from the mains socket; do not pull on the cable.
- Never perform any cleaning or maintenance work without having disconnected the appliance from the electricity mains.
- Do not place metal objects (knives, spoons, pan lids, etc.) on the hob as they may become hot.
- For the attention of wearers of pacemakers or other active implants:
The hob complies with all current standards on electromagnetic interference.
Your induction hob is therefore perfectly in keeping with legal requirements (89/336/CEE directives). It is designed not to create interference on any other electrical apparatus being used on condition that the apparatus in question also complies with this legislation. Your induction hob generates short-range magnetic fields.
To avoid any interference between your induction hob and a pacemaker, the latter must be designed to comply with relevant regulations. In this respect, we can only guarantee our own product conformity. Please consult the pacemaker manufacturer or your doctor concerning its conformity or any possible incompatibility.
Switching the appliance off
Disconnect your appliance from the electricity supply before carrying out any work on it.
Cleaning the appliance
! Do not use abrasive or corrosive detergents (for example, products in spray cans for cleaning barbecues and ovens), stain removers, anti-rust products, powder detergents or sponges with abrasive surfaces: these may scratch the surface beyond repair.
! Never use steam cleaners or pressure cleaners on the appliance.
- It is usually sufficient simply to wash the hob using a damp sponge and dry it with absorbent kitchen roll.
- If the hob is particularly dirty, rub it with a special glass ceramic cleaning product, then rinse well and dry thoroughly.
- Food residue and dirt can be removed using a special scraper. Do this as soon as possible, do not wait for the hob to cool down in order to avoid incrustations. For excellent results, use a special stainless steel wool pad for vitroceramic glass cleaning soaked in soapy water.
- If any plastic or sugary substances are accidentally melted on the hob, remove them immediately with the scraper, while the surface is still hot.
- Once it is clean, the hob may be treated with a special protective maintenance product: the invisible film left by this product protects the surface from drips during cooking. This maintenance should be carried out while the appliance is warm (not hot) or cold.
- Always remember to rinse the appliance well with clean water and dry it thoroughly: residues can become encrusted during subsequent cooking processes.
* Only available on certain models.
Stainless steel frame *
Stainless steel can be marked by hard water which has been left on the surface for a long time, or by cleaning products containing phosphorus. After cleaning, it is advisable to rinse the surface well and dry it thoroughly. If water is spilt on the surface, dry it quickly and thoroughly.
! Some hobs have an aluminium frame which is similar to stainless steel. Do not use any cleaning or degreasing products which are not suitable for use with aluminium.
Disassembling the hob
If it is necessary to disassemble the hob:
-
Loosen the screws fixing the alignment springs on each side.
-
Loosen the screws holding the fixing hooks in each corner.
-
Take the hob out of its installation cavity.
! Do not attempt to repair the appliance yourself. If the appliance breaks down, contact a Service Centre.

Italiano, 1


FR
FR
- DESCRIPTION OF THE APPLIANCE,10
- PRECAUTIONS AND TIPS, 11
- CARE AND MAINTENANCE, 12
- POSITIONING
- BUILT-IN APPLIANCE
- VENTILATION
- FIXING
- ABOVE AN EMPTY CABINET OR A DRAWER
- CONNECTING THE HOB TO THE OVEN
- DISPOSAL
- RADIANT ZONES
- KBH 6034 DO/HA-KBH 6024 DO/HA-KBH 6014 D/HA-KBH 6014/1/HA-KBH 6024 DO/1/HA
- KBH 6004/1/HA-KBH 6000/1/HA
- THE CONTROL KNOBS
- EXTENDABLE COOKING ZONE CONTROL
- SPECIFIC CASE - KBH 6034 DO/HA
- PRACTICAL ADVICE ON USING THE APPLIANCE
- GENERAL SAFETY
- SWITCHING THE APPLIANCE OFF
- CLEANING THE APPLIANCE
- STAINLESS STEEL FRAME
- DISASSEMBLING THE HOB
- FR
Brand : Hotpoint Ariston
Model : KBH 6000 1 HA
Category : Cooker