
GYT12012SB - Kettle AEG - Free user manual and instructions
Find the device manual for free GYT12012SB AEG in PDF.


| Product type | Electric kettle |
| Brand | AEG |
| Model | GYT12012SB |
| Capacity | 1.7 liters |
| Power | 2200 W |
| Supply voltage | 220-240 V ~ 50/60 Hz |
| Material | Stainless steel |
| Color | Black and stainless steel |
| Swivel base | Yes, 360° |
| Automatic shut-off | Yes |
| Boil-dry protection | Yes |
| Descaling filter | Removable, stainless steel |
| Water level indicator | Yes, transparent |
| Lid opening | Push-button with spring |
| Dimensions (H x W x D) | 25 x 22 x 15 cm |
| Net weight | 0.8 kg |
| Cable length | 75 cm |
| Warranty | 2 years |
| Package contents | Kettle, base, filter, user manual |
| Care and cleaning | Descale regularly with vinegar or citric acid; wipe with a damp cloth |
| Safety | Safety cut-out, cool-touch handle |
Frequently Asked Questions - GYT12012SB AEG
User questions about GYT12012SB AEG
0 question about this device. Answer the ones you know or ask your own.
Ask a new question about this device
Download the instructions for your Kettle in PDF format for free! Find your manual GYT12012SB - AEG and take your electronic device back in hand. On this page are published all the documents necessary for the use of your device. GYT12012SB by AEG.
USER MANUAL GYT12012SB AEG
natural_image
Modern kitchen interior with white cabinets, black sink, and stainless steel refrigerator (no visible text or symbols)AEG
Image 2
Installation layout


Image 4
Operation mixer side Fonctionnement côté mitigeur Funktionstätigkeit der mischbatterie Funktion blanderside Toiminta hanan puoli Virkemåte blandebatteriets side Funktion blandarsida Werking zijde mengkraan Funzionamento lato miscelatore
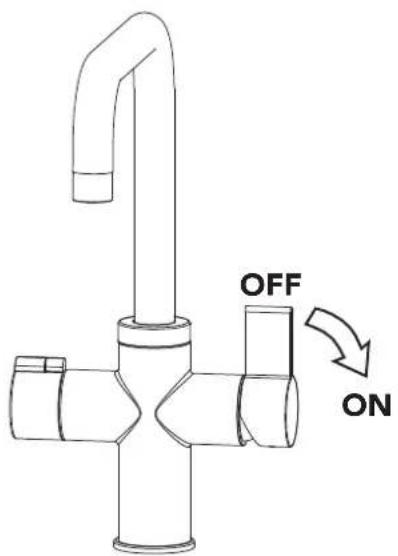
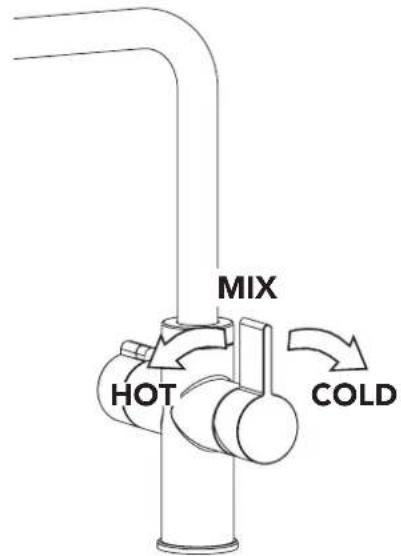
Image 5
Operation boiling water Fonctionnement Côté Eau Bouillante Funktionstätigkeit Für Kochendes Wasser Funktion Side Med Kogende Vand Toiminta Kuuman Veden Puoli Virkemåte På Siden For Kokvarmt Vann Funktion Kokande Vattensida Werking Zijde Kokend Water Funzionamento lato acqua bollente
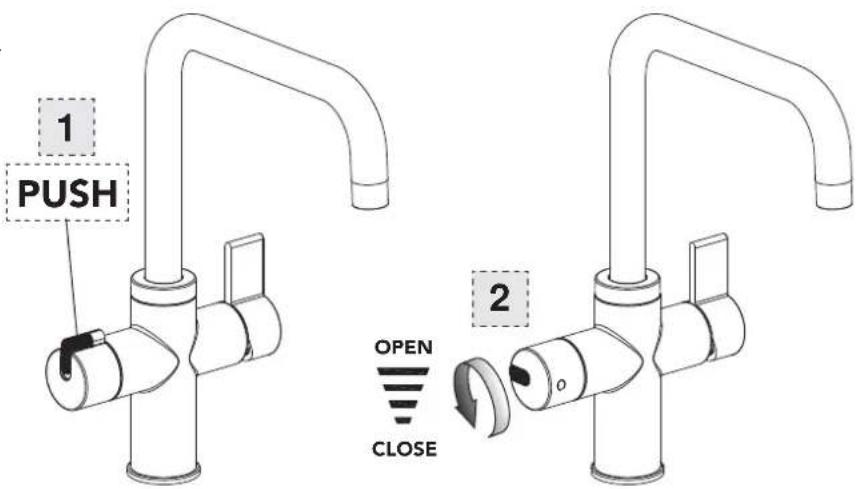
Image 6
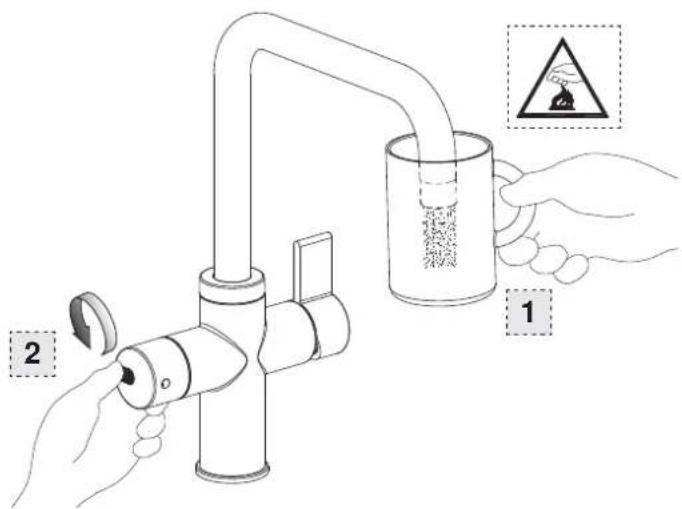
Boiling water side use Emploi côté eau bouillante Einsatz von kochendem wasser Brug side med kogende vand Käyttö kuuman veden puoli Bruk av siden for kokvarmt vann Användning kokande vattensidan Gebruik zijde kokend water Utilizzo lato acqua bollente
CONTENTS
- PRE-INSTALLATION INFORMATION......8
- INSTALLATION....10
- WORKING....10
- MAINTENANCE....11
FOR PERFECT RESULTS
Thank you for choosing this AEG product. We have created it to give you impeccable performance for many years, with innovative technologies that help make life simpler -features you might not find on ordinary appliances. Please spend a few minutes reading to get the very best from it.
Visit our website to:
Get usage@advice, brochures, trouble shooter, service information:
www.aeg.com
Register your product for better service:
www.registeraeg.com
Buy Accessories, Consumables and Original spare parts for your appliance:
www.aeg.com/shop
CUSTOMER CARE AND SERVICE
Always use original spare parts.
Whem contacting our Authorised Service Centre, ensure that you have the following data available: Model, PNC, Serial Number.
The information can be found on the rating plate.
Warning / Caution-Safety information.
General information and tips.

Environmental
information.
Subject change without notice.
1. PRE-INSTALLATION
1.1
Important
! 1.3 Package content (Image 1)
Qualified staff should read very carefully these instructions before installation and/or maintenance of the product. Afu Mixer B - Base C - Fastening set D - Spacer for the fastening E - Gaskets
1.2
work
Before installation and setting to
Attention! The feeding pipes have to be rinsed thoroughly before the installation of the mixer, so that no shavings, welding or hemp residual or other dirt can be found in the pipes. Foreign bodies can enter the mixer through the rinsed pipes or the general water plant and could damage the washers/ring washers. In order to guarantee a long use of the product, install the angle valve equipped with filter and clean them regularly.
Before the setting to work, unscrew the aerator and rinse it very well.
Technical data
• Maximum working pressure 5 bar
- Recommended working pressure 3 bar (in case of water pressure higher than 5 bar install pressure reducers)
Respecting this indications, will
maintain the warranty rights, ensures the declared properties of the products and warrant the complete reliability.

- Before assembling the hose, please check the appropriate crimping of both sides of the hoses.

- Don't tighten by tools.
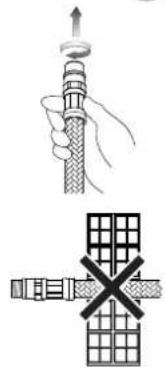
natural_image
Illustration showing a hand holding a cylindrical object and a grid-patterned mechanical component with a cross mark (no text or symbols)- Hand-tighten O-ring seal connectors until feeling a mechanical rest.

- Don't set the hose in the wall.
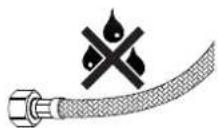
- Tighten the hose without any twis or tension.
- Prolonged contact with any substance, even scarcely aggressive, can cause external braid damage and subsequent flexible burst.

- Before bending the hose please consider a straight part of 2 times the external diameter.

- Maintain minimum bend radius (DN= nominal internal diameter):
DN6 = 25mm
DN8 = 30mm
DN10 = 35mm
DN13 = 45mm

- Hand-tighten connectors with gasket seal (nuts) then apply 1/4 turn using an appropriate wrench.
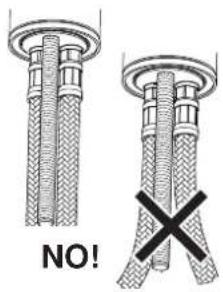
- Do not expose the hose to lateral stress nor overtight by any tool (ex. during the installation of the faucet stud or the drain pop-up lever).
2. INSTALLATION
3. WORKING
2
.1 Please follow exactly the following
sequence (Image 3)
.1 Operation mixer side (Image
- Open the handle to the right to start water supply; the more the handle is opened the more water is supplied.
2.2
For UK market
- Turn up the handle to open cold water, ns of turn it down to open hot water.
If necessary for network connections of the taps and fittings use adapter 3/8 - 1/2" with the relative seals present in the kit GYB06116XA.
3.2
Operation boiling water
2.3
Warning!
In case of "COMBI" configuration for installation of the mixer valve GYBMIX16XA and relative connections pay attention to the directions in the system's handbook included in the package of the boiler
The tap has a handle with safety funct (especially for kids) for boiling water enabled with a pressure and rotation motion. The handle retracts if released and locks automatically.
WARNING! The temperature of wa flow can reach values that may case burnings.
3.3
Boiling water side use
To get the best results, for example to prepare coffee or tea, it is necessary to let "first water" flow. This allows removing air bubbles. This allows removing air bubbles that are in the water and tend to form a layer of foam on the preparation.
IMPORTANT! keep the container to fill so to contain completely the water supply spout. So you avoid boiling water splashes and the tap will be used safely.
Use only appropriate containers for hi temperature water.
3.4 Warning!
At the expiry of warranty terms the product should undergo full maintenance, first of all of all functional parts, for an optimal use of the product.
This maintenance should be carried o every two years by qualified staff.
4. MAINTENANCE
4.1 Directions for product cleaning
Water contains scale deposit in variable quantity, which remains on the surface of the product, leaving deposits once water has evaporated. It is possible to prevent the formation of scale deposits, and keep your product clean drying it always with a soft cloth immediately after use.
NEVER USE DETERGENTS, SOLVENTS, CHEMICAL AGENTS, ABRASIVE MOPS, METALLIC WIPES, ALCOHOL, ETC. that would damage irremediably product surfaces, damaging its esthetic, its gloss and its satin finish.
CLEAN ONLY WITH WATER AND NEUTRAL SOAP DRYING WITH A SOFT CLOTH.
CONTENU
- PRELIMINAIRES....13
- INSTALLATION....15
- FONCTIONNEMENT....15
- ENTRETIEN....16
POUR DES RESULTATS PARFAITS
natural_image
Illustration showing a hand holding a cylindrical object and a grid-patterned mechanical component with a cross mark (no text or symbols)DN6 = 25mm
DN8 = 30mm
DN10 = 35mm
DN13 = 45mm

natural_image
Illustration of three different mechanical or electrical components with cross symbols indicating failure or failure (no text or labels present)natural_image
Illustration of three different mechanical or electrical components with no visible text or symbols- INFORMATIE VOORAF....43
- INSTALLATIE....45
- WERKING......45
- ONDERHOUD....46
VOOR PERFECTE RESULTATEN
natural_image
Illustration of three different mechanical or electrical components with no visible text or symbols- Image 2
- Image 4
- Image 5
- Image 6
- CONTENTS
- FOR PERFECT RESULTS
- Visit our website to:
- CUSTOMER CARE AND SERVICE
- PRE-INSTALLATION
- 1.1
- Important
- ! 1.3 Package content (Image 1)
- 1.2
- work
- Before installation and setting to
- Technical data
- Respecting this indications, will
- INSTALLATION
- WORKING
- 2
- .1 Please follow exactly the following
- .1 Operation mixer side (Image
- 2.2
- For UK market
- 3.2
- Operation boiling water
- 2.3
- Warning!
- 3.3
- Boiling water side use
- Warning!
- MAINTENANCE
- Directions for product cleaning
- CONTENU
- POUR DES RESULTATS PARFAITS
- VOOR PERFECTE RESULTATEN
Brand : AEG
Model : GYT12012SB
Category : Kettle