
LLD 8S111 X EU - Washing machine HOTPOINT - Free user manual and instructions
Find the device manual for free LLD 8S111 X EU HOTPOINT in PDF.
| Product type | Built-in dishwasher |
| Brand | HOTPOINT |
| Model | LLD 8S111 X EU |
| Capacity | 15 place settings |
| Dimensions (W x H x D) | 59.5 x 82 x 57 cm |
| Energy class | A+ |
| Annual energy consumption | 304 kWh (based on 280 standard cycles) |
| Annual water consumption | 3080 L (based on 280 standard cycles) |
| Noise level | 42 dB(A) |
| Wash programs | Eco, Auto Intensive, Auto Normal, Auto Fast Wash, Trio Wash, Delicates, Express 30', Soak |
| Options | Delayed start, Multifunction tablets, Super drying, Short time, Wash zones |
| Safety | Anti-leak device, child safety (not specified), door lock |
| Water hardness adjustment | Yes, 5 levels |
| Indicators | Salt, rinse aid, remaining time, cycle end |
| Maintenance | Washable filters, removable wash arms, cleanable water inlet filter |
| Water pressure | 0.05 to 1 MPa (0.5 to 10 bar) |
| Power supply | See rating plate (230 V / 50 Hz typical) |
| Standby consumption | 5 W (on mode), 0.56 W (off mode) |
Frequently Asked Questions - LLD 8S111 X EU HOTPOINT
User questions about LLD 8S111 X EU HOTPOINT
0 question about this device. Answer the ones you know or ask your own.
Ask a new question about this device
Download the instructions for your Washing machine in PDF format for free! Find your manual LLD 8S111 X EU - HOTPOINT and take your electronic device back in hand. On this page are published all the documents necessary for the use of your device. LLD 8S111 X EU by HOTPOINT.
USER MANUAL LLD 8S111 X EU HOTPOINT
Precautions, advice and Assistance, 3-4
General safety
Disposal
Saving energy and respecting the environment
Assistance
Installation, 5-6
Positioning and levelling
Connecting the water and electricity supplies
Advice regarding the first wash cycle
Switching the appliance on for the first time
Technical data
Description of the appliance, 7
Overall view
Control panel
Loading the racks, 8-9
Lower rack
Upper rack
Third rack*
Adjusting the height of the upper rack
Start-up and use, 10
Starting the dishwasher
Measuring out the detergent
Wash cycles, 11
Table of wash cycles
Special wash cycles and Options, 12
Rinse aid and refined salt, 13
Measuring out the rinse aid
Measuring out the refined salt
Care and maintenance, 14
Shutting off the water and electricity supplies
Cleaning the dishwasher
Preventing unpleasant odours
Cleaning the sprayer arms
Cleaning the water inlet filter
Cleaning the filters
Leaving the machine unused for extended periods
Troubleshooting, 15
| Product Fiche | |
| Brand | HOTPOINT ARISTON |
| Model | LLD 8S111 |
| Rated capacity in standard place settings (1) | 15 |
| Energy efficiency class on a scale from A+++ (low consumption) to D (high consumption) | A+ |
| Energy consumption per year in kWh (2) | 304.0 |
| Energy consumption of the standard cleaning cycle in kWh | 1.07 |
| Power consumption of the off-mode in W | 0.56 |
| Power consumption of the left-on mode in W | 5.0 |
| Water consumption per year in litres (3) | 3080.0 |
| Drying efficacy class on a scale from G (low efficacy) to A (high efficacy) | A |
| Programme time for standard cleaning cycle in minutes | 195' |
| The duration of the left-on mode in minutes | 10 |
| Noise in dB(A) Re 1pW | 42 |
| Built-in model | Yes |
| NOTES | |
| 1) The information on the label and fiche relates to the standard cleaning cycle, this programme is suitable to clean normally soiled tableware and it is the most efficient programme in terms of combined energy and water consumption. The standard cleaning cycle corresponds to the Eco cycle. | |
| 2) Based on 280 standard cleaning cycles using cold water fill and the consumption of the low power modes. Actual energy consumption depends on how the appliance is used. | |
| 3) Based on 280 standard cleaning cycles. Actual water consumption depends on how the appliance is used. | |
Precautions, advice and Assistance
This appliance was designed and manufactured in compliance with international safety standards. The following information has been provided for safety reasons and should therefore be read carefully.
Keep this instruction manual in a safe place for future reference. If the appliance is sold, given away or moved, please ensure the manual is kept with the machine.
Please read these instructions carefully: they contain important information on installation, use and safety.
This appliance is designed for domestic use or similar applications, for example:
- staff kitchen areas in shops, offices and other work environments;
-farmhouses; - use by guests in hotels, motels and other residential settings;
- bed & breakfasts.
General safety
- The appliance should not be operated by people (including children) with reduced physical, sensory or mental capacities, or by inexperienced people who are not familiar with the product, unless supervision or instructions on how to use it are provided by someone who assumes responsibility for their safety.
- An adult must supervise children at all times to prevent them from playing with the appliance.
- The appliance was designed for domestic use inside the home and is not intended for commercial or industrial use.
- The appliance must be used by adults only to wash domestic crockery in accordance with the instructions in this manual.
- The appliance must not be installed outdoors, even in covered areas. It is extremely dangerous to leave the machine exposed to rain and storms.
- Do not touch the appliance when barefoot.
- When unplugging the appliance always pull the plug from the mains socket. Do not pull on the cable.
- The water supply tap must be shut off and the plug should be removed from the electrical socket before cleaning or maintaining the appliance.
- If the appliance breaks down, do not under any circumstances touch the internal parts in an attempt to perform the repair work yourself.
- Do not lean or sit on the open door of the appliance: this may cause the appliance to overturn.
- The door should not be left open as it may create
a dangerous obstacle.
- Keep detergent and rinse aid out of reach of children.
- The packaging material should not be used as a toy for children.
Disposal
- Disposal of packaging material: observe local legislation so that the packaging may be reused.
- The European Directive 2012/19/EU relating to Waste Electrical and Electronic Equipment (WEEE) states that household appliances should not be disposed of using the normal solid urban waste cycle. Exhausted appliances should be collected separately in order to optimise the re-using and recycling rate of the materials inside the machine, while preventing potential damage to the environment and public health. The crossed-out dustbin symbol is marked on all products to remind the owners of their obligations regarding separated waste collection.
For further information relating to the correct disposal of household appliances, owners may contact the relevant public authority or the local appliance dealer.
Saving energy and respecting the environment
Saving water and energy
- Only begin a wash cycle when the dishwasher is full. While waiting for the dishwasher to be filled, prevent unpleasant odours using the Soak cycle (see Wash cycles).
-
Select a wash cycle that is suited to the type of crockery and to the soil level of the crockery using the Table of wash cycles:
-
for dishes with a normal soil level use the Eco wash cycle, which ensures low energy/water consumption levels.
- If the load is smaller than usual activate the Half Load option* (see Start-up and use).
- If your electricity supply contract gives details of electricity-saving time bands, run wash cycles when electricity prices are lower. The Delayed Start button * (see Start-up and use) helps you organise the wash cycles accordingly.
Phosphate-free and chlorine-free detergents containing enzymes
- We strongly recommend that you use detergents that do not contain phosphates or chlorine, as these products are harmful to the environment.
- Enzymes provide a particularly effective action at temperatures around 50^ . As a result detergents containing enzymes can be used in conjunction with low-temperature wash cycles in order to achieve the same results as a normal 65^ wash cycle.
- To avoid wasting detergent, use the product in appropriate quantities based on the manufacturer's recommendations, the hardness of the water, the soil level and the quantity of crockery to be washed. Even if they are biodegradable, detergents contain substances which may alter the balance of nature.
Assistance
Before contacting Assistance:
- Check whether the problem can be resolved using the Troubleshooting guide (see Troubleshooting).
- Restart the programme to check whether the problem has ceased to exist.
- If the problem persists, contact the Authorised Technical Assistance Service.

Never use the services of unauthorised technicians.
Please have the following information to hand:
- The type of malfunction.
- The appliance model (Mod.).
- The serial number (S/N).
This information can be found on the appliance data plate (see Description of the appliance).
If the appliance must be moved at any time, keep it in an upright position; if absolutely necessary, it may be tilted onto its back.
Positioning and levelling
- Remove the appliance from all packaging and check that it has not been damaged during transportation. If it has been damaged, contact the retailer and do not proceed any further with the installation process.
- Arrange the dishwasher so that its sides or back panel are in contact with the adjacent cabinets or the wall. This appliance can also be recessed under a single worktop (see the Assembly Instruction sheet.)
- Position the dishwasher on a level sturdy floor. If the floor is uneven, the front feet of the appliance should be adjusted until it reaches a horizontal position. If the appliance is levelled correctly, it will be more stable and much less likely to move or cause vibrations and noise while it is operating.
4^ . To adjust the height of the rear foot, turn the red hexagonal bushing on the lower central part at the front of the dishwasher using a hexagonal spanner with an opening of 8mm . Turn the spanner in a clockwise direction to increase the height and in an anticlockwise direction to decrease it (see Building-in Instruction sheet attached to the documentation.)
Connecting the water and electricity supplies
A Connection to the water and electricity supplies should only be performed by a qualified technician.
The dishwasher should not stand on the water hoses or electricity supply cable.
A The appliance must be connected to the water supply network using new hoses.
Do not use old piping.
The water inlet and outlet hoses and the electricity supply cable may be positioned towards the right or the left in order to achieve the best possible installation.
Connecting the water inlet hose
- To a suitable cold water connection point: before attaching the hose, run the water until it is perfectly clear so that any impurities that may be present in the water do not clog the appliance; after performing this operation, screw the inlet hose tightly onto a tap with a 3/4 gas threaded connection.
- To a suitable hot water connection point: your dishwasher may be supplied with hot water from the mains supply (if you have a central heating system with radiators) provided that it does not exceed a temperature of 60^ .
Screw the hose to the tap as described for connection to a cold water supply.
A If the inlet hose is not long enough, contact a specialist store or an authorised technician (see Assistance.)
The water pressure must be within the values indicated in the Technical Data table (see adjacent information.)
The hose should not be bent or compressed.
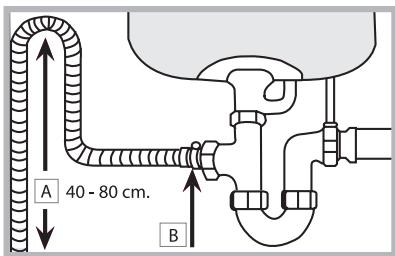
Connecting the water outlet hose
Connect the outlet hose (without bending it) to a drain duct with a minimum diameter of 4 cm.
The outlet hose must be at a height ranging from 40 to 80~cm from the floor / surface where the dishwasher rests (A).
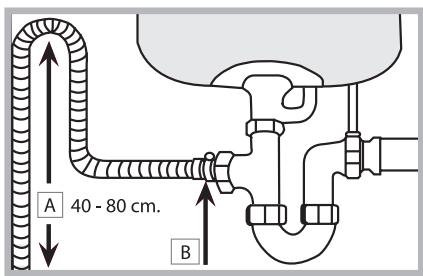
Before connecting the water outlet hose to the sink drain, remove the plastic plug (B).
Anti-flooding protection
To ensure floods do not occur, the dishwasher:
- is provided with a special system which blocks the water supply in the event of anomalies or leaks from inside the appliance.
Some models are also equipped with the supplementary safety device New Acqua Stop*, which guarantees anti-flooding protection even in the event of a supply hose rupture.

WARNING: HAZARDOUS VOLTAGE!
Under no circumstances should the water inlet hose be cut, as it contains live electrical parts.
Electrical connection
Before inserting the plug into the electrical socket, make sure that:
- The socket is earthed and complies with current regulations.
- the socket can withstand the maximum load of the appliance, which is indicated on the data plate located on the inside of the door
(see Description of the appliance);
- The power supply voltage falls within the values indicated on the data plate on the inside of the door.
- The socket is compatible with the plug of the appliance. If this is not the case, ask an authorised technician to replace the plug (see Assistance); do not use extension cables or multiple sockets.
Once the appliance has been installed, the power supply cable and the electrical socket should be easily accessible.
The cable should not be bent or compressed.
If the power supply cable is damaged, it must be replaced by the manufacturer or its Technical Assistance Service in order to prevent all potential hazards (see Assistance.)
- Only available in selected models.
Anti-condensation strip*
After installing the dishwasher, open the door and stick the adhesive transparent strip under the wooden shelf in order to protect it from any condensation which may form.
Advice regarding the first wash cycle
After the installation, remove the stoppers from the racks and the retaining elastic elements from the upper rack, if any. Immediately before the first washing, completely fill the salt dispenser with water and add only then approximately 1 kg of salt (see chapter entitled Rinse aid and refined salt). The water may overflow: this is normal and is not a cause for concern. Select the water hardness value (see chapter entitled Rinse aid and refined salt). - After the salt has been poured into the machine, the LOW SALT indicator light* switches off.
A If the salt container is not filled, the water softener and the heating element may be damaged as a result.
| Technical data | |
| Dimensions | width 59.5 cm height 82 cm depth 57 cm |
| Capacity | 15 standard place-settings |
| Water supply pressure | 0,05 ÷ 1MPa (0.5 ÷ 10 bar) 7,25 – 145 psi |
| Power supply voltage | See appliance data plate |
| Total absorbed power | See appliance data plate |
| Fuse | See appliance data plate |
| CE | This dishwasher conforms to the following European Community Directives: -2006/95/EC (Low Voltage) -2004/108/EC (Electromagnetic Compatibility) -2009/125/EC (Comm. Reg. 1016/2010) (Ecodesign) -97/17/EC (Labelling) -2012/19/EC (WEEE) |
The control panel features a "Touch Control" system; press the symbols lightly with your fingertips to activate the command.
The symbols in the key to the wash cycles (to the left of the control panel) DO NOT light up.
Wash cycles are selected by pressing the P symbol.
The machine has a buzzer/set of tones (depending on the dishwasher model) to inform the user that a command has been implemented: power on, cycle end etc.
The symbols/indicator lights/LEDs on the control panel/ display may vary in colour and may have a flashing or fixed light (depending on the dishwasher model).
The display provides useful information concerning the type of wash cycle, drying/wash-cycle phase, remaining time, temperature etc.
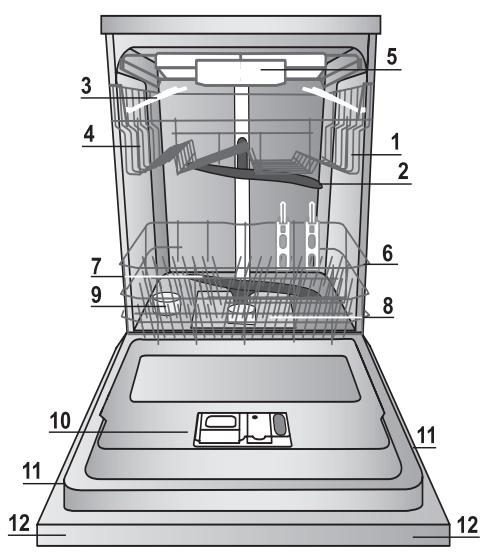
Overall view
- Upper rack
- Upper sprayer arm
- Tip-up compartments
- Rack height adjuster
- Third rack
- Lower rack
- Lower sprayer arm
- Washing filter
- Salt dispenser
- Detergent dispenser, rinse-aid dispenser and Active Oxygen device*
- Data plate
- Control panel***
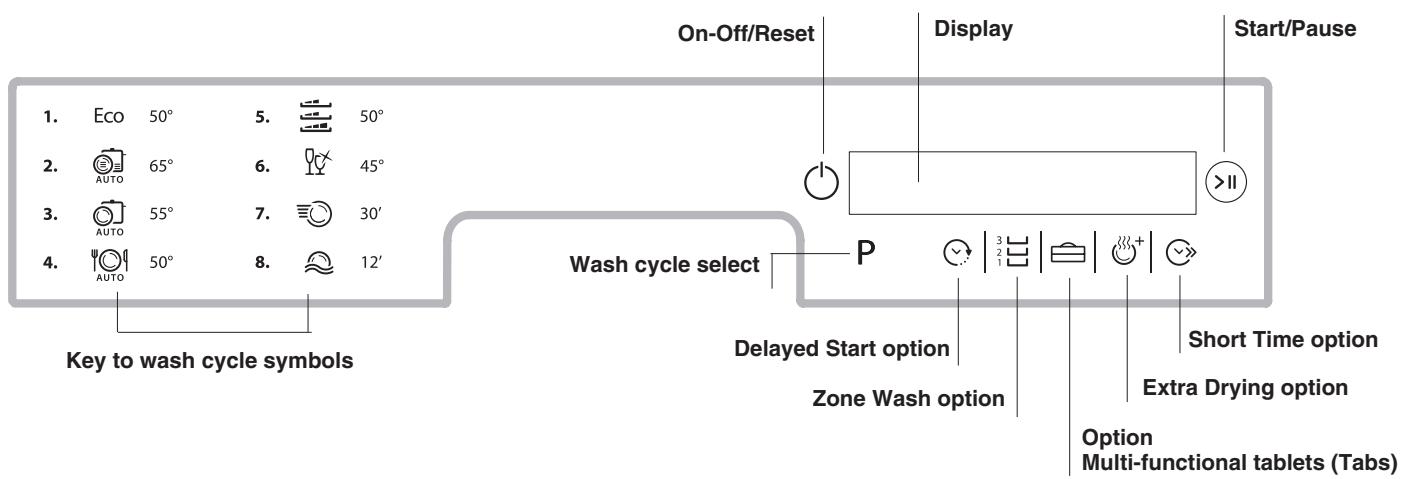
Control panel
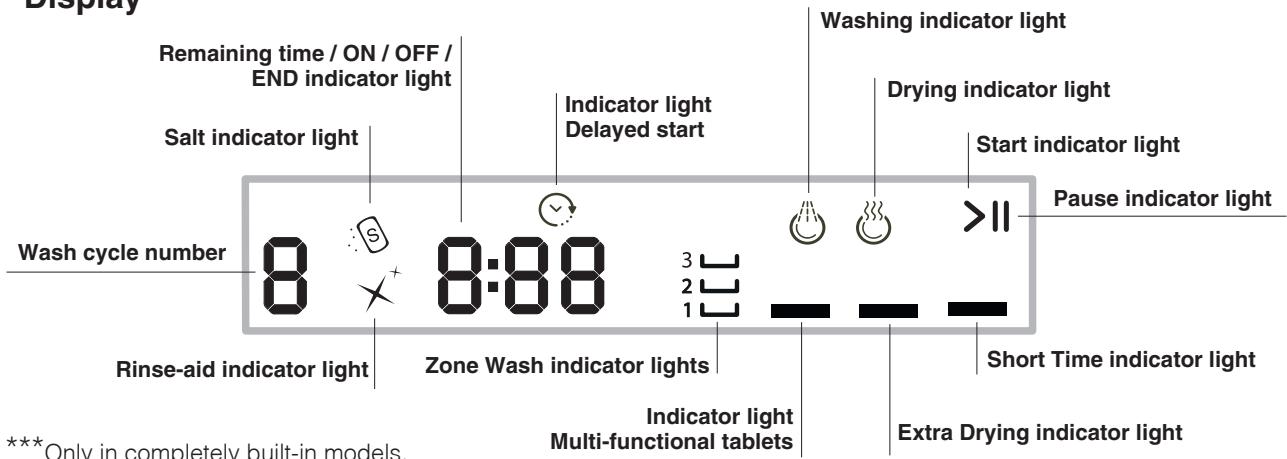
Display
- Only available in selected models.
The number and type of wash cycles and options may vary depending on the dishwasher model.
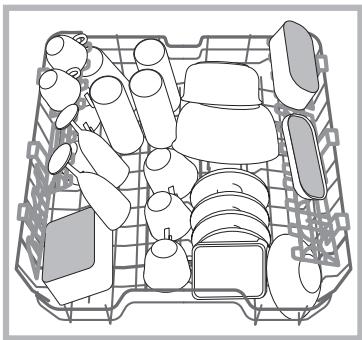
Tips
Before loading the racks, remove all food residues from the crockery and empty liquids from glasses and containers. No preventive rinsing is needed under running water.
Arrange the crockery so that it is held in place firmly and does not tip over; and arrange the containers with the openings facing downwards and the concave/convex parts placed obliquely, thus allowing the water to reach every surface and flow freely.
Make sure that the lids, handles, trays and frying pans do not prevent the sprayer arms from rotating. Place any small items in the cutlery basket.
Since plastic dishes and non-stick frying pans usually retain more water drops, their drying will be not so good as that of ceramic or stainless-steel dishes.
Lightweight items such as plastic containers should be placed in the upper rack and arranged so that they cannot move.
After loading the appliance, make sure that the sprayer arms can rotate freely.
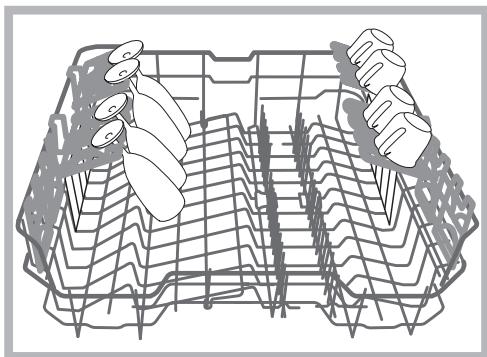
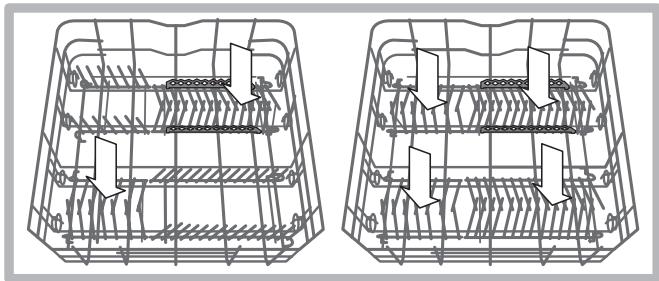
Lower rack
The lower rack can hold pans, lids, dishes, salad bowls, cutlery etc. Large plates and lids should ideally be placed at the sides.
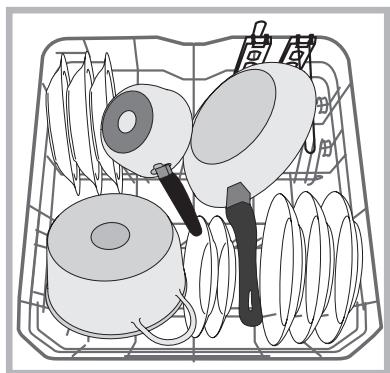
Very soiled dishes and pans should be placed in the lower rack because in this sector the water sprays are stronger and allow a higher washing performance.
*Only available in selected models with different numbers and positions.
Several dishwasher models are fitted with tip-up sectors*. They can be used in a vertical position when arranging dishes or in a horizontal position (lower) to load pans and salad bowls easily.
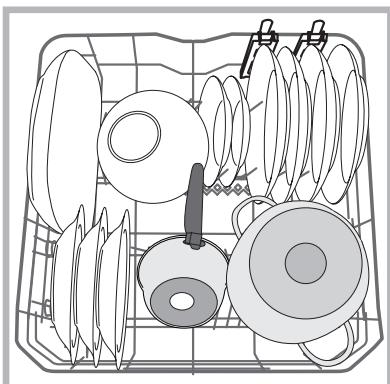
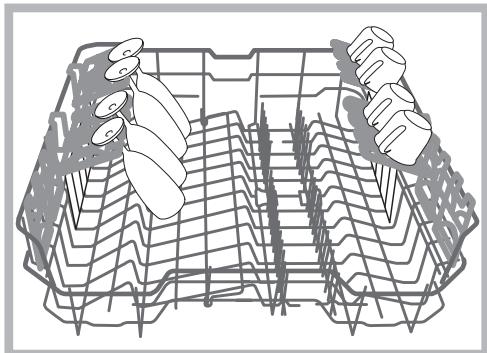
Upper rack
Load this rack with delicate and lightweight crockery such as glasses, cups, saucers and shallow salad bowls.
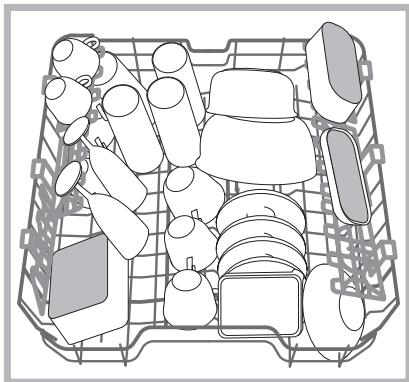
Several dishwasher models are fitted with tip-up sectors*
They can be used in a vertical position when arranging tea/ dessert saucers or in a lower position to load bowls and food containers.
Tip-up compartments with adjustable position
The side tip-up compartments can be positioned at three different heights to optimize the arrangement of crockery inside the rack.
Wine glasses can be placed safely in the tip-up compartments by inserting the stem of each glass into the corresponding slots.
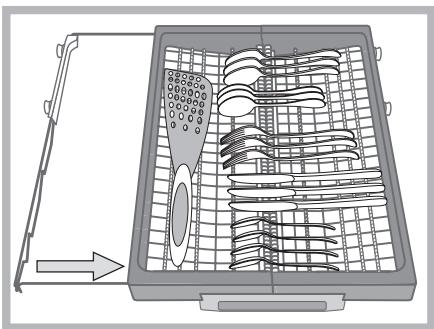
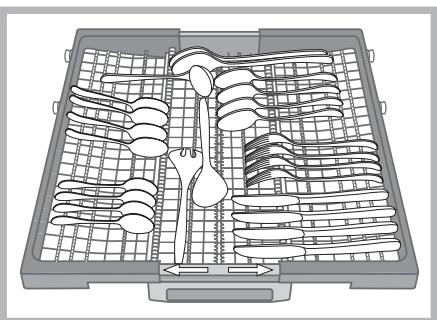
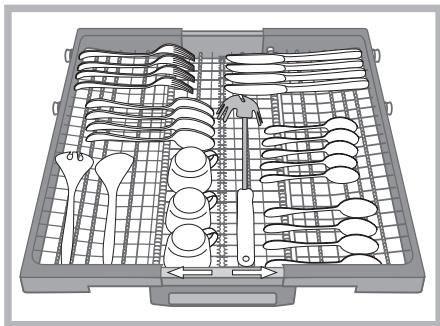
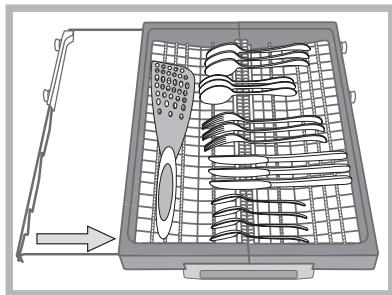
Third rack
The third rack was designed to house the cutlery. Arrange the cutlery as shown in the figure.
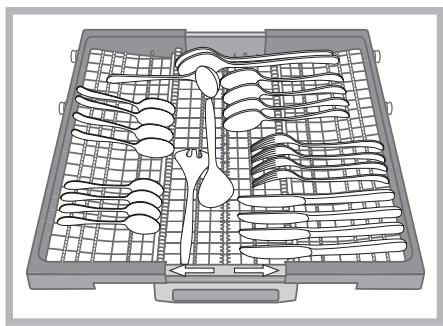
"Knives and other utensils with sharp edges must be positioned with the blades facing downwards."
A separate arrangement of the cutlery makes collection easier after washing and improves washing and drying performance. The geometry of the rack makes it possible to place such small items as coffee cups in the area in the middle.
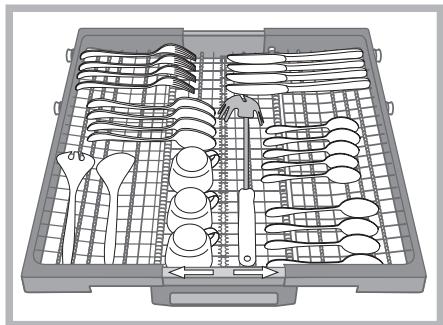
The third basket is equipped with two sliding side trays to make the most of the height of the space below.
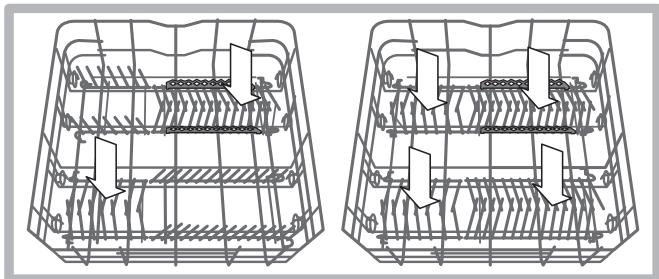
The upper rack can be adjusted for height based on requirements: high position to place bulky crockery in the lower rack and low position to make the most of the tip-up compartments/sectors by creating more space upwards.
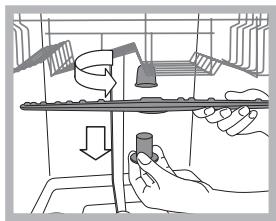
Adjusting the height of the upper rack
In order to make it easier to arrange the crockery, the upper rack may be moved to a higher or lower position.
The height of the upper rack should be adjusted WHEN THE RACK IS EMPTY.
NEVER raise or lower the rack on one side only.

If the rack is equipped with a Lift-Up device* (see figure), lift it up by holding its sides. To restore the lower position, press the levers (A) at the sides of the rack and follow the rack down.

The upper rack cannot be used in the high position and in the tip-up compartments closed in a vertical position.
Unsuitable crockery
Wooden crockery and cutlery.
- Delicate decorated glasses, artistic handicraft and antique crockery. Their decorations are not resistant.
- Parts in synthetic material which do not withstand high temperatures.
Copper and tin crockery.
- Crockery soiled with ash, wax, lubricating grease or ink.
The colours of glass decorations and aluminium/silver pieces can change and fade during the washing process. Some types of glass (e.g. crystal objects) can become opaque after a number of wash cycles too.
Damage to glass and crockery
Caused by:
- Type of glass and glass production process.
Chemical composition of detergent.
Water temperature of rinse cycle.
Tips:
- Only use glasses and porcelain guaranteed by the manufacturer as dishwasher safe.
- Use a delicate detergent suitable for crockery.
-
Collect glasses and cutlery from the dishwasher as soon as the wash cycle is over.
-
Only available in selected models.
Starting the dishwasher
- Turn the water tap on.
- Press the ON-OFF symbol: the display lights up for a few seconds and the text ON appears.
- Open the door and pour in a suitable amount of detergent (see Measuring out the detergent.)
- Load the racks (see Loading the racks) and shut the door.
- Press the P symbol to select the wash cycle based on the type of crockery and its soil level (see Table of wash cycles)
- Select the wash options* (see Special wash cycles and options.)
- Press Start/Pause; the Start indicator light on the display lights up. The wash cycle number, the indicator lights corresponding to washing, any selected options and the time remaining until the end of the cycle appear on the display.
- Once the wash cycle has ended, its corresponding number appears on the display along with the text END. Switch off the appliance using ON/OFF; the text OFF will appear on the display. Shut off the water tap and unplug the appliance from the electricity socket.
-
Wait a few minutes before removing the crockery to avoid getting burnt. Unload the racks, beginning with the lower level.
-
The machine will temporarily switch off automatically during certain extended periods of inactivity in order to minimise electricity consumption.
AUTO WASH CYCLES*: this model of dishwasher is equipped with a special sensor which can be used to assess the level of soiling and automatically select the most efficient and economic wash cycle accordingly. The duration of the auto wash cycles may vary due to the operation of the sensor.
If the crockery is only lightly soiled or has been rinsed with water before being placed in the dishwasher, reduce the amount of detergent used accordingly.
Changing a wash cycle in progress
If a mistake was made during the wash cycle selection process, it is possible to change the cycle, provided that it has only just begun. To change the wash cycle, switch off the machine by pressing and holding down ON/OFF/Reset; the text 3-2-1 OFF will appear on the display. Switch the machine back on using ON/OFF; and select the wash cycle and any desired options again.
Adding extra crockery
Press Start/Pause: the Pause symbol lights up. Open the door, taking care to avoid the escaping steam, and place the crockery inside the appliance. Press Start/Pause again: the Start symbol lights up and the cycle is resumed.
Press Start/Pause to pause the machine; the wash cycle is stopped temporarily.
At this stage the wash cycle cannot be changed.
Accidental interruptions
If the door is opened during the wash cycle or there is a power cut, the cycle stops. It starts again from the point at which it was interrupted once the door has been shut or the electricity supply restored.
- Only available in selected models.
Measuring out the detergent
A good wash result also depends on the correct amount of detergent being used. Exceeding the stated amount does not result in a more effective wash and increases environmental pollution.
Based on how soiled the items are, the amount can be adjusted to individual cases using powder or liquid detergent.
In the case of normally soiled items, use approximately either 35 gr (powder detergent) or 35 ml (liquid detergent). If tablets are used, one tablet will be enough.
If the crocckery is only lightly soiled or if it has been rinsed with water before being placed in the dishwasher, reduce the amount of detergent used accordingly.
For good washing results also follow the instructions shown on the detergent box.
For further questions please ask the detergent producers' Advice Offices.
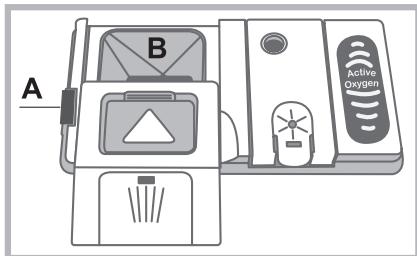
To open the detergent dispenser use the opening device "A".
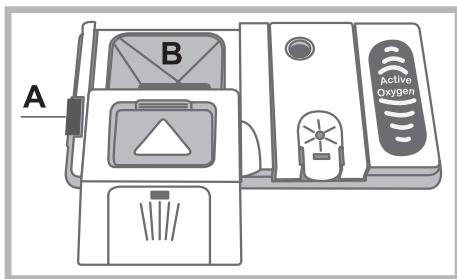
Introduce the detergent into the dry dispenser "B" only. Place the amount of detergent for pre-washing directly inside the tub.
- When measuring out the detergent refer to the Table of wash cycles to add the proper quantity. Compartment B comprises a level showing the maximum quantity of liquid or powder detergent that can be added to each cycle.
- Remove detergent residues from the edges of the dispenser and close the cover until it clicks.
- Close the lid of the detergent dispenser by pulling it up until the closing device is secured in place.
The detergent dispenser automatically opens up at the right time according to the wash cycle.
If all-in-one detergents are used, we recommend using the TABS option, because it adjusts the cycle so that the best washing and drying results are always achieved.
Only use detergent which has been specifically designed for dishwashers.
DO NOT USE washing-up liquid.
Using excessive detergent may result in foam residue remaining in the machine after the cycle has ended.
The use of tablets is only recommended for models which offer the MULTI-FUNCTIONAL TABLETS option.
To achieve the best results from each washing and drying cycle, powder detergent, liquid rinse aid and salt should be used.
Wash-cycle data is measured under laboratory conditions according to European Standard EN 50242.
Based on the different conditions of use, the wash-cycle duration and data can change.
The number and type of wash cycles and options may vary depending on the dishwasher model.
| Wash cycle | Wash cycle which include drying | Options | Approximate duration of wash cycles | Water consumption (l/cycle) | Energy consumption (KWh/cycle) |
| 1. Eco | Yes | Delayed start – Tabs – Extra Dry | 03:15' | 11 | 1,07 |
| 2. Auto Intensive AUTO | Yes | Delayed start – Tabs – Extra Dry – Short Time – Zone wash | 02:00' - 03:10' | 15,5 - 17,0 | 1,55 - 1,80 |
| 3. Auto Normal AUTO | Yes | Delayed start – Tabs – Extra Dry – Short Time – Zone wash | 01:30' - 02:30' | 15,0 - 16,5 | 1,25 - 1,40 |
| 4. Auto Fast AUTO | No | Delayed start – Tabs | 00:40' - 01:20' | 13,0 - 14,5 | 1,20 - 1,30 |
| 5. Trio Wash | Yes | Delayed start – Tabs – Extra Dry – Short Time | 02:00' | 18,0 | 1,35 |
| 6. Delicate | Yes | Delayed start – Tabs – Extra Dry | 01:40' | 11,5 | 1,15 |
| 7. Express 30' | No | Delayed start – Tabs | 00:30' | 9,0 | 0,55 |
| 8. Soak | No | Delayed start | 00:12' | 4,5 | 0,01 |
Instructions on wash-cycle selection and detergent dosage
- The ECO wash cycle is the standard cycle to which the energy label data refers. It can be used to wash crockery with a normal soil level and is the most efficient cycle in terms of energy and water consumption for this type of crockery. 32 gr/ml + 6 gr/ml* - 1 Tab (Quantity of pre-washing detergent)
- Heavily soiled dishes and pans (not to be used for delicate items). 38 gr/ml - 1 Tab
- Normally soiled pans and dishes. 32gr / ml + 6gr / ml^** - 1 Tab
- Limited quantity of daily soiling (ideal for 4 place settings) 25gr / ml - 1 Tab
- Wash spread over the three racks: normal in the upper rack and third rack for cutlery and glasses, heavy-duty in saucepans in the lower rack. 38 gr/ml - 1 Tab
- Cycle for delicate items, which are more sensitive to high temperatures 35 gr/ml - 1 Tab
- Fast cycle to be used for slightly dirty dishes (ideal for 2 place settings) 25 gr/ml - 1 Tab
- Pre-wash while awaiting completion of the load with the dishes from the next meal. No detergent.
Standby consumption: Left-on mode consumption: 5 W - Off mode consumption: 0.56 W.
Special wash cycles and Options
Notes:
Optimum performance levels when using the "Fast wash" and "Express 30" cycles can be achieved by respecting the specified number of place settings.
To reduce consumption even further, only run the dishwasher when it is full.
Note for Test Laboratories: for information on comparative EN testing conditions, please send an email to the following address: ASSISTENZA_EN_LVS@indesitcompany.com
Wash options*
The OPTIONS may only be set, changed or reset after the wash cycle has been selected and before the Start/ Pause button has been pressed.
Only the options which are compatible with the type of wash cycle set may be selected. If an option is not compatible with the selected wash cycle (see Table of wash cycles), the corresponding symbol/indicator light flashes rapidly 3 times.
If an option is selected which is not compatible with another previously-selected option, it flashes 3 times and goes off, while the option selected first will remain active.
To deselect an option which has been set by mistake, press the corresponding symbol button again.

Delayed start
It is possible to delay the start of the cycle for a period of time between 1 and 24 hours.
- After selecting the desired wash cycle and any other options, press the DELAYED START symbol; the symbol on the display lights up. Press the DELAYED START symbol to select the time at which you wish the wash cycle to begin (1 to 24 hours.)
- Confirm your selection using the Start/Pause symbol; the countdown will begin. The selected delay period is displayed.
- Once this time has elapsed, the DELAYED START indicator light goes off and the wash cycle begins.
To deselect it, press and hold the DELAYED START symbol until the text OFF appears.

The DELAYED START function cannot be set once a fresh cycle has been started.

Short Time
This option can be used to reduce the duration of the main wash cycles while, maintaining the same washing and drying performance levels. After selecting the wash cycle, press the SHORT TIME button; the illumination of the corresponding symbol/indicator light indicates its selection. Press it again to deselect it.

Extra drying
To improve the dryness level of the crockery, press the EXTRA DRYING button, the indicator light will illuminate. If it is pressed again the option will be deselected.
A higher temperature during the final rinse and an extended drying phase allow for improving drying.

The EXTRA DRYING option increases the duration of wash cycle.

Multi-functional tablets
This option optimises washing and drying results.
When using multi-functional tablets, press the MULTI-FUNCTIONAL TABLETS button, the indicator light will illuminate. The "Multi-functional tablets" option results in the lengthening of the wash cycle.

The use of tablets is only recommended when the LTI-FUNCTIONAL TABLETS option is available.

This option is not recommended for use with washable dishes which do not specify the use of multi-functional刮ets.

Zone Wash
This option makes it possible to carry out the wash cycle in the selected rack only. Select the wash cycle and then press the ZONE WASH button: the selected rack lights up and the wash cycle starts in the selected rack only. Press the button again to deselect the option.
The option is available with the following wash cycles: Intensive and Normal.
Select the option and the Intensive cycle to start the ULTRAINTENSIVE ZONE washing. This wash cycle is ideal for very soiled mixed loads, e.g. pans and saucepans, dishes with heavy encrustation or difficult-to-clean crockery (grater, vegetable mill, dirty cutlery). The spraying pressure is stronger and the washing temperature higher, thus ensuring optimum handling of stubborn stains.
- Select the option and the Normal cycle to start the SAVING ZONE washing. This function makes it possible to reduce energy consumption. Cycle duration might change.
Remember to load the crockery in the selected rack only
A Only use products which have been specifically designed for dishwashers.
Do not use table/industrial salt or washing-up liquid.
Follow the instructions given on the packaging.
If using a multi-functional product it is not necessary to add any rinse aid. However, we recommend that you add salt, especially if you live in an area where the water is hard or very hard. (Follow the instructions given on the packaging).
If you do not add salt or rinse aid, the LOW SALT* and LOW RINSE AID indicator lights will stay lit.
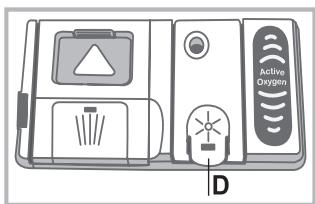
Measuring out the rinse aid
Rinse aid makes it easier for the crockery to dry, as water runs off the surfaces more readily and therefore does not leave streaks or marks. The rinse aid dispenser should be filled:
- When the LOW RINSE AID indicator light* on the control panel is illuminated, a reserve supply of rinse aid is still available for 1-2 cycles;
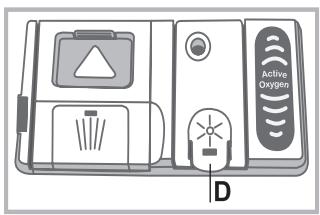
- Open the dispenser “D” by pressing and pulling up the tab on the lid;
- Carefully introduce the rinse aid as far as the maximum reference notch of the filling space - avoid spilling it. If this happens, clean the spill immediately with a dry cloth.
- Press the lid down until you hear a click to close it.
NEVER pour the rinse aid directly into the appliance tub.
Rinse-aid quantity setting
If you are not completely satisfied with the drying results, you can adjust the quantity of rinse aid. Switch the dishwasher on and off using the ON/OFF button. Press the Start/Pause button 3 times. Start it using the ON/OFF button; the setting is shown on the display (set to factory level).
Adjust the level of rinse aid supply using the P button.
Press ON/OFF to save the setting.
If the rinse aid level is set to ZERO, no rinse aid will be supplied. The LOW RINSE AID indicator light will not go on if you run out of rinse aid.
Up to maximum 4 levels can be set based on the dishwasher model.
- If there are streaks on the crockery, set a low number (1-2.)
- If there are drops of water or limescale marks, set a high number (3-4.)
Setting water hardness
Every dishwasher is equipped with a water softener which uses refined salt designed specially for this type of appliance to supply water without limescale - used to wash the crockery.
This dishwasher has a setting which helps to reduce pollution and optimises washing performance in accordance with the water hardness level in your area. This information can be obtained from your local water supplier.
Switch the dishwasher on and off using the ON/OFF button. Press and hold down the Start/Pause button for a few seconds until you hear a beep. Switch the dishwasher on using ON/OFF; the set level will appear on the display (water softener set to medium level).
Adjust the hardness level using the P button (1-2-3-4-5* see the water hardness table) up to max 5 levels.
Press ON/OFF to save the setting.
Even if using multi-functional tablets, fill the salt dispenser.
| Water Hardness Table | Average salt dispenser capacity duration** | |||
| level | °dH | °F | mmol/l | months |
| 1 | 0 - 6 | 0 - 10 | 0 - 1 | 7 months |
| 2 | 6 - 11 | 11 - 20 | 1,1 - 2 | 5 months |
| 3 | 12 - 17 | 21 - 30 | 2,1 - 3 | 3 months |
| 4 | 17 - 34 | 31 - 60 | 3,1 - 6 | 2 months |
| 5* | 34 - 50 | 61 - 90 | 6,1 - 9 | 2/3 weeks |
| For values between 0°f and 10°f, we do not recommend the use of salt. * a setting of 5 may increase cycle duration. ** 1 wash cycle per day. | ||||
(^ dH) = hardness measured in German degrees - ^ f = hardness measured in French degrees - mmol/l = millimoles per litre)
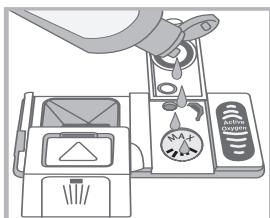
Measuring out the refined salt
In order to obtain the best possible results from a wash cycle, make sure that the salt dispenser is never empty.
Refined salt removes limescale from the water, thus avoiding the formation of deposits on crockery.
The salt dispenser is located in the lower part of the dishwasher (see Description) and should be filled:
- When the green float cannot be seen by simply looking at the cap of the salt dispenser;
- When the LOW RINSE AID indicator light on the control panel is illuminated ;
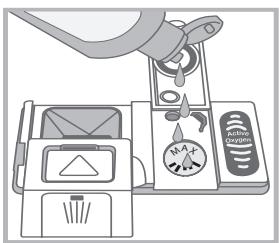
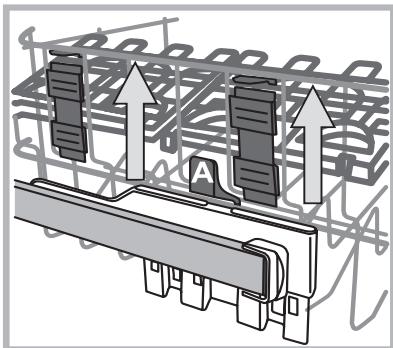
- Remove the lower rack and unscrew the cap (anticlockwise).
- The first time you do this: fill the water tank right up to its edge.
-
Position the funnel (see figure) and fill the salt dispenser up to the edge (approximately 1kg ). It is normal for a little water to leak out.
-
Remove the funnel* and wipe any salt residues away from the opening; rinse the cap under running water and then screw it on, the head facing downwards so as to let the water flow out of the four slots (star-shaped arrangement) in the lower part of the cap (cap with green float*).
It is advisable to perform this procedure every time you add salt to the dispenser.
Make sure the cap is screwed on tightly so that no detergent can get into the container during the wash cycle (this could damage the water softener beyond repair).
When necessary, measure out the salt before a wash cycle so that any saline solution which has leaked out of the salt dispenser is removed.
- Only available in selected models.
Shutting off the water and electricity supplies
- Turn off the water tap after every wash cycle to avoid leaks.
- Always unplug the appliance when cleaning it and when performing maintenance work.
Cleaning the dishwasher
- The external surfaces of the machine and the control panel can be cleaned using a non-abrasive cloth which has been dampened with water. Do not use solvents or abrasive products.
- Any marks on the inside of the appliance may be removed using a cloth dampened with water and a little vinegar.
Preventing unpleasant odours
Always keep the door of the appliance ajar in order to avoid moisture from forming and being trapped inside the machine.
- Clean the seals around the door and detergent dispensers regularly using a damp sponge. This will avoid food becoming trapped in the seals, which is the main cause behind the formation of unpleasant odours.
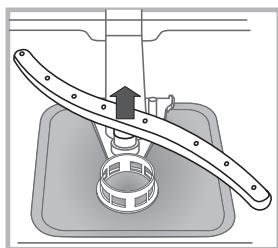
Cleaning the sprayer arms
Food residue may become encrusted onto the sprayer arms and block the holes used to spray the water. It is therefore recommended that you check the arms from time to time and clean them with a small non-metallic brush.
The two sprayer arms may both be removed.
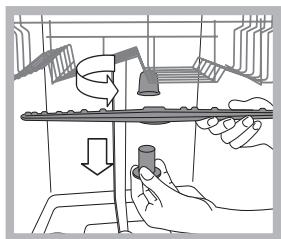
To remove the upper sprayer arm, turn the plastic locking ring in an anti-clockwise direction. The upper sprayer arm should be replaced so that the side with the greater number of holes is facing upwards.
The lower sprayer arm can be removed by pressing on the side tabs and pulling it upwards.
Cleaning the water inlet filter*
If the water hoses are new or have not been used for an extended period of time, let the water run to make sure it is clear and free of impurities before performing the necessary connections. If this precaution is not taken, the water inlet could become blocked and damage the dishwasher.
Clean the water inlet filter at the tap outlet regularly.
- Turn off the water tap.
- Unscrew the end of the water inlet hose, remove the filter and clean it carefully under running water.
- Re-place the filter and screw the water hose back into position.
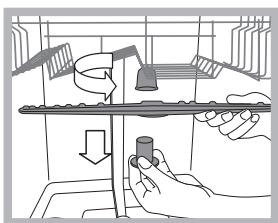
Cleaning the filters
The filter assembly consists of three filters which remove food residues from the washing water and then recirculate the water. They should be cleaned if you wish to achieve the best results in every wash.
Clean the filters regularly.
The dishwasher should not be used without filters or if the filter is loose.
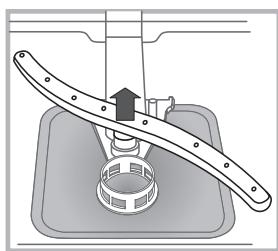
- After several washes, check the filter assembly and if necessary clean it thoroughly under running water, using a non-metallic brush and following the instructions below:
1. Turn the cylindrical filter C in an anti-clockwise direction and pull it out (fig. 1).
2. Remove the cup filter B by exerting a slight pressure on the side flaps (fig. 2);
3. Slide out the stainless-steel plate filter A. (fig. 3).
4. Inspect the trap and remove any food residues. NEVER
REMOVE the wash-cycle pump protection (black detail) (fig.4).
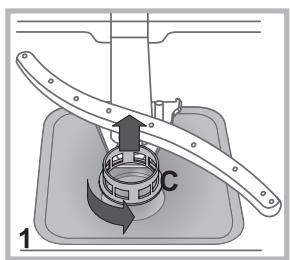
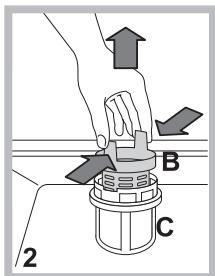
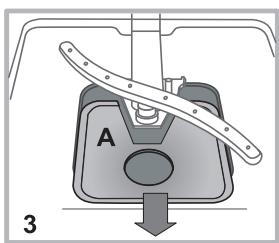
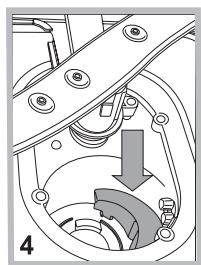
After cleaning the filters, re-place the filter assembly and fix it in position correctly; this is essential for maintaining the efficient operation of the dishwasher.
Leaving the machine unused for extended periods
- Disconnect the appliance from the electricity supply and shut off the water tap.
- Leave the door of the appliance ajar.
-
When you return, run a wash cycle when the dishwasher is empty.
-
Only available in selected models.
Whenever the appliance fails to work, check for a solution from the following list before calling for Assistance.
| Problem: | Possible causes / Solutions: |
| The dishwasher does not start or cannot be controlled | • Switch off the appliance by pressing the ON/OFF button, switch it back on after approximately one minute and reset the program. • The appliance has not been plugged in properly. • The dishwasher door has not been shut properly. |
| The door won't close | • The lock was released. Strongly push the door until a “clacking” noise is heard. |
| No water drains out from the dishwasher. | • The dishwasher cycle has not yet finished. • The water inlet hose is bent (see Installation). • The drain duct is blocked. • The filter is clogged up with food residues. |
| The dishwasher makes excessive noise. | • The dishes are rattling against each other or against the sprayer arms. • An excessive amount of foam has been produced: the detergent has not been measured out correctly or it is not suitable for use in dishwashers (see Start-up and use). |
| The dishes and glasses are covered in a white film or limescale deposits. | • The level of the refined salt is low or the dosage setting is not suited to the hardness of the water (see Rinse aid and salt). • The lid on the salt dispenser is not closed properly. • The rinse aid has been used up or the dosage is too low. |
| The dishes and glasses are streaked or have a bluish tinge. | • The rinse aid dosage is too high. |
| The crockery has not been dried properly. | • A wash cycle without a drying program has been selected. • The rinse aid has been used up or the dosage is too low (see Rinse aid and salt). • The rinse aid dispenser setting is not suitable. • The crockery is made from non-stick material or plastic. |
| The dishes are not clean. | • The racks are overloaded (see Loading the racks). • The crockery has not been arranged well. • The sprayer arms cannot move freely. • The wash cycle is too gentle (see Wash cycles). • An excessive amount of foam has been produced: the detergent has not been measured out correctly or it is not suitable for use in dishwashers (see Start-up and use). • The lid on the rinse aid compartment has not been shut correctly. • The filter is dirty or blocked (see Care and maintenance). • The refined salt level is low (see Rinse aid and salt). |
| The dishwasher does not take any water in - Tap shut-off alarm. Beeps are heard and H2O is displayed. | • There is no water in the mains supply. • The water inlet hose is bent (see Installation.) • Turn on the tap and the appliance will start after a few minutes. |
| F 6 is displayed. | • The appliance stopped because no action was taken when the beeps sounded. Switch off the machine using the ON/OFF button, turn on the tap and switch the machine back on after a few seconds by pressing the same button. Re-program the appliance and restart the wash cycle. |
- Only available in selected models.
FR
FR
Français, 16
Sommaire
HeicnpaBHOCTN mMeToDbInx yctpaHeHn, 58
CepBnchoe o6cnyxuBaHne, 59
RU
N3dennecnpoeKtnpoBaHO n3rOToBneHO B COOTBeTCTBnC MeJyHapOndbIMN HopMaTnBaMn NO 6e3oNaChocTn. HactoIzne IHcTpykunn CoCTaBneHb B ueJx BaWei 6e3oNaChocTn n DOJXhbl 6bITb BHIMATEJIbHo pOuHTaHbI.
Baxho coxpaHt b daHHoe pyKoBOdCTBO dIra erO nocJeDyUoX KOnCylbTaucn. B clyuae npodaxn, nepeDaun nn peeee3da npOBepbTe, uTo6bl daHHoe TexHnueckoe pyKoBOdCTBO conpOBoXdAno I3dJIne.
HeoXoDIMO BHnMaTeJIbHO npOuHtAe HactOaIe HNCTpyKUn: B HIX CoepKaTcBaxHbIe CBeDeHnIy O6 yCTaHOBKe I3dEINr, ero 3KcnPnyatauNi N 6e3OnaChOCTn.
DanHoe n3dJIne npedHa3HaueHo IJy 6bITOBOro nnI dpyrOrO aHaJIOrnUHOrO NcNoJIb3OBAHnR, HapnIMep:
-B NOMEUHINX, INeHa3NaueHHbIX IJIa PnIroTOBJeHINI PIuINI DJIa IepcoHaJIa MaRa3InHOB, OfICOB INIpoUHX UypeKJdeHIN;
-B arpoTpynCTnuecknx ycaIb6ax;
-ДлЯ ИСПОЛБ3OBAHИЕ ПОЖИВАЮЦМВ В ГOSTИНUCE, MOTENE И BдугNXВремEHьIX MeCTAX ПОЖИВAHИ;
-BTOCTHINUaX TUNa《HOMEpC3aBtpaKOM》
IpoBepbTe, YTo6bl BOOpOBoHbI ⅢaHaHr He 6bl 3aIOMJIeH nn CxkT.
IopcoeHHeHne cInBHoro JlnaHra
IopcoeHnHTe cINBHOJ uHaHr, He crn6a erO, K CInBHomTyp6oNPOBOyC MmHImaJIbHbIM dnaMeTpOM 4 cm.
CnBHOJ 7JIaHr DOnJKeH 6bITb paCNoIooKeH Ha BbICote OT 40 Do 80 cm OT nOJa HIN OT pJaTΦOpMbI NocyDOMoeHNO MaunHbI (A).
Ipeep noDcoeINHeHnem CInBHorO ⅢaHaRa K cnfoHy MoKn CHIMITE pnaCTNKOByIO np6ky (B).
3aunTa npOTnB 3aTOnJIeHnA
Bo n36ekhne 3aToPJIeHnI NocyDOMOeHna MaunHa:
- OCHAULEHa CnCTeMoI, NpeKpbBaUoSe IIOaUy BObI B CInuae aHOMaJIIN INII BNYTpEHHNX YTeueK.
HeKOTOpbIe MoDEni OChaSeHbI DOnOJIHnTeJbHbIM 3aUHTbIM yCTpoIcTBOM New Acqua Stop*, npedoxpaHryoUIm OT 3aTOnJIeHn DaKe B Cnyuae pa3pbIbA BODonpOBoHDoro ShlaHra.

BHIMAHNE: ONACHOE HANPJXEHNE!
Kateropnueckn 3anpeaetc8 o6pe3aTb 7naHr noDaun BObl, TAK KAK BDOJIb Hero npoxoJrT 3JeMeHTb IOd HAnpJxKeHnEM.
3neKtpnueckoe noDcoeHHeHne
Ipeep noDcoeHHeHem BnJIK MaunHb K 3neKtpuecko np03tke Heo6xOIMO npOBepntcneDuOee:
- ceTeBa r po3eTKa dONKHa 6bIb CoEiHHeHa C 3a3eMJIeHnEM I COOTBeTCTBOBaTb HOpMaTnBAM;
3JNEKtpnueckarpo3etkaDoljxHa6bItbPaccuTaHaHa MaKcImaJIbHyO Ntpe6IeMyo MoUHocTbN3JeIny, yKa3aHHyO Ha 3aBODCKoTabnueKe, paCNoIooKeHHo C BHYTpHenCTOpOHbI DBepuI.
(CM. Onicahne nocydomoeuHoi MaLHHbI);
- HanpjaKeHne cETn 3NEkTPOINTaHnI DOJXHO COOTBeCTBOBaTb DaHHbIM Ha nacnopTHoN TaBnUyKe, paCNOJoxeHHo C BHYTpHeHc CTOpObI DBePcbl MaunHbI;
Cetebarpo3eTKaDOJXHa6bItbCOBMeCTUMaCoUTeNCelbHOI BnIKo n3dennr. B npOTnbHOM cnyuae npuynte 3amEny BnIKn yNoJIHOMOueHHOMy TexHnky (cM. TexHnueckoe obcnykBaHHe), He nCOnb3yIte yDnnHInTeNn TpOHNKn.
A N3dJIne DoJIKHO 6bITb yCTaHOBNeHO TaKIM O6pa3OM, YTO6bl npOBoD 3JIeKTPoPHTAHnI N 3JIeKTPopO3eTka 6bln JERKO DOCTynHbI.
CeteboKa6eBn3dEINHJeD0JIKeHbITbCOHTNIMcXaT.
A EcIn CTeBoi Ka6eBIO NOBpeKDeH, BO n36eKaHne ONaCHOCTn npuynte erO 3aMeHy npou3BOUnteIIO u3deJIyN yNoIHomOueHHOMy LcHTpy TexHnueckoro o6CnykBaHn. (CM. TexHnueckoe o6CnykBaHne)
Пленka 3ацntыl OT KOндсcaTata*
Iocne yctahOBKn nocydomoEHO MaunHb B HnUy KxOHNHO 3JIeMeNTa OTKpoTte ee dBepu N hakNeIte PpO3paHyO cAMOKJEAIOCS pIoNCKy Cn3y DepeBraHHo KxOHNHO pa6Oey NOBepxHOCTn DnA ee 3aUNTbI OT BO3MOXHO KOHDeHCata.
PpeDynpexdHnno nepBomy nCpOJIb3ObaHnIO MaunHbI
Iocne mONTaxa BbHyt b3arnyuShK, yctahOBJIeHHbIe Ha KOp3nHax, IN ChrTb KpeNEXHbIe pe3nHKn C BepxHeN KOp3nHbI (ecnn nmeIOCTc).
Iocne yctanobkn MaunHbI, HnocpeCTBENHO nepei nepBbIM 3KkIOM MoKN 3aONHInTe 6aOK cOnN BODoN 3acBInbTe B Hero npimepno 1 Kr cOnN (cM. pa3deN Ononackueamelb u peaehepuuoua corb): ecNI BOda 6ydt BbTEKaTb N3 bauka, 3TO HopMaJIbHOe RAJIeHne. Bb6epnte CTeneHb JecTKOCTN Bobl (cM. pa3deN Ononackueamelb u peaehepuuoua corlb).
HKNKOrIa He 3aIbaiTe OOnaacknBaTeJIb HEnocpeIcTBHeHO B MOeHyIO KaMepy MaunHbl.
OtpereynuynTe Do3y onoJaacknBaTeJra
Ecni Bac He yIobIeTbopReT KaueCTBO cyuKn, MoXHo OtperyInpoBaTb Do3y onoJaceKnBaTeJI. BkHouNte N BblKIOUHTe NocydomOeHyu MaShINy KhoNkoB KBN./BblKl. HaxMnte 3 pa3a KhoNky Nyck/Na3a. BkJIooHte MaShINy KhoNkoB KBN./BblKl. 3aDaHHa J03a No8BtCra Ha DcNpIee (3aBoDcKaHaCTpoK). OtperyInpyIte Do3npOBaHne onoJaceKnBaTeJI KhoNkoP.
Haxmnte KhONky BkJ./BbIK.ДЯ coxpaHEnHa HactpoKn. YpOBeH bOnJaCKnBaTeJI MoxHO hAcTponTb Ha HOJIb. B 3TOM cIyuee OOnJaCKnBaTeJIb He IcNoJIb3yETcR, n INHdIKaTOP OTCytCTBnA OOnJaCKnBaTeJI Na PnUHHe eO OTCytCTBnA He 3aropaETcR.
Moxho 3aatab MaKcHmym 4 ypOBHb B 3aBnCmOCTN OT MoJeIN NOcydOMoeHOn MaSHINbl.
ecnHa nocynde octaOTcB 6eIbe pa3BOjbl,OTperpynpyTe noDauhy onoJaCKnBaTeJHa MeHbUee 3HaueHne (1-2).
ecnHa nocyuode ocTaIOTcKaanBbIOBbI INIINrTHa HAKIN, OTperynpyTe noaCyOnoJaCKnBaTeJIHa 6Oonee BbICOKoe 3NaueHne (3-4).
Bb6op cTeHn JecTKoCTN BObl
Bce nocydomoechIbe MaunHbYkOMnEeKToBaHb CmRHTeMe BODbl, KOTOpbl 6bnarOapra CneuaJIbHO perEnepepyUoee CoIN DnA NOcyDOMoeCHbIX MaunH ydaIaReT N3BeCTb N3 BObl, INCNOJb3yUoSeIcRdMaTbNOCyDbI.
JaHHa NocyDoomoeyH MaunHa MoKet 6bItb HAcTpoHe TaKIM O6pa30m, YTO6bl COKpatNTb 3aRpy3HeHne OkpyKaHOeI cpebl I ONTMn3INPOBaT KaYcETBO MblTB NOCyDbl B 3aBNCMOCTN OT JcEKTOKCTNOBbl. Bbl MOKeTe y3HaTb CTeNEHb JcEKTOKCTN BObl BAWeM paOHe, O6pTaBUnCb B OprAH3aUIO BODOChA6JcEHNA. BKlOUHTe IN BbIKIOHTe NocyDoomoeyHuO MaunHy KONKOI BKL./BbIKL. DePJKTE HAKaToI KNOHky Pnyck/lay3a HeCKoJIbKO CEkyND Do BkLIQUeHn 3ByKOBOrO CnIHnla. BKlIOHTe MaunHy KONKOI BKL./BbIKL. 3aDaHnHa CTeNEHb NOBtCn Ha DnCnPiee (CMrHTeJIb HAcTpoEH Na CpeDHIO CTeNEHb JcEKTOKCTN).
Otperynpyte cTeenb JeeCTKoCTN BOdbi KhoNkoi P; (1-2-3-4-5 CM. TaBnucy JeeCTKoCTN BOdbi) BnIOt b DO MAkCmMaJIbHOrO 5-0I cTeENH.
Haxmnte KhONky BKJ./BbIK.ДЯ coxpanenHaCTpoKn. EcIn Bbl nolb3yeTeCb MHOrofoyHKUHOHaJIbHbIMn TabneTKamn, 6aOc pereHepepyuOe CoIbIOdoJIXeH 6bITB JIObOM cIyuae 3aONHeH.
CpeIcTBA npOTnB HnnpTbIX 3anaXOB
Bcerda ocTabIaIte DBepu MaunHbI nOly-npIKpbITOn BO n36exKaHne 3acto BlaXHOCTn.
- Perylaryno npouuzaite nepimetpaNbhe ynploTHenHn IBePcI Ndo3aTopoB MOUeero cpeDCTBa pni NMOOn BnaXHoN r6Kn. TaKIM oBa3OM ydaJIaOTc8 OCTaTK Niu -OCHOBHO npuHHbI oBa3BaHn HnepnTbIX 3anaxOB.
Ucstka opocnteJe
Octatkn Pnun Moryt npuJInHnyt K nonactm opocnteien n 3acopntb OTBepCTna, n3 KOtOpbIX BbIXoINT BOda: Bpem O T BpemEn CneJeT npOBepaTb opocnteien n npouNcaTb nx HEMetanJnueckoI ueTKoI.
O6a opocuTeJRABnIOTcBcEMhBMIM.
EcnBamHaioObpaTbCBy CepBnchbI ueHTp:
BhimaHne! PnppeMOHTe Tpe6yIte NcNoJIb3OBAHnOpunHaJIbHbIX 3aNaChbIX qAcTei.
Ipeed Tem kak o6paTntbC8 B CepBnC TexHnueckoro 06cJyXnBaHHa:
-ПюоверTe,MOKHOиуСТpaHNTь HeINcPpABHOCb CamOCToTeIbHo (CM. HeINcPpABHOCn I MeToIbIx yCtpaHeHnA).
BHOBB 3anyctnte nporpammy dIy npOBepKn nCnpaBHOCTM MaunHbI.
B npotnbHOM cIyueo6bpaTntecb BynoJIHOMOeHHb CepBnC TexHnueckoro 06cIyXuBaHna.
Hnkorda He obaaTecb K HeynoHOMOeHHbIM TexHnKam.
Pn o6paueHn B CepBna Texnueckoro 06cJyXnBaHna coo6uHTe:
XapakTepeHncpabHOCTN
- MoDéJIb n3ДeJIЯ (MoI.)
- cepиньий Homep ("S/N")
3Tn daHHbIe Bbl haNdeTe Ha nacnopTHoI Ta6JIuKe, paCnoIOXeHHOI Ha I3JeIN (cm. OnncAHne n3dJIInr).
Cy anbin KeTyeH Kopray
Cy aIbIn KeTyIe KojI 6epMey yIiH, bIbIc Jyy MaunHaCbI:
- KaIbIncbI3 JxafJaInapda Hemece KypblfblHbI, iIiHeH cy afbIn KeTKeH Ke3De cy Ke3IH 6yfaTTbH apHaBb IxyJEmeH Xa6DbIbIKTaJIraH.
CoHdai-ak, Kei6ip yIriJep New Acqua Stop* den ataJIaTbIH KocbIMwa kayinci3dk KypaJIbMeH JkaDbIkTaIraH, on Tinti Kipic TYtiriHiX bIpTbJIbIN KetKeHHde De cy aIbIn KeTydeH Kopfainbl.
ECKEPTY: KAYINTI KEPHEY!
Cydih Kipic TyiriH eWbip KaFdaa Da KHOuBb 6oMaHb3,ce6eBi OHda TOK eTeiH 3neKtp 6eniKtep 6ap.
TOKKa KaJfay
Aibipblpo3eTKaFA Kocnac 0ypbH, MbHa KaFaInapra Ke3 JeTki3iHi3:
- Po3eTka Jxepre TybIKTaJIfAH XaHe aFBIMdaFbI epExeJepre caikec keJei.
pO3eTka KpybIfblHbH eH KEN KyaTbHa 乌daan anaDb. BymMehecikTIiHKi KaFbIHda opHaIackaH depeKTe pTilimUeciHekpcetijIreH((《KpybIfbl CnNaTTamacbl》BJIIMH KapaHbI3); - Tok keniicih Kepheyi depekter tiimwecinhe KepceTirre H MHeep ayKbIMbIHda XaTbIP.
- P03eTka KpybIfblbIH WTeNCelbDik yMbHa caikec keJI. Oaai 6oImaca, KyaHaHdbIpbIJFaH MaMaHdbI WaKbIptBIn, aiBydpai aybiCTbipbH3 («Kemek» 6enim H kapaHbI3); 3apTy Ka6eJIbdepin Hemece 6ipHewe po3eTkaHbI KOJaHaHbaHbI3.
A KypbJfbl OphaTbJfHaHH KeiH, TOK CbIMbl MeH po3eTKafohai KON XeTkiy MymKIn 6Olybl Tnic.
A CbIMdbMaibcTbipyHaHMeceOraH KbicbImCaIyfa 6oJmaiDbI.
A TOK cblmbi 3aKbIMdaJlca, bapIbIK biktmam KaltepeppeH caKaTHy ywiH OHbi EHNipuyi Hemece Oblh TexnkaBik KEMeK KepcTeY KbI3MeTiy aybIcTbpyi Kepek (KMeK) BoJIIMH KapaHbI3.)
- Tek keh6ip ynlirepde 6ap.
KoHdEHaCuaJaHaN KopFaYbIh JeHTa*
blbic kyy MaunHaCbIH opHaTkKaHHaH KeiH, eciKti aWbIn, Ty3IyI MymKiH KOHeHcaUmaH KOpFay yuH JeimMeJIpJeHTaHbI aFaaw TapTnHaBtAcTbHa Jaa6bICTbipbHbI3.
BipinchiyyuKlbHaKaTbICTbKeHeC
OphatkaHHan KeiH TapTnapdaH TbIfbHapdbI XaHe 6ap 6oIca, KofapfI TapTnaJa KaIFaH aJNaCTKKaJIbIK 3JeMeHTTepeIaBIn TactaHbI3.
Anfawkbi peT Kyydah 6ypbH, Tz3 DnCneHcepin Cymen TObnk TOITbIPbHBi3 da, codan Kein rHa oA H WAMMeH 1 Kr Ty3 Kocblb3 («Wiaora Kemeki 3at XeHe Tz3» De n atanatbH tapaybl kapaHb). Cy acIn Terinyi MymKiH: 6yn KaJIbINTb Jxadai XeHe npobIema emec. Cy KaTbIbIFbIHm HmHt TaHdaHb3 («Wiaora Kemeki 3at XeHe Tz3» De n atanatbH tapaybl kapaHb). - Ty3 MaunHara KyblfahnHahn KeiH, TY3 A3 INDkATOp Wambl* ceHei.

Jyy uKJIapbI P TaH6acbH 6acy apKblb TaHdaJaabI.
KypbIbnbIa naIdaIaNHybIfa nepMeH KOJIdaHbIbnFaHbIH 6bnipyre aphanfah CnHraIyHdep KnbHbIbap (blbcI Jyy MaunHacbIHbN ylrniche baNaHbICTbI): Kocy, uKNl CoHbI, T.6.
Backapy TaKtacbHdaftb/duCnpeJeeri TaH6aIapdbIH/ INHdkaTOp WAmdapbHbIH/DnOdTapdbIH Tyci 0p Typni XHe XbINbIKTaHemece TypaKbI XApbFb6OnybIMymkH (bIbIC Kyy MaunHacbHbI YnRicHe baiNaHbICTbI).
DncnneJe Jyy cKJIbIbIH Typi, KeNTipy/Jyy cKJIbIbIH Ke3eHi, KaIraH yaKbIT, TemnepaTypa XoHE T.6. KaTbICTbI naIdaIbI aknapat 6epinei.
| Курал: | ыдьс жу машинасы | |
| Сayda atayы | Hotpoint ARISTON | |
| Өндірүшін сayda 6elrici | ||
| Yltri | LLD 8S111 | |
| Дайындахан | Indesit Company | |
| Өндіріл'reн сeл | П一步一步 по ветаха П一步一步 по ветаха П一步一步 по ветаха П一步一步 по ветаха П一步一步 по ветаха П一步一步 по ветаха П一步一步 по ветаха П一步一步 по ветаха П一步一步 по ветаха П一步一步 по ветаха П一步一步 по ветаха П一步一步 по ветаха Лыз Быз Сыз Тыз Сыз Сыз Сыз Сыз Сыз Сыз Сыз Сыз Сыз Сыз Сыз Сыз Сыз Сыз Сыз Сыз Сыз Сыз Сыз Сыз Сыз Сыз Сыз Сыз Сыз Cыз Cыз Cыз Cыз Cыз Cыз Cыз Cыз Cыз Cыз Cыз Cыз Cыз Cыз Cыз Cыз Cыз Cыз Cыз Cыз Cыз Cыз Cыз Cыз Cыз Сыз Сыз Сыз Сыз Сыз Сыз Сыз Сыз Сыз Сыз Сыз Сыз Сыз Сыз Сыз Сыз Сыз Сыз Сыз Сыз Сыз Сыз Сыз Сыз S/N XXXXXXX * XXXXXXXXX, ягни: | 15 достахан жабдьfы |
| Злшем'dерi | Ени 59,5 cm Биiktiri 82 cm Терэндir 57 cm | |
| Тok желісін'derі кер'veydін hemece kergheynepay KBыIMын HOMHады Məhi | 220-240 B ~ | |
| Злесър ТOKън CTANДарТь Tурін He mece aиьмалы TOKън HOMHады Мэпìrì | 50 Г汞 | |
| Су Кысьмь | 0,05-1 МПа (0,5-10 6ap) 7,25-145 Фунт/шаршы дюм | |
| Сактундырьш | Жабъкън Тхений Сорковер костecin караньiz | |
| Жуусыньбí | A | |
| Кent tipусыньбí | A | |
| Куат ТУънусыньбí | A | |
| Злесър ТOK ТУъньь | 1,07 kBt/cafat | |
| СтандарТь Jжу сижльньн Cу ТУъньь | 11 litpr | |
| Злесър ТOKтан Корrayсыньбí | I koprayсыньбí | |
| IPX0 Карacrърындаьсыкрал boьинда saсійkeстік Куәлікteriptураьibles kocьмда aknapat hemece сәйkeстік Куәліririnig kewipmeci kacket bollca, cert.rus@indesit.com Злесърондан poшta mekeнжайba hya cypay xizibepyɪñizre болады. | Жабък төмэн'deri Eypona оksomenkaьik КaybIMdactlbfhybIn ДирektimbalapbyHa Naçkec Keiledi: - 2006/95/EC ("Төмэн керney") - 2004/108/EC ("элесър магнittik улесимдін") - 2009/125/EC ("Comm. Reg. 1016/2010") (экодизий) - 97/17/EC (Белriney) - 2012/19/EU («Кокъс олесър жэ"He олесъронданьк жабък») «Оразma мен onьн 6өлшekterpi Taramfa Тим�у i Tmic» | |
| Осы курал'dин ондірін'reн кунін shtrpx-ku'da Керсетіл'reн сретяльк hemiр'den tabуга boliады (S/N XXXXXXXX *XXXXXXXX), ягни: | - Серіяльк hemiр'deri 1-canн кул'dиьн coнfvы саньн bіл'diperi. - Серіяльк hemiр'deri 2-жэne 3-canн ai'dиьн реттik hemiipin біл'diperi. - Серіяльк hemiр'deri 4-жэne 5-canн ai'tьл'llan anai men Жул'dиьн кунін bіл'diperi. |
*Hemipnepi MeH no3uJnapbI eP TpyPi TaHaaynbI ynrinepe fana 6ap.
Biphee bIbIC kyy MaunHacb KaibpMaJIb 6enimuepeMeH Xa6DbIKTaJIFaH*.
OnapbTa6aKTapbOpHaNaCTbIPFaH Ke3eTik KyuHeMece Ta6aIap MeH calat bIdbICTapbIH OhaI opHaJaCTbIPy yuH KJIdeHen Kynde (TeMeHi) KOJdaHyra 6oNaBbl.
XofapfblTapTna
Бут tappingастakанлар,шынlaяКтар,tabakwaлар мен тайпak caJaT bIDbICTapbI CnKТbHэзк epi ZeHIn bIDbIC-агКтap caJIbHb3.
Biphee bIDbc kyy Maunacb KaibpMaJIb 6enimweepMeH XabdkTaNrHa*. Ta/ndecep Ta6akwanaPbIH opHanactbIpraH Ke3de OJapDbI TIK Kynde Hemece Kcepep MeH TaFAM KOHTeHepnepiH cany yuHIn TeMeHri KaJIbINTa KOndaHyf6OJaBl.
PozucbpeTTeTeIH KaibpMaJIb 6JIkTep
bldbic-aykTbI taptnia iihInde oHTaJIbI type peTtey yuin uetki KaibpmaJIb6eIKTeepdi yu6 bniKtikke opHaJacTbipyfa 6oanaJI.
Iapan 6okannapbH aYbH Tnicti Tecikke caly apKbIbI KaibpMaJIb6eIKTepre Kayinc3 Typde opHaNaactbIpyfa 6oJabl.
KorapfI TapTnabHbN 6niKTiriH KAKeTTiIKTepre Kapa peTteYre
6oJabi: YnKeH bIDc-ajKbTI TeMeHrI TapTnara KOIO yuH Jxofapbl
no3nju XaHe Jxofapbl KaTbKaBpeK opbH KaIbpy apkbl
kaibpMaIb 6eikTepdi 6apbHwa naDanaHy uH TEmHri
no3nui.
XofapfbTaptNaHbIn 6niktirin peTey
blIbIC-ajkTbI petteydi keHinDeTy yuiH XOFapfbl TaptnaHbl XOFapbl Hemece TEmeH KblNkbltyfa 60anaBl.
KofapbI taptnaHbIn 6niktiri TAPTNA BOC BOJFAHDA peTeyi kepk.
TaptnabI TEK 6ip KafbIHah KeTepin Hemece TEmeHdetin KOHObI 6OJMaHbI3.
Taptna KTepey KypalbIme* (cypeTI kapaHbI3)XabdkTaIFaH 6oJca, Ohbl eki XaftbHaH YCTan KeTepiH3. TeMeHri No3nUraF aKaItaDah KOIO yWIn TaptnaHbIH WETepiHderi TTKaIapDbI (A) 6acbl, TaptnaHbI TEmHeIeriH3.
A Kofapfbl Taptnahbl KofapfbI N03nuaFka KonbIn, KaibpMaNbI 6eikTepdi TIK Kynde Xaybin KondaHy MymkiH emec.
Yushi Taptna
Ywihui tapTna bIbIc-ayKa aphaIFaH. bIbIc-ayKtbl cypTe KepcetinreHde opHaIaCTbIPbIbI3.
A «ΘTkip XnEKeTp i 6ap nbIwaKtap XeHe 6aCa KypaIap TEmeH KapaTbIbIn caJIbHybl KepeK.»
blIbIc-ayKbI bIeK opHaIaCTbIpy KyydAn KeiH WbIfApybl JKeHInIeTeDi KHe Kyy MeH KeNTipy eHIMdiNirih KaKcapTaIbI.
TapTnHaBbH KpybIbMb KoPe KeceNepiH opTaIaFbI ayMaKKa KOIOFa MymKiHdik 6epei.
Yushi ce6eTte eki cbyfblmabl haya 6ap, onapdbh apkacbHda TeMeHderi 6oc opbHHbH bniKTiri TOnbIfbIme KOnDaHbJaDbI.
JaibKcb3 bIbIC-aJk
AfaTuH XacanFaH bIdbc-ayK neH ac KypaIJaapbl.
- Be3eHdipinreH h3iK cTakaHdap, KOJdAn JkacaJfAn 6yIbIMdap XHe KHe bDlcA-aK. OnapdbH owekei Te3imDi emc.
KofapbI TemnepaTypaFa Te3imDi eMec CInHTeTnKaNbIK MaTePnaJdAn JacanFan H6JIkTep 6ap bIDbc-aK.
- Мьс пон КалайданЖасалфан bIDbc-aяК.
Kyn,6aayb3,MaiJaTbH MaHemeCnMaMeH JaCTaHaH bIbIC-aK.
Kyy npoueci 6abibcbihda acem sbihb meh aniomnHn/Kymic 3aTtapdbH Tyci e3repin, eHIn KeTy i MymkiH. CoHdaH-ak, bipHewe pet JyFAHHaH KeIH KeBip sbHbI Typnepi (MbicaJIb, xpyCTaJIb) 6yIbIHFBip 6oBbIN KeTy i MymkiH.
IbHbMeH bIDbc-aKtBih 3aKbIMdaIybl
Cebééi:
- ΜυBIHbI MeH ΜυBiHbI ΜυBfApy npoucciHiN Typi.
Kyfbll3aTbIH XIMNnblk Kypambl. - ⅢaIO UIKNbIHdAfbCy TEMpepaTpaCbI.
Kehectep:
- Θндіруші bIDIC kyy Maшинасьнда kyyfa 6ОлТынБИн Kaenindik Берген wblHb Meh Фарфорды konДанБИнБI3.
- bIbIc-aIaKKa KOIaNJIb H3IJK Jyfbl3aT KOJdaHbIbI3.
- CtaKaHap MeH bIbIc-aIK Kyy ZIKbla aIKTanfah Ke3depeey bIbIc Kyy MaUINHaCbIHaN WbIfapbl aJIbIbI3.
bldbic kyy MaunHaCbH icKe Kocy
- Wymekti awbihb3.
- KOCY-ΘWIpy TaHbAcBbH bAcBbHb3: DnCnpei 6ipHewe cekyHdka JkaHbIn, KOCY Jka3ybl naJda 6oJaBl.
- EciKti aUbIn JyFbI 3aTbH KOnaiNbI MeIeepiH KyBbHbI3 («JxYfbl 3aTbI eNlwey» bEnimH KapaHbI3.)
- TapTnapanapbI JyKTeH3 («TapTnapanapbI JyKTeY» 6eJIIMH KapaHb3), OaH KeiH ecikTi Jka6bIHb3.
- bIbIc TyPi MeH KIPNeHy DeHReHHe BaJIaHaBtBi JyU YIKNbIH TaHday yUH P TaHbAcBH BacbHb3 (Xyy UIKJIapbIHbIH KeCTecIH KapaHbI3)
- Kyy onuynapbIH TaHdaHbI3 * («Aphai Kyy uKJdapbl MeH onuynap» 6eNIMH KapaHbI3.)
- Bactay/ToKtata Tpy TyMecin 6acbHb3; DncnneJderi Bactay INdNkATop 7amblKaHaDbI. Kyy typihe caikec kyy UKNbHbIN Hemipi, INDnKATop 7aMdaB, Ke3 KeIReH TaHaJaF anu np XHe CNIKnDbH CObHa DeiH KaIFaH yaKbIT dncnnneJe KepCetineDi.
- Kyy uKJIbI aKaTalFaHHaKeIH ducnneJe OFAH Tnicti Hemip MeH COHbl Ka3ybl NaJaDa 60NaDb. KOCY/ElIPy TyMeCiHiKemerimekpblfblHbI eWipiH3; dncnneJe EILIPy Ka3ybl KepcTeJneDi. Cy WMyerIH Xaybl, KpyblfblHbI po3eTKaHa afblTbHbI3.
- KolbIbI3dbI KyIipin aImay yuH, bIbIc-aIaKbIb6ipHeWe MInHyTTah KeiH fAHa aJIbIbI3. TapTnapDbI TeMeHHen 6actan 6ocatbIbI3.
A - TokTbI 6apbIHwa a3 TyTbIHy ywiH KpypbINfbI 6enrIi 6ip y3ak 6eIncEHci3dk Ke3depiHne abTOMaTTbI Typpe yaKbITwa ewedi.
ABTO Jyy LUKNDApbl*: bIbIC Jyy MaunHacBihBn 6yI yIrci IactaHy dapejexecin eJwn, en TImDi opi Yhemdi Jyy LUKNBIH ABTomATbI Type TaHdayFa MymKINik 6epTeIH apHaBI daTynKeH XabDkTAfAH. DaTynKTIn KymbcBHa 6aIIaNbICTbl aBOJx Jyy LUKNDApblH N3akTBIfB apTpnpi 6Onybl MymKiH.
Ablbic-ayk a3 Naactahfah 6oIca Hemece bIdbc Jyy MaunHacbiHa caBih6ac 6ypbH waBilraH 6oIca, Kyfbi3aTbIH MJIWepih a3aiTbIHbI3.
OpbHdaIbIn JkaTKaH Kyy UnkblbH e3repty
Jyy zukblh TaHday 6apbcihda KaTe KeTKeH 6oNca, zkn JkaHa fana 6bactaflanf 6oIfah KzaIaIa, ObIe3repy MymKIn. Jyy zukblh e3repy ywiH KOCY/0UIPY/KaIIbHa KeJItripy Tymecin 6acbln YcTan apkblbl Kypblfblbl EwipiH3; DcINneJe 3-2-1 UIPy Xa3by Kepcetinei. KOCY/0UIPY Tymecim H Kypblfbhl KaTaNah Kocbln, Jyy Zukbl MeH Ke3 KeIre H KaKETTI ONUHN TaHdaHbI3.
KocbIMba bIDbc-aK Kocy
Bactay/toktata typy TyMecin bacHBi3: ToKtata Typy TaHbacbi KaHaIbI. IbIKKaH 6yFa TImeyre TbipbcIn ecKi taIbH3 da, bIbIC-aAKTbI KpybINfbIHbIH iHIe KObIHbI3. Bactay/toktata Typy TyMecin KaIa 6acBiH3: Bactay TaHbAcbl KaHbIn, ZIKN KaNfactbIpblJaBl.
KypbIfblHbTOKTaBbIO KoIO ywiH Bactay/TKTaTatyuMeciH bAcbl3; Kyy uNKbly yaKbITHa TOKaYnbI.
BvI Ke3eJ Kyy UIKbIn E3repty MymKIn emec.
Ke3deincoK toktaynap
Kyy zukbl opbHany bapbcihda ecik aublcna Hemece TOK eWIn Kanca, ZIKL TOKtaNb. Ecik JaaBilfahn Hemece TOK KocblfAHHaH KeiH ON TOKtaFaH JepiHeh KaTadaH icKe KocblJaDbI.
Xyfb1w 3aTTbI eJnwey
Kakcbi Kyy HToTnKeci KyybIi 3aTTbIH Dypbc MOnIepi KOnDaHbIInFaHbHa Da 6aJNaHbICtB1 60JaDbI. BenrineHren MeIsepeH Ken KOnDaHy Kyy TImdInirH apTTbIpMaIdbI XHe KopShaarH opTaHbI Ke6ipeK NaCTayfa AKeJIeI.
3aTTapDbH NaCTAHy DApexecHe 6aJINaHbICTbI, YHTaK Hemece cyhbiKxyfbl3aTTapDbH MeJIWeepiH peTten OTbipyfa 6oJadbl.
Optawa JnactaHfah 3aTTap ywiH wamameh 35 r (yHTak KYfblw 3aT) Hemece 35 Ml (cynbIK KYfblw 3aT) KOndaHbIHbI3. TaBnetkaJap KOndaHbInca, 6ipeyi keTkiniKti.
blbic-aak a3 nactaHfah 60nca Hemece bldbc Jyy MaunhaCbHa caIbIH6ac 6ypbIH waiblnraH 60nca, XyfbIi 3aTbIH MeJIeepiH a3aHTbIHbI3.
Xyy Hetnkeci xakcbi 6onybl ywiH xyfb13aT Kopa6bIHdafbI HyckaynapdbI da opbIHdaHbI3.
KocbIMwa cypaKaTapbIb3 60nca, KyfbIw 3aT eHdpyWicHIN TyTbIHyBbInapFa Konday KepeTy 6eJIiMe xabapnaCbIb3.
Kyfb3at taptnacbH awy ywiH «A» awy KypaBnH naDanaHbHbI3.
Kyfbi3aTbI TeK «B» Kypfak Taptnara calbHb3. AnDbH ana Kyyfa apHanrah Kyfbi 3aTTb1 TikeJe KypblnfbHbH iwiHe caJIbHb3.
- Kfbl 3at MeIweipin eIweeH Ke3e, dypbc MeIweepin Kocy yuih Kyy uKnIdpbIbH KecTeCIN kapaHb3. B 6enirihde ap6ip uKJda Kocyfa bOnaTbH cyBik Hemece YHTak Kfbl Mlweepin eh KeN MeIweipin Kepcetetih 6enri 6ap.
- TapTnahbIh weriHderi xybl 3aT kAnbIKapbIH cyptin aIbIn, KaKnaK «TbIK) eTKeHwe nTepi Jka6bl3.
- KabyopbHa6eKITJREHwe Kyfbu 3aT aTpTaNacBHBkaknafBH XofapbKeTepin Ka6bHbI3.
XyfbIi 3at tapTnacbl Jyy cIKJIbHa caike TnicTi yaKbTTa abTomattbl Type aBlaIaBl.
ÖMb6eBn JyFbIsh 3aTtap KOnDaHbIJnca, TABS onUcnIcBn NaIdaJaHaHfAn JKeH, c6e6i on UckNDbI ePdAdbm E H JkaKcbI Jyy JxHe KeNTipy H aTnxKeIepiHe KOn JKeTki3etIHneI peTteJdi.
AblbIc Jyy MaunHaIapbHa apHaIbIn XacalraH JyfbIi 3aTTapdbI rHa KaJdaHbIHbI3.
KoJMeH bIDbIC xyyf a apHaIFaH cyNbIKtblKTbl KOnDAHBAHbl3.
Uamaan TbIC JyfbI 3aTTbI naDanaHy cNKlaAraTfHaDa KypblfnI iwiHde ke6ikTIn KaLybHa eKeenyi MymkIn.
Ta6neTkaJapdbI TeK BIPHEWE ΦYHKUЯCbI BAP TABNETKJAP onucaBb ap ynrillepe KOnDaHraH xeH.
Op6ip yyy xhe KenTipy uNKbIHAn eH xKaCbl HtNxke any yuH yHTaK xyfbl3aT, waiOfa KEMeKwI cyhblkTBIK nen Ty3 KOJaHaBInybl KepeK.
Kyy zikblihn deperi EN-50242 Eyponaibk ctaHapbHa caikec 3epxHaBik kafdaJa eJiHeJI.
Otp Tpypi KOnlaHy wapTtapbI Heri3iHde xyy uKnbHbHbY 3aKtbfbMeH deperi e3repyi MyMkiH.

blbcxyu maunacbHbIn ynricHe 6auihbcIbXyuyu kndapbHbIn caHbMeN Typi XeHe onpnaIap eptyni 6onybi MymkiH.
| Жуу с unkны | Кent tipу | Опциялар | Жуу с unkсынын узakсынfы | Су түлүнү (и/ цүл) | Куат түлүнү (кВт/цүл) |
| 1. Eco | Иэ | Delay Start - Tabs - Extra Dry | 03:15' | 11 | 1,07 |
| 2. Авто карсынды | AUTO | Иэ | Delay Start - Tabs - Extra Dry - Shor Time - Zone Wash | 02:00' - 03:10' | 15,5 - 17,0 |
| 3. Авто калсынды | AUTO | Иэ | Delay Start - Tabs - Extra Dry - Shor Time - Zone Wash | 01:30' - 02:30' | 15,0 - 16,5 |
| 4. Авто кылдан | AUTO | Жok | Delay Start - Tabs | 00:40' - 01:20' | 13,0 - 14,5 |
| 5. Trio wash | AUTO | Иэ | Delay Start - Tabs - Extra Dry - Shor Time | 02:00' | 18,0 |
| 6. Нэзik | YXY | Иэ | Delay Start - Tabs - Extra Dry | 01:40' | 11,5 |
| 7. Тeз | XXX | Жok | Delay Start - Tabs | 00:30' | 9,0 |
| 8. Сүга салын кю | XXX | Жok | Delay Start | 00:12' | 4,5 |
Xyy uNKbIH TaHay XeHe XyfbIi 3aT MOnIeepiHaBikTay HycKaynapbl:
- 3KO kyy zukbl - kyat bencricinderi depekter HcKan Tpyfah cTaNapTTbU KKn. Ohbl NaCTaHy dapejcei optawa bIbIC-aykTbI kyy ywiH kondahyfa boanaBky hHe ocbl bIDbc-aK typiHe kyat neH cybl eH TNIMdi Type JyMcaDbI. 32 r/Mn + 6 r/Mn* - 1 tabNetka (AndbH aHa kyy KeiHde KondaHbNAtbH Kyfbl 3aT MeIWepi)
- KaTbI NaCTaHFaT TaKaTap MeH KAcTePJIepe (H3iK 3aTTap yuHn naDaHaBImaybl Tnic). 38 r/Mn - 1 TabJeTka
- Optaал actanfah kactpeinep meh Ta6akTap. 32 r/Mn + 6 r/Mn** - 1 Ta6Jntka
- Kyndenikti nactaHydbiH ueKteyni Mmwepi (4 kiciNik KInHaKtap ysiH konaibl) 25 r/Mn - 1 tabNetka
- Kyy eki tapTnada opbIHanaIb: KOFAPbI TapTnada KpNCTaJIbIK 3aTTap MeH cTaKaHdap yuH H3iK JHe TEmHri TapTnada KaCTpeIep yuH KyaTTbI peKIM. 38 r/Mn - 1 TabNetka
- JorapbI temnepaTpaF a ceiMTaJI H3IK 3aTTapFa apHaNfAu 35 r/Mn - 1 TaBneTka
- A3dAn KipneHren bIbIcTap yuHn KblIam uKKn KOnDaHbIaIbI (2 Kicinik KInnaKaTap yuHn KOnaJIbI) 25 r/Mn - 1 TabNetka
- KeNeci TaMaKTHa6aKTapbIH JyKTeJyHIn AaKaTaNbYbH Kytin TpyFaH Ke3De bIbIcTapbl AnbH aJIa Jyy. KfYbI 3aTcbI3.
Kyty kyinHderi TybHybl: KocblbIn typy pexminHderi TybHybl: 5 Bt - Kyy eWippyi pexminHderi TybHybl: 0,56 BT
EckepTneJep:
《Kbllam》KHe《Te3 30^ )ZUKnIapbIH KOnJaHaH Ke3e, OHtaIbI HAtnxRere bIDbc-aAaTbIH 6enrIneHReH MeIwepiH xyy apKblb Kon JeTki3yre 6oNaIbI.
TyTBHybI OaH api a3aIy yuH bIbIC kyy MaunHaCbIH TEK TOITbIPbIN Kymblc icTeTIH3.
CbHaK 3epTxHaHaapHa apHaHaF aneckPtne:CaIbCTbIPMaJIb EN cbHaKaTdaHapbI yuHIN TEmHeDi I MeKeHkaJFa 3JeKTPOHdbIK xaT k6epiH3: ASSISTENZA_EN_LVS@indesitcompany.com
Xyy onzuaapbl*
Xyy zukbl taHdaIbIn, Bactay/ToKtata Tpy Tymeci 6acblraHa dein h fana OIIUNAPDbI opHaTyfa, e3repTyre Hemece KaTa opHaTyfa 6oJaBl.
OphatbIinaH kyy zuklbihIn Typimeh yinecimDi onuHaapdbf aHa TaHdaYfa 6oNaDb. OnuTaHaJaFAnH kyy zuklbHa caikec KeJImece (Kyy zuklbapbHIn KectecIH KapaHb3), Tnicti TaHba/ INdkaTOP WAmbl3 pet XblJamkXblblbTaNbl.
Бурьн тандалган бackа onцямен упесимд emec onця тандалca, on 3 pet KBынлыктан eweidi, an eh anfaшкbl boNBIn тандалган onця Косынлвтура Берedi.
Katelecin opHaTbIJIFaH onCuIaHb TaHdaydAn 6ac TapTy yuHn Tnicti TaHbAHy/ToyMeHi TaBb 6ip pet 6acbHb3.

Kewiktipin 6actay
LInKlDbH,6aTanybH 1-24 carat apalbfHdaflbip Mep3imRe KeuikTipyre bonaBl.
- KaKeTTi Kyy ZIKbI MeH Ke3 KeIReH bAcKa onCnIaPdbI TaHaFaHHan KeiH KEUIKTIPII BACTAY TaHbAcBn H bAcBnI3; DnCnJIeNeT aHbA XaHaDbI. Kyy ZIKbI bactaTaBn YaKbITbI (1-24 cafT) TaHday ywiH KEUIKTIPII BACTAY TaHbAcBn BacBnI3.
- Bactay/ToKtata Tpy TaH6acbIn 6acbIn TaHdaYbI pactaHb3; Kepi cahak bactanaIb. TaHdaTfAH KeWikktpy Mep3imi KepcTeJIedI.
3.YaKbIaKaTaNFaHHaKeiH,KEUIKTIPIBACTAYuHnKaTOp 1aMbIeWeJeDiJe,KyyuNKnblbactanaDbI.
Benricin any yuin EUIPY naia 6oIraHwa KEUIKTIPIBACTAY taHcbiH bcIn YcTan TpybHb3.

Xyy uKJIbI 6aTaTaNFaHHa KeiH KEUIKTIPIIN BACTAY
fYHKUcBIn OpaHTy MymKiH emec.

Kbicka yaKbit
Kyy XaHe KeTtipy EHMdiinH DeHreIH TeMeHNTeN, Heri3ri Kyy UKNdapbHbH Mep3imH a3aHTy yuH ocbl b KondaHyfa 60anaDb.
Bny kyy uknbl taHdaIrah Ke3e Kblicka yaKbIT tyMeciH/ TaH6acbH 6acbHb3. OnuHbTaHdaydaH 6bIFapy ywiH dcl coN TyMeHi TaBbip pet 6acbHb3.

+KocbImwaKeNTipy
bldbic-aykTBH Ke6y deHeReiH XaKcapTy yuH IN KOCbIMUJA KEPTIPY tyImeCIN 6acbH3; TaHb/aNdikatop IaMbI KaHaadbl. KaTadaH 6acbJnca, onuJaH 6ac TapbIaNbbl.
CoHfbl 1aIO Ke3IHderI KOFapbIpaK TeMnepaTypa MeH y3aFbIpaK KENTipy Ke3EHKe6y DeHreIN JAKCapTaBbl.

KOCbIMWA KENTIPY onuyncbj xyy uNKlbHbIH KtBfbH apTbipadbl.

Biphewe fyuHKunycbI 6ap Ta6neTkanaP (Ta6neTkanaP)
Бул onця куу куе KeNTipy HETKkepeiH OHTaIaNbIpaIbI.
BipHeweФункцЯсblбap Ta6NETkanaIapbl KOndaHaHKe3de,
BIPHEWEФYHKUЯCblBAP TABNETKAJIAP Ta6acbln
bacIbI;ДиСплeдTeNtci Ta6b/aHdNKaTOp 7aMbI JkaHaIbI.
«BipHeweФункцясblбap Ta6NETkanaP» onцясbl KYNkbIbIH Mep3IMIn Y3apTaIbI.

BIPHEUe FyHKcIaCbI BAP TabJIETKALAP onuIcBIO 6oJraH Ke3de RaHa TaSNeTKaIapDbI KOJaHa HxH.

BipHeWe 6yHKnIaCbI 6ap Ta6NetkAnapDbIH KOJaHbIybl TipinMeReH Jyy CnKnIaPbIHda 6yn OnuHaHbIKoJaHbSaFaH H.

Eeinn kyy (Zone Wash)
Бул onцяжу сиклььнTek taHdaIaNfah TapTnaJa opbydayfa Mymkihidik 6epei.Жусиклььн TaHdAn, ZONE WASH Tymecin bacbHb3: TaHdaIaNfah TapTna XaHaNbI da,Жусикльы Tek taHdaIaNfah TapTnada bactanaIb. Onцянbl anbln tactay yuH IN TymMeHi KaTadaH bacbHb3.
BvI onuHbI TeMeHderi Jyy cuknnapbHa KaIda Hyfa 6oJaIbI: KapKbIHdbI XHe KaJIbInTbI.
ULTRAINTENSIVE ZONE yHKuncbiH icke Kocy ywiH BJIIN Kyy OUNcRcbi H XeHe KapKbHdbI cNKDbI TaHaNbI3. ByJ kyy cNkbl KacTppeDep MeH Tabanap, TamaK JAcBcBn KaIfAH TabaKTap HemeCe Ta3aJaHybl KnbH bIDbc-Ark (YKKlW, Kekehic Keckiw, KipNeHReH ac KypaLdApbl) CnKtbl KaTbI NaCTaHafn 3aTTap yuH KOJaNbI. MaMbpaTy KbICbIMbMeH kyy Tempepatypacbl KOFapbApak BoJaBl, COhBn apKaCbHdaKeTnei KOrTBn DaKTapbl OHTaJIb EHDey KaMTaMaCbI 3 etineDi.
UaiofKaEMekwi 3aTTbI eJiwey
IaiofKaMeKu3aTbIbIc-aakTbKe6yHKeHInTei,ce6eBi cy bETepiHen KblIaMbipak aftn KeTei KHe COHbIKTaH cbIbIKTap Hemece DaKTap KaJbIPMaIbI. IaiofKaMeKu3aT daIcnpeHcpi MbiHa KaFaanapda TOnTbIpBlyTnic:
- Backapy TaKTaBHaFbI IaIOFA KEMEKU 3AT A3 INHdNkaTOp 7aMbI* JxHaFah Ke3e 1-2 Unkfra XetetINDei 7aIOFA KEMeku 3at Kopbl eJI de 6oJaBl;
- KaKaNaKTaFbI TetikTi 6acBIn, TaTpY apKbIbI «D»ДиСпeHcepiH aWbIbI3;
- TontbipatbH JepdiE h KofapfB6enricHe deiH wiaOfa KemeKu3 aTneH abaiJAN TOIbipbHb3 - terin anMaHb3. Byn opbH anCa, Terinre CyibIKTBkTbI Kyprak WyepekeNeh depey cyptin anbHb3.
- Ka6y yuHIN KaKNaTbI «TbIK»eTKeHHe 6acblb3.
Jaora Kemeki 3aTbI KypblfblHbH iwiHe Tikeen EWKAAAH Kyowbl60MaHbI3.
Iaora kemekwi 3at napameTpi
KenTipy HətɪnʌkeciH ToɪbɪfBImeH KaHaFAT 6ɔnMaCAhBɪ3, 7aɪOfa
KəmEkʌi 3aɪt bɪn Mənʌpeɪn petTeyɪhɪ3re 6ɔnʌdʌ. KOCY/
ΘWIpy TYmecIMeH bɪdɪc Kyy MaɪnɪHaCbɪN KOCbɪN, eɪwiPIɪ3.
Bactay/ToKtata Tpy TYmeciH 3 pet 6acbɪHɪ3. KOCY/ΘWIpy
TYmeciH I KEMeriMeH OhBI ICKe KOCbɪHɪ3; napameTp dɪncɪpneIe
Kepcetɪneɪ (3aɪbɪTbɪk DeHReIe OphatbɪFaH).
Iaiofakemekui 3at6epy deHreinP TYmeciH Kemerimeh pettehi3.
Iapametpi caTay yuH KOCY/0UIPY TuMecin 6acbHb13.
JauFakemekui 3aT deHrei HJI 6oJIbIn opHaTBInca, JauFakemekui 3aT KocbIMaIDbl. JauFakemekui 3aT TaCybINca,
JauOFA KEMEKU 3AT A3 INDnKaTOP MaMbIXaHbINbl.
bldbic kyy MaunHacbIbH yIrciHe 6aIHaHbICTbE h Kebi 4 deHreOpNaTyfa 60anaBbl.
- bɪdɪc-ərʌkTa cbɪzɪkTap 6ap 6ɔnca, TəmehipeK caHfə opHaɪbɪhɪ3 (1-2).
- bɪdɪc-ərʌkTæ cy TAmʌbɪnapβi Hemece Kaɪ daɪkɪtapβi 6ɔnca, Kɔfapβi caHɒbl opHaɪtɒhɒbɪz (3-4).
Cydbih KaTbIbnBifbIH oHaTy
Op6ip bIbIC Kyy MaunHacbl, dIaONcbl Kpyblfbl TyPihe apHaJFaH Ta3aJaHfAH Ty3bl naJaDaHa OtblpbIn bIbIC-aKkTbI Kyy YuHn PaJaDaHaBnAeH KaKcbI3 Cybl KaMTaMaCbl 3 etetIH cy KymCapTkblbImeKa6blkTaIaNbl.
Bynblbc Jyy MaunHacbHna KopwafAn optAhIaCTaybl a3aHTyfa KEMKTEcETIH npametp 6ap Xane ON MeKeHi3deri
Cydih KaTbIbIbIbIH DeHreInHe caiKec xyy eHIMdiJirH OHTaIIaHbIpaIbI. Byn aknapaTbI JxepriNkTi cy KETki3yUicHe anyfa 6oJabl.
KOCY/ΘWIPY TyImeCImeH bIDbIC Jyy MaUINacbIH KocbIn, eWiipH3. CnHAn ecTireHwe Bactay/ToKTata TyImeCIN 6acBn, 6ipHeWe cekyHd yCTan TypbHbI3. KOCY/ΘWIPY TyImeCImeH bIDbIC Jyy MaUINacbIH KocbHbI3; DnCnpeJe opHaTbJFaH DeHreKePcTeineDi (Cy JyMCapTKbIbIopTaAa deHreRe opHaTbJFaH).
Cy KaTbIbIbIbIH DeHreIH P TyMeciIH KEMeIMeH petteH3, (1-2-3-4-5* cy KaTbIbIbIbIH KeCTecIH KapaHbI3) eH Kebi 5 DeHreIe DeHH.
Napametpi caTay yuH KOCY/0WIPY TyMecin 6acbHb3. TinTi bipHeWe yHKUncBb 1bap Ta5neTkapanapDbI KOJaHcHb3 Da, T3 DnCnEhcepH TOITbPbHb3.
| Су КатылыБынык ecentci | Туз dinscpenhcepiин сылыIMыДыБынын optашa Мерзim** | |||
| Деньгей | °dH | °fH | MMольь/л | ай |
| 1 | 0 - 6 | 0 - 10 | 0 - 1 | 7 ai |
| 2 | 6 - 11 | 11 - 20 | 1,1 - 2 | 5 ai |
| 3 | 12 - 17 | 21 - 30 | 2,1 - 3 | 3 ai |
| 4 | 17 - 34 | 31 - 60 | 3,1 - 6 | 2 ai |
| 5* | 34 - 50 | 61 - 90 | 6,1 - 9 | 2/3 anta |
| 0°F мeн 10°F.apальыБындаБы Mэндөр Ушin Túзды кордану Усынылмайды. * «5» napаметri сикл мөрзimiн узартуbl Mүмін. ** Күніне 1 жуүлbl. | ||||
(^ d H = 葱蒙汗 唐 豪 胜 育 胜 育 胜 育 胜 育 胜 育 胜 育 胜 育 胜 育 ) ^ 于 )
Ta3anaHfah Tv3dbI eJlwey
Xyy uKKnblh KOndaHya 6abpbHwa JxakcbI HToNkere KOn JeKeTki3y YuHIN, Tsy DnCneHcepI eWkaWah 6oc 60MaTbHIn KaMTaMaCbI3 etiH3. Ta3aHaHraH Tsy Cdybl KaKaTaH Ta3aJaNdbI, OcbJaNb bblc-ayKaTt TaHbAnapDbH naDa 6OlybHa XoJ BepMeNi.
Ty3 dncnepceip bldic kyy MaunHaCbHbH TEmHri 6enirHde opHanackan (Cunattama) 6eimin KapaHbI3) XaHe MHa KaFaJnapda TOnTbIpblNybl Tnic:
Kacbln kaJIrkbl* ty3 dinCneHcepiH yCTiHeN kai fHa KaapaHaJa KePiH6eTIn Ke3de;
- IWAIOFA KÖMEKÜI 3AT A3 İNİNKaTOP Üʌmbli baskapy TaKTacbIHda JɑHfAH Ke3nde *;

- Temehri taptna hbl wifapbin anbIn, KaKaNaTbI bypan wifapbin anbHbI3 (caFaTiniHe KapcbI 6aftTA).
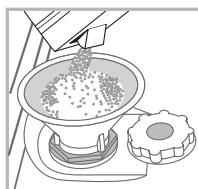
- Myhbl6ipihni pet opbiHaHan Ke3e: cy bIbICbIH WeTIHe DeiH TOITbIPbIHbI3.
- WYHfBImaHb KoynbIn* (cyperti KapaHbI3), Ty3 DnCneHcepiH wTeiHe DeiH TOITbIPbIHbI3 (WamameH 1 kr). A3
MJIWepeCyblhafbykAlbntblkaFdaI.
- 4.4.4.4.4.4.4.4.4.4.4.4.4.4.4.4.4.4.4.4.4.4.4.4.4.4.4.4.4.4.4.4.4.4.4.4.4.4.4.4.4.4.4.4.4.4.4.4.4.4.4 13; KaKNaKTbI cy aftbHbI actbHda Wai bHbI da, KaKaNaKTbH (Kacbl KaNTkbic6ap KaKnaK*) TeMeHI XaFbHdaFb (XyNbI3 niihiinderi) Tep KeTKeH cy aftn Ketyi yuih, 6etih Temeh Kapatbn 6ypaHbI3
Iinncncepre ty3 Kockan caibn 6yJ npoceypaHbOpbHaarXeH.
Xyy zukblb6apbcihda kontheHepre Kyfbi 3aT kipin KeTneTIHde KaKnaK Mbltan XabJIFaHbHa Ke3 KeTki3iH3 (aHTnce, cy XymCapTKblbl Jehdye ReKeImeTIHde 6by3Iyby MyMKIH).
A KaKeT Ke3e, Jyy CnKnblHaH 6ypbH T3dbI eJlwn aIbIHbI3, cOaIIwa T3 DnCneHcePiH eBikKaH Ke3 KeIreH T3 epiHicj K0bIaIbI. - Tek keh6ip ynlirpe 6ap.
Cy MeH ToKtbl eWipy
Cy afbin KeTneyi yuiH ap6ip Kyy uKbHaH KeiH cy wymeriH kaybln OTbipHbI3.
KypbIInfblHb Ta3aJlafah Ke3e JxHe TexHnKaJbIK KbI3MeT KepcTey XyMbICTapBnOpbIHdaFah Ke3e Ohbl TOkTaH axbipaTbHbI3.
bldbic kyy MaunHaCbIn Ta3aJay
KypblfnbHInh cbipTKbl 6eTepi meh backapy taKTacBn CymenblrfaHaFah, abpa3uBTi emec u7bepeKeNeh Ta3aIayfa6oIaBl. EpitkiTep Hemece abpa3uBTi epitHinep KOnlaHyra 6oImaIbI.
KypblfnbHbH iWihderi Ke3 KeInre h caTak i3epei cymen XaHe a3dAn cipKeMeH bIraJdaHaHfauSybepeKeH eKetipyre 6oJaBl.
XaftbIMcbI3 niCTepdiH aIdbH anLy
KpybIyfnHbIh iIi DbIMKbIJaHbIn Ketneyi ywiH OHbIH ecirH apdaibm 6ip3 aIbIn ycTaHbI3.
Eci aHaHacbHdaFb6eKtkiTep MeH Jyfb3aT dncnHcePepin Mep3imDi Tpyde bInFaI rgykamen Ta3an an OtbipbH3. MyhIn HAtnKeciHde 6eKtiKiTepDe TaMaK TypbIn KaImaHbI, aJ 6yn JaFdaJ XaFbIMcbI3 NICTepDIn NaJa da 6onybHIn Heri3ri ce6e6i.
To3aHdaTkbIsh 03ekwelepepiTa3anay
Tamak KaIbIKTapbi To3aHdAtkbIe 0eKwelepHb6etHe KaTbIN KaJIbIN, cy 1aWATbIH TecikTepei BiTeYi MymKiH. CoHdbIKTaH, 0eKwelepPi Me3imDi Type Tekcepi, MetaIcBi3 5eTkameh Ta3anaHbIn TyPraHbI KeH.
Eki to3aHaTbIsh e3ekweHi de uibfapbn anyra 6oaADB.
KorapfTo3aHdaTbIu 3eKUWeHi
UbIrapIn any yuHnPiactMaCCaHa
XacalFaH KyIbIiTay CaINHaCbH
caFat Tinihe Kapcb6afttta
6ypaHbI. KofarpTo3aHdaTbIu
3eKUWeHi TecIKTepi KeiipeK KaFbH
KoRapf KaPaTbIn KaITaHaOpHbHa
KOIO KepeK.
TemeHri T03aHaTkbls 03ekweshi6yipnepderi 1bIfbHKbl jepnepdi6acbln, OHbl kofapbl kapaTapyapkblbl 1bIfapbl anlya 6oanaBl.
CydbH Kipic cy3rici Ta3anay*
Cy TyikTepi JkaHa Hemece y3ak yaKbIT 6oBbI KOnlaHbImaFaH 6oJcA, kAnfamac bpybIn onap apkbln cy eTKi3in, Ta3a epi iuiHde KaIbIKTap jok ekeHHe Ke3 JeTki3iH3. ByI caKtbI KwaPacbi opbHdaIaMaca, cybH Kipic 6iteJin, bIbIC Kyy MaunHacbl 3aKbIMdaJIybl MyMKIH.
A Uymek XaftbHaftc cydbH Kipic cy3ricin Mep3imTi Typde Ta3anl OTbIpbHb3.
-CyUyMeryHxa6bIbI3.
-CydbH Kipic TyTirihin WeiH 6ocatbIn aIbHb3, OaH KeiH cy3riH aIbIn, OHbCy afblbActbHa xaKcblan TaanaHb3.
-Cy3rHiOpHbHaKoBbI,cyTytirHOpHbHa6paHaI3.
Cy3rjinepdi Ta3anay
Cy3ri KINHaFbI CydbI TaMaK KaNDbIKTapbIH Ta3aJaTbIH XHe OdaH KeiH CydbI KaTa aHaNDbIpaTbIH Yw Cy3rIeH TypaDbI. Op6ip Jyyda eH JkaKcbI HAtnKere KOJKeTki3rIi3 KeIce, OnapdbI Ta3anay Kepek.
Cy3rinepDi mep3imdi Tpyde ta3an an OTbipbHbI3.
Ablbc Jyy MaunHacbIH cy3ric3 Hemece cy3ri bocan KeTkeh ke3de naaDanaHyfa 60MaaiDbI.
-
BipHeWe pet JyFaHHaH KeiH, cy3ri JxHaFbIh TeKcepiH3 JxHe KaXeT 6oNa OHbl MeTaIcbl3 5eTkAmeh epi TEmHeDiH HyCKaynapdbOpBHaDn OTbIPbIn, Cy aBbHbI acTbIHDa JxKaKcbIan Ta3aIahbI3:
-
LInnHdpnik C cy3ricin cafat tinihe kapcbi 6aftta 6paHbI3 da, cybpbl anblHbI3 (1-cyper).
- 甲HbIaK B cy3ricin XneKeTepi a3dAn 6acy apKbIbI bIbIapbIn aJIbIbI3 (2-cyper);
- Tot 6acnaiTbH 6oNaT TiImWe A cy3riciH cybpIn aIbIHbI3. (3-cyper).
- Ty3aKbI Kapan IblHbI3 Da, Ke3 KeTReH TaMaK KaNDbIKTapBHaH Ta3apTbHbI3. Kyy UKNbl CopfblcHbH KOpfay KypanbH (Kapa TycTi 3a) ELKAWAH AUYbI BOJMAHbI3 (4-cyper).
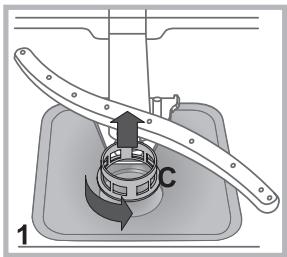
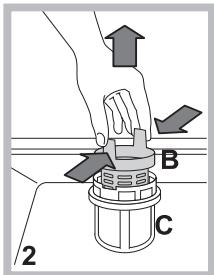

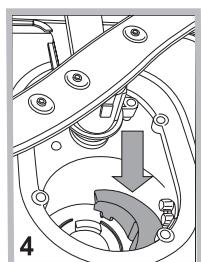
Cy3rinepTa3anaFaHHaKeiH,Cy3rXINHaBbIHOpHbHaKoYbIN, OHblDpybCTan6ekitih;0ynblDbIC KyyMaunHaCbIH TImDi Kymbcbl YsiH eTe MaHbI3dbI.
MaunHaBly 3aK yaKbIT naJaIaN6ayra KaIdbIpy
KypbIJIfBiHbI TOKTah aftiTbIn, cy WjMyerIH Xa6blHbI3.
KypblfbciriH cAaBk KaIbIpblb3.
KaiTbIn KeIReH Ke3De, BiDbic Kyy MaunHacbH 6oc yCTan Kyy UIKJIbH Icke KOCbIHbI3.
* TeK Kei6ip yIrrinepe 6ap.
Kypblfbl dypbic xmbic icTeMei KaIFAH Ke3e, KEmek KbI3MeTIHe Tenefoh COKnac 6ypbIH TeMeHderi TiImHne IweimDi i3deH3.
| Акayльк: | ыктимал сбentерi /шewimdeрi: |
| ыдьс чуу машинасы icke Косьлмайды hemece оны баckару МуKMн emec. | • Крьлгыны КOKС/ОШIPУ Туймесиб acу apьлы ewipiniz3, обан кейн оны bip shamamem bip mHyTTan KeiH KOSBn, SaftapnAmahb Kaitya opHaTbHb3. • Крьлгы розТКага дурьс КOSTIMarfaH. • bldic chyy машинасын eciri duypic kaziblmaraH. |
| Есik чувлмайды. | • КльпВБОСТВIFAN.«Тык» etKeH dIb6IC ecTIJINREHWE ecIKTi KaTbI INTEPIH3. |
| ыдьс чуу машинасынан cy aflblmaiDbl. | • bldic chyy машинасын bIn ChIKKBy eNl anArykTALMgaran. • Cydln kipic Tytiri MaBlyckan («Орату» boLIMIH kapaHb3). • Afb3y Tytiri JxabllbIn KanFAH. • Cy3ri tamak KaNDbKTapbIMen biteLin n KalFAn. |
| ыдьс чуу машинасы shaMuadan TbIC шуbl mblfapadbl. | • Tabaknap bsp-bipine Hemece TozahdATKbUw E3ekWreTe TmN TapcsbIaNdubl. • Shamaadan TbIC ke6ik boLBy: Jxbyu 3at duypic eIlewHbEerH Hemece on bldic Jxuy maShuHaIapbInDa kondaHyaF kaonaiBbEmc. («ICke KocSy Jxeh naIaIaNHy» boLIMIH kapaHb3). |
| Tabaknap men CTaKaHdarpDlnH бетінда ak TycrTi Ka6bIkuMaH Hemece Tat KaIbIbKTapbIMen KanTalFan. | • Ta3aNaHraH Tys MeIsepi a3 Hemece MeIleepneMe napaMeTpci cydln KaTbIbYbHa DpybIC KoIbIMarH («ShaIora KEmekuli 3at JxHe Tys" boLIMIH kapaHb3). • Tys dinCneHcepHIn KacNaRbI duypic JxabILMaFah. • ShaIora KEmekuli 3at TayCbIIFAH Hemece Obln MELIepneMeci Tblm TEmH. |
| Tabaknap men CTaKaHdarp cbIb3bIgH Hemece peHrI KeKsiin. | • ShaIora KEmekuli 3aTbHm MELIepneMeCi Tblm Jxofapbl. |
| ыдьс-аяк dypbC KenTipinmei. | • Kentipy bafdapnAmacbI Jox KJy UZKJIbI TaHdIaNFaH. • ShaIora KEmekuli 3at TayCbIIFAH Hemece Obln MELIepneMeCi Tblm TEmH («ShaIora KEmekuli 3at JxHe Tys" boLIMIH kapaHb3). • ShaIora KEmekuli 3at dinCneHcepHIn napaMeTpI JxTePNIKTeJxOfarbl emec. • bldic-aay JxablcNtBn MaTePnAnDn Hemece ППACTIKTEH JxacalFAn. |
| Tabaknap ta3a emec. | • TaptnIaPraT bTm KeN bIDbc CanbHAn («TaptnIaPra bIbIC canu" boLIMIH kapaHb3). • bldic-aay duByc petTeIImereH. • To3aIaTbIbI e3ekWsepe epKIn Jxbyu anMiaDbl. • Kyy LcNKJIbI Tblm H3eK («Kyyu ZcIKLdApbl» boLIMIH kapaHb3). • Shamaadan TbIC ke6ik boLBy: Jxbyu 3at duypic eIlewHbEerH Hemece on bldic Jxuy maShuHaIapbInDa kondaHyaF kaonaiBbEmc. («ICke KocSy Jxeh naIaIaNHy» boLIMIH kapaHb3). • ShaIora KEmekuli 3at BSeIRHderI KacNaK dypbc JxabILMaFah. • Cy3ri Kip Hemece 6iteLin n KalFAn («Kytim KcpCetU xHe TexHnKaIbIK Kbl3Met KcpCetU» boLIMIH kapaHb3). • Ta3aNaHraH Tys DeHRei Temen («ShaIora KEmekuli 3at JxHe Tys" boLIMIH kapaHb3). |
| ыдьс чуу машинасы nc Кор的意义 - Shymek eшурл Дa6bln. Сигнал ectilediж HeH2O Jxazbl Керсетеidi. | •Жу�ende cy JoxK. •Сydln Kipic Tytiri MaBlyckan («Орату» boLIMIH kapaHb3.) • Shymekti aushbIb3, coNda KxpybIbIb6ipHeWe mHyTTan KeiH icke KocBlaIaBl. • KpybIbFlbToKtaRaH, ce6eBi cunHan beipinreHide ewbip epeket JxacalMaran. KOCY/ΘIWIpy TuymecinH KemerimEn KpybIbHb EwipinH, ODAH KeiH ShyMeKTi aushbIb3 da, dəl coN Tcymehi biPheWe cekHydTan KeiH bacy apkblb KpybIbHbI kaiTaDAn KocBlbI3. KpybIbHbI kaiTa 6aFdpamamlan, Jyy цИКЛьн кaitadAn bactaHb3. |
Kemek Kbl3metiHe xa6apnacnac 6ypbH:
- Поблманы Akayлбтардь кюн hyckaylbfBн Колдаи OТырпш ewyre 60laTbIHn, He 60maTbIHbH TeKcepiH3 («Akaylkbmapdbl kio» 6eimih KapaHbI3).
BaFdpamamaKaTa icKe KocbHb3 da, npo6Jema KeTkeHH TeKcepH3. - Поблемашишиме, Кэландьрьлfaн Тхнkaльк кемк бepy Кызmetihe xaбapлacьнbl3.

KyelaHdbipbJIMaFaH MaMaHdapFa Kbi3MeT KepeTei36eHi3.
- Precautions, advice and Assistance, 3-4
- Installation, 5-6
- Description of the appliance, 7
- Loading the racks, 8-9
- Start-up and use, 10
- Wash cycles, 11
- Special wash cycles and Options, 12
- Rinse aid and refined salt, 13
- Care and maintenance, 14
- Precautions, advice and Assistance
- General safety
- Disposal
- Saving energy and respecting the environment
- Saving water and energy
- Phosphate-free and chlorine-free detergents containing enzymes
- Assistance
- Before contacting Assistance:
- Never use the services of unauthorised technicians.
- Please have the following information to hand:
- Positioning and levelling
- Connecting the water and electricity supplies
- Connecting the water inlet hose
- Connecting the water outlet hose
- Anti-flooding protection
- WARNING: HAZARDOUS VOLTAGE!
- Electrical connection
- Anti-condensation strip*
- Advice regarding the first wash cycle
- Tips
- Lower rack
- Upper rack
- Tip-up compartments with adjustable position
- Third rack
- Adjusting the height of the upper rack
- Unsuitable crockery
- Damage to glass and crockery
- Starting the dishwasher
- Changing a wash cycle in progress
- Adding extra crockery
- Accidental interruptions
- Measuring out the detergent
- Instructions on wash-cycle selection and detergent dosage
- Special wash cycles and Options
- Notes:
- Wash options*
- The OPTIONS may only be set, changed or reset after the wash cycle has been selected and before the Start/ Pause button has been pressed.
- To deselect an option which has been set by mistake, press the corresponding symbol button again.
- Delayed start
- Short Time
- Extra drying
- Multi-functional tablets
- Zone Wash
- Measuring out the rinse aid
- NEVER pour the rinse aid directly into the appliance tub.
- Rinse-aid quantity setting
- Press ON/OFF to save the setting.
- Setting water hardness
- Measuring out the refined salt
- It is advisable to perform this procedure every time you add salt to the dispenser.
- Shutting off the water and electricity supplies
- Cleaning the dishwasher
- Preventing unpleasant odours
- Cleaning the sprayer arms
- Cleaning the water inlet filter*
- Cleaning the filters
- Leaving the machine unused for extended periods
- Sommaire
- HeicnpaBHOCTN mMeToDbInx yctpaHeHn, 58
- IopcoeHHeHne cInBHoro JlnaHra
- 3aunTa npOTnB 3aTOnJIeHnA
- BHIMAHNE: ONACHOE HANPJXEHNE!
- 3neKtpnueckoe noDcoeHHeHne
- Пленka 3ацntыl OT KOндсcaTata*
- PpeDynpexdHnno nepBomy nCpOJIb3ObaHnIO MaunHbI
- OtpereynuynTe Do3y onoJaacknBaTeJra
- Bb6op cTeHn JecTKoCTN BObl
- CpeIcTBA npOTnB HnnpTbIX 3anaXOB
- Ucstka opocnteJe
- Ipeed Tem kak o6paTntbC8 B CepBnC TexHnueckoro 06cJyXnBaHHa:
- Hnkorda He obaaTecb K HeynoHOMOeHHbIM TexHnKam.
- Pn o6paueHn B CepBna Texnueckoro 06cJyXnBaHna coo6uHTe:
- Cy anbin KeTyeH Kopray
- ECKEPTY: KAYINTI KEPHEY!
- TOKKa KaJfay
- KoHdEHaCuaJaHaN KopFaYbIh JeHTa*
- BipinchiyyuKlbHaKaTbICTbKeHeC
- XofapfblTapTna
- PozucbpeTTeTeIH KaibpMaJIb 6JIkTep
- XofapfbTaptNaHbIn 6niktirin peTey
- KofapbI taptnaHbIn 6niktiri TAPTNA BOC BOJFAHDA peTeyi kepk.
- Yushi Taptna
- JaibKcb3 bIbIC-aJk
- IbHbMeH bIDbc-aKtBih 3aKbIMdaIybl
- bldbic kyy MaunHaCbH icKe Kocy
- A - TokTbI 6apbIHwa a3 TyTbIHy ywiH KpypbINfbI 6enrIi 6ip y3ak 6eIncEHci3dk Ke3depiHne abTOMaTTbI Typpe yaKbITwa ewedi.
- OpbHdaIbIn JkaTKaH Kyy UnkblbH e3repty
- KocbIMba bIDbc-aK Kocy
- Ke3deincoK toktaynap
- Xyfb1w 3aTTbI eJnwey
- Xyy uNKbIH TaHay XeHe XyfbIi 3aT MOnIeepiHaBikTay HycKaynapbl:
- EckepTneJep:
- Xyy onzuaapbl*
- Kewiktipin 6actay
- Kbicka yaKbit
- +KocbImwaKeNTipy
- Biphewe fyuHKunycbI 6ap Ta6neTkanaP (Ta6neTkanaP)
- Eeinn kyy (Zone Wash)
- UaiofKaEMekwi 3aTTbI eJiwey
- Iaora kemekwi 3at napameTpi
- Cydbih KaTbIbnBifbIH oHaTy
- Ta3anaHfah Tv3dbI eJlwey
- Cy MeH ToKtbl eWipy
- bldbic kyy MaunHaCbIn Ta3aJay
- XaftbIMcbI3 niCTepdiH aIdbH anLy
- To3aHdaTkbIsh 03ekwelepepiTa3anay
- CydbH Kipic cy3rici Ta3anay*
- Cy3rjinepdi Ta3anay
- MaunHaBly 3aK yaKbIT naJaIaN6ayra KaIdbIpy
- Kemek Kbl3metiHe xa6apnacnac 6ypbH:
Brand : HOTPOINT
Model : LLD 8S111 X EU
Category : Washing machine