
F800X - Dash cam HP - Free user manual and instructions
Find the device manual for free F800X HP in PDF.


| Product Type | Dashboard Camera (Dash Cam) |
| Brand | HP |
| Model | F800X |
| Dimensions (L x W x H) | 6.5 x 4.5 x 3.2 cm |
| Weight | 80 g |
| Power Source | Built-in rechargeable lithium-ion battery, 12V cigarette lighter adapter |
| Video Resolution | Full HD 1080p (1920x1080) at 30 fps |
| Viewing Angle | 140° wide angle |
| Sensor | CMOS 1/2.7 inch |
| Storage | microSD card (not included) up to 64 GB, class 10 recommended |
| Main Features | Loop recording, motion detection, night vision, built-in GPS, G-sensor |
| Maintenance and Cleaning | Clean the lens with a soft, dry cloth. Do not use abrasive products. |
| Safety | Use the provided mounting bracket. Do not obstruct the driver's view. |
| Spare Parts and Repairability | Battery, mounting bracket and USB cable available. Repair by HP authorized center. |
| General Information | User manual available in PDF. Operating temperature: -10°C to 60°C. Warranty: 1 year. |
Frequently Asked Questions - F800X HP
User questions about F800X HP
0 question about this device. Answer the ones you know or ask your own.
Ask a new question about this device
Download the instructions for your Dash cam in PDF format for free! Find your manual F800X - HP and take your electronic device back in hand. On this page are published all the documents necessary for the use of your device. F800X by HP.
USER MANUAL F800X HP
natural_image
HP logo in white on black circular background, no additional text or symbolsf800x
Car Camcorder
The battery for this car camcorder is sealed internally. DO NOT attempt to disassemble the camcorder and remove the battery.
Always charge using the provided system. Improper charging of the battery may result in explosion.
The battery is designed for this camcorder and is not customer replaceable.
Batteries may explode if exposed to naked fire. Never expose the car camcorder in a fire.
◆ Recycle the camcorder observing local regulations.
Notes on Installation
- Install the device near the rear-view mirror to obtain the best open-field view. Do NOT install the camcorder in a location that will obstruct your required driving view.
- Make sure that the lens is within the wiping range of the windshield wiper to ensure a clear view even when it rains.
- Do not touch the lens with your fingers. Finger grease may be left on the lens and will result in unclear videos or snapshots. Clean the lens on a regular basis.
- Do not install the device on a tinted window. Doing so may damage the tint film.
- Make sure that the installation position is not hindered by the tinted window.
User Notice
-
This car camcorder is equipped with many Advanced Driver Assistance System (ADAS) features. Please note that this car camcorder will NOT, automatically apply brakes, control the steering, or control other functions of your vehicle to avoid traffic accidents. These features are intended to be for reference only. There are many variables that can cause these ADAS features to not function correctly and therefore it is the sole responsibility of the driver to operate their vehicle according to all the local safety and traffic laws.
-
The ADAS/Driving Safety features such as LDWS, FCWS, Front Vehicle Go, Headlight warning, Speed Cam Alert, Speed Limit Alert, Driver Fatigue Alert and ACC/DEC Alert will be disabled, if the camcorder is not connected to the car charger.
1 Introduction
1.1 Package Contents
The package contains the following items. In case there is any missing or damaged item, contact your dealer immediately.
Camcorder Bracket

natural_image
Technical line drawing of a camera with concentric circular components (no text or symbols)
natural_image
Simple line drawing of a stylized object resembling a hat or flask (no text or symbols)CD-ROM Quick start guide Car adapter

natural_image
Simple concentric circle diagram with no text or symbols

natural_image
Illustration of a computer mouse with a cord and cable (no text or symbols)1.2 Product Overview
Top and Bottom Views

Side (Left and Right) Views

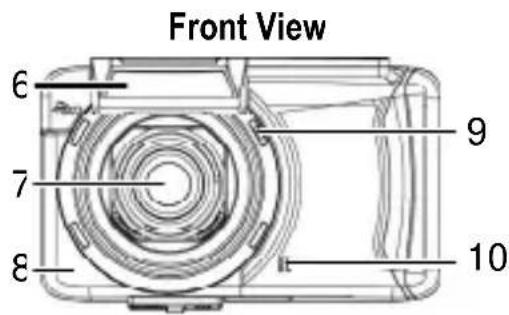

| No. Item No. Item | |
| 1 Bracket Socket 7 Wide Angle Lens | |
| 2 Memory Card Slot 8 Wi-Fi Transmission | |
| 3 Power Switch 9 Speaker | |
| 4 LED Indicator 10 Microphone | |
| 5 USB / Power Connector 11 | |
| 6 GPS Antenna |
2 Getting Started
2.1 Inserting the Memory Card
Insert memory card with the gold section facing upward and the screen of the camcorder facing upward too, as illustrated. Push the memory card in until a click sound is heard, indicating the card is in position.

natural_image
Line drawing of a rectangular electronic device with a card inserted, showing internal components and an arrow pointing to the card (no text or symbols present)To remove the memory card
Push to eject the memory card out of the slot.
Note:
- Do not remove or insert the memory card when the camcorder is turned on. This may damage the memory card.
- Please use a Class 6 or higher rating Micro SD card, max. up to 32GB.
- Please format the micro SD cards before the initial use.
- When removing the memory card, be careful that the card may spring out and get lost. The memory slot has this spring-out feature for easy removal of the card.
2.2 Installing in Vehicles
2.2.1 Mount to Windshield
- Push the bracket into bracket slot on top of camcorder, until a click sound is heard.

natural_image
Diagram of a digital camera with an attached sensor or sensor device (no text or symbols present)-
With the suction-cup laying flat, position the suction-cup on the windshield.
-
Hold the base firmly on the windshield and press down the clamp to mount the car holder to the windshield. Make sure the base is securely locked in place.

natural_image
Line drawing of a device with a lid and arrow indicating rotation or movement (no text or symbols)2.2.2 Adjust the Camcorder position
- Loose the knob to swivel the camcorder vertically.

- Loose the knob to swivel the camcorder horizontally up to 360° .

- Then tighten the knob to make sure the camcorder is securely locked in place.
2.3 Connecting to Power
Use only the supplied car adapter to power up the camcorder and charging the built-in battery.
- Connect one end of car adapter to USB/Power connector port on the camcorder.

natural_image
Line drawing of a device rear panel connected to a cable, showing an arrow indicating direction (no text or symbols present)- Plug the other end of the car adapter to the cigarette lighter socket of your vehicle. Once the vehicle engine is started, the camcorder automatically powers on.

natural_image
Interior view of a car dashboard and steering wheel with red dashed lines indicating lane markings (no text or symbols)Note:
This product should be installed near the rear view mirror, at the center and top of windshield for optimal viewing.
2.4 Powering the Camcorder On / Off
2.4.1 Auto Power On/Off
Once the vehicle engine is started, the camcorder automatically turns on. If the Automatic Record function is enabled, the recording will automatically start right after the camcorder turns on.
2.4.2 Manual Power On/Off and Reset
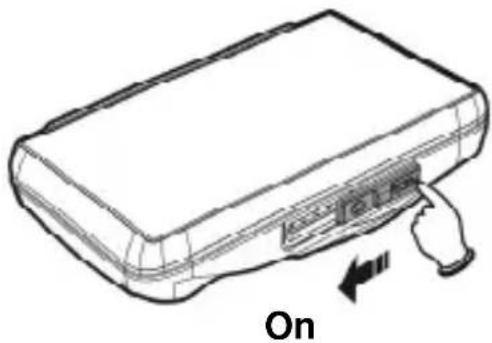
2.4.2.1 Manual Power On
Push the power switch and make sure that the power switch locks on the memory card slot.
natural_image
Line drawing of a briefcase with a hand pressing a button labeled 'On' (no other text or symbols)2.4.2.2 Power Off
Push the power switch and make sure that the memory slot is released and the camcorder starts power off sequence. Do not power on the camcorder when it is in the power-off sequence, or the recorded file may become corrupt.

2.5 Initial Settings
Before using the camcorder, we recommend you to enable the Automatic Record function and set up the correct Date and Time.
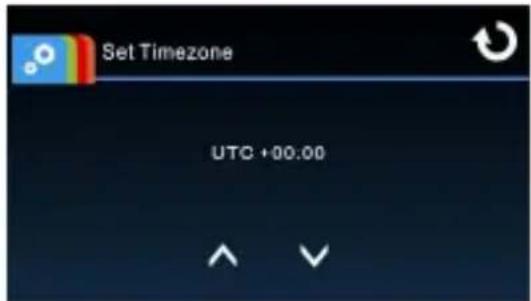
2.5.1 Setting the Universal Time Code (UTC)
Depending on your location, you may need to change the current UTC setting of the camcorder so that the correct date and time are updated
when a GPS signal is detected.
- Touch to enter Main Menu.
- In System main menu,
touch < > for
Set Timezone menu, touch

zone; then touch to complete setting.

| City | UTC | City | UTC | City | UTC | City | UTC | City | UTC |
| Accra | 0 | Budapest * | +1 | Houston * | -6 | Melbourne | +10 | Santiago | -4 |
| Adolis Ababa | +3 | Buenos Aires | -3 | Indianapolis * | -5 | Mexico City * | -6 | Santo Domingo | -4 |
| Adelaide ** | +9 | Cairo | +2 | Islamabad | +5 | Miami * | -5 | São Paulo | -3 |
| Algiers | +1 | Calgary * | -7 | Istanbul * | +2 | Minneapolis * | -6 | Seattle * | -8 |
| Almaty | +6 | Canberra | +10 | Jakarta | +7 | Minsk | +3 | Seoul | +9 |
| Amman * | +2 | Cape Town | +2 | Jerusalem * | +2 | Montevideo | -3 | Shanghai | +8 |
| Amsterdam * | +1 | Caracas ** | -4 | Johannesburg | +2 | Montreal * | -5 | Singapore | +8 |
| Ansdyr | +12 | Cesablanca * | 0 | Kabul ** | +4 | Moscow | +4 | Sofa * | +2 |
| Anchorage * | -9 | Chicago * | -6 | Karachi | +5 | Mumbai ** | +5 | St. John's ** | -3 |
| Ankara * | +2 | Columbus * | -5 | Kathmandu ** | +5 | Nairobi | +3 | Stockholm * | +1 |
| Antananarivo | +3 | Copenhagen * | +1 | Khartoum | +3 | Nassau * | -5 | Suva | +12 |
| Asuncion | -4 | Dallas * | -6 | Kingston | -5 | New Delhi ** | +5 | Sydney | +10 |
| Athens * | +2 | Dar es Salaam | +3 | Kinshasa | +1 | New Orleans * | -6 | Taipei | +8 |
| Atlanta * | -5 | Darwin ** | +9 | Kirikimati | +14 | New York * | -5 | Tallinn * | +2 |
| Auckland | +12 | Denver * | -7 | Kolkata ** | +5 | Oslo * | +1 | Tashkant | +5 |
| Baghdad | +3 | Detroit * | -5 | Kuala Lumpur | +8 | Ottawa * | -5 | Tegucigalpa | -6 |
| Bangalore | +5 | Dhaka | +6 | Kuwait City | +3 | Paris * | +1 | Tehran ** | +3 |
| Bangkok | +7 | Doha | +3 | Kyiv * | +2 | Perth | +8 | Tokyo | +9 |
| Barcelona * | +1 | Dubai | +4 | La Paz | -4 | Philadelphia * | -5 | Toronto * | -5 |
| Beijing | +8 | Dublin * | 0 | Lagos | +1 | Phoenix | -7 | Vancouver * | -8 |
| Beirut * | +2 | Edmonton * | -7 | Lahore | +5 | Prague * | +1 | Vienna * | +1 |
| Belgrade * | +1 | Frankfurt * | +1 | Las Vegas * | -8 | Reykjavik | 0 | Warsaw * | +1 |
| Berlin * | +1 | Guatemala | -6 | Lima | -5 | Rio de Janeiro | -3 | Washington DC * | -5 |
| Bogota | -5 | Halifax * | -4 | Lisbon * | 0 | Riyadh | +3 | Winnipeg * | -6 |
| Boston * | -5 | Hanoi | +7 | London * | 0 | Rome * | +1 | Yangon ** | +6 |
| Brasilia | -3 | Harare | +2 | Los Angeles * | -8 | Salt Lake City * | -7 | Zagreb * | +1 |
| Brisbane | +10 | Havana * | -5 | Madrid * | +1 | San Francisco * | -8 | Zürich * | +1 |
| Brussels * | +1 | Hong Kong | +8 | Managua | -6 | San Juan | -4 | ||
| Bucharest * | +2 | Honolulu | -10 | Manila | +8 | San Salvador | -6 |
* Be sure to adjust for daylight saving time (DST) by adding +1 hour to the UTC offset.
** These areas may observe half hour increments and daylight saving time (DST).
2.6 Application
2.6.1 Application installation
-
Search from Google Play or App Store for Pixi Cam application.
-
Install the App.

APP Layout and Features may be changed subject to different software versions. Please refer to Google Play or APP Store for update
2.6.2 Wi-Fi connecting
- Touch to enter Main Menu.
- Touch to switch over to System Main Menu.
- Touch /
for entering Wi-Fi function menu wait for screen to display camcorder ID and Wi-Fi password

Note:
Wi-Fi function is dependent on the model purchased.

- Using Wi-Fi function of a mobile camcorder, search for camcorder ID from the list and select and enter Wi-Fi Password.
For iOS / Android Users:
Using the mobile camcorder [Settings] → [Wi-Fi] → [Select
camcorder ID no.: f800xXXXXXX] → [Enter the password] →
[Connecting]
- Launch the Pixi Cam App。

- To disconnect Wi-Fi link, just exit Pixi Cam Application.

Note:
- Make sure the Wi-Fi function of the equipment is activated and the mobile camcorder is receiving Wi-Fi signal before executing the Pixi Cam App, or the App will be closed.
- The mobile device shall be within a maximum of a 10m distance from the equipment without any buildings in between.
- When the Wi-Fi function of the equipment is activated for 3 minutes without connecting with your mobile device, or the connection is disconnected, the equipment will automatically stop the Wi-Fi function and you will need to re-activate the Wi-Fi function.
- It is recommended that you should set the correct date and time for your mobile device before using the equipment, so that the recorded video will be consistent with the date and time settings of the mobile device.
- When linking up with a mobile device, touch-control of camcorder screen is no longer effective. Perform operations via the Pixi Cam Application. For operating the camcorder again, you need to exit the Pixi Cam Application first. To operate the camcorder, please quit the Pixi Cam program, and restart.
- The language of the Pixi Cam App will be consistent with that of your mobile device, it shall be the default language if it is not the built-in one.
3 Using the Car Recorder
3.1 Recording Videos
3.1.1 Record videos while driving
When the vehicle engine starts up and the Automatic Record function is enabled, the camcorder automatically turns on and starts recording.
The touch panel function is not ready yet within 2 seconds upon the Auto Recording start.
Recording will automatically stop when the engine is switched off, or
when touching the to stop recording manually.
Note:
- With some vehicles, the recording will continue when the engine is switched off. If this happens, please manually turn off the cigarette lighter /power socket or remove the car adapter from the cigarette lighter.
- It can be configured to save a video file for every 3 or 5 minutes of recording.
- The camcorder saves the recording in the memory card. If the memory card capacity is full, the oldest file in the memory card is overwritten.
3.1.2 Emergency Recording
Start the Emergency Recording, do the following:
- During video recording, touch

to enter emergency
recording mode, the “Emergency” message will be shown immediately on the lower left corner of the screen, and the recorded file will be protected.

The camcorder will record an emergency video of 3 or 5 minutes (depending on the setting) or until manually stopped.
- Touch again, to halt the recording.
3.2 Driving Safety
The following driving safety function is for reference only. Divers are advised to exercise discretion based on actual road conditions
| Function List Description | ||
 | LDWS | Once your vehicle's location is determined by GPS and the LDWS function is enabled, this feature produces voice and screen message alerts if your vehicle drifts from or changes lanes at speeds over 50 km/h (31 mile/h). |
 | FCWS | When FCWS is activated after satellite positioning, camcorder will issue a voice alert and an alarm image when vehicle speed is above 60 km/h (37 mile/h) and the distance with the front vehicle is less than 20m. |
 | Front Vehicle Go | Once your vehicle's location is determined by GPS and the Front Vehicle Go function is enabled, this feature starts to detect the motion of cars in front of you after your car remains motionless for 20 seconds. It produces voice and screen message alerts when the movement of the car in front of you changes its images in the camera. |
 | Headlight Warning | When Headlight is activated, camcorder will issue a voice alert and an alarm screen reminding that insufficient brightness is sensed on the recording face. |
 | Driver Fatigue Alert | If the Driver Fatigue Alert function is enabled, this features produces voice and screen message alerts one hour after it has begun recording and repeats the alerts every half an hour afterwards. |
 | Motion Detection | If Motion Detection is activated, the camcorder will automatically trigger recording when the camcorder detects any motion in front. When the battery is fully charged and is in good condition, Motion Detection can record continuously for about 30 minutes. |
 | Collision Detection | If Collision Detection is activated, this feature begins emergency recording once it detects any vibrations caused by a collision. |
 | ACC/DEC Alert | This feature produces voice and screen message alerts if the ACC/DEC Alert function is enabled and the car accelerates 20 km/h (12.4 mile/h) in one second when driving at speeds over 80 km/h (50 mile/h) or decelerates 30 km/h (18.6 mile/h) in one second when driving at speeds under 50 km/h (31 mile/h) after position is determined by GPS. |
3.3 Playing Videos and Viewing Pictures
3.3.1 Playing Videos and Emergency Recording
Playback video record files as follows:
- Touch to enter main menu.
- Touch to switch over to File / Position menu.
- Touch / video/video/Emergency function menu.


- Touch / < > for required video file, touch selected preview of video to enter Playback Mode

- Touch positively to return to Record Screen.
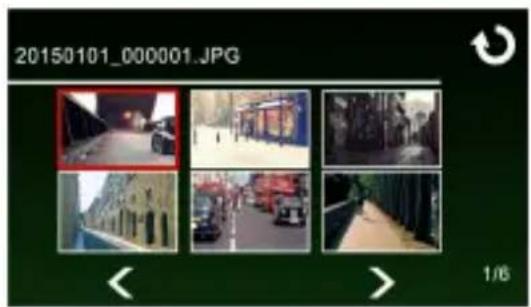
3.3.2 Viewing Pictures
View pictures as follows:
-
Touch to enter Main Menu.
-
Touch to switch over to File / Position main menu.
-
Touch to enter Picture function menu.
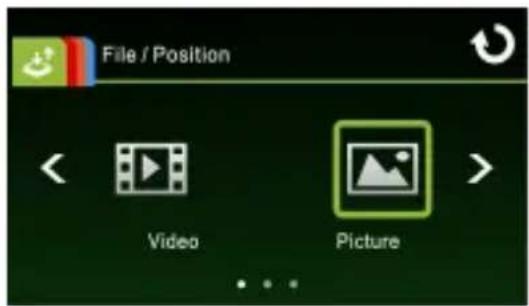
- Touch / For the file for required picture files, touch selected preview of picture to enter Picture Playback Mode.
natural_image
Grid of six street scenes with vehicles and buildings, displayed in a photo editing interface (no readable text or symbols on the scenes themselves)- Touch respectively to return Record Screen.
3.3.3 Deleting Files
To delete file(s), do the following:
- Touch to enter Main Menu.
- Touch to switch over to File / Position main menu.
- Touch 🎯/ 🎯/ 🎯 to enter Video/Picture/Emergency menu.
-
Touch / < > for required video or picture file; touch selected preview image to enter Video/Picture Playback Mode.
-
Touch ☐ to enter File Deletion menu, select 📋/ 📋 to delete one file or all files; touch 🔒 to confirm or cancel the selection.

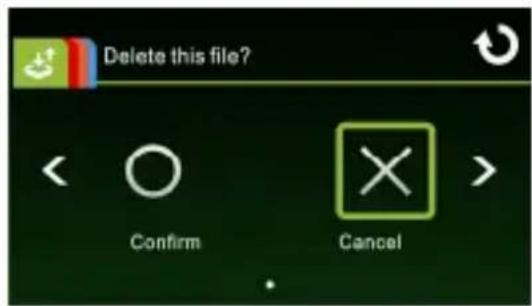
| Item Description |
| Delete One Delete the current file. |
| Delete All Delete all files. |
- Touch respectively to return to Record Screen.
Note:
Deleted files cannot be recovered. Ensure the files have backup before deletion.
natural_image
Technical line drawing of a camera with concentric rings and a side panel (no text or symbols)CD-ROM

natural_image
Simple line drawing of a stylized object resembling a bottle or container (no text or symbols)natural_image
Simple concentric circle diagram with no text or symbols

natural_image
Illustration of a computer mouse with a cord and cable (no text or symbols)natural_image
Line drawing of a rectangular electronic device with a card inserted, showing internal components and an arrow pointing to the card (no text or symbols present)natural_image
Line drawing of a digital camera with an overhead lamp and base mount (no text or symbols)natural_image
Line drawing of a device with a lid and arrow indicating rotation or movement (no text or symbols)natural_image
Line drawing of a device rear panel connected to a cable, showing an arrow indicating direction (no text or symbols present)natural_image
Interior view of a car dashboard and steering wheel (no text or symbols visible)Remarque:
natural_image
Line drawing of a rectangular electronic device with a hand pressing a button (no text or symbols)En service
2. Touchez

natural_image
Technical line drawing of a camera module with no visible text or symbols
natural_image
Simple line drawing of a stylized object resembling a hat or flask with a handle (no text or symbols)CD-ROM Guia rápido Adaptador veicular

natural_image
Simple concentric circle diagram with no text or symbols

natural_image
Illustration of a medical device with a bulb and cord (no text or symbols)natural_image
Line drawing of a rectangular electronic device with a card inserted, showing internal components and an arrow pointing to the card (no text or symbols present)natural_image
Line drawing of a digital camera with an overhead sensor or lens assembly (no text or symbols)natural_image
Line drawing of a device with a magnifying glass and arrow indicating rotation (no text or symbols)natural_image
Diagram of a device rear panel connected to a cable, showing an arrow indicating direction (no text or symbols present)natural_image
Interior view of a car dashboard and steering wheel with red dashed lines indicating lane markings (no text or symbols)Observação:
natural_image
Grid of six black-and-white street photos showing urban and commercial scenes, no visible text or symbolsnatural_image
Technical line drawing of a digital camera with concentric rings and a side panel (no text or symbols)
natural_image
Simple line drawing of a stylized heart-shaped object with no text or symbolsnatural_image
Simple concentric circle diagram with no text or symbols

natural_image
Illustration of a medical device with a bulb and cord (no text or symbols)natural_image
Line drawing of a rectangular electronic device with a card inserted, showing internal components and an arrow pointing to the card (no text or symbols present)natural_image
Diagram of a digital camera with an attached sensor or lens assembly (no text or symbols present)natural_image
Line drawing of a camera with an adjustable lens and screen, showing motion arrows (no text or symbols)natural_image
Line drawing of a device rear panel with an external cable pointing to it (no text or symbols)natural_image
Interior view of a car dashboard and steering wheel with red dashed lines indicating lane markings (no text or symbols)Nota:
natural_image
Grid of six outdoor scenes with vehicles and buildings, displayed in a photo editing interface (no readable text or symbols on the images themselves)
- Notes on Installation
- User Notice
- Introduction
- Package Contents
- Product Overview
- Getting Started
- Inserting the Memory Card
- To remove the memory card
- Note:
- Installing in Vehicles
- Mount to Windshield
- Adjust the Camcorder position
- Connecting to Power
- Powering the Camcorder On / Off
- Auto Power On/Off
- Manual Power On/Off and Reset
- Manual Power On
- Power Off
- Initial Settings
- Setting the Universal Time Code (UTC)
- Application
- Application installation
- Wi-Fi connecting
- Using the Car Recorder
- Recording Videos
- Record videos while driving
- Emergency Recording
- Driving Safety
- Playing Videos and Viewing Pictures
- Playing Videos and Emergency Recording
- Viewing Pictures
- Deleting Files
- Remarque:
- Touchez
- Observação:
- Nota:
Brand : HP
Model : F800X
Category : Dash cam