
Dimension Sub - Subwoofer FOCAL - Free user manual and instructions
Find the device manual for free Dimension Sub FOCAL in PDF.


| Product Type | Powered subwoofer |
| Dimensions (H x W x D) | 390 x 400 x 400 mm |
| Weight | 13 kg |
| Amplifier Power | 300 W RMS |
| Frequency Response | 27 Hz – 200 Hz |
| Driver Diameter | 11" (27 cm) |
| Impedance | 4 ohms |
| Inputs | LFE (RCA), stereo line level, high-level speaker binding posts |
| Outputs | RCA line output |
| Enclosure Type | Bass-reflex (ported) |
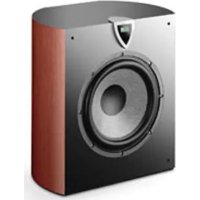
| Finish | Black ash vinyl, high-gloss black lacquer |
| Auto-Standby | Yes, with adjustable sensitivity |
| Phase Control | 0° / 180° switch |
| Low-Pass Crossover | Variable 50 – 200 Hz |
| Power Supply | AC 230V, 50/60 Hz |
| Power Consumption | 400 W max, <0.5 W standby |
| Warranty | 2 years (parts and labor) |
| Included Accessories | Power cable, RCA interconnect, user manual |
| Placement | Floor standing, front or corner |
Frequently Asked Questions - Dimension Sub FOCAL
User questions about Dimension Sub FOCAL
0 question about this device. Answer the ones you know or ask your own.
Ask a new question about this device
Download the instructions for your Subwoofer in PDF format for free! Find your manual Dimension Sub - FOCAL and take your electronic device back in hand. On this page are published all the documents necessary for the use of your device. Dimension Sub by FOCAL.
USER MANUAL Dimension Sub FOCAL
English : page 5 Deutsch : página 30 Русский стр. 54
This device complies with part 15 of the FCC Rules. operation is subject to the following two conditions:
- This device may not cause harmful interference.
- This device must accept any interference received, including interference that may cause undesired operation.
 |  |  |
| The lightning flash with arrowhead symbol within an equilateral triangle, is intended to alert the user to the presence of uninsulated "dangerous voltage" within the product's enclosure that may be of sufficient magnitude to constitute a risk of electric shock to persons. | Caution: to prevent the risk of electric shock, do not remove cover (or back). No user-serviceable parts inside. Refer servicing to qualified service personnel. | The exclamation point within an equilateral triangle is intended to alert the user to the presence of important operating and maintenance (servicing) instructions in the literature accompanying the product. |
| 1. Read these instructions.2. Keep these instructions.3. Take these warnings into consideration.4. Follow all the instructions.5. Do not use this equipment around water.6. Only clean with a dry cloth.7. Do not cover ventilation outlets. Follow manufacturer's instructions when installing the equipment.8. Do not install the equipment near a source of heat, a cooker, a heating duct or other equipment (including amplifiers) which gives off heat.9. Respect safety instructions for power cable. The power cable has two prongs, one of which is larger than the other. A grounded cable has two prongs as well as a third which is the grounding prong. The largest or third prong is there for your safety. If the power cable doesn't fit your power socket, seek the advice of an electrician and replace the old power socket.10. Make sure the cable cannot be stepped on, crushed or pinched. Extreme care must be paid to the plug and the connection of the cable to the equipment.11. Only use accessories recommended by the manufacturer.12. Only use handling equipment, legs, tripods, supports or tables recommended by the manufacturer or those sold with the equipment. When using a cart, take extra care when moving the cart and equipment to avoid injury in case something falls.13. Disconnect the equipment in case of a thunderstorm or if left unused for extended periods of time. | 14. All maintenance must be carried out by a qualified professional. Maintenance is required following any damage caused to the equipment such as deterioration of the power cable or plug, spillage of liquid or insertion of objects inside the equipment, exposure to rain or humidity, poor functioning or physical damage.15. Do not use any accessories which aren't recommended by the manufacturer to avoid any risk.16. This product should only be connected to the type of power supply as indicated on the label on the equipment. In case of uncertainty as to the type of power supply of your electrical installation, consult the manufacturer of the product or your electricity provider. For equipment requiring a battery or another power source, consult the user manual. | 17. Do not overload power sockets, extension cables or power strips. This could lead to fire or electric shock.18. Never insert objects in the ventilation outlets of the equipment. The object may come in contact with components exposed to high voltages or cause short-circuiting and lead to fire or electric shock. Never spill liquid on the equipment.19. Never try to repair this equipment yourself; opening the equipment may expose you to high voltages or other risks. For all maintenance, consult a qualified professional.20. In case a replacement part is required, make sure the maintenance technician uses parts specified by the manufacturer or which have identical specifications to the original part. Non-compliant parts may lead to fire or have other risks.21. Following any intervention or repair to the equipment, ask the technician to carry out tests to verify the product works safely.22. The equipment must not be mounted to the wall or ceiling unless the manufacturer has intended it to, and only depending on antenna cables.23. Do not expose to dripping water or splashing.24. CAUTION: May cause an explosion if battery is incorrectly replaced. Replace only with the same or equivalent type. |


- Safety instructions 3
- Summary
- Package contents
- Presentation
4.1. Multichannel surround sound
4.2.User interface 8
4.3. Connections panel 9
4.4. Remote control 10 - Positioning and installation 11
5.1. Positioning Dimension 11
5.2. Installation on a TV cabinet 12
5.3. Mounting to a wall 13 - Settings selectors 14
6.1. "DISTANCE" selector 14
6.2. "POSITION" selector 15
6.3. Adaptation to the room's acoustic 16
6.4. "SUBWOOFER" selection 17 -
Connections 18
7.1. Connecting Dimension to your TV 18
7.2. Connecting the HDMI™ In input 19
7.3. Examples of connections 20
7.3.1. Connection example 1 20
7.3.2. Connection example 2 21
7.3.3. Connection example 3 22
7.3.4. Connection example 4 23
7.4. Connecting a subwoofer 24 -
Use and functions 25
8.1. CEC function
(Consumer Electronics Control) | 25
8.2. Power mode 25
8.3. Setting TV audio format and Audio-Video source 25
8.4. Volume control 25
8.5. Input selector 26
8.6. Night mode 26
8.7. Bass level settings 26
8.8. Audio-Video synchronisation (lip-sink) 26 8.9. Light function 27
-
Troubleshooting | 27-28
-
Technical specifications 29
26
You have just purchased a Focal product. We would like to thank you and welcome you to our world of high-fidelity. Focal has been designing, developing and manufacturing high-end speaker drivers and loudspeakers for more than 30 years. More recently, the first pair of Focal headphones was launched. Innovation, tradition, performance and pleasure are our key values which characterise the "Spirit of Sound". Wherever you may be, we have one goal: to unite people around a common passion for rich and authentic sound.
The Dimension soundbar was designed with this philosophy in mind, and our goal is to apply our expertise in the field of acoustics to other uses other than traditional hi-fi loudspeakers in order to give cinephiles something to be excited about: natural, dynamic and high-definition audio which takes you right to the heart of the action.
3. package contents

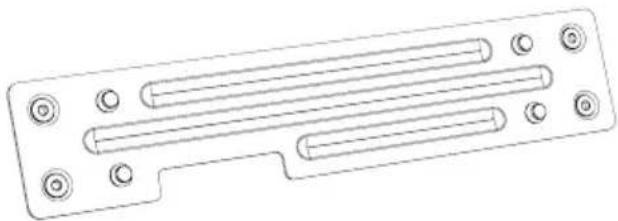
1 x Wall mount

2 x Stands
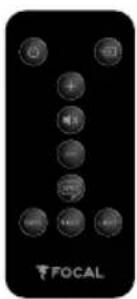
1 x Remote control 1 x user manual

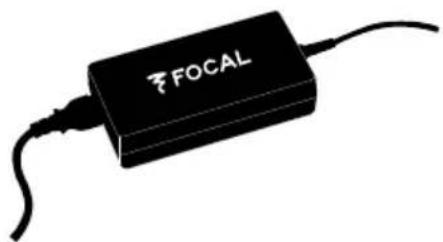
1 x Power unit
1 x Power cable

4. Presentation
4.1. Multichannel surround sound
Dimension is compatible with multichannel protocols Dolby Digital® and DTS®. What's more, Dimension uses a built-in virtualisation algorithm which transforms stereo signals into real multichannel audio.


4.2. User interface
Dimension features a touch screen display for controlling volume, inputs and listening mode. The display stays off during the viewing. Equipped with a proximity sensor, Dimension automatically turns on when you're nearby or when you use the remote control.

4.3. Connections panel
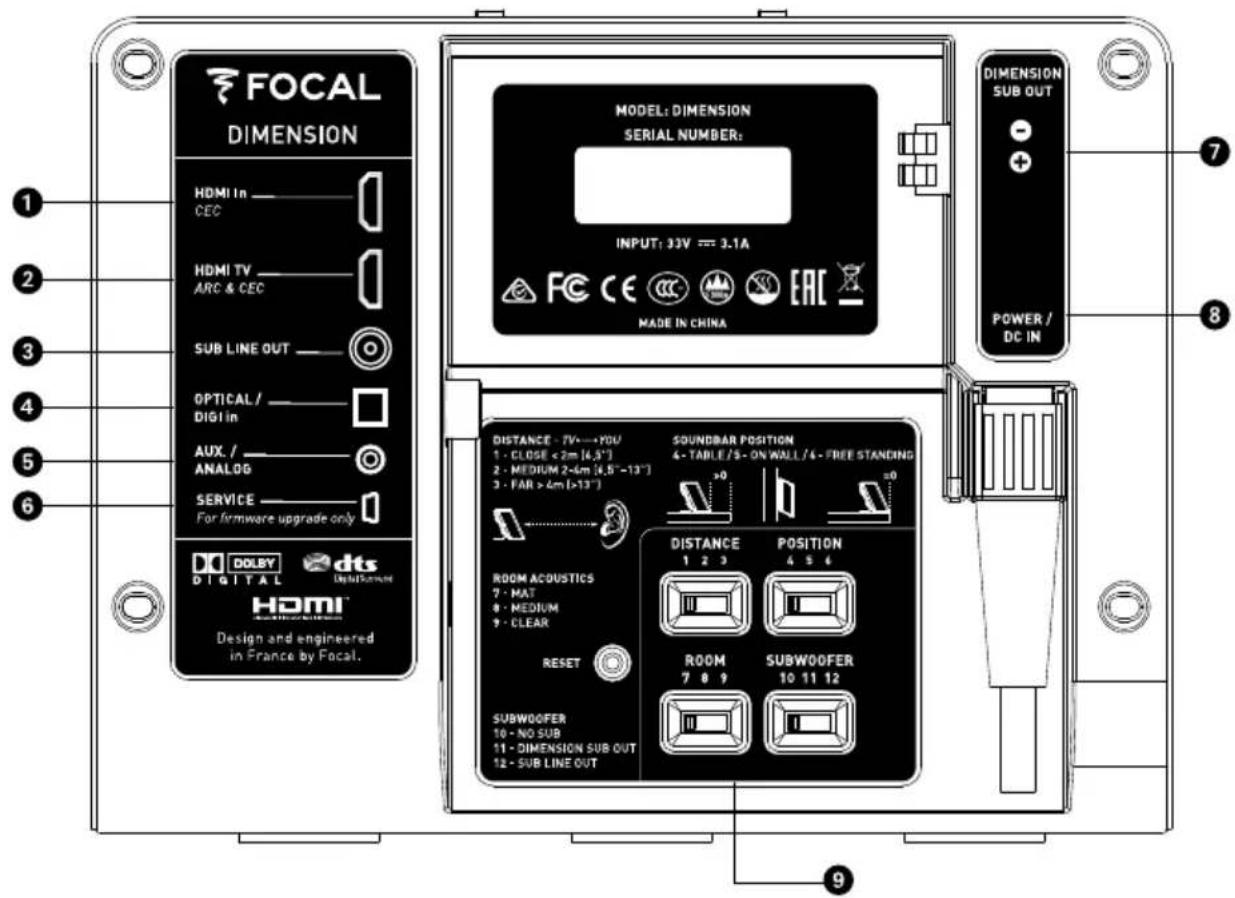
1 HDMI™ In: for connecting devices equipped with a HDMI™ interface: Blu-ray player / DVD player / games console / set-top box.
2 HDMI™ TV: for connecting a TV. Equipped with the ARC (Audio Return Channel) function, this bi-directional connexion receives audio signals from a TV or sends video signals to a TV.
3 SUB LINE OUT: RCA analogue output for connecting an external active subwoofer.
4 OPTICAL/DIGI In: for connecting to an optical audio output on a TV not equipped with a HDMI™ ARC. You can connect all other players equipped with digital optical outputs.
5 AUX / ANALOG: for connecting devices equipped with an analogue output: digital music players, tablets, computers...
6 SERVICE: this input is only used by the After Sales Service in case system updates are required.
7 DIMENSION SUB OUT: output solely dedicated to the Dimension Subwoofer.
8 POWER / DC IN: for connecting Dimension to a power supply.
9 SETTINGS SELECTORS: these 4 selectors enable you to adjust Dimension's audio according to your installation and to the acoustics of the room. See "Settings selectors" section (page 14) to make adjustments.
4.4. Remote control
Dimension is equipped with the CEC (Consumer Electronics Control) protocol. If your TV is equipped with this function, enabling this function will allow you to control your soundbar with your TV's remote control. The name used for the CEC protocol may vary from one TV manufacturer to another.
Universal and learning remote controls can be programmed to control Dimension. If required, you can find the infrared command codes on the Dimension soundbar webpage on Focal's website: www.focal.com.
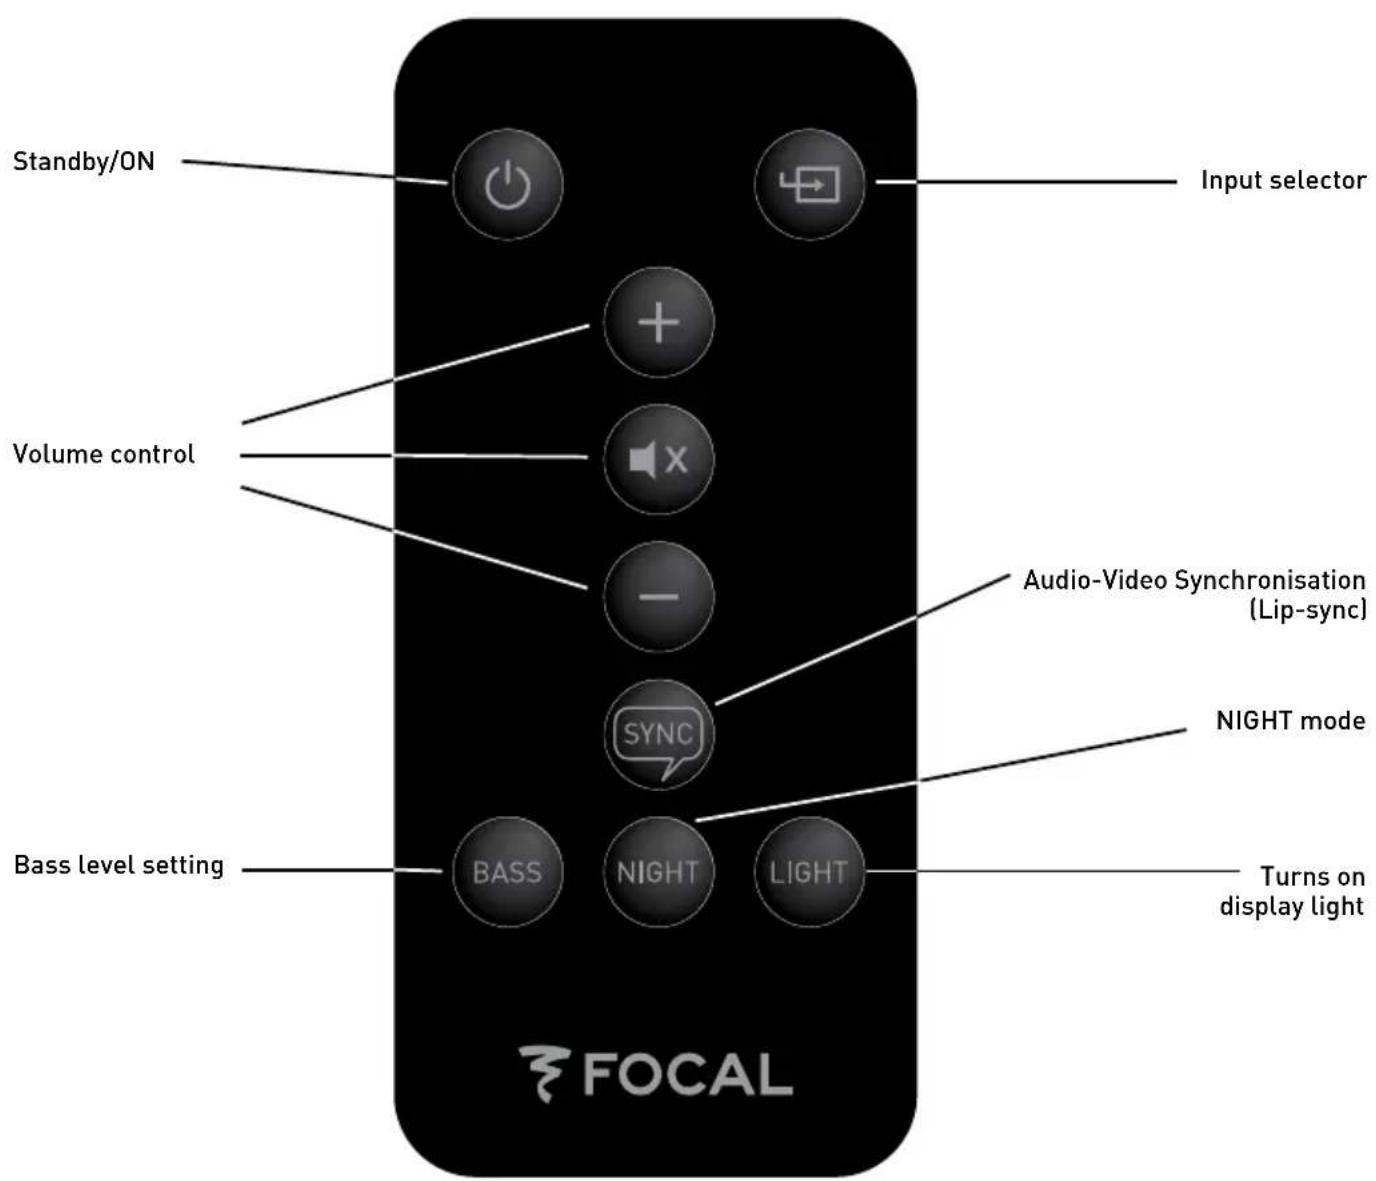
If your TV isn't equipped with the CEC function, or if you don't use a universal remote control, a remote control is supplied with Dimension. The remote control uses the same layout as the touchscreen on the soundbar.
Before using the remote control, remove the plastic tab from the remote control's battery compartment. To change the batteries on your remote control, open the battery compartment and replace with an identical battery type: CR2025.
5. positioning and installation
5.1. positioning Dimension
For the best surround sound, it is recommended to position your soundbar opposite the listening position in symmetry with the room's walls. The following diagrams show several recommended positions.

5.2. Installation on a TV cabinet
Before installing on a TV cabinet, the two stands provided must be assembled to Dimension as shown in the following diagram:

Neither end of the Dimension soundbar should be within 5cm of an obstacle (wall, furniture or other surfaces).


To give the soundbar more stability and to avoid it falling, we recommend positioning Dimension so it rests entirely on the TV cabinet.

Make sure the settings selector on the back panel is on the appropriate setting.
If Dimension is very close to the edge of your TV cabinet, set the "POSITION" selector to 6 - FREE STANDING.
In case of the contrary, set the "POSITION" selector to 4 - TABLE.
For more information on settings selectors, see "Settings selectors" section (page 14).
5.3. Mounting to a wall
Neither end of the Dimension soundbar should be within 5cm of an obstacle (wall, furniture or other surfaces).
Dimension can be installed above or below your TV according to its height.
Make sure the settings selector on the back panel is on the appropriate setting:
"POSITION" on 5 - ON WALL.
For more information on settings selectors, see "Settings selectors" section (page 14).
Dimension is supplied with a wall-mounting kit. Follow the installation procedure below.

1) Determine and mark the locations of the fixing holes. Use a spirit level to make sure Dimension is horizontal. Pass cables through the intended space on the wall mount.

2) Drill holes at the marked locations and insert dowel pins. Caution: use appropriate dowel pins for the type of wall. The wall, dowel pins and screws must be able to support the weight of Dimension: 12lbs (5,5kg).

3) Fix the wall mount to the wall.
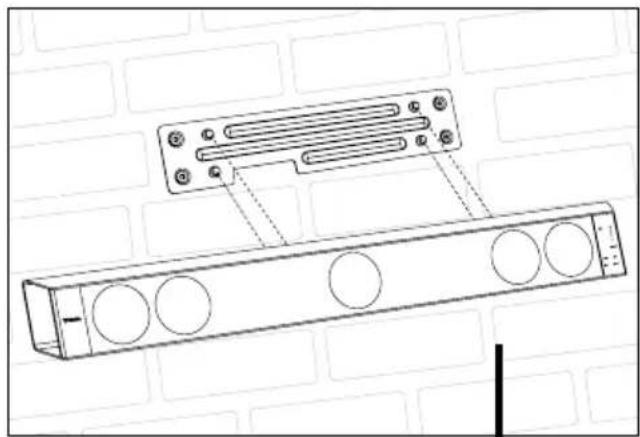
4) Connect the cables, then bring your soundbar up to the support, mounting Dimension to the 4 pins on the wall mount.

6. Settings selectors
Use the 4 selectors on the back panel to adjust Dimension's sound according to your listening room and your needs.
These settings selectors must be set before installing your soundbar permanently.
6.1. "DISTANCE" selector
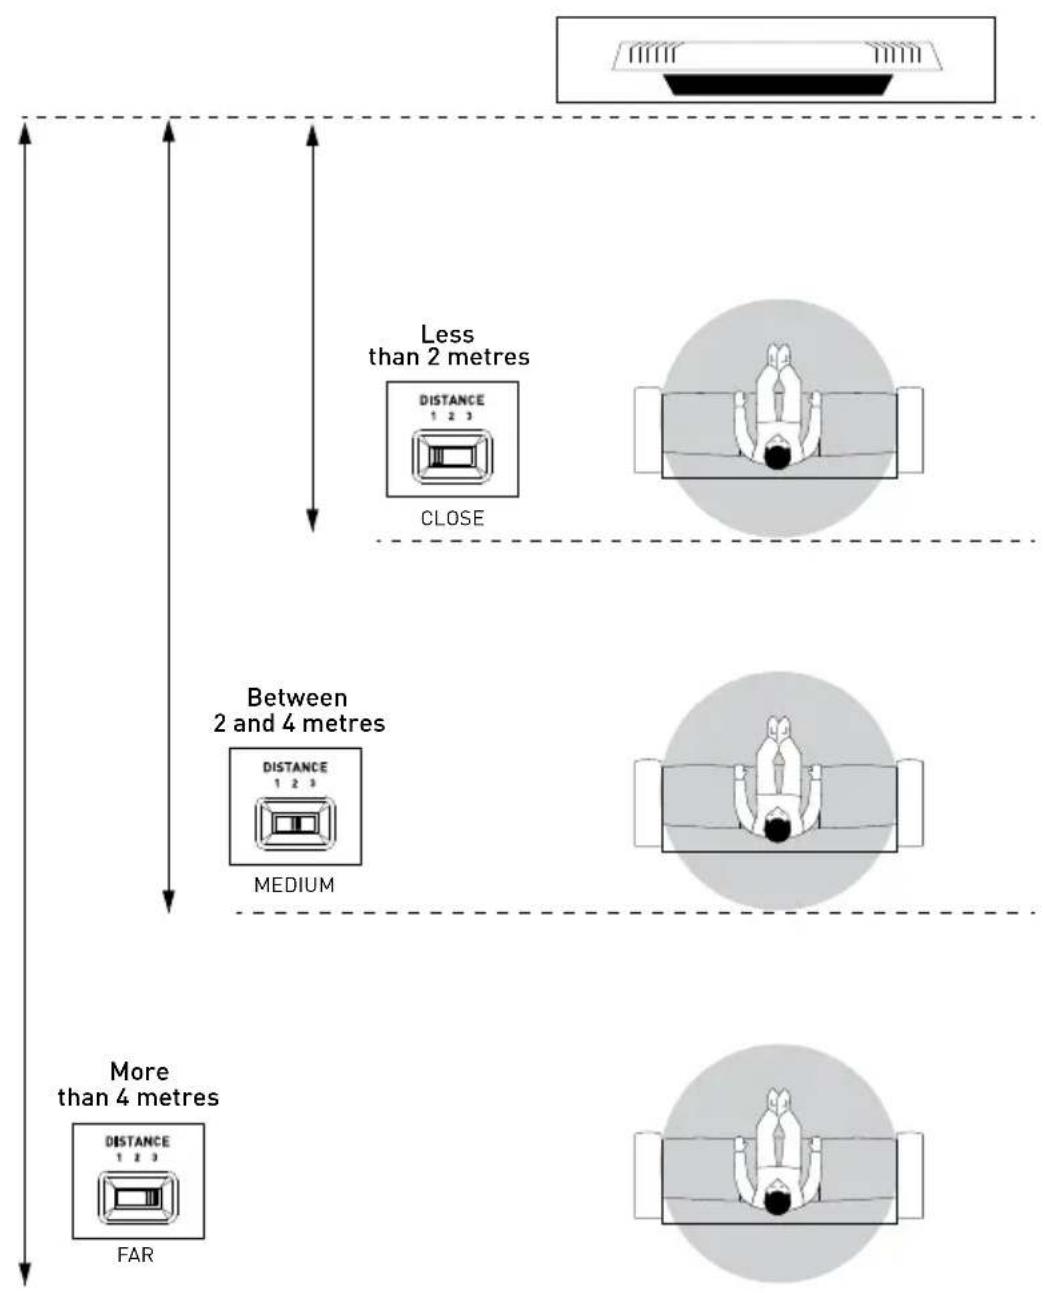
This selector enables you to adjust the sound rendering according to the distance between the listening position and the soundbar.
If Dimension is positioned less than 2 metres from the listening position, set the "DISTANCE" selector to 1 - CLOSE. If Dimension is positioned between 2 and 4 metres from the listening position, set the "DISTANCE" selector to 2 - MEDIUM.
If Dimension is positioned 4 metres or more from the listening position, set the "DISTANCE" selector to 3 - FAR.
6.2. "POSITION" selector

If Dimension is positioned on a piece of furniture without its face being flush with the edge of the piece of furniture, set the "POSITION" selector to 4 - TABLE.

If Dimension is mounted to a wall, set the "POSITION" selector to 5 - ON WALL.

If Dimension is positioned on a piece of furniture with its face flush with the edge of the piece of furniture, set the "POSITION" selector to 6 - FREE STANDING.
6.3. Adaptation to the room's acoustics
The quality of the surround sound depends on the room's acoustics and on the acoustic properties of the room's materials.

If your room has low reflecting acoustic properties: walls covered with fabric, curtains, carpets or rugs, set the "ROOM" selector to 7 - MAT.

If your room has average reflecting acoustic properties: adjacent walls made out of plaster or hollow bricks, if you have various pieces of furniture, uncovered parquet, set the "ROOM" selector to 8 - MEDIUM.
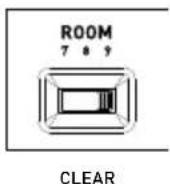
If your room has high reflecting acoustic properties: walls with large glass surfaces, solid bricks, tiled floors, set the "ROOM" selector to 9 - CLEAR.
6.4. "SuBW00fER" selector
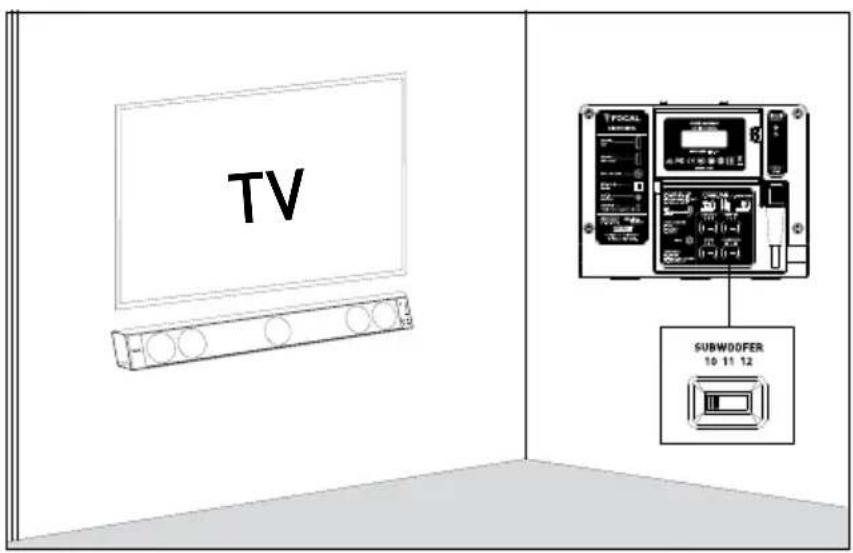
If Dimension is used alone without a subwoofer, set the "SUBWOOFER" selector to 10 - NO SUB.

If Dimension is used with the dedicated Dimension Subwoofer, set the "SUBWOOFER" selector to 11 - DIMENSION SUBWOOFER OUT.

If Dimension is used with an active subwoofer connected to the SUB LINE OUT output, set the "SUBW0OFER" selector to 12 - SUB LINE OUT.
7. Connections
Dimension is equipped with the HDMI™ ARC (Audio Return Channel) function. This function allows you to receive the audio signal from your TV if the TV is equipped with a HDMI™ ARC (Audio Return Channel) output. When both HDMI™ ARC inputs are connected, Dimension reproduces the sound from the TV or any other source connected to it: Blu-ray, DVD, set-top box. Make sure the Audio Return Channel function is enabled in your TV's set-up menu. Dimension also has a standard HDMI™ input. This is used for devices using multichannel audio encoding (5.1, Dolby digital, DTS Surround). Thus, you can take full advantage of the quality of your Audio/Video player. The following section explains Dimension's possible connexions in more detail.
7.1. Connecting Dimension to your TV
![graph TD TV["TV"] -->|HDMI ARC| A["Monitor"] TV -->|HDMI TV ARC & DEC| B["Bus Cable"]](/content/2026/06/1283913/images/3a0dea4be4465cc2dc44ceca6fd7df9afaf0993f9adbeaa44813356901ad5de5.jpg)
Connect the HDMI™ TV input on Dimension to your TV's HDMI™ input.
If your TV is equipped with the ARC (Audio Return Channel) function, use your TV's HDMI™ ARC output. The ARC (Audio Return Channel) function allows you to transmit audio signals to Dimension from your TV and all other devices connected to your TV.
![graph TD A["TV"] --> B["TOSLINK"] A --> C["HDMI"] A --> D["Optimum Disk"] B --> E["2 HDMI ARC & CRC"] C --> E D --> F["1"]](/content/2026/06/1283913/images/e32592fa3ea80c23414f20cd5cf7ef179c461c599245b36f81501edf7270eba0.jpg)
If your TV is not equipped with the ARC (Audio Return Channel) function, connect the TV's digital optical output (Toslink) to Dimension's OPTICAL/DIGI In input. In any case, make sure Dimension's HDMITM TV input is connected to a HDMI™ input on your TV. This connection will transmit the video signal from Dimension to your TV via Dimension's HDMI™ In input.
7.2. Connecting the HDMI™ In input
Connect the HDMI™ In input to the source used for playing films encoded in 5.1 and, in general, the source generally used for playing Blu-ray disks and/or DVDs. This input receives the audio signals directly from your Audio/Video player without going through your TV, thus, there's no loss in quality.
![graph TD A["TV"] --> B["TOSLINK"] A --> C["HDMI"] A --> D["Optical Cable"] B --> E["DVD / BLU-RAY"] C --> E D --> F["HDMI"]](/content/2026/06/1283913/images/d40d9b038fabae82bbe0f46488148dd45495f0870f3e0df020de3f17e2faa44d.jpg)
If you wish to connect more than one audio/video source directly to Dimension, you can purchase a HDMI™ hub. A HDMI™ hub has several HDMI™ inputs and one HDMI™ output which you connect to Dimension.
7.3. Examples of connections
The following section provides examples of the most common connections. For the best surround sound, it is important to connect the player you want to use for playing multichannel content to the HDMITM In output (5.1 or over). These examples are based on TVs equipped with the HDMITM ARC (Audio Return Channel) function. If your TV does not support this function, in addition to the HDMITM cable, also connect your TV's optical audio cable (Toslink) to Dimension's DIGI In input.
7.3.1. Connection example 1
If you mainly use a Blu-ray player for your multichannel audio/video content: connect your Blu-ray player to Dimension's HDMITM In input. Other devices are depicted to complete the example and to show the other options possible with Dimension.
![graph TD A["TUNER TV"] --> B["HDMI 1 ARC"] A --> C["HDMI 2"] A --> D["HDMI 3"] A --> E["TV BOX"] A --> F["HDMI TV ARC & CEC"] A --> G["AUX. / ANALOG"] A --> H["MP3"] I["GAME CONSOLE"] --> J["CD"] K["DVD / BLU-RAY"] --> L["HDMI In CEC"] M["OPTICAL DIG in"] --> N["CD"]](/content/2026/06/1283913/images/a2f2ebf422da8d07d65c265be725f568a971a36d2f411b0a9dffd77931f3bdd7.jpg)
To play audio from a TV tuner, set-top box or games console, select Dimension's TV input. To play audio from a Blu-ray player, select Dimension's HDMI™ In input.
To play audio from a CD player, select Dimension's DIGI In input. Likewise, to play audio from a digital media player, select the AUX input.
7.3.2. Connection example 2
If you mainly use a set-top box for your multichannel audio/video content: connect your set-top box to Dimension's HDMI™ In input. Other devices are depicted to complete the example and to show the other options possible with Dimension.
![graph TD TV["TV"] --> HDMI1["HDMI 1 ARC"] TV --> HDMI2["HDMI 2"] TV --> HDMI3["HDMI TV ARC & CEC"] TV --> AUX["AUX. / ANALOG"] CPU["COMPUTER"] -->|Data| Tablet["Computer"] Tablet --> HDMI4["HDMI In CEC"] Tablet --> TVBox["TV BOX"] GameConsole["GAME CONSOLE"] -->|Data| Tablet](/content/2026/06/1283913/images/93eb6a92283e78c57c47e74cc25e6d328f90950695f77dcf78191c7198288700.jpg)
To play audio from a games console, select Dimension's TV input. To play audio from a set-top box, select Dimension's HDMI™ In input. Likewise, to play audio a computer, select the AUX input.
7.3.3. Connection example 3
If you mainly use a games console for your multichannel audio/video content: connect your games console to Dimension's HDMI™ In input. Other devices are depicted to complete the example and to show the other options possible with Dimension.
![graph TD TV["TV"] -->|HDMI 2| TVBox["TV BOX"] TV -->|HDMI 1 ARC| TVBox TVBox -->|HDMI TV ARC & CEC| GameConsole["GAME CONSOLE"] GameConsole -->|HDMI In CEC| GameConsole GameConsole -->|AUX. / ANALOG| WirelessReceiver["WIRELESS RECEIVER"] WirelessReceiver -->|Bluetooth®| Bluetooth["Bluetooth®"] Wirel…](/content/2026/06/1283913/images/8042879fd3d42cb3395daa0f313656c53fdabaa102d4660ce97ea0ba1c59a045.jpg)
To play audio from a set-top box, select Dimension's TV input.
To play audio from a games console, select Dimension's HDMI™ In input.
To play audio from a wireless receiver, select Dimension's AUX input.
Focal's Universal Wireless Receiver is used in this example. Focal's Universal Wireless Receiver uses Bluetooth aptX® technology.
7.3.4. Connection example 4
If you wish to connect all your devices using a HDMI™ cable connected to Dimension's HDMI™ In input, you can purchase a HDMI™ hub. These splitters have several HDMI™ inputs and one output.
![graph TD A["TUNER TV"] --> B["HDMI 1 ARC"] A --> C["HDMI TV ARC & CEC"] C --> D["Hub HDMI"] D --> E["TV BOX"] D --> F["DVD / BLU-RAY"] G["Game Console"] --> D D --> H["HUB HDMI"] H --> I["HDMI In CEC"] I --> D](/content/2026/06/1283913/images/2bf03ed83402eb71730fd4feb1f9c788100ba42770086d02e6922029e1376dbf.jpg)
Select Dimension's TV input to play audio from the TV tuner.
Select Dimension's HDMITM In input to play audio from all devices connected to the HDMI Hub.
DIMENSION
User manual
7.4. Connecting a subwoofer
There are two subwoofer outputs on Dimension's back panel. The first, SUB LINE OUT, is used for connecting any amplified subwoofer. The second, DIMENSION SUB OUT, is an amplified output exclusively reserved for the Dimension Subwoofer.
Consult the Dimension Subwoofer user manual to help with installation.
![graph TD A["Power Input"] --> B["OR"] C["Substation Out"] --> D["Output"] B --> E["Power Output"] D --> F["Substation Out"]](/content/2026/06/1283913/images/c391ab8c45ba2be85d5c6260c5cbcd4d489e4bd1da6d4c95a15da333d10c24b5.jpg)
8. Use and functions
8.1. CEC (Consumer Electronics Control) function
Dimension is equipped with the CEC (Consumer Electronics Control) function. If your TV and some of your other devices (set-top box, Blu-ray player,...) support this technology, you can control Dimension using your TV's remote control. Functions controlled:
- Volume: when using your TV's remote control to adjust the volume, your TV will transmit this information to Dimension which will adjust its volume.
- Power on: as soon as you turn on your TV, Dimension will turn on selecting the HDMI™ TV input.
- Input selector: as soon as you turn on a device connected to the HDMI™ In input, Dimension will select this input.
To use the CEC function, enable this function on your TV. Caution: the CEC function may have a different name depending on the TV manufacturer.
8.2. Power mode
Dimension has 3 different power modes:
- Power on mode: Dimension plays audio from the device selected.
- Eco mode: Reduced power consumption, the automatic detection of signals from the HDMI™ CEC and DIGI In inputs is activated.
- Standby mode: minimum power consumption (< 0.5 Watts).
Dimension will automatically switch from power-on mode to Eco mode when no audio signal has been detected for 20 minutes. When Dimension is in Eco mode, detection of CEC commands and signals is activated on the HDMI ™ and DIGI In inputs respectively:
- When a signal is detected from the DIGI In input, Dimension automatically switches to power-on mode and activates the DIGI In input.
- When a CEC command is detected on the HDMITM In or HDMI TM TV inputs, Dimension automatically switches to power-on mode and activates the HDMITM In or HDMI TM TV inputs.
Note: If your TV is not equipped with the CEC function, the HDMI™ inputs will not detect any commands. In this case, use the remote control supplied for turning on the device, controlling volume, and selecting input. Standby mode is only available when no HDMI™ cable is connected to Dimension. This mode is activated after 6 hours of inactivity, or by pressing and holding down the ⏻ button for more than 2 seconds on Dimension's user interface. Press the ⏻ button on the remote control or on the user interface to turn Dimension on.
8.3. Setting TV audio format and Audio-Video source
For the best 5.1 experience, make sure you configure the audio output formats of your TV or other devices. Depending on the brand and the quality of the device, numerous audio settings may be available which may diminish the audio experience with Dimension.
Consult the user manuals for your devices and navigate to the audio settings. In the menu, prioritise these two following audio formats:
- Dolby Digital: 48kHz, up to 5.1 channels.
- DTS Surround: 48kHz, up to 5.1 channels.
If these formats are not indicated, your device may have an "automatic" setting. In this case, use this setting. Your device will adapt the audio output format to Dimension using the best quality available.
8.4. Volume control
As well as using the CEC function, you can adjust Dimension's volume by pressing the + and - buttons on your remote control or directly on Dimension's display.
The volume will be shown on Dimension's volume indicator.
The sound can be muted by pressing the ⏻ button on your remote control.
When Dimension is muted, the volume indicator will glow. Press the ⏻ button on your remote control again to reactivate the sound, or press the + button or the - button.
8.5. Input selector

You can select your desired input by pressing the button on the remote control or by selecting the input type directly on Dimension's user interface.
8.6. Night mode
Dimension features a Night mode for discretion. When using this mode, Dimension reduces the peak volume and the dynamic range of a film's soundtrack. This mode is only available for Dolby Digital encoded content.
To activate this mode:
- press the Night button on the remote control OR
- press "Night" directly on Dimension's user interface.
Night mode display is activated on the user interface.
8.7. Bass level setting

You can adjust the bass level on Dimension or on the actual subwoofer.
To adjust the bass level:
- press the (BASS) button on your remote control.
- adjust bass level by pressing the + or - buttons on the remote control or on the user interface.
Once the bass is adjusted to the desired level, press the BASS button on your remote control again or wait a few seconds until Dimension returns to the standard display mode.
8.8. Audio-Video synchronisation (lip-sync)

The quality of your various devices (media players, flat-screens, consoles,...), the flow of information exchanged with them and how your TV treats video signals can all affect audio/video synchronisation.
To overcome this, Dimensions offers two solutions:
- HDMI™ In input: features automatic lip sync for synchronising audio and video.
- HDMI™ TV, Digi In and AUX inputs: audio and video synchronisation can be adjusted manually.
In case of synchronisation problems on the HDMI™ In input, audio and video synchronisation can also be adjusted manually. Follow these steps to synchronise the audio and video manually:
- Select the source which you wish to synchronise.
- Press the SYNC button on your remote control. The selected source will flash.
- Adjust the delay between the audio and video signals using the + and - buttons on the remote control or directly on the user interface.
When the signals have been synchronised, exit the synchronisation mode by pressing the SYNC button on your remote control again. Synchronisation adjustments vary depending on the input. You can adjust the synchronisation of the audio and video differently for the various inputs, thus for your different devices.
Note: If you want to restore the programmed delay default (factory settings) or automatic synchronisation on HDMI™ In, press the ⏻ button on the remote control or user interface until the bar display volume are all extinct.
8.9. Light function
The user interface light is normally off. You can turn it on for a few seconds by pressing the "Light" button on your remote control.
9. Troubleshooting
Refer to the table below if you encounter any problems with Dimension. If the problem persists, or if none of the solutions proposed solve the problem, turn Dimension off and contact your dealer or Focal's authorised After Sales Service.
| Problem Possible causes Possible solutions | More information | ||
| No sound is coming from Dimension, the Standby button is flashing and the volume + button is lit. | The overheating protection has been activated due to excessive amplifier temperature. | Unplug the system, wait for an hour until it cools down, then turn Dimension back on. | / |
| No sound is coming from Dimension, the Standby button is flashing and the HDMITM TV button is lit. | The overheating protection has been activated due to overcurrent. | Unplug the system, wait for an hour until it cools down, then turn Dimension back on. | / |
| No sound is coming from Dimension, the Standby button is flashing and one or two other buttons are lit. | Dimension's microprocessor has stopped working due to a considerable electric shock. | Unplug the system, wait for five minutes, then turn Dimension back on. | / |
| No sound | The cables have not been connected correctly or there is a fault with one or more cables. | Check connections.If the problem persists, interchange the cables. | Page 18 |
| The desired source has not been selected. | Select the desired source using the remote control (input button) or the user interface. | Page 8 & 10 | |
| The volume is set to minimum or the Mute function has been activated. | Adjust the volume according to the desired level using the + or - buttons, or deactivate the Mute function. | Page 10 | |
| Your audio-video source is transmitting an audio format not recognised by Dimension. | In the source settings, select an audio format supported by Dimension. | Page 25 | |
| The HDMITM devices connected to Dimension do not support HDCP (High-Bandwidth Digital Content Protection). | Connect an audio-video device which supports HDCP. | / | |
| No sound is coming from your Dimension Sub subwoofer. | The cable has not been connected correctly or there's a fault with the cable. | Check the cable is connected correctly. | Dimension Sub user manual |
| The "SUBW0OFER" selector setting is positioned incorrectly. | Check that the "SUBW0OFER" selector is set to 11 - "DIMENSION SUBW0OFER OUT". | Page 17 | |
| No sound is coming from the subwoofer connected to the SUB LINE OUT output. | The cable has not been connected correctly or there's a fault with the cable. | Check the cable is connected correctly. | Page 24 |
| The "SUBWOOFER" selector setting is positioned incorrectly. | Check that the "SUBWOOFER" selector is set to 12 - SUB LINE OUT. | Page 17 | |
| The subwoofer used is set to OFF, Standby or is malfunctioning. | Check your active subwoofer is working correctly. | / | |
| The CEC via the HDMITM connections are not working correctly. | The CEC command via HDMITM is deactivated on your audio-video devices. | Enable this function on the audio-video devices connected to Dimension. | Page 25 |
| At least one of your devices is not equipped with this control function. | / | / | |
| The audio and the video are not synchronised. | Your TV is not equipped with an automatic synchronisation function. | Use Dimension's manual "SYNC" function. | Page 26 |
| The remote control is not working. | Dimension is not within reach of your remote control or the angle is too extreme. | The reach of the remote control is approximately 7 metres. The maximum angle is 20°. | / |
| The battery in your remote control is low. | Replace the battery. Page 10 | ||
| Your TV is equipped with the Audio Return Channel function but there's no sound when Dimension's TV input is selected. | The Audio Return Channel function on your TV is deactivated. | Refer to your TV's user manual and enable the TV's Audio Return Channel function. | Page 18 |
| The HDMITM cable has not been connected incorrectly or a there's a fault with the cable. | Check connections are correct. If the problem persists, try another HDMITM cable. | Page 18 | |
- Technical specifications
| Type 5-channel sound bar | |
| Speaker drivers 5 ultra-flat speaker-drivers made of paper cones - 3 | 15/16" (10cm) |
| Nom power 6-channel 320Watts | |
| Integrated amplification 6-channel 450Watts | |
| Frequency response (+/- 6 dB) 50Hz - 25Khz | |
| Inputs | 2 x HDMITM (OUT/IN)Digital Optical ToslinkAnalogue 3.5 mm Jack |
| Subwoofer outputs | Dimension Sub Out: Powered output dedicated to Dimension Sub Sub Line Out: Low-Level output compatible with all amplified subwoofers |
| Modes | HDMI ARCTM (Audio Return Channel)HDMI CECTM (Consumer Electronics Control)Auto Power on HDMITM inputsAdjustable bassAdjustable Sound and Picture synchronisationNight modeRoom acoustics |
| Soundbar on furniture (Width x Depth x Height) | 451/4x41/2x41/2" (115.5 x 11.5 x 11.5cm) |
| Wall mounted Soundbar (Width x Depth x Height) | 451/4x29/16x515/16" (115.5 x 6.5 x 14.7cm) |
| Weight 12lbs (5,5kg) |
Conditions of guarantee
All Focal loudspeakers are covered by guarantee drawn up by the official Focal distributor in your country. Your distributor can provide all details concerning the conditions of guarantee. Guarantee cover extends at least to that granted by the legal guarantee in force in the country where the original purchase invoice was issued.

Your Focal-JMlab product was developed and manufactured with high-quality materials and components which can be recycled and/or re-used. This symbol indicates that electrical and electronic equipment must be disposed of separately from normal garbage at the end of its operational lifetime. Please dispose of this product by bringing it to your local collection point or recycling centre for such equipment. This will help to protect the environment in which we all live.
INHALTSVERZEICHNIS
1 x Wandhalterung

2 x Standfüße

Funktionen:
Функции:
International Guarantee
The Focal guarantee only applies if this page is returned to us within 10 days of purchase, to the following address:
Now it's possible to register on line : www.focal.com/warranty
Model: Serial number:
Name of dealer: Town:
Date of purchase: Purchase price:
Your name: Age: Occupation: ____ ____
Your complete address: ____
Your email address: ____
Details of your installation (brand, model):
- iPod, iPad, iPhone®: ____ - Other music players: ____
- Tuner / Web Radio: ____. - DVD: ____.
■ Blu Ray: ____ ■ CD / SACD: ____
- Satellite / TNT: ____. - Flat screen: ____
■Amplifier: ____ ■Others: ____
Your decision for purchasing this Focal model was made according to:
□ Dealer's advice Friend's advice □
□ Visit to an exhibition, show Press article □
□ Listening in auditorium Already own Focal products
□ Reliability / Quality Documentation □
□ Reputation French produce □
□ Guarantee Quality / Price ratio □
□ Design / Finishes Other □ ____
□ Sound
In case of purchase of new equipment, what were your former speakers?
Explain in a few words why you choose Focal...
Further comments: ____

- PACKAGE CONTENTS
- PRESENTATION
- MULTICHANNEL SURROUND SOUND
- USER INTERFACE
- CONNECTIONS PANEL
- REMOTE CONTROL
- POSITIONING AND INSTALLATION
- POSITIONING DIMENSION
- INSTALLATION ON A TV CABINET
- MOUNTING TO A WALL
- SETTINGS SELECTORS
- DISTANCE" SELECTOR
- ADAPTATION TO THE ROOM'S ACOUSTICS
- SUBW00FER" SELECTOR
- CONNECTIONS
- CONNECTING DIMENSION TO YOUR TV
- CONNECTING THE HDMI™ IN INPUT
- EXAMPLES OF CONNECTIONS
- CONNECTION EXAMPLE 1
- CONNECTION EXAMPLE 2
- CONNECTION EXAMPLE 3
- CONNECTION EXAMPLE 4
- DIMENSION
- CONNECTING A SUBWOOFER
- USE AND FUNCTIONS
- CEC (CONSUMER ELECTRONICS CONTROL) FUNCTION
- POWER MODE
- SETTING TV AUDIO FORMAT AND AUDIO-VIDEO SOURCE
- VOLUME CONTROL
- INPUT SELECTOR
- NIGHT MODE
- BASS LEVEL SETTING
- AUDIO-VIDEO SYNCHRONISATION (LIP-SYNC)
- LIGHT FUNCTION
- TROUBLESHOOTING
- CONDITIONS OF GUARANTEE
- INHALTSVERZEICHNIS
- FUNKTIONEN
- ФУНКЦИИ
- INTERNATIONAL GUARANTEE
- DETAILS OF YOUR INSTALLATION (BRAND, MODEL)
- YOUR DECISION FOR PURCHASING THIS FOCAL MODEL WAS MADE ACCORDING TO
Brand : FOCAL
Model : Dimension Sub
Category : Subwoofer