
F0155330AA - Saw SKIL - Free user manual and instructions
Find the device manual for free F0155330AA SKIL in PDF.


| Product type | Circular saw |
| Brand | Skil |
| Model | F0155330AA |
| Power supply | Mains electric, 230 V, 50 Hz |
| Power | 1200 W |
| Blade diameter | 190 mm |
| Max cutting depth at 90° | 67 mm |
| Max cutting depth at 45° | 48 mm |
| No-load speed | 4500 rpm |
| Weight | 4.5 kg |
| Cable length | 2 m |
| Noise level | 95 dB(A) |
| Brake system | Electromechanical disc brake |
| Protective guard | Yes, with automatic lock |
| Bevel cut | Up to 45° |
| Maintenance | Clean ventilation slots with compressed air |
| Safety | Two-hand switch, anti-restart protection |
| Spare parts | Available on Skil website and authorized dealers |
| Repairability | Repairability index 8.0/10 |
Frequently Asked Questions - F0155330AA SKIL
User questions about F0155330AA SKIL
0 question about this device. Answer the ones you know or ask your own.
Ask a new question about this device
Download the instructions for your Saw in PDF format for free! Find your manual F0155330AA - SKIL and take your electronic device back in hand. On this page are published all the documents necessary for the use of your device. F0155330AA by SKIL.
USER MANUAL F0155330AA SKIL
natural_image
Side profile illustration of a Skil SAW power tool with visible blade and handle (no text or symbols)
GB ORIGINAL INSTRUCTIONS 8
F NOTICE ORIGINALE 13
D ORIGINALBETRIEBSANLEITUNG 20
NL ORIGINELE GEBRUIKSAANWIJZING 27
S BRUKSANVISNING I ORIGINAL 34
DK ORIGINAL BRUGSANVISNING 39
N ORIGINAL BRUKSANVISNING 46
FIN ALKUPERÄISET OHJEET 51
E MANUAL ORIGINAL 57
P MANUAL ORIGINAL 64
I ISTRUZIONI ORIGINALI 71
H EREDETI HASZNÁLATI UTASÍTÁS 78
CZ PŮVODNÍM NÁVODEM K POUŽÍVÁNÍ 85
TR ORİJINAL İŞLETME TALİMATI 91
PL INSTRUKCJA ORYGINALNA 97
UA ОРИГІНАЛЬНА ІНСТРУКЦІЯ
З ЕКСПЛУАТАЦІЇ 104



natural_image
Line drawing of a Skil manual tool with labeled components (no text or symbols beyond branding)15


16


ACCESSORIES

WWW.SKIL.COM
GB
Compact multi-material saw 5330 INTRODUCTION
- This tool is intended for lengthways and crossways sawing of wood, chipboard, plywood, aluminium, tiles, stone, plastic and lightweight construction materials held in a fixed position
• This tool is intended for making short cuts only
• This tool is not intended for professional use - Read this instruction manual carefully before use and save it for future reference ④
TECHNICAL DATA ①
TOOL ELEMENTS ②
A Safety switch
B Trigger switch
C Clamp for setting cutting depth
D Cutting depth scale
E Dust extraction hose
F Connection for dust extraction
G Hex key
H Storage for hex key
J Spindle-lock button
K Blade bolt
L Clamping flange
M Knob for plunge cutting
N Foot plate
P Upper guard
Q Indicator "Power On"
R Line-of-cut indicator
S Parallel guide
T Knob for adjusting parallel guide
V Hardened steel saw blade
W Diamond disc
Y Ventilation slots
Z Lower guard
SAFETY
GENERAL SAFETY INSTRUCTIONS
WARNING! Read all safety warnings and all instructions. Failure to follow the warnings and instructions may result in electric shock, fire and/or serious injury. Save all warnings and instructions for future reference. The term "power tool" in the warnings refers to your mains-operated (corded) power tool or battery-operated (cordless) power tool.
1) WORK AREA SAFETY
a) Keep work area clean and well lit. Cluttered or dark areas invite accidents.
b) Do not operate power tools in explosive atmospheres, such as in the presence of flammable liquids, gases or dust. Power tools create sparks which may ignite the dust or fumes.
c) Keep children and bystanders away while operating a power tool. Distractions can cause you to lose control.
2) ELECTRICAL SAFETY
a) Power tool plugs must match the outlet. Never modify the plug in any way. Do not use any adapter plugs with earthed (grounded) power tools. Unmodified plugs and matching outlets will reduce risk of electric shock.
b) Avoid body contact with earthed or grounded surfaces such as pipes, radiators, ranges and refrigerators. There is an increased risk of electric shock if your body is earthed or grounded.
c) Do not expose power tools to rain or wet conditions. Water entering a power tool will increase the risk of electric shock.
d) Do not abuse the cord. Never use the cord for carrying, pulling or unplugging the power tool. Keep cord away from heat, oil, sharp edges or moving parts. Damaged or entangled cords increase the risk of electric shock.
e) When operating a power tool outdoors, use an extension cord suitable for outdoor use. Use of a cord suitable for outdoor use reduces the risk of electric shock.
f) If operating a power tool in a damp location is unavoidable, use an earth leakage circuit breaker. Use of an earth leakage circuit breaker reduces the risk of electric shock.
3) PERSONAL SAFETY
a) Stay alert, watch what you are doing and use common sense when operating a power tool. Do not use a power tool while you are tired or under the influence of drugs, alcohol or medication. A moment of inattention while operating power tools may result in serious personal injury.
b) Use personal protective equipment. Always wear eye protection. Protective equipment such as dust mask, non-skid safety shoes, hard hat, or hearing protection used for appropriate conditions will reduce personal injuries.
c) Prevent unintentional starting. Ensure the switch is in the off-position before connecting to power source and/or battery pack, picking up or carrying the tool. Carrying power tools with your finger on the switch or energising power tools that have the switch on invites accidents.
d) Remove any adjusting key or wrench before turning the power tool on. A wrench or a key left attached to a rotating part of the power tool may result in personal injury.
e) Do not overreach. Keep proper footing and balance at all times. This enables better control of the power tool in unexpected situations.
f) Dress properly. Do not wear loose clothing or jewelry. Keep your hair, clothing and gloves away from moving parts. Loose clothes, jewelry or long hair can be caught in moving parts.
g) If devices are provided for the connection of dust extraction and collection facilities, ensure these are connected and properly used. Use of dust collection can reduce dust-related hazards.
4) POWER TOOL USE AND CARE
a) Do not force the power tool. Use the correct power tool for your application. The correct power tool will do
the job better and safer at the rate for which it was designed.
b) Do not use the power tool if the switch does not turn it on and off. Any power tool that cannot be controlled with the switch is dangerous and must be repaired.
c) Disconnect the plug from the power source and/or the battery pack from the power tool before making any adjustments, changing accessories, or storing power tools. Such preventive safety measures reduce the risk of starting the power tool accidentally.
d) Store idle power tools out of the reach of children and do not allow persons unfamiliar with the power tool or these instructions to operate the power tool. Power tools are dangerous in the hands of untrained users.
e) Maintain power tools. Check for misalignment or binding of moving parts, breakage of parts and any other condition that may affect the power tool's operation. If damaged, have the power tool repaired before use. Many accidents are caused by poorly maintained power tools.
f) Keep cutting tools sharp and clean. Properly maintained cutting tools with sharp cutting edges are less likely to bind and are easier to control.
g) Use the power tool, accessories and tool bits etc., in accordance with these instructions, taking into account the working conditions and the work to be performed. Use of the power tool for operations different from those intended could result in a hazardous situation.
5) SERVICE
a) Have your power tool serviced by a qualified repair person using only identical replacement parts. This will ensure that the safety of the power tool is maintained.
SAFETY INSTRUCTIONS FOR MULTI SAWS
1) CUTTING PROCEDURES
a) A DANGER: Keep hands away from cutting area and the blade. If both hands are holding the saw, they can not be cut by the blade.
b) Do not reach underneath the workpiece. The guard cannot protect you from the blade below the workpiece.
c) Adjust the cutting depth to the thickness of the workpiece. Less than a full tooth of the blade teeth should be visible below the workpiece.
d) Never hold the workpiece being cut in your hands or across your leg. Secure the workpiece to a stable platform. It is important to support the work properly to minimize body exposure, blade binding, or loss of control.
e) Hold the power tool by insulated gripping surfaces only, when performing an operation where the cutting tool may contact hidden wiring or its own cord. Contact with a "live" wire will also make exposed metal parts of the power tool "live" and could give the operator an electric shock.
f) When ripping always use a parallel guide or straight edge guide. This improves the accuracy of cut and reduces the chance of blade binding.
g) Always use blades with correct size and shape (diamond versus round) of arbour holes. Blades that do not match the mounting hardware of the saw will run eccentrically, causing loss of control.
h) Never use damaged or incorrect blade washers or bolt. The blade washers and bolt were specially designed for your saw, for optimum performance and safety of operation.
2) KICKBACK CAUSES AND RELATED WARNINGS
- Kickback is a sudden reaction to a pinched, bound or misaligned saw blade, causing an uncontrolled saw to lift up and out of the workpiece toward the operator
- When the blade is pinched or bound tightly by the kerf closing down, the blade stalls and the motor reaction drives the unit rapidly back toward the operator
- If the blade becomes twisted or misaligned in the cut, the teeth at the back edge of the blade can dig into the top surface of the wood causing the blade to climb out of the kerf and jump back towards operator
- Kickback is the result of tool misuse and/or incorrect operating procedures or conditions and can be avoided by taking proper precautions as given below
a) Maintain a firm grip with both hands on the saw and position your arms to resist kickback forces. Position your body to either side of the blade, but not in line with the blade. Kickback could cause the saw to jump backwards, but kickback forces can be controlled by the operator, if proper precautions are taken.
b) When blade is binding, or when interrupting a cut for any reason, release the trigger and hold the saw motionless in the material until the blade comes to a complete stop. Never attempt to remove the saw from the work or pull the saw backwards while the blade is in motion or kickback may occur. Investigate and take corrective actions to eliminate the cause of blade binding. Avoid cutting nails or screws.
c) When restarting a saw in the workpiece, centre the saw blade in the kerf and check that saw teeth are not engaged into the material. If saw blade is binding, it may walk up or kickback from the workpiece as the saw is restarted.
d) Support large panels to minimise the risk of blade pinching and kickback. Large panels tend to sag under their own weight. Supports must be placed under the panel on both sides, near the line of cut and near the edge of the panel.
e) Do not use dull or damaged blades. Unsharpened or improperly set blades produce narrow kerf causing excessive friction, blade binding and kickback.
f) Blade depth and bevel adjusting locking levers must be tight and secure before making cut. If blade adjustment shifts while cutting, it may cause binding and kickback.
g) Use extra caution when sawing into existing walls or other blind areas. The protruding blade may cut objects that can cause kickback.
3) GUARD FUNCTION
a) Check guard for proper closing before each use. Do not operate the saw if guard does not move freely and enclose the blade instantly. Never clamp or tie the guard so that the blade is exposed. If saw is accidentally dropped, guard may be bent. Check to make sure that guard moves freely and does not touch the blade or any other part, in all angles and depths of cut.
b) Check the operation and condition of the guard return spring. If the guard and the spring are not operating properly, they must be serviced before use. Guard may operate sluggishly due to damaged parts, gummy deposits, or a build-up of debris.
c) Assure that the base plate of the saw will not shift while performing the "plunge cut" when the blade bevel setting is not at 90^ . Blade shifting sideways will cause binding and likely kickback.
d) Always observe that the guard is covering the blade before placing saw down on bench or floor. An unprotected, coasting blade will cause the saw to walk backwards, cutting whatever is in its path. Be aware of the time it takes for the blade to stop after switch is released.
4) CUT-OFF MACHINE SAFETY WARNINGS
a) The guard provided with the tool must be securely attached to the power tool and positioned for maximum safety, so the least amount of wheel is exposed towards the operator. Position yourself and bystanders away from the plane of the rotating wheel. The guard helps to protect operator from broken wheel fragments and accidental contact with wheel.
b) Use only diamond cut-off wheels for your power tool. Just because an accessory can be attached to the power tool, it does not assure safe operation.
c) The rated speed of the accessory must be at least equal to the maximum speed marked on the power tool. Accessories running faster than their rated speed can fly apart.
d) Wheels must be used only for recommended applications. For example: Do not grind with the side of a cut-off wheel. Abrasive cut-off wheels are intended for peripheral grinding; side forces applied to these wheels may cause them to shatter.
e) Always use undamaged wheel flanges that are of correct diameter for your selected wheel. Proper wheel flanges support the wheel thus reducing the possibility of wheel breakage.
f) The outside diameter and the thickness of your accessory must be within the capacity rating of your power tool. Incorrectly sized accessories cannot be adequately guarded or controlled.
g) The arbour size of wheels and flanges must properly fit the spindle of the power tool. Wheels and flanges with arbour holes that do not match the mounting hardware of the power tool will run out of balance, vibrate excessively and may cause loss of control.
h) Do not use damaged wheels. Before each use inspect the wheels for chips and cracks. If power tool or wheel is dropped, inspect for damage or install an undamaged wheel. After inspecting and installing the wheel, position yourself and bystanders away from the plane of the rotating wheel and run the power tool at maximum no load speed for one minute. Damaged wheels will normally break apart during this test time.
i) Wear personal protective equipment ⑥. Depending on application, use face shield, safety goggles or safety glasses. As appropriate, wear dust mask, hearing protectors, gloves and shop apron capable of stopping small abrasive or workpiece fragments.
The eye protection must be capable of stopping flying debris generated by various operations. The dust mask or respirator must be capable of filtrating particles generated by your operation. Prolonged exposure to high intensity noise may cause hearing loss.
j) Keep bystanders a safe distance away from work area. Anyone entering the work area must wear personal protective equipment. Fragments of the workpiece or of a broken accessory may fly away and cause injury beyond the immediate area of operation.
k) Hold power tool by insulated gripping surfaces only, when performing an operation where the cutting accessory may contact hidden wiring or its own cord. A cutting accessory contacting a "live" wire may make exposed metal parts of the power tool "live" and could give the operator an electric shock.
I) Position the cord clear of the spinning accessory. If you lose control, the cord may be cut or snagged and your hand or arm may be pulled into the spinning accessory.
m) Never lay the power tool down until the accessory has come to a complete stop. The spinning accessory may grab the surface and pull the power tool out of your control.
n) Do not run the power tool while carrying it at your side. Accidental contact with the spinning accessory could snag your clothing, pulling the accessory into your body.
o) Regularly clean the power tool's air vents. The motor's fan will draw the dust inside the housing and excessive accumulation of powdered metal may cause electrical hazards.
p) Do not operate the power tool near flammable materials. Sparks could ignite these materials.
q) Do not use accessories that require liquid coolants. Using water or other liquid coolants may result in electrocution or shock.
5) KICKBACK AND RELATED WARNINGS
- Kickback is a sudden reaction to a pinched or snagged rotating wheel. Pinching or snagging causes rapid stalling of the rotating wheel which in turn causes the uncontrolled power tool to be forced in the direction opposite of the wheel's rotation at the point of the binding.
- For example, if an abrasive wheel is snagged or pinched by the workpiece, the edge of the wheel that is entering into the pinch point can dig into the surface of the material causing the wheel to climb out or kick out. The wheel may either jump toward or away from the operator, depending on the direction of the wheel's movement at the point of pinching. Abrasive wheels may also break under these conditions.
- Kickback is the result of power tool misuse and/or incorrect operating procedures or conditions and can be avoided by taking proper precautions as given below.
a) Maintain a firm grip on the power tool and position your body and arm to allow you to resist kickback forces. Always use auxiliary handle, if provided, for maximum control over kickback or torque reaction during start-up. The operator can control torque reactions or kickback forces, if proper precautions are taken.
b) Never place your hand near the rotating accessory. The accessory may kickback over your hand.
c) Do not position your body in line with and behind the rotating wheel. When the wheel, at the point of operation, is moving away from your body, the possible kickback may propel the spinning wheel and the power tool directly at you.
d) Use special care when working corners, sharp edges etc. Avoid bouncing and snagging the accessory. Corners, sharp edges or bouncing have a tendency to snag the rotating accessory and cause loss of control or kickback.
e) Do not attach a saw chain, woodcarving blade, segmented diamond wheel with a peripheral gap greater than 10 mm, or toothed saw blade. Such blades create frequent kickback and loss of control.
f) Do not "jam" the cut-off wheel or apply excessive pressure. Do not attempt to make an excessive depth of cut. Overstressing the wheel increases the loading and susceptibility to twisting or binding of the wheel in the cut and the possibility of kickback or wheel breakage.
g) When the wheel is binding or when interrupting a cut for any reason, switch off the power tool and hold the power tool motionless until the wheel comes to a complete stop. Never attempt to remove the cut-off wheel from the cut while the wheel is in motion, otherwise kickback may occur. Investigate and take corrective action to eliminate the cause of wheel binding.
h) Do not restart the cutting operation in the workpiece. Let the wheel reach full speed and carefully re-enter the cut. The wheel may bind, walk up or kickback if the power tool is restarted in the workpiece.
i) Support panels or any oversized workpiece to minimize the risk of wheel pinching and kickback. Large workpieces tend to sag under their own weight. Supports must be placed under the workpiece near the line of cut and near the edge of the workpiece on both sides of the wheel.
j) Use extra caution when making a "pocket cut" into existing walls or other blind areas. The protruding wheel may cut gas or water pipes, electrical wiring or objects that can cause kickback.
ADDITIONAL SAFETY WARNINGS
GENERAL
- This tool is not intended for use by persons (including children) with reduced physical, sensory or mental capabilities, or lack of experience and knowledge, unless they have been given supervision or instruction concerning use of the tool by a person responsible for their safety
- Before using the tool for the first time, it is recommended to receive practical information
- This tool is not suitable for wet cutting ③
• Always disconnect plug from power source before making any adjustment or changing any accessory - Never use the tool for side grinding
-
Never use the tool when cord is damaged; have it replaced by a qualified person
-
Do not operate the power tool stationary (it is not designed for operation with a saw table)
- Do not work materials containing asbestos (asbestos is considered carcinogenic)
- Do not saw ferrous metals (red hot chips can ignite the dust extraction)
- When working stone, use dust extraction; the vacuum cleaner must be approved for the extraction of stone dust (using this equipment reduces dust-related hazards)
- Dust from material such as paint containing lead, some wood species, minerals and metal may be harmful (contact with or inhalation of the dust may cause allergic reactions and/or respiratory diseases to the operator or bystanders); wear a dust mask and work with a dust extraction device when connectable
- Certain kinds of dust are classified as carcinogenic (such as oak and beech dust) especially in conjunction with additives for wood conditioning; wear a dust mask and work with a dust extraction device when connectable
- Follow the dust-related national requirements for the materials you want to work with
ACCESSORIES
- SKIL can assure flawless functioning of the tool only when original accessories are used
- Use only accessories with an allowable speed matching at least the highest no-load speed of the tool
- Use only saw blades/cut-off wheels with a minimum diameter of 85 mm, a maximum diameter of 89 mm and a spindle hole of 10 mm
- Never use grinding discs with this tool
BEFORE USE
- Always check that the supply voltage is the same as the voltage indicated on the nameplate of the tool
- Avoid damage that can be caused by screws, nails and other elements in your workpiece; remove them before you start working
- Be familiar with the controls and the proper use of the tool
- Remove all obstacles on top of as well as underneath the cutting path before you start cutting
- Secure the workpiece (a workpiece clamped with clamping devices or in a vice is held more securely than by hand)
- Use suitable detectors to find hidden utility lines or call the local utility company for assistance (contact with electric lines can lead to fire or electrical shock; damaging a gas line can result in an explosion; penetrating a water pipe will cause property damage or an electrical shock)
- Use completely unrolled and safe extension cords with a capacity of 16 Amps (U.K. 13 Amps)
DURING USE
- The noise level when working can exceed 85 dB(A); wear ear protection
- Always keep the cord away from moving parts of the tool; direct the cord to the rear, away from the tool
- Never use the tool without the original protection guard system
-
Do not attempt to cut extremely small workpieces
-
Do not work overhead with the power tool (sufficient control of the power tool is not ensured in this working manner)
- In case of jamming or electrical or mechanical malfunction, immediately switch off the tool and disconnect the plug
- If the cord is damaged or cut through while working, do not touch the cord, but immediately disconnect the plug
AFTER USE
- When you put away the tool, switch off the motor and ensure that all moving parts have come to a complete standstill
- After switching off the tool, never stop the rotation of the accessory by a lateral force applied against it
EXPLANATION OF SYMBOLS ON TOOL
④ Read the instruction manual before use
⑤ Double insulation (no earth wire required)
⑥ Wear protective glasses and hearing protection
⑦ Do not dispose of the tool together with household waste material
WHEN CONNECTING NEW 3-PIN PLUG (U.K. ONLY):
- Do not connect the blue (= neutral) or brown (= live) wire in the cord of this tool to the earth terminal of the plug
- If for any reason the old plug is cut off the cord of this tool, it must be disposed of safely and not left unattended
USE
- On/off ⑧
- switch on tool by first pressing knob A forward and then pulling trigger switch B
- switch off tool by releasing trigger switch B
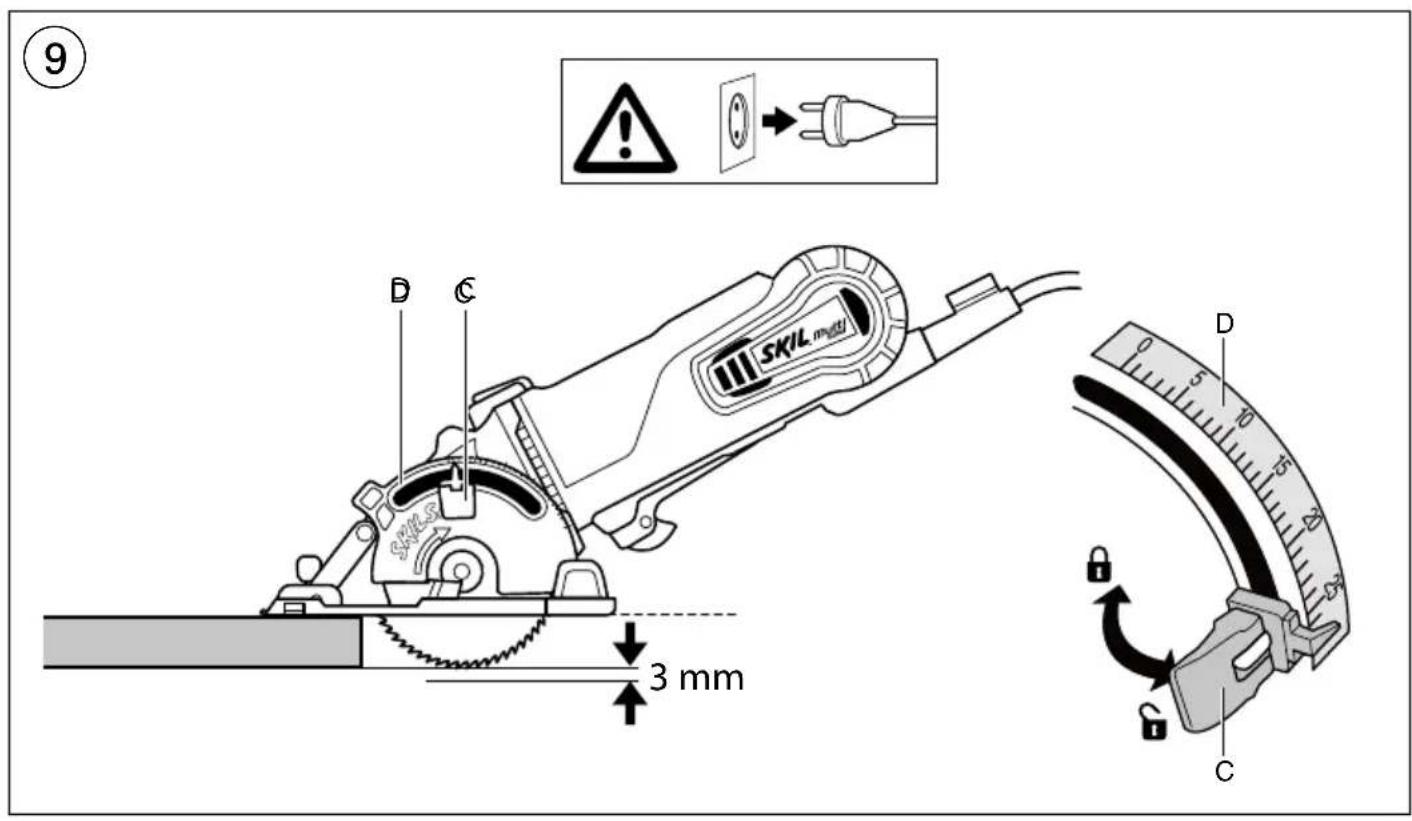
- Adjusting cutting depth (0-28,5 mm) ⑨
- loosen clamp C
- set desired cutting depth using scale D
- tighten clamp C
- for an optimal quality cut the saw blade should not extend more than 3 mm below the workpiece
- be aware that the actual depth of cut of the diamond disc differs approx. 2 mm from the depth of cut indicated on scale D
! always make trial cuts first to verify actual line of cut
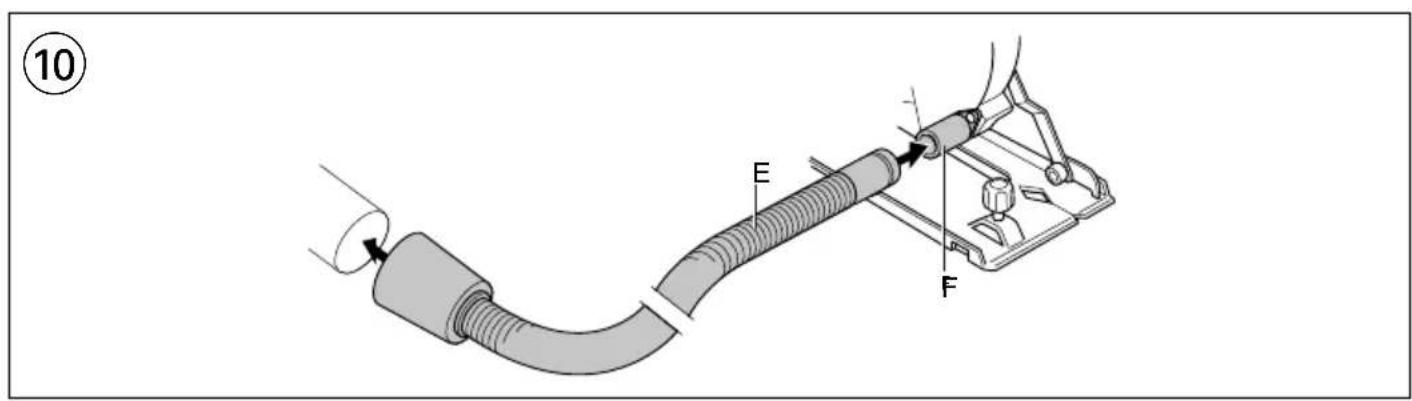
- Dust suction ⑩
- connect vacuum cleaner hose E to connection F and vacuum cleaner as illustrated
! never let the vacuum cleaner hose interfere with the lower guard or the cutting operation
! do not use vacuum cleaner when cutting metal
- Changing saw blade ⑪
! disconnect the plug
! ensure that the blade has come to a complete standstill
- set cutting depth to the maximum
- take hex key G from storage H
- push spindle-lock button J and hold it while you remove blade bolt K by turning hex key G CLOCKWISE (= in same direction as arrow printed on saw blade)
! push spindle-lock button J only when tool is at a standstill
- release spindle-lock button J
-
remove flange L
-
press knob M with your thumb
- lift up foot N and remove saw blade
! change saw blade with saw teeth and arrow printed on saw blade pointing in same direction as arrow on upper guard P
- mount flange L
- firmly tighten blade bolt K by turning hex key G COUNTER-CLOCKWISE while pushing spindle-lock button J
- release spindle-lock button J
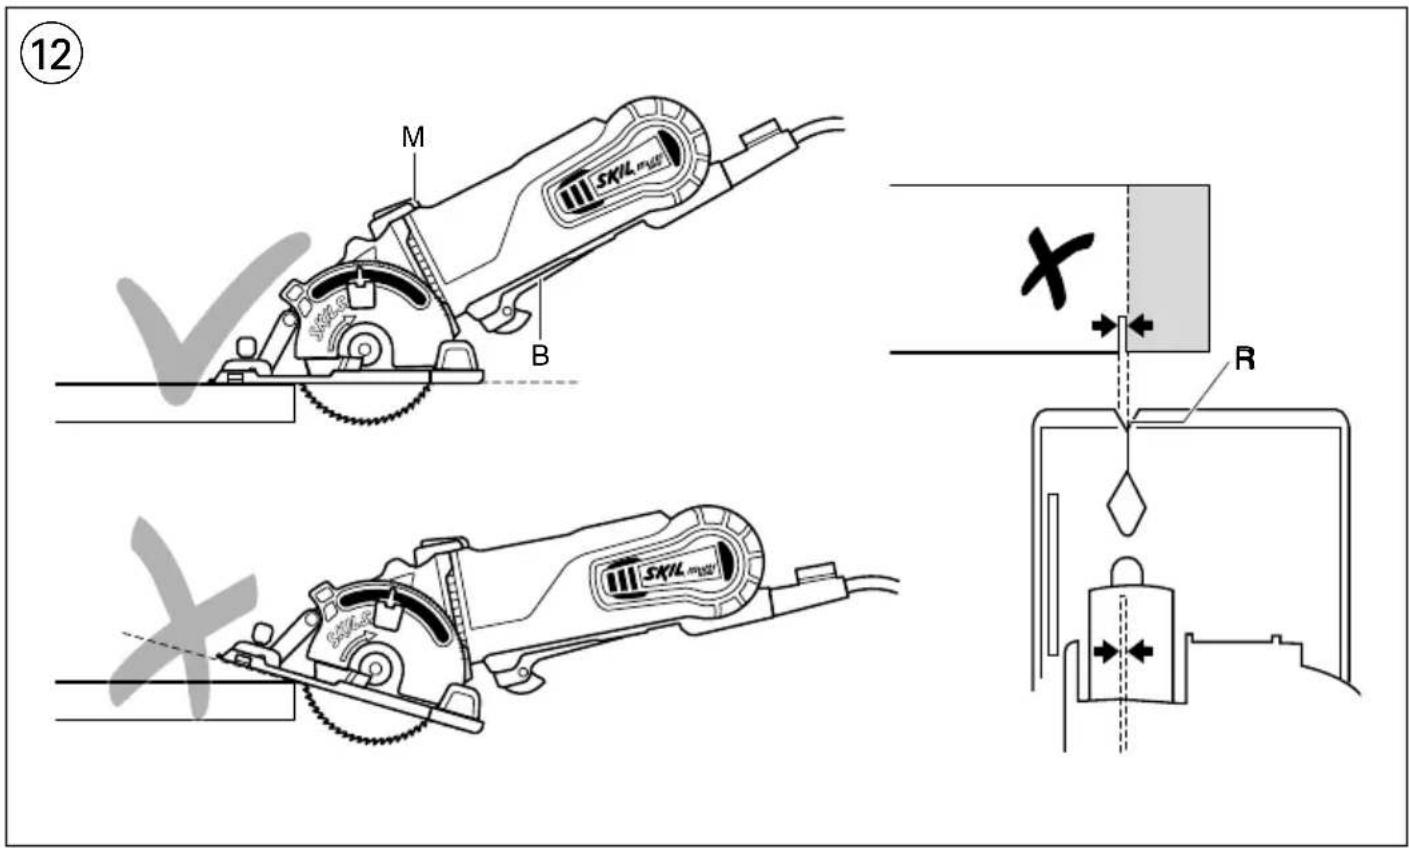
- Operating the tool ⑫
- set desired cutting depth
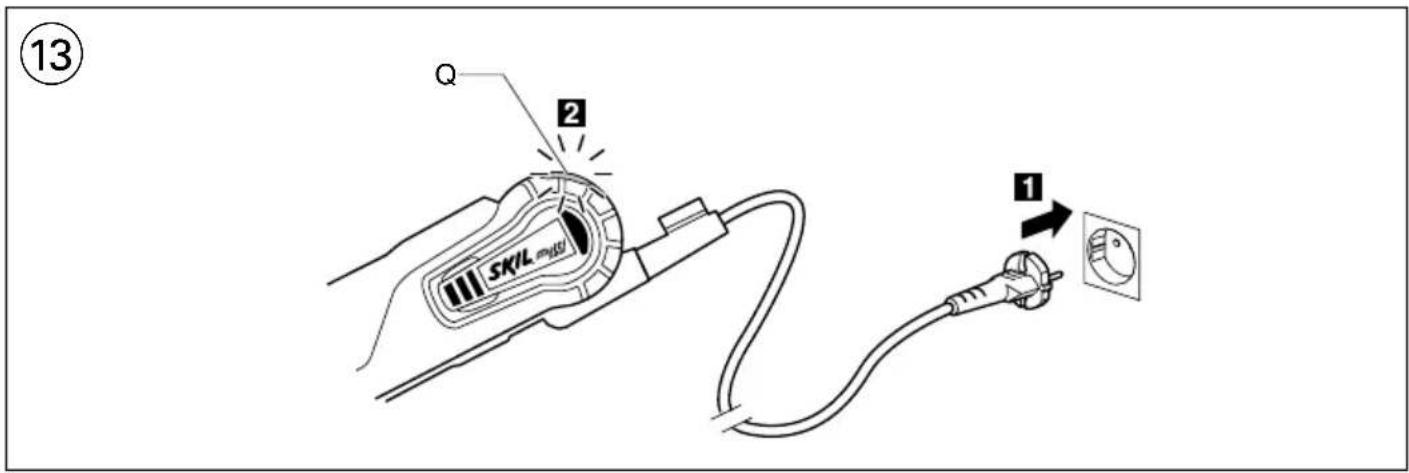
- connect plug to power source (light Q turns on indicating that the tool is receiving power) ⑬
- press knob M with your thumb
- place tool with front end of foot flat on workpiece
- tilt tool forward with line-of-cut indicator R lined up with desired line of cut marked on the workpiece
! ensure that the saw teeth are not engaged into the workpiece
- switch on the tool
! the tool should run at full speed before the blade enters into the workpiece
! do not force the tool (apply light and continuous pressure in order to avoid overheating the blade tips and, in case of cutting plastics, melting the plastic material)
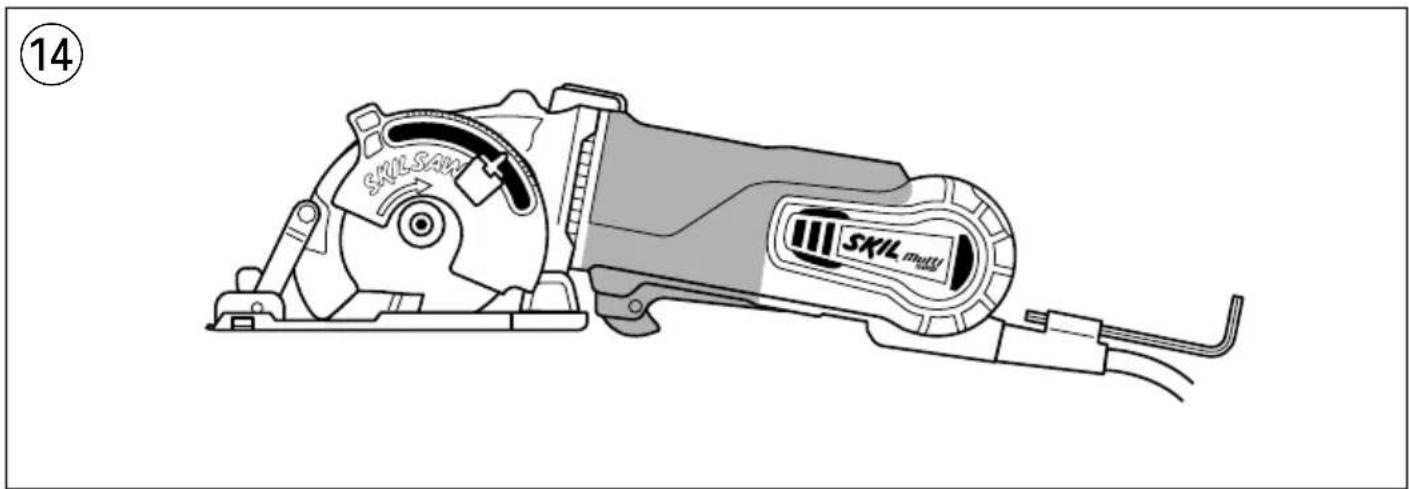
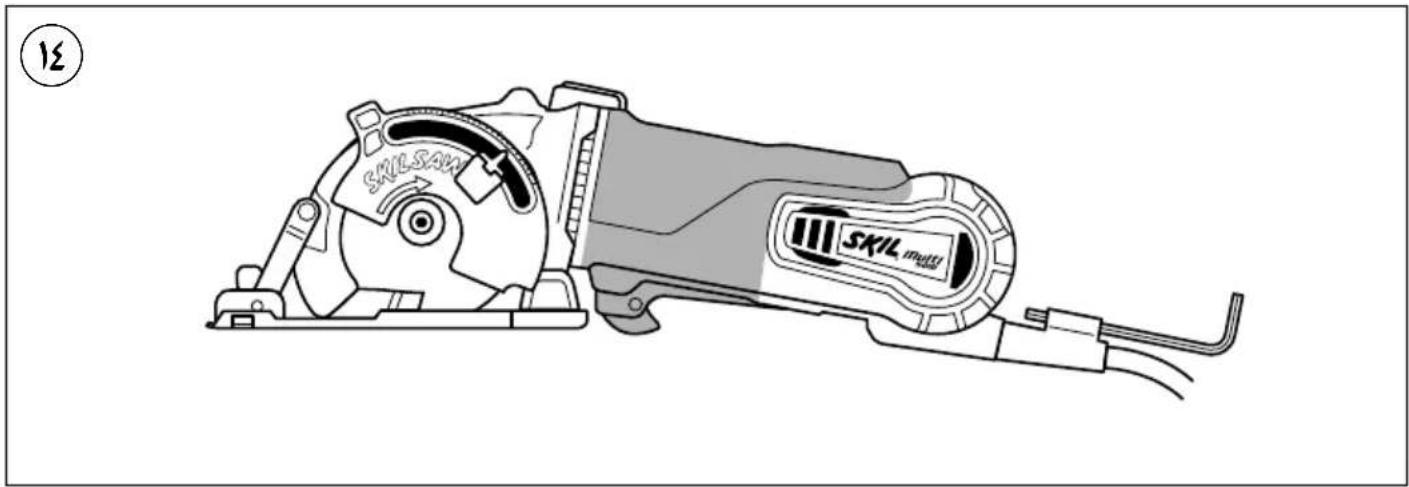
! while working, always hold the tool at the grey-coloured grip area(s) ⑭ - after completing the cut switch off tool by releasing trigger B
! ensure that the blade has come to a complete standstill, before you lift the tool from the workpiece
- Plunge cutting ⑮
- switch on the tool
! the tool should run at full speed before the blade enters into the workpiece - press knob M with your thumb
- tilt tool forward with line-of-cut indicator R lined up with desired line of cut marked on the workpiece
- gradually move tool forward
! never pull tool backwards
- Parallel guide S ⑯
- for making exact cuts along a workpiece edge
- can be inserted in either side of foot
Adjusting parallel guide
- loosen knob T
- adjust to desired cutting width by using parallel guide scale (use line-of-cut indicator R as 0-reference)
- tighten knob T
APPLICATION ADVICE
- Only use sharp saw blades of the correct type ⑰
- use hardened steel saw blade V ② for cutting wood, aluminium, plastic and all sorts of laminated wood
- use diamond disc W ② for cutting ceramics and tiles
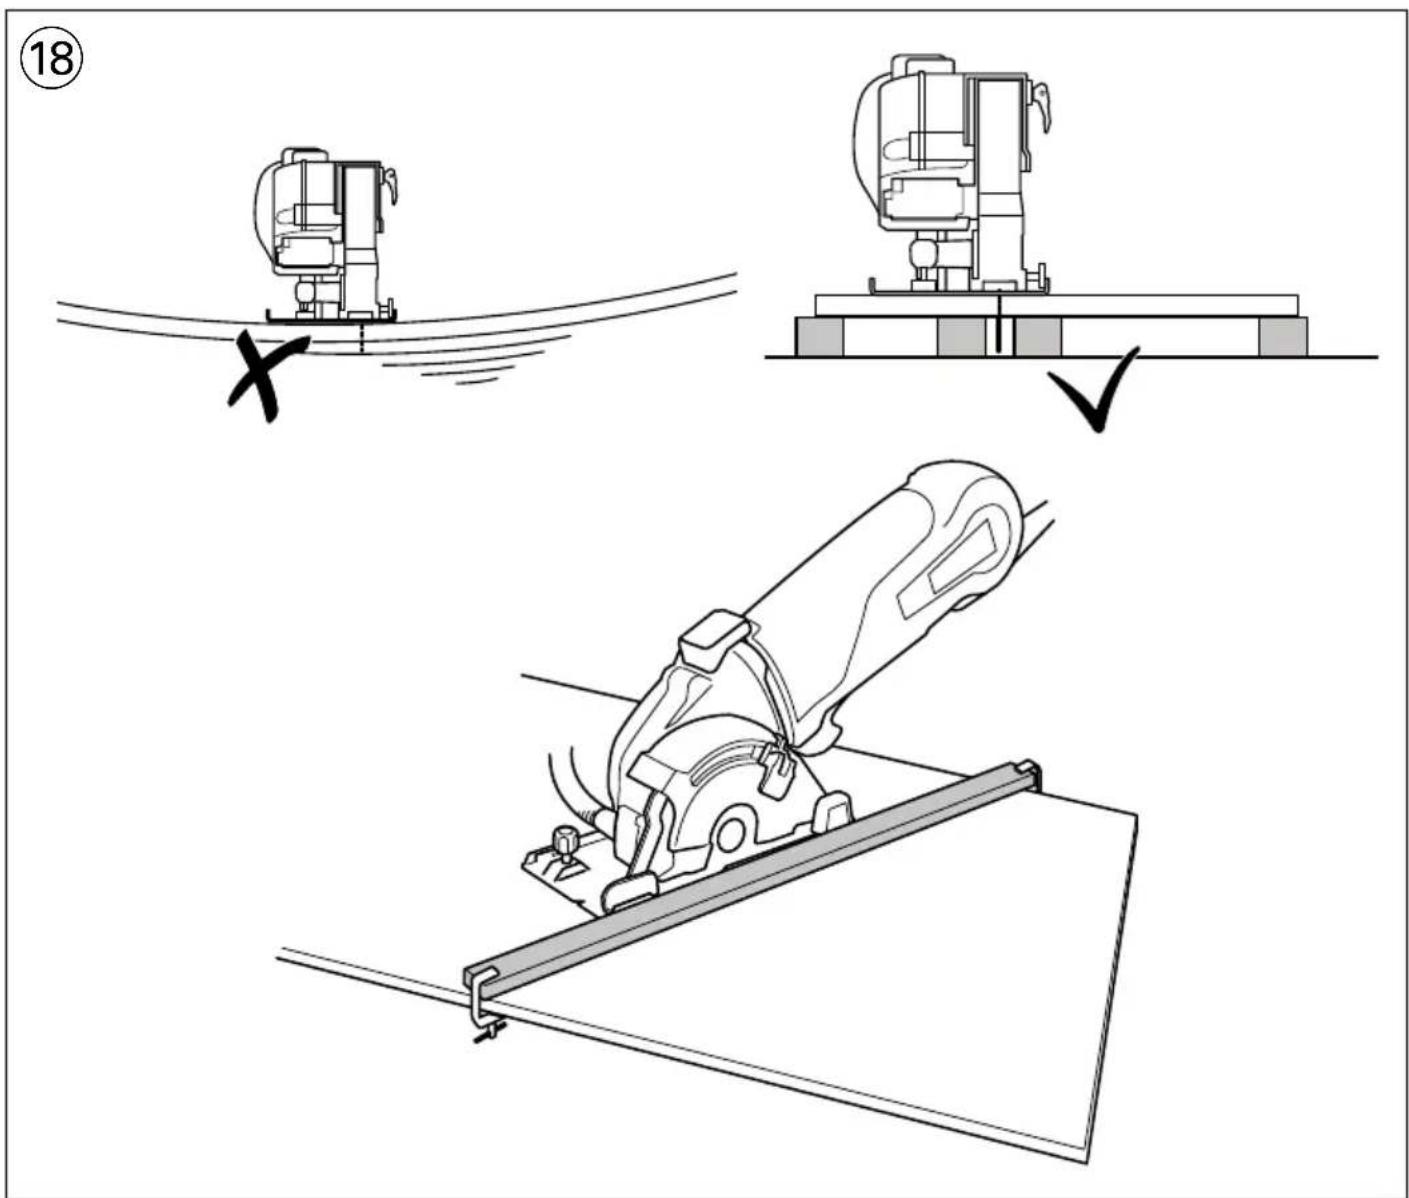
• Cutting large panels ⑱
- support panel close to the cut either on floor, table or workbench
! set cutting depth so that you cut through panel and not through support
- in case parallel guide does not allow desired width of cut, clamp or nail straight piece of wood to workpiece as a guide, and use the right side of the foot against this guide
- Splinter-free cutting
- always face the good side of the workpiece down
- fasten a straight piece of wood on the workpiece by means of 2 clamps
- For more tips see www.skil.com
MAINTENANCE / SERVICE
• This tool is not intended for professional use
- Always keep tool and cord clean (especially ventilation slots Y ②)
! disconnect the plug before cleaning
- Always keep the area around lower guard Z ② clean (remove dust and chips by blowing out with compressed air or with a brush)
- Clean saw blade immediately after use (especially from resin and glue)
- If the tool should fail despite the care taken in manufacturing and testing procedures, repair should be carried out by an after-sales service centre for SKIL power tools
- send the tool undismantled together with proof of purchase to your dealer or the nearest SKIL service station (addresses as well as the service diagram of the tool are listed on www.skil.com)
ENVIRONMENT
- Do not dispose of electric tools, accessories and packaging together with household waste material (only for EU countries)
- in observance of European Directive 2012/19/EC on waste of electric and electronic equipment and its implementation in accordance with national law, electric tools that have reached the end of their life must be collected separately and returned to an environmentally compatible recycling facility
- symbol ⑦ will remind you of this when the need for disposing occurs
DECLARATION OF CONFORMITY C€
- We declare under our sole responsibility that the product described under “Technical data” is in conformity with the following standards or standardization documents: EN 60745, EN 61000, EN 55014, in accordance with the provisions of the directives 2004/108/EC, 2006/42/EC, 2011/65/EU
• Technical file at: SKIL Europe BV (PT-SEU/ENG1), 4825 BD Breda, NL
Operations & Engineering
Olaf Dijkgraaf
Approval Manager

SKIL Europe BV, 4825 BD Breda, NL
10.09.2014
NOISE/VIBRATION
- Measured in accordance with EN 60745 the sound pressure level of this tool is 94 dB(A) and the sound power level 105 dB(A) (standard deviation: 3 dB), and the vibration * (triax vector sum; uncertainty K = 1.5 m/s^2 )
* when cutting wood 2.8 m/s ^2
* when cutting metal 2.9 m/s²
- The vibration emission level has been measured in accordance with a standardised test given in EN 60745; it may be used to compare one tool with another and as a preliminary assessment of exposure to vibration when using the tool for the applications mentioned
- using the tool for different applications, or with different or poorly maintained accessories, may significantly increase the exposure level
- the times when the tool is switched off or when it is running but not actually doing the job, may significantly reduce the exposure level
! protect yourself against the effects of vibration by maintaining the tool and its accessories, keeping your hands warm, and organizing your work patterns
F
Scie compacte polyvalente 5330
INTRODUCTION
Operations & Engineering
Olaf Dijkgraaf
Approval Manager


SKIL Europe BV, 4825 BD Breda, NL
10.09.2014
BRUIT/VIBRATION
Operations & Engineering
Olaf Dijkgraaf
Approval Manager

SKIL Europe BV, 4825 BD Breda, NL
10.09.2014
GERÄUSCH/VIBRATION
Operations & Engineering
Olaf Dijkgraaf
Approval Manager
SKIL Europe BV, 4825 BD Breda, NL
10.09.2014
GELUID/VIBRATIE
Operations & Engineering
Olaf Dijkgraaf
Approval Manager
SKIL Europe BV, 4825 BD Breda, NL
10.09.2014
LJUD/VIBRATION
Operations & Engineering
Olaf Dijkgraaf
Approval Manager


SKIL Europe BV, 4825 BD Breda, NL
10.09.2014
ST∅J/VIBRATION
1) SIKKERHET PÅ ARBEIDSPLASSEN
a) Hold arbeidsområdet rent og ryddig. Rotete arbeidsområder eller arbeidsområder uten lys kan føre til ulykker.
b) Ikke arbeid med maskinen i eksplosjonsutsatte omgivelser – der det befinner seg brennbare
væsker, gass eller støv. Elektroverktøy lager gnister som kan antenne støv eller damper.
- Kutte stor panel ⑱
VEDLIKEHOLD / SERVICE
Operations & Engineering
Olaf Dijkgraaf
Approval Manager

SKIL Europe BV, 4825 BD Breda, NL
10.09.2014
ST∅Y/VIBRASJON
Operations & Engineering
Olaf Dijkgraaf
Approval Manager


SKIL Europe BV, 4825 BD Breda, NL
10.09.2014
MELU/TÄRINÄ
Operations & Engineering
Olaf Dijkgraaf
Approval Manager


SKIL Europe BV, 4825 BD Breda, NL
10.09.2014
RUIDOS/VIBRACIONES
Operations & Engineering
Olaf Dijkgraaf
Approval Manager

SKIL Europe BV, 4825 BD Breda, NL
10.09.2014
RUÍDO/VIBRAÇÕES
Operations & Engineering
Olaf Dijkgraaf
Approval Manager

SKIL Europe BV, 4825 BD Breda, NL
10.09.2014
HLUČNOSTI/VIBRACÍ
Operations & Engineering
Olaf Dijkgraaf
Approval Manager

SKIL Europe BV, 4825 BD Breda, NL
10.09.2014
GÜRÜLTÜ/TİTREŞIM
Operations & Engineering
Olaf Dijkgraaf
Approval Manager
SKIL Europe BV, 4825 BD Breda, NL
10.09.2014
HAŁASU/WIBRACJE
Operations & Engineering
Olaf Dijkgraaf
Approval Manager
SKIL Europe BV, 4825 BD Breda, NL
10.09.2014
ΘΟΡΥΒΟ/ΚΡΑΔΑΣΜΟΥΣ
Operations & Engineering
Olaf Dijkgraaf
Approval Manager


SKIL Europe BV, 4825 BD Breda, NL
10.09.2014
ШУМ/ВИБРАЦИИ
Operations & Engineering
Olaf Dijkgraaf
Approval Manager

SKIL Europe BV, 4825 BD Breda, NL
10.09.2014
HLUKU/VIBRÁCIÁCH
Operations & Engineering
Olaf Dijkgraaf
Approval Manager


SKIL Europe BV, 4825 BD Breda, NL
10.09.2014
BUCI/VIBRACIJAMA
- Mjereno prema EN 60745 prag zvučnog tlaka ovog električnog alata iznosi 94 dB(A) a jakost zvuka 105 dB(A) (standardna devijacija: 3 dB), a vibracija * m/s² (vektorski zbroj u tri smjera; nesigurnost K = 1,5 m/s²) * kod rezanja drva 2,8 m/s² * kod rezanja metala 2,9 m/s²
- Razina emitiranja vibracija izmjerena je sukladno normiranom testu danom u EN 60745; ona se može koristiti za usporedbu jedne alatke s drugom, te preliminarnu procjenu izloženosti vibracijama pri uporabi alatke za navedene namjene
OPŠTA UPUTSTVA O SIGURNOSTI
PAŽNJA! Čitajte sva upozorenja i uputstva. Propusti kod pridržavanja upozorenja i uputstava mogu imati za posledicu električni udar, požar i/ili teške povrede. Čuvajte sva upozorenja i uputstva za budućnost. Pojam upotrebljen u upozorenjima “električni alat” odnosi se na električne alate sa radom na mreži (sa mrežnim kablom) i na električne alate sa radom na akumulator (bez mrežnog kabla).
1) SIGURNOST NA RADNOM MESTU
DODATNA SIGURNOSNA UPUTSTVA
OPŠTA
- Ovaj alat namenjen je za upotrebu osobama (uključujući i decu) sa smanjenim fizičkim, senzorskim ili mentalnim sposobnostima ili sa manjkom iskustva i znanja, a ako im osoba zadužena za njihovu bezbednost nije pružila odgovarajuća pomoć i uputstvo kako koristiti alat
- Pre prvog korišćenja električnog alata, preporučuje se da dobijete praktične informacije
- Ovaj alat nije podesan za vlažno sečenje ③
- Obavezno iskopčajte alat iz električne utičnice pre nego što izvršite bilo kakva podešavanja ili zamenu pribora
- Nikada nemojte da koristite alat za bočno brušenje
- Nikada nemojte da koristite alat ako je kabl oštećen; zamenu kabla mora da obavi stručno lice
- Nemojte koristiti električni alat u stacionarnom položaju (nije predviđen da se koristi na stolu za rad)
- Ne obradjujte nikakav materijal koji sadrži azbest (azbest važi kao izazivać raka)
- Nemojte seći neobojene metale (parčići crvenog užarenog metala mogu da zapale izvučenu prašinu)
- Prilikom obrade kamena, koristite izvlačenje prašine; usisivač mora da bude odobren za izvlačenje kamene prašine (korišćenje ove opreme smanjuje opasnosti u vezi sa prašinom)
- Prašina od materijala, kao što su boja koja sadrži olovo, neke vrste drveta, minerali i metal, može biti opasna (dodir ili udisanje prašine može prouzrokovati alergijske reakcije i/ili respiratorna oboljenja rukovaoca i lica u blizini); nosite masku protiv prašine i radite uz uključeni uređaj za ekstrakciju prašine kada radite na mestima gde ju je moguće priključiti
- Određene vrste prašine su klasifikovane kao kancerogene (kao što su prašina hrastovine i bukovine), posebno u sadejstvu sa aditivima za pripremu drveta; nosite masku protiv prašine i radite uz uključeni uređaj za ekstrakciju prašine kada radite na mestima gde ju je moguće priključiti
- Prati nacionalne propise vezane za prašinu koja se proizvodi prilikom rada na obrađivanim materijalima
PRIBOR
- SKIL može priznati garanciju samo ukoliko je korišćen originalni pribor
- Koristite samo pribor čija je dozvoljena brzina u najmanju ruku jednaka najvećoj brzini pri praznom hodu električnog alata
- Koristite isključivo listove testere/diskova za rezanje minimalnog prečnika 85 mm, maksimalnog prečnika 89 mm, i sa otvorom za vreteno širine 10 mm
- Uz ovaj električni alat nikad nemojte da koristite brusne točkove
PRE UPOTREBE
- Uvek se uverite da je napon struje isti kao i napon naveden na pločici sa nazivom alatu
- Izbegavajte oštećenja od šrafova, eksera i drugih predmeta na vašem području rada; uklonite ih pre nego što započnete rad
- Upoznajte se sa komandama i pravilnim korišćenjem alata
- Pre nego što započnete sečenje, uklonite sve prepreke na vrhu, kao i ispod putanje sečenja
- Obezbedite radni predmet (radni predmet stegnut pomoću stega ili nečeg sličnog je mnogo stabilniji neko kada se drži rukom)
- Koristite odgovarajuće aparate za proveru dali se u zidu koji bušimo nalaze skrivene instalacije, ili za taj posao nađite odgovarajuće preduzeće (kontakt sa električnim vodovima može izazvati požar ili električni udar; oštećenje gasovoda može izazvati eksploziju; probijanje cevi sa vodom uzrokuje štete ili može izazvati električni udar)
- Produžni kabl koji koristite mora da bude sasvim odmotan i siguran, sa kapacitetom od 16 A
TOKOM UPOTREBE
Operations & Engineering
Olaf Dijkgraaf
Approval Manager

SKIL Europe BV, 4825 BD Breda, NL
10.09.2014
BUKA/VIBRACIJE
- Mereno u skladu sa EN 60745 nivo pritiska zvuka ovog alata iznosi 94 dB(A) a jačina zvuka 105 dB(A) (normalno odstupanje: 3 dB), a vibracija * m/s ^2 (zbir vektora tri pravca; nesigurnost K = 1,5 m/s ^2 )
* pri sečenju drvo 2,8 m/s²
ÜLDISED OHUTUSJUHISED
Operations & Engineering
Olaf Dijkgraaf
Approval Manager

SKIL Europe BV, 4825 BD Breda, NL
10.09.2014
MÜRA/VIBRATSIOON
APKALPOŠANA / APKOPE
Operations & Engineering
Olaf Dijkgraaf
Approval Manager


SKIL Europe BV, 4825 BD Breda, NL
10.09.2014
TROKSNIS/VIBRĀCIJA
TECHNINIAI DUOMENYS ①
PRIETAISO ELEMENTAI ②
Operations & Engineering
Olaf Dijkgraaf
Approval Manager


SKIL Europe BV, 4825 BD Breda, NL
10.09.2014
TRIUKŠMINGUMAS/VIBRACIJA
Operations & Engineering
Olaf Dijkgraaf
Approval Manager

SKIL Europe BV, 4825 BD Breda, NL
10.09.2014
БУЧАВА/ВИБРАЦИИ
Operations & Engineering
Olaf Dijkgraaf
Approval Manager

SKIL Europe BV, 4825 BD Breda, NL
10.09.2014
صدالارعتاشات


natural_image
Line drawing of a SKIL mini tool with labeled components (no text or symbols beyond branding)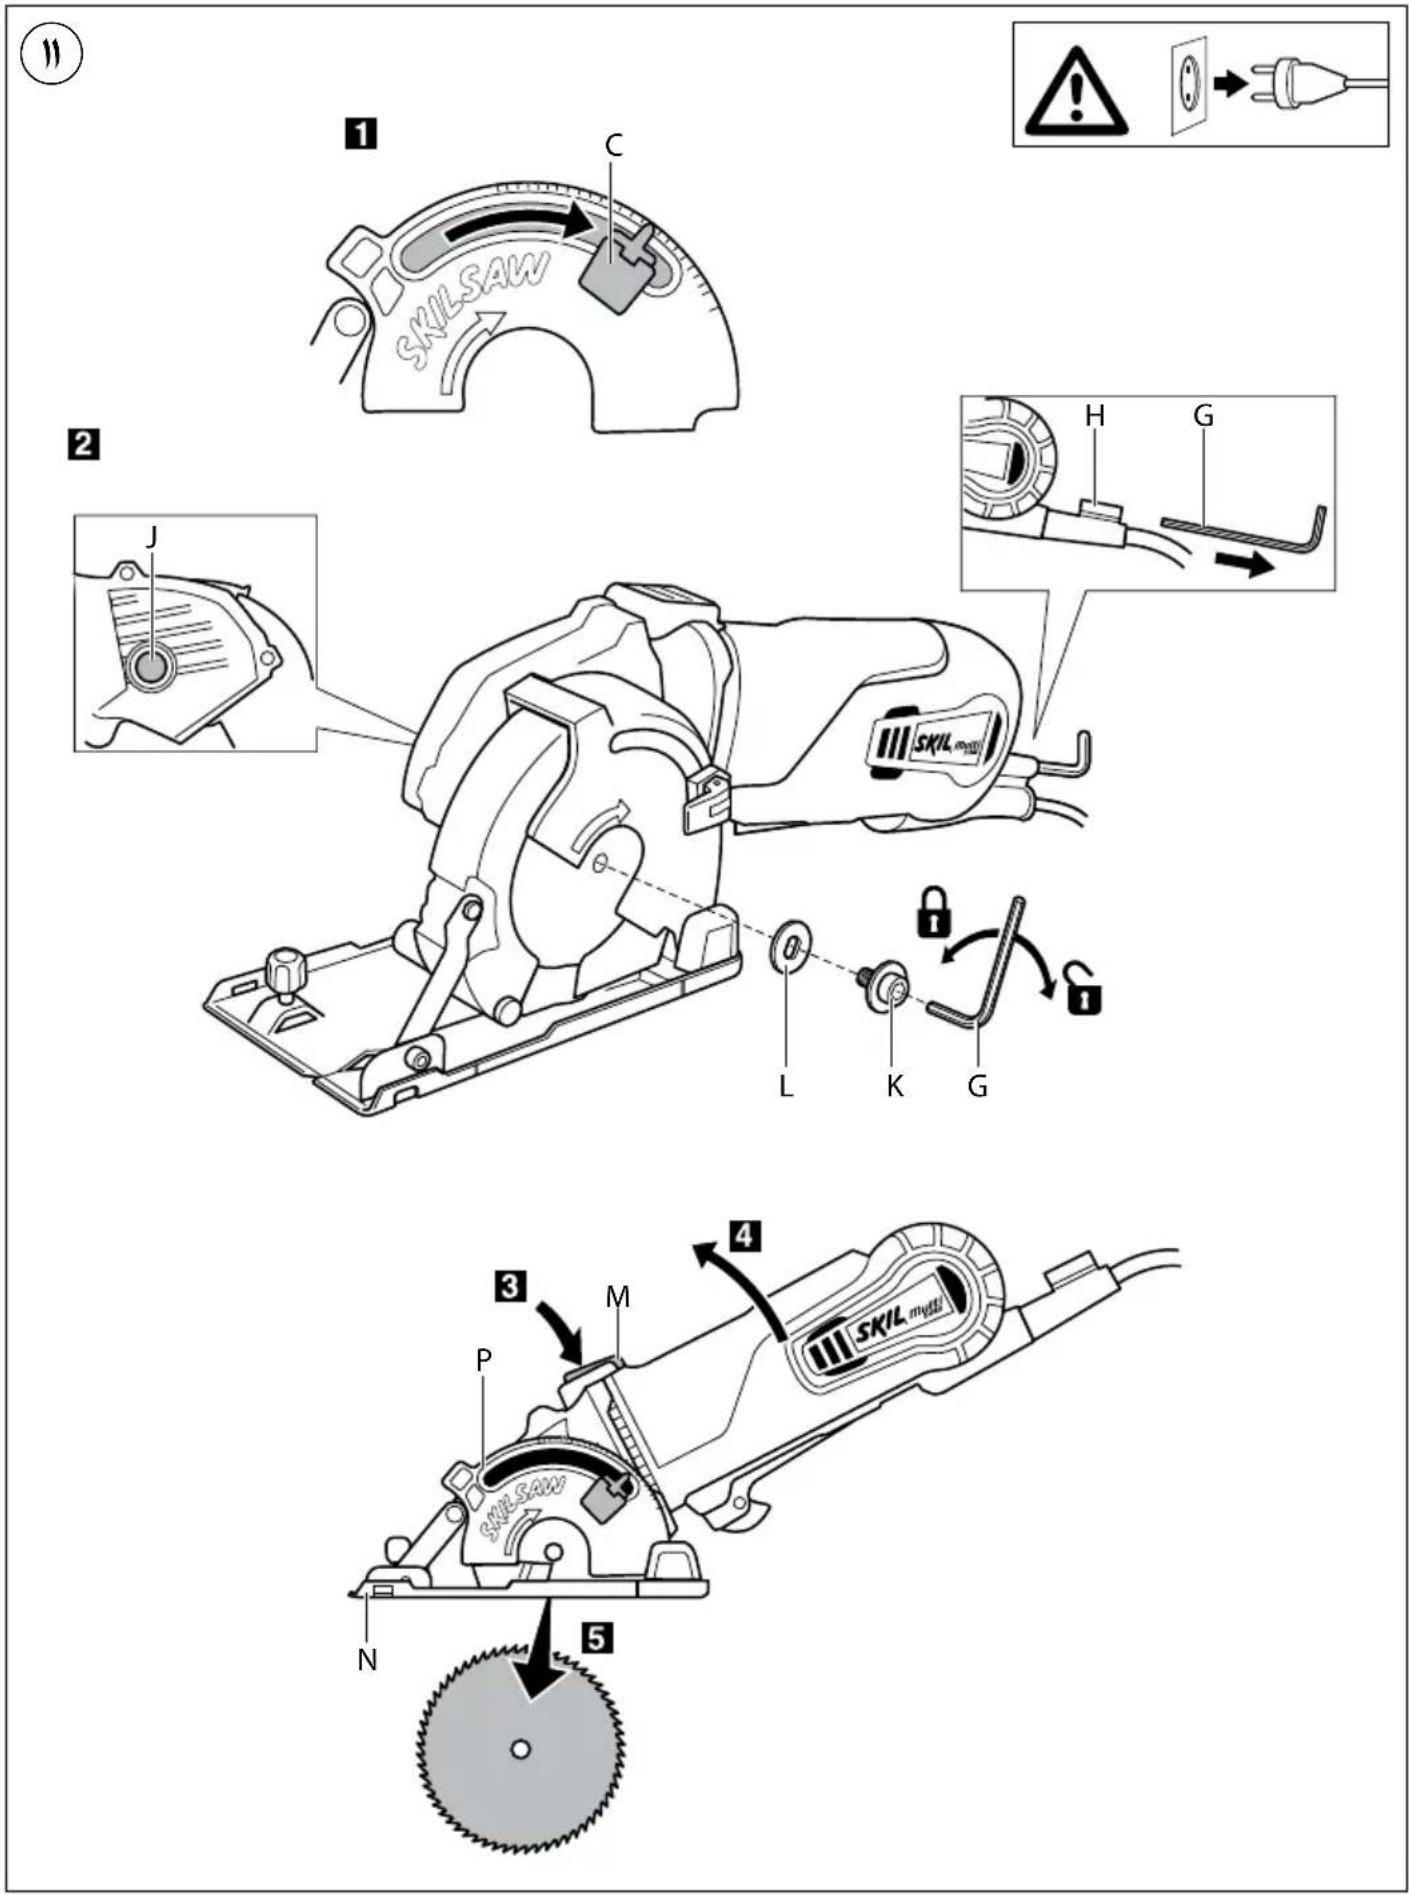


natural_image
Side profile illustration of a Skil SAW power tool with visible blade and handle (no text or symbols)


- GB
- Compact multi-material saw 5330 INTRODUCTION
- TECHNICAL DATA ①
- TOOL ELEMENTS ②
- SAFETY
- GENERAL SAFETY INSTRUCTIONS
- 1) WORK AREA SAFETY
- 2) ELECTRICAL SAFETY
- 3) PERSONAL SAFETY
- 4) POWER TOOL USE AND CARE
- 5) SERVICE
- SAFETY INSTRUCTIONS FOR MULTI SAWS
- 1) CUTTING PROCEDURES
- 2) KICKBACK CAUSES AND RELATED WARNINGS
- 3) GUARD FUNCTION
- ADDITIONAL SAFETY WARNINGS
- GENERAL
- ACCESSORIES
- BEFORE USE
- DURING USE
- AFTER USE
- EXPLANATION OF SYMBOLS ON TOOL
- USE
- APPLICATION ADVICE
- MAINTENANCE / SERVICE
- ! disconnect the plug before cleaning
- ENVIRONMENT
- DECLARATION OF CONFORMITY C€
- NOISE/VIBRATION
- F
- Scie compacte polyvalente 5330
- INTRODUCTION
- BRUIT/VIBRATION
- GERÄUSCH/VIBRATION
- GELUID/VIBRATIE
- LJUD/VIBRATION
- ST∅J/VIBRATION
- 1) SIKKERHET PÅ ARBEIDSPLASSEN
- VEDLIKEHOLD / SERVICE
- ST∅Y/VIBRASJON
- MELU/TÄRINÄ
- RUIDOS/VIBRACIONES
- RUÍDO/VIBRAÇÕES
- HLUČNOSTI/VIBRACÍ
- GÜRÜLTÜ/TİTREŞIM
- HAŁASU/WIBRACJE
- ΘΟΡΥΒΟ/ΚΡΑΔΑΣΜΟΥΣ
- ШУМ/ВИБРАЦИИ
- HLUKU/VIBRÁCIÁCH
- BUCI/VIBRACIJAMA
- OPŠTA UPUTSTVA O SIGURNOSTI
- DODATNA SIGURNOSNA UPUTSTVA
- OPŠTA
- PRIBOR
- PRE UPOTREBE
- TOKOM UPOTREBE
- BUKA/VIBRACIJE
- ÜLDISED OHUTUSJUHISED
- MÜRA/VIBRATSIOON
- APKALPOŠANA / APKOPE
- TROKSNIS/VIBRĀCIJA
- TECHNINIAI DUOMENYS ①
- PRIETAISO ELEMENTAI ②
- TRIUKŠMINGUMAS/VIBRACIJA
- БУЧАВА/ВИБРАЦИИ
Brand : SKIL
Model : F0155330AA
Category : Saw