
AC450 - Network card / adapter TP-LINK - Free user manual and instructions
Find the device manual for free AC450 TP-LINK in PDF.


| Product Type | Wireless Network Adapter |
| Brand | TP-Link |
| Model | AC450 |
| Interface | USB 2.0 |
| Wireless Standards | IEEE 802.11a/b/g/n/ac |
| Frequency Band | 2.4 GHz & 5 GHz |
| Maximum Data Rate | 450 Mbps (5 GHz), 150 Mbps (2.4 GHz) |
| Antenna | Internal dual-band antenna |
| Wireless Security | WPA/WPA2, WPA-PSK/WPA2-PSK |
| System Requirements | Windows 10/8/7/Vista/XP, Mac OS X, Linux |
| Dimensions | 56 x 24 x 8 mm |
| Weight | 20 g |
| Power Consumption | 2.5W (max) |
| Operating Temperature | 0°C to 40°C |
| Operating Humidity | 10% to 90% non-condensing |
| Package Contents | AC450 Adapter, Quick Installation Guide, Resource CD |
| Certifications | FCC, CE, RoHS |
| Compatibility | Windows, Mac, Linux, Chrome OS |
| LED Indicator | Power/Activity |
| Repairability | Non-repairable; replace if defective |
Frequently Asked Questions - AC450 TP-LINK
User questions about AC450 TP-LINK
0 question about this device. Answer the ones you know or ask your own.
Ask a new question about this device
Download the instructions for your Network card / adapter in PDF format for free! Find your manual AC450 - TP-LINK and take your electronic device back in hand. On this page are published all the documents necessary for the use of your device. AC450 by TP-LINK.
USER MANUAL AC450 TP-LINK
Chapter 1. Get to Know About Your Adapter .... 2
1.1. Product Overview 3
1.2. LED Status 3
Chapter 2. Connect to a Computer .... 4
Chapter 3. Windows....6
3.1. Install Driver 7
3.2. Join a Wireless Network....8
3.3. Uninstall Driver....8
Chapter 4. Mac OS X....9
4.1. Install Driver and Utility.... 10
4.2. Join a Wireless Network.... 12
4.2.1. TP-Link Utility 12
4.2.2. WPS (Wi-Fi Protected Setup) 14
4.3. Management 16
4.3.1. Link Status....16
4.3.2. Profile 17
4.4. Uninstall Driver and Utility.... 20
Chapter 5. Linux ...... 22
Appendix: Troubleshooting 24
About This Guide
This guide is a complement to the Quick Installation Guide. The Quick Installation Guide instructs you on quick installation, and this guide provides the product overview and detailed instructions for each step.
When using this guide, please note that features of the adapter may vary slightly depending on the model and software version you have. All screenshots, images, parameters, and descriptions documented in this guide are used for demonstration only.
Conventions
In this guide, the following conventions are used:
| Convention | Description |
| Teal Italic | Hyperlinks are in teal italic. You can click to redirect to a website or a specific section. |
| Teal | Contents to be emphasized and texts on the web page are in teal, including the menus, items, buttons, etc. |
| Note: | Ignoring this type of note might result in a malfunction or damage to the device. |
| Tips: | Indicates important information that helps you make better use of your device. |
More Info
- The latest software and utility can be found at the Download Center at http://www.tp-link.com/support.
- The Quick Installation Guide (QIG) can be found where you find this guide or inside the package of the product.
- Specifications can be found on the product page at http://www.tp-link.com.
- Our Technical Support contact information can be found at the Contact Technical Support page at http://www.tp-link.com/support.
Chapter 1
Get to Know About Your Adapter
This chapter introduces what the adapter can do and shows its appearance. This chapter contains the following sections:
- Product Overview
- LED Status
1.1. Product Overview
TP-Link Wireless USB Adapter connects your computer to a Wi-Fi network for smooth HD video, voice streaming and online gaming.
- Blazing fast wireless data transmission rates of up to 433Mbps
- Small, unobtrusive design allows you to plug it in and forget it is even there
- Utilizes 802.11ac standard and is backward compatible with 802.11a/n • Supports ad-hoc and infrastructure mode • Supports 64/128 bit WEP, WPA-PSK/WPA2-PSK • Supports Windows, Mac and Linux
1.2. LED Status

You can check the adapter's working status by following the LED Explanation table.
| Status | Indication |
| Off | The driver has not been installed.The adapter's radio has been disabled. |
| Flashing Slowly The driver has been installed but no data is being transmitted or received. | |
| Flashing Quickly Data is being transmitted or received. | |
Tips:
If the LED is off, try these troubleshooting tips:
- Check if the adapter is recognized and enabled or not. Refer to Troubleshooting-T2 for detailed instructions.
- Remove and reinsert the adapter.
- Reinstall the software, if necessary.
Connect to a Computer
This chapter introduces how to connect the adapter to your computer.
Before you start using your adapter, insert the adapter into a USB port on your computer directly.

After connecting your adapter to the computer, please follow the instructions in the appropriate chapter for your operating system: Windows, Mac OS X, Linux.
Windows
This chapter introduces how to install your adapter's driver, use your adapter to join a wireless network, and uninstall your adapter in a Windows system. The adapter is equipped with a Setup Wizard, which can guide you through the installation process.
This chapter includes the following sections:
- Install Driver
- Join a Wireless Network
- Uninstall Driver
3.1. Install Driver
- Insert the resource CD into your CD drive and run the Autorun.exe from the pop-up Autoplay window.
Note:
- You can also download the driver from the product's Support page at www.tp-link.com.
- In some operating systems, the CD screen will pop up automatically. Otherwise, run the CD manually.
- Select Archer T1U and follow the instructions to complete the installation.
Note:
If you can't install the driver successfully, disable the antivirus software and firewall, then try again.

- When the following screen appears, the driver has been installed successfully.

3.2. Join a Wireless Network
You can join a wireless network via Windows built-in wireless utility. Follow the instructions below to use your computer system's built-in wireless utility:
- Click the network icon on the taskbar. Select the Wi-Fi network you want to join, and click Connect. Enter the network password when prompted.
- When the network icon changes to the connected state, it indicates a successful network connection.
3.3. Uninstall Driver
The software uninstallation steps vary a bit from different systems. Please follow the appropriate instructions for your Windows operating system: Windows 8/8.1/10, Windows XP/7.
- Windows 8/8.1/10
Go to Start menu to find the TP-Link application. Click Uninstall TP-Link Archer T1U Driver, then follow the on-screen instructions to complete the uninstallation.
- Windows XP/7
Go to Start > All Programs > TP-Link > Uninstall TP-Link Archer T1U Driver. Follow the on-screen instructions to complete the uninstallation.
Chapter 4
Mac OS X
This chapter introduces how to install your adapter's driver and utility, use your adapter to join a wireless network, manage your adapter, and uninstall your adapter in Mac OS X.
This chapter includes the following sections:
• Install Driver and Utility - Join a Wireless Network - Management - Uninstall Driver and Utility
4.1. Install Driver and Utility
We take the steps in Mac OS X 10.10 as an example - the steps may vary slightly for other versions of Mac OS.
- Download the driver and utility from this product's Support page from TP-Link's official website www.tp-link.com.
Note:
The CD is included in the package. If your computer has a CD drive, you can also run the included CD to install the driver and utility.
- Double click to unzip the downloaded folder and run the Install.pkg.

- The Install TP-Link Wireless Utility Wizard window will appear. Click Continue and follow the wizard to continue the installation.

- When the following screen appears, the driver and utility have been installed successfully. Click Restart to finish the installation.

- After restarting the computer, the TP-Link Utility icon will appear on the menu bar in the upper-right corner of the screen. To use the utility to join a Wi-Fi network with your adapter, refer to Join a Wireless Network.
Note:
If the TP-Link Utility icon connected properly and

does not appear on the menu bar, make sure the USB wireless network adapter is on.
4.2. Join a Wireless Network
There are two options of using the adapter to join a Wi-Fi network.
Option 1: TP-Link Utility
TP-Link Utility lets you easily connect the adapter to a Wi-Fi network and manage the adapter.
Option 2: WPS (Wi-Fi Protected Setup)
WPS (Wi-Fi Protected Setup) is a network security standard for easily adding computers and other devices to a home network. Use this method if your wireless router or access point supports WPS.
4.2.1. TP-Link Utility
- Open TP-Link Utility and select Site Survey tab. Then select the network you want to join from the list and click CONNECT.

- The Authentication\Encryption screen displays. If your network uses wireless security, you will be prompted to enter the Wi-Fi password of the network. Then click OK.

- After successfully connecting to your network, you will see a symbol in front of your network's SSID, which indicates a successful connection.

4.2.2. WPS (Wi-Fi Protected Setup)
WPS can be activated via PBC (Push Button Configuration) and PIN code. Please refer to PBC or PIN below.
• PBC
- Press the WPS/QSS button on your router or AP.

- Within 2 minutes, open TP-Link Utility and click WPS tab. Click PBC.

- The following screen indicates a successful connection by WPS.

• PIN
- Open TP-Link Utility and click WPS tab. Mark down the PIN displayed on the screen. Select the network you want to join from the WPS AP List and click PIN.

- Within 2 minutes, log in to the web management page of your router or AP. Go to its WPS page, enter the PIN of the adapter in the corresponding field and click Connect.
- The following screen indicates a successful connection by WPS.

4.3. Management
TP-Link Utility provides you with an easy way to manage various connection settings of your Wi-Fi network. It includes the following sections:
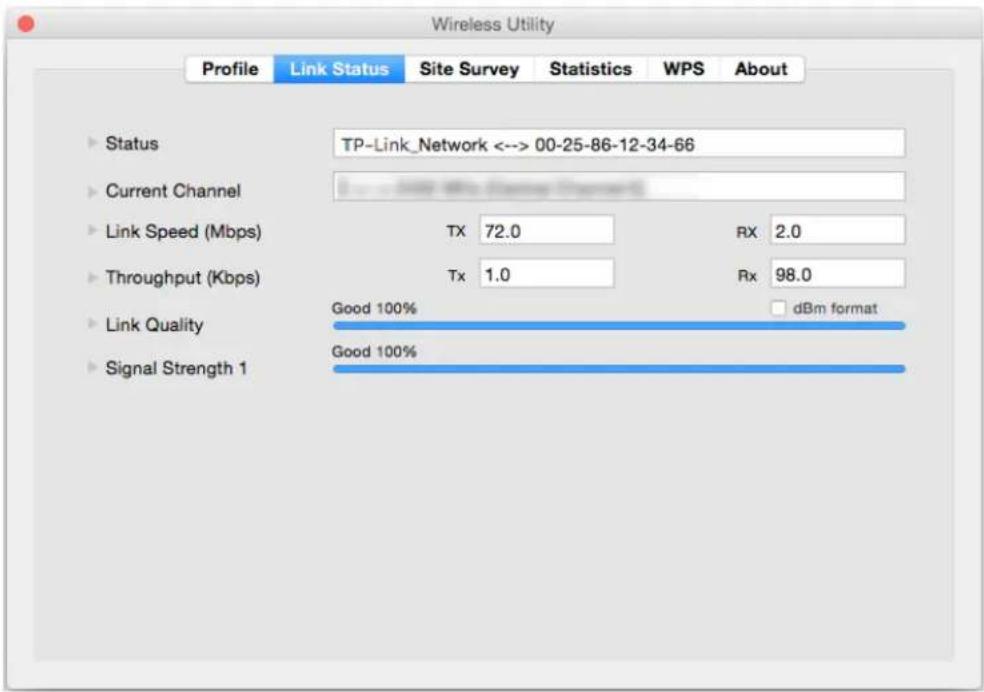
Link Status - View the information of the current Wi-Fi network connection and of the adapter.
Profile - Save or manage various Wi-Fi network connection settings.
About - View the utility version and the driver version of your adapter.
Open TP-Link Utility and click the Link Status or Profile tab to manage the corresponding section of your adapter.
4.3.1. Link Status
You can view the current channel, the link quality and signal strength of the Wi-Fi network, and other information of the link status as shown in the following figure.
4.3.2. Profile
The Profile screen lets you save and manage different Wi-Fi network connection settings as profiles so that you can quickly and simply connect to your network. Moreover, you can join a hidden Wi-Fi network that does not broadcast its SSID by adding a profile, provided that you know its wireless settings, such as SSID, security type, and encryption type. For details, please refer to the instructions below: To add a new profile, To join a Wi-Fi network, and To manage an existing profile.

• To add a new profile
- Click the ADD button, and then a new window will pop up.
- Complete the settings as shown below, and click OK.


Profile Name - Enter a name for your profile, such as Home, Office, Coffee house. Do not enter a profile name that already exists.
SSID - Enter the name of your Wi-Fi network.
System Configuration:
Select CAM (Constantly Awake Mode) or Power Saving Mode depending on your preference. In Power Saving Mode, the adapter will automatically reduce its power consumption when not being used.
You can specify the Tx Power level to adjust the transmit power of the adapter. A lower level will reduce performance, but it decreases interference in the local network environment.
Note:
It is recommended to keep the default values for the settings of RTS Threshold and Fragment Threshold. Advanced users can make adjustments if necessary.
Authentication & Security:
Select or enter the corresponding wireless settings, including Authentication Type, Encryption Type and WPA Pre-Shared Key, which should be the same as those of your Wi-Fi network.
• To join a Wi-Fi network
If you want to join a Wi-Fi network that listed in the profile screen, select the profile and click the ACTIVATE button in the bottom corner.
• To manage an existing profile
If you want to change the name or the wireless settings of an existing profile, select it and click the EDIT button in the profile screen, and then you can edit the settings of this profile. If you want to delete a profile that you no longer use, select it and click the DELETE button.
4.4. Uninstall Driver and Utility
1. Double click Uninstall.command in the downloaded folder.

- A command window will pop up, please type the password of the root user to uninstall the software.

- Wait till the "Process completed" shows up, then restart your computer to finish the uninstallation.
![tplink — uninstall.command — 80x24 [000]uaheathWestControlClientGARNTTransgeart, Next has no Info.glstart File. [000]uaheathWestControlClientGARNTTransgeart, Next has no Info.glstart File. [000]uaheathWestControlClientGARNTTransgeart, Next has no Info.glstart File. Next file:///System/Library/Extens…](/content/2026/06/1283595/images/a4b08f29ad41856e89a61ecbcae61b0cb5be091eeb307aa9778095003d1b9e55.jpg)
Chapter 5
Linux
This chapter introduces how to install your adapter's driver in a Linux system.
Visit the TP-Link website at http://www.tp-link.com, and go to the Archer T1U's product page. Then find the compatible version of the driver in the support page. Download and install the driver on your computer.
Appendix: Troubleshooting
T1. What should I do if the adapter is not detected?
- Make sure the adapter is securely connected to the computer.
- Make sure you meet the minimum system requirements for the adapter and that the latest Windows and system updates are installed on your computer.
- Make sure you use the latest driver for your specific adapter. The latest drivers can be found at the product's Support page at http://www.tp-link.com.
- Try a different USB port on the computer.
- Try restarting the computer or try using the adapter on a different computer.
T2. How to check if I have installed the driver for my adapter successfully or not?
- On your computer, please right-click the Computer icon and go to Manage;

- Open the Device Manager and go to Network adapters, and then find the corresponding TP-Link adapter, right-click it and then go to Properties;

- If you can see "This device is working properly." in the red box, you have already installed the driver successfully.

T3. What should I do if I can't connect to the Wi-Fi after installing the driver?
• Refer to T2 to check if you have installed the driver for your adapter successfully. - Make sure the adapter is securely connected to the computer. - Disable the antivirus software and firewall, then try again. - Try a different USB port on the computer. - Restart your computer and try again.
- Re-install the driver and try again.
T4. How to find the hardware version of the adapter?
- The hardware version is printed on the product label on the package or the adapter. There is a character string "Ver:X.Y" (for example, Ver:2.0) in the Serial Number field, and the number X is the hardware version of the adapter.

- Visit http://www.tp-link.com/faq-46.html and follow the second method to find the hardware version of the adapter.
COPYRIGHT & TRADEMARKS
Specifications are subject to change without notice. - is a registered trademark of TP-Link Technologies Co., Ltd. Other brands and product names are trademarks or registered trademarks of their respective holders.
No part of the specifications may be reproduced in any form or by any means or used to make any derivative such as translation, transformation, or adaptation without permission from TP-Link Technologies Co., Ltd. Copyright © 2017 TP-Link Technologies Co., Ltd. All rights reserved.
FCC STATEMENT

This equipment has been tested and found to comply with the limits for a Class B digital device, pursuant to part 15 of the FCC Rules. These limits are designed to provide reasonable protection against harmful interference in a residential installation. This equipment generates, uses and can radiate radio frequency energy and, if not installed and used in accordance with the instructions, may cause harmful interference to radio communications. However, there is no guarantee that interference will not occur in a particular installation. If this equipment does cause harmful interference to radio or television reception, which can be determined by turning the equipment off and on, the user is encouraged to try to correct the interference by one or more of the following measures:
- Reorient or relocate the receiving antenna.
- Increase the separation between the equipment and receiver.
- Connect the equipment into an outlet on a circuit different from that to which the receiver is connected.
- Consult the dealer or an experienced radio/ TV technician for help.
This device complies with part 15 of the FCC Rules. Operation is subject to the following two conditions:
1) This device may not cause harmful interference. 2) This device must accept any interference received, including interference that may cause undesired operation.
Any changes or modifications not expressly approved by the party responsible for compliance could void the user's authority to operate the equipment.
Note: The manufacturer is not responsible for any radio or TV interference caused by unauthorized modifications to this equipment. Such modifications could void the user's authority to operate the equipment.
FCC RF Radiation Exposure Statement:
This equipment complies with FCC radiation exposure limits set forth for an uncontrolled environment. End users must follow the specific operating instructions for satisfying RF exposure compliance. This transmitter must not be co-located or operating in conjunction with any other antenna or transmitter. This equipment has been SAR-evaluated for use in hand. SAR measurements are based on a 5mm spacing from the body and that compliance is achieved at that distance.
CE Mark Warning
CE
This is a class B product. In a domestic environment, this product may cause radio interference, in which case the user may be required to take adequate measures.
OPERATING FREQUENCY (the maximum transmitted power)
5180MHz—5240MHz (23dBm)
EU declaration of conformity
TP-Link hereby declares that the device is in compliance with the essential requirements and other relevant provisions of directives 2014/53/EU and 2011/65/EU.
The original EU declaration of conformity may be found at http://www.tp-link.com/en/ce.
RF Exposure Information
This device meets the EU requirements (2014/53/EU Article 3.1a) on the limitation of exposure of the general public to electromagnetic fields by way of health protection.
This device has been tested and meets the ICNIRP exposure guidelines and the European Standard EN 62209-2. SAR is measured with this device at a separation of 0.5 cm to the body, while transmitting at the highest certified output power level in all frequency bands of this device. Carry this device at least 0.5 cm away from your body to ensure exposure levels remain at or below the as-tested levels.
Restricted to indoor use.
Canadian Compliance Statement
This device complies with Industry Canada license-exempt RSSs. Operation is subject to the following two conditions:
1) This device may not cause interference, and 2) This device must accept any interference, including interference that may cause undesired operation of the device.
1) The device for operation in the band 5150–5250 MHz is only for indoor use to reduce the potential for harmful interference to co-channel mobile satellite systems; 2) For devices with detachable antenna(s), the maximum antenna gain permitted for devices in the bands 5250-5350 MHz and 5470-5725 MHz shall be such that the equipment still complies with the e.i.r.p. limit; 3) For devices with detachable antenna(s), the maximum antenna gain permitted for devices in the band 5725-5850 MHz shall be such that the equipment still complies with the e.i.r.p. limits specified for point-to-point and non-point-to-point operation as appropriate; and
The high-power radars are allocated as primary users (i.e. priority users) of the bands 5250-5350 MHz and 5650-5850 MHz and that these radars could cause interference and/or damage to LE-LAN devices.
DFS (Dynamic Frequency Selection) products that operate in the bands 5250-5350 MHz, 5470-5600MHz, and 5650-5725MHz.
Warning:
Radiation Exposure Statement:
This EUT is compliant with SAR for general population/uncontrolled exposure limits in RSS-102 and has been tested in accordance with the measurement methods and procedures specified in IEEE 1528 and IEC 62209. This equipment should be installed and operated with a minimum distance of 1.0 cm between the radiator and your body. This
device and its antenna(s) must not be co-located or operating in conjunction with any other antenna or transmitter.
Industry Canada Statement
CAN ICES-3 (B)/NMB-3(B)
Korea Warning Statements
- Keep the device away from water, fire, humidity or hot environments.
- Do not attempt to disassemble, repair, or modify the device.
- Do not use a damaged charger or USB cable to charge the device.
- Do not use any chargers other than those recommended.
- Do not use the device where wireless devices are not allowed.
- This USB Adapter can be powered only by computers that comply with Limited Power Source (LPS).
Please read and follow the above safety information when operating the device. We cannot guarantee that no accidents or damage will occur due to improper use of the device. Please use this product with care and operate at your own risk.
For EU/EFTA, this product can be used in the following countries:
| AT BE BG CH CY CZ DE DK | |||||||
| EE EL EF FI FR HR HU IE | |||||||
| IS | IT | LI | LT | LU | LV | MT | NL |
| NO | PL | PT | RO | SE | SI | SK | UK |
Explanation of the symbols on the product label
| Symbol | Explanation |
 | RECYCLINGThis product bears the selective sorting symbol for Waste electrical and electronic equipment (WEEE). This means that this product must be handled pursuant to European directive 2012/19/EU in order to be recycled or dismantled to minimize its impact on the environment.User has the choice to give his product to a competent recycling organization or to the retailer when he buys a new electrical or electronic equipment. |
- CHAPTER 1. GET TO KNOW ABOUT YOUR ADAPTER
- CHAPTER 2. CONNECT TO A COMPUTER
- CHAPTER 3. WINDOWS
- CHAPTER 4. MAC OS X
- CHAPTER 5. LINUX
- APPENDIX: TROUBLESHOOTING
- ABOUT THIS GUIDE
- CONVENTIONS
- MORE INFO
- CHAPTER
- GET TO KNOW ABOUT YOUR ADAPTER
- PRODUCT OVERVIEW
- LED STATUS
- TIPS
- CONNECT TO A COMPUTER
- WINDOWS
- INSTALL DRIVER
- JOIN A WIRELESS NETWORK
- UNINSTALL DRIVER
- MAC OS X
- INSTALL DRIVER AND UTILITY
- NOTE
- TP-LINK UTILITY
- WPS (WI-FI PROTECTED SETUP)
- PBC
- PIN
- MANAGEMENT
- LINK STATUS
- PROFILE
- TO ADD A NEW PROFILE
- SYSTEM CONFIGURATION
- AUTHENTICATION & SECURITY
- TO JOIN A WI-FI NETWORK
- TO MANAGE AN EXISTING PROFILE
- UNINSTALL DRIVER AND UTILITY
- DOUBLE CLICK UNINSTALL.COMMAND IN THE DOWNLOADED FOLDER
- LINUX
- T1. WHAT SHOULD I DO IF THE ADAPTER IS NOT DETECTED
- T2. HOW TO CHECK IF I HAVE INSTALLED THE DRIVER FOR MY ADAPTER SUCCESSFULLY OR NOT
- T4. HOW TO FIND THE HARDWARE VERSION OF THE ADAPTER
- COPYRIGHT & TRADEMARKS
- FCC STATEMENT
- FCC RF RADIATION EXPOSURE STATEMENT
- CE MARK WARNING
- CE
- OPERATING FREQUENCY (THE MAXIMUM TRANSMITTED POWER)
- EU DECLARATION OF CONFORMITY
- RF EXPOSURE INFORMATION
- CANADIAN COMPLIANCE STATEMENT
- WARNING
- RADIATION EXPOSURE STATEMENT
- INDUSTRY CANADA STATEMENT
- KOREA WARNING STATEMENTS
Brand : TP-LINK
Model : AC450
Category : Network card / adapter