AT 104 - Washing machine HOTPOINT - Free user manual and instructions
Find the device manual for free AT 104 HOTPOINT in PDF.
User questions about AT 104 HOTPOINT
0 question about this device. Answer the ones you know or ask your own.
Ask a new question about this device
Download the instructions for your Washing machine in PDF format for free! Find your manual AT 104 - HOTPOINT and take your electronic device back in hand. On this page are published all the documents necessary for the use of your device. AT 104 by HOTPOINT.
USER MANUAL AT 104 HOTPOINT
How to get better results
Instructions for installation and use
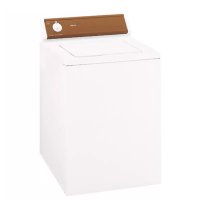
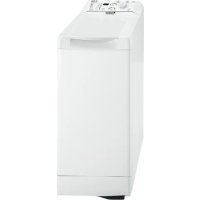
Top loading washing machine safe and easy to use
Class A at 40°C
The first washingmachine to give a perfect washatonly 40^
Cashmere Gold
The first washing machine to have "The Woolmark Company" recognition
Quick Guide
Here are the 12 topics explained in this manual. Read, learn and have fun: you will discover many secret ways to get a better wash, more easily and making your washing machine last longer. And especially keeping an eye on safety.
1. Installation and removal (p. 2)
Installation, after delivery or transport, is the most important operation for the correct functioning of your washing machine. Always check:
- That the electric system complies with the law;
- That the inlet and draining pipes are connected correctly;
- That the washing machine is levelled properly: something worth checking for the life of your washing machine and the quality of your wash;
- That the tub fastening screws (on the back of the appliance) have been removed.
2. Safety for you and your children (p. 3)
Here you will find the necessary guidelines for the safety of your entire household. Because safety is very important indeed.
3. What goes in your washing machine and how to start it (p. 4)
A correct distribution of your laundry is vital both to the successful outcome of the wash and to the life of your appliance. Learn all the tips and secrets to dividing your linen: colour, type of fabric and tendency of creating fuzz are the most important criteria.
4. Understanding the control panel (p. 5)
The control panel is very simple. It has only a few essential buttons to help you choose any type of wash cycle, ranging from the most energetic, capable of cleaning a mechanic's overalls, to the most delicate for wool. Familiarising with it will help you get the best out of your wash, while spending less and helping your washing machine last longer. It's easy.
5. Guide to the wash programmes (p. 6)
Herein is an easy table to help you choose the right programme, temperature, detergents and possible additives. Choose the right programme and you will get better results with your wash while saving time, water and energy, day after day.
6. Guide to understanding labels and symbols (p. 7-8)
The international symbols on the labels of your garments are easy to understand and equally important for the success of your wash. The guide includes simple instructions to help you choose the suitable wash programme, the right temperature, wash cycles, ironing methods and specific Ariston symbols.
7. Useful tips to avoid mistakes (p. 8)
Years back, our grandmothers were the ones who gave us good advice - and in those days synthetic fibres did not exist: washing was easy. Today, your washing machine gives you helpful advice.
8. How to close the drum (p. 9)
Open and shut the doors fully for a safe wash cycle.
9. The detergent dispenser (p. 10)
How to use the detergent dispenser.
10. Problems and solutions (p. 11 and 12)
Before calling a technician, read these pages: immediate solutions may be found for a number of problems. If the problem persists, call Ariston customer services and any failure will be repaired as soon as possible.
11. Care and maintenance (p. 13)
Your washing machine is a true friend: with just a bit of care, it will repay you with loyalty and devotion.
With the necessary upkeep, it will wash for years and years to come.
12. Technical features (p. 14)
Herein are the technical features of your washing machine: model type number, electric and water specifications, size, capacity, speed of the spin cycle and compliance with Italian and European rules and regulations.
Installation and removal
When the appliance arrives
Whether new or just transported to a new house, installation is extremely important for the correct functioning of your washing machine.
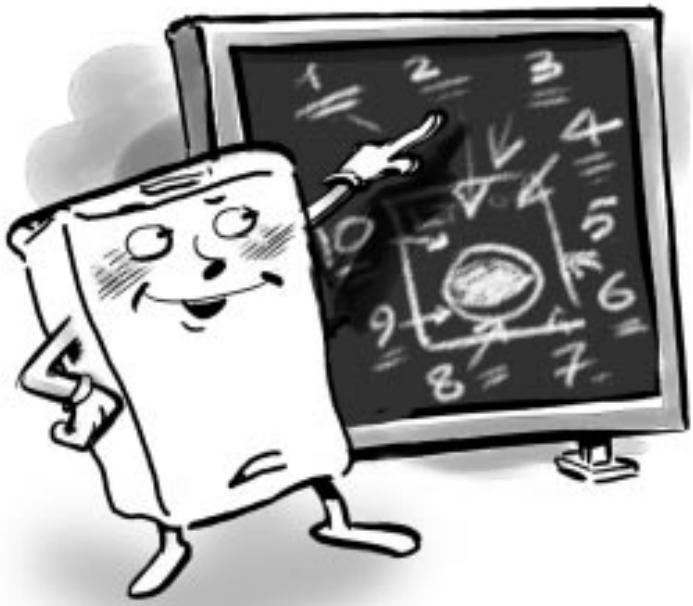
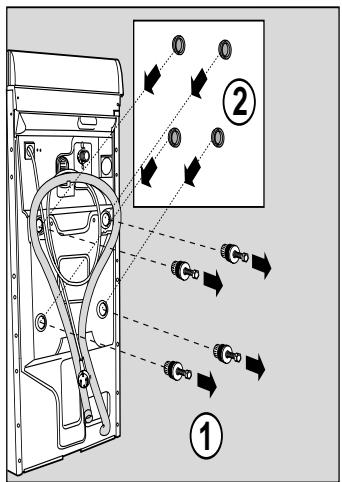
After removing the appliance from its packaging, check that it is intact. If in doubt, contact a qualified technician immediately. The inside of the machine is blocked, for transportation, by four screws and rubber washers on the back panel.
Do not throw the blocking screws and the spacers away. In the event of a removal, they can be used to block the components inside the appliance again and so protect it during transport.
Unblocking: remove the 4 screws!
Before using the washing machine, remove the screws, remove the rubber washers with the relative spacer (keeping all the parts) and use the plastic tabs provided to fill in the holes.
Warning: should the screws be re-used, make sure you fasten the shorter at the top.
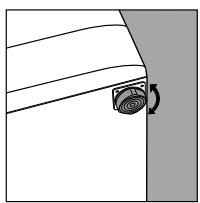
Levelling
The washing machine must be levelled appropriately in order to guarantee its correct functioning.
To level the appliance, the feet must be adjusted; the angle of inclination, measured according to the worktop, must not exceed 2^ . When placed on fitted carpet, make sure the ventilation is not obstructed within its surroundings.
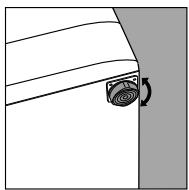
The feet are adjustable.
Connection to the water mains
Water pressure must range within the values indicated on the data plate on the rear of your washing machine. Connect the inlet hose (situated unassembled inside the drum) to a cold water tap with a 3/4 gas threaded mouth. If the water pipes are new or left unused, run the water until it is clear and free of debris. Attach the hose to the appliance, in line with the appropriate water pipe inlet at the top right.
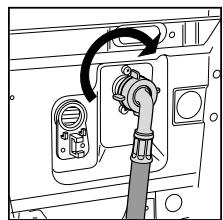
Water hose inlet to be fitted to the top right.
Connecting the drain hose
On the back of the appliance, towards the top, you will find a hook onto which you should fasten the drain hose if necessary. Insert the other end in a wall draining duct or place it on the edge of a sink or tub avoiding excessive kinks and bending. It should be placed at a height ranging from 60 to 100 cm.
In case it is necessary to fix the end of the hose at a height below 60~cm from the ground, it must be fixed in the appropriate hook placed on the back panel as mentioned above.
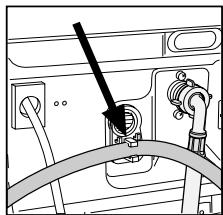
The hook to be used in case the drain hose ends at a height below 60 cm.
If the hose drains into a tub or sink, apply the plastic guide and tie it to the tap.
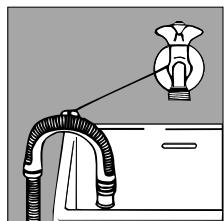
The guide for draining into tubs and sinks.
The hose must never remain immersed in water.
Extensions are inadvisable. In case of absolute need, the extension must have the same diameter as the original hose and must not exceed 150~cm in length. In case of wall draining pipes, their efficiency must be checked by a qualified technician. If the dwelling is on one of the upper floors of a building, there may be drain trap problems causing the washing machine to load and unload water continuously. In order to avoid such an inconvenience, special antidrain trap valves are available in shops.
Electric connection
Before connecting the appliance to the electric socket, be sure that:
1) the electric socket is able to sustain the appliance's maximum power load indicated on the data plate and in compliance with the law;
2) the supply voltage is included within the values indicated on the data plate;
3) the socket is compatible with the appliance's plug. If not, do not use adapters, but replace either the socket or the plug;
4) electric household appliances must be equipped with an "earthing" system,
5) that the machine is not placed on top of the power supply cable once the connection has been made.
Warning!
Any modifications made to the factory settings or an irregular electric connection, any electrical, mechanical or hydraulic modification whatsoever to the appliance shall render the guarantee invalid and shall relieve the manufacturer and retailer of any and all liability.
Plastic bags, polystyrene foam, screws and other packaging parts are not children's toys, and are potentially dangerous.
More and more important
Your safety and that of
your children
Your washing machine has been built in compliance with the strictest international safety regulations. To protect you and all your family.
Read these indications and all the information in this manual carefully: they are an important source, not only of numerous useful tips, but also of vital information on safety, use and maintenance
- In case of malfunctioning, first unplug the appliance from the wall socket and turn off the water tap; do not under any circum-stances touch internal parts in order to attempt repairs. This will also render the guarantee invalid.
- The washing machine should not be installed in an outdoor environment, not even when a roof shelters the area, because it may be very dangerous to leave it exposed to rain and thunderstorms.
- It must only be used by adults and exclusively for washing clothes following the instructions provided in this manual.
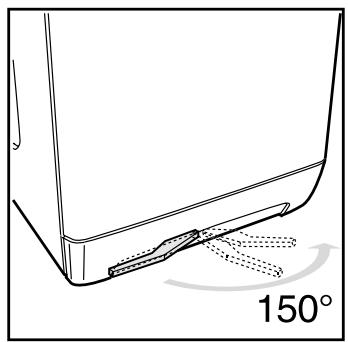
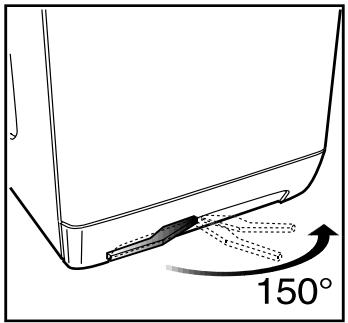
- Should it have to be moved, pull the white lever, situated
on the left beneath the base, and the retractable wheels will appear, thus allowing for easy movement.
- Before loading the washing machine, make sure the drum is empty.
-
Never touch the washing machine when barefoot or with wet or damp hands or feet.
-
Never use extensions or multiple plugs, which are particularly dangerous in humid environments. The power supply cable must never be bent or dangerously compressed.
- Do not remove the filter while the appliance is on. Do not use hand wash detergent because the
abundance of foam could come out from the lid and cause damage.
- Never pull on the plug or the washing machine to disconnect it from the wall socket: it is extremely dangerous.
- While the appliance is functioning, do not touch the drain water as it could reach very high temperatures. Keep it out of children's reach. Never force the washing machine door because this could damage the safety block on the opening, which serves to protect from accidental openings.
- This appliance is intended for domestic use. Industrial use (in hotels, restaurants and laundries) compromises its original manufacturing characteristics and invalidates the guarantee.
"I only want an authorised specialised technician with original Aristol spare parts!"

How to change the power supply cable
The power supply cable is special and can be purchased exclusively from authorised Ariston Technical Service Centres.
To replace it, do as follows:
-
Make sure that the washing machine is switched off and unplugged.
-
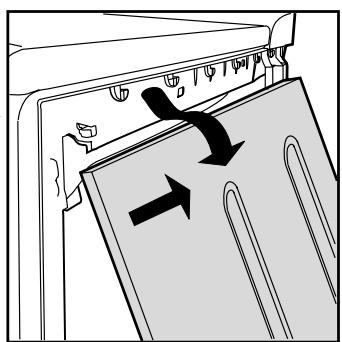
Remove the appliance base and unscrew the 2 screws on the bottom right-hand side, then unscrew the 6 rear screws, on the left-hand side, and remove the side panel by tipping it slightly outwards and pulling it out.(fig.1 and 2).
-
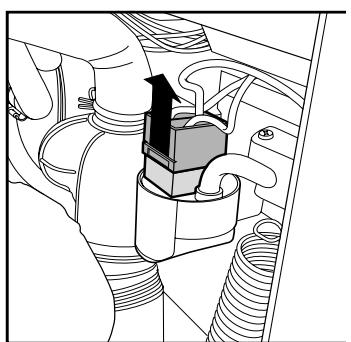
Disconnect the electricity supply to the radio interference suppresser by removing the connector (fig. 3).
-
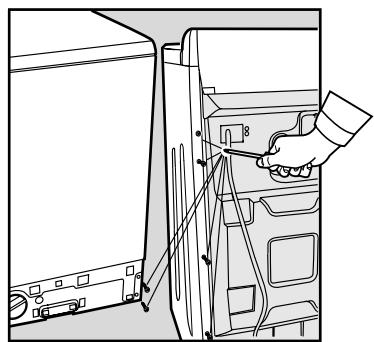
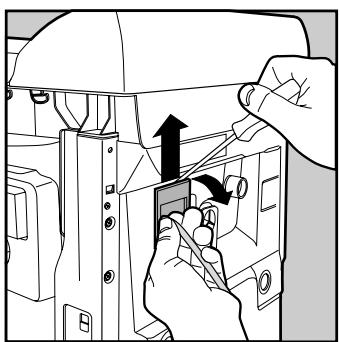
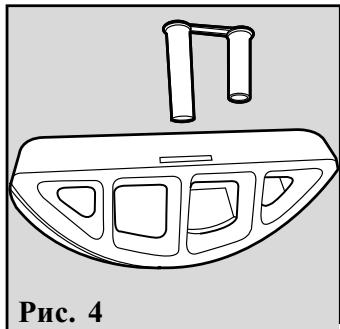
Unscrew the 2 outer filter fastening screws and, with the help of a screwdriver (see fig. 4), release it from the back panel by pulling upwards.
-
Once you have positioned the new power supply cable, reconnect the connector, making sure the safety hook is securely in place.
You must contact a qualified professional to replace the power supply cable. The same must respect the applicable norms in force.
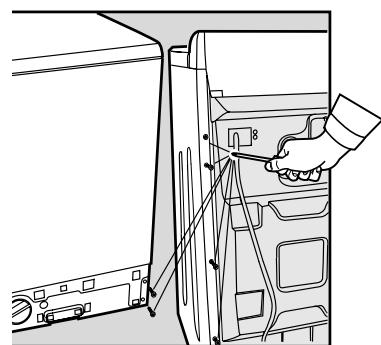
Fig.1
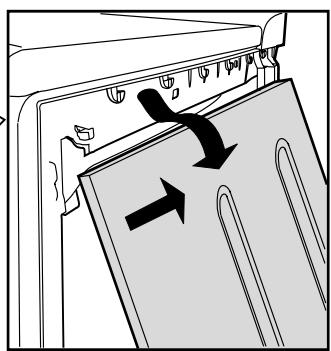
Fig. 2
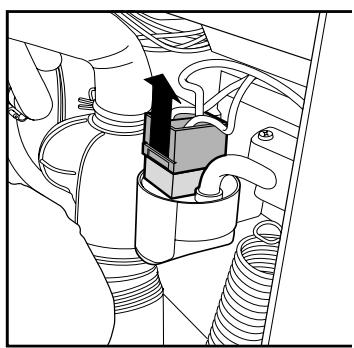
Fig.3
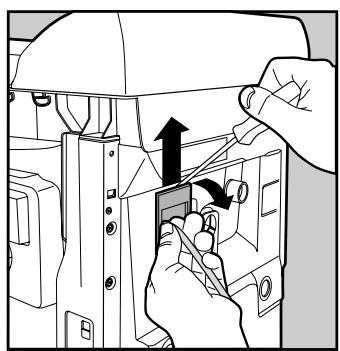
Fig. 4
What goes in your washing machine?
Before washing, you can do a great deal for better results. Divide your garments according to fabric and colour. Read the labels and follow their indications. Alternate small items with large ones.
Before washing.
Divide your washing according to the type of fabric and colour resistance: sturdy fabrics should be separated from delicate ones.
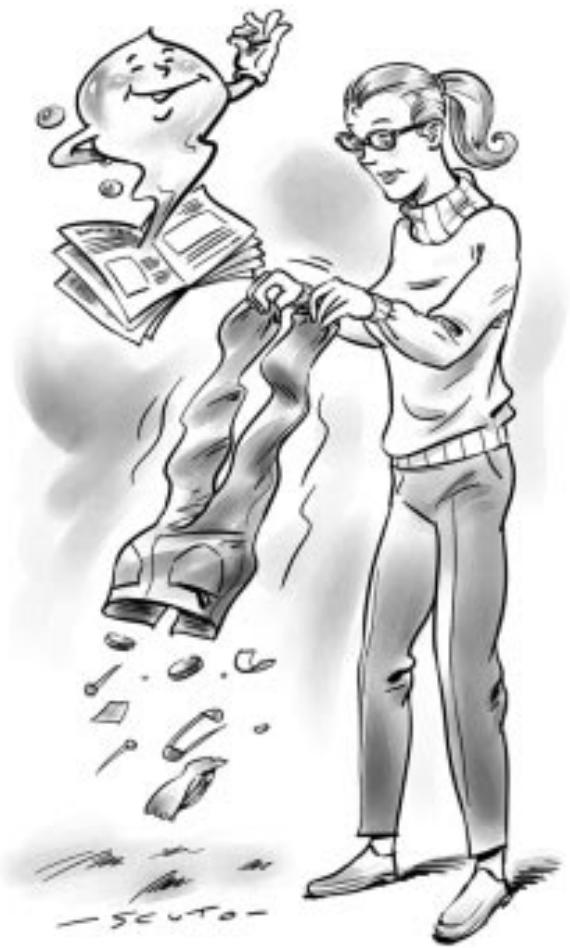
Light colours should be separated from dark ones. Empty all pockets (coins, paper, money and small objects) and check the buttons. Mend immediately or remove loose buttons as they could fall off during the wash cycle.
The labels say it all.
Always look at the labels: they tell you everything about your garment and how to wash it in the best way possible.
The table on page 7 shows you all the secrets of the symbols found on labels. Their indications are a valuable guide to a better wash and to longer lasting clothes.
Alternate small items with large ones.
Unfold all your washing. Place it loose inside the drum and follow the indications as to the recommended load quantity for the different wash programmes. Your clothes will come out cleaner and with fewer creases.
Garments treated with petrol-based stain remover.
Do not place garments in your washing machine that have been treated with petrol, pure alcohol, trichlorethylene etc. until these products have evaporated completely.
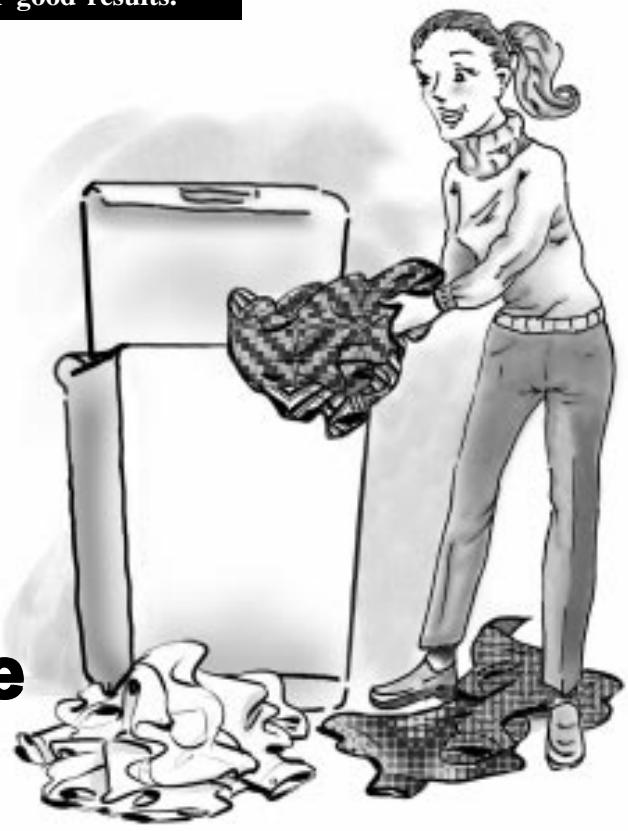
Dividing your garments according to fabric and colour is very important for good results.
How to start the appliance
Putting your appliance in place and moving it.
If your washing machine is equipped with a special set of retractable wheels you can easy move it. To lower the wheels and thus move the appliance effortlessly, just pull the lever, situated on the left-hand side beneath the base. Once the appliance is in the required position, put the lever back in place. The washing machine is now firmly in place.
See figure. (Just for equipped models)
After installing your new washing machine, start a wash cycle (with the appliance empty) by setting programme "1" at 60 degrees C.
Starting the washing machine in the right way is important for the quality of your wash, for preventing problems and for lengthening the life of your appliance. After loading your washing and pouring in the detergent together with any additives, always check that:
For delicate garments: protect underwear, tights and stockings, children's socks and delicate items by placing them in a canvas pouch
- The appliance doors are firmly shut.
- The plug is inserted in the socket.
- The water tap is turned on.
- button G is on the O position.
- The set of retractable wheels is stored away (i.e. the wheels are not touching the floor).
Choose the desired programme
The programme is selected according to the type of garments that need to be washed and how dirty these are. To select the programme,
consult the table on page 6. Turn knob A and set it to the number corresponding to the desired programme. Select the temperature using knob B, in the case turn the knob C selecting the spin speed and, if necessary, press the function buttons (D-E-F); finally press the ON-OFF button G (position I).
Don't forget to select "12h, 9h, 3h 1 h" (one position) whether you need such delayed wash.
At the end of the wash cycle... Wait for approximately two minutes.
Then turn the washing machine off by pressing ON-OFF button G (O position). You can now open the washing machine doors safely. After having removed the freshly cleaned washing, leave the doors open or ajar so that the humidity left inside can evaporate.
Always turn the water tap off.
Remember that, in the event of a power failure, or should the washing machine switch itself off, the programme selected will start up again from where it was interrupted.
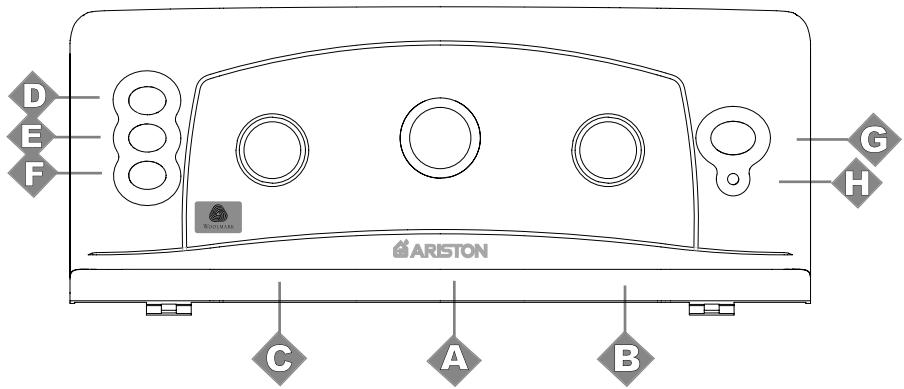
Understanding the control panel
Here I'm in command
Making the right choice is important. And it's easy.
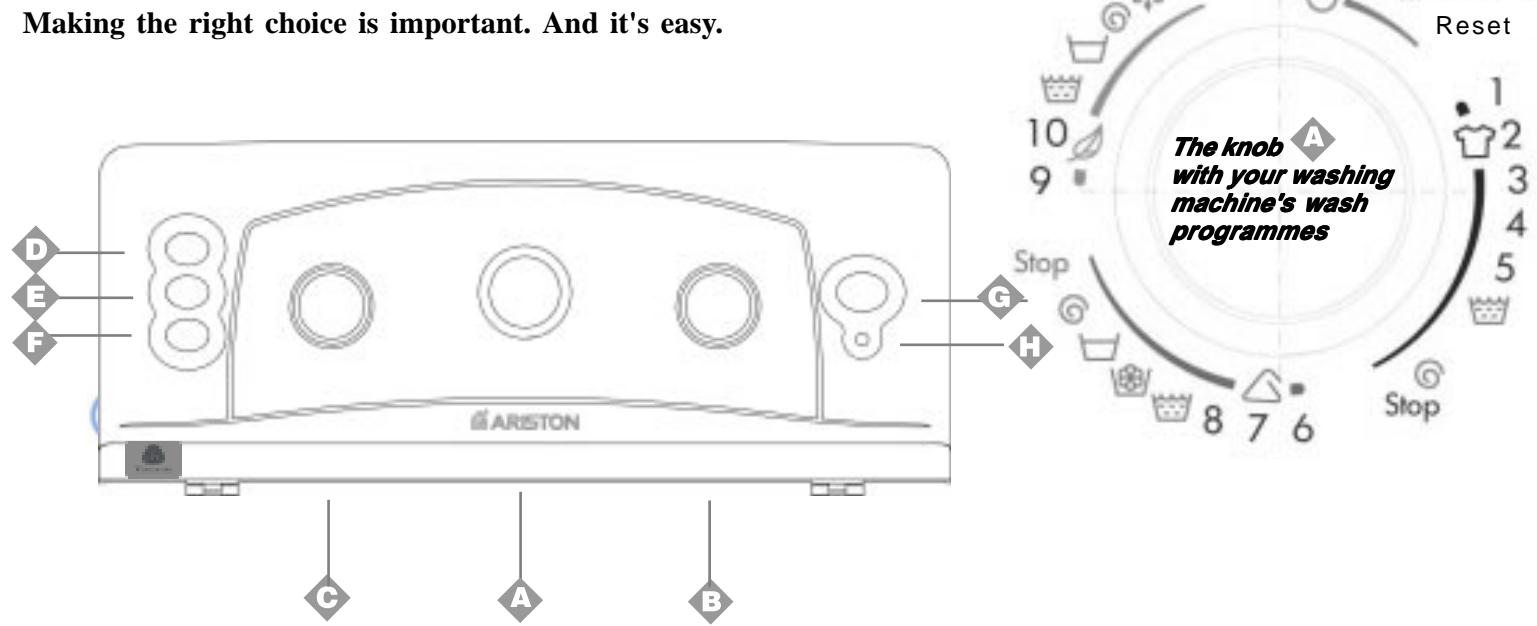

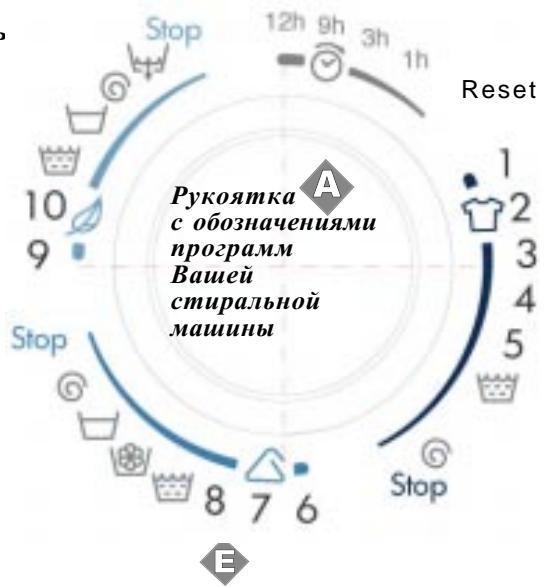
Programme selector knob and programmed start
It is used to select the wash programme.
Turn this knob clockwise only.
To select the programmes, the mark situated on the knob must be aligned with the symbol/ number that corresponds to the desired programme. Now press the on/off button G (I position), and lamp H will begin flashing. After 5 seconds, the setting is accepted, lamp H stops flashing (staying lit) and the wash cycle begins.
If you want to interrupt the programme in progress or set a new one, select one of the positions Stop and wait 5 seconds: when the cancellation has been accepted, lamp H will flash, at this point you can set the new one or turn the appliance off, should you wish to add some garments, by then waiting for approximately 2 minutes before opening the appliance doors.
You can also use this knob to delay the start of the washing machine.
Select one of the four positions for the programmed start (after 12 hours, 9h, 3h or 1 hour), press the on/off button G (I position) and wait 5 seconds. This is when the setting has been accepted (lamp H stops flashing and stays lit) and you can select the programme you require.
Lamp H flashes in a special way (2" on and 4" off) to indicate that the programmed start has been set. Even during this phase, you can open the appliance door and change the wash load.
After the wash cycle has been set and accepted by the washing machine, any changes to the position of the knob will be of no use (except in the Stop/ Reset position).

Temperature control knob
It is used to set the wash temperature indicated in the programme table (on page 6). It also allows you to reduce the temperature recommended for the selected programme, and even to set a cold wash cycle (snow symbol ).

Spin exclusion/variation Knob
It is used to exclude the spin cycle and/or to reduce the spin speed of the selected programme. The maximum speed for the four types of fabric are:
Fabric Speed
Cotton max rpm
Synthetics 800 rpm
Wool 600 rpm
Silk none
In any case, the appliance distributes the load at low speed.


Easy iron button
This function allows your washing to come out of the machine without creases, making it much easier to iron.
You can use it with programmes 3-5 (Cotton), 6-7 (Synthetics), 10 Silk.
Press this button in programmes 4-5-6-7-10 and the wash cycle will come to a stop on symbol . You can complete it by pressing button D again.


Stain removal (see pages 9-10)
Thanks to this command, the washing machine will carry out a more intensive wash that optimises the effectiveness of the liquid additives, thus allowing more resistant stains to be removed. When you press the Stain Removal button, you cannot run the Pre-wash and the Easy Iron function (button D) is enabled.


Extra Rinse
This function increase the quantity of water during the rinse cycles for resistant fabrics. Use of this function is recommended to improve
The information contained in the table is purely indicative. It could in fact vary depending on the appliance model, the quantity and type of garments to wash, the hardness and temperature of the mains water supply, as well as the temperature of the environment.
rinsing results when washing full loads and large quantities of detergent are used.
Recommended in case of detergent contact allergies.
Option available with programmes 1-2-3-5-6-7

ON-OFF

When button G is pressed, the washing machine is switched on, when it is not the machine is switched off.
Turning the machine off does not cancel the selected programme.

ON-OFF lamp
Lamp H flashes when the appliance is switched on and awaiting a programme to be set. A steady light means the appliance has accepted the selected programme.
What are you washing today?
A programme for all seasons
| Type of fabric and degree of soil | Progr. Knob | Temp. Knob | Detergent for pre-wash | Detergent for wash | Fabric softener | Bleach | Cycle length (minutes) | Description of wash cycle |
| PROGRAMMED START | ||||||||
| After 12 - 9 - 3 -1 hours | Deliaied Start by 12-9-1 hours | |||||||
| Reset/Stop | Reset | Interrupts/Cancels selected Program. | ||||||
| COTTON | ||||||||
| Exceptionally soiled whites (Sheets, tablecloths, etc.) | 1 | Max | ◆ | ◆ | ◆ | 155 | Pre-wash, Wash at high temperature, rinses, intermediate and final spin cycles | |
| Heavily soiled whites (sheets, tablecloths, etc.) | 2 | Max | ◆ | ◆ | Delicate/Traditional | 140 | Wash at high temperature, rinses, intermediate and final spin cycles | |
| Normally soiled whites (sheets, tablecloths, etc.) | 3 | 60°C | ◆ | ◆ | Delicate/Traditional | 140 | Wash at 60°C, rinses, intermediate and final spin cycles | |
| Normally soiled whites and fast colours | 4 | 40°C | ◆ | ◆ | 160 | Long Wash cycle at 40°C, rinse cycles, intermediate and final spin cycles | ||
| Normally soiled whites and fast colours | 5 | 40°C | ◆ | ◆ | Delicate/Traditional | 90 | Wash cycle at 40°C, rinse cycles, intermediate and final spin cycles | |
| Rinse cycles/Bleach | ◆ | Delicate/Traditional | Rinse cycles, intermediate and final spin cycles | |||||
| Spin cycle | Draining and final spin cycle | |||||||
| Stop/Reset | Interrupts/Cancels selected programme | |||||||
| SYNTHETICS | ||||||||
| Heavily soiled fast colour synthetics (baby linen, etc.) | 6 | 60°C | ◆ | ◆ | 105 | Wash at 60°C, rinses, anti-crease or delicate spin cycle | ||
| Delicate colour synthetics (all types of slightly soiled garments) | 7 | 40°C | ◆ | ◆ | Delicate | 75 | Wash cycle at 40°C, rinse cycles, anti-crease or delicate spin cycle | |
| Delicate colour synthetics (all types of slightly soiled garments) | 8 | 30°C | ◆ | ◆ | 30 | Wash cycle at 30°C, rinse cycles and delicate spin cycle | ||
| Rinse cycles/Bleach | ◆ | Delicate | Rinse cycles, anti-crease or delicate spin cycle | |||||
| Fabric softener | ◆ | Rinse cycles with automatic introduction of softener, anti-crease or delicate spin cycle | ||||||
| Anti-crease - Rinse Hold | Rinse hold for silk and especially delicate garments | |||||||
| Spin cycle | Draining and delicate spin cycle | |||||||
| Stop/Reset | Interrupts/Cancels selected programme | |||||||
| DELICATES | ||||||||
| Wool | 9 | 40°C | ◆ | ◆ | 55 | Wash cycle at 40°C, rinse cycles and delicate spin cycle | ||
| Silk, particularly delicate garments and fabrics (curtains, silk, viscose, etc.) | 10 | 30°C | ◆ | ◆ | 45 | Wash cycle at 30°C, rinse cycles, anti-crease or draining | ||
| Rinse cycles | ◆ | Rinse cycles, anti-crease or draining | ||||||
| Anti-crease - Rinse Hold | Rinse hold for silk and especially delicate garments | |||||||
| Spin cycle | Draining and delicate spin cycle (wool) | |||||||
| Draining | Draining | |||||||
| Stop/Reset | Interrupts/Cancels selected programme |
Special programmes
Important: To cancel the wash programme you have just set, select one of the position "Reset- Stop" for 3 seconds.
4- Class A at 40^ Your washing machine has a special programme to allow you to obtain optimum results even at low temperatures. By setting programme 4 at a temperature of 40^ , the results you will obtain will be the same as you would normally obtain at 60^ thanks to the washing machine's action and the length of the wash cycle.
8- Daily wash at 30^ in 30 minutes. Your washing machine has a programme designed to wash lightly soiled garments in a short amount of time. By setting programme 8 at a temperature of 30^ C, you can wash different fabrics together (except for woollen and silk items), with a maximum load of 3 kg. This programme allows you to save on both time and energy as it only lasts approximately 30 minutes. WE RECOMMEND THE USE OF LIQUID DETERGENT.
Understanding labels and the symbols for the various Ariston Top Loaders…
Learn the meaning of these symbols and you will get better results, your garments will last longer and your machine will repay you by washing better.
All over Europe, garment labels contain messages expressed in small yet important symbols. Understanding them is very important if you want to get
better results and treat your garments the way they they deserve to be treated. These symbols are divided in five different categories and shapes: wash cycle
Useful tips
Turn shirts inside out to get better results and make them last longer.
Always empty pockets of their contents.
Look at the label: it will always give you useful advice.
When loading your washing, alternate large and small garments.
bleaching 7 ironing 3 dry cleaning O and drying
Make sure you select the right temperature...
Consult and learn the symbols in this table: they will help you obtain a better wash, treat your clothes properly, and get a better performance out of your washing machine.
| Wash cycle | Bleaching | Ironing | Dry cleaning | Drying |
| Strong Movement | Delicate Movement | High temp. | ||
| 95 Wash cycle 95°C | Can be bleached in cold water | Hot iron max 200°C | Dry cleaning with all solvents | Can be tumble-dried |
| 60 Wash cycle 60°C | Do not bleach | Warm iron max 150°C | Dry cleaning with perchloride, aviation gasoline, pure alcohol, R111 and R113 | Do not tumble dry |
| 40 Wash cycle 40°C | Cool iron max 110°C | Dry cleaning with aviation gasoline, pure alcohol and R113 | Lay flat to dry | |
| 30 Wash cycle 30°C | Do not iron | Do not dry clean | Hang to dry non-spin dried garments | |
| Delicate hand wash | Dry on hangers | |||
| Do not wash in water | ||||
| ON OFF | |
| Start-reset | |
| Delayed start | |
| Pre-wash - Wash Max° | |
| 90° Wash | |
| 60° Wash | |
| Delicate 40° Wash | |
| 60° Synthetics | |
| 50° Synthetics | |
| 40° Synthetics |
| Rinse |
| Rinse level/Extra rinse |
| Fabric softener |
| Rinse hold - Anti-crease |
| Spin cycle |
| Spin cycle variation or no spin cycle |
| Water Draining |
| Wash cycle intensity |
| Wool |
| Hand wash |
| Silk and curtains | |
| Daily wash at 30° in 30' | |
| Easy iron | |
| Stain removal | |
| Half load | |
| Temperature setting | |
Useful tips to avoid mistakes
■ Never use your washing machine to wash... torn, fraying or non-hemmed linen. If it is absolutely necessary, place it in a bag for protection. Brightly coloured linen with whites.
Persistent or special stains Treat these before washing by rubbing the toughest stains with a special detergent, with detergent paste or specific stain removers (see the inset on treating special stains with stain removers on page 9).
Watch the weight! For best results, do not exceed the weight limits stated below
(figures show weight when dry):
- Sturdyfabrics: maximum 5kg
- Synthetic fabrics: maximum 2.3kg
- Delicatefabrics: maximum 2kg
- Pure virgin wool: maximum 1 kg
- Towelling: maximum 2.3kg
How much does it weigh?
1 sheet 400-500 gr.
1 pillowcase 150-200 gr.
1 tablecloth 400-500 gr.
1 bathrobe 900-1,200 gr.
1 towel 150-250 gr.
■ Coloured T-shirts, printed ones and shirts last longer if turned inside out before washing. Printed T-shirts and sweatshirts should always be ironed inside out.
Salopette alert.
Very popular "salopette" type overalls have straps with hooks that can damage the drum of your washing machine or other garments during the wash. By placing the hooks in the bib pocket and fastening them with safety pins, all risks are avoided.
■Holidays: unplug the appliance.
When you go on holiday, we recommend that you unplug your washing machine, turn off the water inlet tap and leave the door open or ajar. This way, both the drum and the gasket will remain nice and dry and unpleasant odours will not develop inside the washing machine.
WOOL CYCLE
For best results, use a specific detergent, taking care not to exceed a load of 1kg.
How to wash almost anything
Curtains.
Curtains tend to crease a great deal. Here is a tip to reduce creasing: fold the curtains and place them in a pillow case or mesh bag. Do not load anything else, so that the overall weight does not exceed the half load. Remem
ber to use the specific programme 10 which automatically excludes the spin cycle.

■ Quilted coats and windcheaters.
You can wash quilted coats and wind-cheaters, too, if they are padded with goose or duck down. The important thing is not to run a 5 kg load.
Trainers.
Once you have removed mud and dirt from trainers, you can wash them with jeans and other tough garments. Do not wash trainers with whites.
Cashmere Gold: As gentle as a hand wash
The first washing machine to have "The Woolmark Company" recognition.
The Cashmere Gold programme was designed to machine wash the most delicate and precious woollen and Cashmere garments.
The Merloni Elettrodomestici "Wool-Cashmere"programmehas
been approved by The Woolmark Company for washing woollen garments labelled "hand wash only" featuring The Woolmark Company Brands. This is the first delicate hand wash cycle offered by a washing machine approved
by The Woolmark Company. (M.0206).
This result has been achieved thanks to the speed of the drum (90 rpm), even during the rinse phase, which prevents the fibres from rubbing.
Always use programme 9 (wool) with all garments labelled hand wash: the tub with a hand in it. it is advisable to use specific detergents for woollen garments.
When detergents and water are not enough…
How to get rid of some special stains
- Red wine. Leave to soak with detergent, rinse and treat with acetic acid or citric acid, then rinse. Treat any residue with bleach.
- Blood. Fresh stains should be treated immediately with cold water. In the event of dry blood stains, leave to soak overnight with a special detergent and then rub with soapy water.
- Dry grease stains. Moisten with turpentine, dab the stains with your fingertips and a cotton cloth, after placing the garment on a soft surface.
- Rust. Oxysalt (can be found in a chemists) hot molten, or a cold anti-rust product. Old stains may have already damaged the fabric: risk of holes...
- Mould stains Treat with bleach, rinse thoroughly (only white and coloured garments resistant to chlorine).
- Oil paint. Moisten with detergent petrol, dab the stains after placing the garment on top of a soft cloth, then treat repeatedly with the detergent.
- Ink and biro. Dab with cotton soaked in methyl alcohol or alcohol at 90^ .
- Tar. Dab with fresh butter, rub in turpentine then wash immediately.
- Wax. Scrape away, then run a hot iron between two sheets of absorbent paper. Then rub in cotton with turpentine or methyl alcohol.
- Chewing gum. Rub in nail polish remover and wipe with a clean rag.
- Mould. Cotton and white linen should be placed in a solution of 5 parts water, one bleach and a spoon of vinegar, then washed immediately. For other white fabrics, use hydrogen peroxide at 10 volumes and wash immediately.
- Lipstick. Dab with ether on wool or cotton. Use trichlorethylene for silk.
- Nail polish. Place a sheet of absorbent paper on the side of the stain, wet it with nail polish remover, shifting the garment as the sheet gradually changes colour.
- Grass. Dab with a wad of cotton soaked in methyl alcohol.
For a safe wash cycle
How to open and shut the drum
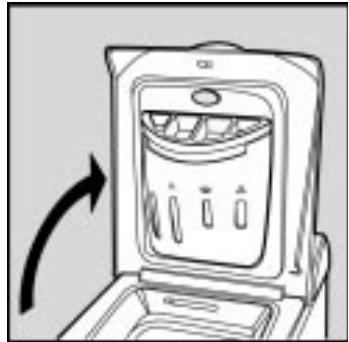
Fig.1
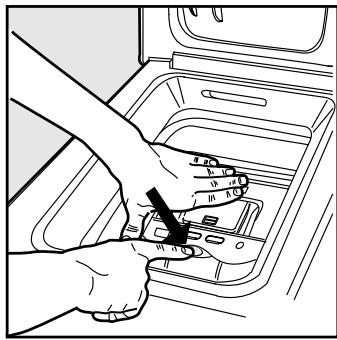
Fig. 2
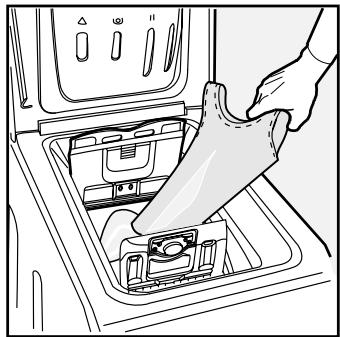
Fig. 3
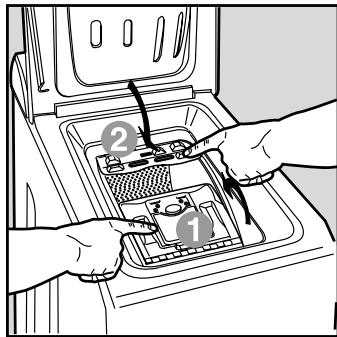
Fig. 4
A) OPENING (Fig. 1). Lift the external lid and open it completely.
B) Then open the drum using both hands as shown in Fig. 2:
- press the button indicated by the arrow in Fig. 2 lightly downwards, with one hand firmly resting on the doors to prevent them from suddenly opening and hurting your fingers;- therefore follow the appliance doors along as these unhook and open easily.
C) LOADINGTHEWASHING MACHINE.(Fig.3).
D) SHUTTING.(Fig.4).
- close the drum fully by first shutting the front door followed by the rear one;
- then ensure the hooks on the front door are perfectly housed within the seat of the rear door;
- after the hooks have clicked into position, press both doors lightly downwards to make sure they do not come loose;
- finally shut the external lid.
It's important for a good wash
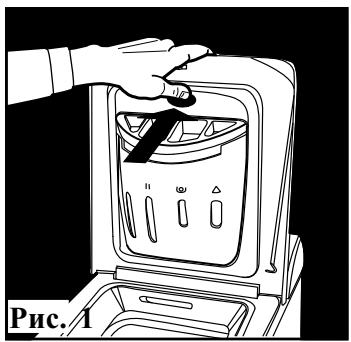
The secrets of the detergent dispenser
The first secret: the detergent dispenser is in a handy position underneath the appliance door.
You should add detergent and any additives following the dosage recommended by the manufacturers: generally, all the indications you need are on the box.
Doses vary according to wash load, the water hardness and how soiled the washing is. Do not exceed. More detergent does not necessarily mean greater wash efficiency, on the contrary...
Experience will help you select the right dosage almost automatically: it will become your secret.
When pouring in the softener in compartment 3, avoid exceeding the "max" level indicated.
The washing machine automatically adds the softener to
the wash in each pro-gramme.
Liquid detergent is to be poured in just a few seconds before starting the wash cycle.
Remember that liquid detergent is particularly suitable for wash cycles of up to 60 degrees and those not requiring pre-washing.
Liquid or powder detergents are sold together with special containers that are to be placed directly inside the washing machine drum, according to the instructions found on the detergent box.
Never use hand wash detergent, because it may form too much foam, which could damage the washing machine. One last secret: when washing with cold water, always reduce the amount of detergent you use: it dissolves less easily in cold water than in hot water, so part of it would be wasted.
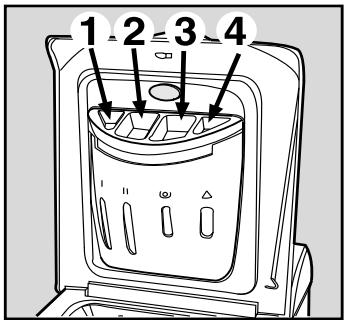
In compartment 1: Detergent for pre-wash (powder)
In compartment 2: Detergent for the wash cycle (powder and liquid)
In compartment 3: Fabric softener
In compartment 4: Bleach
Pre-wash, bleach and fabric softener
Should it be necessary to bleach, set the special programmes and pour the bleach into compartment 4 of the detergent dispenser.
When you pour the bleach in, take care not to exceed the "max" level indicated.
The use of bleach excludes the possibility of running a pre-wash.
Traditional bleach can only be used on sturdy white fabrics, whereas delicate bleach can be used for coloured fabrics and
synthetics. You cannot bleach with the "Silk" program me and with the "Special Programmes" (see page 6).
N.B.:
1) Concentrated bleach must be diluted in all cases.
2) For concentrated detergents (in powder or liquid), use a programme without pre-washing.
3) For detergents contained in a ball or in tablets, do not run a pre-wash.

Fabric Softener Addition
Fabric softener makes your washing softer and decreases the electrostatic load of synthetic fibres.
Degrees of water hardness
^ ^.H
1 - Soft 0-7 0-15
2 - Medium 8-14 16-25
3 - Hard 15-21 26-37
4 - Very hard more than 21 more than 37
Fabric softeners can be used for towelling fabrics, kn it wear, curtains, etc.
Pour the fabric softener into compartment 3 of the dispenser following
Cutting costs efficiently
A guide to running your household appliances cheaply while respecting the environment.
FULL LOAD
The best way to save on energy, water, detergent and time is to use your washing machine, washing a full recommended load.
A full load instead of two half loads allows you to SAVE up to 50% of energy.
USE LESS DETERGENT IF: you are washing few garments, the washing is only soiled lightly, foam forms during washing or the water is not very hard, or soft even (please see small table above with the degrees of water hardness). To find out how hard the water in your area is, contact your local Water Works.
IS PRE-WASHING STRICTLY NECESSARY?
Only for extremely soiled garments.
Programming a wash WITHOUT pre-washing for lightly soiled or medium soiled garments allows you to SAVE on detergent, time, water and between 5 and 15% of energy.
IS WASHING WITH HOT WATER STRICTLY NECESSARY?
Treating stains with a stain remover or soaking garments with dry stains in water before washing can reduce the need to programme a wash using hot water.
Use a wash programme at 60^ to SAVE up to 50% of energy.
BEFORE USING A DRYING CYCLE...
Select a high speed spin cycle, where the spin speed can be adjusted, if the washing should be dried in a tumble-dryer. A reduced water content in the washing allows you to SAVE both time and energy in the drying programme.
the manufacturer's instructions. The fabric softener is automatically inserted into the machine during the last rinse. At the end of the wash programme, some water will be left in compartment 3. This is used for the inlet of denser fabric softeners into the machine, i.e. to dilute the more concentrated softeners.
Should more than a normal amount of water remain in compartment 3, this means the emptying device is blocked, thus interrupting the suction effect of the device.
For cleaning instructions, see page 13. Never pour fabric softeners together with starch into the dispenser, as the overflow system could get clogged.

Troubleshooting
Before calling, read the following
Your washing machine could fail to work. In most cases, the problems arising can be easily solved without having to call for a technician. Before calling for assistance, always check these points.
The washing machine fails to start.
Is the plug correctly inserted in the socket? It could have been moved whilst cleaning.
■ Is there electricity in the house?
A circuit breaker could have gone off, perhaps because too many appliances are on at the same time. Or perhaps because of a general power failure in your entire area.
■ Is the appliance door shut properly?
For safety reasons, the
washing machine cannot work if the door is open or not shut properly.
■ Is the ON/OFF button pressed?
If it is, then a programmed start has been set.
■Is the programmed start knob, on those models concerned, in the correct position?
Is the water tap turned on? For safety reasons, if the washing machine does not load water, it cannot start a wash cycle.
RIGHT WRONG
Turning off the water tap after each wash limits the use of the washing machine's hydraulic system and eliminate leakage risks when no-one is at home.
Try to only leave the appliance in use unattended if the place where it is located is equipped with a floor drain.
Always leave all appliance doors ajar.
This will avoid the formation of bad odours.
Clean the appliance's exteriors delicately.
To clean the exteriors and the rubber parts of the appliance, always use a cloth dipped in lukewarm soapy water.
Leave the washing machine plugged in while cleaning. Even during maintenance, the appliance should always be unplugged.
Use solvents and aggressive abrasives. Never use solvents or abrasives to clean the external and rubber part of the washing machine.
Neglect the detergent dispenser. It is removable and can easily be cleaned by leaving it under running water.
Go on holiday without thinking about it. Before leaving, always make sure that the washing machine is unplugged and that the water tap is turned off.

The washing machine fails to load water.
Is the tap correctly attached to the pipe?
■ Is there a water shortage?
There could be work in progress in your building or street.
■ Is there enough pressure? The autoclave may be malfunctioning.
Is the tap filter clean? If the water is very calcareous, or if work has recently been carried out on the water piping, the tap filter could be clogged with particles and debris.
Is the rubber hose bent? The tract of the rubber hose bringing water to the washing machine must be as straight as possible. Make sure it is not squashed or bent.
The washing machine continuously loads and unloads water.
Is the drain hose positioned too low? It must be installed at a height ranging from 60 to 100cm
Is the hose's mouth immersed in water?
Does the wall drainage system have a breather pipe? If the problem persists even after these checks, turn off the water tap, switch the appliance off and call for assistance. If you live on an upper floor of your building, there may be a problem with your drain trap.
To solve this problem, a special valve must be installed.

The washing machine does not drain or spin.
Does the selected programme foresee water draining? Some wash cycles require enabling the draining manually.
Has the "Anti-crease" function - in those appliances where it is foreseen - been enabled? This function requires enabling the draining manually.
Is the drain pump clogged? To check it, turn off the tap, unplug the washing machine and follow the instructions on page 12, or call for technical assistance.
Always get assistance from authorised technicians and always insist on original spare parts
■ Is the rubber hose bent?
The tract of the drain hose must be as straight as possible. Make sure it is not squashed or bent.
Is the washing machine's drain duct clogged? Is there an extension on the drain hose? If so, is it positioned incorrectly, blocking the water flow?
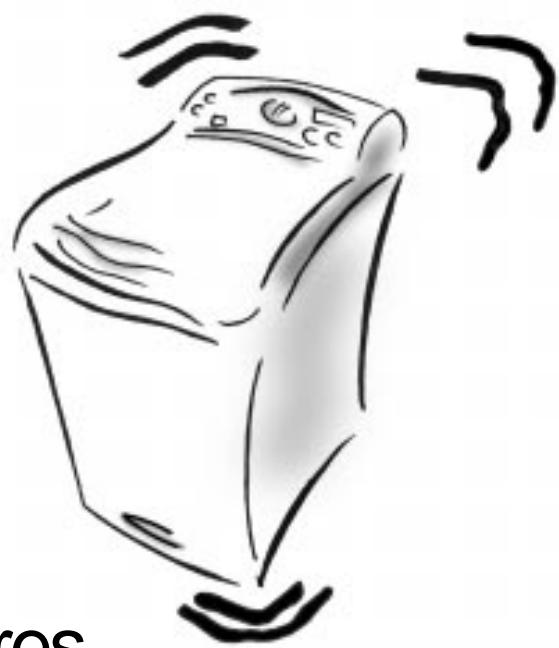
The washing machine vibrates too much during the spin cycle.
Has the internal floating unit been correctly unblocked during installation? See page 2 on installation procedures.
Has the washing machine been levelled correctly? The levelling of the appliance should be checked periodically. In time, the appliance could move imperceptibly. Adjust the feet and check them with a level.
Has it got enough room around it? The appliance
should not be leaning against any sanitary fixtures and must have some free space around it. If it is placed on a fitted carpet floor, ensure that there is enough room for air to circulate between the appliance feet and the carpet.
The washing machine leaks.
Is the metal ring of the inlet hose properly attached? Turn off the tap, unplug the appliance and try tightening its attachment without forcing it.
Is the detergent dispenser obstructed? Try extracting it and washing it under tap water.
Is the drain hose well attached? Turn off the tap, unplug the appliance and try tightening its attachment.
Too much foam.
Is the detergent suitable for washing-machine use? Make sure that it bears the definition "for washing-machines" or "hand and machine wash", or the like.
Is the correct amount being used? An excessive amount of detergent, besides producing too much foam, does not guarantee a more effective wash, and causes scaling in the internal parts of the appliance.
If, despite all checks, the washing machine fails to function and the problem persists, call your nearest authorised Customer Service Centre, providing the following information:
- the type of malfunctioning
- the model type no. (Model......)
- the serial number (S/N ....) These indications can be found on the data plate situated on the back of the washing machine front base. (fig. 1)
When in need, check the pump and the rubber hose.
The washing machine comes equipped with a self-cleaning pump that does not require any cleaning or maintenance. Small objects may accidentally fall into the pump: coins, hair clips, loose buttons and other small items. To avoid possible damage, they are withheld in an accessible pre-chamber, situated at the lower end of the pump.
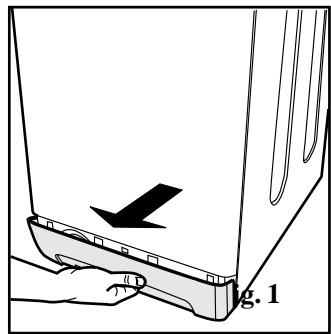
Fig. 1
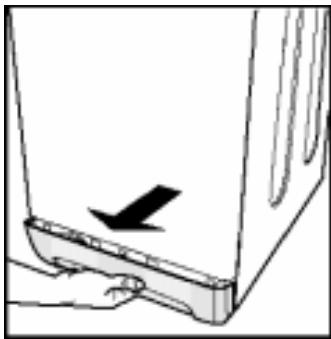
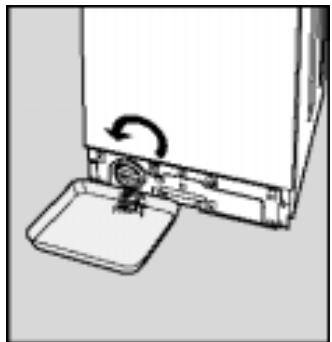
To access this pre-chamber, just remove the panel covering the bottom of the washing machine (fig. 1); then lift the cover rotating it anti-clockwise (fig. 2) and check its contents accurately.
The rubber hose
Check the rubber hose at least once a year. If you see any cracks, replace it immediately. When you use your washing machine, water pressure is very strong and a cracked hose could easily split open.
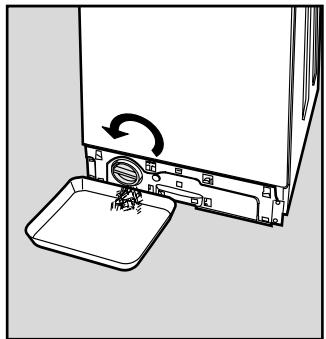
Fig. 2
Warning: make sure that the wash cycle has come to a full stop and unplug the appliance before removing the lid as well as before any type of maintenance procedure. It is normal to find that a little water comes out after removing the lid. When replacing the panel, make sure you insert the hooks situated at the bottom of the washing machine in the right slots before pushing it back against the appliance.
Easy Care and Maintenance
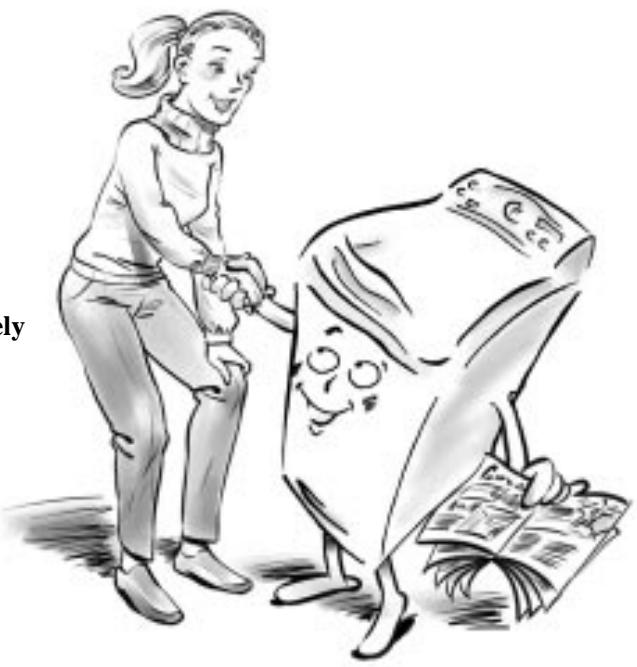
Treat it well and it'll be your
friend forever
Your washing machine is a reliable companion in life and on the job. It is just as important for you to keep it in shape.
Your washing machine is designed to last a lifetime without any problems. A few simple steps help keep it in shape and last longer.
Firstly, you must turn off the water tap after each wash: the constant pressure of water could warp a few of the component parts.
In addition, by doing so, you will avoid the risk of leaks when no-one is at home.
If the water in your area is too hard, use a deliming product (water is hard if it often leaves whitish stains around taps or drains, especially of bath tubs. For more accurate information as to the type of water in your system, call the local water works or a local plumber).
Pockets must always be emptied by removing even coins, pins, badges and any other hard object.
The washing machine exterior should be cleaned with a cloth dipped in lukewarm soapy water.
It is important to wash the detergent dispenser regularly. To prevent dried washing powder from accumulating, place the dispenser under running water for a few minutes.
Never exaggerate with detergent doses.
Normal detergents already contain deliming agents. Only if the water is particularly hard, that is, rich in lime content, do we recommend the use of a specific product at every wash. A periodical wash cycle with a dose of a deliming product, without detergents or washing, may prove useful.
Never use too much detergent or additives because this could cause an excess amount of foam, scaling and possible damage to the component parts of your washing machine.
Do not forget to empty all pockets: small metallic objects can cause damage to your washing machine's drum during the spin cycle.
How to clean the detergent dispenser
Disassembly:
Press lightly on the large button on the front of the detergent dispenser and pull it upwards (fig. 1).
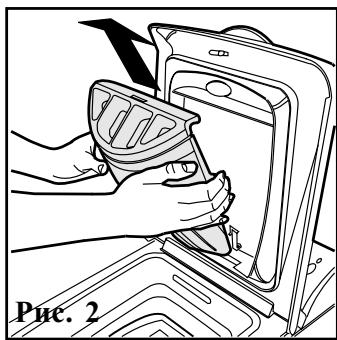
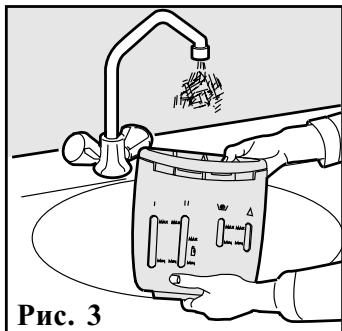
Cleaning:
Then clean the dispenser under a tap (fig. 3) using an old toothbrush and, once the pair of siphons inserted in the top of compartments 1 and 2 (fig. 4) have been pulled out, check whether the same are not clogged and then rinse them.
Reassembly:
Do not forget to reinsert the pair of siphons into the special housings and then to replace the dispenser into its seat, clicking it into place (fig. 4, 2 and 1).
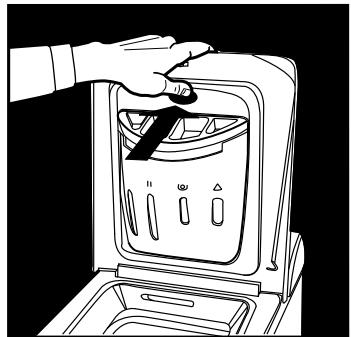
Fig.1
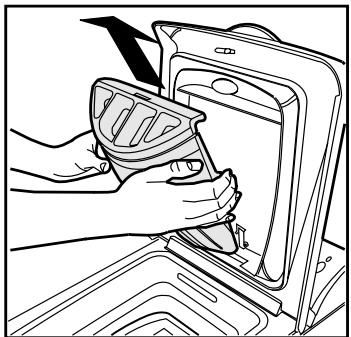
Fig. 2
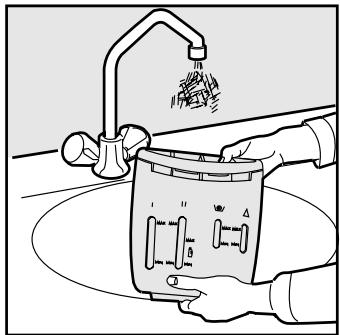
Fig. 3
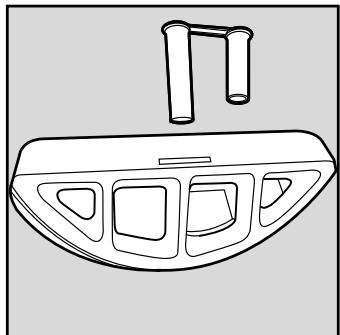
Fig. 4
We take care of your loads
Electronic ABC balancing of your spin cycle
Warning
This appliance is equipped with an electronic autobalancing device (Auto Balance Control) that enables the spin cycle to be run at high speed only with well-distributed wash loads. An unbalanced wash load would in fact seriously damage the appliance.
Before each spin cycle phase, the ABC auto-balancing system makes the drum perform repeated revolutions, both clockwise and anticlockwise, in order to distribute the garments inside it uniformly and then to start the spin cycle off gently.
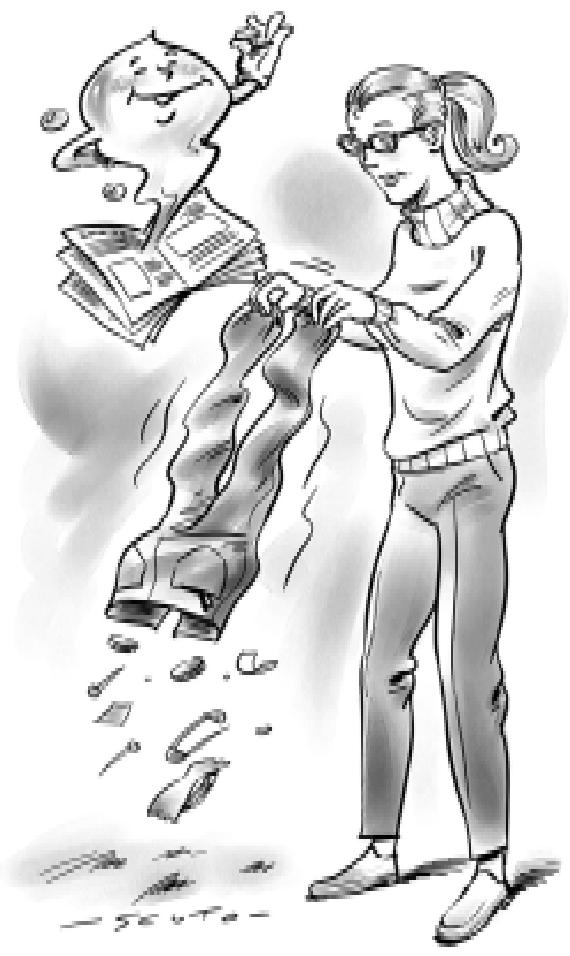
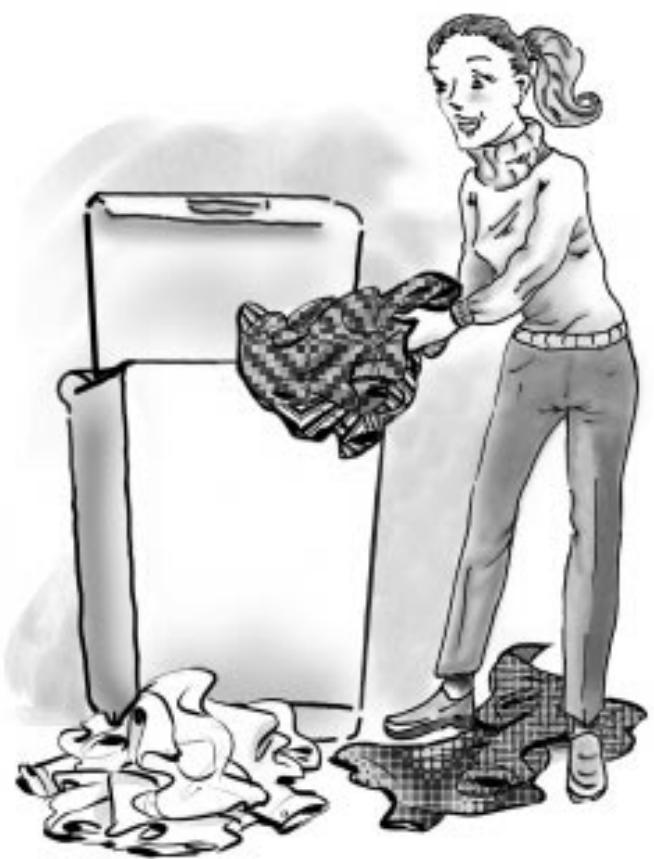
In special load conditions, these revolutions may not be sufficient to distribute the weight inside the drum evenly (if there are towel bathrobes, blankets and sheets inside it that have formed a "ball", etc.).
In these conditions, two different things may happen:
-
the ABC system "accepts" the imbalance, but reduces the spin speed. In this case, the clothes will come out wetter than usual;
-
the ABC system deems this imbalance to be beyond the acceptability threshold and excludes the spin cycle. In this case, take out the washing, unroll the garments and put them all back into the appliance and set the spin cycle programme.
In both cases, it is not a matter of poor appliance quality, but raher one of the more advanced features it has to protet it from breakages, vibrations, movements on the floor or other inconveniences.
Technical features
| Model | AT 84 |
| Dimensions | width cm 40 |
| height cm 85 | |
| depth cm 60 | |
| Capacity | from 1 to 5 kg |
| Electric connections | voltage 230 Volts 50Hz maximum absorbed power 2100 W |
| Water connections | maximum pressure 1 Mpa (10 bar) minimum pressure 0.05 Mpa (0.5 bar) drum capacity 42 litres |
| Spin speed/min | up to 800 r.p.m. |
| Controlling programmes in accordance with IEC Norm 456 | run with a load of 5.0 kg, programme 3, 60°C |
| This appliance conforms with the following European Community Directives: - 73/23/EEC of 19/02/73 (Low Voltage) and subsequent modifications - 89/336/EEC of 03/05/89 (Electromagnetic Compatibility) and subsequent modifications |
The manufacturer reserves the right to make any modifications whatsoever, at any time and without notice, to the appliance or any of its accessories that may be deemed necessary for technical or commercial requirements.

ARISTON
Prélavage, Javel, assouplissant
KpaTkI NyTeBOdnteJIb NO pYKOBoDCTBy
HactoIe PykoBoIcTBo coIepKHT 12 pa3JeIOB. BHHMaTeJIbHO H3yUHTe HX. Bbl OTKpoTe MHOrO cKeKpeTOB 3ΦΦeKTTHBHO H HetpyIOeMKoI CTHPKN, y3HaTe BO3MOxKHOCTN CBOeI CTHpAJIbHO MAmHHbI H HayuHTecb 06paIaTbcra C Hei. Oco6oe BHHMaHHe 06paTHTe Ha pa3DeJI IIO 6e3OnacHoCTH.
1. YcTaHOBka N NOdKJIIOUeHne (c. 3-4)
YctaHOBKa nocJe doCTaBKn nIu TpaHCnOpTnpOBKn ABnEeTc HAn6Oone BaxHoon OepaunEn dny npAunbHO np60tbl CTpapbHm MaunHb. O63atelbNo npOBepbTe, yTo:
- 3JNeKTPoCnCTema COOTBeTCTByet HOpMaM (COOTBeTCTBne xa-pakTepnCTNK 3JNeKTPocEtN MaunHbI);
- 3aJIbHoi n CInBHOI JIaHaHn IOnCOeINHeHbI IpabuJbHO;
- CTnPaJIbHaJaMaUHHa BblIpOBHeHa DoJIxKbIM O6pa3OM - 3TO BnIeT Ha CpOK CnyX6bl CTnPaJIbHOJ MaUHbI N KaueCTBO CTnPK;
- TTO TpaHcNoptnOboOBHbI 6oJIbI, KOTOpBIMN 3aKpenJIe 6aK (CM. 3aJHIOU NaHeJIb MaUNHbI), CHrTbI.
2. Бezonaachoctb - xopowa npnbbyka (c. 5)
3Decb Bbl NaIdeTe OCHOBHeIe npaBnla 6e3OanHO kCpIyatau n CTnpaJIbHO MaunHbl.
3.Подготовka 6eьяи 3aynck MaunHbI (c.7)
IpaBnblbno ndop cTnpaEmbIX Beuei npabHomepHOCTb 3a- rpy3kn rapaHTnpyHOT BbcOKOE kaecTBO cTnpKn n DOJrnn Cpok cnjX6bl MaunHbI. N3uynte BCE peKoMeHdauN no pacnPedeJeHHIO 6eJIb: ZBeT, TIN TKaHN i CKNoHHOCTb K CKaTbIBaHHIO - HauBoJe BaxHbIe KpnTePN.
4. Панель урраBsня (c. 8)
PanaHb ynpabHeHn BeCbMa npocTa. Bcero HeckoJbKO KHOK NOMOryt Bam Bbl6paTb NIObOe peXm CTnPK:OT camoro INHTeHCNBHO, CNOcoBHOrO OTCTnPaTb TEXNueeCKyO ODeJy, DO HAnboJe TdNNKaTHORO -DnIa Wepctn. 3HaHne NaHeJIynpabHeHn NOMoKET NOnyUHTb HAnJLyUWe pe3yNbTaTb CTnPK PpN HAnMeHbUnx 3aTpatax 3Heprn n PpOJNT CpOK cnyk-6bl CTnpaBHoM MaunHbI.
8. KaK 3aKpbIbTaB 6apa6an (c. 12)
OTKpoTe I noJIHoCTbI O 3aKpoTe DBePcbl IJRA 6e3OnacHoi CTnRPKn.
9. PacnpeJeIteJIb MOIoUx cpeIcTB (c. 13)
Kac nCnoNb3OBaTb paCnpedeJIInTb MOUoIuX cpeIcTB.
11. 06cIyXnBaHne n yxoD (c. 6, 14 n 15)
Hemhoro BHHMaHnHa 3a60tbl - n CTnpalbHa MaunHa OTBeTnBAM PpeaHNOCTbH N 6laROpAhpOcTBIO. He cNlukom 6peMeHNTeNbHbI yXoD 3a CTnpalbHOm MaunHO n pOdINT cPOK ee CnyK6bl Ha MHorne roDbl.
12. Texhnueckne xapaKtepncTnkn (c. 16)
Texnueckne xapaKtepcntkn BaWei cTnpaHNo MaunHbI: TnIOBOH HOpem MoJeN, 3JeKtpueckne n rIpaBnueckne npaMeTpbl, Ra6apNTbl, EMKOCTb, CKOPoCTb OTXIMa N COOTBeTCTBNE eBpOneNCKM cTaHdaptam.
YcTaHOBKa I IOdkJIIOUeHne
Ko rgda o60pydovahne doCTaBJIeHO
IocJIe NOKyIKH HJH IepemeHcHn Ha HOBoe MecTo yCTaHOBka CTnpaJIbHOJ MaIHHHbOc06eHHo BaKHa JIA ee IIpaBnJIbHOJ pa6OTbI.
CnB ynpakOBky, Heo6xOIMO npOBepntb 9eJIOCTHOCTb CTpaIbHO MaunHb. B cnUyae COMHeHn H e3aMeI JnteJIbHo 06paauTeCb K KBaI NΦuNpOBAHOMy TexHNKy. B npoucece TpaHCnOpTnpOBKn 6apaban CTpaIbHO MaunHbI 6loKnpuyetc npn NOMOn CyTbIpex 6oJTOB n pe3INHObIX BCTaBOK B 3aDne NaHeN MaunHbI.
Pa36nokropOBka: ydaJntb 4 6oJta!
Ipeud nCNoJb3OBAHnem CTnpaJIbHOm MaunHbI ydaNte 6oNTbl, pe3uHOBbie wa6bI N 6oJIb7yUo MetaJInuYeCKyU oNepeyuO pAnky (He BbI6paCbIbAitne). 3akpoTe 6pa30BaBwuece 0TBePCTnA
BHHMaHHe: B cJyuae IOBTOPOHO HcIOJIb3OBaHHa 6OJIe KOpOTKHe BHHTbI IOJIxHbI paCIOJIaRaTbcra CBepxy.
BbipabHbHaHe
Дяхорowe pa6obtbl CTpaIbHЯ MaunHa DoJxHa 6bIb BbipOBHeHa. Nocne ycTaHOBKn MaunHb Ha MeCTO OTepynPyte ee yCToUHBOe NOJoxHeNe PyTem BpaSeHn HOXek.OTKIOHeHne OTropN3OHTaII BepxHey NobepxHOC-TN KOpnyca DoJxHo 6bITb He 6oJee 2^
CoхраиTe 6JIOKHyIOnHe 6OJIbI N BTVJKN, KOTOpBIE MOryT OIIHT IIHaI0bITbcN Iprn TpaHcNOpTnpOBKe MaIIHHbI.
Pecylupyembe hooeku
Ecnn CtnpaBna MaunHa cTOnt Ha KOBoPbOM NOKpbITnU, y6eINTecb, YTO ee OCHOBaHne BO3BbIaETCa HAd HmM BeHTNJIaUN He 3aTpPydHeHa.
UJnHr He dOJIxKeH OCTaBaTbCra nOrpyXeHHbIM B Body.
He pekomeHdyetc npimehenhe ydHHnteJe dJIa cNIB-Horo shaHa, pni Heo6xOIMOCTn DOnyckaetc ero HapaunBaHne 7JNaHrom Tako-ro Jze DNAmetpa N dINHOH He 60one 150 cm.
Ecnn CnBHOI JNaHr BCTopeH B KaHaJIIN3aUIO, IMeTe BBNdy, YTO Ha BepXHH 3TaXkAmoKet CO3dA TbCBcA《CnOHHbIe OΦΦeKT》—MaUNHa OJHOBpEmEHo CnBaET N 3aINBaET BODy.ДЯnpedOTbpaueHnno NOD6HOrO ΘΦΦeKTA yCTaHabINBaIOT 3a-nOpHbI KpaH (aHTncΦOH).
Takke npn Bpe3aHn n CnBHO ro 7naHra B KaHn3aunIO Bo3pactaHT Tpe6oBaHn K ee npOnyckHo nCnoc6hOCTn: Daxe He60Jbwo 3acop MoKet Bbl3BaTb npTeUky n PpO6Iembl co CnBOM.
YnaKOBOHyIe MaTePnaJIbI (IIJaCTHKOBbIe IIaKeTbI, HeONJIacT, 6oJIbI) - He DetCKne HrpyuIKN, OHJyJBIOITcHOTc IOTeHuaJIbHO OIIaChbIMN.
IopkIoueHne K 3NeKtpocetn
1.MaunHa noKnHouaetcK 3JIeKtpueckoCetn npn NOMOuIN DByXNoIHOChoPo3ETKN C 3a3eMnlaIOUm KOHTaKTOM (po3ETKa He NOCTABNJeTcC MaunHO). Aa3HbIn PpOBoD DoJKeH 6bITb NpOKJIuOyenpe3 aBtOMaT 3auNTbI CETn, paCCuHTaHHbI Ha MaKCNMaNbHbI TOK (TOK cpa6aTabBaHn) 16A, n IMeIoUm BpEm Cpa6aTabBaHn He 60nee 0,1 c.
2.Пин haInuHn B6Iu3n ot npednoIarAemoro Mecta yCTaHOBKn MaunHbI po3eTkn C 3a3eMJIyUOuIM KOHTaKTOM, IMeUoSei TpexnpOBODHyIOBVDKy Ka6eJl C MeDhblmJxNlaMn CeueHneM He
Mehee 1,5 KB. MM (nHn aJIOMHHeBbIMN XJUaMn CeueHem He Mehee 2,5 KB.MM),Dopabotka 3JeKtPoCetn He npOn3BoNTcra.Pnp OTCyTCTBn yKa3aHHo pO3eTKn n npOBODKn CneDyET npOBECTn NX MOHTaK.
- Прokладka 3a3eMJIeHnI OТдeЛьнБIM ПpoBOdOM He ДonyckaETcR.
4.Длдя dopa60Ки 3ЛeКТрп ueckо сети peKOMeHdye etcay npIMeHЯTb npOBOD PnB 3x1,5 380 FOCT 6223-79.
IOnyckaetc npmeneHne dpyrnx Mapok Ka6eJn, oBeceuNbauoux noJxapo- n3NeKtpo6e30nacHoctb npn 3KcNpyataunMaunHbl.
Ipeod eKnioyuHue MauuHbI e cemb y6edumecb, ymo:
1)po3eTka n npoBOnda coOTBETCTBYIOT HOpMaM N BbldePknBaIOT MaKcImaIbHyO Harpy3ky 06opyoDobAHy, yka3aHHyOB Ta6JIuKexapakTepeNtK;
2) HanpexHne n Yactota TOka CETn COOTBETCTBYOT DaHHbIM MaunHbI;
3)po3eTka u BnIka OndHoro Tnna,ecn HET-3aMeHNTe BnIKy uNn po3eKy,a He NcNoJIb3yIte nepexoDnKnu ydInHHTeTI;
4)po3eTka 3a3emnHa B COOTBETCTBm C HOpMaMn 6e3oNaChOCTn,(DOnyckaetcnpraHn3aun3a3emHe npa6oum Hynm,pnp ycjo
BUN, YTO 3aunTHna JINHnHe NmeeT pa3pbIbA n NODKJIoueHa HAprrMyU B 06BOD KaKnx-NN6o Pnp6opOB (Hapnpimep, 3neKtpnueckoTo CcETnka);
5) nocIe noKIOUeHnIuTauI KabeJIb He HaxoDHTcra NoMaunHOi.
PNEyUNPEXDEHNE!
Pon3BODntb CHnMaet Cce6BaCKyIO OTBeTCTBeHHocTb B Cnyae IIO6bIXN3MeHEni 3aBOdCKnx yCTaHOBOK O6OpUdoBAnHg (3JekTpueckne, MexaHueckne, rnpablnueckne napamETpbl) nIHNeppaBnIbHorO 3JekTpueckoro NOpKnIooHn.
Kak 3aMeHnTb PNTaIOUnci Ka6eJIb
Nttaoun Ka6eJb npedHa3HaueH dJa KOHKpeTHOHTnpaIbHO MaunHbIMoKet 6bItb npno6pTeH 3ameHe TOnbKO B CepBnCHOM ceHTpe.
IЯ ero 3aMeHbI CJIeDyIte HIXKeI npBVeDEHHbIM INHCTpyK- cIyM:
- y6eNTecb, yTO MaunHa BbIKIOyeHa N OTKIOyeHa OT Cetn.
-
ChTb ПИNTuc n OTBnHTntb 2 BnHTa, paCNoJIOKeHhIe BH3y Cnpaba.3aTEM OTBnHTntb 6 3aHnx BnTOB CneBa n CHrTb 6OKOBu NaHeIb, CnErKa HAKIoHNB ee HapyKy n NotaHyB BBepx (pnc.1n2).
-
OToeINHHTb 3JIeKtpnueckn npoBOD npOTNB NOMEX, OToeINHRA 3axIM (pnc. 3).
- OTBnHTNb 2 BHeuHnx KpEnExKbIX BNHTa FInIbTpA IN npn NOMOOn OTBeptKn (CM. pnc. 4)OTcENtB erO ot 3aDHeN CTeHN, NOTaHyB FInIbTp BBepx.
- По завершени посождуненя HOBORO Kaбеля,
BHObI NOIDCOEHNHTb 3aXIM, npOBepra YTO6bl npedeOxpaHNTeNbHbIKpUoyOK 6bln npouHo 3aueenHe.
3aMeHa Ka6eJb IIO6om cnyuae DOJXHa nPOn3BODnITbC KBAJIuHnUPOBaHHbIM ne pcoHaJOM, CO6JIoJaIooM DeiNCbYbUoNHe HopMaTnBbl.
Pnc.1
Pnc.2
Pnc.3
Pnc.4
He npocTo BaJxHo, a cBepXBaJxHo
БezonaCHOCTh -
Xopoшая пивьчka
BaIIa cTHnpaJIbHna MaIIHHa cKoHcTpynpObaHa b COOTBeTcTBn C caMbIMN cTpoIHMn MeJdYHapOINbIMN IIpaBNIaMn 6e30IaChocTn, YTO6bI BbI H BaIIa CeMbЯ YUbCTBOBaJIH ce68 3aIIHueHHbIMN.
Ipoyuamaime 6hmameIbHO 3mu yka3aHua u 6c0 uHΦopMauHo daHHO2O pyKOBODc6a: 3mo 6aXh bIu UcmOuHk He moIbKO MHO-2OuCJehHbIX noJIe3HbIX c6eMo6, Ho u maKxce Heo6xodumble c6e deHua o 6e3onachOM uCnoIb3O6aHu u OcbayKubAHu cmupaIb-Hou MaunHbI.
- 3To obOpuyoBaHne pa3pa-60TaHO IJIa NcNoJb3OBAHnBHyTpN NOMeUeHn. Hn npKaknx O6cTOrTeIbCTBax He nCNoJb3yIte obOpuyoBaHne Ha yInCe.
- ΘTo obOpuyoBaanHe DoJHKHO NcNoIb3OBATbcB DOMaunHX ycNObnX dJa6bIIOBOI CTnPKn B COOTBeCTBmC daHHoH INCHpyKuEn. UcNoIb3OBAHne ObopyDoBaHnH He NOHa3HaueHnO, a TaKKe npOMbIShJeHHoe NcNoIb3OBAHne, NcNoIb3OBAHne MaunHb B OΦncax, PpeDpnaTnx CepbI oBCnyxnbAHn, 3dpabooxpaHeHn, pOcBeSeHn I T.I. He PpeDycmTopeHo. Ppon3BODNTeNb He Hecet OTBetCTBeHHocTn 3a BbIXoD n3CTPOr OBOpuyoBaanr npn HapuyeHNu ycNoBn DaHHOro NykTa IHCTpyKuHn.
- ΘTo obOpdyoBaHne o6naJaet 60nbHmBecOM:peBnraIte erO TObKO npuYbepeHHocTN B CBOx CNnaxN NocLeyCTaHOBKn TpaHCnOpTnpoBOOHbIX 60JTOB.4To6bl 60JIeHTb nepemeUeHne MaunHbHa MecTe,BlIDBnHbTe y6upaOuNeceKoNEca -DnA 3TOrO NotaHnte 3a 6Beln pbUar,paTNOLOXeHHbIn CneBa NOOCHOBAHnEM MaunHbI.
4.He noIb3yItec b ydHnHnTeJMaMn nIu TpoHnKamn. Ecnn Heo6xOaum 6oJee dInHHbI Ka6eJIb, cJeNyET yCTaHOBnTb HOBbl Ka6eJIb 6oJbWei DInHbIC TeMn JKe xapakTe pncnKaMn. Ptataoun Ka6eJIb HNKOrda He doJXeH 6blbN30rHyT n nepekata.
3aMeHa Ka6eJr DoJxHa npOn3BODnTbC8 TOJbKO KBaJIuΦnUcPOBaHHbIM nepCoHaJOM.
POMHnTe, yTO BKJIuOeHne O6OpUdoBaHnI NOBbIWeH H0 MOUHOCTN C NcONJb3OBAHnEM TPOHnKOB UyINHnTeJe CO3DaET NOTEHnAaNBHyIO ONaCHOCTb BO3rOpAHnI.
Pon3BODInTeJIb He Hecet OTBETCTBEHHOCTH 3a BO3GopAHnI, PON3OWeDiUne I3-3a INCNoB3OBAHnI TPOHNKOB UyDNINHTeJIe,a TAKKe COeDNHInTeJIbHOro Ka6JIa, CeeyHe KOTOPORo HE COOTBeTCTByET NOTpe6JIAeMoN O6OpyDobAHnEM MOUHOCTNI.
Pn yctaHOBKe CTnpaJIbHOI MaunHbI Heo6xOdmo npoBepntb COOTBeTCTBne XapakTepnCTK CETn mMaunHbI.
Pomnhte, yto ycmaHObka po3emok unu yduHumeneu 8 bAHbIX KOMhAmax kamezopueecku 3anpeeHa!
- Перед загузкои стурально машинь, y6eintecb,чTo 6apaban nyct.
6.He hncnoJIb3yIte moOuIne cpeIcTBa IJRApyHOn CTnPK: 6pa3yUoIaCra NeHa MOKeT BblTN I3 NOD KpbIJKN IOBpeDNTb 6obOpYDoBaHHe.
7. He ydaJnTe fHJIbTp, KOrDa o6OpyIDoBaHne BkJIIOUeHO.
8.He kacaTecb pa6oTaOuSei MaunHbl, ecn Baun pykn nHn HOrn MOKpbIe nNc cbIpB; He noJIb3yTecb o6OpydoBaHnem 6ocNKoM.
9.He TAHHHe npOBoNn Camy MaunHy, YTO6bI BbHYtB BNJIky n3 pO3eTKn: 3TO OueHb ONaCHO.
10. Korda obopydobAHne pa-boTaET, He KacaTecb CnBaOSeIeC BODbl, KOtopa MoXeT 6bItb OueHb rOpaye, DePxnte Detey Ha 6e3onachom pacCTOHN.
PnOCTaHOBKe MaUNHbpa36JIOKINPOBka 3aMKa
DBepuCb Cpa6aTbIBaet C 2-MnHyTHoN 3aepXkoH.He NbItaTeCb OTKpbITb DBepy B 3To mPomexyTke BpeMeHN (a Tem 6Olee BO BpeMa pa60tbl): 3TO MOKeT NOBpeDInTB MExAHN3M 6JOKnPOBKn.
11.Пи BO3HKNKOBeHn He-CTaHdapTHo CNTyaCIn OTKJIIOHHTe MaunHy, NepeKpoTe KpaH NODaCh BODbl, BbIHbTe BNJky n3 PO3ETKn I NO3BOHHTe B CepBnCHbI UeHTp, TeNeΦOHN bOToporo HaneuataHb I rapaHTnHOM DOKyMente (raPaHTnHOM TaIone, cepBnCHoN KHNKke, CepBnCHom ceTnΦnKaTe). PpeD 3BOH-KOM B CepBnCHbI ZeHTp npOHTaTne pa3deN «YcTaPHeHne HeNCnPabHOCTeN»
12.He pa3peuatae TdTeM nIuaM,He3HaKOMbIM C daHHoHnHCTpykUnei,NOJIb3ObaTbc8obOpyDoBaHnem 6e3 Baueero npncmotpa.
13. 3a nppeuaeTc n3MeHeHne KOHCTpyKUIN MaUHHbI N BMe- uAteJIbCTBO JNU, He yNOJHOmOuEHbIX PpOn3BODnTeJIem Ha rapaHTnHbI peMOHT.
YxOДи o6cJIyJxHBaHne - 3TO npocTo
He npeBbIshaTe peKoMeHDoBaHHbIe O3bl MOUxN CpeDCTB
B coctab Bcex cpeiCTB, npedHa3NaueHbIX IJIa CInpaJIbHbIXMaunH,BXoDnT aHTINHaKInnH.EcnB Oda B BaWe MeCTHOCTOnOTJUaETcOcO6oJxJEcTKoCTbHoMbI peKOMeHNyEM NcIOJIb3OBaTbCneuaJIbHbIe cpeiCTBa pniKaKdoi CTnpke.
PepnoDnueckn Ppon3BODnte OuNCTky, NcTINb MaunHy Ha BblNoJIHeHne NpOprMaMbI cTnpKb 6e3BeJbMy MoUeTo CpeIcTBa C ODNIM NIIbY ydaJInteJeM HaKnPiN.
He nCNoJIb3yIte CnIuKOM MHOrMoIOUxxCpeDCTB NIO6abOK, TAK KAc 3TO PnIBoDNT K O6pa3OBAHnIO N3bIToUHoi NeHbI, HaNIN I MOKeT NOBPeDHT DeTaNI CTnpaJIbHO MaUNHbI.
He 3aobybme binymb6ce u3 kapmanoh6:
Maiehke Memaiuueckne npedmembl Mozym nooapedumb 6apaabam Maunnbi 60 epmma omkuma.
ПодгOTOBа 6eelья
Bb mokeTe cIeJIaTb MHOro IpeE CTnPKo, YTO6bI rapaHTnpObaTbe ee OTLIuHbI pe3yJIbTaT: paccopTppyIte 6eJIbe IO MaTePnaJy H IIBeTy, IpoUHTaIte 3THKETKn Ha 6eJIbe H OJeKJTe H CJIeJyIte Hx peKOMeHdaIHHM, Ipr 3aRpy3Ke MaIIHHbI YepeDyIte MeJIKne H KpyHbI e IpeIMeTbI ODeJbI.
Ipeed ctnpko
Pa36epnte 6JIbe no MaTePnany
I NO yCTOuNBOCTN OKpACKn: pa3-
deJIte 6JIbe n3 npOuHbIX n De-
IIKATbIX TKAHeN, CTnpaTne OT-
deJIbHO 6JIeOE n CBeTHoe 6JIbe.
BbIHbTe BCE n3 KapMaHOB (MOHe-
tbl, BymaxKn, DeHbIn n Dpyrme
MeIKNe ppeMTebl), KOTOpBle MOrTy NOBpeDnTb MaunHy.
PpOBepbTe nyROBnUcI: cpa3y yKpeNITe nIN OTOpBNTe pNOxOdePjAunecr NpyROBnCbl, NOCKoNbKy OHN MOrT OTOpBaTbcR BO Bpemr CTnPK. 3aCTerHnTe MOnHm, py6aShKn BbIBepHnTe Hau3HaHky.
JIA 3aHNTbI HpeIMeTOB OJeKJIbI H3 DeJHKaTHbIX TKAHei (HHKHee 6eJIbe, YJKN, JeTCKHe HOCKN) NOMeCTHTe HX B XOJIIOBBie MEHOUOKH.
CbepyTebc 3TNKeTkamn
Bcerda cmOTpnte Ha 3tKeTkn, mHeoIeNecr Ha OdekJe N6JIbe: B HIX POKa3aHO KAK CTnpaTb N yXaXnBaTb 3a N3DeJnA M.
B tablne Ha c. 10 npnbVeHbI CnMBOJbI, npocTaBIAeMbIe Ha 3TuKeTkax, npackpbI-TO ux coJePxAaHne.
Co6nIoueHne npaBnI cTnpKn HaoJIoTO coXpaHNT BaShu Beun.
CmeuBaIe KpyHbIe I MeJIKe BeUIN np3aRpy3Ke MaUNHbI
PacnpaBbTe 6eIbe H He PnToHo 3arpy3nte ero B 6apabah.
CneyuTe peKOMeHDoBaHHbIM HOpMaM 3aIpy3Kn 6eIbI da pa3- IINuHbIX npOrpamM CTnPK — Bbl IOJyUHTe OJeKdy, LyUHe BbICTpaHHyIO C MeHbIIM KOJINuCeCTBOM CKJaADOK.
3anyck MaunHbI
YctaHObKa MaunHbHa MeCTO N nepemeueHne
Ecnn Baasa ctnpaJIbHa maunHa OCHaIeHa CneuaJIbHbIM KOMJIeKToM y6npaUoXxCra KOIec,TO Bm MoXeTe JERKO nepemeuTaB ee.
YTo6bI onyCTnTb KOleca n
pepeBnHyt b
obopydOBaHne, npocTo
notaHnte 3a pbUar,
pacnoJooKeHHbI cJIeBa IOD
OCHOBaHEm MaunHbl.
Piocne yCTaHOBKn
obopydOBaHnB TpE6yeMoe
IIOLOXeHne BepHnTe pbyar B IcXoDHOe IIOLOXeHne. Tepeb cTnpaBnHa MaunHa 3aΦNkCnpOBaHa Ha MeCTe (cm.pnc.).
Odekda, 6pb6oTaHHa PANTHOBBIOIDTeJIeM Ha OCHOBE 6eH3nHa
He nomeuaiTe B CTnpaIbHyo MaunHy OeKdy, NOBepRyHoc 6pb6OTke 6eH3nHOM, YNCTbIM 3TNIOBBIM CInrTOM, TpNXJLOP3-TNIJIeHOM INP., NOKA 3TN BeUeCTBa NOnHOCTbO He NCnapaTc.
IJIa noJyuYeHnXoPOuHHx pe3yJIbTaTOBOueHb BaJHo pa3o6paTb 6eJIbeNo MaTePnaJIy nUBeTy.
IIO OKOHuaHn CTnpKn...
Iocne OKOHuaHn cTnpKn NOOxJnte np6Jn3nteJbHo 2 MNHybl. 3aTeM BbIKIOUHTe CTnpAJIbHyo MaunHy HaxaTNem KHOKN G (noJoxeHne O - BbIKIOueHo). TeNepb Bbl MoKTe OTKpbITb DBepCbMaUNHB. BbHyB 6JIbe, OCTaBBte DBepCu OTKpBTbIMN NIN pNtOKpBTbIMN, YTO6bl DaTB nCnapNTbcra OCTabWeicn Bnare. O63aTeJbHO nepeKpoTIe KpaH noDaHN BObl NTKIOUHTe MaunHy n3 CETn.
POMHHTe, YTO nocne OTKJIIOUeHnEAJIeKTPoNtAHHaNJIcAMOBbIKJIOUeHnMaunHbl,
IocJIe ycTaHOBKn HOBoi MaIIHHbI IpoBeHnTe Ipo6HyIO CTnPKy 6e3 3aRpy3Kn, HcNoJIb3yI npOrpaMMy "1" npH TeMnepaType 60^ C.
PpaBnIbHbI Nyck MaunHbOueH BaxHe C ToCK 3peHnnaOBblWeHnKaueCTBa CTnpKn UyBeJIuYeHn Cpoka 3KcNlyaTaauu o6OpyDoBaHn.
Iocne 3aRpy3Kn MaunHbI n 3a- npAkn MOUxN CpeCTB n pa3- JnHyIx Do6aBOK o6ra3aTeJIbHO y6eDntecb B TOM, qTo:
1.Дверцamaшинblнаджно 3akpbita.
2. Maunha BkIIOueHa B 3neKtpnueckyO cTeB.
- Otkpbl KpaH noaun BObl.
- Khonka G haxoДиТСВ noIpoXeHn O (BknOyeHo).
- Koneca MaunHb y6paHb (T.e. He kacaIOTc nona).
BbI6op JeJaemOn nporpaMMbl
PpOrpaMMy cIeIyET BbIbIpaTbB COOTBeTCTBnC TINOM 6eJIbIu n CTeIeHbIO eO 3aIpy3HeHnra (CM. Ta6IuCy npOrpamM Ha c.9). POBepHnTe pykoTky BbIbopa nporpamM A u yctahOBnTe ee
Ha HOMep KeJaemOn nporpaMMbl.
PykoTko BbIbopa Temnepa-TpyB ByctahOBIne Tpe6yEmyo TemnepaTy CtnPKu, yTo pykoTka Bbl6opa ckopocTu CKoPocTN OTKIMa, ecNHeo6xOJMo, HaxMnte, ecNtpe6yeTcHaxMnteФyHKUN-OHaJIbHbIe KONKu (D,E,F); HaKOHeU HaxMnte KONKY BKIOUeHn/ BYkIIOueHnG (noLOXeHne I - BKIOUeHo).
«Здесь Командаюя»
YdaJIeHne IaTeH (cM. cTp. 12-13)

3ToK HONKo 3aadaTcpe KIM YCUNHeHHo CTnPK, npu KOtOpOM Bo3pactaet 3ΦΦeKTHBHOCTb DeIcTBnX XnDkNX Do6bOK -ydaJIaHTc CaMbI cToKne 3aarp3HeHn.
Iocne Haxatna 3ToN KHOKN Bbl He CMOXeTe 3aDeiCTBOBaTb pexm npeBapnteHn HO CTnPKn.


ДОПОЛНИТЕLBHOЕ NOLOOCKAHNE
3Ta OOnuN I03BOJnE T yBeJIuNTb KOJIuYeCTBO nOIOckaHn B npOrpaMMax CTnPK 6eJIbY n3 npOuHbIX TkaHei.
Cobetyem noIb30BaTbc8 3ToI OIe, KOrda CTnpaIbHna MaunHa 3arpyKeHa NOJIHOCTbU, a TaKxe B Clyuayx, KOrda IMeet MeTo I O Bbl E H Ha YBCTBNTbHOCt b K CTnpaJIbHbIM NOpOShkAM (KOHTAKTHa anleprna).


KhONka BkJIoueHnra / BbIKJIoueHnra
Haxatne KhoNk G BkNochaet MaunHy. EcJn KhoNka G He Haxkata, To MaunHa BblKlOyuHe. BbIKNoyeHne MaunHbI He OTMeHReT 3aDaHHy nporpaMMy.


UcnoJIb3ObaHne CmraJuaOuNX Doabok Deaet TkaHb MaYue H ChnKaet 3NeKtpn3yEmoCTb TkaHei N3 NCKycCTBeHHbIX
BOJOKOH.
Cmrgntelmb MoKet NcNoJIb3OBaTbc4IJa MaxPOBbIX TkaHeN, TpIKOTaXHbIX N3-DeJIn, 3aHaBeCeN nT.D. 3aJeTe Cmrgntelb B OTdeJeHne 3 pacnpede
Kak cHn3ntb paCXoDbI
3KoHmHa 3KcnIyamaua 6bImO6bx npubopoe he nanocum yuepe6a okpycaoue i cpe.
MAKCHMAJIbHAR3AΓPY3KA
CtapaHTeecb MaKCHMaJIbHO 3aRpyKaTb MaIIHHy, 3THM Bb C3KOHOOMHTe 3JIeKTpo3HeprHIO, BOyU, MOIOIhne cpeIcTBa H Bpem. HaIIpHMeP, IIpn IIOIHoi 3aRpy3Ke pacxOJ 3JIeKTPO3HeprHn 6yIeT ha 50% MeHbIe, Yem IIpn 3aRpy3Ke HAnIOJOBHNy.
YMEHbIIAITE KOJIINcECTBO MOIOIeRO CPEICTBA, ECJIN: BbI cTHpaTe HeHMHO6eJIb, 6eJIbe TOJIbKO cJIeRka 3aIprz3HeHO, BO BpeM MoIKN O6pa3yETcR IeHa, HIN BOJa He CJIINKOM JKeCTKa, HIN DaJKe MraKKa (CM. Ta6JIuY «JKeCTKocTB BoDi» BBepxU). YTO6bI BbIaCHHTb KaKOBa JKeCTKocTB BoDi, O6paTHTeCb B KInJIiHo-3KcIIJyaTaIHOOHHy KOHTOpY, OTBeauHOIyo 3a BOIOCha6KeHne BaIIero Doma.
HJKHA JIN IIPEDBAPHTEJIbHAA CTNPKA?
IporpaMMbI IpeBapHTeHbHO CTnPKN HJXHBToJIbKO JINa CnJIbHO 3aIpy3HeHHo 6eJIb! OTKa3 OT IpeBapHTeJIbHO CTnPKN c6epexet MOIOUHe cpeCTBa, BOy H 3aTpaTbI 3JEKtpo3HepHH Na 5 - 15% , He TOBOPa yKe O BAIIEM JInuHOM BpeMeHH.
TAK JIN HEOBXOJIMA TOPRAB BOJA?
IpeepcTnPKo3amOHTe6eJIbe,06pa6oTaHTe IITHa cIeIIaJIbHbIMn CpeCTBaMH,N BAM He IIOtpe6yeTc cIHIIKOM ropua BODa.CTnPKa IIpH 60°C cIIOco6Ha cKOHOHmTb IO 50% 3JIeKTpo-3HeprHH.
JIITeJI, CJIeIyI INCTpyKUJMAI pON3BOIDTeJI.
CmrgntelbABTOMaTneckn BBOINTcB MaunHy BO BpeMn oocJeHero nooockaHna. N0 OKOnuHnn nporgpAmbl CTnpKnBOTdeneHn36ydet OCTaBaTbc HEMHO BObl. OHa nCNoJb3yeTc Dnla BBedeHnryctbIX CmrgnteNeB BMauHnY,TOeTb pactBopReT KOHcEHTpnpObaHHbe CMrgnteJI.
EcnBOTdJeHn3OCTaetcB0bI6oMbIe HOpMbI,3TO O3-HauaET,yTO 6JIOKIpOBaHOonopoxHHouee yCTpoiCTBO nero BCacbIBaIOUaqAФyHKuINHe pa6oTaET.
Hnctpykun no yxody 3a pacnpedeJntelem cm. Ha ctp.16. HnkOrda He 3aJIbAte B pacnpedeJnteIb CMrHTeIb BmecTe C KpaxMaIOM -pacnpedeJnteIb MoKet 6blTnepeNoHN H 3akynopen.
YcTpaHHe HeNCpPaBHOCTeI
MaunHa He BKJIOyaeTcA
BcTabJeHa Nn BnJIka B po3eK? Bbl MoTIn BBkNHOuHTb MaunHy Ha Bpem O6CnyKbAHn I yXoJa.
He OTKJIUOyeHo Jn 3JIeKTpueCTBO? U3-3a nepeIpy3Kn MOr cpa6oTaTb ABOtOMaT 3JIeKTPocEtN. IJIn npOn30weI O6uN C6oN 3JIeKTPoNTaHnB BaWe m paiohe.
3aKpbIta Nn NnOtHO DBepe Za MaunHb? CtnpaIbHaMaunHa He MoKeT paOToTaB,ecn DBePca OTkpIta nnPiXo 3aKpbIta.3ToCdeJaHo n3 coo6paJehn6e3onacNoCTn.
Hajata JIN KhoNka BkNo-ueHn/BykInoueHn G (noJoxeHne I)? Ecn HajaTata, 6bl 3anporpammpoBaH OTIOXeHHb CTapt npo-rgpammbl.
PykoTka Bb6opa npo- rpaMM (OTJIOXeHHO crapTa) A haxoHTcB npaBnIbHom NIOJOxEHnn.
OTkpblI Nkpan noDaun BOdb? IV3 coo6paKeHn 6e3onacHocT MaunHa, He 3aNoJIHeHHa BOdo, He MoKcET BkJIouHTbcr. Bo3MOxHO nepeKpbTa noDaua BOdb I DOME.
Maшина He 3aJIbBaet BODy
■PpaBnIbHo JIn NpOcOeHnHeN WJNaHr?
He nepekpbita Jn noada BOdbI B DOME? Bo3moXHO, B DOME INJIN NO6NI3OCTN BeDeTcpeMOHT N BOIOCha6-KeHne BpemeHHO OTKIIUoyeHO.
I OoctaToUHo JIN DaBJIeHne B BoDOnpOBoDE? Bo3MOxHO, HEnCnPabEH aBtOKJlaB.
He 3acopen nI npbtp? HnIbTp Ha 3aJIINBHom IJnahre MoKet 6bITb 3a6nt N3BeCTKOBBIMu YactuamN JIN MyCOPOM, OCTaBUnMcN PocJe pemOHTA BOOnpO-BOda.
He nepexkat mI shaHr no-dauch BOdb? Ppocneiute, KAK npoloxen shaHr, HET JIN n3r6OBn nepeJiomob.
MaunHa 3aJINBaET nCJINBaET BODy OJHOBpeMeHNO
He cIINsKOM JHn3KO paCnOJoxeH CInBHOJ ⅢaHr? KoHeu ⅢaHaRa DOJIKeH HaxoDITcH Ha BblCote 60-100 cm.
He okazanca Jn Koheu WlaHra B BoDe?
I MeetcJN OTBODHa Tpy6ka B CnNBHO CNCTeMe?
Ecnn nonbItkn yctpaHntb HeNCnpaBHOCTb He yBeHuaJINc b ycIeXOM, BblKIOUHTe MaunHy, NepeKpoTe BOyu O6paTneCb B cepBncbIu cHTp 3a NOMOsb.
HaBepxHnx 3taxk 3dAHm MOKeT CO3daTbCra TAK Ha3blBaembl «CnOHHb 3Φ-ΦeKT》.ДЯ erO npedOTbpa-ueHn yctaHaBnBaETc CneuaJIbHbN CnOh.
ПРавильho
3aKpbIbaiTe KpaH IocJIe KaKaIOI CTnPKN.
OrpaHnUbTe HcNoJIb3OBA-Hne TnIpaBInuecko ChcTeMbMaHHbI, KOrJa HHKOro HetDOMa-3THMBblyMeHbHHTe OHaChocTB IIPOteuKn.
He octabJHte pa6oTaIO- Ie o6OpUOBaHne 6e3 npcMoTpa,ecJH B MecTe,1pe pacNoJIoKeHa MaHHa B HNOJy HaxOHTcR cJHBHOe OTBepCThe.
Bcerda ocTabJHne IBepyu B IIpHOTKpbITOM IOIOKeHH, YTO6bI B MaINHe He cKaJIINBaJIcH HeIIpHraTHbI 3aIIax.
BHeHHHe HaneJH MaHHHbI npotnpaIte c 60JIbHoi oCTOpOxHOCTbIO.
KopnycMaHHHbI Hpe3HHoBbIeJeTaJIH IpOHTpaIte YHcToI TkaHbIO,CMOyeHHOI B TeIIJIoM bJIbHOI BOIe.

HENPABNJIbHO
Ipu uucmke ocmaeimcmuabhyu mauunhy nodKIOUeHNHO Kcemu.
Bo Bpem 06cIyJxHBHnMaIIHHa BcERda DoJIXHa6bITb OTKJIIOUeHa OCTH.
HcnoJIb3yIme pacm6OpuMeu u akmu6hble a6pa3u6bl. HNKoTJa He IIpIMeHnTe paCTBOPHTeJIN HJIn a6pa3NBbl J1JYHCTKN BHeIIHHx Hpe3NHOBbIX YactTei CTHpAJIbHOJ MaIIHHbl.
He 3abombmecb o pacnpedeIumel Meouux cpedcm6.
CbeMHbI paacpeJeJnteJIb MoKHO JERKO IIpOMbITb IIOI IIpoTOuHOBoIo.
Ye3KaeHado120, He dymaume o maunne.
IpeoToBe3IOM BceEJa IpoBepaTe,HTO CTnpaJIbHaMaIIHnA OTKJIOUeHa N KpaHIOJaH BOIbI 3aKpbT.
Kak chntb paepenlntb MOIOx CpeCTB
Pa36opka:
Clerka Haxmte Ha 6oIbIyIO KhoNkY Ha IpeJeHNe CTOpOHe pacPepdIeJIteJI N BbITaHIte ero BBexp (pnc.1).
UcTka:
3aTe m npomoye pacnpednntb noD cTpye BObl (pnc. 3), nCnoJIb3yra cTapyo 3y6HyIO uTeKy. BbInbTe napy cnfoHOB, BCTaBHeHHbIX B BerPsiHry OTdeJeHn I n 2 (pnc. 4), npOBepbTe He 3a6nbl JIN OH N IpomoyTe nx.
C6opka:
YcTaHOBIne napy cnfoHOB B CnEuaJIbHbIe OTBepCTnI N 3aTeM NOMeCTIne paCnpedeJIInTeJIb Ha MecTo, BCTaBJIa ero do uJeuKa (pnc.4,2 n1).
PpO6JIeMbI npn cInBe BOdBi nOTXIMe
IpeDyMcTpPbAeT JN CINB Bbl6paHHa np orp mma? B HeKOTopbIX nporpamMax CINB BblIOJIHReTCBpyHyIO.
3aJeCTBOBaHa JINyHKcIgA «ANTNCMHaEMocTb»?Ta yHKcIg NpeDnonaraet pyHoi CJIIB BObl I3 MaIHHbl.
He 3acopen JIN CInBHOH hacoc? IJn npOBepKn 3akpoIte KpaH, BbIKIOuHTe MaunHy n3 CETn, daJIee - CM. INHCTpyKcUN Ha c. 15. Ppi Heo6xOIMOCtN BbI3OBITE CNEznaJINCtA cepBVCHOHO zEHTpa.
He nepexkat nCInBHOJnlaHr?PpocneJeIte,kaK npoloxhen nlaHr, HET JNn3rnbOBnpejIOMOB.

MaunHb? B KaKOM COCTOHN yDnHnteB CINBHO OJANHr N npaBnIbHO N OH paNoJoxhen? HecTaHapTHbI yDnHnteB MoKet 3aepKuBaTb BOy
CnJIbHaBn6paun npn OTKIMe
Charbln TpaHcnpTnpoBOUHbIe ORpaHnHTeJI?CM. HNCTpyKUnn No yctaHOBKe MaunHbI Ha c.3.
XopoO Io NbIpoBHeHa MaunHa? PeryIpaHOpnoBepaIte roPn3oHTaJIb-H O C T bycTaHOBKn MaunHb. OtpereynpuyTe NOJIOKeHHe HOKe MaunHbI.
I OoctaToeHJn 3aOp Mekdy MaunHO, CTeHOH N OkpyXaOuUmm npEmdTaMm? Heo6xOdImo oBeCneuHb HEKOTOpoe npocTpaHCTBO BOKpyr MaunHb, OHa He DoJIkHa KaOkpXaUoN x npEmdTOB. EcnMaunHa CTOUT Ha KOBPOBOM NOKpbITTN, yBeDInTeCb, YTO Mekdy HOKKAMMaunHb IN KOBPOM IMeETcdoCTaTOHoe IpocTpaHCTBO DnA cIpKyJIaUN BO3duXa.
PpoTeuKn
MetaJIHueckoe KOJbUO Ha KOHcze 3aINBHO OJHaRa NIOTHO 3aTAYTO I npO KlaJaK npAunlbHo yCTaHOBHeHa.3akpoTe kpaH, BbIKIQUHTe MaUSHy N3 CETN, POITAHTE KOJIbUO pyKaMn 6e3 OC0bIX ycJIIn.
HetIIN3acopaBpacnpedeHNTeMe MOUxNxCpeDCTB?
I 3B IeK n Te pacnpedeJIteIb n npoMoITe erO noD cTpyeB BObl.
HaJexHo Jn 3aKpEnHe nCBHOJ WJahr? 3aKpoI Te KpaH, BbIKJIOnHTe MaWInHy N3 CETN, POITAHHTe COeINHeHHe.
H36bIToUHoe neHoo6pa3ObaHne
IpoXoOHT MMOUee cpeCDTO DnI NCNoJIb3OBAHnB B CTnpaJIbHOmMaunHe? PpOBepTe, eCTb Jn Ha yPakOBKe HADnncs: «JnmauHHoN CTnPKN» IIN «Jn pyuHoi N MaunHHoN CTnPKN».
IpaBnIbHO Hb Bb Ido3npyeTe MoIOoee CpeDCTBO?IpeEIO3npOBKa MOIOJeroCpeDCTBa NOMMOIOBbl WENHNOIeHOO6pa3OBAHNHeTOJIbKO yXyDiwaET KaueCTBOCTNPK, HO IMoKet PpIBeCTN K IOJOMKe MaUNHBi.
Ecnn nocne npoBepkn MaunHa He pa60taet nn npo6JIembl octaOTcra, CBJXnTEcb C cepBnCHbIM ueHtpom Indesit, n npn 3BOHKe COO6UInTe CneDyUOuIu INΦopMaunIO:
HOMep rapaHTnHoro DOkymeHTa (cepBucHO KNHXKN, cepBnCHOro cepTnΦNkata n T.n.)
HeuCnpaBHOCTb,
- MoDéJIb CτɪpaɪbHòm MaɪnHbI (Mod. ...),
- 3aBoDcKoH oMeP (S/N),
3Tn daHbIe Bb HauTe Ha Ta6JnUKe, paCnoJoxeHHoB HxKHeuactn zuokOJIa (puc. 1).
При НебхODIMOCTN роверайтЕ насocи pe3INHOвьй Шанг
Стуральна машина оборуковая самоочидахимся насocom, которий не тpe6ует спенильно чстkn.Одно Ке Дрдмétы (MOHétы, 3akOJIKN, IIYROBnIb I np.) Moryt cIyuaHIO IOHAcTb B Hacoc.ДЯnx H3BJIeYeHna Hacoc obopydOBaHСпeинajLbHbIM «yIOBHTeJIeM» ИИ PhЛbTpOM,pacIIIOJIOKeHHbIM B HIXKHe KOHnce Hacoca.
Pnc.1
TO6b BbHytB HJIbTp, CHMHTe IaHeJIb BH3y MaIIHHb (pnc.1).PiOBepHHTe KpbIHKy HJIbTpapipOTHB yacOBOc CTpeJIKH (pnc.2), H3BJEKeHTe HOCMOTpHTe HJIbTp.
BHHMaHHe: IIpeI TeM KaK OTKpbITb IaHeJIb H BbHyTp, a TaKKe IIpeI BbIIIOJIHeHNem JIO6bIX OIIepaIIN IIO TexHHueC KOMy 06cJLYjXHBaHHIO, y6eIHTecb, YTO MaIIHHa 3aKOHNJa IHKJI CTnPKH N OTKJIHOHTe MaIIHHy OT cETH.
YTo6bI c6paTb He6OJIbIIoe KOJIInueCTBO BOJbI, KOTOpoe MoKet BbITeU b3 ΦHJIbTpA, IIOJOxHTe IIpeEi Hm JIoTOK. He 3a6yJBTe IIOtHO 3aTAYb TcPbIbKy fHJIbTpA, KOrJa 3aKOHuHTe OCMOTp. Ipn yCtahOBKe IaHeJIN Ha MeCTO BCTaBbTe KpIKn, pacIOJIOkeHHbIe BHN3y MaIIHHbI, B COOTBeTcTBYIOHne OTBepCTHn Ha IaHeJIN H 3aKpOIte ee TOJIYKOM OTce6J.
Pnc.2
Pe3HOBbI IIJaHT
IpoBepaHTe IJIaHr HepeKe OJHO rpa3a B roI. Pprn JIO6bIX Pprn3HaKax Teu HJIN IOBpeKJeHHaHEMeJIEHHO 3aMeHHe TIIaHr. HeNcPpABHbI IIJIaHr, HAXOJIMHcI POI DaBJEHHem, MoKeT BHe3aIIHO JIoIHyTb BO BpeMa pa6OTb MaIIHHbI.