
Pro 120 CC4 - Shredder Intimus - Free user manual and instructions
Find the device manual for free Pro 120 CC4 Intimus in PDF.


| Product Type | Document Shredder |
| Brand | Intimus |
| Model | Pro 120 CC4 |
| Security Level | P-4 (cross-cut 4 x 30 mm) |
| Cutting Capacity | Up to 120 sheets (70 g/m²) |
| Power Supply | 230 V, 50 Hz |
| Motor Power | 1 500 W |
| Dimensions (L x W x H) | 35 x 45 x 55 cm |
| Weight | 30 kg |
| Noise Level | 58 dB (A) |
| Main Functions | Automatic start/stop, reverse, overload protection, bin full indicator |
| Maintenance and Cleaning | Oil the blades every 2,000 cuts, clean exterior with a soft cloth |
| Safety | Automatic shutdown in case of overheating, safety lock, finger protection |
| Spare Parts and Repairability | Replacement blades, motor, belt, switches; repairable by authorized center |
| General Information | 2-year warranty, German manufacture, CE compliant |
| Bin Type | Removable bin with viewing window |
| Bin Volume | 120 liters |
| Materials Destroyed | Paper, staples, paper clips, credit cards |
| Duty Cycle | Continuous operation possible with cooling |
| Included Accessories | User manual, lubrication oil, waste bags |
Frequently Asked Questions - Pro 120 CC4 Intimus
User questions about Pro 120 CC4 Intimus
0 question about this device. Answer the ones you know or ask your own.
Ask a new question about this device
Download the instructions for your Shredder in PDF format for free! Find your manual Pro 120 CC4 - Intimus and take your electronic device back in hand. On this page are published all the documents necessary for the use of your device. Pro 120 CC4 by Intimus.
USER MANUAL Pro 120 CC4 Intimus
Before operating, please read the Operating Instructions!

Betriebsanleitung
Operating Instructions
Abb. 1

Abb. 2
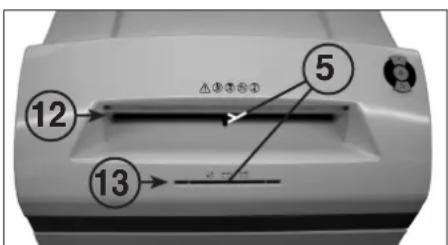
Abb. 3
BEDIENUNG
BEDIENUNGSELEMENTE:
<< The machine may not be operated by more than one person at any given time!
The machine was designed for safe operation by "one person only".

<< During the shredding process no other work may be performed on the machine (for example cleaning, etc.)!

<< The machine is not a toy, and is not suitable for use by children!
The overall technical safety concept of this machine (dimensions, feed openings, emergency shutdown devices etc.) does not provide for any guarantee regarding hazard-free operation by children.


<< Danger of injury! Keep all loose articles of clothing, ties, jewelry, long hair or other loose objects away from opening!

<< Danger of injury! Never insert fingers into opening!

<< In case of danger switch the machine off with the mains switch, or with the emergency switch, or unplug the machine!

<< Always unplug the machine from the mains power supply before opening the machine!
Repairs may only be performed by trained personnel!
INITIATION
AREA OF APPLICATION:
The intimus 120SC2/CC3/CC4/CC5/CC6
data shredder is a machine used for shredding general documents and
data carriers such CD's, DVD's, credit cards and 3.5" diskettes.

The machine must only be used to shred paper, credit cards and CD's, DVD's and 3.5" diskettes.
Shredding other sorts of data carriers may cause damage to the machine (e.g. damage to the cutters etc.).
INSTALLATION:
- Unpack the machine and put it together. - Fit the plastic bag onto the bag frame.
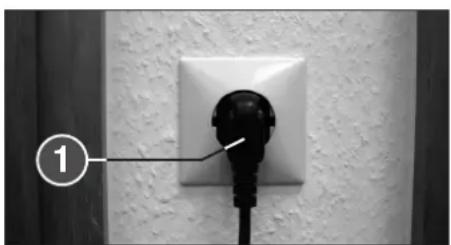
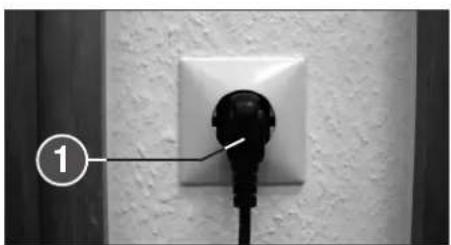
- Connect the machine to the power with the plug (1) (Fig. 2) (For information on the right fuse for the plug see "TECHNICAL DATA").

The socket outlet shall be installed near the equipment and shall be easily accessible!
Only operate the machine in enclosed rooms at temperatures between 10°C and 25°C!
OPERATION
CONTROLS:
1 = Mains plug (fig. 2)
When the machine is first plugged in it is not on.
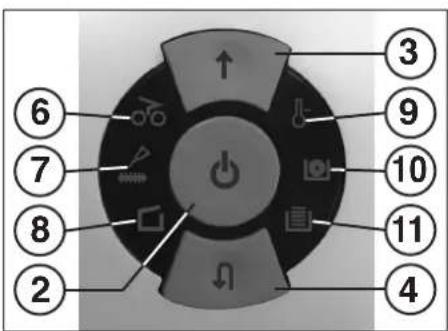
2 = Function buttons (fig. 1)
"Ready"/ "Off" / "Stop"
This button has three functions:
a) "Ready"
The machine changes to "Ready" if you press this button briefly.
At the same time the integral LED display ⏻ comes on.
b) "Off"
The machine switches off if it is in the "Ready" mode and the button is held down for about 3 seconds.
Note: The machine switches off automatically if it is not used for about 5 minutes.
c) "Stop"
If you press this button briefly when the cutters are running they switch off and stop.
3 = Forwards button (fig. 1)
This button has two functions:
a) If this button is pressed briefly, the cutting mechanism runs forwards for a few seconds, e.g. to remove remaining material from the cutting mechanism. At the same time the integrated LED display ↑ lights up.
b) If this button is pressed and held for approx. two secs., the cutting mechanism runs forwards continually and materials to be shredded can be fed into the machine. At the same time the integrated LED display ↑ lights up.
4 = Reverse button (fig. 1)
If you press this button the cutters run backwards for a short time. At the same time the integral LED display ⚡ comes on.
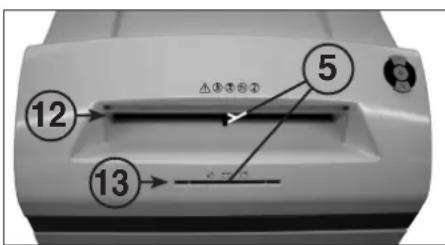
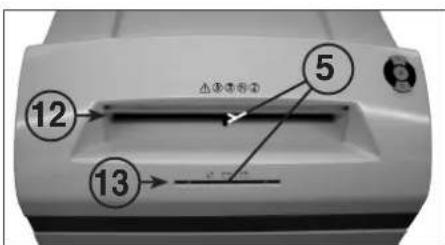
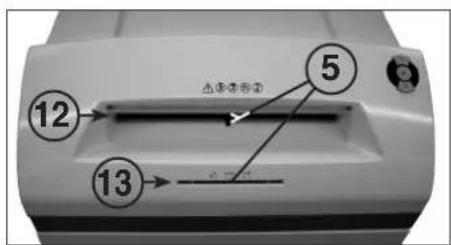
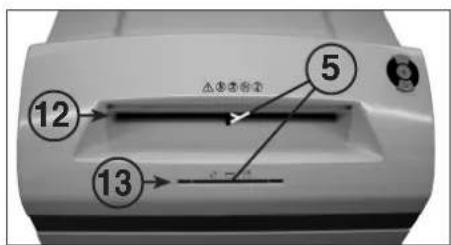
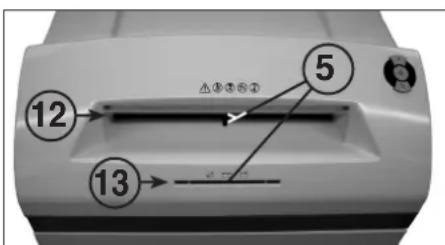
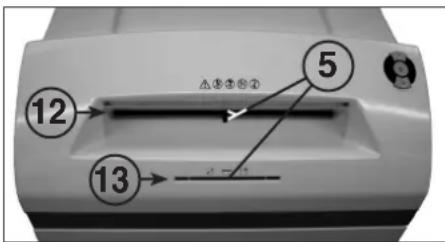
5 = Light barrier (Forward motion) (fig. 3)
The shredding procedure starts as soon as material is fed into one of the two feed slots. At the same time the integral forward button LED display ↑ comes on.
6 = Control display (fig. 1)
"Material jam in machine"/
"Simultaneous material feed" / "Light barrier covered when door opens or when machine turned on"
For the procedures see the relevant description under the "MALFUNCTION" section.
a) "Material jam in machine"
Comes on when too much material has been fed into the cutters. The cutters jam, then run in reverse for a short time and stop. The motor switches off.
b) "Simultaneous material feed"
Comes on when material has been fed into both slots at the same time. The cutters stop, then run in reverse for a short time and stop. The motor switches off.
c) "Light barrier covered
when door open"
Comes on when there is still material in one of the two feed slots when the door is opened. The cutters stop. The motor switches off.
d) "Light barrier covered
when machine turned on"
Comes on when there is still material in one of the two feed slots when the machine is switched on.
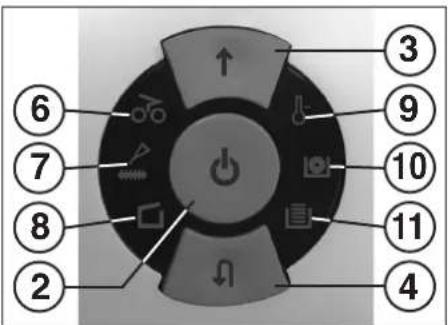
fig. 1

fig. 2

fig. 3
OPERATION
CONTROLS:
7 = Control display (Fig. 1)
"Oil cutters"
Comes on when the cutters in the cross cut version must be oiled. The lubrication procedure must be acknowledged on the reverse button (4) (see description in "CUTTER MAINTENANCE").
8 = Control display (Fig. 1)
"Door open"/ "Door malfunction"
a) "Door open"
Comes on if the door on the lower part of the machine is opened. The machine switches off automatically and cannot be started as long as the door remains open.
b) "Electrical fault"
Flashes when there is an electrical fault in the door sensor. The machine switches off. Please contact your dealer.
9 = Control display (Fig. 1)
"Motor overload" /
"Electrical fault"
To find out what to do see the relevant description under the "MALFUNCTION" section.
a) "Motor protection"
Comes on when the motor has been overloaded and has switched off. The machine cannot be started while the motor is cooling down.
b) "Electrical fault"
Flashes when there is an electrical fault inside the control board. At the same time the function button (2) LED display flashes. The machine switches off. Please contact your dealer.
10 = Control display
"CD/DVD container full" (Fig. 1)
Comes on when the CD/DVD container is full and must be emptied. The cutting unit for reducing CD/DVD switches off. The emptying procedure must be acknowledged on the forward button (3).
Note: The cutting unit for reducing paper can be used furthermore.
11 = Control display
"Paper collection bag full" (Fig. 1)
Comes on when the paper collection bag is full and must be emptied. The cutting unit for reducing paper switches off. Note: The cutting unit for reducing CD/DVD can be used furthermore.
12 = Paper feed slot (Fig. 3)
13 = CD/DVD feed slot (Fig. 3)
14 = Paper collection bag (Fig. 4)
15 = CD/DVD collection container (Fig. 4)
16 = Oil reservoir (Fig. 6)
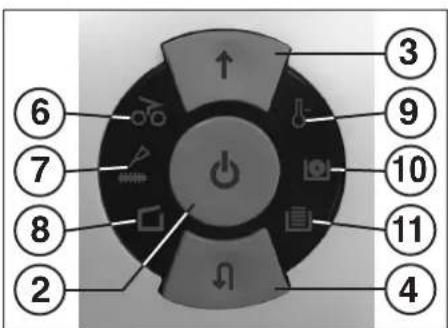
fig. 1

The shredder may not be used as a step ladder or as a seat. Danger of falling due to breakage!
SWITCHING THE MACHINE ON:
Proceed as follows to switch the machine to "Ready":
- Press the function button (2) briefly.
- The function button (2) LED display Comes on for "Ready".
- The machine can be loaded.
MATERIAL FEED:
Feed paper into the cutting mechanism through the paper feed slot (12) (fig. 3).
Feed data carriers (CD, DVD or credit card) into the cutting mechanism individually into the separate CD/DVD feed slot (13) (fig. 3). The machine automatically switches to forwards running, draws the material in and automatically switches off after shredding.

When shredding papers, do not shred CD/DVD at the same time, and vice versa!
Note: For shredding transparent films, the machine must be manually switched to forwards running (press and hold the forwards button (3) for approx. 2 secs.).
By briefly pressing the function button (2) (Stop function), the shredding process can be stopped at any time. To continue, press and hold the forwards button (3) for approx. 2 secs. If the machine is not used for a period of approx. 5 mins., it automatically switches off.

Never feed the shredder with a quantity of material exceeding the maximum indicated. Refer to the TECHNICAL DATA section!
Should the machine become overloaded, follow the instructions under "MATERIAL JAM IN MACHINE" under "MALFUNCTIONS".
Two separate collection containers ensure that waste is separated properly.
EMPTYING THE PAPER COLLECTION BAG (Fig. 4):
If the paper collection bag is full the machine switches off. The control display 1) comes on. Proceed as follows:
- Open the door. The control display ☐(8) comes on. If there is still material in one of the feed slots, the control display ☑(6) also comes on.
- Take the collection bag (14) and the frame out of the bottom part of the housing. Remove the bag and dispose of the contents. The control display ☐ (11) goes out.

fig. 3
- Fit the emptied bag onto the bag frame and insert the bag and the frame into the bottom part of the housing again. Close the door. The control display (8) goes out.
- If the control display 6(6) comes on, press the forward button (3) briefly. The remaining material in the feed slot is shredded and the display go out.
Note: The machine will only run if the door is closed.
EMPTYING THE
CD/DVD COLLECTION CONTAINER (Fig. 4):
Note: The "CD container full" is monitored by counting the number of shredding processes performed.
If the number of CD's/DVD's pre-programmed into the control unit (about 20) is shredded the machine switches off. The control display 🔒 (10) comes on.
Proceed as follows:
- Open the door. The control display □(8) comes on and the forward button (3) LED display ↑ as well as the control display 🔒 (10) flashes.
- Remove the collection container (14) from the inside of the door and dispose of the contents.
- Press the forward button (3) briefly to acknowledge that the CD/DVD container has been emptied. The counting process begins at zero again. The control display (10) and the forward button (3) LED display go out.
- Attach the emptied container to the door again and close the door.
Note: The machine will only run if the door is closed.
DYNAMIC LOAD DISPLAY:
To prevent a material jam and thus ensure a continual, effective destruction of the data carriers, the current load level of the motor is displayed during the shredding process by a coloured, diffuse light in the feed slot as follows:
Green light: load < 50%
Yellow light: load 50 - 75%
Red light: load 75 - 100%
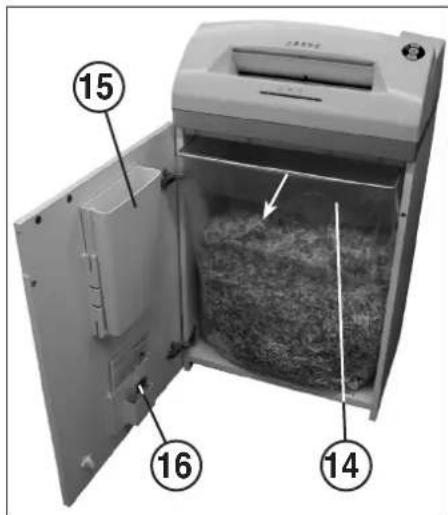
fig. 4
MALFUNCTIONS
MATERIAL JAM IN THE MACHINE:
(Auto reverse function)
If a jam is caused by too much material being fed in the following happens:
- The cutters jam, then run in reverse for a short time (material is released) and stop. The motor switches off. The control display 066 comes on.
Proceed as follows:
Paper jam in paper feed slot (12)
- Remove the paper that has been fed back.
- The cutters now run forwards automatically and shred the remaining paper in the cutters. During the forward run the forward button (3) LED display comes on. The control display goes out.
- Continue shredding with less paper.
Material jam in CD/DVD feed slot (13)
- Remove the returned material.

Remove the material carefully because there is the risk of being injured by the sharp cut surfaces.
- The remaining material to be cut is now automatically fed to the cutters again and shredded. During the forward run the forward button (3) LED display comes on. The control display ⬆6 goes out.
- If the material to be cut has gone through continue shredding with the right amount of material.
- If necessary, switch the cutters manually alternately from forward to reverse until the material has gone through completely and been shredded.
SIMULTANEOUS MATERIAL FEED:
Should material be fed into the two feed slots at the same time the following happens:
- The cutters jam, then run in reverse for a short time (material is released) and stop. The motor switches off. The control display off comes on.
- Take the material out of one of the slots.
- Press the forward button (3) briefly. The material in the other slot is fed to the cutters and shredded. The control display (6) goes out.
LIGHT BARRIER COVERED WHEN DOOR OPENED:
Should there still be material in one of the two feed slots when the door is opened, the motor switches off and the cutters stop. The control display 60(6) comes on.
Close the door and acknowledge the status by pressing the forward button (3) briefly. The existing material is fed to the cutters and shredded.
LIGHT BARRIER COVERED
WHEN MACHINE TURNED ON:
Should there still be material in one of the two feed slots when the machine is switched on the control display (6) comes on.
Remove the material and acknowledge the status by pressing the forward button (3) briefly.
MOTOR PROTECTION:
Should the motor be overloaded it switches off. The control display ♂ (9) comes on.
The machine can be started again after a cooling down period of about 25 - 40 minutes (depending on the model and the room temperature).
ELECTRICAL FAULT:
If the control display (9) flashes together with the function button (2) LED display or only the control display (8) flashes there is an electrical fault. The machine cannot be started. In this case please contact your dealer.
FAULT CHECK LIST:
Should the machine not work, check the following points:
- is the plug connected to the power supply?
- is the door closed?
- is the paper collection bag full? Follow the instructions for "EMPTYING THE PAPER COLLECTION BAG".
- Is the CD/DVD collection container full? Follow the instructions for "EMPTYING THE CD/DVD COLLECTION CONTAINER".
- Is there a material jam in the machine? Follow the instructions in "MATERIAL JAM IN THE MACHINE".
- Is the motor overloaded? See "MOTOR PROTECTION".
If none of these test points apply, please contact your dealer.
MAINTENANCE / DISPOSING
CLEANING THE PHOTOCELLS (Fig. 5):
If paper particles should come to rest in the inlet guide (for example after a paper jam) it is possible that the machine will not turn off, due to the broken light barrier.
To remove these paper strips and also to clean the photocell, pass another sheet of paper through the feed slot, or switch the machine to reverse and wipe both "eyes" of the photocell with a brush.
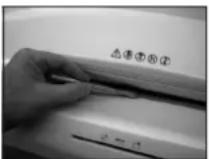
fig. 5

fig. 6
CUTTER MAINTENANCE (CROSS CUT):

Cross cut cutters must be oiled after a specific operating time.
If the control display (7) comes on proceed as follows:
Open the door. The control display (8) comes on and the reverse button (4) LED display as well as the control display (7) flashes. Remove the oil reservoir (16) (Fig. 6) from the holder in the door and close the door again.
Pour a little oil onto a sheet of paper and then feed this through the paper feed slot (12) onto the cutters.
The paper is drawn in and in this way the oil is distributed to the cutters.
Note: This procedure is acknowledged as follows to turn off the display after the cutters have been oiled:
- Open the door until the control display □(8) lights up. The control displays ⑦ and (4) flash.
- Press the reverse button ▼ (4) and keep it held down until the control display ⏻7) goes out.
- Close the door again.
The cutters now start a cleaning cycle automatically (forward and reverse run) and then switch off. The machine is ready for use again. Should you need to re-order the special oil see "SPECIAL ACCESSORIES".
AUTOMATIC ENERGY SAVING:
If the machine is not used for a while it automatically switches off after about 5 minutes. The function button (2) LED display ⏻ for "Ready" goes out. Press the function button briefly to turn it on again.
DISPOSING OF THE MACHINE:

Dispose of the machine in an environmentally friendly fashion at the end of its useful service life. Do not dispose of any of the parts included in the machine or its packaging with household waste.
TECHNICAL DATA
| Model | Type | Cutting widthpaper / CD,DVD | Cutting capacitypaper / CD,DVD | Working width | Noise level | DimensionsW x D x H | Weight |
| intimus 120SC2 | 227-6S | 5.8 mm / 8 mm | 35-38 sheets* / 1 piece | 310 mm | app. 57 dB(A) | 535 x 395 x 980 mm | 46 kg |
| intimus 120SC2 | 227-4S | 3.8 mm / 8 mm | 31-33 sheets* / 1 piece | 310 mm | app. 57 dB(A) | 535 x 395 x 980 mm | 46 kg |
| intimus 120CC3 | 227-4C | 3.8x36 mm / 8 mm | 23-25 sheets* / 1 piece | 310 mm | app. 57 dB(A) | 535 x 395 x 980 mm | 47 kg |
| intimus 120CC4 | 227-2C | 1.9x15 mm / 8 mm | 15-17 sheets* / 1 piece | 310 mm | app. 57 dB(A) | 535 x 395 x 980 mm | 47 kg |
| intimus 120CC5 | 227-1C | 0.8x12 mm / 8 mm | 10-12 sheets* / 1 piece | 310 mm | app. 57 dB(A) | 535 x 395 x 980 mm | 47 kg |
| intimus 120CC6 | 227-1CF | 0.8x4.5 mm / 8 mm | 7-8 sheets* / 1 piece | 310 mm | app. 57 dB(A) | 535 x 395 x 980 mm | 47 kg |
Pre-fusing (slow-blow): 220-230V = 10 amps / 115-125V = 15 amps / 100V = 18 amps
| Model | Power supply datasupply voltage/frequency · current consumption · power | ||
| intimus 120SC2 | 220-230V/50Hz · 7.8 amps · 1.8 kW | 115-125V/60Hz · 12.0 amps · 1.4 kW | 100V/50/60Hz · 18.0 amps · 1.8 kW |
| intimus 120SC2 | 220-230V/50Hz · 7.8 amps · 1.8 kW | 115-125V/60Hz · 12.0 amps · 1.4 kW | 100V/50/60Hz · 18.0 amps · 1.8 kW |
| intimus 120CC3 | 220-230V/50Hz · 7.8 amps · 1.8 kW | 115-125V/60Hz · 12.0 amps · 1.4 kW | 100V/50/60Hz · 18.0 amps · 1.8 kW |
| intimus 120CC4 | 220-230V/50Hz · 7.8 amps · 1.8 kW | 115-125V/60Hz · 12.0 amps · 1.4 kW | 100V/50/60Hz · 18.0 amps · 1.8 kW |
| intimus 120CC5 | 220-230V/50Hz · 7.8 amps · 1.8 kW | 115-125V/60Hz · 12.0 amps · 1.4 kW | 100V/50/60Hz · 18.0 amps · 1.8 kW |
| intimus 120CC6 | 220-230V/50Hz · 7.8 amps · 1.8 kW | 115-125V/60Hz · 12.0 amps · 1.4 kW | 100V/50/60Hz · 18.0 amps · 1.8 kW |
* based on A4-paper 70g/m² at 230V/50Hz
SPECIAL ACCESSORIES
| Description | Order-No. |
| Plastic bag, 440x330x950x0.05 mm | 99977 |
| Lubricant, 110 ml bottle | 88035 |
| Note: For orders of special accessories and spare parts, please contact your dealer. | |
RECOMMANDATIONS IMPORTANTES DE SÉCURITÉ

fig. 1
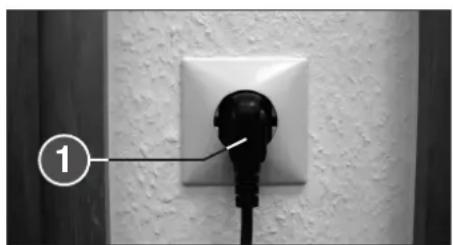
fig. 2

fig. 3
UTILISATION
ELEMENTS DE COMMANDE :
DYSFONCTIONNEMENT ELECTRIQUE:
ELIMINATION DE LA MACHINE:

3 = Vooruittoets (afb. 1)
6 = Controlelampje (afb. 1)
afb. 2

afb. 3
BEDIENING
BEDIENINGSELEMENTEN:
7 = Controlelampje (afb. 1)
8 = Controlelampje (afb. 1)
9 = Controlelampje (afb. 1)
„Overbelasting motor“ /
15 = Opvangbak CD/DVD (afb. 4)
16 = Oliereservoir (afb. 6)
afb. 1

- is de motor overbelast?
Zie "MOTORBEVEILIGING".
Fig. 2
6 = Indicador de control (Fig. 1)
"Recipiente CD/DVD Ileno" (Fig. 1)
Fig. 2
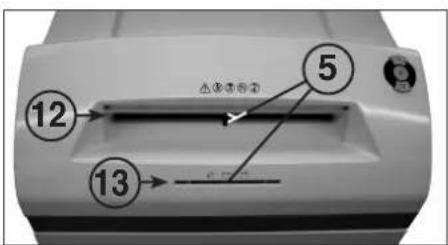
Fig. 3
UTILIZAÇÃO
ELEMENTOS DE COMANDO:
7 = Indicador de controlo (Fig. 1)
"Olear o mecanismo de corte"
Fig. 2

Fig. 3
USO
ELEMENTI DI COMANDO:
Eik. 1
Eik. 2
Eik. 3
ΧΕΙΡΙΣΜΟΣ
ΣΤΟΙΧΕΙΑ ΧΕΙΡΙΣΜΟΥ:
1 = Netstik (afb. 2)
3 = Fremad-tast (afb. 1)
afb. 1
afb. 2
afb. 3
BETJENING
BETJENINGSELEMENTER:
7 = Kontrol-indikator (afb. 1)
„Smøre skæreenhed“
16 = Oliebeholder (afb. 6)

afb. 1

OPSTART AF APPARATET:
T∅MNING AF OPSAMLINGSBEHOLDEREN for CD/DVD (afb. 4):
VEDLIGEHOLD SKÆREENHED (CROSS-CUT):

Plasticpose, 440x330x950x0,05 mm
Olieflaske, 110 ml
bilde 2
bilde 3
BETJENING
BETJENINGSELEMENTER:
7 = Kontroll-indikator (bilde 1)
INNKOBLING AV MASKINEN:
Maskinen kobles inn til „driftsklar“ på denne måten:
- Trykk kort på funksjonsknappen (2).
- LED-indikatoren 📊or funksjonsknappen (2) lyser opp for „driftsklar“.
- Maskinen kan mates.
MATERIALMATING:
VEDLIKEHOLD / DEPONERING
VEDLIKEHOLD SKJÆREVERKT∅Y (CROSS-CUT):

bild 2
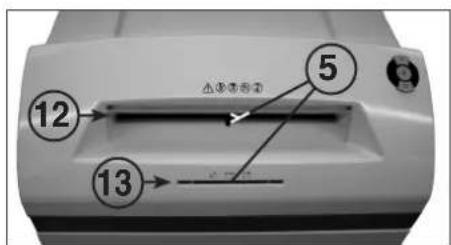
bild 3
HANDHAVANDE
REGLAGE:
7 = Kontrollangivelse (bild 1)
"Olja skärverk"
kuva 1

kuva 2
kuva 3
KÄYTTÖ
HALLINTAELEMENTIT:
kuva 1

Sulake (hidas):
220-230V = 10 A / 115-125V = 15 A / 100V = 18 A
rys. 2

rys. 3
OBSŁUGA
ELEMENTY OBSŁUGI:
obr. 2

obr. 3
OBSLUHA
OVLÁDACÍ PRVKY:
- kéb
- kéb
KEZELÉS
KEZELŐELEMEK:
A GÉP MEGSEMMISÍTÉSE:

Фиг. 2
Фиг. 3
РАБОТА С МАШИНАТА
УПРАВЛЯВАЩИ ЕЛЕМЕНТИ:
Фиг. 4
ПОВРЕДИ
Рис. 2
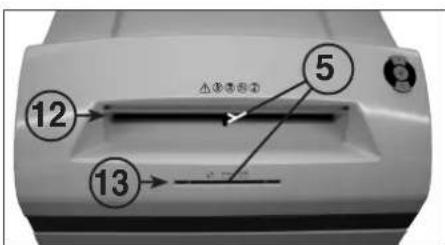
Рис. 3
ЭКСПЛУАТАЦИЯ
251 Wedoor Avenue fax +1 / 260 563-4575
Wabash, IN 46992 info@martinyale.com
www.martinyale.com
Germany MARTIN YALE INTERNATIONAL GmbH +49 / (0) 7544 60-0
Borzheimer Straße 6-12 fax +49 / (0) 7544 60-248
57 James Street, Halfway House sales@martinyale.co.za
Marshall Town, Johannesburg
P. O. BOX 1291, Houghton 204
www.martinyale.co.za
United Kingdom MARTIN YALE International +44 / (0) 1293 44 1900
Unit C 2 The Fleming Centre, Fleming Way fax +44 / (0) 1293 61 11 55
Crawley, West Sussex, RH10 9NN enquiries@intimus.co.uk
www.intimus.co.uk
France MARTIN YALE International S.A.R.L. +33 / (1) 70 00 69 00
40 Avenue Lingenfeld fax +33 / (1) 70 00 69 24
77200 Torcy contact@martinyale.fr
Spain MARTIN YALE Ibérica S.L. +34 / 9 02 22 31 31
Chaoyang District, Beijing
www.martinyale.com.cn



- BEDIENUNG
- BEDIENUNGSELEMENTE
- INITIATION
- AREA OF APPLICATION
- INSTALLATION
- OPERATION
- CONTROLS
- 3 = FORWARDS BUTTON (FIG. 1)
- 6 = CONTROL DISPLAY (FIG. 1)
- SWITCHING THE MACHINE ON
- MATERIAL FEED
- EMPTYING THE PAPER COLLECTION BAG (FIG. 4)
- EMPTYING THE
- CD/DVD COLLECTION CONTAINER (FIG. 4)
- DYNAMIC LOAD DISPLAY
- MALFUNCTIONS
- MATERIAL JAM IN THE MACHINE
- (AUTO REVERSE FUNCTION)
- PAPER JAM IN PAPER FEED SLOT (12)
- MATERIAL JAM IN CD/DVD FEED SLOT (13)
- SIMULTANEOUS MATERIAL FEED
- LIGHT BARRIER COVERED WHEN DOOR OPENED
- LIGHT BARRIER COVERED
- WHEN MACHINE TURNED ON
- MOTOR PROTECTION
- ELECTRICAL FAULT
- FAULT CHECK LIST
- MAINTENANCE / DISPOSING
- CLEANING THE PHOTOCELLS (FIG. 5)
- CUTTER MAINTENANCE (CROSS CUT)
- NOTE: THIS PROCEDURE IS ACKNOWLEDGED AS FOLLOWS TO TURN OFF THE DISPLAY AFTER THE CUTTERS HAVE BEEN OILED
- AUTOMATIC ENERGY SAVING
- DISPOSING OF THE MACHINE
- RECOMMANDATIONS IMPORTANTES DE SÉCURITÉ
- UTILISATION
- ELEMENTS DE COMMANDE
- DYSFONCTIONNEMENT ELECTRIQUE
- ELIMINATION DE LA MACHINE
- BEDIENING
- BEDIENINGSELEMENTEN
- UTILIZAÇÃO
- ELEMENTOS DE COMANDO
- USO
- ELEMENTI DI COMANDO
- ΧΕΙΡΙΣΜΟΣ
- ΣΤΟΙΧΕΙΑ ΧΕΙΡΙΣΜΟΥ
- BETJENING
- BETJENINGSELEMENTER
- OPSTART AF APPARATET
- T∅MNING AF OPSAMLINGSBEHOLDEREN FOR CD/DVD (AFB. 4)
- VEDLIGEHOLD SKÆREENHED (CROSS-CUT)
- 7 = KONTROLL-INDIKATOR (BILDE 1)
- INNKOBLING AV MASKINEN
- MATERIALMATING
- VEDLIKEHOLD / DEPONERING
- VEDLIKEHOLD SKJÆREVERKT∅Y (CROSS-CUT)
- HANDHAVANDE
- REGLAGE
- KÄYTTÖ
- HALLINTAELEMENTIT
- OBSŁUGA
- ELEMENTY OBSŁUGI
- OBSLUHA
- OVLÁDACÍ PRVKY
- KEZELÉS
- KEZELŐELEMEK
- A GÉP MEGSEMMISÍTÉSE
- РАБОТА С МАШИНАТА
- УПРАВЛЯВАЩИ ЕЛЕМЕНТИ
- ПОВРЕДИ
- ЭКСПЛУАТАЦИЯ
Brand : Intimus
Model : Pro 120 CC4
Category : Shredder