LS 1065 - Washing machine Saivod - Free user manual and instructions
Find the device manual for free LS 1065 Saivod in PDF.


| Product type | Front-loading washing machine |
| Brand | Saivod |
| Model | LS 1065 |
| Washing capacity | 7 kg |
| Maximum spin speed | 1200 rpm |
| Energy class | A+ |
| Annual water consumption | 10,000 L |
| Annual energy consumption | 180 kWh |
| Noise level (washing/spinning) | 59 dB / 77 dB |
| Power supply | 230 V ~ 50 Hz |
| Nominal power | 2000 W |
| Dimensions (W x D x H) | 60 x 60 x 85 cm |
| Net weight | 65 kg |
| Motor type | Asynchronous motor |
| Number of programs | 15 |
| Main programs | Cottons, Synthetics, Delicates, Wool, Quick 30 min, Prewash, Rinse + Spin |
| Additional functions | Delayed start, Child safety, Adjustable dirt level, Extra rinse option |
| Drum type | Stainless steel drum |
| Maintenance and cleaning | Regular cleaning of filter and door seal; available drum cleaning program |
| Safety | Child safety, automatic stop in case of jamming, anti-overflow system |
| Spare parts | Available on the official website and authorized retailers; guaranteed repairability for 10 years |
Frequently Asked Questions - LS 1065 Saivod
User questions about LS 1065 Saivod
0 question about this device. Answer the ones you know or ask your own.
Ask a new question about this device
Download the instructions for your Washing machine in PDF format for free! Find your manual LS 1065 - Saivod and take your electronic device back in hand. On this page are published all the documents necessary for the use of your device. LS 1065 by Saivod.
USER MANUAL LS 1065 Saivod
Thank you for choosing our product.
Please read these instructions carefully before connecting and using the machine. An awareness of how the machine operates will help guarantee its correct and safe use. The instructions also contain some useful information on the machine's functions that will help you get the most out of its use.
If you decide to sell or give the washing machine to someone else, remember to give the instruction book to the new owner.
INDEX

NOTES AND ADVICE FOR THE USER 67
DESCRIPTION OF THE MACHINE 7
INSTALLING THE MACHINE 8-10
• Unpacking and unblocking the machine 8
- Positioning and levelling the machine 9
• Connecting to the water supply system 9
• Connecting to the power supply 10
USING THE WASHING MACHINE 10-12
• Using the machine 10
• Use of detergents 11
• How to eliminate stains 12
• International clothing care symbols 12
MAINTENANCE 13-14
- Cleaning the machine 13
- Cleaning the filter 13
- Troubleshooting 14
MODEL:
PRODUCTION CODE:
DATE OF PURCHASE:
6

NOTES AND USEFUL ADVICE FOR THE USER
The washing machine has been designed for domestic use only, and as such any other use is regarded as improper and therefore potentially dangerous.
▼ Any modifications or attempts to alter the equipment in any way may be dangerous for the user and cause damage to the washing machine.
Due to the weight of the machine, special safety standards must be observed during handling.
The machine must not be used by unsupervised children.
▼ Any modifications to the water or electrical system must be carried out by authorised specialists.
When positioning the appliance, make sure that the power supply cable is not bent or squashed and that it is accessible.
Before operating the machine, remove all packing materials and the locking device used for protection during transport (protection screws). Failure to do this may result in serious damage to the machine and to your home.
If the machine is installed on a carpeted floor, make sure that air is free to circulate between

natural_image
Cartoon illustration of a distressed machine with steam rising, accompanied by a character holding a device (no text or symbols)Do not plug-in or unplug the machine with wet hands.

natural_image
Cartoon illustration of a smiling washing machine with electrical circuit symbols (no text or labels)The power supply socket to which the machine is connected must be earthed and must comply with the safety requirements
natural_image
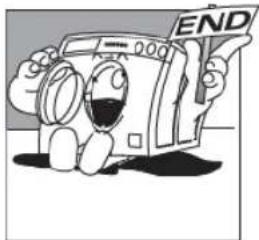
Cartoon illustration of a smiling car with a camera and 'END' sign, no text or symbols presentThe washing machine can only be opened after the led or the display has indicated the end of the cycle. On some models this is shown with the start button flashing.

natural_image
Cartoon illustration of a washing machine with a wrench and a close-up of its head, no text or symbols present.Unplug the washing machine from the power supply before servicing and cleaning.
the machine and the floor.
▼ The washing machine must never be overloaded.
When the machine is in operation, avoid any contact with the water coming out of the drain hose, as this may be hot. Do not touch the door glass as this may also heat up during the wash
Only wash clothes that are machine washable. In case of doubt, check the manufacturer's instructions found on the label attached to the clothes (see "Clothing cares symbols").
Before loading clothes into the washing machine, check that all the pockets are empty. Hard or pointed objects such as coins, pins, nails, screws or even stones can cause serious damage.
Clothes that have been dirtied with substances containing petroleum cannot be washed in the machine. If stains have been removed using vaporising products, before loading the clothes in the washing machine, wait until the substances have completely evaporated from the material.
▼ Do not use detergents formulated for hand washing, in that the excessive lather pro-

natural_image
Cartoon illustration of a distressed washing machine with steam rising from its side, surrounded by electrical equipment (no text or symbols)Extension leads or multiple adapters must not be used to connect the washing machine to the mains supply.

natural_image
Cartoon illustration of a distressed character holding a water bottle, with raindrops falling (no text or symbols)Do not expose the appliance to atmospheric agents.
natural_image
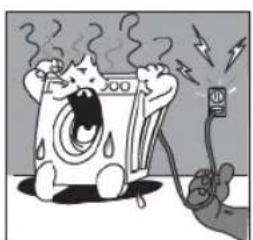
Cartoon illustration of a distressed washing machine emitting steam from a plug (no text or symbols)To disconnect the machine from the power supply, pull the plug and not the cable.

natural_image
Cartoon illustration of a smiling water dispenser with a faucet and pipe (no text or symbols)After the end of each washing cycle it is advisable to unplug the machine and chut-off the water supply.
duced could damage the internal components.
After washing rugs, blankets or any other long fibre fabrics, remember to check the filter and, if necessary, clean it.
▼ It is advisable to leave the door open at the end of the wash cycle.
Under no circumstances should any repairs to the machine be attempted by unqualified persons as this could result in serious damage and will invalidate the guarantee.
▼ Repairs to the washing machine must only be carried out by persons authorised to do so by the service centres. Only original spare parts may be used for repairs.
This appliance is marked according to the European directive 2002/96/EC on Waste Electrical and Electronic Equipment (WEEE). By ensuring this product is disposed of correctly, you will help prevent potential negative consequences for the environment and human health, which could otherwise be caused by inappropriate waste handling of
this product. The symbol on the product, or on the documents accompanying the product, indicates that this appliance may not be treated as household waste. Instead it shall be handed over to the applicable collection point for the recycling of electrical and electronic equipment. Disposal must be carried out in accordance with local environmental regulations for waste disposal. For more detailed information about treatment, recovery and recycling of this product, please contact your local city office, your household waste disposal service or the shop where you purchased the product.
THE MANUFACTURER WILL NOT BE HELD RESPONSIBLE FOR ANY ACCIDENTS THAT MAY RESULT FROM NON-COMPLIANCE WITH THE REQUIREMENTS OF SAFETY STANDARDS OR THIS INSTRUCTION MANUAL
DESCRIPTION OF THE MACHINE

The washing machine is a household appliance that can wash any type of fabric whenever you want.
The structure of the machine is fabricated in steel sheet, which has been worked using a special process and then enamelled in order to maintain its external appearance and protect it against corrosion.
The motor and all the other moving parts are built to ensure noiseless machine operation.
The large stainless steel drum is well placed to guarantee a good wash quality and prolong the life of the washing.
The easy to use control panel makes the selection of any wash or dry programme quick and simple (see control panel and table of programmes).
▼ The ample glass door makes loading and unloading easier.
The perfect machine balance is the result of many years of research aimed at finding the correct balance between the various moving parts.
A - Glass door
B - Filter
C - Adjustable feet
D - Top cover
E - Drum
F - Control panel
G - Detergent drawer

The machine must be installed by professionally qualified technicians, according to the manufacturer's indications. Incorrect installation may result in damage to persons and property.
The machine can be installed anywhere, provided the temperature in the place of installation is not below 3^ C and the cables and hoses at the rear of the machine are not crushed in any way.
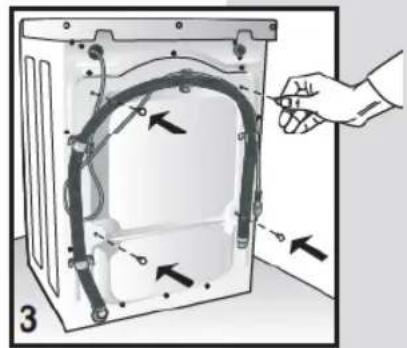
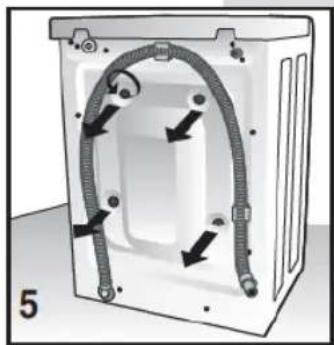
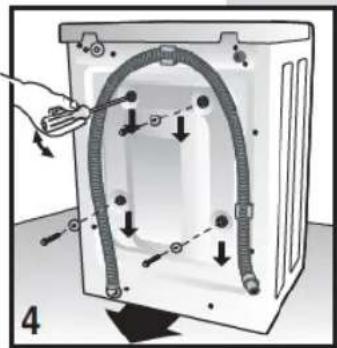
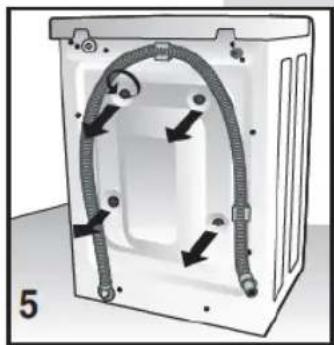
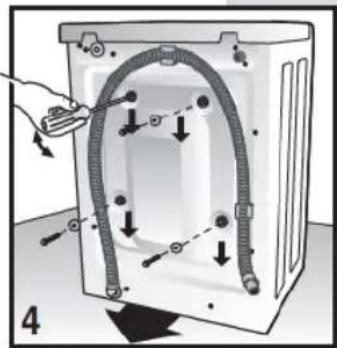
For transport purposes the swinging unit in the machine is blocked using 4 spacers with screws. Before starting the machine these spacers and lock screws must be removed, and stored for use in the event of a possible change of location.
Block off the holes with the plugs provided, which can be found in the bag containing the documents.
N.B. If the spacers fall into the inside of the machine, open the rear panel, recover them and then replace the panel.
For transport purposes the swinging unit in the machine is blocked using 4 spacers with screws. Before starting the machine these screws must be removed using a screwdriver.
Insert a screwdriver in the holes and proceed as shown in the figure to recover the 4 plastic spacers.
N.B. If the spacers fall into the inside of the machine, open the rear panel, recover them and then replace the panel.


natural_image
Diagram of a washing machine casing with coiled tubing and mounting points (no text or symbols)SETTING THE MACHINE LEVEL
natural_image
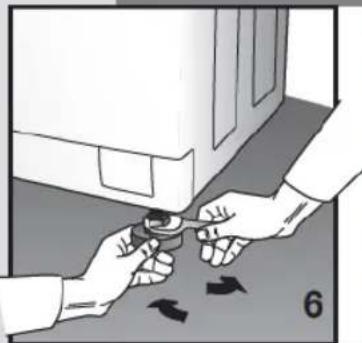
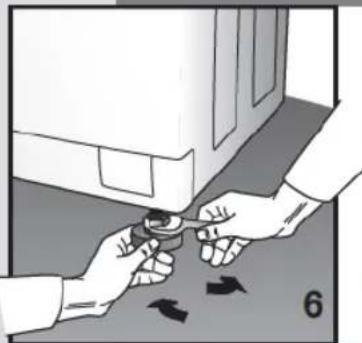
Illustration of hands using a tool to adjust or install a component, with arrows indicating motion (no text or symbols)After selecting a suitable position, level the machine carefully using the adjustable feet (Fig. 6). Particular care must be taken when selecting the position, levelling the washing machine and ensuring the safety of lock nuts.
If levelling is not carried out correctly, the washing machine will be unstable and noisy during operation, which may result in damage.
If the machine stands on a carpet floor, make sure that air can circulate freely between the washing machine and the floor itself.
It is not recommended that the machine be installed in locations where the temperature is liable to drop below freezing.
CONNECTION TO THE WATER SUPPLY SYSTEM

natural_image
Illustration of a hand adjusting a pipe with a valve, against a tiled wall (no text or symbols)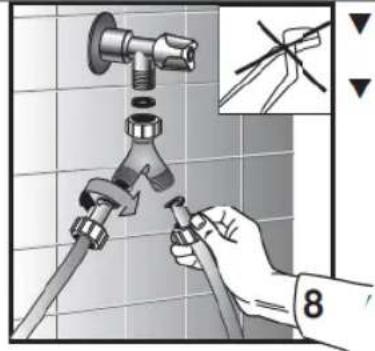
The mains water pressure must be between 0.05 and 1.00 MPa (0.5 - 10 bar.)
Before connecting the water fill hose, open the valve and allow a quantity of water to flow. This will censure that the supply pipes are free from impurities, such as sand or rust (this operation is very important when the washing machine is being connected to a new supply system or if the system has not been used for a long period of time).
Connect the water fill hose to a 3/4 threaded cold water outlet.

natural_image
Illustration of a hand adjusting a hose component with a handle, no text or symbols presentN.B. On electronic washing machines fitted with a dual solenoid valve (hot and cold water), connect the red hose to the hot water supply valve and the other hose to the cold water supply valve.
If a hot water supply is not available, both hoses must be connected to the cold supply using the fitting supplied (see fig. 8)
Place the filter washer supplied between the hose and the valve and hand tighten the connection as much as possible (fig. 7-8).
▼ Connect water feed hose (fig. 9).
N.B. New water hose set have to be used.

▼ The water supply tao must be fully open when washing.
The water drain hose must be placed at least 60 cm and not more than 90 cm from the floor (fig. 10).
If the drain hose is connected to a fixed drainage system, the free end must be inserted in a pipe of minimum internal diameter 40 mm.
The drain hose water connection to the drainage system must not be hermetically sealed, as this would cause air to accumulate and the water to siphon out.
If the waste water is to be discharged into a sink or washbasin, insert the hose in the special bracket supplied and hook it over the edge of the sink or washbasin. Then tie the hose ard bracket to a tap or similar (fig. 11). To avoid overflowing, the sink drain must be clear of obstructions and must be able to empty quickly.

natural_image
Illustration of a hand washing a sink with faucet, no text or symbols presentCONNECTING TO THE POWER SUPPLY
▼ Check that the voltage indicated on the technical data plate on the back of the washing machine is the same as that of the mains power supply (fig. 12).
The fuses, electric cables and wall socket must be rated to withstand the maximum power load indicated on the data plate.
On completion of the installation, the appliance must be connected to the mains supply through a two-pole switch.

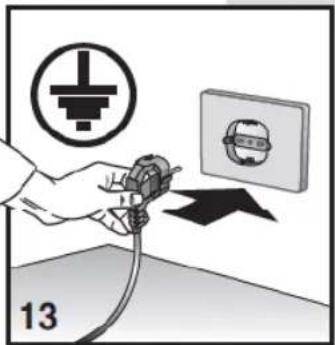
The power supply socket into which the washing machine will be plugged must be earthed. Otherwise, the manufacturer will not be held responsible for any accidents (fig. 13).
If the socket to which the machine will be connected is faulty or does not comply with the requirements, it must be replaced by a qualified electrician.
The washing machine must not be connected to the electricity supply using extension leads or multi-plug adapters.
During maintenance the washing machine must be unplugged from the power supply socket.
▼ Do not plug-in or unplug the machine with wet hands.
If the power cable is damaged in any way, contact the specialised technical service centre.
▼ Position the appliance so that the power supply cable can be accessed with ease, enabling it to be disconnected when required.

USING THE MACHINE
ADVICE BEFORE USING
Attention: Before running the machine loaded for the first time, we recommend that you run a short washing cycle with the machine empty.
This makes it possible to check operation of the machine and clean the drum.
Each time you use the machine:
▼ check that all water connections are tight, the drain hose is positioned correctly (see connection to the water supply) and the supply tap is open. (fig. 14).
▼ make sure that your hands are dry, then insert the plug into the power socket.
▼ divide the washing according to fabric type (check the labels on the clothes).
▼ check that the clothes to be washed have nothing n their pockets that might damage the washing, the washing machine or the filter


natural_image
Illustration of a hand opening a washing machine with a black arrow indicating clockwise motion (no text or symbols)USE OF DETERGENTS

The washing machine has a three-compartment detergent drawer.
compartment for pre-wash or soak powder detergent (1)
II compartment for no mal wash powder detergent (2)
compartment for fabric softener (3)
use a low-foam detergent and softener (if necessary), of the type indicated for automatic washing machines. Use the doses recommended on the package.

N.B. Excessive amounts of detergent may result in too much foam, and give a poor quality wash.
Insufficient amounts of detergent may mean that the washing does not come properly clean.
N.B. When filling the detergent compartment it is important that the detergent does not overflow into the compartment used for fabric softener, as this would result in a rinse cycle containing soap, which might leave the washing with white stains. Equally, do not allow the fabric softener to overflow into the detergent compartment, as this would reduce the cleaning capacity.
natural_image
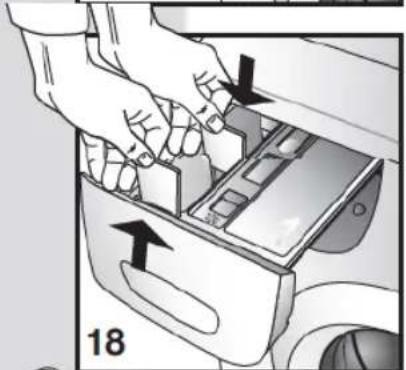
Illustration of a hand inserting a device into a car compartment, showing arrows indicating movement (no text or symbols present)N.B. When using a liquid detergent (recommended for programs without pre-wash) proceed as follows: remove the baffle from its housing at the front of compartment 2 and insert it in the guides near the centre of the same compartment.

natural_image
Illustration of a bottle pouring liquid into a car air vent (no text or symbols)▼ close the detergent drawer before starting the wash.

natural_image
Diagram of a device drawer with internal compartments and a directional arrow, no text or symbols presentAttention! Never remove the detergent drawer when the machine is running, as water may come out of it.
HOW TO REMOVE STAINS
Some stains cannot be removed by just washing in a washing machine. Before trying to remove any type of stain by hand, first try the removal procedure on a small area of hidden fabric starting from the edge of the stain and working inwards, this will prevent a dark ring from forming around the site of the stain. A few methods for removing stains are reported below.
WAX: scrape the wax using a blunt point in order not to damage the fabric. Then, with the fabric placed between two pieces of absorbent paper, run a hot iron over the stain.
▼ BALL-POINT PENS AND FELT-TIP PENS: clean using a soft cloth soaked in ethyl alcohol. Take care not to spread the mark.
DAMP AND MOULD: if the fabric supports the use of bleach, perform a wash cycle adding bleach. Other-wise, soak the soiled part in hydrogen peroxide (10 volumes) and leave for 10 to 15 minutes.
LIGHT SCORCH MARKS CAUSED BY IRONING: follow the instructions for mould and damp.
Rust: use products specially designed for rust stains, following the manufacturer's instructions written on the packet.
CHEWING GUM: rub ice over the mark, scrape away as much as possible and then rub with a cotton cloth soaked in acetone (alternatively, use nail varnish remover).
▼ PAINT: do not allow the paint to dry. Rub the area with the solvent recommended by the paint manufacturer (e.g. water, turps, trichloroethylene), apply soap and then rinse.
LIPSTICK: stains on cotton or wool can be eliminated using a cloth soaked in ether. Stains on silk require the use of trichloroethylene.
▼ NAIL VARNISH: place a sheet of absorbent paper on the stained material, then dampen the back of the fabric with acetone, frequently changing the paper placed over the stain. Continue like this until the stain has disappeared.
▼ TAR OR DIRT: spread some fresh butter over the stain, allow to stand and then wash with oil of turpentine.
▼ GRASS: delicately soap the stain, use diluted bleach. Good results can be obtained on woollen fabrics using 90% alcohol.
▼ Blood: put into soak in cold water with added salt, then wash with washing soap.
INTERNATIONAL CLOTHING CARE SYMBOLS
Before placing the clothes in the washing machine and selecting the wash programme, examine the symbols on the manufacturer's label. The table reported below will provide a useful guide to reading the symbols.

Normal wash

Delicate wash

Wash at max 95°C

60 Wash at max 60°C

40 Wash at max 40°C

30 Wash at max 30°C

Hand wash

Dry-clean only

Bleach in cold water

Do not bleach

Iron at up to max 200°

Iron at up to max 150°

Iron at up to nax 100°

Do not iron
A
Dry-clean using solvent
F
Dry-clean using benzine, pure alcohol and R113 only
P
Dry-clean using ethyl perchlorate, berzine, pure alcohol, R111 and R113.

Do not dry-clean
-
Dry flat
[Non-Text]
Dry hanging
[NO TEXT]
Dry on hanger
[Non-Text]
Dry in tumble dryer at normal temperature
©
Dry in tumble dryer at low temperature

Do not tumble-dry
CLEANING THE WASHING MACHINE

natural_image
Illustration of a hand using a washing machine to adjust or install a component (no text or symbols visible)The washing machine has been designed to reduce maintenance to a minimum. However, it is important that you remember to clean it regularly.
Before cleaning, make sure that the appliance has been disconnected from the power supply and that the water supply tap has been turned off.
The external structure and the parts of the washing machine in plastic must be cleaned with a soft damp cloth only.

natural_image
Illustration of a hand washing a sink with a tool, no text or symbols presentWARNING!! Never use chemicals, abrasive products, alcohol, soap, petrol or other solvents to clean the appliance as these may cause damage. (fig.21)
After washing, leave the door open for a little while to allow rubber parts to dry.
Wash out the detergent compartments from time to time. To do this, extract the detergent compartment and rinse it under running water, (fig. 22) then replace it.
REMOVING THE DETERGENT DRAWER

natural_image
Hand placing a device into a car drawer with an arrow indicating left motion (no text or symbols visible)▼ open the detergent drawer;
▼ press on the word "PUSH" with the right hand and pull out the drawer with the left hand (fig. 23)

natural_image
Diagram of a washing machine with a valve and arrow indicating rotation (no text or symbols)CLEANING THE FILTER
ATTENTION!!
Before starting the operations described below, make sure that the washing machine is empty. Do not remove the filter while the machine is running, or when full of water.
Place a cloth or flat plate under the filter to collect any water that may still be inside it. Open the filter door, unscrew the filter and remove it, turning in an anticlockwise direction (fig.24-25).
The filter must be cleaned periodically.
Rinse the filter under running water to eliminate all waste. Replace the filter, screwing in a clockwise direction and making sure it is hermetically sealed.

natural_image
Hand inserting a cable into a washing machine component (no text or symbols visible)HOW TO REMOVE STAINS
If the appliance is not working properly, check through the following troubleshooting list before calling for technical assistance. In some models malfunctions are shown with a code at the end of the cycle.
Code:
E:00 Carry out all checks listed in paragraphed marked with *
E:01 Carry out all checks listed in paragraphed marked with **
E:02 Technical malfunction "Call Customer Service"
E:03 Technical malfunction "Call Customer Service"
The washing machine does not work (warning lights are off) (Display off)
- check that:
1) The mains power supply is working
2) The plug is inserted correctly in the socket
3) The On/Off button has been pressed, or if there isn't any, that the programming knob is positioned on a program.
The washing machine does not work (warning lights are off) (Display on)\*
- check that:
1) The program has been selected
2) The glass door is properly closed
3) The "Start" button has been pressed (electronic models only)
4) check the indications provided under "The washing machine does not fill with water"
The washing machine does not fill with water\*:
- check that:
1) There is water in the water supply system
2) The water supply hose is connected to the washing machine
3) The water supply tap is open
4) The filter is not blocked. If it is, clean the filter after unplugging the appliance from the power supply
The washing machine continuously fills and drains the water\*\*:
- check that:
1) The drain hose has been installed at the proper height (60-90 cm)
2) The end of the drain hose is not under water
The washing machine does not drain or spin\*\*:
- check that:
1) The drain hose is properly connected
2) The drain hose is not bent
3) The drainage filter is not blocked
4) The no-spin function has not been selected
5) The "stop with water" function has not been selected.
The washing machine vibrates and is noisy
- check that:
1) All the blocking elements used for transpor-
tation have been removed.
2) the washing machine is level
3) Bulky items such as sheets, tablecloths etc. are not all in one part of the drum
The glass door does not open
- check that:
1) the wash cycle is finished.
2) the "stop with water" function has not been selected (automatic on some models).
The washing has not been properly spun
- check that:
1) The washing is evenly distributed in the drum
2) The correct spin speed has been selected
The washing machine stops during the wash
- check that:
1) The mains power supply is working
There is still a lot of detergent in the compartment
- check that:
1) The water supply tap is open
2) The filter between the tap and the supply hose is clean
Thewashing is not clean at the end of the wash cycle
- check that:
1) The drum is not overloaded
2) The correct amount of detergent has been used
3) The correct programme has been selected
The washing has shrunk or faded
- check that:
1) The correct washing programme has been selected
2) The correct washing temperature has been selected
Thewashing machine does not dry (washer-dryer models only)
• Make sure that:
1) The water supply tap is open
2] The drainage filter is clean
3) The washing machine is turned on (spy light or display on)
4) The drying program has been selected
5) The drying time has been set
If, after trying the above remedies, the machine still does not work, refer the fault to the nearest authorised service centre.
When calling the service centre, inform them of the machine model, the serial number and the type of fault. The data relating the appliance can be found on the rating plate affixed to the filter door.
This information will allow the technical service staff to select the appropriate spare parts, thus making the repair service quicker and more efficient.
Cher Client,
natural_image
Cartoon illustration of a distressed airbag with steam rising, next to a falling object (no text or symbols)natural_image
Cartoon illustration of a smiling washing machine with a hand pointing at it, no text or symbols present.natural_image
Cartoon illustration of a distressed washing machine with steam rising, surrounded by medical equipment (no text or symbols)natural_image
Cartoon character reacting to a falling object with raindrops, no text or symbols presentnatural_image
Cartoon illustration of a smiling computer with a 'END' sign, no text or symbols presentnatural_image
Cartoon illustration of a smiling refrigerator with a wrench and a wrench, next to a small robot (no text or symbols)natural_image
Cartoon illustration of a washing machine emitting steam and a plug, with no visible text or symbolsnatural_image
Cartoon illustration of a smiling car with open eyes and a water faucet, no text or symbols present
natural_image
Diagram of a washing machine casing with coiled tubing and directional arrows indicating flow (no text or symbols)NIVELLEMENT DE LA MACHINE À LAVER LE LINGE
natural_image
Illustration of hands using a tool to adjust or install a device, with arrows indicating motion (no text or symbols present)natural_image
Illustration of a hand adjusting a pipe with a valve, against a tiled wall (no text or symbols)
natural_image
Illustration of a hand adjusting a hose with a handle, no text or symbols presentnatural_image
Illustration of a hand using a faucet to clean or wash the sink in a tiled bathroom (no text or symbols)natural_image
Illustration of a hand pressing down inside a washing machine (no text or symbols)UTILISATION DES DETERGENTS

natural_image
Person inserting a device into a car compartment with arrows indicating direction (no text or symbols)natural_image
Illustration of a bottle pouring liquid into a device with a magnified view (no text or symbols)natural_image
Diagram of a device drawer with internal compartments and a directional arrow, no text or symbols presentnatural_image
Illustration of a hand using a washing machine to adjust or install a door (no text or symbols visible)natural_image
Illustration of a hand washing a sink with a water dispenser (no text or symbols)natural_image
Hand placing a device into a drawer with an arrow indicating left motion (no text or symbols visible)natural_image
Diagram of a mechanical device with a rotating arrow and label '24' (no readable text or symbols)NETTOYAGE DU FILTRE
natural_image
Hand inserting a cable into a washing machine component (no text or symbols visible)SOLUTION DES PROBLÈMES
natural_image
Cartoon illustration of a distressed open box with steam rising, being hit by a person holding a phone (no text or symbols)natural_image
Cartoon illustration of a smiling washing machine with a hand pointing at it, no text or symbols present.natural_image
Cartoon illustration of a smiling car with a camera and 'END' sign, no text or symbols presentnatural_image
Cartoon illustration of a smiling washing machine with a wrench and a small robot nearby (no text or symbols)natural_image
Cartoon illustration of a distressed washing machine with steam rising from its side, surrounded by other appliances (no text or symbols)natural_image
Cartoon illustration of a distressed character holding a large object with falling droplets (no text or symbols)natural_image
Cartoon illustration of a washing machine emitting steam from a plug, with no visible text or symbolsnatural_image
Cartoon illustration of a smiling character with glasses and a water faucet, no text or symbols present


natural_image
Diagram of a washing machine casing with coiled tubing and mounting fixtures (no text or symbols)natural_image
Illustration of hands holding a small mechanical component with directional arrows indicating motion (no text or symbols)natural_image
Hand installing a pipe fitting on a tiled wall, no text or symbols visible
natural_image
Illustration of a hand adjusting a hose with a valve, no text or symbols presentnatural_image
Illustration of a hand washing a sink with faucet, no text or symbols presentCONEXIÓN ELÉCTRICA
natural_image
Illustration of a hand opening a washing machine with a black arrow indicating left motion (no text or symbols)USO DE LOS DETERGENTES

natural_image
Illustration of a bottle pouring liquid into a car interior (no text or symbols)
natural_image
Diagram of a device drawer with internal compartments and an arrow indicating direction (no text or symbols)CÓMO ELIMINAR ALGUNAS MANCHAS
natural_image
Illustration of a hand using a washing machine to adjust or install a component (no text or symbols visible)natural_image
Illustration of a hand washing a sink with a tool, no text or symbols presentnatural_image
Hand placing a device into a drawer with an arrow indicating left motion (no text or symbols visible)natural_image
Diagram of a washing machine with a valve and arrow indicating rotation (no text or symbols)LIMPIEZA DEL FILTRO
ATENCIÓN!!
natural_image
Hand inserting a component into a water tank, no text or symbols visiblenatural_image
Cartoon illustration of a distressed washing machine with steam rising, accompanied by a character holding a device (no text or symbols)natural_image
Cartoon illustration of a smiling washing machine with electrical circuit symbols (no text or labels)natural_image
Cartoon illustration of a distressed washing machine with steam rising from its side, surrounded by steam and a distressed monitor (no text or symbols)É proibido ligar a máquina de lavar roupa à tomada eléctrica utilizando extensões ou fichas múltiplas.

natural_image
Cartoon illustration of a distressed character holding a water bottle, with raindrops falling (no text or symbols)natural_image
Cartoon illustration of a smiling computer with a camera and 'END' sign (no text or symbols on the device itself)natural_image
Cartoon illustration of a washing machine with a wrench and a close-up of its head, no text or symbols present.natural_image
Cartoon illustration of a washing machine emitting steam from a plug (no text or symbols)natural_image
Cartoon illustration of a smiling character with a pipe and water droplet, no text or symbols present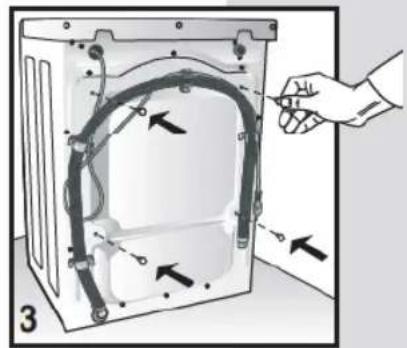


natural_image
Diagram of a washing machine casing with coiled tubing and mounting points (no text or symbols)COMO COLOCAR A MÁQUINA DE LAVAR ROUPA EM POSIÇÃO PERFEITAMENTE HORIZONTAL

natural_image
Illustration of hands using a tool to adjust or install a component, with arrows indicating motion (no text or symbols present)natural_image
Hand holding a pipe with a valve above a tiled wall, no text or symbols visible
natural_image
Illustration of a hand adjusting a hose with a handle, no text or symbols presentnatural_image
Illustration of a hand washing a sink with a faucet, no text or symbols presentLIGAÇÃO ELÉCTRICA
natural_image
Illustration of a hand pressing down inside a washing machine (no text or symbols)natural_image
Diagram showing a bottle pouring liquid into a car interior with a smartphone inside (no text or symbols)natural_image
Diagram of a car door opening with internal compartments and a directional arrow indicating movement (no text or symbols)natural_image
Illustration of a hand using a washing machine to adjust or install a component (no text or symbols visible)natural_image
Illustration of a hand washing a sink with a water dispenser (no text or symbols)natural_image
Hand placing a device into a drawer with an arrow indicating left motion (no text or symbols visible)natural_image
Diagram of a mechanical device with a rotating arrow and label '24' (no readable text or symbols)LIMPEZA DO FILTRO
natural_image
Hand inserting a cable into a washing machine component (no text or symbols visible)natural_image
Cartoon illustration of a distressed open box with steam rising, being heated by a person holding a phone (no text or symbols present)natural_image
Cartoon illustration of a smiling washing machine with a hand pointing at it, no text or symbols present.natural_image
Cartoon illustration of a distressed washing machine with steam rising, surrounded by medical equipment (no text or symbols)natural_image
Cartoon character holding a large object with raindrops, no text or symbols presentnatural_image
Cartoon illustration of a smiling car with a camera and 'END' sign, no text or symbols presentnatural_image
Cartoon illustration of a washing machine with a wrench and a close-up of its head, no text or symbols present.natural_image
Cartoon illustration of a distressed washing machine emitting steam from a plug (no text or symbols)natural_image
Cartoon illustration of a smiling character holding a water tap, with no text or symbols present.

natural_image
Diagram of a washing machine casing with coiled tubing and directional arrows indicating flow (no text or symbols)natural_image
Illustration of hands using a tool to adjust or install a component, with arrows indicating motion (no text or symbols)natural_image
Illustration of a hand adjusting a pipe with a valve, against a tiled wall (no text or symbols)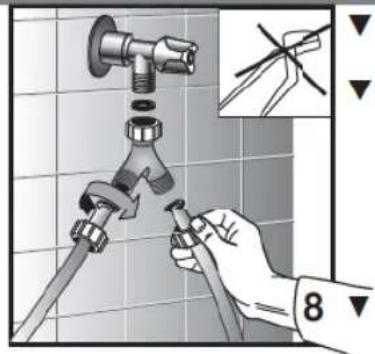
natural_image
Illustration of a hand adjusting a hose with a valve, no text or symbols presentnatural_image
Illustration of a hand washing a sink with a faucet, no text or symbols presentnatural_image
Illustration of a hand opening a washing machine with a black arrow indicating clockwise motion (no text or symbols)WASCHMITTEL

natural_image
Illustration of a bottle pouring liquid into a device with a bag partially inserted (no text or symbols visible)natural_image
Diagram of a device drawer with internal compartments and a directional arrow, no text or symbols presentnatural_image
Illustration of a hand using a washing machine to adjust or install a door (no text or symbols visible)natural_image
Illustration of a hand washing a sink with a tool, no text or symbols presentnatural_image
Hand placing a device into a drawer with an arrow indicating left motion (no text or symbols)natural_image
Diagram of a mechanical device with a rotating arrow indicating motion, no text or symbols presentnatural_image
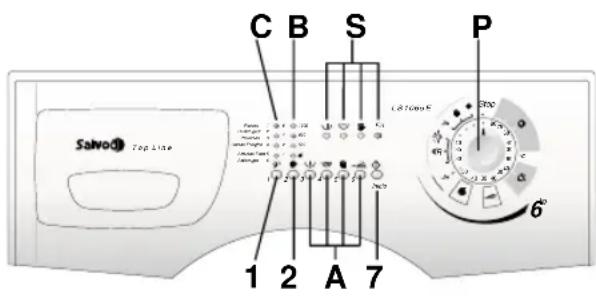
Hand inserting a cable into a washing machine component (no text or symbols visible)1 Delayed start button
2 Spin selector button
A Optional function buttons
B Spin speed indicator leds
P Program and temperature knob
S Programme status led
C Delayed start indicator led
7 Start button

USING THE WASHING MACHINE
WASH CYCLE
(follow these instructions and the washing machine will run the selected wash cycle)
- Open the door.
- Load the washing in the drum and close the door.
Warning: Do not overload the machine. It is not advisable to wash items that absorb large quantities of water such as carpets.
-
Add a low-suds detergent and softener designed for automatic washing machines in the respective compartments of the detergent drawer (see chapter "USE OF DETERGENTS).
-
Close the detergent drawer. Do not open the drawer while the machine is working as this may cause water to spill out.
-
Rotate the programmer knob (P) to select the required program and temperature according to the type of fabric to wash (see: "PROGRAMME TABLES"), then press the start button (7) and the cycle will start.
-
Select the required spin speed by pressing button (2) (see "VARIABLE SPIN").
-
Select the (A) buttons with the functions required (see "OPTIONAL FUNCTIONS"). The buttons pressed will light-up.
-
Press button (1) if required (see "DELAYED START").
-
Press button (7) to start the wash cycle (see "START BUTTON").
-
After the wash cycle has finished, turn the programme knob to the stop position.
-
Open the door and remove the washing.
- With dry hands, unplug the washing machine from the mains supply.
- Close the water feed valve.
MONITORING THE WASH
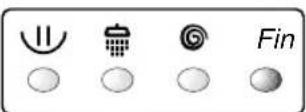
The figure alongside shows the 4 main functions of a wash cycle: PREWASH-MAIN WASH, RINSES, SPIN, END. During the cycle, each of these functions is highlighted by a led informing the user what the washing machine is doing at that moment. After the spin phase, the corresponding led will stay lit for approximately 2 minutes; this is the time lapse necessary before the door can be opened. At this point, the "END" led will light-up.
2
USING THE WASHING MACHINE
▼ VARIABLE SPIN
The machine offers a wide selection of spin speeds that can be selected beforehand according to the wash programme. To change the spin speed, simply press button (2) to select the required speed. The corresponding speed led will light-up each time the button is pressed. To exclude the spin, select the led corresponding to symbol ☐, if present, or the writing "no-spin".

N.B. the maximum spin speed will vary according to the model and is indicated by the Leds on the machine. The maximum spin speed that can be selected for each programme is indicated by the leds that light-up automatically when the wash programme is selected.
Spin load imbalance control: This washing machine is equipped with a special electronic control system for correctly balancing the wash load. Prior to each spin, the system ensures that the washing is evenly distributed in the drum.
If the washing is not evenly distributed, the final spin speed is reduced, and if the load is very unbalanced, the spin is not effected.
1000
800
500
○
▼ DELAYED START
The machine is fitted with a delayed start function. This allows the washing machine to be programmed to start the wash cycle up to 8 hours later. The delay in hours can be selected as follows: press the button (1) to set a delay of 1, 2, 4, 8, hours. Press START (7). the button (1) signalling that the function has been activated. The machine will wait for the number of hours set to elapse and then start the wash cycle automatically.
▼ START BUTTON
Press this button to start the wash cycle. The button (7) to indicate that the wash cycle has started.
▼ PROGRAMMER KNOB "STOP"
The stop function resets the washing machine. If, for any reason, you want to change the wash programme or add more washing to the load during the wash cycle, simply place the programmer knob in position "STOP". Then re-position the knob on the new programme and press the "START" button.
Warning!! only use this function if strictly necessary and then only if the programme to reset has been running for a few minutes. Before opening the door after a reset, wait 2 minutes for the locking mechanism to release.

OPTIONAL FUNCTIONS

If one of the following buttons is selected, it will light up. If a function button has been pressed by mistake or is no longer required, the option can be cancelled by simply repressing the button.
PREWASH
Press this button to obtain a short prewash of maximum temperature 40^ C and approximately 10 minutes duration. This function can only be used with "COTTON, SYNTHETIC and DAILY" programs.

ENERGETIC WASH
When this button is pressed, the washing machine will run a wash cycle at the set temperature, though with a longer duration. The button is enabled for the "COTTON" and "SYNTHETICS" programs.

EXTRA RINSE

The washing machine has been designed to reduce water consumption to a minimum. In very soft water areas, or in the case where detergent residues are noticed at the end of the wash cycle, pressing this button will add one more rinse to the program.
ANTI-CREASE
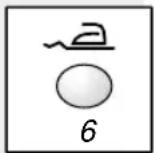
When this button is pressed, at the end of the wash cycle, the items loaded in the washing machine will continue to rotate for a further thirty minutes to reduce creasing. With this function enabled, the spin speed is 800 rpm. The function cannot be activated for the "WOOL" program.
NB. The use of this function depends on the type of programme selected. Consequently, if the wash programme does not include this function, the button cannot be enabled (see "PROGRAMME TABLE").
PROGRAMME TABLES
| PROGRAMMER KNOB | WASH TEMPERATURE | LABELS | FABRIC TYPE | Detergent compartments | BUTTONS ENABLED | |||
| COTTON | 90° |  | Heavily soiled white cotton fabrics with organic stains. |  | ● | ● | ● | ● |
| COTTON | 75° | 75 | Sheets, shirts, tablecloths, towels that are resistant and heavily soiled. |  | ● | ● | ● | ● |
| COTTON * | 60° | 60 | For shirts, tablecloths, towels that are resistant and normally soiled. |  | ● | ● | ● | ● |
| COTTON | 40° | 40 | White and coloured fabrics that are resistant and heavily soiled |  | ● | ● | ● | ● |
| COTTON | 30° | 30 | Delicate coloured fabrics that are lightly soiled |  | ● | ● | ● | ● |
| SYNTHETICS | 60° | 60 | Colourfast synthetic fabrics that are heavily soiled |  | ● | ● | ● | ● |
| SYNTHETICS | 40° | 40 | Delicate coloured synthetic fabrics that are lightly soiled |  | ● | ● | ● | ● |
| SYNTHETICS | 30° | 30 | Delicate coloured synthetic fabrics that are lightly soiled |  | ● | ● | ● | ● |
| DELICATES | 40° | 40 | Delicate cotton, viscous and mixed delicate fabrics |  | ○ | ○ | ○ | ● |
| DELICATES | 30° | 30 | Delicate cotton, viscous and mixed delicate fabrics |  | ○ | ○ | ○ | ● |
| WOOL *** | 40° | Machine washable wool |  | ○ | ○ | ○ | ○ | |
| WOOL | 30° |  | Machine washable wool | ○ |  | ○ |  | |
| WOOL | COLD | —— | Machine washable wool | ○ |  | ○ |  | |
| HAND WASH | 30° |  | Hand washable fabrics | ○ | ○ | ○ | ○ | |
| QUICK WASH | 35° |  | Delicate cotton, viscous and mixed delicate fabrics lightly soiled | ○ |  | ○ |  | |
| DAILY WASH | 40° |  | Delicate cotton fabrics, delicate coloureds that are lightly soiled | ● |  | ○ |  | |
| COLD WASH | COLD |  | Delicate fabrics | ○ |  | ● |  | |
| RINSES | —— |  | To rinse and refresh the washing | ○ |  | ● |  | |
| DRAIN AND SPIN | —— |  | Drain and final spin | ○ |  | ○ |  | |

FUNCTION ENABLED FUNCTION DISABLED
OPTIONAL WITH PREWASH BUTTON PRESSED
* Reference programme for energy classification purposes according to standard EN 60456

With Energetic Wash button selected
*** Reference program for pure new wool
"EASY LOGIC" TECHNOLOGY
The electronic washing machine is equipped with a special system that automatically recognises the amount of washing loaded in the drum. The machine can thus regulate the amount of water to use for the wash and proportion the wash time accordingly, thus saving water, time and energy. In the case where the amount of washing is less than the maximum recommended load (see technical characteristics table), the quantity of water used for the wash will be reduced by 2 litres for each kg less of washing. In the case of a half-load or less, the machine will automatically carry out one rinse less than programmed. N.B. This function is only activated for cotton programmes.
TECHNICAL CHARACTERISTICS
| MODEL → | LS 1065 E | |
| Dimensions: | Width cm.: | 59.5 |
| Height cm.: | 85.5 | |
| Depth cm.: | 55.0 | |
| Maximum recommended load during washing: | 6.0 Kg | |
| 4.0 Kg | ||
| 3.0 Kg | ||
| 1.5 Kg | ||
| Max. spin: (rpm) | 1000 | |
| Water pressure: | min. 0,05 MPa - max. 1 MPa | |
| Max. absorbed power/Electrical connection | see rating plate | |
FONCTIONS OPTIONNELLES
▼ "STOP" EN EL PROGRAMADOR
TECNOLOGÍA "EASY LOGIC"
▼ "STOP" NO PROGRAMADOR
FUNÇÕES OPCIONAIS

▼ "STOPP" AUF DEM PROGRAMMSCHALTER
ZUSATZFUNKTIONEN


- INDEX
- 6
- NOTES AND USEFUL ADVICE FOR THE USER
- DESCRIPTION OF THE MACHINE
- SETTING THE MACHINE LEVEL
- CONNECTION TO THE WATER SUPPLY SYSTEM
- N.B. New water hose set have to be used.
- CONNECTING TO THE POWER SUPPLY
- USING THE MACHINE
- ADVICE BEFORE USING
- USE OF DETERGENTS
- HOW TO REMOVE STAINS
- INTERNATIONAL CLOTHING CARE SYMBOLS
- CLEANING THE WASHING MACHINE
- REMOVING THE DETERGENT DRAWER
- CLEANING THE FILTER
- ATTENTION!!
- The washing machine does not work (warning lights are off) (Display off)
- The washing machine does not work (warning lights are off) (Display on)\*
- The washing machine does not fill with water\*:
- The washing machine continuously fills and drains the water\*\*:
- The washing machine does not drain or spin\*\*:
- The washing machine vibrates and is noisy
- The glass door does not open
- The washing has not been properly spun
- The washing machine stops during the wash
- There is still a lot of detergent in the compartment
- Thewashing is not clean at the end of the wash cycle
- The washing has shrunk or faded
- Thewashing machine does not dry (washer-dryer models only)
- Cher Client,
- NIVELLEMENT DE LA MACHINE À LAVER LE LINGE
- UTILISATION DES DETERGENTS
- NETTOYAGE DU FILTRE
- SOLUTION DES PROBLÈMES
- CONEXIÓN ELÉCTRICA
- USO DE LOS DETERGENTES
- CÓMO ELIMINAR ALGUNAS MANCHAS
- LIMPIEZA DEL FILTRO
- ATENCIÓN!!
- COMO COLOCAR A MÁQUINA DE LAVAR ROUPA EM POSIÇÃO PERFEITAMENTE HORIZONTAL
- LIGAÇÃO ELÉCTRICA
- LIMPEZA DO FILTRO
- WASCHMITTEL
- USING THE WASHING MACHINE
- WASH CYCLE
- MONITORING THE WASH
- 2
- ▼ VARIABLE SPIN
- ▼ DELAYED START
- ▼ START BUTTON
- ▼ PROGRAMMER KNOB "STOP"
- OPTIONAL FUNCTIONS
- PREWASH
- ENERGETIC WASH
- EXTRA RINSE
- ANTI-CREASE
- PROGRAMME TABLES
- "EASY LOGIC" TECHNOLOGY
- FONCTIONS OPTIONNELLES
- ▼ "STOP" EN EL PROGRAMADOR
- TECNOLOGÍA "EASY LOGIC"
- ▼ "STOP" NO PROGRAMADOR
- FUNÇÕES OPCIONAIS
- ▼ "STOPP" AUF DEM PROGRAMMSCHALTER
- ZUSATZFUNKTIONEN
Brand : Saivod
Model : LS 1065
Category : Washing machine