
FZ 83 C.1 IX/HA - Freezer HOTPOINT - Free user manual and instructions
Find the device manual for free FZ 83 C.1 IX/HA HOTPOINT in PDF.
| Product type | Built-in electric oven |
| Brand | Hotpoint |
| Model | FZ 83 C.1 IX/HA |
| Dimensions (W x H x D) | 43,5 x 32 x 41,5 cm |
| Interior volume | 158 L |
| Power supply | 220-240 V ~ 50 Hz, 2800 W |
| Installation type | Built-in under counter or column |
| Cooking programs | Traditional, Pastry, Fast Cooking, Multi-cooking, Pizza, BBQ, Gratin, Steaming (40°C) |
| Adjustable thermostat | 60°C – MAX (except specific programs) |
| Electronic programmer | Timer, cooking duration, delayed end of cooking |
| Interior lighting | Bulb 25 W, E14 base, replaceable |
| Door | Removable for cleaning, double glazing |
| Included accessories | Rack, dripping pan, rotisserie (depending on model) |
| Cleaning | Manual, enameled, non-abrasive detergents |
| Safety | Automatic shut-off at end of cooking, fan cooling |
| Energy consumption | Energy class not specified |
| Approximate weight | 30 kg |
Frequently Asked Questions - FZ 83 C.1 IX/HA HOTPOINT
User questions about FZ 83 C.1 IX/HA HOTPOINT
0 question about this device. Answer the ones you know or ask your own.
Ask a new question about this device
Download the instructions for your Freezer in PDF format for free! Find your manual FZ 83 C.1 IX/HA - HOTPOINT and take your electronic device back in hand. On this page are published all the documents necessary for the use of your device. FZ 83 C.1 IX/HA by HOTPOINT.
USER MANUAL FZ 83 C.1 IX/HA HOTPOINT
Electrical connections
Description of the appliance, 16
Overall view
Control panel
Start-up and use, 17
Starting the oven
Data plate
The electronic cooking programmer, 18
Cooking modes, 19-21
Cooking modes
Practical cooking advice
Cooking advice table
Precautions and tips, 22
General safety
Disposal
Respecting and conserving the environment
Assistance
Maintenance and care, 23
Switching the appliance off
Cleaning the appliance
Cleaning the oven door
Replacing the light bulb
Sliding Rack Kit assembly

Hotpoint
ARISTON
GB
! Before placing your new appliance into operation please read these operating instructions carefully. They contain important information for safe use, for installation and for care of the appliance.
! Please keep these operating instructions for future reference. Pass them on to possible new owners of the appliance.
Positioning
! Keep packaging material out of the reach of children. It can become a choking or suffocation hazard. see Precautions and tips).
! The appliance must be installed by a qualified person in compliance with the instructions provided. Incorrect installation may cause harm to persons, animals or may damage property.
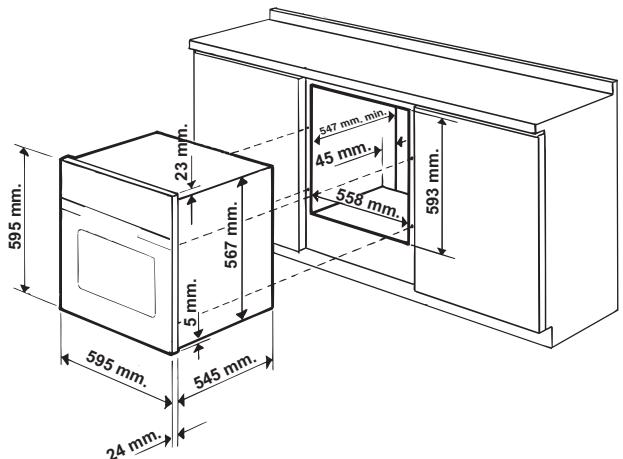
Fitting the appliance
Use the appropriate cabinet to ensure that the appliance functions properly.
- The panels adjacent to the oven must be made of heat-resistant material.
- Cabinets with a veneer exterior must be assembled with glues which can withstand temperatures of up to 100^ .
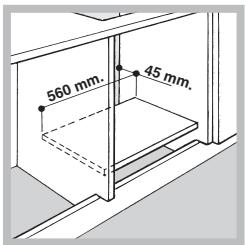
- To install the oven under the counter (see diagram) and in a kitchen unit, the cabinet must have the following dimensions:
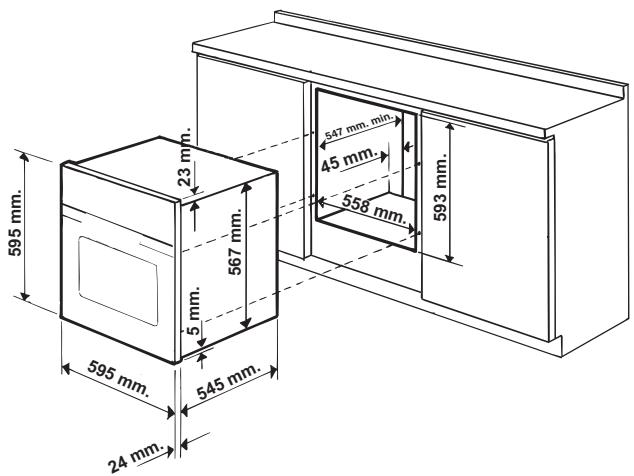
! The appliance must not come into contact with electrical parts once it has been installed. The consumption indications on the data plate have been calculated for this type of installation.
Ventilation
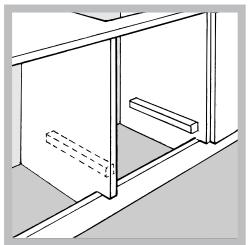
To ensure good ventilation, the back panel of the cabinet must be removed. It is advisable to install the oven so that it rests on two strips of wood, or on a completely flat surface with an opening of at least 45 × 560 ~mm (see diagrams).
Centring and fastening
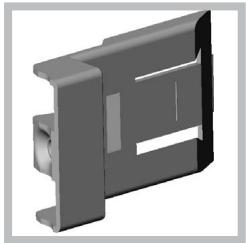
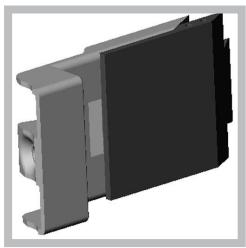
Position the 4 tabs on the side of the oven according to the 4 holes of the outer frame. Adjust the tabs according to the thickness of the cabinet side panel, as shown below:
thickness of 20~mm : take off the removable part of the tab (see diagram)
thickness of 18 mm: use the first groove, which has already been set in the factory (see diagram)
thickness of 16 mm: use the second groove (see diagram)
Secure the appliance to the cabinet by opening the oven door and putting 4 screws into the 4 holes of the outer frame.
! All parts which ensure the safe operation of the appliance must not be removable without the aid of a tool.
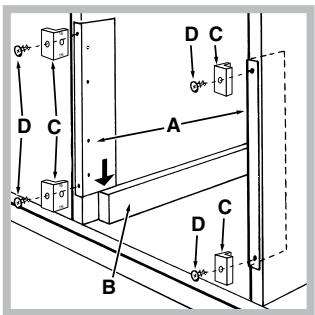
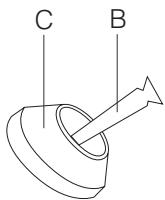
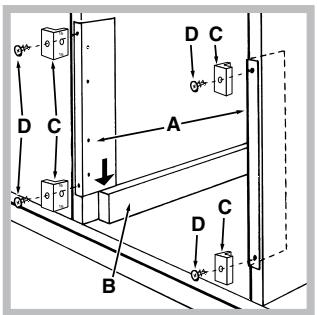
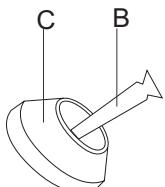
Centring and fixing*
- Position brackets "A" against oven support "B".
-
Position tabs "C" against brackets "A". If the thickness of the cabinet side panel:
-
is 16 ~mm thick: place the tab so that the number 16 written on it is facing you;
- is 18 ~mm thick: place the tab so that the part without any text is facing you;
-
is 20 ~mm thick: do not fit the tab.
-
Fix the brackets and tabs onto the edge of the cabinet side panel using screws "D".
- Fix the oven to the cabinet using the screws and plastic washers "E".
Electrical connections
! Ovens equipped with a three-pole power supply cable are designed to operate with alternating current at the voltage and frequency indicated on the data plate located on the appliance (see below).
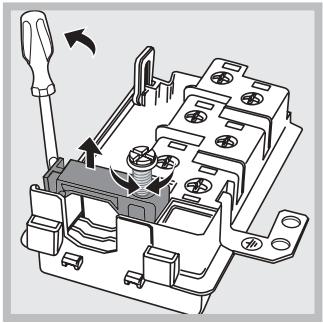
Fitting the power supply cable
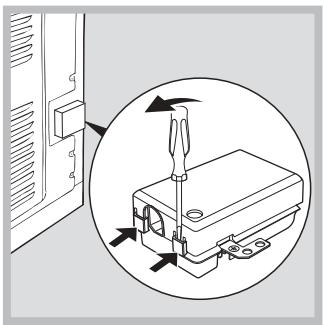
- Open the terminal board by inserting a screwdriver into the side tabs of the cover. Use the screwdriver as a lever by pushing it down to open the cover (see diagram).
- Loosen the cable clamp screw and remove it, using a screwdriver as a lever (see figure).
- Remove the wire contact screws L-N- 1± then fasten the wires under the screw heads, respecting the colour code: Blue (N), Brown (L) and Yellow-Green Verde (±) .
Connecting the supply cable to the mains
Install a standardised plug corresponding to the load indicated on the data plate (see side).
The appliance must be directly connected to the mains using an omnipolar circuit-breaker with a minimum contact opening of 3mm installed between the appliance and the mains, suitable for the load indicated and complying with current electrical regulations (the earthing wire must not be interrupted by the circuit-breaker). The supply cable must not come into contact with surfaces with temperatures higher than 50^ .
! The installer must ensure that the correct electrical connection has been made and that it is compliant with safety regulations.
Before connecting to the power supply, make sure that:
- The appliance is earthed and the plug is compliant with the law.
- The socket can withstand the maximum power of the appliance, which is indicated on the data plate (see below).
- The voltage must be in the range between the values indicated on the data plate (see below).
- The socket is compatible with the plug of the appliance. If the socket is incompatible with the plug, ask an authorised technician to replace it. Do not use extension cords or multiple sockets.
! Once the appliance has been installed, the power supply cable and the electrical socket must be easily accessible.
! The cable must not be bent or compressed.
! The cable must be checked regularly and replaced by authorised technicians only (see Assistance).
! The manufacturer declines any liability should these safety measures not be observed.
- Only on certain models.
GB
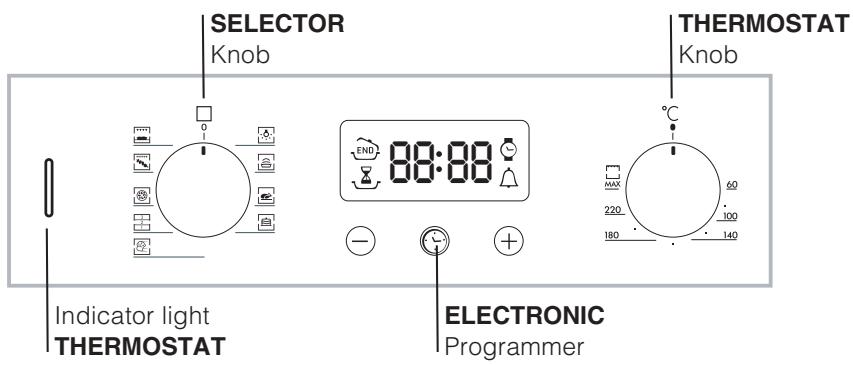
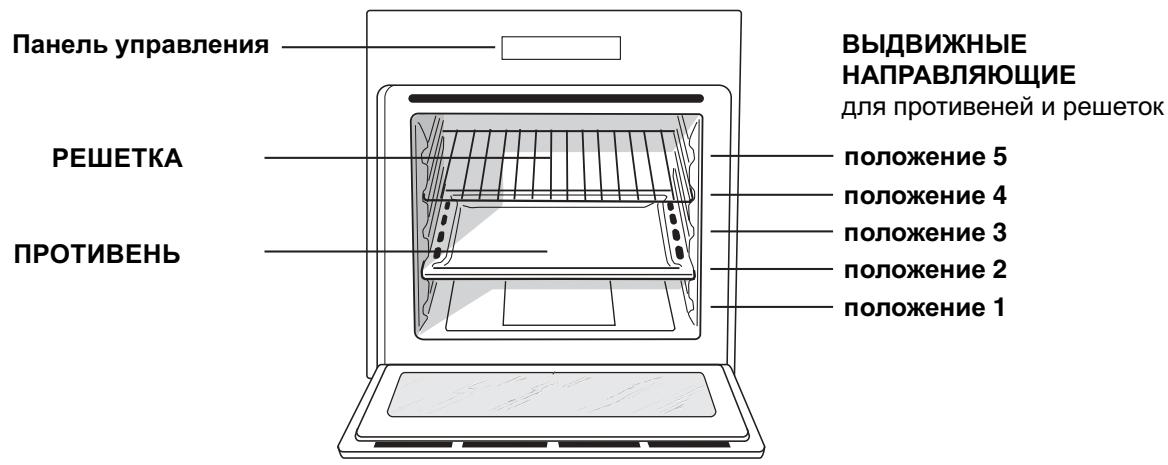
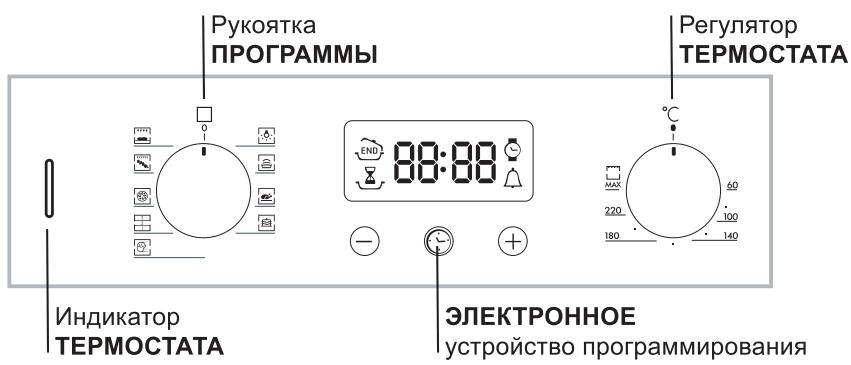
Overall view

Control panel
! The first time you use your appliance, heat the empty oven with its door closed at its maximum temperature for at least half an hour. Ensure that the room is well ventilated before switching the oven off and opening the oven door. The appliance may produce a slightly unpleasant odour caused by the burning away of protective substances used during the manufacturing process.
Starting the oven
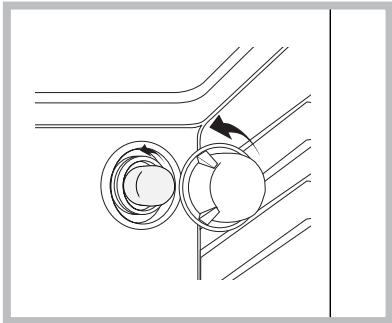
- Select the desired cooking mode by turning the SELECTOR knob.
- Select the desired temperature with the THERMOSTAT knob. See the Cooking advice table for cooking modes and the suggested cooking temperatures (see Cooking Modes).
- When lit, the THERMOSTAT indicator light indicates that the oven is heating up to the temperature set.
-
You may do the following during cooking:
-
change the cooking mode by turning the SELECTOR knob.
-
change the temperature by turning the THERMOSTAT knob.
- stop cooking by turning the SELECTOR knob to the "0" position.
! Never put objects directly on the oven bottom to avoid damaging the enamel coating.
! Always place cookware on the rack(s) provided.
Cooling ventilation
In order to cool down the external temperature of the oven, some models are fitted with a cooling fan that blows out air between the control panel and the oven door.
! Once the cooking has been completed, the cooling fan remains on until the oven has cooled down sufficiently.
Oven light
It goes on when selecting with the SELECTOR knob. It stays on when a cooking mode is selected.
| DATA PLATE | |
| Dimensions | width 43.5 cm height 32 cm depth 41,5 cm |
| Volume | lt. 58 |
| Electrical connections | voltage: 220-240V ~ 50Hz maximum power absorbed 2800W |
| ENERGY LABEL | Directive 2002/40/EC on the label of electric ovens. Standard EN 50304 Energy consumption for Natural convection – heating mode: Convection mode. Declared energy consumption for Forced convection Class – heating mode: Baking. |
| CE | This appliance conforms to the following European Economic Community directives: - 2006/95/EEC of 12/12/06 (Low Voltage) and subsequent amendments; - 89/336/EEC of 03/05/89 (Electromagnetic Compatibility) and subsequent amendments; - 93/68/EEC of 22/07/93 and subsequent amendments. - 2002/96/EC |
Setting the clock
! The clock may be set when the oven is switched off or when it is switched on, provided that a the end time of a cooking cycle has not been programmed previously.
After the appliance has been connected to the
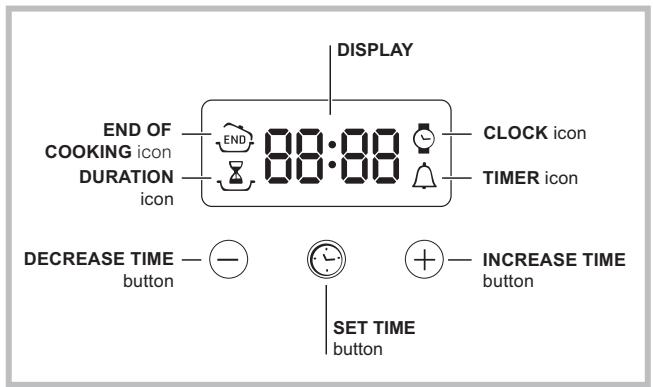
mains, or after a blackout, the icon and the four numerical digits on the DISPLAY will begin to flash.
- Press the button several times until the icon and the four digits on the display begin to flash.
- Use the "+" and "-" buttons to adjust the time; if you press and hold either button, the display will scroll through the values more quickly, making it quicker and easier to set the desired value.
- Wait for 10 seconds or press the button again to finalise the setting.
Setting the timer
! This function does not interrupt cooking and does not affect the oven; it is simply used to activate the buzzer when the set amount of time has elapsed.
- Press the button several times until the icon and the three digits on the display begin to flash.
- Use the "+" and "-" buttons to set the desired time; if you press and hold either button, the display will scroll through the values more quickly, making it quicker and easier to set the value.
- Wait for 10 seconds or press the button again to finalise the setting.
The display will then show the time as it counts down. When this period of time has elapsed the buzzer will be activated.
Programming cooking
! A cooking mode must be selected before programming can take place.
Programming the cooking duration
- Press the button several times until the icon and the three digits on the DISPLAY begin to flash.
- Use the "+" and "-" buttons to set the desired duration; if you press and hold either button, the display will scroll through the values more quickly, making it quicker and easier to set the value.
- Wait for 10 seconds or press the button again to finalise the setting.
-
When the set time has elapsed, the text END appears on the DISPLAY, the oven will stop cooking and a buzzer sounds.
-
For example: it is 9:00 a.m. and a time of 1 hour and 15 minutes is programmed. The programme will stop automatically at 10:15 a.m.
Setting the end time for a cooking mode
! A cooking duration must be set before the cooking end time can be scheduled.
- Follow steps 1 to 3 to set the duration as detailed above.
- Next, press the button until the icon and the four digits on the DISPLAY begin to flash.
- use the "+" and "-" buttons to adjust the cooking end time; if you press and hold either button, the display will scroll through the values more quickly, making it quicker and easier to set the desired value.
- Wait for 10 seconds or press the button again to finalise the setting.
- When the set time has elapsed, the text END appears on the DISPLAY, the oven will stop cooking and a buzzer sounds.
Programming has been set when the 量 and buttons are illuminated. The DISPLAY shows the cooking end time and the cooking duration alternately.
Cancelling a programme
To cancel a programme:
- press the button until the icon corresponding to the setting you wish to cancel and the digits on the display are no longer flashing. Press the “-” button until the digits 00:00 appear on the display.
- Press and hold the "+" and "-" buttons; this will cancel all the settings selected previously, including timer settings.
Cooking modes
! A temperature value can be set for all cooking modes between 60^ C and Max, except for
- BARBECUE (recommended: set only to MAX power level);
- GRATIN (recommended: do not exceed 200^ ).

LEAVENING mode
The oven reaches and maintains a temperature of 40^ irrespective of the position of the THERMOSTAT knob. This mode is ideal for leavening dough made with yeast.

TRADITIONAL OVEN mode
Both the top and bottom heating elements will come on. With this traditional cooking mode, it is best to use one cooking rack only: if more than one rack is used, the heat distribution will be uneven.

BAKING mode
The rear heating element and the fan come on, guaranteeing the distribution of heat delicately and uniformly throughout the oven. This mode is ideal for baking and cooking temperature sensitive foods such as cakes that need to rise and to prepare certain tartlets on 3 shelves simultaneously.

FAST COOKING mode
The heating elements and the fan come on, guaranteeing the distribution of heat consistently and uniformly throughout the oven.
Pre-heating is not necessary for this cooking mode. This mode is especially recommended for cooking pre-packed food quickly (frozen or pre-cooked). The best results are obtained if you use one cooking rack only.

MULTI-COOKING mode
All the heating elements (top, bottom and circular), as well as the fan, will come on. Since the heat remains constant throughout the oven, the air cooks and browns food uniformly. A maximum of two racks may be used at the same time.

PIZZA mode
The heating elements (bottom and circular) and the fan come on. This combination heats the oven rapidly by producing a considerable amount of heat, particularly from the bottom element. If you use more than one rack simultaneously, switch the position of the dishes halfway through the cooking process.

BARBECUE mode
The top heating element and the rotisserie (where present) come on. The high and direct temperature of the grill is recommended for food that requires high surface temperature. Always cook in this mode with the oven door closed.

GRATIN mode
The top heating element as well as the fan and the rotisserie (where present) come on. This combination of features increases the effectiveness of the unidirectional thermal radiation of the heating elements through forced circulation of the air throughout the oven.
This helps prevent food from burning on the surface, allowing the heat to penetrate right into the food. Always cook in this mode with the oven door closed.
The Rotisserie (only available on certain models)
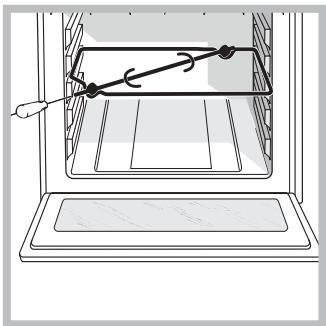
To operate the rotisserie (see diagram) proceed as follows:
- Place the dripping pan in position 1.
- Place the rotisserie support in position 3 and insert the spit in the hole provided on the back panel of the oven.
- Start the rotisserie using the knob to select MODE
! When mode is on, the rotisserie will stop if the door is opened.
Practical cooking advice
! Do not place racks in position 1 and 5 during fan-assisted cooking. Excessive direct heat can burn temperature sensitive foods.
! In the BARBECUE and GRATIN cooking modes, particularly when using the rotisserie, place the dripping pan in position 1 to collect cooking residues (fat and/or grease).
MULTI-COOKING
- Use position 2 and 4, placing the food that requires more heat on 2.
- Place the dripping pan on the bottom and the rack on top.
BARBECUE
- Insert the rack in position 3 or 4. Place the food in the centre of the rack.
- We recommend that you set the maximum power level. The top heating element is regulated by a thermostat and may not always be on.
PIZZA MODE
- Use a light aluminium pizza pan. Place it on the rack provided.
For a crispy crust, do not use the dripping pan (prevents crust from forming by extending cooking time). - If the pizza has a lot of toppings, we recommend adding the mozzarella cheese on top of the pizza halfway through the cooking process.
Cooking advice table
| Cooking modes | Foods | Weight (in kg) | Rack Position | Pre-heating time (minutes) | Recommended temperature | Cooking time (minutes) |
| Leavening | Leavening process of dough made with yeast or baking powder (brioches, bread, sugar pie, croissants, etc.) | |||||
| Traditional Oven | Duck | 1 | 3 | 15 | 200 | 65-75 |
| Roast veal or beef | 1 | 3 | 15 | 200 | 70-75 | |
| Pork roast | 1 | 3 | 15 | 200 | 70-80 | |
| Biscuits (short pastry) | - | 3 | 15 | 180 | 15-20 | |
| Tarts | 1 | 3 | 15 | 180 | 30-35 | |
| Baking Mode | Tarts | 0.5 | 3 | 15 | 180 | 20-30 |
| Fruit cakes | 1 | 2 or 3 | 15 | 180 | 40-45 | |
| Plum cake | 0.7 | 3 | 15 | 180 | 40-50 | |
| Sponge cake | 0.5 | 3 | 15 | 160 | 25-30 | |
| Stuffed pancakes (on 2 racks) | 1.2 | 2 and 4 | 15 | 200 | 30-35 | |
| Small cakes (on 2 racks) | 0.6 | 2 and 4 | 15 | 190 | 20-25 | |
| Cheese puffs (on 2 racks) | 0.4 | 2 and 4 | 15 | 210 | 15-20 | |
| Cream puffs (on 3 racks) | 0.7 | 1 and 3 and 5 | 15 | 180 | 20-25 | |
| Biscuits (on 3 racks) | 0.7 | 1 and 3 and 5 | 15 | 180 | 20-25 | |
| Meringues (on 3 racks) | 0.5 | 1 and 3 and 5 | 15 | 90 | 180 | |
| Fast cooking | Frozen food | |||||
| Pizza | 0.3 | 2 | - | 250 | 12 | |
| Courgette and prawn pie | 0.4 | 2 | - | 200 | 20 | |
| Country style spinach pie | 0.5 | 2 | - | 220 | 30-35 | |
| Turnovers | 0.3 | 2 | - | 200 | 25 | |
| Lasagne | 0.5 | 2 | - | 200 | 35 | |
| Golden Rolls | 0.4 | 2 | - | 180 | 25-30 | |
| Chicken morsels | 0.4 | 2 | - | 220 | 15-20 | |
| Pre-cooked food | ||||||
| Golden chicken wings | 0.4 | 2 | - | 200 | 20-25 | |
| Fresh Food | ||||||
| Biscuits (short pastry) | 0.3 | 2 | - | 200 | 15-18 | |
| Plum cake | 0.6 | 2 | - | 180 | 45 | |
| Cheese puffs | 0.2 | 2 | - | 210 | 10-12 | |
| Multi-cooking | Pizza (on 2 racks) | 1 | 2 and 4 | 15 | 230 | 15-20 |
| Lasagne | 1 | 3 | 10 | 180 | 30-35 | |
| Lamb | 1 | 2 | 10 | 180 | 40-45 | |
| Roast chicken + potatoes | 1+1 | 2 and 4 | 15 | 200 | 60-70 | |
| Mackerel | 1 | 2 | 10 | 180 | 30-35 | |
| Plum cake | 1 | 2 | 10 | 170 | 40-50 | |
| Cream puffs (on 2 racks) | 0.5 | 2 and 4 | 10 | 190 | 20-25 | |
| Biscuits (on 2 racks) | 0.5 | 2 and 4 | 10 | 180 | 10-15 | |
| Sponge cake (on 1 rack) | 0.5 | 2 | 10 | 170 | 15-20 | |
| Sponge cake (on 2 racks) | 1 | 2 and 4 | 10 | 170 | 20-25 | |
| Savoury pies | 1.5 | 3 | 15 | 200 | 25-30 | |
| Pizza Mode | Pizza | 0.5 | 3 | 15 | 220 | 15-20 |
| Roast veal or beef | 1 | 2 | 10 | 220 | 25-30 | |
| Chicken | 1 | 2 or 3 | 10 | 180 | 60-70 | |
| Barbecue | Soles and cuttlefish | 0.7 | 4 | - | Max | 10-12 |
| Squid and prawn kebabs | 0.6 | 4 | - | Max | 8-10 | |
| Cuttlefish | 0.6 | 4 | - | Max | 10-15 | |
| Cod filet | 0.8 | 4 | - | Max | 10-15 | |
| Grilled vegetables | 0.4 | 3 or 4 | - | Max | 15-20 | |
| Veal steak | 0.8 | 4 | - | Max | 15-20 | |
| Sausages | 0.6 | 4 | - | Max | 15-20 | |
| Hamburgers | 0.6 | 4 | - | Max | 10-12 | |
| Mackerel | 1 | 4 | - | Max | 15-20 | |
| Toasted sandwiches (or toast) | 4 and 6 | 4 | - | Max | 3-5 | |
| With rotisserie (where present) | ||||||
| Veal on the spit | 1.0 | - | - | Max | 80-90 | |
| Chicken on the spit | 1.5 | - | - | Max | 70-80 | |
| Lamb on the spit | 1.0 | - | - | Max | 70-80 | |
| Gratin | Grilled chicken | 1.5 | 2 | 10 | 200 | 55-60 |
| Cuttlefish | 1.5 | 2 | 10 | 200 | 30-35 | |
| With rotisserie (where present) | ||||||
| Veal on the spit | 1.5 | - | 10 | 200 | 70-80 | |
| Lamb on the spit | 1.5 | - | 10 | 200 | 70-80 | |
| Chicken on the spit + potatoes (roasted) | 1.5 | - | 10 | 200 | 70-75 |
GB
GB
! The appliance was designed and manufactured in compliance with international safety standards. The following warnings are provided for safety reasons and must be read carefully.
General safety
- The appliance was designed for domestic use inside the home and is not intended for commercial or industrial use.
- The appliance must not be installed outdoors, even in covered areas. It is extremely dangerous to leave the appliance exposed to rain and storms.
- When handling the appliance, always use the handles provided on the sides of the oven.
- Do not touch the appliance with bare feet or with wet or moist hands and feet.
- The appliance must be used to cook food by adults only and according to the instructions in this manual.
- When the appliance is in use, the heating elements and some parts of the oven door become extremely hot. Make sure you don't touch them and keep children well away.
- Ensure that the power supply cable of other electrical appliances does not come into contact with the hot parts of the oven.
- The openings used for ventilation and dispersion of heat must never be covered.
Always grip the oven door handle in the centre: the ends may be hot. - Always use oven gloves to place cookware in the oven or when removing it.
- Do not use aluminium foil to line the bottom of the oven.
- Do not place flammable materials in the oven: if the appliance is switched on by mistake, it could catch fire.
Always make sure the knobs are in the "●"/"O" position when the appliance is not in use. - When unplugging the appliance always pull the plug from the mains socket, do not pull on the cable.
- Never carry out any cleaning or maintenance work without having unplugged the plug from the mains.
- In the case of a malfunction, under no circumstances should you attempt to repair the appliance yourself. Repairs carried out by
inexperienced persons may cause injury or further malfunctioning of the appliance. Contact a Service Centre (see Assistance).
- Do not rest heavy objects on the open oven door.
- Do not let children play with the appliance.
- The appliance should not be operated by people (including children) with reduced physical, sensory or mental capacities, by inexperienced individuals or by anyone who is not familiar with the product. These individuals should, at the very least, be supervised by someone who assumes responsibility for their safety or receive preliminary instructions relating to the operation of the appliance.
Disposal
- Observe local environmental standards when disposing packaging material for recycling purposes. Observe existing legislation when disposing of the old appliance.
- The European Directive 2002/96/EC on Waste Electrical and Electronic Equipment (WEEE), requires that old household electrical appliances must not be disposed of in the normal unsorted municipal waste stream. Old appliances must be collected separately in order to optimise the recovery and recycling of the materials they contain and reduce the impact on human health and the environment. The crossed out "wheeled bin" symbol on the product reminds you of your obligation, that when you dispose of the appliance it must be separately collected.
Consumers should contact their local authority or retailer for information concerning the correct disposal of their old appliance.
Respecting and conserving the environment
- By using the appliance in the hours between late afternoon and early morning, you can help reduce the work load placed on electrical companies.
- Always keep the oven door closed when using the BARBECUE and GRATIN modes: to attain best results and to save energy (approximately 10% ).
- Regularly check the door seals and wipe clean to ensure they are free of debris so that they stick properly to the door and do not allow heat to disperse.
Assistance
Communicating:
- appliance model (Mod.)
- serial number(S/N)
This information is found on the data plate located on the appliance and/or on the packaging.
Switching the appliance off
Disconnect your appliance from the electricity supply before carrying out any work on it.
Cleaning the appliance
- The stainless-steel or enamel-coated external parts as well as the rubber seals may be cleaned using a sponge that has been soaked in lukewarm water and neutral soap. If these stains are difficult to remove, use only specialised products. After cleaning, rinse and dry thoroughly. Do not use abrasive powders or corrosive substances.
- Ideally, the inside of the oven should be cleaned after each use, when it is still lukewarm. Use hot water and detergent, rinse and dry with a soft cloth. Do not use abrasive products.
- All accessories - with the exception of the sliding racks - can be washed like everyday crockery, and are even dishwasher safe.
! Never use steam cleaners or pressure cleaners on the appliance.
Cleaning the oven door
Clean the glass part of the oven door using a sponge and a non-abrasive cleaning product, then dry thoroughly with a soft cloth. Do not use rough abrasive material or sharp metal scrapers as these could scratch the surface and cause the glass to crack. To clean more thoroughly, you can remove the oven door.
- Open the oven door fully (see diagram).
- Lift up and turn the small levers located on the two hinges (see diagram).
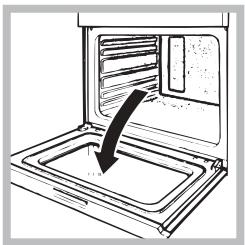
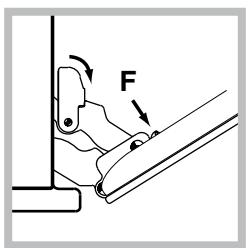
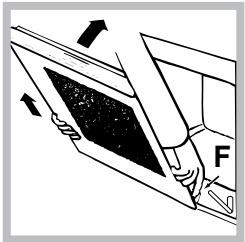
- Grip the door on the two external sides and close it approximately half way. Unlock the door by pressing on the clamps F, then pull the door towards you lifting it out of its seat (see diagram). To replace the door, reverse this sequence.
Inspecting the seals
Check the door seals around the oven periodically. If the seals are damaged, please contact your nearest After-sales Service Centre (see Assistance). We recommend not using the oven until the seals have been replaced.
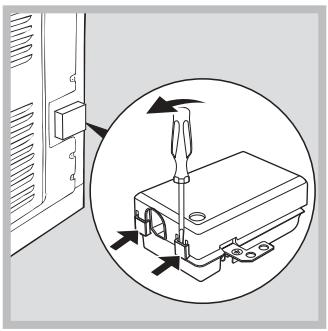
Replacing the light bulb
To replace the oven light bulb:
- Remove the glass cover of the lamp-holder.
- Remove the light bulb and replace it with a similar one: Wattage 25 W, cap E 14.
- Replace the glass cover (see diagram).
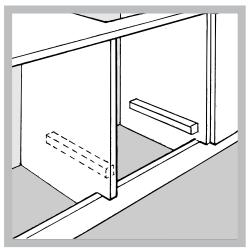
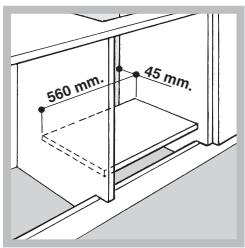
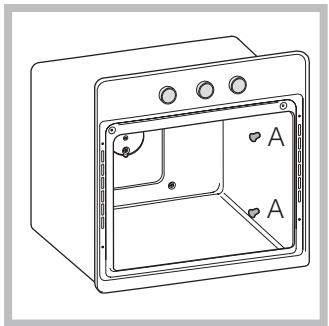
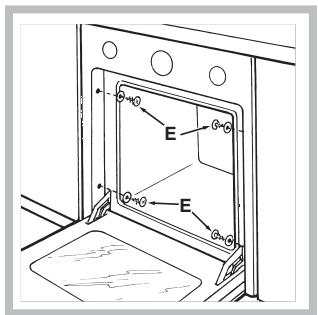
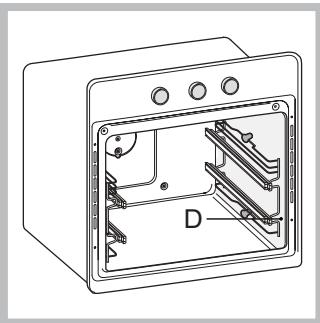
Sliding Rack Kit assembly
To assemble the sliding racks:
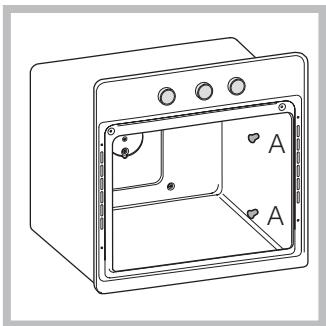
-
Loosen the two screws A (see diagram). If the oven is fitted with self-cleaning panels, these will have to be temporarily disassembled.
-
Replace the screws A with the screws and spacers (B + C) supplied with the kit.
- Tighten the new screws B and the corresponding spacers C, fitting the self-cleaning panels on again.
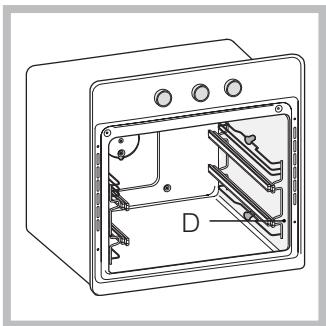
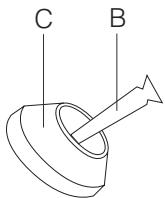
-
Secure the two joints D of the guide rail in the holes provided on the oven walls (see diagram). The holes for the left guide rail are situated at the top, while the holes for the right one are at the bottom.
-
Finally, fit the guide rail on the spacer C.
! Do not place the sliding racks in position 5.
FR

Italiano, 1

English,13

Français, 24

Espanol, 35

Portuges, 46

Pycckn,57
FC 832 C.1 /HA
FC 832 C.1 IX/HA
FC 83.1 /HA
FC 83.1 IX /HA
FQ 83.1 /HA
FZ 83.1 /HA
FZ 83.1 IX /HA
FQ 932 C.1/HA
FD 83.1 /HA
FZ 93 C.1 /HA
FZ 93 C.1 IX /HA
FZ 932 C.1 /HA
FZ 932 C.1 IX/HA
FZ 83 C.1 /HA
FZ 83 C.1 IX /HA
F 83.1 /HA
F 83.1 IX/HA
Sommaire
Installation, 25-26
Positionnement
Para montar as guias correiras:
-
Desatarraxe osinous parafudos A (veja a figura). Se o fornó foridotado de painéis auto-limpantes, estes resultarão momentaneamente desmontados.
-
Substituir os parafusos A com os parafusos e os espacadores (B + C) fornecidos com o kit.
PporpaMMbl npiroTOBJIeHn
PpakTnueckne COBtI NO ppiroTOBJIeHHIO
Tabnica npiroTOBJIeHnA
PpeOocTopoXHocTn npekomeHaaznn, 66
Obuime Tpe6obAHnno 6e3oNaChOCTn
Ipeepa6oTka
3KoHOMnA 3JIeKtPo3HeprnN OxpaHa OkpykaIoUeI cpebl
TexHHueckoe o6cJyXnBaHne n yXoI, 67
ObecToUBaHneI3dEInr
UcTka n3dEIna
UcTka DBepu
3aMeHa JAmNoUKN
KpePHeHne KOMnJIeKta BbIDBnXhBIX HAnpaBnIouxN
CepBnchoe o6cnyxmbaHne, 68

Hotpoint
ARISTON
!Baxho coxpaHtB daHHoe pykoBOcTBO dIra erO nocJeDyUoXnx KOHCyIbTauM. B cnyuae npodaJn, nepeDaun3deJnI nn npn pepeE3ne Ha HOBoe MeCTO XHTeJIbCTBa HeoBXoIMo pOBepNTb, YTO6blpyKOBOcTBO OCTaBAJIOCb BMeCTe C 3dEJIeM, DJIr TOrO YTO6bl erO HOBbI BnaDeJIeC MOR O3HaKOMITbcr C npabINamN 3KcPlyaTaUm N C COOTBeTCTByUOUMN npedynpexKeHnA M.
!BnMaTeJIbHO npOHTaIe HNCTpyKcHn:B HNX coDePkaTc BaxHbIe CBeDeHnO 6yCTaHOBKe, 3KcNJIyatauH N 6e3OnacHocTn n3JeHnA.
PacnoJoxKeHne
! He pa3pewaTe DeTAM nIgpaTb C ynaKOBOHybIMn MaTePnAaMaN. YnaKOBka DoJIXHa 6bITb yHnTuXeHa B COOTBcETCBn C npabunamn c6opa Mycopa (cm. PpedocmopoxKnocmu u peKoMeHdaauu).
!MOHTaK n3dEInna Ipon3BODITcB COOTBeTCTBn C DaHHbIMN IHCTpykUmaM KBAJIINuCIPOBaHHbIMn Cneunalntamn. HenpaBnJbHbI MOHTaK n3dEInna MOKeT CTaTb npuHNoN IOBpeXdeHn NMyueCTBa IN pnuHNt b yuep6 JIOyAM N DOMaHm XJBOTHBIM.
BcTpoeHHbIMoHTax
Дя obecneeyHЯ nCnpaBHOФункIoHnpOBaHЯ n3JeNЯ KxOHHbI ΣeMeHT DoJIKeH IMeTb COOTBeTCTByUOuIe XapaKTePncTnK:
- NaHeJI KkyoONHbIX 3JemeMHTOB, npNJIeRAIOUxK JdyXOBOMy 6kaΦy,ДОЛЖнБI 6bITb BblIOJIHHeHb I3 TepMOCTOiKO rMaTePnAJa;
KJIeI KUYOHbIX 3JIeMeHToB 3JIeMeHToB I3 ΦaHepoBaHHoro DepeBa DOJXeH 6bITb yCTOnuHBIM K TemnepaType 100^
ДлгВСТРанваня Духово Гшкафнод КухонньIM TOnOM (CM.CXeMy)ИиВ BшkaФ-пehал Иша Кухонного эЛем enta DoJIXHa Иметы Следушие pa3Мерbl:
!IocJIe BCTpaINBaHnI N3dJIInB K KyXOHbI 3JIeMeHT D0JXHa 6bITb ICKJIHOueHa BO3MOxHOCTb KAcAHNIG K 3JIeKTPuYeCKIM YuACTaMNI.
Pacxod 3neKtpo3Heprnn, yka3aHHbI Ha nacnpTHoI
TbIyKe I3JeJIa, 6bl 3aMepeH IJra DaHHoro Tnna MOHTaxa.
Bentnlaeia
Дя obecneeyHnHaJIeXaIeB eHTIJIaIHy Heo6xOIMO ChrTb 3aIHOIO nAHeIb HnIi KxOHHO OIeMeHTa. PekomeHdyetcY cTaHOBntb dYxOBoi ShkaΦ Ha Dba DepeBraHHbIX bpycKa IIn Ha CnIoUHoe OCHOBaHne C OTBepCTnEM dIaMeTpOM He Mehee 45 x 560 MM (CM CXEmbl).
UeHTpOBka n KpenJIeHne
4 KpeKexHbIX 3JemeHTa c 6OKOB DyXOBOro 5kaΦa doJXHBi 6bITb OTpeRyIINPOBaHbI B COOTBETCTBnC 4 OTBepCTnAMN B pame B 3aBcIMOCTn OT TOJIuINHbI 6OKOBoi NaHeJI KxOHHOrO 3JemeHTa:
TOJIUHa 20 MM: NOJHOCTbIO ydaIte CbeMHyO Yactb KpeNExKHO OJIeMeHtA (CM. CXemy);
TOnuHa 18 MM: NcNoJb3yIte
IepBbI Na3, corJaIcHo yKe
rotOBoKoHgUpyaun
IpOn3BOIDTeJIa (CM. CXEmy);
TOJIUHa 16 MM: NcPOJIb3yIte BTOPOJ n3 (CM. CXEmy).
Дя Крелени Идели К Кхону МЕ entу: OКpoIte Деру Духовоу Шафи n 3aBHTnTe 4 Wypyna Дя DepeвHHbIX панeнь B 4 OTbepCTry BпетIMeTpalbHoi pam.
!Bce3aunTHbIeJemeHTbIOJIKHbI6bl3aKpeINHeHbTakIMO6pa3OM,YTO6bIXMOxHO6blNO
CHaTb TOJIbKO Iprn NOMOUs CneuHaNbHOro INHCTpyMeHTa.
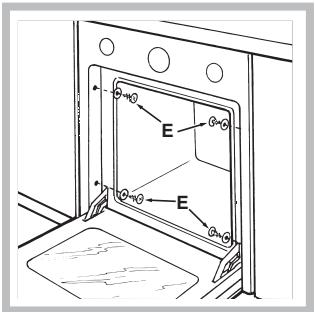
ZeHTpOBka N KpePJIeHne\*
- YctaHOBtB cKo6bI “A” B KpaJ K dYXOBMy shkaΦy “B”.
- UctaHOBnTb yToJIKN "C" B KpaI K cKo6am "A". B YactHOCTn, ecNI ToJIuINHa 6OKOBoi nAHeJIIMe6eJIbHOrO 3JemeHTa:
16 MM: npnKpeNtB yroJOK TaKIM o6pa3OM, uTo6bl npocTaBHeHHbHa Hei Homep 16 6bl o6paueH K Bam;
18 MM:ПрикpenItb yroJokТakIMобразOM,чTOбbl CTOPOHa 6e3 NaДписeй 6bla obpauneHa KBam;
20 MM: He yctaHaBJIbBaTb yroJIOK.
- Ппкренив скоби и углки К краю бokови панели мбебл Horo заlemeHTa ри пошу探测 "D".
- Ппкренич духовошkaф к мебелову элем entу ри помоци усуюви пл actmaccobbyхшайб“E”.
3JIeKTpNueeCKoe NODKJIIOUeHHe
!DyXOBbIe WkaΦbl, yKOMJIeKTOBaHHbIE TpExnOJIIOChbIM Ka6eJIem 3JIeKTPoNTaHnA, paCHTaHbI HaФyHKUHOHPOBAHne C NepeMeHHbIM TOKOM C HAprrJKeHNEM UcactOTOJ 3JIeKTPoNTaHnA, yKa3aHHbIMNa NaCnOpTHoN Ta6JIuYe C DaHHbIMN (CM. HuXe).
IopcoeHHeHne cTeBoro ka6eJra
- OTkpoIte 3aJxIMHyUo
Kopo6Ky, HaxaB Iprn
NOMOUs OTBePTKu Ha
BbICTynl C 60KOB
KpbIiKh: NOTAHNTe N
OTKpoIte KpbIiKhY (CM. CXEmy). - OTBnHTnte BnHT Ka6eJbHOrO caJbHnKa n BblHbTe ero, NOdJeB OTBePTKoI (CM. CXemy).
* IMeETcra TOJbKO B HEKOTOpbIX MoJeJIaX.
3.OTBnHTNTe BNHTbI KOHTaKTOB L-N-1 N 3aTeM npNKpeNITe npOBoJa NOJ ROJOBKaMn BNHTOB, CO6JIHOJa YBeTObYIO MapKnIPOBky CnHn (N) KopuHeBly (L) XKeITo-3eJeHbI (1一)
IopcoeHHeHne cTeBOrO ka6eJnK Cetn 3NeKtpoNTaHHN
UctaHOBtHe Ha CeTeBOI Ka6eJIb HOpMaJIIO3OBaHHyIO
UTeNcEJIbHyIO BnIKy, paCHTaHHyIO Ha HArpy3Ky,
Yka3aHHyIO Ha nacnpTHOI Ta5NIuChe (CM. c6Oky).
B Cnyae npAmoro NpOKIIoueHnRA K CETn
3JeKTPoPOnTAHnRA MEXdy N3DeJIInEM I CEtBu
Heo6xOIMMO YCTaHOBtB MHOrONoJIOChBI
BbIKHouaTeJIb C MNHMaJIbHbIM PaCCTOraHnEM MeKdY
KOHTaTMn 3 MM, paCHTaHHbIi Ha DaHHyIO HaRpy3KY
IN COOTBeTCTByUoUm DeIcTByUoUm HOpMaTINBaM
(BbIKHouaTeJIb He DoJIkeH pa3MbIkaTb IPOBOID
3a3EmNeHnA). CeTeBOI Ka6eJIb DoJIkeH 6blTb
pacnoIOXeH TAKIM O6pa3OM, UTO6bl Hi B OJHOI
ToUKe erO TempehataHa He IpReBbIaJaTaempehatypy
PomeSeHnA 60Jee Yem Ha 50^
!Элктомпгет HeCET OTBETCTBEHNOCTb 3a празиьhoe поКлючене Идени Кэлкtrpueckо сети и за соблюденье празиь БeЗОпаСнOpt. Перед поКлюченem Идени К сети элктponttаня поверът спedyюцee:
- CeTeBa rpo3eTka IOnJxHa 6bITb CoeINHeHa C 3a3emJIeHnEM I COOTBETCTBOBaTb HOpMaTINBaM;
- ceTeBa rpo3eTka DOnJxHa 6bItb paccuTaHa Ha MaKcImaJIbHyIO Ntpe6IReMyIO MOnHOCt bN3JeINy, yKa3aHHyIO HA NacnOpTHoT Ta6NIuKe (CM. Huxe);
Ha npjxehne cTeN 3JIeKtpOnITaHnI DOJXHO HaxoDntbcB NpeJeIax 3NaueHn, yKa3aHHbIX Ha nacnpTHOH Ta6NIuKe (cM. HuKe); - ceTeBaJ po3eTka DoJIxHa 6bIb COBMeCTMa co UTeNceJIbHOB BnIKo N3dJIIna. B npOTuBHOM Clyuae 3aMeHInePo3eTKy IIN BnIKy; He NCNoJIb3yIne YdIIHHIneTI INI TPOHNKIn.
!I3eJIne IOJIXHO 6bITb yCTaHOJIeHO TaKIM o6pa3OM, YTO6bI cTeBOi Ka6eJIb N cTeBaI pO3EtKa 6blIIN IERKO DOCTynHbl.
!Cetebon ka6eIb n3JeIy He doJxH 6blc corHyT nn CxkT.
! Pernyraho npobepreIte coCToHne ceTeBOrO ka6eNn B clyuae Heo6xOIMMOCTn NOpuynte erO 3aMeHy ToJIbKO yONHOMOueHHbIM TexHNKam (CM. TexHuueckoe o6cIyKuaHue).
!Pon3BODHTeH He HecET OTBeTCTBeHHOCTn 3a nocJeCTBnH Heco6IooHe nepueNCJIeHHbIX Bblwe Tpe6OBaHn.
RS
O6uBn
KoHcOJIb ynpaBneHnna
!Pn nepBOM BKJIUOHeHn DyXOBOro 乌kaΦapeKOMeHdyem PpOKaJIHTb eTo npIMepHO B TeueHne yaca npi MaKcImaJIbHOI TempeAte C 3aKpbIToDDBepue. 3aTeM BblIKIIOHTe DyXOBoi 乌kaΦ,OTKpoIte DBepuy I pOBeTpIte NOMEuHne. 3anax, KOTOpBI Bbl MOKeTe NOUYBCTBOBaTb, Bbl3BaH NcnapeHmE BeIeCTB, NcNOJIb3OBAHHbIX dIpy npeDOxpaHEnHn DyXOBOrO 乌kaΦa.
BkIIOUHeHneDyXOBOrO uKaΦa
- Bыберптуную рограмmy риготовлени рпимоши руковский ПОГРAMMbI.
- Bb6epnte tempepaty npn nomoun peyjntopa TEPMOCTAT. B cneuaIbHou Tabnue npnbOuNTcpepehB TINOB nprirotoblenia C COOTBeTCTByUOUMn peKOMeHdyEmblm Tempepatym (cm. PpOpaMMbl).
- BkHoueHHbI INHnKaTOp TEPMOCTATA 03haaet TekyuO f3y HargBa DuxOBKn Do 3aHaHHoI TempeaTypbl.
- B npocece npiroTOBJIeHnB JIO6OIMoMeHT MOxHO:
3aropaeTc npn BbIbope npn NOMOu npyKoTkn PPOrPAMMbI. OctaetcBkJIOeHNoi npn BbIbope nporpaMMbl pnproTOBJIeHn.
Ta6JIuca npnroTOBJeHna
IopraOK MOHTaKa BbIDBnKhBIX HaprabJIIOUx:
- OTBnHTnte Dba wypyna (cm. cxemy). Ecnn dYXOBoi UIkaΦ OCHaueh CaMOHCTaUMCRA NaHeJIaMNI, OHN OKaKytcR BpEmHo CHrTbIMN.
- 3aMeHnTe WypynbI A Ha WypynbI n pacnopHbIe 3JIeMeHTbI (B + C) n3 KOMnJIeKTA.
- 3aBnHTnte HOBbIe WypynI B n COOTBeTCTByHouIe pacnOpHbIe DeTaJIc C, BOCCTaHaBJIINBaJ Ha MeTo TAKKe cAmOChTЯUneCЯHeJI.
- 3akpeinte Dba
kpeenKhbix 3JemeHTa D
HaPpaBnIOUeB
CNEuJaIbHbIX OTBepCTnIX
B CTEHKax DyXOBKn (CM. cxEmy).OTBepCTnJeBOi
HaPpaBnIOUeI
pacnoJIOxKeHb CBeP3y, a
papBoi - CHN3Y.
5.B3aBepseHne BCTaBbTe HnPaBnIIOuIIO
Ha pacnopHyo TeTajb C.
!He BCTaBnIe Te BbIDBnKHbIe HappaBJIouIe B nOJXeHN 5.
RS
Ipeed Tem kak o6paTntbCBA CepBnchoe 06cnyxuBaHne:
- Поберът, можно Лу устаранъ Heиспразвость самостаялъно ();
BHOBB BKJIOUHTe pOporpAMMy IaI npOBepKn IcnpaBHOCTM MaunHbI;
B npTnBHOM cnyae o6paTntecb B ynoJIHMOUeHHb LcHTp TexHueckoro 6cnykBaHna.
!Hikorda He obaaTecb K HeynoHHomOeHHbIM TexHnKaM.
Pn o6paueHn B cHTp CepBnCHoro 06cnyXbAHncoo6uNTe:
coo6eHne, noka3bIbaemoe Ha dincPee TEMPEPATybl
MoJeJIb n3JeJIIna (MoI.)
- HomeTex. nacnopTa (cepHbI Ng)
3Tn daHHbIe Bbl HaJeTe Ha nacnopTHoN Ta6nUyKe, paCnoJIOXeHHoH Ha n3JeIN.
- GB
- Positioning
- Fitting the appliance
- Ventilation
- Centring and fastening
- Centring and fixing*
- Electrical connections
- Fitting the power supply cable
- Connecting the supply cable to the mains
- Overall view
- Control panel
- Starting the oven
- Cooling ventilation
- Oven light
- Setting the clock
- Setting the timer
- Programming cooking
- Programming the cooking duration
- Setting the end time for a cooking mode
- Cancelling a programme
- Cooking modes
- LEAVENING mode
- TRADITIONAL OVEN mode
- BAKING mode
- FAST COOKING mode
- MULTI-COOKING mode
- PIZZA mode
- BARBECUE mode
- GRATIN mode
- Practical cooking advice
- MULTI-COOKING
- BARBECUE
- General safety
- Disposal
- Respecting and conserving the environment
- Assistance
- Communicating:
- Switching the appliance off
- Cleaning the appliance
- Cleaning the oven door
- Inspecting the seals
- Replacing the light bulb
- Sliding Rack Kit assembly
- Sommaire
- PacnoJoxKeHne
- BcTpoeHHbIMoHTax
- Bentnlaeia
- UeHTpOBka n KpenJIeHne
- ZeHTpOBka N KpePJIeHne\*
- 3JIeKTpNueeCKoe NODKJIIOUeHHe
- IopcoeHHeHne cTeBoro ka6eJra
- IopcoeHHeHne cTeBOrO ka6eJnK Cetn 3NeKtpoNTaHHN
- O6uBn
- KoHcOJIb ynpaBneHnna
- BkIIOUHeHneDyXOBOrO uKaΦa
- Ipeed Tem kak o6paTntbCBA CepBnchoe 06cnyxuBaHne:
- Pn o6paueHn B cHTp CepBnCHoro 06cnyXbAHncoo6uNTe:
Brand : HOTPOINT
Model : FZ 83 C.1 IX/HA
Category : Freezer