
35.1104 - Weather Station TFA - Free user manual and instructions
Find the device manual for free 35.1104 TFA in PDF.


| Product Type | Weather Station |
| Brand | TFA |
| Model | 35.1104 |
| Dimensions (station) | 110 x 22 x 110 mm |
| Weight (station) | 110 g |
| Power supply | 2 AAA 1.5V batteries (not included) |
| Display | Backlit LCD |
| Indoor temperature | -10°C to +50°C |
| Indoor humidity | 20% to 95% |
| Outdoor sensor | Wireless thermohygrometer sensor (included) |
| Outdoor sensor range | up to 30 meters in open field |
| Outdoor temperature | -40°C to +60°C |
| Outdoor humidity | 20% to 99% |
| Radio-controlled clock | DCF-77 (Europe) |
| Functions | Time, date, alarm, trend display, min/max memory |
| Care and cleaning | Wipe with a soft, dry cloth. Do not use solvents. |
| Safety | Keep out of reach of children. Do not expose to excessive moisture. |
| Spare parts and repairability | Standard batteries available. For repairs, contact TFA customer service. |
| General information | Manual downloadable in PDF from notice-facile.com |
Frequently Asked Questions - 35.1104 TFA
User questions about 35.1104 TFA
0 question about this device. Answer the ones you know or ask your own.
Ask a new question about this device
Download the instructions for your Weather Station in PDF format for free! Find your manual 35.1104 - TFA and take your electronic device back in hand. On this page are published all the documents necessary for the use of your device. 35.1104 by TFA.
USER MANUAL 35.1104 TFA


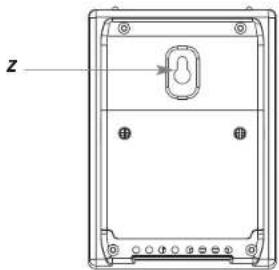
Fig. 7




(D) Wireless weather station with photo viewer
GB
1. Introduction
1.1 Functions
• Colour monitor 7" optionally as
- Photo viewer
– Weather station with weather icons, graphics and texts - Weather station with photo
– Monthly calendar with photo
• Digital photo viewer
- Digital Photo viewer with zoom, rotation, slide show mode (with 13 variable transi-
tion effects, slide duration and display format
– Supported image files: JPEG
– Memory devices: SD, MMC USB Memory Stick (up to 32 GB)
- Weather station
– Transmission of outdoor temperature and humidity via up to 3 transmitters
(868 MHz, max. 30 m)
– Indication of indoor and outdoor temperature and humidity with trend pointers
– Weather forecast with weather symbols
– Atmospheric pressure with tendency and bar graph indication of the last 6 hours
– Radio controlled clock with alarm and date
- Indication of the actual moon phase
– Indication of dew point and heat index (temperature sensitivity in combination
with humidity) for indoor and outdoor
- Temperature range outdoor: -20°C...60°C (-4°F...140°F)
- Temperature range indoor: 0°C...50°C (32°F....122°F)
- Reversible °C/°F
- Outdoor and indoor humidity: 20%...99% r.F.
- Simple intuitive operation with IR remote control or on the unit
• Languages: English, German, French - On/Off timer for saving energy
- For wall mounting or table standing with stand
• Equipment: Power adapter, outdoor temperature and humidity transmitter 30.3178
with 2 x 1,5 V AAA batteries, IR remote control with CR2025 button cell battery
1.2. Elements
1.2.1 Receiver (Display unit)
1.2.1.1 Housing (Fig. 2+3)
A: Wall mount holes/stand (removable)
B: Card cartridge
C: USB port
D: Power adapter
Wireless weather station with photo viewer
1.2.1.2 Buttons (Fig. 4)
E: Screen ON-OFF button – Screen on and off
F: ▲ button – Navigation button for up-direction
G: ▼ button – Navigation button for down-direction
H: ◀ button – Navigation button for left-direction
I: ▶ button - Navigation button for right-direction
J: Enter button - Confirmation of data entry
K: Exit button – To exit the actual display
1.2.2 IR remote control unit
1.2.2.1 Buttons (Fig. 5)
L: Screen ON-OFF button – Press to turn ON/OFF the display screen
M: Photos, Weather, Setup, Calendar and Weather+Photos button
- Press a button to go straight into the appropriate display.
N: Slideshow button - Start/Stop (II) the slideshow
O: Menu button – Enter the menu selection for each program
P: Zoom button – Enlarge image
Q: Exit button - To exit the actual display
R: Rotate button - Rotate the image
S: ▲ button – Navigation button for up-direction
T: ▶ button - Navigation button for left-direction
U: ENTER button - Confirmation of data entry
V: ▶ button - Navigation button for right-direction
W: ▼ button – Navigation button for down-direction
1.2.2.2 Housing
- Battery compartment
- Release lever
1.2.3 Thermo-hygro sensor (Fig. 6+7)
X: LED indicator - Flashes when remote unit transmits a reading
Y: Display – LCD for temperature and humidity values, channel number, battery symbol and reception icon
Z: Wall mount hole
A: Battery compartment – with the buttons TX and °C/°F and the channel switch 1-2-3.
- Getting started
2.1 Start-up of the IR remote control
- Open the battery compartment by pressing the release lever slightly inwards and then
pulling out the battery compartment. - Remove the battery insulation strip.
- Slide the battery compartment back until the release lever is engaged.
• The unit is now ready to use.

Wireless weather station with photo viewer

2.2. Start-up of the weather station and the transmitter
2.2.1 Inserting of batteries and reception of outdoor values
- Insert the adapter into the jack. Connect the power adapter to a wall socket. Important! Make sure that your household voltage is 230V! Otherwise your clock may be damaged.
- The Weather menu appears and the reception icon of the transmitter flashes. The wireless weather station is now trying to receive the transmitter for four minutes.
- Open the battery compartment of the transmitter (screwed) and insert two batteries 1.5 V AAA, observing the correct polarity.
- Once the station has received the transmitter, the temperature, the humidity, the selected channel and the reception icon appear in the Weather menu.
2.2.2 Radio controlled time reception
- After the reception of the outdoor values, "Start radio controlled reception now" appears a few seconds later on the display.
- Choose "v" with ◀ or ► button.
- Confirm with ENTER button.
- The display will be turned off for 10 minutes for radio controlled clock reception. Attention:
Please do not press any button during signal reception. The radio contact is otherwise interrupted.
• After successful reception, the time, date, the current moon phase and the reception icon appear on the display.
- The instrument undergoes RCC reception at 2:03am and 3:03am everyday. This can however only take place automatically when the screen is off and the radio reception in the Setup menu is set to "automatic". Press the ON-OFF button to turn the display off during the night or program the automatic shutdown in the Setup menu. When the screen is on "Start radio controlled reception now" appears. Choose "√" with or ▶ button.
- You can also start the radio reception in the Setup menu manually or turn it off.
- In case the clock cannot detect the DCF-signal (for example due to disturbances, transmitting distance, etc.), the time can be set manually. The clock will then work as a normal quartz clock.
Information about radio time
The time base for the radio controlled time is a Caesium Atomic Clock operated by the Physikalisch Technische Bundesanstalt Braunschweig which has a time deviation of less than one second in one million years. The time is coded and transmitted from Mainflingen near Frankfurt via frequency signal DCF-77 (77.5 kHz) and has a transmitting range of approximately 1500 km. Your radio-controlled clock receives this signal and converts it to show the precise time in summer or wintertime. The quality of the reception depends greatly on the geographic location. In normal cases, there should be no reception problems within a 1,500 km radius around Frankfurt.
Wireless weather station with photo viewer

Please take note of the following:
- Recommended distance to any interfering sources like computer monitors or TV sets is a minimum of 1.5 - 2 metres.
- Within ferro-concrete rooms (basements, superstructures), the received signal is naturally weakened. In extreme cases, please place the unit close to a window and/or point its front or back towards the Frankfurt transmitter.
- During night-time, the atmospheric disturbances are usually less severe and reception is possible in most cases. A single daily reception is adequate to keep the accuracy deviation below 1 second.
2.2.3 Setting the weather symbols
- For a correct weather forecast, the actual weather condition has to be set in the Setup menu when getting started the instrument.
- Press EXIT button.
- Choose "Setup" with ▶ button.
- Choose "Weather Forecast" with ▲ or ▼ button.
- Choose "Partly Cloudy / Cloudy / Rainy / Stormy / Sunny" with ◀ or ► button.
- Confirm with ENTER button.
- If you prefer, you can do further settings (see 3.1.5)
- Press EXIT button.
3. Operation
3.1 Menu selection
- If EXIT or MENU button will be pressed, the menu selection appears:



Photo Weather Weather & Photos Calendar Setup
- Choose with ◀ or ▶ button, which menu should be processed.
- Confirm with ENTER button.
3.1.1 Photos
- Plug a USB stick or memory card (SD, MMC) in the space provided.
- With the navigation buttons you can view the single pictures or you can access the pictures as a slideshow. Choose the settings in the Setup menu.
- Buttons on the IR remote control:
Slideshow - Start/Stop (II) the slideshow
Zoom - Enlarge image (x2, x4, x8, x16)
Rotate - Rotate image (90°, 180°, 270°)
Wireless weather station with photo viewer

3.1.2 Weather
- On the display appear the actual weather, the moon phase, date and time.
- Please set the setting options in the Setup menu.
18 19 17 16 15 14

① Weather forecast with weather symbols
② Bar graph indication of the last 6 hours
③ Absolute atmospheric pressure (in hPa, mb, InHg, mmHg)
④ Tendency of atmospheric pressure
⑤ Indication of the dew point for indoor (in °C/°F)
⑥ Indication of the heat index for indoor (in °C/°F)
⑦ Indication of indoor temperature (in °C/°F) with trend pointer
⑧ Indication of the indoor humidity with trend pointer
⑨ Indication of the dew point for outdoor (in °C/°F)
10 Indication of the heat index for outdoor (in °C/°F)
11 Indication of the outdoor humidity with trend pointer
12 Indication of outdoor temperature (in °C/°F) with trend pointer
13 Outdoor transmitter reception icon
14 DCF symbol
15 Radio controlled clock (24/12 hour mode)
16 "Alarm on" icon
17. Indication of moon phase
18. Date (day, month or month, day)
19 Channel number of the remote sensor 1, 2 or 3
Wireless weather station with photo viewer
Weather forecast symbols
• There are 5 different weather symbols:


Sunny Partly Cloudy Cloudy Rainy Stormy
- The weather forecast relates to a range of 6 hours and indicates only a general weather trend. For example, if the current weather is cloudy and the rain icon is displayed, it does not mean the product is faulty because it is not raining. It simply means that the air pressure has dropped and the weather is expected to get worse but not necessarily rainy. The accuracy is about 70% .
- Set the current weather in the Setup menu when getting started.
Trend pointers
- The trend pointer displayed on the LCD indicates if the atmospheric pressure, temperature and humidity are currently increasing, steady or decreasing.
Dew point
- If the air is cooled continuously at constant absolute humidity, then the relative humidity will steadily increase up to a maximum of 100%. If the air is cooled further, then the excess water vapour is separated out in the form of water droplets.
Heat index
• Temperature sensitivity in combination with humidity.
Moon phase display
• The moon phase of each day is shown on the LCD:

New Moon (no indication)

Waning Crescent

Waxing Crescent

Last Quarter

First Quarter

Waning Gibbous

Waxing Gibbous

Full Moon


Wireless weather station with photo viewer
3.1.3 Weather & Photos
• The weather, the time and a photo appear on the display.

① Radio controlled clock (24/12 hour mode)
② "Alarm on" icon
③ Weather forecast with weather symbols
④ Indication of indoor temperature (in °C/°F) with trend pointer
⑤ Indication of indoor humidity with trend pointer
⑥ Indication of outdoor temperature (in °C/°F) with trend pointer
⑦ Indication of outdoor humidity with trend pointer
⑧ Outdoor transmitter reception icon
⑨ Photo
10 DCF symbol


Wireless weather station with photo viewer
3.1.4 Calendar
- The time with seconds, the alarm time, the date and a photo appear on the display.
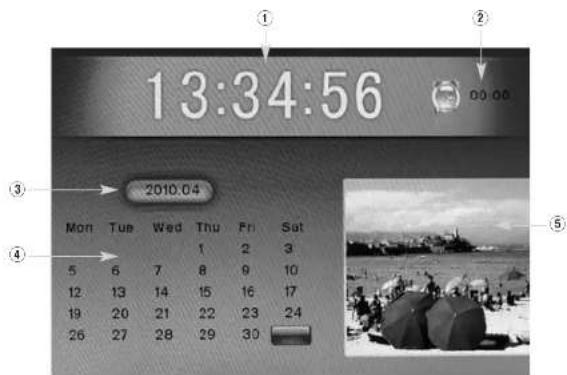
① Radio controlled clock (24/12 hour mode)
② Alarm time when alarm is activated
③ Year, month
④ Weekday, date
⑤ Photo
- Press ◀ or ▶ button to display the previous or next month.
- Press ▼ or ▲ button to display the previous or next year.
3.1.5 Setup
• The different sections appear on the display.
• The actual section is highlighted in yellow.
- Press ◀ or ▶ button to change the section.
- Press ▲ or ▼ button to choose a selection.
- Hold and press the ▲, ▼, ◀ or ▶ button for a fast count.
- Press ENTER button to confirm the selection.

Wireless weather station with photo viewer

You can now change the default settings (default settings)
• Language: German, English, French
• Slideshow Time: 3, 5 or 15 seconds, 1 or 15 minutes or 1 hour
• Transition Effect: Random until vertical (13 options)
• Photo Repeat Mode: Repeat all, random, manual
• Display Mode: Crop, stretch, cinema 16:9
- For power saving, you can select two periods of time when the photo frame is turned off daily (example: from 22 h until 7 h and from 9 h until 16 h).
ONIOFF timer 1-On: 1. time turn off (e.g.: 22 h)
ONIOFF timer 1-Off: 1. time turn on (e.g.: 7 h)
ON/OFF timer 2-On: 2. time turn off (e.g.: 9 h)
ON/OFF timer 2-Off: 2. time turn on (e.g.: 16 h)
• Brightness: 1 - 16, 8
• Contrast: 1 - 16, 8
• Saturation: 1 - 16, 8
• Radio-Controlled Reception: Automatic, search now
• Time Zone: +12/-12 hours, 0
• Time/Date: If no radio reception is possible.
• Calendar Display Format: Day/Month or Month/Day
• Time Format: 24 Hour or 12 Hour (PM appears on the display after 12 h)
- Alarm: Setting of alarm. When the alarm is activated, the alarm symbol appears on the display. Press any button to stop the alarm.
• Wireless Sensor Reception: Automatic or search now
- Temperature Unit: °C or °F (Please change also the temperature unit in the transmitter)
- Weather Forecast. Partly Cloudy; Cloudy; Rainy; Stormy or Sunny. Please set when getting started!
• Pressure Unit: hPa, mb, InHg, mmHg
- Remote Channel Display: Automatic change of all received channels, Channel 1 Only,
Channel 2 Only, Channel 3 Only
- Default Setting: Yes/No. Press ENTER button and choose "√" with ◀ or ▶ button, if you want to change to the default settings.
• S/W Version: W232-1 1.14 (no setting possible)
- Press EXIT button to exit the Setup menu and to return to the Menu selection.
Manual setting of the RCC reception
- Choose "Radio-Controlled Reception".
- Choose "Search Now" with ◀ or ► button.
- Confirm with ENTER button.
- Choose than "√" with ◀ or ▶ button, when "Start radio-controlled clock reception now?" appears on the display.
- Confirm with ENTER button.
- The display will be turned off for 10 minutes for radio controlled clock reception.
Wireless weather station with photo viewer

Manual setting of clock
- In case the clock cannot detect the DCF-signal (for example due to disturbances, transmitting distance, etc.), the time can be set manually.
- Choose "Radio-Controlled Reception"
- Choose "OFF" with ◀ or ▶ button.
- Confirm with ENTER button.
- Choose "Time/Date" with ▲ or ▼ button.
- Set the time and date with ◀ or ▶ and ▲ or ▼ button.
- Confirm with ENTER button.
4. Outdoor transmitter
- After batteries are inserted the sensor will automatically transmit outdoor values to the display unit on channel 1.
- Press “°C”F” button on the transmitter to change the temperature unit on the sensor display from °C to °F.
- You can also start the transmitter search manually in the Setup menu "Wireless Sensor Reception".
- Choose "Search Now" and confirm with ENTER button.
- The weather station is now trying to receive the data of the transmitter.
- Press "TX" button in the battery compartment of the outdoor transmitter if you want to send manually the values to the display unit (e.g. for testing or in case of loss of transmitter signal).
• After successful installation screw up the battery compartment of transmitter carefully.
4.1 Additional transmitters
- Start the transmitter search in the Setup menu "Wireless Sensor Reception".
- Open the battery compartment of the transmitter.
- Set the switch to the position CH2 for the second channel.
- Insert two batteries 1.5 V AAA, polarity as illustrated.
- Once the station has received the transmitter, the temperature, the humidity, the selected channel and the reception icon appear in the weather display.
- Repeat the single steps if you want to connect a third transmitter.
- Choose "Remote Channel display" "Automatically" in the Setup menu, the station now shows the temperature and humidity values of each channel in rotation.
• After successful installation screw up the battery compartment of the transmitter carefully.
5. Positioning of display unit and the transmitter
- Choose a shady and dry position for the transmitter. (Direct sunshine falsifies the measurement and continuous humidity strains the electronic components needlessly).
- Place the display unit at the final position. Avoid the vicinity of any interfering field like computer monitors or TV sets and solid metal objects.
Wireless weather station with photo viewer

- Check the transmission of 868 MHz signal from the transmitter to the display unit (transmission range 30 m free field). Within ferro-concrete rooms (basements, superstructures), the received signal is naturally weakened.
- If necessary choose another position for transmitter and/or display unit.
- Is the transmission successfully, you can wall mount the transmitter by the hanging hole.
6. Energy supply
6.1 Receiver (Display unit)
- The base station is powered by a 5.0 V power adapter.
- In a power failure, the internal memory can store the settings for 1 minute. After 1 minute, the instrument has to be set again.
6.2 Transmitter
• The transmitter is powered by 2 x AAA 1.5V batteries.
- When the batteries in the outdoor sensor unit are used up, low battery icon appears on the display of the transmitter. Change the batteries immediately.
- Start the transmitter search in the Setup menu "Wireless Sensor Reception".
- Open the battery compartment of the transmitter (screwed) and insert two new batteries 1.5 V AAA.
- Use alkaline batteries only. Observe correct polarity.
- Screw up the battery compartment carefully.
6.3 IR remote control
• The remote control is powered by a battery CR20205.
- If the remote control has no function also at close range, change the battery.
- Open the battery compartment by pressing the release lever slightly inwards and then pull out the battery compartment.
- Insert a new battery. Observe correct polarity (+pol above).
- Slide the battery compartment back until the release lever is engaged.
Caution
- Low batteries should be changed soon to avoid the damage resulting from a leaking battery. Batteries contain harmful acids. Wear protective glasses and gloves when handling with leaked batteries.
- Please do not dispose of old electronic devices and empty batteries in household waste. To protect the environment, take them to your retail store or to appropriate collection sites according to national or local regulations.
7. Maintenance
- Keep the instrument in a dry place.
- Do not expose the instrument to extreme temperatures, vibration or shock.

Wireless weather station with photo viewer

- Clean it with a soft damp cloth. Do not use solvents or scouring agents.
- Avoid placing the instrument near interference sources/metal frames such as computer or TV sets.
- If the instrument does not work properly, set the instrument in Setup menu back to the default setting and a new setting has to be made. Change the batteries in the transmitter.
• The product is not a toy. Keep it out of reach of children. - The product is not to be used for medical purpose or for public information, but is determined for home use only.
• The specifications of this product may change without prior notice. - No part of this manual may be reproduced without written consent of TFA Dostmann.
- Improper use or unauthorized opening of housing will mean the loss of warranty.
8. Liability Disclaimer
Wireless weather station with photo viewer
9. Specifications
Model
VIEWER Wireless Weather station with photo viewer
Colour monitor 7" TFT analogue
Resolution 800 x 480 Pixel
Photo format JPEG
Memory SD, MMC (up to 32 GB)
USB Host Up to 32 GB
Clock DCF
Measuring range
Temperature indoor 0°C... +50.0°C (32°F...122°F)
Temperature outdoor -20°C... +60.0°C (-4°F...140°F)
Shows "LL" Below measuring range
Shows "HH" Above measuring range
Humidity in/outdoor 20%RH \~ 99%RH
Energy supply
Main energy AC-DC Adapter 5,0V
IR remote control 1x CR2025
Remote sensor 2x 1,5 V AAA
Power consumption ∅ 7.5W
Transmission
Frequency 868 MHz
Channel max. 3
Transmission (open area) 30 Metres
Transmission interval approx. 20 s
Equipment
AC-DC power adapter 1 piece
IR remote control 1 piece
Remote sensor 1 piece
Batteries 2x 1.5 V AAA for sensor 1x CR2025 for IR remote control

DECLARATION OF CONFORMITY
Herewith we declare, that this wireless transmission device does comply with the essentials requirements of R&TTE Directive 1999/5/EC.
A copy of the signed and dated Declaration of Conformity is available on request via info@tfadostmann.de.


- WIRELESS WEATHER STATION WITH PHOTO VIEWER
- INTRODUCTION
- 1.1 FUNCTIONS
- ELEMENTS
- 1.2.1 RECEIVER (DISPLAY UNIT)
- 1.2.1.1 HOUSING (FIG. 2+3)
- PLEASE TAKE NOTE OF THE FOLLOWING
- 2.2.3 SETTING THE WEATHER SYMBOLS
- OPERATION
- 3.1 MENU SELECTION
- 3.1.1 PHOTOS
- 3.1.2 WEATHER
- 3.1.4 CALENDAR
- 3.1.5 SETUP
- MANUAL SETTING OF THE RCC RECEPTION
- MANUAL SETTING OF CLOCK
- OUTDOOR TRANSMITTER
- 4.1 ADDITIONAL TRANSMITTERS
- POSITIONING OF DISPLAY UNIT AND THE TRANSMITTER
- ENERGY SUPPLY
- 6.1 RECEIVER (DISPLAY UNIT)
- 6.2 TRANSMITTER
- 6.3 IR REMOTE CONTROL
- CAUTION
- MAINTENANCE
- LIABILITY DISCLAIMER
- SPECIFICATIONS
- MODEL
- MEASURING RANGE
- TRANSMISSION
- EQUIPMENT
- DECLARATION OF CONFORMITY
Brand : TFA
Model : 35.1104
Category : Weather Station