
Genius - Built-in kit Mr. Handsfree - Free user manual and instructions
Find the device manual for free Genius Mr. Handsfree in PDF.


| Product type | Radio installation kit |
| Brand | Mr. Handsfree |
| Model | Genius |
| Dimensions (W x H x D) | 178 x 50 x 100 mm |
| Weight | 0.3 kg |
| Material | ABS Plastic |
| Power supply | 12 V DC (via ISO connector) |
| Connections | ISO connectors, antenna, USB (depending on model) |
| Main functions | Secure radio retention, aesthetic finish, compatibility with most standard car radios |
| Maintenance and cleaning | Wipe with a soft, dry cloth. Do not use abrasive products. |
| Safety | Installation must be carried out with power off. Avoid any short circuit. |
| Spare parts and repairability | Parts available from the manufacturer upon request. Repair possible by a professional. |
| Package contents | Installation kit, fixing screws, adapters, installation manual |
| Warranty | 2 years |
| Vehicle compatibility | Standard single DIN (1 DIN) |
Frequently Asked Questions - Genius Mr. Handsfree
User questions about Genius Mr. Handsfree
0 question about this device. Answer the ones you know or ask your own.
Ask a new question about this device
Download the instructions for your Built-in kit in PDF format for free! Find your manual Genius - Mr. Handsfree and take your electronic device back in hand. On this page are published all the documents necessary for the use of your device. Genius by Mr. Handsfree.
USER MANUAL Genius Mr. Handsfree
mrHandsfree® carkit Genius
SMART MOBILE TECHNOLOGY™

NL
GB
F
D
|
E

P
GR
RU
HU
HR
DK
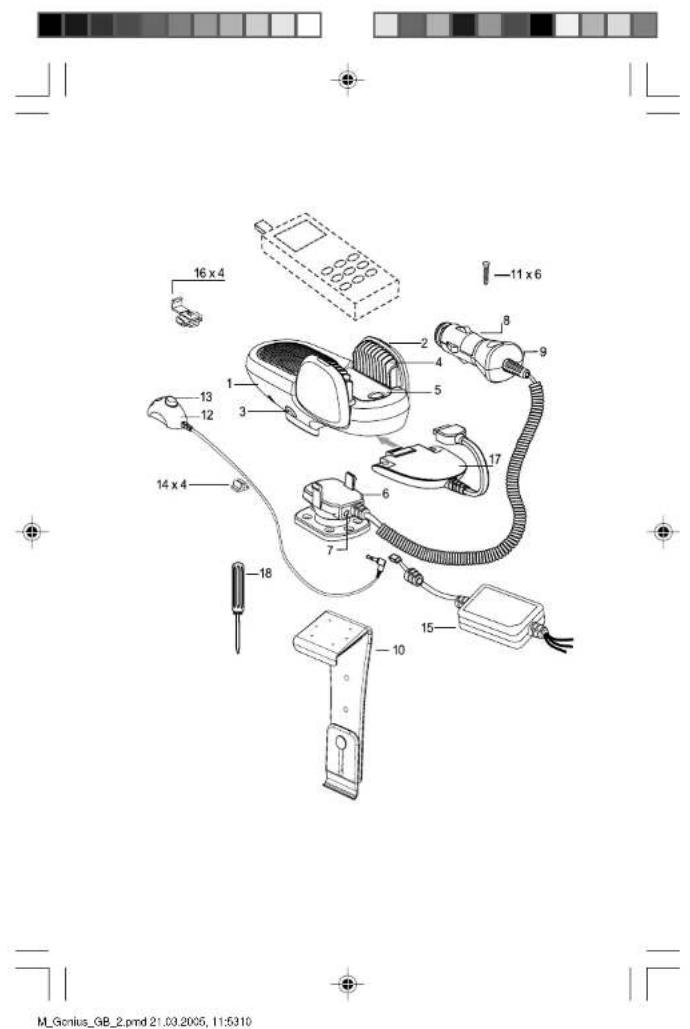

TABLE OF CONTENTS
WHAT DOES MR HANDSFREE GENIUS INCLUDE?......2
INSTALLATION....2
OPERATION OF MR HANDSFREE GENIUS....6
TROUBLE-SHOOTING 7
MAINTENANCE....9


M_Gonius_GB_2.pmd 21.03.2005, 11:531

Dear mr Handsfree Genius owner,
Congratulations on your purchase of one of the most sophisticated and easy to use car kits! This model provides you with the highest quality full-duplex voice communication. Now you can enjoy the safest telephone conversations in your car without any inconveniences.
WHAT DOES MR HANDSFREE GENIUS INCLUDE?
-
Main Unit with built-in speaker
-
TALK mode LED indicators.
-
Buttons for releasing the Main Unit from the Main unit holder.
-
Holder for Mobile phone.
-
Button to release the cramps of the Holder.
-
Main unit holder.
-
Microphone jack.
-
Power adapter for cigarette plug;
8.1. Curled cord
8.2. Removable fuse.
-
LED indicator of Power Adapter.
-
Mounting bracket.
-
Long screws (15mm) for fastening the Mounting Unit to the dashboard of your car.
-
Microphone.
-
Button for microphone sensitivity.
-
Clips for guiding the microphone cord.
-
Adapter for connection to car power supply and Mute cord of Car Radio (CRM).
-
Contact clips for connecting the cords.
-
Connector for connecting Mobile Phone to the Main Unit (not included).
-
Screw driver.
INSTALLATION
MOUNTING MR HANDSFREE GENIUS
- Select the place where you want to install the Genius main unit. The place for the main unit has to be easily accessible for your hands, clearly visible for the phone's display and safe enough in case of accidents and for the operation of Airbags. Under no circumstances should the appliance prevent the driver from controlling or operating the car in any way.
- The mounting for the Genius main unit (this is also the phone holder) has to be done by using a mounting bracket. The Genius main unit has to be removed from the main unit holder. This holder is already screwed to the universal mounting bracket.

INSTALLATION

Mounting the Genius main unit holder
The Genius main unit can be mounted in two ways:
A. You can mount the universal mounting bracket with the supplied screws, or
B. Remove the universal mounting bracket from the main unit holder by unscrewing the 6 screws.
- Screw the main unit holder to the dashboard or a bracket that is designed for your type of car.
How to fix the universal mounting bracket?
In most cars, the universal mounting bracket is placed on the right side of the gear-control console. Make sure that the mounting bracket does not block any airbags!
- Check for a location in your car (close to the gear-control console) where the mounting bracket fits and where it is comfortable for use.
- Make sure that the location in your car where you want to install your mr Handsfree Genius is free from dust and dirt. Remove the cover of the adhesive tape on the mounting bracket.
- Put the upper part of the mounting bracket, with the adhesive tape, over the edge of the console. Put the lower part of the mounting bracket, with the angle, under the edge of the console.
- Press both parts of the mounting bracket together until the face of the upper part is in a horizontal position. Insert the screw in the appropriate hole. Tighten the screw. Place the enclosed cap over the nut.
- You have now successfully installed the universal mounting bracket.
English 3

Connecting the electrical wires for power and mute function
A. When you want to use the cigarette plug with the curled cord, you have to insert this plug in the cigarette lighter of your car.
B. You can also change the curled cord of the cigarette plug into the straight cord. This way you can hide the cables easily and use the mute functions for your car radio. This mute function has to comply with the standard.
• Unscrew the 4 screws on the main unit holder.
- Unplug the curled cord and plug the straight cord in the socket.

- Screw the cover plate back on the main unit holder.
- Connect the wires of the cord with the radio by using the supplied cable connectors.
Remark: We recommend to connect the + wire to the continuous power supply. This makes it able to use the car kit also when your engine is turned off. To prevent your car's battery from getting low, we recommend taking your phone out of the car kit when you leave the car.
• The wires are color coded. They are listed in Table 1 and each wire should be connected to the corresponding item listed in the column D.
Table 1.
| A B | |
| Red wire | The + voltage of the car's power supply |
| Black wire | The negative GND connection |
| Brown wire | Used for Car Radio muting (CRM) and is connected to Car Radio. |
Warning: Connect only to a negative ground electrical system and a +12 Volts power system.



MICROPHONE CONNECTION
- For optimum performance, the microphone should be located at least 75 cm from the Genius main unit and 40-50 cm from the driver's mouth. Make sure that the holes of the microphone are directed towards the driver and not towards the Genius main unit.
- Place the microphone on its location using Velcro.
- Use the supplied clips to guide the microphone cord.
- Insert the microphone plug into the socket of the Genius main unit holder.
- By default, the button on the microphone is in OUT-position (unpressed position). Only for some telephones it is necessary to put the button in the ON-position.
ADJUSTMENT OF THE PHONE HOLDER
- Turn the big screw in the centre of the main unit holder to the left to make movements possible.
- Put the main unit holder in the preferred position.
- Fasten the big screw to the right to fix the main unit holder in the preferred position.
Warning: Do not move the main unit holder without unfastening the big screw. This will damage the fixation rubber inside!
CONNECTING A CONNECTOR TO THE GENIUS MAIN UNIT
• Take the Genius main unit of the Genius main unit holder
- Connect the Genius connector to the Genius main unit.
- Place the Genius main unit back on the main unit holder.
English 5

M_Gonius_GB_2.pmd 21.03.2005, 11:535


HOW TO USE THE UNIVERSAL HOLDER?
- Release the cramps of the Genius main unit by pushing the button between the cramps.
- Put your telephone between the cramps.
- Close the cramps in a way that they hold the telephone and it therefore cannot fall.
• Take the telephone out of the holder without releasing the cramps by sliding the telephone to the top side.
• To insert the telephone, you slide it from the top side between the cramps of the Genius. - You only have to adjust the cramps to the size of your telephone once.
CONNECTING THE PHONE TO THE CONNECTOR CABLE
• Activate the power supply to the Genius by starting the engine and connecting the cigarette plug (if applicable).
- Connect the Genius connector to the mobile phone after the power supply is activated.
- Charging function is activated now (if applicable).
Important:
During installation always make sure that the power cord is inserted into the cigarette lighter and power provided before connecting your mobile phone. The connection of your mobile phone should ALWAYS be the LAST step of complete mr Handsfree installation.
The Genius main unit can be released from the holder. When the two buttons are pressed together, the main unit can be taken of the Genius main unit holder. This way you can remove all important electronics and avoid being robbed.
IMPORTANT!
- Always read the 'TROUBLE-SHOOTING' chapter carefully.
- The mr Handsfree 'Special Brand' mobile phone connector can be obtained by mail or directly from your local supplier.
- Due to the 'Special Brand' mobile phone connector which can be ordered separately for each mobile phone model (Nokia, Ericsson etc.), your mr Handsfree Genius is suitable for any type of mobile phone.
OPERATION OF MR HANDSFREE GENIUS
HOW TO SWITCH ON YOUR GENIUS WHILE USING THE CIGARETTE PLUG?
- Insert your mr Handsfree power cord into the cigarette lighter of your car to switch mr Handsfree in ON-position. Please note that for several brands of cars the engine has to be turned on before the cigarette plug is activated.
- LED indicator lights on the cigarette plug.
- To switch off, you simply plug out your power cord from the cigarette lighter.
When the Built-in cable is used, and connected to the continuous power, the Genius is always switched on.


HOW TO ANSWER A CALL?
- Answer incoming calls as normal on your mobile phone. For most phones it is possible to enable the 'auto answer' function. In this case the phone will answer the call automatically.
- You can start the conversation immediately by speaking into the microphone.
- Adapt to the appropriate speaker-volume by using your mobile phone control panel.
HOW TO PLACE A CALL?
- Dial the telephone number on your mobile phone as normal. - You can start the conversation immediately after being connected by speaking into the microphone.
HOW TO END A CALL?
At the end of your conversation hang up your mobile phone as normal.
HOW TO USE VOICE DIALING?
If your telephone supports the voice dialing function, you can pronounce the name of the person you want to call after activating the voice dialing function.
TROUBLE-SHOOTING
| Problem Reason | Elimination | |
| The device does not charge, you don't hear the caller, the caller does not hear you, and the MUTE function does not work. | There is a bad connection between the main unit and the holder. | You should remove main unit from the holder and connect it again. If you made the connection correctly, you will hear a click. |
| Sometimes a high-frequency noise can be heard in the car radio. | It is possible that your car radio does not have enough RF distortions protection. | Please place the mr Handsfree Genius at least 20 cm from the car radio. |
English 7


| Problem Reason Elimination | ||
| Mr Handsfree does not work. Green LED of Cigar Adapter is off. | Cigarette lighter jack is damaged.No contact between Power Adapter and Cigarette lighter jack.1.5A fuse in the Power Adapter is burned.Power Adapter is damaged. | Check the contact in the connection points.Use for connection contact clips which correspond to the standard of your car or another suitable type of connection.Replace the fuse. |
| Mr Handsfree Genius does not work.It is connected to Car Radio through Additional Adapter.Car Radio works. | No contact between the wires.Car Radio wires have smaller diameter than necessary (with cross section area less than 0.75mm2).1.5A fuse in the Additional Adapter is burned. | Check if the Cigarette lighter functions normally.Clean the contact of the Cigarette lighter jack and the Power Adapter.Remove the Fuse.Unscrew the nut from the Power Adapter, open the housing and take out the Fuse (Illustration p.9.)Insert new 1.5A fuse.Assemble the Power Adapter.If items 1 3 did not help apply to a service center. |
| A caller does not hear you. | The microphone is disconnected.Microphone's cord is damaged. | Check the connection of the microphone and the microphone jack of the Mounting unit.Apply to a service center. |
| Your Mobile phone is connected to Mr Handsfree Genius but it does not work. | Telephone or connector contacts are dirty. | Clean the contacts of the telephone and connector. |
| Mr Handsfree Genius is connected to Car Radio but does not mute if during a call. | Car Radio Mute function needs additional settings to be activated. | Check your Car Radio User's Guide and make necessary settings. |

8En

MAINTENANCE
Please check following mr Handsfree maintenance TIPS to keep your kit in top condition:
- Do not expose the appliance to moisture.
• Always unplug the power cable when not in use.
mr Handsfree wishes you a nice and safe journey!

English 9

M_Gonius_GB_2.pmd 21.03.2005, 11:539

INHOUDSTAFEL
WAT OMVAT MR HANDSFREE GENIUS?......2
INSTALLATIE....2
WERKING VAN MR HANDSFREE GENIUS....7
VERHELPEN VAN PROBLEMEN ....8
ONDERHOUD....9


M_Gonius_NL.pmd 18.03.2005, 12:021

WAT OMVAT MR HANDSFREE GENIUS?
MICROFOONAANSLUITING
WERKING VAN MR HANDSFREE GENIUS
HOE DE GENIUS AANSCHAKELEN BIJ HET GEBRUIK VAN DE SIGARENPLUG?
ONDERHOUD
TABLE DES MATIÈRES
QUE CONTIENT LE MR HANDSFREE GENIUS?......2
INSTALLATION....2
FONCTIONNEMENT DU MR HANDSFREE GENIUS....7
RÉSOUDRE DES PROBLÈMES ....8
ENTRETIEN....9


M_Gonius_F.omd 18.03.2005, 12:061

RACCORDEMENT DE MICROPHONE
ENTRETIEN
INHALTSVERZEICHNIS
WAS ENTHÄLT DAS MR HANDSFREE GENIUS?......2
INSTALLATION....2
FUNKTION DES MR HANDSFREE GENIUS....7
BESEITIGEN VON PROBLEMEN....8
WARTUNG....9


M_Gonius_D.pmd 17.03.2005, 13:521

WAS ENTHÄLT DAS MR HANDSFREE GENIUS?
MIKROFONANSCHLUSS
WARTUNG
INDICE
COME E' COMPOSTO IL MR HANDSFREE GENIUS......2
INSTALLAZIONE....2
M_Gonius_l.pmd 21.03.2005, 18:401

COLLEGAMENTO DEL MICROFONO
MANUTENZIONE
ÍNDICE
QUÉ CONTIENE EL MR HANDSFREE GENIUS?......2
INSTALACIÓN....2
FUNCIONAMIENTO DEL MR HANDSFREE GENIUS......7
RESOLVER PROBLEMAS....8
MANTENIMIENTO....9


M_Gonius_E.pmd 17.03.2005, 12:221

Querido propietario del mr Handsfree Genius
MANTENIMIENTO
ÍNDICE
O QUE O MR HANDSFREE GENIUS CONTÉM?......2
INSTALAÇÃO....2
M_Gonius_P.pmd 17.03.2005, 12:221

MANUTENÇÃO
M_Gonius_GR.pmd 16.03.2005, 17:511

ΣΥΝΤΗΡΗΣΗ
TARTALOMJEGYZÉK
MIBÖL ÁLL A MR HANDSFREE GENIUS?......2
ÜZEMBEHELYEZÉS....2
A MR HANDSFREE GENIUS MÜKÖDÉSE....6
HIBAELHÁRÍTÁS....7
KARBANTARTÁS....9


M_Gonius_HU.pmd 19.03.2005, 16:511


Kedves mr Handsfree Genius tulajdonos,
MIBÓL ÁLL A MR HANDSFREE GENIUS?
A MIKROFON CSATLAKOZTATÁSA
KARBANTARTÁS
SADRŽAJ
ŠTO SADRŽI MR HANDSFREE GENIUS?......2
INSTALACIJA....2
RAD MR HANDSFREE GENIUS-A 6
TRAŽENJE GREŠAKA....7
ODRŽAVANJE....9


M_Gonius_HR.pmd 16.03.2005, 18:051


Dragi korisniče mr Handsfree Geniusa,
Cestilamo vam na kupovini jednog od najpromišljenjih kompleta za korištenje u vozilu, a koji se istovremeno jednostavno koristil Ovaj model vam pruža potpunu dupleks glasovnu komunikaciju najveće kvalitete. Od sada možete uživati u najsigurnijem telefonskom razgovoru u vozilu bez ikakvih smećnji.
ŠTO SADRŽI MR HANDSFREE GENIUS?
- Osnovna jedinica s ugrađenim zvučnikom.
- LED indikaton za nacin rada TALK- razgovor.
- Tipke za oslobadanje osnovne jedinice od nosača osnovne jedinice,
- Nosač za mobilni telefon.
- Tipke za oslobađanje steznika nosača
- Nosač osnovne jedinice.
- Mikrofonska utičnica.
- Adapter napajanja za upaljač za cigarette:
8.1. Namotani kabel
8.2. Osigurač za zamjenu. - LED indikator za adapter napajanja.
- Ploča za učvršćivanje.
- Dugi vijci (15 mm) za učvršćenje jedinice za montažu na armatumu ploču.
- Mikrofon.
- Tipka za osjetljivost mikrofona.
- Stezaljke za vođenje mikrofonskog kabla.
- Adapter za spajanje na napajanje vozila i kabel za utišavanje radioaparata u
vozilu (CRM) - Kontaktne stezaljke za spajanje kablova.
- Konektor za spajanje mobilnog telefona na osnovnu jedinicu (nije uključen).
- Odvijač.
INSTALACIJA
MONTIRANJE MR HANDSFREE GENIUS-a
- Pričvrstite ponovno ploču vijcima na nosač osnovne jedinice.
- Spojite žice kabela s radio aparatom, koristeći pri tome isporučene
konektore za kabel. Opaska: Preporučujemo, da spojite + žicu na trajno napajanje. To omogućuje korištenje kompleta za vozilo i kada je motor isključen. Kako bi se spriječilo pražnjenje akumulatora vozila, preporučujemo da nonesete sa sobom telefon kada napuštate vozilo.
SPAJANJE MIKROFONA
- Za najbolje rezultate mikrofon treba biti udaljen najviše 75 cm od Genius osnovne jedinice i 40-50 cm od usta vozača. Provjente, da li je otvor mikrofona usmieren prema vozaču, a ne prema psopynoi jedinici Genius.
• Postavite mikrofon na odgovarajuće mjesto koristeći Velcro. - Upotrijebite isporučene učvršćivače, kako biste proveli mikrofonski kabel.
- Spojte utikac mikrotona u uticnicu nosaca osnovne jedinice Geniusa.
• Tvornički je tipka na mikrofonu postavljena u OUT (isključeni) položaj (tipka nije utisnuta). Za neke tipove telefona potrebno je, da tipka bude u ON (uključeni) položaj.
PODEŠAVANJE NOSAČA TELEFONA
- Zakrenite veliki vijak u sredini nosača osnovne jedinice na lijevo, kako bi se jedinica mogla pomicati.
- Postavite nosač osnovne jedinice u željeni položaj.
- Pritegnite veliki vijak, tako da ga zakrenete u desno, kako biste učvrstili nosač osnovne jedinice u željenom položaju.
Upozorenje: Ne zakrećite nosač osnovne jedinice bez otpuštanja velikog vijka. Takvom radnjom možete oštetiti gumu za učvršćenje na unutrašnjoj strani!
SPAJANJE KONEKTORA NA GENIUS OSNOVNU JEDINICU
INHOLDSFORTEGNELSE
HVAD ER INDBEFATTET I MR HANDSFREE GENIUS?......2
INSTALLATION....2
BRUG AF MR HANDSFREE GENIUS....6
PROBLEML∅SNING....7
VEDLIGEHOLDELSE....9


M_Gonius_DK.pmd 21.03.2005, 18:421


MIKROFONTILSLUTNING
AFSLUTNING AF EN SAMTALE
VEDLIGEHOLDELSE
СОДЕРЖАНИЕ
MR HANDSFREE GENIUS....2
УСТАНОВКА....2
РАБОТА С УСТРОЙСТВОМ МР HANDSFREE GENIUS......7
Русский 4
M_Gonius_RU.pmd 21.03.2005, 12:054


Русский 5

ЗАПОЛНЯЕТСЯ ПРОДАВЦОМ
® Designed & developed by Premier Technology for
TE-Group nv - Belgium
Carkit Genius/05-05/V04


- MRHANDSFREE® CARKIT GENIUS
- TABLE OF CONTENTS
- DEAR MR HANDSFREE GENIUS OWNER
- WHAT DOES MR HANDSFREE GENIUS INCLUDE
- INSTALLATION
- MOUNTING MR HANDSFREE GENIUS
- MOUNTING THE GENIUS MAIN UNIT HOLDER
- HOW TO FIX THE UNIVERSAL MOUNTING BRACKET
- CONNECTING THE ELECTRICAL WIRES FOR POWER AND MUTE FUNCTION
- MICROPHONE CONNECTION
- ADJUSTMENT OF THE PHONE HOLDER
- CONNECTING A CONNECTOR TO THE GENIUS MAIN UNIT
- HOW TO USE THE UNIVERSAL HOLDER
- CONNECTING THE PHONE TO THE CONNECTOR CABLE
- IMPORTANT
- OPERATION OF MR HANDSFREE GENIUS
- HOW TO SWITCH ON YOUR GENIUS WHILE USING THE CIGARETTE PLUG
- HOW TO ANSWER A CALL
- HOW TO PLACE A CALL
- HOW TO END A CALL
- HOW TO USE VOICE DIALING
- INHOUDSTAFEL
- WAT OMVAT MR HANDSFREE GENIUS
- MICROFOONAANSLUITING
- WERKING VAN MR HANDSFREE GENIUS
- HOE DE GENIUS AANSCHAKELEN BIJ HET GEBRUIK VAN DE SIGARENPLUG
- ONDERHOUD
- TABLE DES MATIÈRES
- RACCORDEMENT DE MICROPHONE
- ENTRETIEN
- INHALTSVERZEICHNIS
- WAS ENTHÄLT DAS MR HANDSFREE GENIUS
- MIKROFONANSCHLUSS
- WARTUNG
- INDICE
- COLLEGAMENTO DEL MICROFONO
- MANUTENZIONE
- ÍNDICE
- QUERIDO PROPIETARIO DEL MR HANDSFREE GENIUS
- MANTENIMIENTO
- MANUTENÇÃO
- ΣΥΝΤΗΡΗΣΗ
- TARTALOMJEGYZÉK
- KEDVES MR HANDSFREE GENIUS TULAJDONOS
- MIBÓL ÁLL A MR HANDSFREE GENIUS
- A MIKROFON CSATLAKOZTATÁSA
- SADRŽAJ
- DRAGI KORISNIČE MR HANDSFREE GENIUSA
- ŠTO SADRŽI MR HANDSFREE GENIUS
- INSTALACIJA
- MONTIRANJE MR HANDSFREE GENIUS-A
- SPAJANJE MIKROFONA
- PODEŠAVANJE NOSAČA TELEFONA
- SPAJANJE KONEKTORA NA GENIUS OSNOVNU JEDINICU
- INHOLDSFORTEGNELSE
- MIKROFONTILSLUTNING
- AFSLUTNING AF EN SAMTALE
- VEDLIGEHOLDELSE
- СОДЕРЖАНИЕ
- ЗАПОЛНЯЕТСЯ ПРОДАВЦОМ
Brand : Mr. Handsfree
Model : Genius
Category : Built-in kit