
SANDWICH MAKERS - Kitchen appliance TEFAL - Free user manual and instructions
Find the device manual for free SANDWICH MAKERS TEFAL in PDF.


| Brand | TEFAL |
| Model | SANDWICH MAKERS |
| Product type | Sandwich maker |
| Power supply | 220-240 V, 50 Hz |
| Power | 750 W |
| Dimensions (L x W x H) | 24 x 20 x 9 cm |
| Weight | 1.2 kg |
| Capacity | 2 sandwiches |
| Plate material | Non-stick |
| Temperature indicator | Thermosignal (indicator light) |
| Locking | Yes, by pressing the lock |
| Insulated handles | Yes |
| Cleaning | Soft sponge and detergent; do not immerse |
| Safety | Grounded plug, hot surfaces, cord kept away from heat sources |
| Included recipes | Yes (ham-and-cheese, chocolate-banana) |
| Recommended bread type | Slices of 10 x 10 cm |
| First use | Oil and wipe the plates |
| Cord length | Approximately 0.8 m |
| Warranty | 2 years (domestic use) |
| After-sales service | TEFAL |
Frequently Asked Questions - SANDWICH MAKERS TEFAL
User questions about SANDWICH MAKERS TEFAL
0 question about this device. Answer the ones you know or ask your own.
Ask a new question about this device
Download the instructions for your Kitchen appliance in PDF format for free! Find your manual SANDWICH MAKERS - TEFAL and take your electronic device back in hand. On this page are published all the documents necessary for the use of your device. SANDWICH MAKERS by TEFAL.
USER MANUAL SANDWICH MAKERS TEFAL
Thank you for purchasing this TEFAL appliance. Whatever your model, please read the instructions carefully and keep them to hand.
TEFAL SA has an ongoing policy of research and development and may modify these products without prior notice.
Installation
Place the appliance on a firm table : do not use it on a soft base.
Do not place the appliance on or near slippery or hot surfaces, never leave the cord hanging over a heat source (cooking plates, gas cooker...).
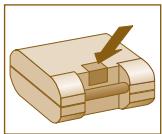
Open the appliance by pressing on the button.
Remove any packaging, stickers or accessories inside and outside the appliance.
Use
Close the appliance. Plug the cord into the wall socket : the light comes on.
Check that your electric installation is compatible with the power and the voltage indicated under the appliance. Connect the appliance to a plug with an earth connection.
If the power supply cord is damaged, it must be replaced by the manufacturer or its service agent or a similarly qualified person in order to avoid a hazard.
During first use :
- Pour a little oil on the plates. Wipe off with an absorbant kitchen towel.
The appliance may give off a slight odour and smoke.
Allow the appliance to pre-heat :
the Thermosignal indicates that the appliance has reached the correct cooking temperature.
BEFORE

THERMO SIGNAL
READY

THERMO SIGNAL
Do not touch the hot surfaces of the appliance : use the handles.
Recipes
Use medium-sized slices of bread (10 x 10 cm), to be buttered on outer surfaces.
- 4 slices of bread · 20 g butter · 70 g gruyere cheese - 1 slice thick chicken - pepper
Cut the gruyere cheese into thin slices and place half of the cheese on two slices of bread. Place half slice of chicken on top and add pepper. Cover with gruyere cheese then join with the other slices of bread. - 4 slices of bread - 20 g butter - 2 bars of plain chocolate - half banana
On two of them, place two pieces of chocolate, some banana cut into slices and, once more, two pieces of chocolate. Then cover with the remaining slices of bread.
After Use
Unplug the cord from the wall socket and leave the appliance to cool in an open position.
Clean the plates and the base of the appliance with a sponge and washing up liquid.
Do not use scouring pads or hard abrasive powder.
Never immerse the appliance and the cord in water.
Wiring Instructions
WARNING : ALL APPLIANCES MUST BE EARTHED.
IMPORTANT : the wires in this lead are coloured in accordance with the following codes.
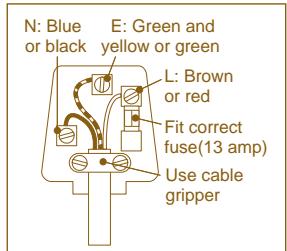
Green and Yellow : Earth Blue : Neutral Brown : Live
Connect the Green/Yellow wire to the terminal in the plug marked "E" (or by the earth symbol) or coloured Green and Yellow.
Connect the Brown wire to the terminal in the plug marked "L" or coloured Red. Connect the Blue wire to the terminal in the plug marked "N" or coloured Black.
Seek professional advice if you are unsure of the correct procedure for the above.
About Your Factory Fitted Plug
The cord is already fitted with a plug incorporating an appropriate fuse. If the plug does not fit your socket outlet, see paragraph below.
Should you need to replace the fuse in the plug supplied, an appropriately rated
approved BS 1362 fuse must be used (refer to electrical specification for fuse rating).
If the plug supplied does not fit your socket outlet, it should be removed from the mains lead and disposed of safely. The flexible cord insulation should be stripped back as appropriate and a suitable alternative plug fitted.
The replacement plug must be equipped with an appropriate fuse. If the plug has external access to the fuse (non-rewritable type plug) please note that the fuse cover is an important part of the plug. Please ensure that it is always refitted correctly. If you lose this cover, please do not use the plug. You may contact Tefal U.K. Limited for a replacement.
For any problems or queries, please contact our helpline :
0845 602 1454 - UK (calls charged at local rate)
(01) 412 3000 - Ireland
OtkpoIte anIIapat, HauKaB Ha KhoNKiY.
YJaJInte BCE yIpaKOBOuHbIe MaTepnAJIbI, HAKJIeIKN,IOCTaHHTe IOIOJIHNTeJIbHbIe PInHaJIeXHOCTN.
IcIIb30BaHne
3aKpoIte anIapat, BCTabIte IHHyp aIInapaTa B pO3eTKy: 3aTogPITc8 cBeTOBoi IIHnIKATOp.
IpoBepbTe, TTO6bHaHnprJKeHne BaIe HcTn COOTBeTCTBOBaJIO yKa3aHHOMy Ha KopHyce np60pa. IIOJKIOUaHTe np60pK pO3ETke c 3a3emJIeHNEM.
EcJIN IPOBOD HINTaHn HOBpeXJDeH, TO OH JOJIKeH 6bITb 3aMeHeH N3rTOBOTeJIem JIN B ABTOPI3OBAHHOM cepBbHcHOM UHTpe BO I36eKaHHe OAnChbIX CNTyaHn.
IIpn IepBOM ICIOJIb3OBaHHn aIapata:
peKOMeHJeTcC JcEgKa CMa3aTb IJNTKN pactHeJIbHM MacJiom I IpotepeTb NX MArKO TpIOnQUKO.
MOKETIOBINTCBJeRKn3aIaxN IblMOK.
Heo6xoJIMo TaTb aInapaTy
pa30rpeTbcra:
CBeTobO INHINKaTOp TemnepaTybI npOHnΦopMpye T O TOM, yTO IOCTNHyTa HeoXIOmMaJ IJI pIriTOBJIeHnTeMIIpePaTypa.
Ipi6op HaRpeBaetc MoXHO rTOBHTb

THERMO SIGNAL

THERMO SIGNAL
HnKoTgA He KacaiTeCb rOparynx IOBepxHocTei npIb6pa : nCIOJIb3yIte pyKoBnIb.
PeieIbI
IcnoJIb3yIe JOMTNU XJIE6a pa3MepoH He 6OJIbIe YEM 10x10cm,3apaHe cMaJbTe IN MacIOm.
- 4 JIOMTHka XJIe6a·20 r CJINBOUHORO MacJa·70 r HIIeIHAPCKORo Cbpa KcKoK KpyHbI · YepHbI MOJIoTbI Npei
HapebIe IbeIaepckn cbip TOHKMNIOJIbKaMn. IOIOJXte CbIP HA 2 IOMTnKx.Ie6a,IO6abBeTc CBepxy IO KycOuKy KypNIIb. IIOpepHTe. Hakpoite IOJIbKaMn cbpa IIOJOXnte CBepxy OCTabIINecr IOMTknX.Ie6a.
·4JOMTHKAXJIe6a·20FcJIHBOUHORO MacJa IIOKOJAI IIOJIOBUNKa 6baHa
Ha IBaIOMTHka XJIe6a IIOJIOKNTe IO 2 KycocKa IIIOKOJIaDa, IIO6aBBte Iope3AHnHb HA KpyKoKn BsaHAn Ie ne IO KycocKa IIIOKOJIaDa.CBepxY IOJIOKNTe OCTaIIHneCra IOMTHKn XJIe6a.
IocJIe IcIIb30BaHnIa
BbHbTe BUNKy N3 po3eTKN n OCTaBte OTKpbItbI aIInapaT OCTbIBATb.
BbIMoIe IIINTKN I KOPIIYc AIIIIapaTa ryKOJ C MOIOIIMC pEcdTBOM IOI TEIOI BOIOJ.
He nCIOJIb3yIte a6pa3nBhIe r6Kn I IopoIIKN.
HnKoIa He nOgrpykaIte Ipn6Op H IIHyP IITaHIN B BODY.


Brand : TEFAL
Model : SANDWICH MAKERS
Category : Kitchen appliance